
Search Manual
Band-in-a-Box® 2018 for Mac® User's Guide
Chapter 7: RealTracks and RealDrums
RealTracks
What are RealTracks?
RealTracks add “real” instruments recorded by top studio players and recording artists. These tracks replace the MIDI track for that instrument and can be controlled just like the MIDI instrument (volume changes, muting, etc.). Best of all, they follow the chord progression that you have entered, so that you hear an authentic audio accompaniment to your song. These are not “samples,” but are full recordings, lasting from 1 to 8 bars at a time, playing along in perfect sync with the other Band-in-a-Box tracks.
RealTracks use élastique Pro V2 time stretching and pitch transposition engine by zplane.development for great natural sound. These improvements are built-in, so there is nothing you need to do to get it working. Your songs will just “sound better” over a much wider range of tempos and transpositions.
Band-in-a-Box Pro includes the Pro RealCombos, a selection of twenty-five RealTracks in three combos (Jazz, Pop/Rock, and Country) together with RealDrums. Many more RealTracks are available, either as separate add-ons or bundled into the various Band-in-a-Box PAKs for better value. There are over 2000 RealTracks in all, with many more to come.
RealTracks Settings
|
Global settings (Preferences) for RealTracks are made in the RealTracks Settings dialog, which opens with control+click on the [RealTracks] button or the menu command Windows | RealTracks Settings. |
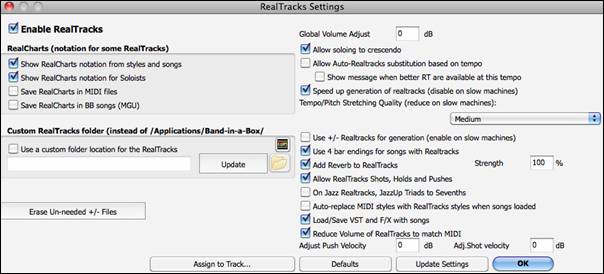
![]() In the RealTracks Settings dialog, you can enable/disable the RealTracks feature.
In the RealTracks Settings dialog, you can enable/disable the RealTracks feature.
RealCharts (notation from RealTracks)
Most RealTracks display notation, i.e. RealCharts, showing the notes that are being played.
To see which RealTracks have RealCharts, visit the Assign RealTracks to Tracks dialog and sort column 11, “Chart.” Instruments with an “N” or “Gt” in this column have RealCharts.
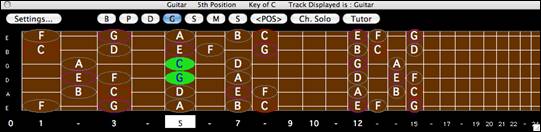
Instruments with “Gt” in the Chart column have RealCharts with notation and on-screen guitar fretboard display.
If the instrument is Acoustic Piano and there is an “N” in the Chart column, the instrument has a Jazz piano RealChart.
The various other instruments with an “N” (Pedal Steel, Slide Guitar, Resophonic, Trumpet, Alto Sax, and Tenor Sax) have RealCharts in standard notation.
|
At the top of the screen, if a track has RealTracks, but is NOT a RealCharts track, then the track name is green. |
|
If a track has a RealChart, the track name is green and underlined with a short line. |
|
If a guitar track has RealChart, then it is green and underlined with a long line. |
The RealCharts can be saved to MIDI files or with Band-in-a-Box songs (MGU).
|
RealCharts are optional and are selected in the RealTracks Settings dialog. |

“Show notation for RealCharts in styles” will show RealCharts that have been generated from styles with RealTracks.
“Show Notation for Soloists” will show RealCharts that have been generated from the Select Soloist dialog.
“Save RealChart in MIDI file” will save the RealChart to a MIDI track so you can analyze it in other programs.
“Save RealCharts in BB Songs (MGU)” will save the RealChart MIDI information to the MGU file.
RealTracks Folder
The RealTracks styles are stored in Applications/Band-in-a-Box/RealTracks by default.
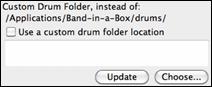
![]() You can choose an alternate folder location in the RealTracks Settings dialog by checking “Use a custom folder location for the RealTracks” and then clicking on the folder button and picking an alternate folder. Then, click on the [Update] button to confirm the new location.
You can choose an alternate folder location in the RealTracks Settings dialog by checking “Use a custom folder location for the RealTracks” and then clicking on the folder button and picking an alternate folder. Then, click on the [Update] button to confirm the new location.

You don’t need to visit this folder when using RealTracks; it is used internally by Band-in-a-Box, so you shouldn’t add or remove files from this RealTracks folder unless you “know what you’re doing.”
Applying RealTracks Settings
![]() You can apply an overall Volume Adjust to the RealTracks. If they are too loud overall, try a Global Volume Adjust of about -10 dB.
You can apply an overall Volume Adjust to the RealTracks. If they are too loud overall, try a Global Volume Adjust of about -10 dB.
![]() “Allow soloing to crescendo” can be applied to some RealTracks to have the intensity of the solo building up, with the flashiest part of the solos playing as the solo builds.
“Allow soloing to crescendo” can be applied to some RealTracks to have the intensity of the solo building up, with the flashiest part of the solos playing as the solo builds.
![]() When set, the program will find the best RealTracks to use at the current tempo. For example, it might substitute an Acoustic Bass at a higher tempo if that is closer to the tempo of all songs.
When set, the program will find the best RealTracks to use at the current tempo. For example, it might substitute an Acoustic Bass at a higher tempo if that is closer to the tempo of all songs.
For example, if we load in a Ballad Jazz style like _BALFRED.STY, we can see that the name of the Bass RealTracks style has a tilde (~) symbol at the beginning. That indicates that it could be changed to a different RealTracks style at a higher tempo.

Now let’s increase the tempo of the song to a higher tempo, like 115.

We will see that the name of the RealTracks instrument switches to one that is suitable for a tempo=110. So, when you press play, you will hear the RealTracks closest to your tempo, without having to do anything to make this happen.
![]() If set, a yellow message appears whenever better RealTracks are available at the current tempo. To choose these RealTracks press the RealTracks toolbar button and choose “Select better RealTracks for this tempo” in the dropdown menu. Use this option if you do not want Band-in-a-Box to automatically substitute your RealTracks, but you would like to know if there are other choices available to you that might be more suitable for the song.
If set, a yellow message appears whenever better RealTracks are available at the current tempo. To choose these RealTracks press the RealTracks toolbar button and choose “Select better RealTracks for this tempo” in the dropdown menu. Use this option if you do not want Band-in-a-Box to automatically substitute your RealTracks, but you would like to know if there are other choices available to you that might be more suitable for the song.
![]() This “speedup” feature works automatically for faster generation of RealTracks using CPU resources during playback. If you have a multi-core machine, you may not notice this at all, since it will use different cores than the main Band-in-a-Box thread. If your machine is older, low on memory, slow hard drive etc., you can disable this “speedup” feature so that your machine is doing less CPU work during playback.
This “speedup” feature works automatically for faster generation of RealTracks using CPU resources during playback. If you have a multi-core machine, you may not notice this at all, since it will use different cores than the main Band-in-a-Box thread. If your machine is older, low on memory, slow hard drive etc., you can disable this “speedup” feature so that your machine is doing less CPU work during playback.
![]()
This allows you to select quality of the tempo and pitch stretching. By default, this is set to “Medium.” You can select “High” if you have a fast computer, but you should select “Low” if you have a slower computer and are hearing stuttering sounds during playback.
![]() This setting is normally left off, but you should enable this if you have a slower machine.
This setting is normally left off, but you should enable this if you have a slower machine.
![]() This allows an additional two bars at the end of the song for the ending on RealTracks to fade (decay) naturally. If your RealTracks selection does not support this feature, you can check www.pgmusic.com/support to see if we have uploaded a free update.
This allows an additional two bars at the end of the song for the ending on RealTracks to fade (decay) naturally. If your RealTracks selection does not support this feature, you can check www.pgmusic.com/support to see if we have uploaded a free update.
![]() This adds audio reverb to the RealTracks and RealDrums. Enter the % amount and click the update button. This uses some CPU cycles, so disable on slower machines.
This adds audio reverb to the RealTracks and RealDrums. Enter the % amount and click the update button. This uses some CPU cycles, so disable on slower machines.
![]() When set, songs will support shots, holds, and pushes for RealTracks. Not all styles have these available, so check the RealTracks Library Holds folder and the “H” column in the Assign RealTracks to Track dialog.
When set, songs will support shots, holds, and pushes for RealTracks. Not all styles have these available, so check the RealTracks Library Holds folder and the “H” column in the Assign RealTracks to Track dialog.
![]() Many Jazz comping styles now play triads (instead of 7ths) when simple triads are entered, instead of “jazzing them up” to 7ths chords (e.g. Guitar: Freddie, Wes Piano: some Jazz, all Stride, and Rehearsal). If you prefer to have triads automatically “jazzed up” when comping using Jazz RealTracks, then you can set this s option to force 7ths for triads.
Many Jazz comping styles now play triads (instead of 7ths) when simple triads are entered, instead of “jazzing them up” to 7ths chords (e.g. Guitar: Freddie, Wes Piano: some Jazz, all Stride, and Rehearsal). If you prefer to have triads automatically “jazzed up” when comping using Jazz RealTracks, then you can set this s option to force 7ths for triads.
![]() If you have many songs using older MIDI styles, and would prefer that they play with RealTracks, you can now do this easily by selecting this option. Then, if you have the needed RealTracks installed, your MIDI style will be intelligently replaced with a RealTracks style.
If you have many songs using older MIDI styles, and would prefer that they play with RealTracks, you can now do this easily by selecting this option. Then, if you have the needed RealTracks installed, your MIDI style will be intelligently replaced with a RealTracks style.
![]() Enable this if you want VST synth and F/X effects loaded/saved with songs.
Enable this if you want VST synth and F/X effects loaded/saved with songs.
![]() This is an option to preserve the original levels of the audio, and not reduce it to match the lower levels of MIDI tracks. This is useful while rendering and transferring files to a DAW. To keep the original audio levels, de-select “Reduce Volume of RealTracks to match MIDI.”
This is an option to preserve the original levels of the audio, and not reduce it to match the lower levels of MIDI tracks. This is useful while rendering and transferring files to a DAW. To keep the original audio levels, de-select “Reduce Volume of RealTracks to match MIDI.”
![]() If you find that RealTracks (other than Drums) pushes are too loud (soft), then put negative (positive) numbers in this field.
If you find that RealTracks (other than Drums) pushes are too loud (soft), then put negative (positive) numbers in this field.
![]() If you find that RealTracks (other than Drums) shots are too loud (soft), then put negative (positive) numbers in this field.
If you find that RealTracks (other than Drums) shots are too loud (soft), then put negative (positive) numbers in this field.
![]() This launches the Assign RealTracks to Tracks dialog (RealTracks Picker) which allows you to select RealTracks.
This launches the Assign RealTracks to Tracks dialog (RealTracks Picker) which allows you to select RealTracks.
![]() If you have RealTracks from a previous version of Band-in-a-Box, you can shrink the size of these RealTracks, and reclaim hard drive space. On boot up, a reminder is shown if you haven’t erased un-needed files so that you can reclaim extra space. You can reclaim 65% of the space used by the RealTracks folder, which is 65GB reclaimed on a 100GB installation! Press the [Erase Un-needed +/- Files] button to erase unneeded files from the RealTracks folder. When erasing unneeded files, the number of files erased, and the number of GB reclaimed will be reported.
If you have RealTracks from a previous version of Band-in-a-Box, you can shrink the size of these RealTracks, and reclaim hard drive space. On boot up, a reminder is shown if you haven’t erased un-needed files so that you can reclaim extra space. You can reclaim 65% of the space used by the RealTracks folder, which is 65GB reclaimed on a 100GB installation! Press the [Erase Un-needed +/- Files] button to erase unneeded files from the RealTracks folder. When erasing unneeded files, the number of files erased, and the number of GB reclaimed will be reported.
Q. What are RealTracks +/- files?
A. With RealTracks from Band-in-a-Box 2010 or earlier, we included extra M4A files in the RealTracks folders. These have transposed versions of the M4A files, which have + or - in the file names. For example, bs1031+1.m4a would be a +/- file, whereas bs1031.m4a would not be one. We call them RealTracks “+/- files.” They are not included with Band-in-a-Box 2011 or higher because they are not needed and they take up extra space.
Q. I bought Band-in-a-Box for the first time with version 2011. Do I need to do anything?
A. No, there are no +/- files included with Band-in-a-Box 2011 or higher, so there is nothing to do.
Q. I have upgraded to Band-in-a-Box 2011 and have existing RealTracks folders with +/- files. Do I need to do anything?
A. You don’t need to do anything. But if you want to save a lot of hard drive space, and you have a newer/faster machine, you can go to the RealTracks Settings (Preferences) and click on [Erase Un-needed +/- files]. Customers with existing RealTracks collections (2010 or earlier) don’t need to do anything, as their existing RealTracks will work.
![]() [Defaults] sets RealTracks Settings back to default settings.
[Defaults] sets RealTracks Settings back to default settings.
![]() Save the new settings that you have made in this dialog by pressing the [Update Settings] button. Most changes will take effect the next time you press [Play].
Save the new settings that you have made in this dialog by pressing the [Update Settings] button. Most changes will take effect the next time you press [Play].
Using RealTracks
There are three ways that you can use RealTracks with Band-in-a-Box:
- Using RealTracks in Songs
- Using RealTracks in Styles
- Using RealTracks in Solos
Using RealTracks in Songs – Select Best
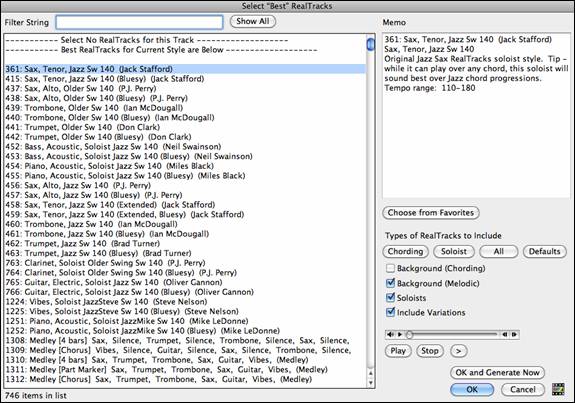
This dialog shows you the RealTracks that best match the genre, tempo, feel of your song. The list is displayed from best to worst. For example, if you have a Jazz Ballad style loaded (tempo 60), the list will show Jazz RealTracks that will work well at a tempo of 60 at the top of the list.
To add a “best” RealTracks to any track, right click (or double click) on the Track. You will then see menu items for “All” RealTracks, “Chording” RealTracks, and “Soloist” RealTracks.

The Select Best “All” RealTracks menu command will list all types (background and soloist) of RealTracks. The Select Best “Chording” RealTrack menu command will show you a list of ill background (chording or melodic) RealTracks, and Best “Soloist” RealTracks will list the best soloist or background soloist RealTracks. Selecting one of these menu commands will open a dialog that lists the best RealTracks, sorted from best to worst for the current style.
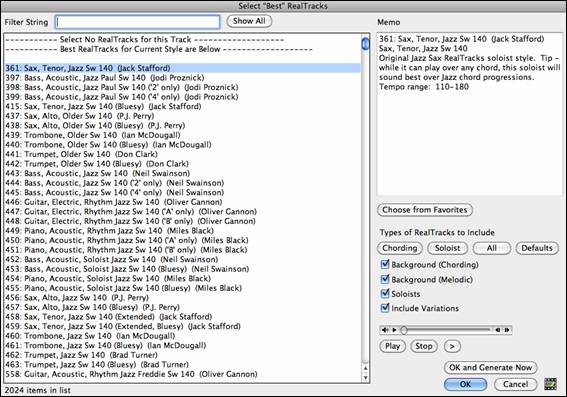
Additional features and buttons help you in your choice. You can audition the RealTracks by double clicking on the list or using the transport control in the dialog.
In this song, we are going to use a Jazz piano on the Piano track. We have filtered the list by “jazz piano” so those are the only RealTracks we see.
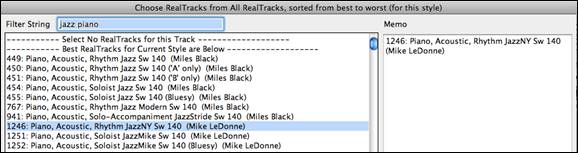
The Memo field gives a description of the current selection in the list.
Types of RealTracks to Include You can use these checkboxes to narrow your search even more for a faster selection. The buttons act as presets for the checkboxes.
|
For example, the [Chording] button selects “Background Chording” and “Background Melodic.” The [Soloist] button selects only the “Soloists” checkbox. [All] selects the Background and the Soloist checkboxes. Note that these buttons do not affect the setting for the “Include Variations” checkbox. |
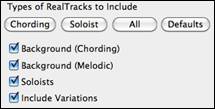
[Defaults] sets all checkboxes to on, including the “Include Variations” checkbox.
Background (Chording) adds a rhythm section chording instrument. This includes guitars, bass, and any chording instrument.
Background (Melodic) will include RealTracks that are background, but melodic. Pedal steel is an example. These are not “full-on” soloists but can sometimes be used as soloists.
Soloists will include RealTracks that are soloists, to create a solo for the song.
If Include Variations is selected, variations of the RealTracks will be included.
![]() The [OK and Generate Now] button closes the dialog, entering the currently selected item, and generating the track.
The [OK and Generate Now] button closes the dialog, entering the currently selected item, and generating the track.
![]() You can also make your choice and press [OK] to return to the main screen. When you press the [Generate and Play] toolbar button, the song will be generated with the new RealTrack instrument.
You can also make your choice and press [OK] to return to the main screen. When you press the [Generate and Play] toolbar button, the song will be generated with the new RealTrack instrument.
Using RealTracks in Songs - Assign RealTracks to Track Dialog
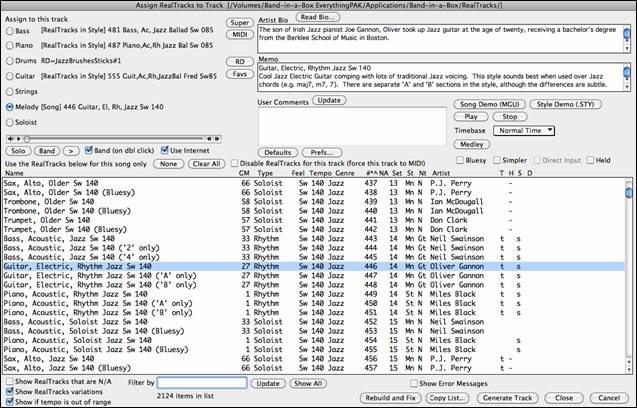
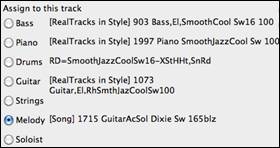
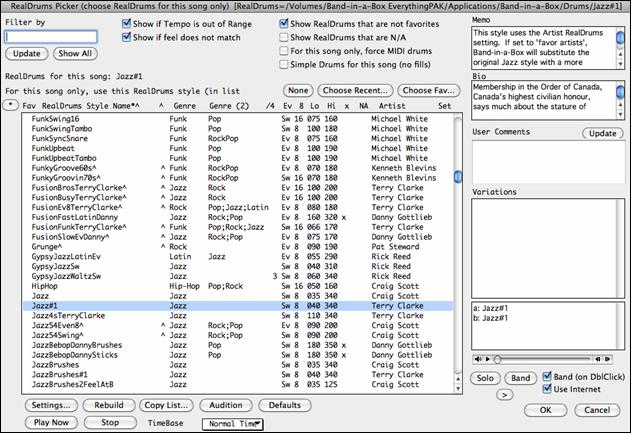
The Assign RealTracks to Track dialog allows you to assign a RealTracks to any track in a song. It also displays any RealTracks that are currently assigned to each track.
This dialog is launched by several ways.
1. Use the control+K hot key.
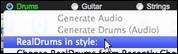
2. Click on the RealTracks toolbar button and select RealTracks Picker Dialog.
![]()
![]()
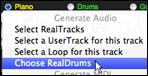
3. Right-click or double click on an instrument name at the top of the main screen and go to Select RealTracks | Choose RealTracks.
![]()
4. Right-click or double click on an instrument name in the Mixer and go to Select RealTracks | Choose RealTrack.
![]()
5. ![]() Press the [Assign to Track…] button in the RealTracks Settings dialog.
Press the [Assign to Track…] button in the RealTracks Settings dialog.
The dialog allows you to assign a specific RealTracks instruments to a track in a song. It also displays any RealTracks that are currently assigned to each track.
|
The RealTracks Picker dialog can be used to choose RealTracks, MIDI Tracks, and RealDrums. If RealTracks or RealDrums are disabled, Band-in-a-Box will offer to enable them when the RealTracks/RealDrums Picker dialog opens. The [Super] button opens the Choose from List dialog where you can pick a MIDI SuperTrack and assign it to the current track. Use the filter to narrow the selection. |
The [MIDI] button opens the MIDI Track Picker, where you can simply select and assign your favorite MIDITrack from any style to play on any track of your current song. You can add MIDITracks to your song (from any style) as easily as adding RealTracks.
Pressing the [RD] (RealDrums) button on the RealTracks picker allows you to select a RealDrums, rather than needing to go to a separate dialog for that.
Press the [Favs] button to select a recently chosen Favorite. You will then see a dialog with a list of your recently chosen RealTracks, most recent on top. You can filter this dialog by text, e.g. “guitar,” to find a recently used RealTracks with the word “guitar” in it.
Picking RealTracks
To use the dialog, first select the track that you want to assign under “Assign to this track.”
Then, select the RealTracks that you want in the list below it.

Instant Preview of RealTracks
You can instantly hear an audio demo of RealTracks by double clicking on a RealTrack in the list. Since this doesn’t affect your song, you can quickly audition many different RealTracks, and find the best ones for your song.
|
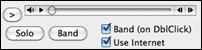
You can choose which of band or solo plays first when you double click on the list, by the “Band (on dbl clk)” checkbox. Otherwise, press the [Band] or the [Solo] button. |
The demos play from the Internet (www.pgmusic.com) or your hard drive (/Applications/Band-in-a-Box/RealTracks-Demos folder).
![]()
The [None] button sets the current track to no RealTracks assigned for the song. The [Clear All] button sets all RealTracks for the song to “None.” It will also optionally disable RealTracks present in the style for this song.
![]() Select “Disable RealTracks for this track (Force this track to MIDI)” if you want to have no RealTracks instrument for this track, even if the style specifies a RealTrack.
Select “Disable RealTracks for this track (Force this track to MIDI)” if you want to have no RealTracks instrument for this track, even if the style specifies a RealTrack.
You can sort the list by clicking on any column heading. As well as Name, GM (General MIDI instrument), Type (Rhythm or Soloist), Feel (Even or Swing), Tempo, Genre, and Number there are more columns with additional information about each RealTrack instrument.
![]()
- The “N/A” column shows “N/A” for RealTracks that you either have not installed or haven’t yet purchased, if “Show RealTracks that are N/A” is checked below.
- “Set” is the number of the RealTracks set that includes the instrument. This column also tells you whether a video is available for the RealTracks.
- The “St” (stereo) column shows whether the instrument playback is stereo or mono.
- Instruments with an “N” or “Gt” in the “Nt” (notation) column will display the RealTrack in notation.
- The “Artist” column has the name of the musician playing on the RealTrack instrument. See the “Artist Bio” box for information about the player.
- The letter “t” in the “T” column indicates RealTracks that are tempo swappable and can be substituted with other RealTracks that are made at different tempos.
- If the “H” column is blank, it means that Holds, Shots, and Pushes are available for the listed RealTracks. The letter “n” in this column means that they are available but not installed. A dash – means that no Holds, Shots, and Pushes are available for the style.
- A letter “s” in the “S” column indicates that the RealTracks instrument comes with simple style variations. By request, a Jazz Swing RealTracks has been created that plays the simplest bass lines for Jazz Swing, with root and 5th in the “a” section, and quarter notes only in the “b” section. To hear these, choose the RealTracks named “very simple” in the RealTracks dialog (by using “very simple” as a text filter).
- The “D” column identifies instruments that have clean signal “Direct Input” versions with a letter “y.”
List Display Options
![]() Since RealTracks are add-on purchases for Band-in-a-Box, your version may not contain all RealTracks. Selecting the “Show RealTracks that are N/A” checkbox will show you all available RealTracks.
Since RealTracks are add-on purchases for Band-in-a-Box, your version may not contain all RealTracks. Selecting the “Show RealTracks that are N/A” checkbox will show you all available RealTracks.
![]() Some RealTracks have variations available, such as the Acoustic Jazz Bass, which has variations that play in “2” only, in “4” only, or in “2” and “4” (for “a” and “b” substyles). Normally you will want to “Show RealTracks Variations.”
Some RealTracks have variations available, such as the Acoustic Jazz Bass, which has variations that play in “2” only, in “4” only, or in “2” and “4” (for “a” and “b” substyles). Normally you will want to “Show RealTracks Variations.”
![]() Use this to show/hide RealTracks that are out of compatible tempo range.
Use this to show/hide RealTracks that are out of compatible tempo range.
![]() A filter is available. Type a filter text, (e.g., bass) and press [Update] and you will then see the list filtered to show only RealTracks that have the word bass somewhere in the title, memo, genre, etc. Multiple search terms work with the RealTracks picker. If you separate terms with a space, each term is searched for separately. So, a search for “Country Guitar Ev 120” will find any Country Guitar styles with an Even feel that would work with a tempo of close to 120. Adding a search term that has a number will filter for RealTracks that match the tempo or within a compatible range. Pressing [Show All] will cancel the filter and show all RealTracks again.
A filter is available. Type a filter text, (e.g., bass) and press [Update] and you will then see the list filtered to show only RealTracks that have the word bass somewhere in the title, memo, genre, etc. Multiple search terms work with the RealTracks picker. If you separate terms with a space, each term is searched for separately. So, a search for “Country Guitar Ev 120” will find any Country Guitar styles with an Even feel that would work with a tempo of close to 120. Adding a search term that has a number will filter for RealTracks that match the tempo or within a compatible range. Pressing [Show All] will cancel the filter and show all RealTracks again.
![]() This will display RealTracks installation errors when you open the dialog. Press the [Rebuild and Fix] button for more information.
This will display RealTracks installation errors when you open the dialog. Press the [Rebuild and Fix] button for more information.
![]() This rebuilds the list of RealTracks. It also reports any installation errors.
This rebuilds the list of RealTracks. It also reports any installation errors.
Other Features
![]() This sets the dialog to default values.
This sets the dialog to default values.
![]() Thislaunches the RealTracks Settings dialog.
Thislaunches the RealTracks Settings dialog.
![]() This plays the current song. Load in demos with the [Song Demo] button.
This plays the current song. Load in demos with the [Song Demo] button.
![]() This stops the song playing.
This stops the song playing.
|
The RealTracks have been recorded by top studio musicians. The artist names and bios are displayed for the RealTracks. Click on the [Read Bio] button to view the full bio and link to more information. |
|
This describes the currently selected RealTracks style, and includes some useful tips, such as a suggested tempo range and Band-in-a-Box styles to use it with. |
|
You can enter your own comments about any style in this field. The comments are saved in RTUserMemos.txt. After you enter your comments, click on the [Update] button to save them. |
![]() The [Song Demo (MGU)] button will display a list of songs in the Applications/Band-in-a-Box/RealTracks – Demos folder that use the selected RealTrack instrument. Click on the song name and then press the [Play] button to hear it.
The [Song Demo (MGU)] button will display a list of songs in the Applications/Band-in-a-Box/RealTracks – Demos folder that use the selected RealTrack instrument. Click on the song name and then press the [Play] button to hear it.
![]() The [Style Demo (.STY)] button shows a list of styles that use the currently highlighted RealTracks instrument. Clicking on a style name will load the style into the current Band-in-a-Box song. Press [Play] to hear your current song played with the RealTracks style that you want to audition.
The [Style Demo (.STY)] button shows a list of styles that use the currently highlighted RealTracks instrument. Clicking on a style name will load the style into the current Band-in-a-Box song. Press [Play] to hear your current song played with the RealTracks style that you want to audition.
|
RealTracks can be made as Half Time, Double Time, or Triple Time, so it is easier to select them. They show up in the RealTracks Picker with tempos indicating when they can be used. For example, Alto Sax, tempo 140 will also show up in the RealTracks picker as Alto Sax, tempo 70 [Double-Time] so you can easily choose it. |
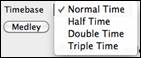
“Triple Time” RealTracks allow you to use fast waltz RealTracks as slow 4/4 RealTracks (with a 12/8 feel).
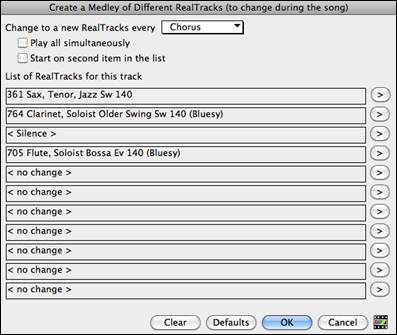
![]() You can define your own Medley, to be saved with the current song only. To do this, select the RealTracks that you want as the first of the medley. Then press the [Medley] button.
You can define your own Medley, to be saved with the current song only. To do this, select the RealTracks that you want as the first of the medley. Then press the [Medley] button.
You will then see the Create a Medley of Different RealTracks dialog. In this dialog, you can specify how often you want the RealTracks to change and create a list of instruments that you want to have included.
|
When you are choosing RealTracks to use, note that there is a RealTracks available called “Silence.” This is to be used when “you” want to play, for example if you want to trade 4’s with the band. |
|
The option to “Start on second item in the list” is useful if you want to start on a different instrument or start with “Silence.” |
![]() You can use the medley feature to play up to 10 RealTracks simultaneously on the same track. If you want to generate many RealTracks, the theoretical limit would be 7 tracks x 10 per track = 70 RealTracks instruments playing at the same time. Multiple RealTracks are created as medleys, but you also select the option “Play All Simultaneously.” Then all the instruments will play all of the time.
You can use the medley feature to play up to 10 RealTracks simultaneously on the same track. If you want to generate many RealTracks, the theoretical limit would be 7 tracks x 10 per track = 70 RealTracks instruments playing at the same time. Multiple RealTracks are created as medleys, but you also select the option “Play All Simultaneously.” Then all the instruments will play all of the time.
![]() If set, the selected RealTracks on the current track will play in a bluesy where major triads are treated like 7th chords. This only applies to Soloists, not rhythm tracks.
If set, the selected RealTracks on the current track will play in a bluesy where major triads are treated like 7th chords. This only applies to Soloists, not rhythm tracks.
![]() When set, the selected RealTracks will play a simpler arrangement (less busy, fewer embellishments). A letter “s” in the S column indicates that simpler styles are available.
When set, the selected RealTracks will play a simpler arrangement (less busy, fewer embellishments). A letter “s” in the S column indicates that simpler styles are available.
![]() When set, the selected RealTracks will use a “clean signal” version so that you can use your own effects. A “y” in the D column indicates that Direct Input tracks are available.
When set, the selected RealTracks will use a “clean signal” version so that you can use your own effects. A “y” in the D column indicates that Direct Input tracks are available.
![]() When set, the selected RealTracks will play with an ultra simple arrangement.
When set, the selected RealTracks will play with an ultra simple arrangement.
![]() This will generate a RealTracks instrument on the currently selected track.
This will generate a RealTracks instrument on the currently selected track.
![]() This button will save the current RealTracks list to a tab-delimited .txt file in the Band-in-a-Box/Data folder and open it in TextEdit. In TextEdit copy all and paste it into an Excel file. You can then apply a hierarchical sorting of the list.
This button will save the current RealTracks list to a tab-delimited .txt file in the Band-in-a-Box/Data folder and open it in TextEdit. In TextEdit copy all and paste it into an Excel file. You can then apply a hierarchical sorting of the list.
![]() This will close the dialog and assign the RealTracks instrument to the current track. Then, when play is pressed, the RealTrack will generate.
This will close the dialog and assign the RealTracks instrument to the current track. Then, when play is pressed, the RealTrack will generate.
![]() Click on [Cancel] to exit the dialog without assigning a RealTracks instrument to the current track.
Click on [Cancel] to exit the dialog without assigning a RealTracks instrument to the current track.
12-Key “Woodshedding” RealTracks
Many people use the RealTracks feature in Band-in-a-Box to learn how to “play like the pros.” This is because you can see notation, tab, on-screen guitar, and more, as you hear the music. Now we’ve taken this to a higher level by providing some “12-Key” RealTracks that have been recorded in all 12 keys. In previous versions, you might decide to learn to play by studying the parts played by the RealTracks artists and watch the notation to do so. Many people have found this a great way to learn, but it had the following issues.
- Since RealTracks were based on only 5 keys, they were transposed much of the time, which would make the guitar part unplayable for a student in some cases.
- The tab/notation was good for guitar, but lacked some precision and graphical representation of bends, pull-offs, hammer-ons, and pull-offs.
So, we have solved that by creating some Guitar RealTracks with:
- recording in all 12 keys. So, you can see what a pro would play over an Ab chord, and you won’t see them play on a G transposed up to an Ab,
- and carefully transcribed notation, with correct bend/hammer-ons, pull-offs, and slides.
So now, you (we!) students have no more excuses! You can watch and learn from the pros!
We’ve made some of these for country guitar (Brent Mason), piano (Mike Rojas), and pedal steel (Eddy Dunlap).

For guitar, this means that they are typically generated with no transpositions on any chord so that you can learn by copying exactly what you see on the fretboard. In combination with another new feature (Hi-Q RealCharts and guitar display), this gives you great notation and guitar display.
Changing RealTracks at any bar
You can have RealTracks styles changes within a song. There are two ways to change RealTracks at any bar.
Change of RealTracks Styles at any bar
You can change styles with RealTracks at any bar. For example, switch from Jazz Swing to Bossa style at any bar.
|
To do this, first open the Edit Settings for Current Bar dialog (press F5) at the bar that you want the style change. Then press the Style change button to select a style change. |

Change of individual RealTracks instrument for any track at any bar
You can change specific RealTracks without changing the style by inserting a specific RealTracks instrument into a track at any bar to create a customized performance. For example, you can change an Acoustic Bass comping part to an Acoustic Bass Solo.
|
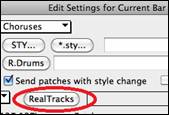
To change the RealTracks instrument for any track at any bar, first open the Edit Settings for Current Bar dialog (press F5) at the bar that you want the style change. Then, press the [RealTracks] button and you will see the RealTracks changes dialog where you can choose which tracks you would like to have RealTracks changes on. |
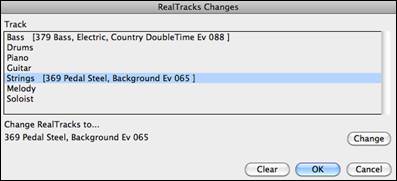
Select a track, then press the [Change] button and you will then see a list of RealTracks.
You can easily preview a RealTrack by double-clicking on an item in the list.
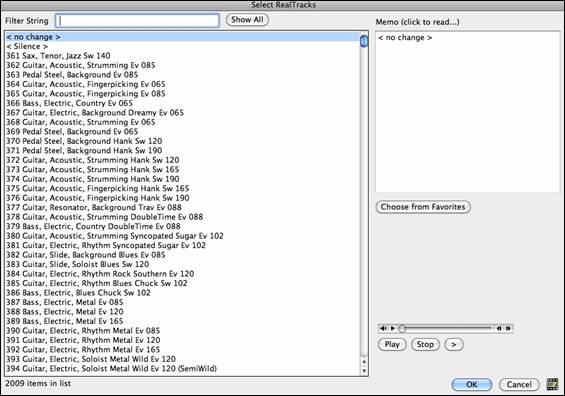
You will see a huge list of RealTracks, so you will likely want to narrow it down. Type a word that will be included in the RealTracks name, like “bass.” Then the list will only show bass RealTracks.

Click on your selection and then choose [OK].
Using RealTracks in Styles
Finding all styles that have RealTracks
|
Open the and locate the Type button above the styles list. This button allows you to filter the list by the type (Real or MIDI). |
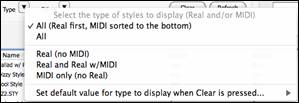
If you want to see the RealStyles, select Real (no MIDI). If you want to see the RealStyles and styles with RealTracks and MIDI tracks, select Real and Real w/MIDI.
The style names for RealStyles are prefaced by an underscore, _.
![]()
The style names for styles with RealTracks and MIDI tracks are prefaced by an equals sign, =.
![]()
Selecting RealStyles from Band Styles List
|
When you choose Band Styles from the [Style] button menu, you see a list of the RealStyles categories with submenus listing the most popular styles in each category. For example, in the Jazz Swing section you will see styles for Ballads, Slow Swing, Medium Slow Swing, Medium Swing, Bebop, and Waltzes. |

The instruments used in each style are displayed, giving a “thumbnail” summary (e.g. Bass, Piano, Guitar, Brushes, and Alto Sax Soloist).

Song Demos
You can load in a song demo for the current selection by choosing the menu item Load Song Demo.
![]()
Options to auto-replace MIDI styles with RealTracks styles
If you have made a lot of songs using older MIDI styles, and would prefer that they play with RealTracks, you can now do this easily by selecting the menu option File | Load Style Special | Auto Replace MIDI styles with RealTracks styles when songs loaded. Then, if you have the needed RealTracks installed, your MIDI style will be intelligently replaced with a RealTracks style. There is also a manual option to do this on an as-needed basis, or to disable the feature for a certain song, or reverse it if you prefer the MIDI style.

Style Aliases allows you to customize this feature by adding the name of a style that should get substituted for a certain style.
Find a RealTracks replacement for current MIDI style will manually substitute a RealTracks for the current MIDI style, if one is available. For example, if the current style is the original Jazz style ZZJAZZ, then choose this to get a RealTracks style instead. Note that a substitute only gets made if you have the RealTracks installed.
Restore Style prior to Style Alias. If a style replacement gets made, but you would prefer the original MIDI style instead, you can choose “Restore Style prior to Style Alias.”
Auto-replace MIDI styles with RealTracks styles when songs loaded. If selected, the style replacements will happen automatically for every song.
Suggest RealTracks style replacements when songs are loaded suggests possible RealTracks substitutions for the current MIDI style, but the replacement style is loaded manually.

|
These style replacement options are also available from the [RealTracks] button. |
Using RealTracks in Solos
Pick “best” soloist RealTracks
This dialog shows you the soloists that best match the genre, tempo, feel of your song. The list is displayed from best to worst. For example, if you have a Jazz Ballad style loaded (tempo 60), the list will show jazz Soloists that will work well at a tempo of 60 at the top of the list, and something like a fast, Heavy Metal Guitar Soloist at the bottom of the list.
To add a best Soloist to the Soloist track, press the [Soloist] button, and choose the menu option “Add Best RealTracks Soloist to Soloist Track.”

To add a best Soloist to any track, use the track radio button (e.g. piano) and right click (or double click) to show the menu, and choose the Select Best Soloist RealTracks menu item.

You will then see a dialog that lists the best soloists. It will include Soloists and “Background Soloists.” You can de-select these if you only want to see Soloists (and not background soloists).
![]() The [OK and Generate Now] button closes the dialog, entering the currently selected item, and generating the track.
The [OK and Generate Now] button closes the dialog, entering the currently selected item, and generating the track.
![]() You can also make your choice and press [OK] to return to the main screen. When you press the [Generate and Play] toolbar button, the song will be generated with the new RealTrack instrument.
You can also make your choice and press [OK] to return to the main screen. When you press the [Generate and Play] toolbar button, the song will be generated with the new RealTrack instrument.
Using the Select Soloist Dialog
Press the [Soloist] button and select the menu Open Soloist Dialog to choose MIDI or RealTracks Soloist to launch the Select Soloist dialog. You can also use the keystroke shift+F4 to launch this dialog.


Get to Soloists in the range from #361 and up. You can do that by:
1. ![]() Typing 361 and pressing [Go to].
Typing 361 and pressing [Go to].
2. ![]() Choosing Favorites to return to a recently chosen Soloist.
Choosing Favorites to return to a recently chosen Soloist.
3. ![]() Click on the [RealTrack] button to jump directly to the start of the RealTracks soloists listings.
Click on the [RealTrack] button to jump directly to the start of the RealTracks soloists listings.
![]()
![]() As with other Soloists, press the [All Solo] button to make sure that the Soloist will be generated for all choruses, or [Melody & Solo] if you just want the Soloist for a certain chorus.
As with other Soloists, press the [All Solo] button to make sure that the Soloist will be generated for all choruses, or [Melody & Solo] if you just want the Soloist for a certain chorus.
Customized RealTracks Soloing
Regenerate part of a Soloist track, without erasing the existing part. This allows you to customize your Soloist track by regenerating parts of the solo with the same or different RealTracks. For example, generate a 4-bar clarinet solo at bar 9. Then generate an 8-bar flute solo at bar 49. The file plays back with both solos intact.
|
To do this, press the [Custom] button in the Select Soloist dialog then select the range for the solo. |

You can repeat the process, for a different range, with a different RealTracks, and all of them will play on the same track.
Soloist Medleys
In Soloist Medleys, the RealTracks is made to switch instruments every “N” bars or every chorus. For example, you can add a Bluegrass Medley Soloist that switches between solos from Mandolin, Guitar, Banjo, and Fiddle every 4 bars. Or a Jazz Medley Soloist that switches between Alto Sax, Trumpet, Piano, and Guitar solos every chorus. Or insert “Silence” as one of the instruments, which allows you to play your own instrument. Use the pre-made Soloist Medleys included, numbers 1308 to 1331, or create a custom one yourself in the Soloist Editor.
Saving RealTracks Soloists
Soloist generated RealTracks are saved with the song, so you will hear the RealTracks play the same solo when you reload the song.
When you generate a solo using RealTracks, Band-in-a-Box will remember this, and when you go to save the song, Band-in-a-Box will ask you if you want to save that solo (and thereby freeze the Soloist track). If you say yes, then the solo will play instantly the same way when the song is reloaded. Of course, you can freeze the soloist track yourself at any time.
Video RealTracks
When you load a video RealTracks, you can use it just like an audio RealTracks, but you can also generate a video, which will display the musician playing your song exactly as you hear it. If you load one of the video RealTracks bands, you will have video RealTracks on 5 tracks, and you can make a video of 1-5 musicians. You can also include a chord sheet or notation in the video.
You can easily find the video RealTracks in the RealTracks or RealDrums Picker. The “Set” column will show “vid” if the video RealTracks is installed.<


When you select video RealTracks, [V] will show at the track buttons.
![]()
|
To make a video, click on the [Video] toolbar button and select Render Video(s) from the menu. |
This will open the Generate Video dialog.
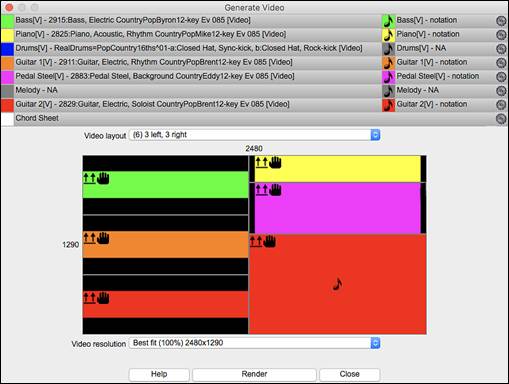
Drag one of the available tracks listed at the top of the dialog and drop it onto the layout selector below. You can also drag and drop the Chord Sheet or Notation (if available). You can even drag a video file (.mp4 files and some .avi files) from the Finder and drop it onto the video layout selector.
If you are making a video of multiple tracks, you can choose a track layout. For example, you can stack 3 tracks vertically for a 3-track video, or 3 tracks on the left and 2 tracks on the right for a 5-track video.

|
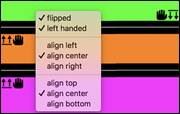
Right-clicking on the layout selector will show you a menu with options to flip a video, make a video for the left handed, or select alignment for each video. |
|
You can select the resolution for the video. The aspect ratio is determined by which tracks are included and how they are arranged, but this allows you to make the final video smaller if you want. |
|
When you are ready, press this button and select the name and location for the video. |
|
While the video is being rendered, you can close the dialog and use other features in Band-in-a-Box. |
|
When the video has been rendered, you can click on the .mp4 file in the Finder to play the video. |
Here is an example of a modern country band (electric bass, electric guitar, piano, drums, and pedal steel).

Saving Your RealTracks
|
As with Band-in-a-Box MIDI parts and RealDrums, the RealTracks can be saved by rendering the complete performance to an audio file or the individual RealTracks to separate audio files. |
The RealTracks selection that you assign to a song will be saved with the song, but the audio track that was generated is not automatically saved with the Band-in-a-Box MGU file. This is because the Band-in-a-Box MGU file only contains chords/melody/lyrics (and an optional audio track AIFF file).
|
If you have generated a RealTracks part that you want to keep you can use the Freeze feature to save it. Frozen tracks will reload with the song and play exactly as saved. |
Simple RealTracks
Simpler Songs
We’ve added a Simpler RealTracks setting – a checkbox in the Additional Song Settings that makes the RealTracks play a simpler (less busy or embellished) arrangement.
|
Access the Additional Song Settings with the [Song Settings] button to the right of the song title box or from the Song menu. |
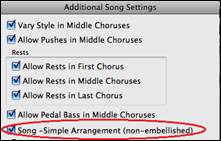
You can also right-click on the [Master] button and choose the menu command Set Song to Simple Arrangement.
![]()
Simpler Tracks
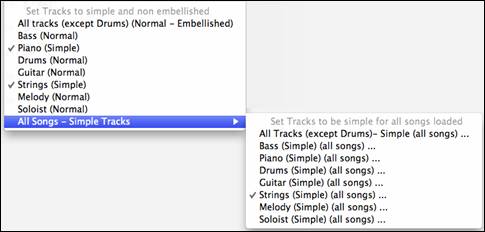
You can set a single track to use a Simple Arrangement by right clicking on the track name at the top of the main screen and choosing Track Settings | Force Track to Simple Arrangement.
![]()
You can also use the [Simple] button to force a track to play with a simple arrangement.
|
|
You can do the same thing in the RealTracks Picker by selecting the “Simpler” checkbox, provided that the RealTracks instrument you are using has a letter “s” in the column headed S*.

Note that not all RealTracks have a simple option (yet). You can see which ones have the option by opening the RealTracks Picker and looking in the second last column on the right marked “S.” If the RealTracks has a simple option, you will see the letter “s” in this column. We will release more RealTracks with the simple option as patch updates on our web site.
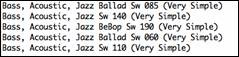
By request, a Jazz Swing RealTracks has been created that plays the simplest bass lines for Jazz Swing, with root and 5th in the “a” section, and quarter notes only in the “b” section.
To hear these, choose the RealTracks named “very simple” in the RealTracks dialog (by using “very simple” as a text filter).
|
|
Simpler Styles
For RealStyles that use RealTracks instruments with the simple option, you can select it in the StyleMaker so that the particular part always plays its simpler variation.
Go to StyleMaker and select the instrument part, Guitar for example, and then click on the [Patch] button to open the Miscellaneous Style Settings dialog. |
![]() You will see a checkbox labeled “Use Simple version.” It will be grayed out if the RealTracks instrument you are using does not have the simple option yet, but if it is showing normal black text then you can check the box to make the style play with the simpler version of the RealTrack.
You will see a checkbox labeled “Use Simple version.” It will be grayed out if the RealTracks instrument you are using does not have the simple option yet, but if it is showing normal black text then you can check the box to make the style play with the simpler version of the RealTrack.
RealDrums
|
The RealDrums feature replaces MIDI drums with audio drums recorded live by top studio drummers. |
Why do RealDrums sound better than MIDI Drums?
RealDrums are recordings of top studio drummers playing multi-bar patterns, whereas MIDI drums are patterns based on single drum hits programmed, typically on a quantized grid, as people assume drummers are typically playing.
With RealDrums, we record top studio drummers at multiple tempos, so the playing you hear at various tempos is also musically different, not just “sped up.” Drummers play different types of fills etc. at slower/faster tempos, and these are captured with RealDrums.
How Do RealDrums Work?
There are several ways to hear RealDrums with new or existing Band-in-a-Box songs. RealDrums can be added to a single song or substituted for MIDI drums in existing styles.
We provide many styles that already have RealDrums. These styles can be identified by the style name beginning with a minus sign. For example, “-ZZJAZZ.STY” is a version of the ZZJAZZ style that uses RealDrums.
RealDrums Settings
|
Use the RealDrums Settings to substitute RealDrums for MIDI drums in existing Band-in-a-Box styles. The dialog opens with the [RealDrums] toolbar button (control+click) or with the [RealDrums] button in the Preferences dialog. |
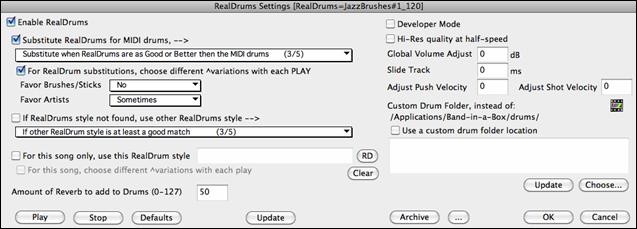
![]() With “Enable RealDrums” checked, RealDrums may be used rather than MIDI. This setting can be changed while the song is playing so that you can compare MIDI drums and RealDrums.
With “Enable RealDrums” checked, RealDrums may be used rather than MIDI. This setting can be changed while the song is playing so that you can compare MIDI drums and RealDrums.

This will substitute RealDrums for MIDI styles in all songs where a suitable RealDrums style is available. You can change the setting from 1 to 5. If set to 1, almost all MIDI drums will be substituted by RealDrums. If set to 5, only RealDrums styles that match the style perfectly will be substituted.
![]()
This feature selects variations of RealDrums instruments with each PLAY. Most RealDrums styles contain many instrument variations (brushes vs. sticks, hi-hat vs. ride cymbal, percussion only, etc.). Now, by selecting “…choose different ^variations with each PLAY,” you can hear a different variation each time play is pressed, so the song sounds fresh each time. One time you will hear it with brushes, the next time with sticks and ride cymbals, etc.
![]()
When selecting RealDrums styles to use for a style, Band-in-a-Box will use your preferences for brushes and sticks. For example, if you choose “Favor Brushes” Band-in-a-Box will always choose from among variations that include brushes (when available).
We have “artist” support. This allows you to choose among different drummers playing the same style. For example, we have multiple artists playing the “JazzBrushes” style. You can set Band-in-a-Box to choose a different artist with each play, or always choose a specific artist.
![]()
Use “If RealDrums style not found, use other RealDrums style” to replace RealDrums styles that you do not have (i.e., have not purchased yet) with ones that you do have. This feature also has a range of settings from 1 to 5. If set to 1, almost all missing styles will be substituted. If set to 5, only RealDrums styles that match the style perfectly will be substituted.
![]()
Individual songs can have RealDrums added to them.
![]() Click on the [RD] button to select a specific RealDrums style to use in a particular song. This will launch the RealDrums Picker with a list of all available RealDrums styles.
Click on the [RD] button to select a specific RealDrums style to use in a particular song. This will launch the RealDrums Picker with a list of all available RealDrums styles.
![]() When this is set, if you save a specific style with a song, you will hear a new variation of that style each time you press PLAY, with different drum instruments.
When this is set, if you save a specific style with a song, you will hear a new variation of that style each time you press PLAY, with different drum instruments.
![]() This button clears the currently selected RealDrums for the song.
This button clears the currently selected RealDrums for the song.
![]() Normally, no reverb is added to the drums, but if you want some added, you can set it here.
Normally, no reverb is added to the drums, but if you want some added, you can set it here.
![]() Only set this when you are a developer making a RealDrums style and want to see additional debug information such as the /Applications/Band-in-a-Box /drumaudioresults.txt file and messages about errors in the _style.txt file.
Only set this when you are a developer making a RealDrums style and want to see additional debug information such as the /Applications/Band-in-a-Box /drumaudioresults.txt file and messages about errors in the _style.txt file.
![]() When selected, RealDrums will use a higher quality (more CPU intensive) method to play the drums when playing at ½ or ¼ speed (from the Play menu).
When selected, RealDrums will use a higher quality (more CPU intensive) method to play the drums when playing at ½ or ¼ speed (from the Play menu).
![]() If you are finding that the RealDrums track is too loud or quiet in relations to the MIDI parts, you can adjust the volume here. This affects all RealDrums styles.
If you are finding that the RealDrums track is too loud or quiet in relations to the MIDI parts, you can adjust the volume here. This affects all RealDrums styles.
![]() You should normally leave this at 0, but if you are having sync problems between the MIDI tracks and RealDrums you can set this to a positive or negative value. Values are in milliseconds (ms).
You should normally leave this at 0, but if you are having sync problems between the MIDI tracks and RealDrums you can set this to a positive or negative value. Values are in milliseconds (ms).
![]() If you find that RealDrums pushes are too loud, put a negative value in this field. Enter a positive value if they are too soft.
If you find that RealDrums pushes are too loud, put a negative value in this field. Enter a positive value if they are too soft.
![]() If you find that RealDrums shots are too loud, put a negative value in this field. Enter a positive value if they are too soft.
If you find that RealDrums shots are too loud, put a negative value in this field. Enter a positive value if they are too soft.
|
You can choose any folder for your RealDrums. This allows you, for example, to conserve space on your hard drive by storing the RealDrums on an external drive. |
|
If you want to store your Drums folder somewhere other than /Applications/Band-in-a-Box/Drums, then specify that location by choosing its folder here. |
Other RealDrums Controls
![]() This allows you to audition the song with and without RealDrums without leaving this dialog.
This allows you to audition the song with and without RealDrums without leaving this dialog.
![]() This will stop song playback.
This will stop song playback.
![]() This will return the settings in this dialog to their defaults.
This will return the settings in this dialog to their defaults.
![]() This will update the settings in the dialog and rebuilds the list of drum styles.
This will update the settings in the dialog and rebuilds the list of drum styles.
![]() The [Archive] button will erase the AIFF files in the Drums folder when there is a smaller M4A available.
The [Archive] button will erase the AIFF files in the Drums folder when there is a smaller M4A available.
![]() For a single chosen folder, this reverses the Install function and erases the AIFF file when there is already an M4A file.
For a single chosen folder, this reverses the Install function and erases the AIFF file when there is already an M4A file.
![]() Press [OK] to make your selection and exit the RealDrums Settings dialog.
Press [OK] to make your selection and exit the RealDrums Settings dialog.
![]() Press [Cancel] to exit the RealDrums Settings dialog without making any changes.
Press [Cancel] to exit the RealDrums Settings dialog without making any changes.
Selecting RealDrums - RealDrums Picker
Use the RealDrums Picker to choose RealDrums for the current song only.
RealDrums Picker opens by:
- clicking on the RealDrums toolbar button and selecting RealDrums Picker Dialog.
![]()
![]()
- right-clicking (or double clicking) on the Drums track button at the top of the main screen and choosing RealDrums in the menu.
- or -
- right-clicking (or double clicking) on the Drums in the Mixer and choosing RealDrums in the menu.

RealDrums can be added to any track, not just the Drums track, so you can have more than one drums track.
 |
To do this, right click on the track button and select Choose RealDrums. When there are multiple drums tracks, they will be automatically called Drums 1, Drums 2 etc.
|
Instant Preview of RealDrums
You can double click on a RealDrums, or on the Variation name of the RealDrums, to audition each variation of the RealDrums. For example, if you’ve found CountryWaltz^, you can now hear demos of the variations (CountryWaltz^1-HiHat,Ride, CountryWaltz^2-Brushes etc.).
Each demo has a “band” version with all instruments, and a “solo” version with drums only.
 |
You can choose which of band or solo plays first if you double click on the list, by the “Band (on DblClick)” checkbox. Otherwise, press the [Band] or the [Solo] button. |
The demos play 4 bars of “a” substyle, and then 4 bars of “b” substyle, using the current RealDrums (left hand panel) and the variation (right hand panel).
List Columns
![]()
The RealDrums list can be sorted by clicking on any of the column headings.
Click on this button to enter an asterisk beside the current selection in the list, indicating that this is a favorite style. |
![]() Click on the name of the RealDrums style name that you want to select for the song. Names ending in a caret ^ have variations available.
Click on the name of the RealDrums style name that you want to select for the song. Names ending in a caret ^ have variations available.
- ^ Clicking in the caret column will show the variations for the selected RealDrums style (if available).
- Genre is the type of music that the RealDrums style comes from, such as Jazz, Rock, or Country.
- Genre (2) suggests additional types of music that the RealDrums style might work for.
- /4 indicates the time signature, which is 4/4 by default. If the column is empty, the time signature is 4/4; if there is a 3 in this column the time signature is 3/4.
- Ev indicates the feel of the RealDrums style, either Even or Swing.
- The listing in the 8 column indicates whether the meter is based on eighth notes (8) or sixteenth notes (16).
- Lo is the slowest tempo for which the RealDrums style is suited.
- Hi is the fastest tempo recommended for the style.
- X indicates a style with a tempo that is out of range for the song.
- N/A are styles not found in the Drums folder.
- Artist lists the names of the drummers who recorded each RealDrums style. Select a name to read their Bio.
- Set is the number of the RealDrums set that includes the style. This column also tells you whether a video is available for the RealDrums.
Filter
|
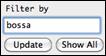
Type a filter text, (e.g. bossa) and press [Update], and you will then see the list filtered to show only RealDrums that have the word bossa somewhere in the title, memo, genre etc. Pressing [Show All] will cancel the filter and show all RealDrums again. |
Multiple search terms work with the RealDrums Picker. If you separate terms with a space, each term is searched for separately. So, a search for “Bossa Rock Ev 120” will find any Bossa Rock styles with an Even feel that would work with a tempo of close to 120. Adding a search term that has a number will filter for RealTracks that match the tempo or within a compatible range.
Additional Settings
There are additional settings to define your selection in the RealDrums Picker.

Show if Tempo is out of Range will show styles that would not work well at the current song tempo. The acceptable range is shown in the list of styles Lo/Hi (9th and 10th) columns.
Show if Feel does not match will show a song where the drums are in Even feel and the style is Swing (or vice versa).
Show RealDrums that are not favorites You can assign a style as one of your favorites by clicking in the first column. Then you can sort by favorites or use this option to see only favorites.
Show RealDrums that are N/A These are styles not found in the Drums folder, likely because they are add-on styles not purchased yet. Press the [Rebuild] button and check the RealDrums Settings to confirm that you have the correct drums folder selected.
For this song only, force MIDI drums Set this if you want MIDI drums and want to override a RealDrums that is set in the style.
Simple Drums for this song If this is enabled, RealDrums will play a simpler arrangement without fills.
|
“Memo” is a memo description of the style. These are stored in the Band-in-a-Box/Data/RDPGMemos.txt file. |

![]() This shows the current RealDrums for the song.
This shows the current RealDrums for the song.
|
RealDrums are recorded by top studio drummers. See the “Bio” for a capsule description of the musician’s career and credits. |

|
This sets the drums to no RealDrums override for the song, and optionally also forces MIDI drums (i.e., no RealDrums for the style either). |
|
You can type in your own comments about any style in the “User comments” field and they are saved. |

|
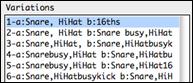
RealDrums styles ending in a caret (^) have variations available. They are listed here. Where there are two instruments shown, such as Brushes/Sticks, the first one plays in the “a” substyle and the second in the “b” substyle. You can double click on the variation name to hear an audio demo. |
![]()
[Settings] opens the RealDrums Settings dialog.
[Rebuild] builds the list of RealDrums present as folders in the Drums folder. If you add new drum styles, press this button to update the list. RealDrums made by you (or others) that are added by you to the Drums folder also appear in the RealDrums Picker dialog.
[Copy List] saves the current list with all information to a tab-delimited .txt file and opens it in TextEdit. In TextEdit copy all and paste it into a spreadsheet such as an Excel file. You can then apply a hierarchical sorting of the list.
The [Audition] button does not load the style but instead uses Media Player to play a demo .AIFF file for the style.
[Defaults] returns the dialog to default settings, which will show all available styles.
[Play Now] loads the selected RealDrums and starts playback. If you have not played the song yet, you will only hear drums since you have not generated non-drums tracks. In that case, press shift+click this button to generate all tracks.
The [Stop] button stops the song playback. Click on [Play Now] to resume.
The TimeBase option will make the RealDrums in normal time, double-time (cut-time), half-time, or triple-time.
![]()
Press [OK] to make your selection and return to the song. When you press [Generate and Play] button on the toolbar, the song will be generated with the new RealDrums style. Press [Cancel] to return to the song without making a selection.
Choose Recent or Favorite RealDrums
![]() Your recent RealDrums selections are saved, and available in the RealDrums Picker dialog. Press the [Choose Recent] button in the RealDrums Picker dialog to see up to 400 recent selections, with the most recent at the top. Clicking on the [Choose Fav] button opens your Favorites list. These are the styles in the list that you have marked with an asterisk to show that they are favorites.
Your recent RealDrums selections are saved, and available in the RealDrums Picker dialog. Press the [Choose Recent] button in the RealDrums Picker dialog to see up to 400 recent selections, with the most recent at the top. Clicking on the [Choose Fav] button opens your Favorites list. These are the styles in the list that you have marked with an asterisk to show that they are favorites.

|
To add a favorite, highlight the style in the RealDrums Picker list and then click on the asterisk button. To remove a favorite, select it in the list and click on the asterisk button. |
![]()
Changing RealDrums at any bar
The Edit Settings for Current Bar dialog opens with the menu command Edit | Bar Settings, with the F5 function key, or the keystrokes option+B.
In this dialog, you can change the RealDrums at the current bar (location of the highlight cell). The change can affect all choruses, or just a selected chorus.

![]() The [R.Drums] button opens the RealDrums Picker to select a new RealDrums style from the list.
The [R.Drums] button opens the RealDrums Picker to select a new RealDrums style from the list.
![]() Click on [Clear RealDrums change] to remove the change.
Click on [Clear RealDrums change] to remove the change.
RealDrums QuickList
This is the simpler dialog for choosing RealDrums, an alternative to the RealDrums Picker. It displays all available RealDrums in a simple list, which can be easily filtered by genre, time signature, feel, and more. The list can be set to show only RealDrums that are compatible with the current style of the song. You can also set the highlighted RealDrums as a prototype RealDrums to find alternates to that RealDrums.
|
To open the dialog, right-click on the Drums track button, and select [QuickList] RealDrums from the menu. |
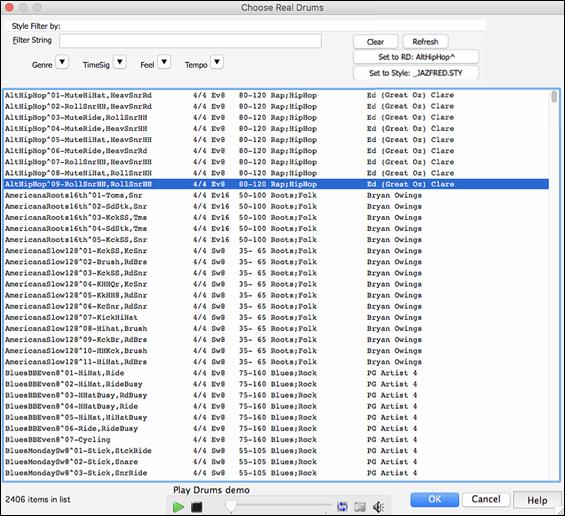
You can filter the list by genre, time signature, feel, tempo, and text. Use the [Set to Style: ] button to see RealDrums that are compatible with the current style of the song. The [Set to RD: ] button allows you to set the highlighted RealDrums as a prototype RealDrums so you can find alternates to that RealDrums. Press the [Clear] button to clear any filter.

Multi-Drums
You can put multiple drum/percussion parts, drum loops, UserTracks drums, and even RealTracks on the same Drums track, with volume mixer adjusting levels. For example, you can add single drums instruments (e.g. Tambourine and Shaker), a bass drum loop, and/or UserTracks drums to BossaBrushes Drums track. To do this, click on the Drums track button and go to Multi-Drums | Edit-Multi Drums for this song.
|
You will then see the Create Multi-Drums dialog.
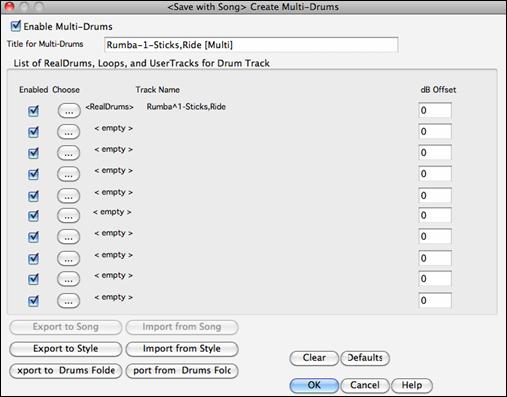
![]() Make sure that you enable the “Enable Multiple Drums” checkbox.
Make sure that you enable the “Enable Multiple Drums” checkbox.
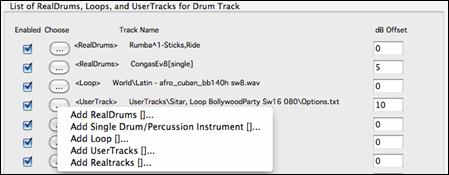
To add drums, click on the […] button on an unused slot. This will show you a menu where you can choose a second RealDrums, [single] drum/percussion (e.g. tambourine), loop, UserTracks, or RealTracks. You can adjust volume for each with the “dB Offset” option.
![]() Then type a title for your Multi-Drums and press the [OK] button.
Then type a title for your Multi-Drums and press the [OK] button.
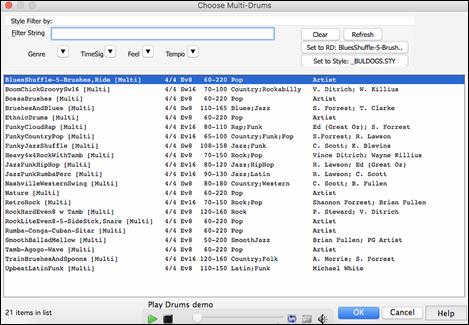
If you want to use a Multi-Drums that you have already made, select the Choose Existing Multi-Drums menu option from the Drums track button menu.
|
|
These drums are saved in the Drums folder, and all have names ending in [Multi].)
UserTracks
UserTracks are an exciting new feature in Band-in-a-Box and allow anyone to create their own audio styles for use in Band-in-a-Box. With a UserTracks style, you can type in any chords into Band-in-a-Box, and the UserTracks style you made will play that chord progression! For example, if you have made a UserTracks style by recording yourself playing a guitar groove, you can then type any chords into Band-in-a-Box, and the result will be that it will play your guitar groove over these completely new, original chord changes! You can even change the tempo, or enter songs in ANY key, and it will still be able to play it!
You can make a UserTracks style in any digital audio workstation (or “DAW”), such as GarageBand, Logic, ProTools, or Reaper, and you do not need Band-in-a-Box to make the style (though you do need Band-in-a-Box to use the finished style).
You can also download backing tracks to record along with.
There is much more choice here, including a variety of different genres of music, and a variety of different tempos. Each one, however, will conform to either the Pop, Jazz, or Blues template. You do not NEED to use these backing tracks to make your style, but they can make the process easier.
Selecting UserTracks in Songs
You can use the UserTracks in a similar manner to using RealTracks.
|
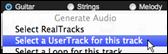
Right click (or double click) on the track button at the top of the screen and choose the Select a UserTrack for this track command from the menu. |
|
An alternative to the menu would be to select the track and then press the [UserTracks] button on the main screen. |
Now you will see the Pick a UserTracks dialog.
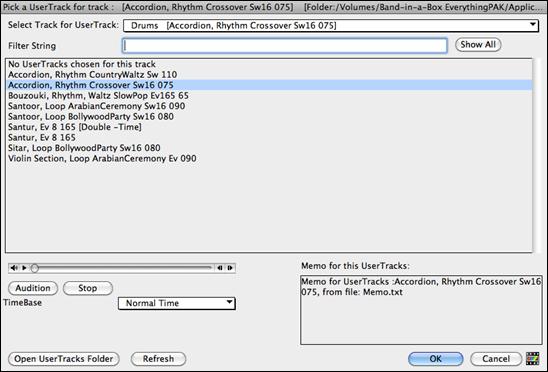
You can preview the selected UserTracks by double clicking on the list or using the transport control buttons.
|
You can select a timebase (normal, half-time, double-time, or triple-time) for any UserTracks. |

Select a UserTrack and press [OK].
You will then see the selected UserTrack listed on the Guitar Tracks on the Mixer.
![]()
|
Now the track behaves like other RealTracks. |
Adding new UserTracks
RealTracks are made by PG Music. UserTracks are made by you, or other Band-in-a-Box users. So, you will have a different list than displayed above. We include a small number of UserTracks with Band-in-a-Box package. There is a UserTracks forum in the PG Music forum, where users can notify others about their UserTracks creations, and share them if they choose to.
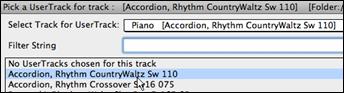
For example, if your friend makes a UserTracks of his accordion playing, and wants to give it to you...
- He can name it whatever he likes, and has called it “Accordion, Rhythm CountryWaltz Sw 110.”
- He has sent you a ZIP file of this folder.
- You will unzip it to your UserTracks folder.
A UserTracks consists of a single Folder, with the name of the UserTracks as the name of the folder. To add the UserTracks to your collection, you simply put the folder into your Applications/RealTracks/UserTracks folder.
Creating your own UserTracks
Creating your own UserTracks is a simple process! It consists of the following steps:
- Create a folder in the UserTracks folder (i.e. usually Applications/Band-in-a-Box/RealTracks/UserTracks) and let’s call it “Guitar, Acoustic, Brian Fingerpicking Ev 140.”
- Now, in that folder, you need to put at least one Band-in-a-Box song. This song can have any chords but should have a wide variety of chords and chord types. Let’s say you call that file MyGuitarPlaying1.sgu
- For each BB song that you put in the folder, there needs to be a corresponding audio file (WAV or AIFF) that matches the BB Song. So, the name must be MyGuitarPlaying1.wav or MyGuitarPlaying1.aiff. You can make that WAV file in any program, (Band-in-a-Box, RealBand, Sonar, Pro Tools etc.). It needs to have a 2-bar lead-in like BB songs always have, and of course it needs to be at the same tempo and be playing over the same chords as the BB file.
That’s it! You now have a folder that looks like this, and you are ready to use your UserTracks.

To use it, follow the same routine as described above, opening the Pick a UserTracks dialog, where you will now see your UserTracks listed with the others.

Now, you can leave it at that, or you can record more files, (i.e. more pairs of files with a Band-in-a-Box file and a corresponding wav file). These can be any other names. And you simply add them to the folder. Band-in-a-Box will automatically add these files to your UserTracks, simply by you putting them there.
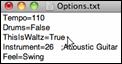
UserTracks support 3/4 waltz time signature.
Just make a UserTracks as normal and save the Band-in-a-Box song with your UserTracks in 3/4 waltz time signature (i.e. save using a waltz style). Make sure that the options.txt file in the folder says “ThisIsWaltz=true.”
|
|
You can find lots of help about making UserTracks on our website, and this page is a good start.
https://www.pgmusic.com/usertracks1.htm
UserTracks Tutorial
Part 1 - Making a basic UserTracks style
This tutorial will show you how to go about making a style, starting with the most basic, simple style that you can make, and then progressing to other ways to make your style even better, with more features and greater variety.
The easiest way to start is by using one of our pre-made templates. You can find templates in the /Applications/Band-in-a-Box/Data/TemplatesForUserTracks folder or download additional templates from pgmusic.com.
Each template contains .pdf chord charts and Band-in-a-Box files. The files are numbered PopSong_1_..., PopSong_2_..., etc. You do not NEED to use these backing tracks to make your style, but they can make the process easier. For the most basic UserTracks style you can make, you ONLY need to use Song_1. We will start off by showing you how to make a basic pop style.
The first thing you need to do is download and unzip the template, UserTracks_Template_Files.zip. Out of the files from that archive, you need to find and print PopSong_1_FirstSong.pdf. This is a 7-page chord chart. The next step is to set up your DAW with the tempo you want your UserTracks style to be at. You are now ready to record your part.
The first two bars are allotted as a count-in and will NOT be used in Band-in-a-Box, so your playing should begin in the DAW at bar 3. This will correspond to bar 1 in the chart. You can then record the song in full (punching in or doing retakes as much as you like or need). You will notice that the chart follows basic Pop progressions (examples: I-VIm-IV-V; I-V-VIm-IV; etc.), and that it is in the key of C for the first 80 bars, then switches to E for 80 bars, and then switches to G for 80 bars.
Once you have finished recording the entire chart, render the track you recorded to either a .wav or .aiff file. The two bars at the beginning for the count-in need to be in the final file.
Then, the audio file you made can be named whatever you like, for example: MyGuitarStyle.wav, AND, the Band-in-a-Box template file (it has a file extension .SGU) has to be saved with the exact same name, which would have to be: MyGuitarStyle.sgu). The only difference between the two names will be that your file ends with .aiff or .wav, and the Band-in-a-Box file ends with .sgu.
To use the style you made, the files need to be placed in a particular place in the Band-in-a-Box folder. If Band-in-a-Box was installed to /Applications/Band-in-a-Box, then the files need to be in a subfolder of /Applications/Band-in-a-Box/RealTracks/UserTracks. So, for example, if you wanted your UserTracks name to be “My First Guitar UserTracks style,” then the two files would go in /Applications/Band-in-a-Box/RealTracks/UserTracks/My First Guitar UserTracks style. (Note: It is the folder name that determines the name of the style as it appears in Band-in-a-Box, NOT the names of the individual wav/aiff/m4a/sgu files.)
Once this is done, the style is now available for you to use in Band-in-a-Box!
Part 2 - Adding to your basic style by recording more material.
Once you have the basic style done from Part 1 of this tutorial, you may find that you want to add more material to make your style even better. There are several reasons for this. To start with, that first basic template has a limited number of chord types. For example, the first song of the pop template only uses major or minor triads. Another reason is that certain features will not work with only the first song recorded. Endings of songs, for example, will stop at the right time, but you won’t have dedicated recorded endings. The final reason you may want to record more material is simply to have more variety in your song. With only the first song recorded, when you use the style you may notice certain licks repeating. The more material you record, the less likely it is that you’ll notice that kind of repetition when the style is used.
So, we have specific templates set up to address these different issues. So, you are free to record some or all the additional templates. You can pick and choose if there are certain issues that are more important to you and your style, or you can record all of them to make sure your style can handle ANY musical situation!
For all the additional templates, the method of recording them is exactly the same as with the first song.
When the recordings are finished, again you simply need to render your recorded track to wav or aiff, save it in the /Applications/Band-in-a-Box/RealTracks/UserTracks folder in the same location as the song1 file, and give it a unique name, which needs to be the same name as the corresponding Band-in-a-Box .sgu file.
When this is done, when the UserTracks style is used in Band-in-a-Box, all additional material you put in that folder will now be part of the style! For most of the additional templates, the method is EXACTLY the same as it was for recording song1.
You can find lots of help about making UserTracks on our website, and this page is a good start.
https://www.pgmusic.com/usertracks1.htm
Audio Controls for RealTracks and RealDrums

Tone
The RealTracks bass/treble tone control adjusts the bass/treble EQ for any RealTrack.
|
Choose an instrument (bass/drums/piano/guitar/strings/melody) and then use the “TONE” control to adjust the tone from -18 (maximum bass) to +18 (maximum treble). Default is 0. The settings are saved with the song. |
Audio Reverb
|
There is a Reverb control for individual tracks with RealTracks or RealDrums, so you can easily add reverb (0 to 127) for any RealTrack. Reverb type is also settable and saved with the song. |
Auto-Add Reverb
There is also a feature that automatically adds reverb to RealTracks, according to instrument type. (No Reverb is added to Bass for example, but most instruments get reverb.) This feature defaults to on, but you can turn it off in RealTracks Settings or Reverb Settings dialog.
![]() If you just want more or less added, you can adjust the “Strength %.” For example, the default adds a reverb of 40 to most tracks, but if you set the strength to 75%, then 30 will get added.
If you just want more or less added, you can adjust the “Strength %.” For example, the default adds a reverb of 40 to most tracks, but if you set the strength to 75%, then 30 will get added.
Reverb Settings
You can also set the type of reverb. The default is a “room” type of reverb. To do this, go to menu Windows | Revert Window, and adjust the various parameters in the Reverb Settings dialog.
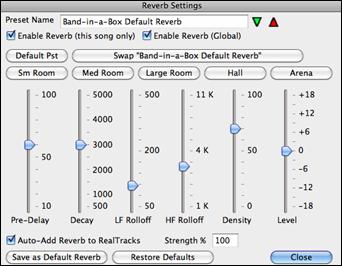
![]() Reverb can be enabled/disabled globally for all songs, in which case the setting will still appear, but no reverb will be applied. Or you can enable/disable the audio reverb for the current song only. This will save some CPU cycles if you are using a slower machine.
Reverb can be enabled/disabled globally for all songs, in which case the setting will still appear, but no reverb will be applied. Or you can enable/disable the audio reverb for the current song only. This will save some CPU cycles if you are using a slower machine.
![]() Click on the green Select a Preset button to open the list of presets. This list will show only the “Band-in-a-Box Default Reverb” until you save some presets of your own.
Click on the green Select a Preset button to open the list of presets. This list will show only the “Band-in-a-Box Default Reverb” until you save some presets of your own.
![]() As you adjust the settings, they will be applied to the current song. The [Swap “Default”] button toggles between your current settings and the default settings. This allows you to hear the effect of the changes you make to the settings.
As you adjust the settings, they will be applied to the current song. The [Swap “Default”] button toggles between your current settings and the default settings. This allows you to hear the effect of the changes you make to the settings.
![]()
Use the row of “room” buttons to load typical settings for different types of spaces. These buttons are a convenient way either to apply a particular effect or to load settings that you can then tweak to make your own preset.
Reverb Parameters
Pre-Delay is the time delay of first reflections.
Decay is the time it takes for reverb to decay. Reverb time is measured as RT60, the time it takes for reverb to decay to a level -60 dB below the dry signal level.
LF Rolloff gradually reduces the bass frequencies. If you can’t add enough reverb because the sound gets too muddy, try increasing the LF Rolloff slider. It is adjustable between 50 Hz and 500 Hz.
HF Rolloff is the rate at which the high frequencies die away as the reverb decays. Rooms with hard surfaces are typically bright, but rooms with soft surfaces are usually darker. It is adjustable between 1 KHz (dark) to 11 KHz (bright).
Density is the density of low-level echoes near the end of the reverb tail. High Density settings add a sheen to the sound.
Level adjusts the final level of the plug-in.
Typical Reverb Settings
- A large hall might have long Pre-Delay, long Decay, and moderate Density.
- A hard large space, such as a gymnasium, might have long Pre-Delay, high Density and high HF Rolloff.
- A soft large space, such as a concert hall with carpet, padded seats, hangings, might have medium Density and low HF Rolloff.
- A small hard space, such as a tile washroom, might have short Pre-Delay, medium-to-long Decay, high Density, and high HF Rolloff.
- A small soft space, such as a large living room, might have short Pre-Delay, short Decay, medium-to-low Density, and low HF Rolloff.
Saving Settings to Presets
You can save your reverb types as presets, and the current settings will be saved with the song in a Preferences/PGReverbSettings.bin file.
To save the current settings to a preset, type in a name for your preset in the “Preset Name” field.
![]()
![]() Then click on the red Save a Preset arrow and choose a location in the Preset list. You can write over an existing name.
Then click on the red Save a Preset arrow and choose a location in the Preset list. You can write over an existing name.
![]()
A prompt will ask you to confirm that you want to save the preset.
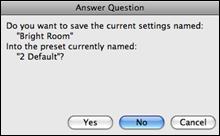
Select [Yes] to save the new preset to the chosen location.
![]() Enable “Auto-Add Reverb to RealTracks” to automatically apply preset amounts of reverb to RealTracks according to the instrument type. No reverb is added to the Bass part, for example, but most instruments get reverb.
Enable “Auto-Add Reverb to RealTracks” to automatically apply preset amounts of reverb to RealTracks according to the instrument type. No reverb is added to the Bass part, for example, but most instruments get reverb.
If you just want more or less reverb added overall, you can adjust the “Strength %.” For example, the default Band-in-a-Box reverb setting is 40 for most tracks. If you set the strength to 75%, the Band-in-a-Box becomes 30.
![]() You can save the current settings as the Default Reverb.
You can save the current settings as the Default Reverb.
![]() Click on [Restore Defaults] to go back to the original “factory” reverb settings for Band-in-a-Box Default Reverb.
Click on [Restore Defaults] to go back to the original “factory” reverb settings for Band-in-a-Box Default Reverb.
Unconditional 30-Day Money Back Guarantee on all products purchased from PG Music Inc.
PG Music Inc.
29 Cadillac Ave Victoria BC Canada V8Z 1T3
Sales: 800-268-6272, 250-475-2874,+ 800-4746-8742*
* Outside USA & Canada where International Freephone service is available.
Access Codes
Tech Support: Live Chat, support@pgmusic.com
 Online now
Need Help?
Customer Sales & Support
|
Phones (Pacific Time) 1-800-268-6272 1-250-475-2874 |
||
| Live Chat | ||
| OPEN | Online Ordering 24/7 |
|
| OPEN | Forums, email, web support |