
Search Manual
RealBand® 2024 for Windows® User’s Guide
Chapter 5: Using MIDI Features
Overview
RealBand is a full-featured MIDI sequencer for Windows with the added ability to create automatic accompaniments in its BB Tracks. If you want to know how to create MIDI tracks and BB Tracks please see the BB Tracks and MIDI tracks chapter. This chapter has instructions for using the many powerful MIDI features in RealBand.
Record and edit music for playback through your sound card or MIDI synthesizer as configured in the MIDI Driver Setup. MIDI music can be displayed in standard music notation on the screen, and also with the on-screen piano keyboard or guitar fretboard. RealBand MIDI sequences are saved in its native sequence file format with the file extension .SEQ. RealBand also includes full support for saving, playing, and editing Standard MIDI files (*.MID) and Karaoke files (*.KAR).
Using DXi and VSTi Synthesizers
DXi and VSTi software synthesizers allow RealBand to play high quality sounds directly through your computer’s sound system without external MIDI hardware. Connecting RealBand to the software synth as a plug-in has several advantages over connecting as a MIDI driver.
The plug-in allows RealBand to merge/sync in any existing audio file (vocals etc.) with the synth output. You can also directly render your performance to a .WAV file using the DXi or VSTi plug-in.
To use DXi/VSTi soft synths with RealBand, you can think of them as a type of “MIDI Output Driver.”

You can either visit the MIDI Driver Setup dialog (Options | Preferences | [MIDI] tab | [MIDI Devices] button) and select the “Re-Route MIDI Playback to Default DXi Synth” checkbox to send all MIDI playback to the default DXi synth, or you can assign DXi synths to individual tracks with the option to set all MIDI tracks to the same port.
![]()
![]()
Routing to Default DXi/VSTi Synth
The Default DXi/VSTi Synth: combo box lets you select which DXi or VSTi synth is used as the default DXi synth.
The Re-Route MIDI Playback to Default DXi/VSTi Synth setting will cause RealBand to re-route all MIDI playback to the Default DXi/VSTi synth. This is the easiest way to use a DXi or VSTi softsynth for playback. If this option is checked, then all MIDI playback output will be routed to the default DXi/VSTi synth regardless of the MIDI track’s port number.
Assigning DXi or VSTi Synths to Tracks
To assign a DXi/VSTi synth to a particular MIDI track, select the track in the Tracks window and then click on the Disclosure Triangle.
![]()
![]() The Disclosure Triangle will reveal more information about a track by making the track row height taller.
The Disclosure Triangle will reveal more information about a track by making the track row height taller.

The [Edit DXi] button launches the DirectX/VST Window.

In the DirectX/VST Window you can select the type of DXi/VSTi softsynth to use and also see a control panel display of the softsynth that allows you to make settings directly for your DXi or VSTi synth.
The settings panel that opens is either for the default DXi synth (16th DXi synth slot which is MIDI port 32) or the current DXi port number if the track is set to a valid DXi port (17-32).
![]()
The DXi/VSTi softsynth will convert the MIDI information to audio, which RealBand will play back through your sound card to audio speakers.
Rendering Songs to Audio with DXi/VSTi
Rendering songs to audio in RealBand is much easier if the MIDI tracks are using a DXi (or VSTi) synth.
Rendering DXi MIDI tracks to audio is as simple as selecting the Render | Merge Audio and DXi Tracks to Stereo Wave File menu command. You will be prompted for a wave file name, and then RealBand will render to the .WAV file. It’s as simple as that.
Remember that audio tracks will also be rendered, so if you only want to render MIDI, then be sure to mute all audio tracks first.

Rendering Individual Tracks to Audio
Right-click in the Tracks window to access these audio rendering commands.

Auto Convert Individual MIDI Track to WAV File
Choose this command to convert any MIDI track to a .WAV file. RealBand will automatically render using a DXi or VSTi synth. WAV files can be exported to other sequencers or Windows Media Player.
Auto Convert Individual MIDI Track to Audio Track
It is easy to convert any MIDI track to an audio track. RealBand will automatically render using a DXi or VSTi synth and import the audio into the first available track in the Tracks window.
Loading and Playing Songs
Loading a Song
To load in a new song, choose File | Open. You will then see a list of files available for use with the program.
To see the custom Open dialog, go to Options | Preferences(Ctrl+F5) and select the checkbox for “Long File Names use custom open/save dialog.”
![]()
This lets you use a more advanced custom file dialog.
This dialog lets you choose a font, and it will remember the dialog’s window size and placement along with the currently selected font. It also has a tree button that lets you view the directory structure, and a button that lets you choose between details mode and list mode. RealBand will remember these settings the next time you load or save a file using the custom file dialog.

The font selection button lets you use any font on your system for the file dialog, in your choice of font size and style. |
|
|
The find button in the custom Open dialog lets you search for a file within the current folder, useful when a folder has many files. |
|
The favorite folders button in the custom Open dialog will let you quickly change the current folder by selecting from a list of “favorite” folders. |
RealBand will remember up to 25 folders from which you had previously loaded files. You can quickly select a folder and instantly go there without having to navigate through the Windows tree structure.
|
Let’s load in the demo song I Said It Before. The file name is i_said.seq. Open the song as you would any file, either with a double mouse click on the file name or by selecting the file name in the dialog and then clicking on the [Open] button. |
The song title and file name appear in the status bar at the top of the screen.
|
The song’s time signature and key signature are seen below the song title and directly above the on-screen piano keyboard. |
|
The song tempo is seen to the right of the time signature and key signature. Click in the tempo field to open the Tempo dialog and type in the tempo in beats-per-minute (bpm). |
Use the up/down scroll arrows to change the tempo without typing it in again, or click the [-] button four times in tempo and RealBand will set its tempo to the four beats (three for a waltz) that you just tapped.
If you click the [=] button four times it will set the tempo and start the song playing. You can also use the minus and equals keys on the computer keyboard to do this.
Use the square bracket [ ] keys to change the tempo by +/- 5 bpm.
Precise “Floating Point” Tempos
RealBand supports precise floating-point tempos, such as 120.514 BPM. This makes it easier to sync MIDI tracks to prerecorded audio tracks if the audio tracks weren’t recorded exactly at an integer tempo. This also is what lets RealBand play a song in sync to an existing audio track after the Audio Chord Wizard has worked its magic.
Chord Wizard
|
The Chord Wizard is located in the Chords window, which opens with the [C7] toolbar button. Right-click anywhere in the window to open the MIDI Chord Wizard menu. |

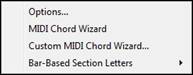
If you choose MIDI Chord Wizard, RealBand will attempt to automatically detect the chords in the song. You can use the Undo command if you want to undo this.
The Custom Chord Wizard command works the same as the MIDI Chord Wizard command except that it launches the Chord Wizard dialog, which lets you customize the settings for chord detection.

The Options menu item launches the Chords Window Options dialog.
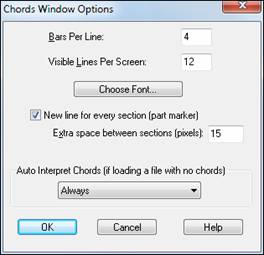
The “Bars Per Line” setting determines how many measures will be drawn per line in the Chords window.
The “Visible Lines Per Screen:” setting determines how many lines (rows) of chords are will be visible per screen. Each screen will always have 125 lines per screen in the Chords window, but the Visible Lines Per Screen setting controls how many lines will be visible without scrolling.
The [Choose Font…] button lets you select a font for the Chords window. The font’s overall size will be determined by the amount of Visible Lines Per Screen, as well as the height of the Chords window.
The “Auto-Interpret Chords” setting is useful in a situation where a file is loaded, but the file doesn’t already contain any chord symbols. If you set this to “Always,” then RealBand will always attempt to automatically interpret the chord symbols using the Chord Wizard. If set to “Ask First,” then RealBand will ask before attempting to automatically interpret chord symbols. If set to “Never,” then RealBand will just load the file without attempting to figure out the Chord Symbols.
Audio Chord Wizard
|
The Audio Chord Wizard is an extremely powerful feature that automatically finds chord symbols (C, Fm7 etc.) by analyzing the audio content of a song and displays them in a chord sheet window. |
The song can be in a digital file format (MP3, WAV, WMA, or CD audio file), one that you created in RealBand, or directly loaded from a CD.
In addition to the chords, the Audio Chord Wizard also automatically determines the bar lines and a Tempo map.
![]() The Audio Chord Wizard imports chord symbols it finds into the Chords window.
The Audio Chord Wizard imports chord symbols it finds into the Chords window.
Use this feature to instantly play along to your favorite songs, by reading and printing the chord symbols.
Playing a Song
![]()
Use the familiar control buttons to Record, Play, Rewind to the start, Fast Forward to the end, and Stop song playback. Playback can be stopped and started anywhere in the song.
The fast-forward and rewind buttons jump to either the end or the beginning of the song. The red circle indicates the Record button for recording MIDI tracks, the red circle with a waveform is for recording audio.
Auto Rewind
Auto Rewind is found in the Options menu. When enabled, RealBand will automatically rewind to the location that playback or recording was started. The choices are Recording Only, Playback Only, Both Recording and Playback, or Disabled.

Soloing Tracks
|
You can solo any track or any combination of tracks by pressing the Solo button on the Tracks window toolbar. The track selection can be changed while the song is playing. Select multiple tracks by holding down the Shift key and clicking on the track numbers. |
Song Location
![]() Use the slider on the main toolbar to jump to a new song location.
Use the slider on the main toolbar to jump to a new song location.
![]()
This shows the current location in the song file. The Now: location is in bars, beats, and MIDI clock ticks according to the current resolution setting, which could range from 48 to 3840 system clock ticks per quarter note (ppq).
![]()
The From: and Thru: locations define the range of bars and beats that will be affected by the various Edit menu operations. The settings are made in the Block menu, or by selecting a range of bars in the Bars window, the Audio Edit Window window, or the track overview in theTracks window.
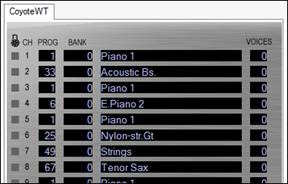
RealBand defaults to showing the Tracks window. Each row in the Tracks window represents a different track of the song.
Conductor Window
“Conductor”- Live Looping/Playback Control
As the song is playing, there are options to control the flow of playback by one of three methods:
1. Conductor window
2. QWERTY hot keys
3. MIDI keyboard
|
The Conductor is launched with the Conductor button on the toolbar. |

![]() You must enable the QWERTY keys to be active for the Conductor during playback. This is done by selecting the “Enable Control by QWERTY keys” checkbox on the Conductor Window.
You must enable the QWERTY keys to be active for the Conductor during playback. This is done by selecting the “Enable Control by QWERTY keys” checkbox on the Conductor Window.

If you want to control the Conductor using the MIDI keyboard, you need to enable this by selecting the checkbox “Enable control by MIDI keyboard.” in the MIDI keyboard control box. When this setting is enabled, any MIDI input will be interpreted as a hot key for the Conductor, and you won’t hear MIDI thru.
![]()
If you’d like the ability to switch your MIDI keyboard between Conductor mode and regular playing mode, you can do this using the lowest “A-natural” MIDI note on your keyboard. This is A1 on an 88-note keyboard. Note A1 will turn the Conductor off, Bb1 turns it on, and B1 will toggle the Conductor on only when the Bb1 note is held down. If you don’t have an 88-note keyboard, you can set the octave setting to a number higher than 1, for example if you set it to “3,” then notes A3/Bb3/B3 will turn the Conductor Off/On/Toggled.
Using the Conductor QWERTY or MIDI keys, you can:
- Define and jump to up to 10 user defined sections in the song,
- Jump back 1 bar/4 bars/# of bars/screen/part/chorus/section,
- Jump ahead 1 bar/4 bars/# of bars/screen/part/chorus/section,
- Loop 1 bar/4 bars/# of bars/screen/part/chorus/section,<
- Pause/stop the song.
In addition, using the MIDI keyboard, you can also use the Conductor to:
A1 (note#21): Turn MIDI Conductor OFF
Bb1: Turn MIDI Conductor ON<
B1: Turn MIDI Conductor ON only as note is held down
The various functions of the Conductor are available with MIDI keys and QWERTY hot keys, as listed in the Wizards, Tools, and Plug-Ins chapter.
Customizing the Sections
Sections: This allows you to define up to 10 points in the song that are sections. By default, the following sections are defined for each song.
- Section 1: Start of song
- Section 2: Intro
- Section 3: First Chorus
- Section 4 :Middle Chorus (i.e. start of chorus #2)
- Section 5: Last Chorus
- Section 6: Ending
- Sections 7-10 are user definable. To do this, type in any bar # using the bar/chorus format (e.g. 21/2 would be bar 21, chorus 2).
If you prefer to enter custom values for the section numbers, you can do this if you check the “custom” checkbox, and then type in up to 10 bar numbers for each section.

The section numbers are saved with the song. Once you have defined the sections, you can jump to a certain section of the song as the song is playing, simply by:
1. Pressing the 1-9 or 0 key on the QWERTY keyboard or,
2. Opening the Conductor window (~ hot key) and clicking on the section button or,
3. Pressing MIDI keys 77-86 (F6 to D7) corresponding to sections 1-10.
Mode (when to do the action)
By pressing a QWERTY hot key prior to an action, you can control when the action will take place. If no mode hot key is pressed prior to an action, the default mode will occur.

The default is set in the “Default Mode for section change” or “Default Mode for going back or ahead” combo box.
For example, by default, the section change will occur as soon as you press the key, and it will go to the equivalent place in the bar immediately before the beginning of the target section (so that the music stays in time, and the next section begins at the end of the bar). But you can change the default for the action to take place at the end of the current bar or current part marker etc.

Play Control Buttons
![]() This plays the song. Hot key = F4, MIDI note = F4.
This plays the song. Hot key = F4, MIDI note = F4.
![]() This stops playback. Hot key = Esc, MIDI note = F#4.
This stops playback. Hot key = Esc, MIDI note = F#4.
Example uses of the Conductor:
In this example, we don’t have custom sections set, so the default sections apply (middle chorus = section 4 etc.).
- Jump to the start of middle choruses during playback (press “4”).
- Loop the middle chorus (press S, which is Loop Section).
- Jump to the end of the song (press 6 ).
- Go back 1 chorus (Ctrl+A).
- Go ahead 1 chorus (Shift+A).
At the end of the current chorus, go back 1 section, press Y then Ctrl+S.
These actions can also be done with the MIDI keyboard. See the section on Conductor Functions with MIDI and QWERTY Hot Keys in the Wizards, Tools, and Plug-Ins chapter.
Unconditional 30-Day Money Back Guarantee on all products purchased from PG Music Inc.
PG Music Inc.
29 Cadillac Ave Victoria BC Canada V8Z 1T3
Sales: 800-268-6272, 250-475-2874,+ 800-4746-8742*
* Outside USA & Canada where International Freephone service is available.
Access Codes
Tech Support: Live Chat, support@pgmusic.com
 Online now
Need Help?
Customer Sales & Support
|
Phones (Pacific Time) 1-800-268-6272 1-250-475-2874 |
||
| Live Chat | ||
| OPEN | Online Ordering 24/7 |
|
| OPEN | Forums, email, web support |