
Search Manual
RealBand® 2024 for Windows® New Features Guide
Details of New Features
Let’s take a closer look at the great new features in RealBand 2024!
256 available tracks
RealBand now has 256 tracks instead of the previous maximum of 48 tracks.

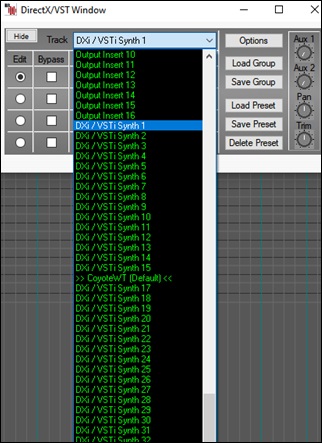
32 VSTi/DXi synth instances
There are now 32 available VSTi/DXi synth instances instead of 16.
Arrow buttons to change the current time
The new up/down arrows next to the time indicator on the tool bar will increase/decrease the current time by 1 tick.
![]()
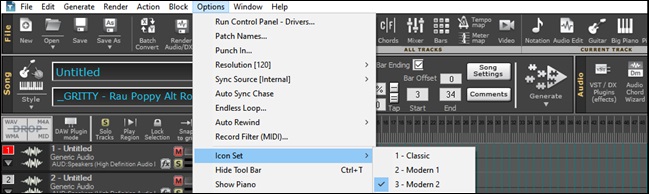
Modern color scheme for some windows
The following windows now have a more modern color scheme that matches the modern toolbar icon sets:
- Tracks Window
- Mixer Window
- Audio Edit Window
To use a modern color scheme, go to Options | Icon Set and select Modern.
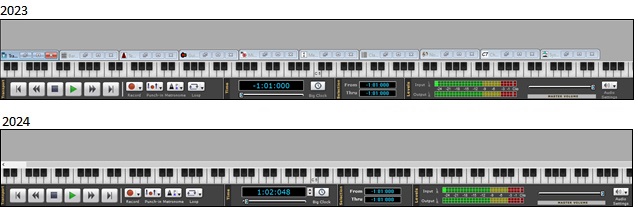
Icons for unused non-floating windows hidden
The icons for non-floating windows that were redundant and took up space at the bottom of the area are now hidden from view.
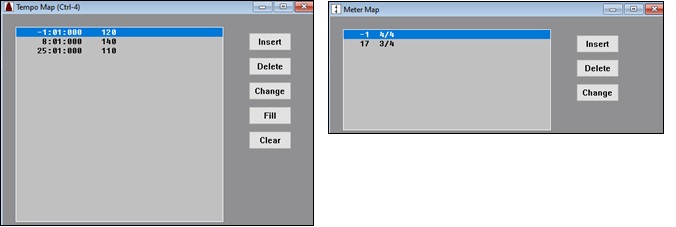
Darker look some windows
Some windows like Meter Map, Tempo Map, Sysex, etc. have a moderately darker look.
Playable RealDrums support
Playable RealDrums are now supported by linking a RealChart track (or any MIDI track) with an audio track containing a RealDrum.
Open the Notation window, display the RealChart track, and press the [PT] button and select Enable Playable Tracks from the menu.
![[PT] button menu in the Notation Window](images/2/rb2024up_008_1.jpg)
A dialog will then open and let you select either an existing RealDrums track or a blank track to link to the current notation track. If you select a blank track, then you will have a chance to generate a new RealDrums track.
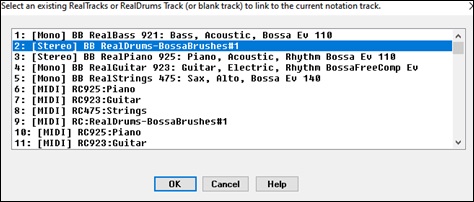
![]() The selected RealDrums track is then linked to the current notation track, and the [PT] button gets the green borders to indicate that you are in the playable track mode. You can now add playable drum notes by clicking on the Editable or Staff Roll Notation Window.
The selected RealDrums track is then linked to the current notation track, and the [PT] button gets the green borders to indicate that you are in the playable track mode. You can now add playable drum notes by clicking on the Editable or Staff Roll Notation Window.
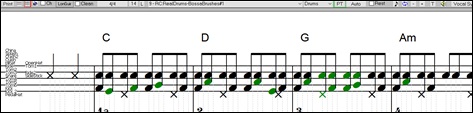
The notes you have entered show in green and will be heard during playback along with the RealDrums audio. But you would want to have your own notes play in place of the RealDrums audio. So, press the [PT] button, select Create Mute Region to mute generated accompaniments from the menu and select the region./p>
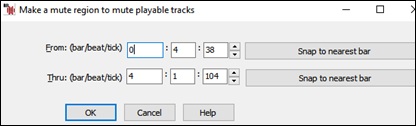
This will add a green label at the top for the selected region. When you play the song, the RealDrums audio in this region won't be heard, but the green notes you have entered will be heard.
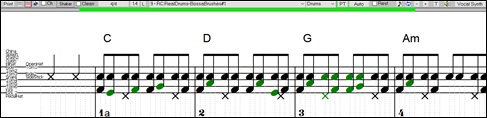
There is also a feature to change the non-playable notes in a region to playable notes. To do this, select the notes, click on the [PT] button to, and select Make notes in selected area playable notes from the menu. The selected notes will then become green and be heard during playback. This menu also has options to change the playable notes to non-playable notes, set MIDI volume of playable notes, choose a different Hi-Q patch, etc.
![[PT] button menu](images/2/rb2024up_008_7.jpg)
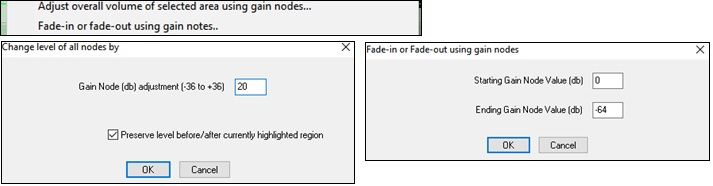
New commands in the right-click menu of the Tracks Window to adjust volume
The two new commands in the right-click menu of the Tracks Window allow you to:
- Increase or decrease the volume of the selected area of a track by using gain nodes, but without having to manually enter them in the gain node area of the track.
- Fade-in or Fade-out a section using gain nodes, without having to manually enter them in the gain node area of the track.
Chord symbols displayed in the Tracks Window
The Time Line at the top of the Tracks Window will show chord symbols for regular chords (non-MicroChords).

Play region even if the track is muted
Holding the Alt key while pressing the [Play Region] button in the Tracks Window will play the selected area of the current track regardless of whether the track was muted or not.

Copy/Move highlighted area of current track to another track
There is a new "Copy/Move highlighted area of current track to another track" command in the right-click menu of the Tracks Window. It makes it easier for "comping" which is to create a track that is a composite of different takes/tracks. It's a quick way to move/copy to a destination track without having to first cut/copy and then paste.

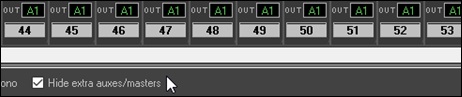
Up to 48 tracks to display in the Mixer
The Mixer can now display up to 48 tracks at a time instead of 24, if the computer monitor resolution supports it.

Hide extra auxes/masters in the Mixer
The "Hide extra auxes/masters" checkbox in the Mixer Window, when checked, will automatically hide any extra masters or auxes beyond the highest used master and highest used aux.
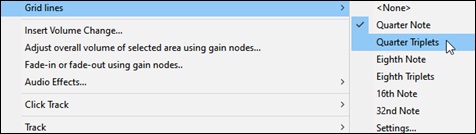
Checkmark displayed on the current grid lines submenu item
The Grid lines submenu in the right-click menu of the Tracks Window and Audio Edit Window will now display a checkmark on the menu item of the current setting.
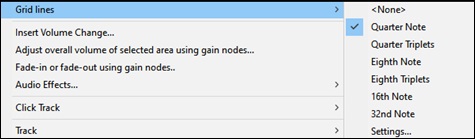
Quarter Triplets setting added to Grid Lines submenu in the Tracks Window right-click menu
The Quarter Triplets setting is added to the Grid Lines submenu in the Tracks Window right-click menu and the Audio Edit Window right-click menu.
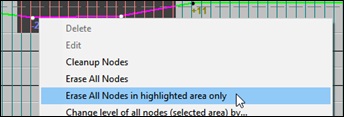
Erase all nodes in highlighted area
The right-click menu that pops up when you click on the nodes area in the Tracks Window has a new command to erase all the gain nodes in the highlighted area.
Improved handling of VU levels in overview section of the Tracks Window
VU levels displayed in the overview section of the Tracks Window now better handle the situation of recording multiple tracks of audio simultaneously. RealBand will now display the correct VU levels for higher tracks within a group of tracks being recorded at the same time, rather than always displaying the same VU levels for higher tracks as the first track in the group of tracks being recorded.

Multi-input audio recording is not implemented for Windows Audio. Multi-input audio recording is implemented in RealBand for MME, but this isn’t recommended because of the higher latency and being less reliable for multi-input recording than ASIO.
Better VU levels display when recording to mono tracks
When recording to mono tracks, the VU levels shown in the overview section of the Tracks Window during recording will be the specific VU levels for the input channel of the track being recorded. Also, if L+R is selected as the “Input Channel for Mono Tracks” in audio settings, and you are recording a group of tracks at the same time (e.g., multiple inputs ports selected in ASIO Drivers dialog), then each track in the group of tracks being recorded will have the correct VU levels shown for its specific input channel (either left or right channel) in the overview section of the Tracks Window.

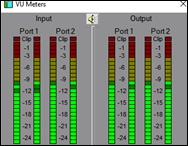
Input and output for all ports displaed in VU Meters window
The floating VU Meters window will display the input and output for all ports that were selected in the Audio Drivers dialog and not just for Input 1 and Output 1.
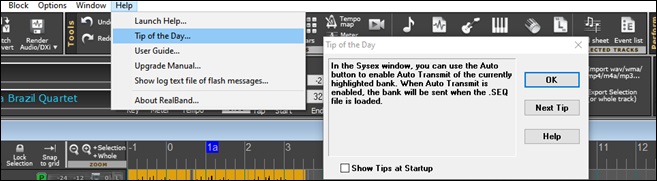
Floating Tip of the Day window
Tip of the Day is now a floating window that can stay on screen rather than a modal dialog.
Audio waveform or MIDI overview shown during dragging a section
When dragging a section of audio or MIDI within the Tracks Window or a section of audio within the Audio Edit Window, you’ll see either the audio waveform or MIDI overview during dragging rather than just a rectangle during dragging.

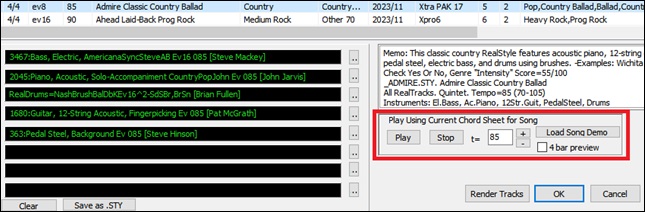
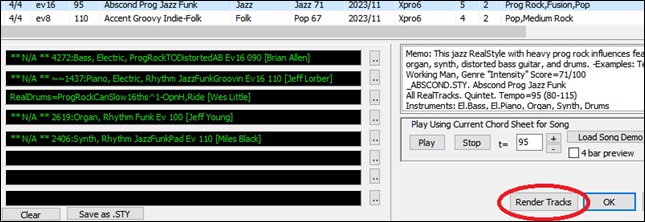
Song preview in StylePicker
In the StylePicker, you can now preview the chords of the song that were entered in RealBand. To do this, enter a chord progression on the Chord Sheet and open the StylePicker window. Then, select a style and press the [Play] button in the “Play Current Chord Sheet” area. This will play the chords in your song using the selected style. You can change the tempo by entering a number in the “t=” field or using the [+][-] buttons. The [Stop] button stops the playback.
Render button in StylePicker to initiate generation of track
You can now initiate generation of tracks from the StylePicker by pressing a render button, and then when you exit the StylePicker RealBand will generate the tracks in RealBand.
Select a style and press the [Render Tracks] button in the StylePicker window.
This will open a small panel where you can select tracks types that you want RealBand to generate.
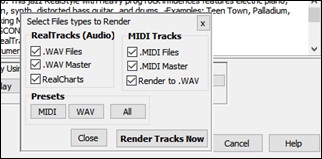
When you press the [Render Tracks Now] button in this panel, RealBand will generate tracks for your song.
Hi-Q patch loaded for MIDI SuperTracks
RealBand loads an Hi-Q patch if it exists when generating a MIDI SuperTrack.
Open the Select MIDI SuperTracks dialog with the Generate MIDI SuperTrack menu item in the [Generate] toolbar button, select a MIDI SuperTrack and press OK.

This will generate a MIDI SuperTrack and load a Hi-Q patch. If you press the [fx] button on the track overview and open the Direct/VST Window, you can see that the Hi-Q patch and a MIDI synth (e.g., sforzando) are loaded.

Thank you for taking time to read this introduction to RealBand 2024!
Unconditional 30-Day Money Back Guarantee on all products purchased from PG Music Inc.
PG Music Inc.
29 Cadillac Ave Victoria BC Canada V8Z 1T3
Sales: 800-268-6272, 250-475-2874,+ 800-4746-8742*
* Outside USA & Canada where International Freephone service is available.
Access Codes
Tech Support: Live Chat, support@pgmusic.com
 Online now
Need Help?
Customer Sales & Support
|
Phones (Pacific Time) 1-800-268-6272 1-250-475-2874 |
||
| Live Chat | ||
| OPEN | Online Ordering 24/7 |
|
| OPEN | Forums, email, web support |