
Search Manual
Band-in-a-Box® 2022 for Mac® Upgrade Manual
Chapter 3: GuickStart Tutorial
Let’s take a close look at the great new features in Band-in-a-Box 2022!
All Tracks Equal
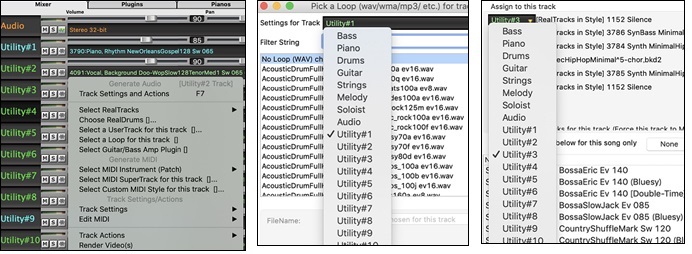
Now all the 24 tracks (8 main tracks and 16 Utility tracks) have the same capabilities. You can generate RealTracks, RealDrums, Loops, etc. on any track. Styles can be made using up to 24 tracks. You can edit audio on any track, not just Audio and Utility tracks. Songs are saved with a very small file size as only the instructions to generate the audio need to be saved.
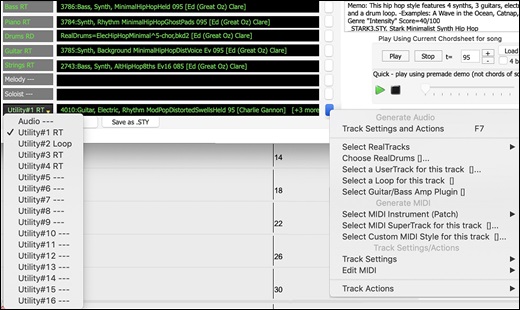
For example, when you click on a Utility track label in the Mixer, you will see a menu with settings and actions, which has always shown for the main tracks, so you can use it to generate RealTracks, RealDrums, MIDI SuperTracks, Loops, etc. on the Utility track. Also, in various track generation dialogs (RealTracks Picker, Loops Picker, MIDI SuperTracks Picker, etc.) the track selector now includes all 24 tracks to allow you to select any track within the dialog..
To make a style with up to 24 tracks, launch the StyleMaker and press the [Settings] button on its toolbar.
![]()
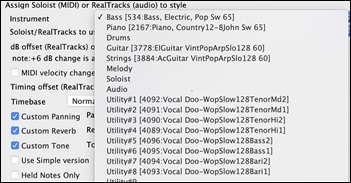
Then, in the Miscellaneous Style Settings dialog, select a Soloist or RealTracks for each of the tracks you need in the “Assign Soloist (MIDI) or RealTracks (audio) to style” area.
You can edit audio on any track.
Previously, when you generated RealTracks on Utility tracks, Band-in-a-Box created very large audio .WAV files. So, if you made a lot of songs with Utility tracks, it took up too much of your hard drive space, and this often made it complicated to organize your files. Now, the Utility tracks work the same way as the main tracks have always worked, so Band-in-a-Box won't create audio files and instead point to the source material. This is called wave instructions, in which Band-in-a-Box saves a list of different parts of the source material. Those instructions are tiny and they are saved in the small Band-in-a-Box song file (.MGU/.SGU).
![]()
Playable RealTracks
This cool feature allows you to add MIDI notes (via the Piano Roll window) to the same RealTrack that is playing. And you will then hear that MIDI track playing, in most cases using a MIDI sound created from the RealTracks recording session. This means you can get the RealTracks to play the notes you want at key parts of the performance, either augmenting or replacing what the RealTracks is playing, for the section you want to change.
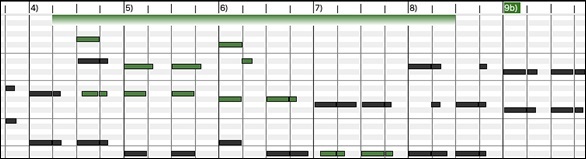
When you open the Piano Roll or Notation window for a RealTracks track, the notes you see are RealCharts, which are silent MIDI. You can see them, but they don’t actually play during playback. With the Playable RealTracks feature, you can make some of these notes playable. 
![]() To enter notes in the Piano Roll window, press the [Playable RealTracks] button on its toolbar.
To enter notes in the Piano Roll window, press the [Playable RealTracks] button on its toolbar.
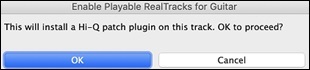
You will then see a message to confirm that a Hi-Q patch plugin will be installed on the track. Press OK to proceed.
![]() Now, the button gets the green borders to indicate that you are in the Playable RealTracks mode. In this mode, any note you enter will be heard during playback unlike RealCharts notes.
Now, the button gets the green borders to indicate that you are in the Playable RealTracks mode. In this mode, any note you enter will be heard during playback unlike RealCharts notes.
You can enter a note by holding the shift+command keys and clicking where you want to add a note. A note will be entered with the duration selected in the “Dur” drop-down menu. It will snap to the nearest grid boundary if the “Snap” setting is enabled. After you have entered a note, you can change its location by dragging it.

The notes you have entered show in green and will be heard during playback along with the RealTrack audio. But you would want to have your own notes play in place of the RealTrack audio. So, right-click on the window and select Create Mute Region to mute RealTracks from the contextual menu. This will add a green label at the top that says “Mute RealTrack Audio.” You can extend it by dragging horizontally. When you play the song, the RealTrack audio in this region won’t be heard, but the green notes you have entered will be heard. If you regenerate the RealTrack, it will be outside of this is region.
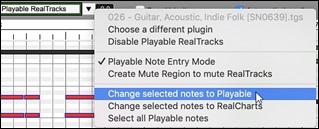
There is also a feature to change the RealChart notes in a region to Playable notes. Select the notes, click on the arrow button to the right of the [Playable RealTracks] button, and select Change selected notes to Playable from the drop-down menu. The selected notes will then become green and be heard during playback.
|
This drop-down menu also has options to change the selected notes to RealCharts notes, select all Playable notes, choose a different Hi-Q patch, etc. |
![]() You can also set volume for the Playable RealTracks notes with the control area to the right of the arrow button.
You can also set volume for the Playable RealTracks notes with the control area to the right of the arrow button.
There are many possibilities you can do with the Playable RealTracks feature. For example, the MIDI version of a pedal steel does not sound realistic, but if you add some pitch bends events, it will sound much bette.!
MultiRiff
This is interactive regeneration of section of RealTracks on any tracks, allowing a “multi-riff” like selection from up to 20 candidates that you could choose from. Audition RealTracks riffs for a section of a track, and select the one you want, either replacing or merging with existing RealTracks audio. And the saved files are tiny (no WAV files involved). Now you can have fun choosing what gets played for the RealTracks, and merge, replace or add your selected riffs to your tracks. This can add life to old tracks, by improving sections that had problems to a better riff.
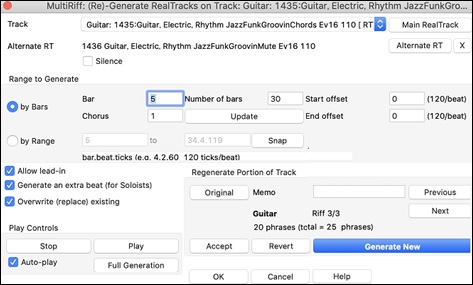
Press the F8 key to open the dialog. You can also open it from the track radio button menu at the top of the screen or the new Track Settings and Actions dialog.
In the dialog, select a track, set a range, and choose a RealTrack to use for that range of the track. You can of course use the RealTrack selected for the whole track, but you can also use different RealTrack for that range. Press the [Generate New] button. A riff will be generated and play automatically. You can press this button again to get more riffs. The [Previous] and [Next] buttons let you navigate through the generated riffs. For each riff, you can add a memo like a keyword or your score out of 10, which makes it easier for you to decide which one to pick. By default, riffs will replace the existing riff on the track, but you can merge them if you disable the “Overwrite (replace existing)” option. When you are happy with a riff and want to add it permanently to the track, press the [Accept] button. You can then generate new riffs for a different range.
Track: Select the track to generate or regenerate riffs. The track can be an existing RealTrack or empty.
Alternate RT: You can use an alternate RealTrack (other than the main RealTrack) on the track, either replacing or merging with the main RealTrack. For example, you can generate a pedal steel riff on a mandolin RealTrack. This is optional.
[Main RT]: This lets you choose a RealTrack to use as the main RealTrack on the track.
[Alternate]: This lets you select an alternate RealTrack.
[X]: This quickly clears the alternate RealTrack.
Silence: When this is checked, silence will be generated, replacing the existing RealTracks over the range. This is useful for arranging or tidying up small glitches.
Start Offset: This setting can fine tune the range. The unit is ticks, which are 120 per beat. For example, entering 60 would start the range 60 ticks (half a beat) later.
End Offset: This setting can fine tune the range. The unit is ticks, which are 120 per beat. For example, entering -40 would end the range 40 ticks earlier.
[Update]: This notifies the program to update the range you have entered.
by Range: Select this to enter the range to use for the generation. The format is bar.beat.tick separated by periods. There are 120 ticks per beat. For example, 3.2.50 would be bar 3, beat 2, tick 50.
[Snap]: This snaps the entered setting to the nearest bar boundaries.
Generate an extra beat (for Soloists): Soloist often end a phrase by playing a single note on the next bar. For example, if you are generating riffs for 4 bars, you will hear a note on the first beat of the 5th bar to end the phrase.
Overwrite (replace) existing: If this option is checked, the new riffs will replace the existing one on the track. Uncheck it if you want to hear both of them playing at once.
[Play]: This will play the song, starting a bar before the beginning of the new generation. It does not generate the other tracks. If you want to do that, choose the [Full Gen.] button instead.
Auto Play: If this is checked, then when a new riff is generated, you will hear it right away. This applied to these buttons: [Generate New], [Previous], [Next], and [Original].
[Full Generation]: This will generate all tracks so that you hear a full arrangement.
[Original]: This returns the current riff to the original riff present on the track before you used this dialog or pressed the [Accept] button.
Memo: You can add a memo like a keyword or your score out of 10, which makes it easier for you to decide which one to pick.
Riff x/x: This shows the current riff number in the list and the total number of riffs. For example, Riff 3/5 means the current is the third riff of 5 riffs total. You can make more (up to 20) by pressing the [Generate New] and navigate through the list until you press [Accept].
[Previous]/[Next]: You can generate up to 20 different riffs at a time. These buttons let you navigate through them.
[Accept]: Press this button when you are happy with a riff and want to add it permanently to the track. This will remove the rest of the riffs in the list, and you can generate new riffs for a different range.
[Revert]: Press this to return to the original riff in the track when you opened this dialog (or changed a track or pressed the [Accept] button to make the riff permanent).
[Generate New]: This will generate a new riff for the selected range. You can keep generating new riffs (up to 20), press the [Previous]/[Next] buttons to navigate through them, and then choose one to add to the track by pressing the [Accept] or [Close] button or changing tracks.
MicroChords (Multiple Chords per Beat)
The MicroChords feature allows you to enter up to 4 chords per beat. Previously, Band-in-a-Box was limited to one chord per beat, but now you can have chords on 8th notes, triplets, or 16ths notes. This is especially useful on slow songs. You can select which tracks will play the MicroChords, allowing some tracks to play fast moving chord progressions and others to play the main chords.
MicroChords are stacked vertically on the Chord Sheet. If there is also a main chord at the same beat, it will display in gray.
![]()
You can enter MicroChords on the Chord Sheet with parentheses and commas. Start with an open parenthesis, type chords separated by commas, and end with a close parenthesis.
For example, typing (C,F) enters two chords for 8th notes, (C,F,G) enters three chords for triplets, and (C,F,G,Am) enters four chords for 16th notes. If you do not type a chord between commas, it will enter a blank chord. For example, typing (C,F,G,,) would enter the first and the second chords for 16th notes and the third chord for an 8th note.
![]()
You can have both MicroChords and a main chord at the same beat. For example, type D7(A,Fm) to enter D7 as a main chord and A and Fm as MicroChords.
![]()
You can erase all chords (main and/or MicroChords) from the highlighted cell with the Delete key.
![]()
Pressing the () and return keys will erase just the MicroChords and advance the cell.
![]()
You can change the current main chord and keep the current MicroChords at the beat by typing another main chord. For example, if you type Gm and press the return key, the main chord will be replaced with Gm and the MicroChords will remain.
![]()
If you want to change the main chord and erase the MicroChords, type a chord followed by parentheses. For example, type Gm() to replace the current main chord with Gm and erase the MicroChords.
![]()
You can also use a dialog to enter MicroChords. Press F6 or M return keys to open the Set MicroChords dialog. This dialog has more features including the option to exclude some tracks from playing the MicroChords.
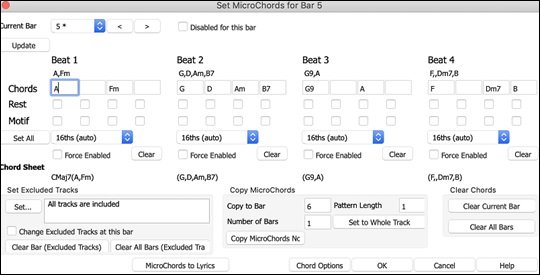
Current Bar: The bar number will display with * if there are some MicroChord data in the bar, and “t” if there is a new “Excluded Tracks: setting.
Disabled for this bar: If this option is checked, none of the MicroChord settings will be played for this bar.
[Update] will update the settings in the dialog. Press this if chords have changed.
Chords: Enter MicroChords on this row. Each beat is divided into four for an even style and three for a swing style.
Rest: A rest will cause the previous chord duration to stop playing, turning the previous chord into a “shot.”
Motif: Enter a checkmark if you want to create a specific rhythmic pattern. You do not need to enter chords as the motif will use whatever current chord is in the song.
[Set All] applies the divisions of the first beat to all other beats.
Triplets/16ths/Auto: This sets the number of divisions per beat. “Triplet” divides the beat into 3, and 16th divides the beat into 4. If “Auto” is selected, the division is automatically selected by the style loaded.
Force Enabled: This is useful if you do not enter any MicroChords in the current beat but still want a beat of silence instead of the main chord.
[Clear] clears the data for the current beat.
Set Excluded Tracks: This area allows you to select tracks to be excluded from playing the MicroChords.
Change Excluded Tracks at this bar: Enabling this allows you to select tracks that should be excluded from playing the MicroChords. Press the [Set] button to select tracks that should be excluded. The excluded tracks will play main chords, instead.
[Clear Bar (Excluded Tracks)] clears any excluded-track setting for the current bar.
[Clear All Bars (Excluded Tracks)] clears any track-excluded settings for all bars in the song.
Copy Chords: This area allows you to copy MicroChords and settings to other bars.
Copy to Bar: This is the destination bar for the copy.
Pattern Length: Set this to 1 if you want the current bar to be copied. If you want a longer section to be copied, enter the number of bars to copied. For example, enter 2 to copy the current and the next bars.
# of Bars: This is the total number of bars to be copied.
[Set to Whole Track] sets the destination to the whole song.
[Copy MicroChords Now] will copy the MicroChords and settings in the current bar (or more bars if the Pattern Length is more than 1) and paste them to the selected bar.
[Clear Bar] clears all settings from the current bar.
[Clear All Bars] clears all settings from all bars in the song.
[MicroChords to Lyrics] displays the MicroChords, including the Motifs (x) and Rests (r), as Bar Lyrics, which are viewable on the Chord Sheet when the Bar Lyrics layer is selected with the [Chord Display] toolbar button menu.
[Chord Options] opens the Chord Options dialog.
Motifs
The Motifs feature allows selected tracks to play specific rhythms without changing the chords. For example, you might want the guitar and bass to play a specific 16th rhythm in a funk song, while the piano and sax stick with the normal feel.
The motifs can be set in the Set MicroChords dialog. You can open it with the F6 or M return keys.
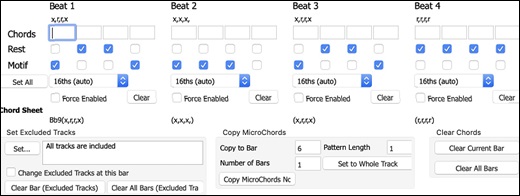
Suppose you have loaded a funk style and you want a horn section to play a specific rhythm (16th-rest-rest-16th) in Beat 1 and 3 and just to rest in Beat 2 and 4. So, you check the Motif checkbox in the first and fourth slots, and the Rest checkbox in the second and third slots for Beat 1, and then you check the Rest checkbox for all slots in Beat 2. You repeat this patten for Beat 3 and 4. Enable the Change Excluded Tracks at this bar option and press the [Set] button to exclude tracks other than a horn section. If you want to use this rhythm pattern in other bars, use the Copy Chords area.
Now, when you play the song, you will hear horns to play hits interspersed with the cool lines that are part of the style itself.
Volume Automation
This feature allows you to have volume automation on any track to achieve volume changes like fades, crescendos or other node-based volume automation.
![]()
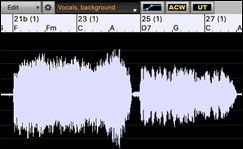
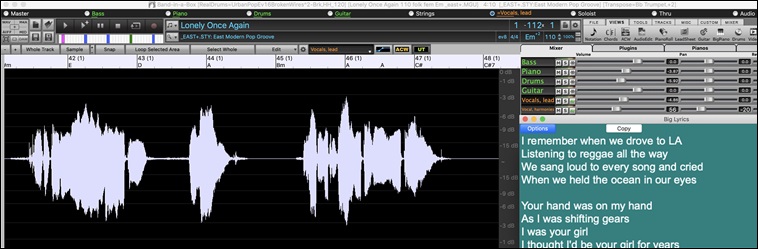
In this tutorial, we are using a song in one of the two new Artist Performance sets. These sets have original songs sung by a variety of very talented singers in a variety of genres. These Artist Performances can be played in Band-in-a-Box and they are great for experimenting with different styles.
Now, let’s load a song called “Emmaline 100 country male C _goldrsh.MGU” from theApplications/Band-in-a-Box/Artist Performance Sets/Artist Performance Set 12 - Songs with Vocals volume 2 folder. This song has great leading and background vocals, but when you play the song, you may notice that the background vocal is too loud.
|
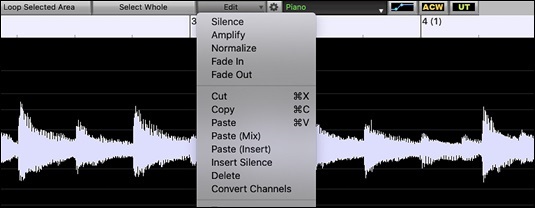
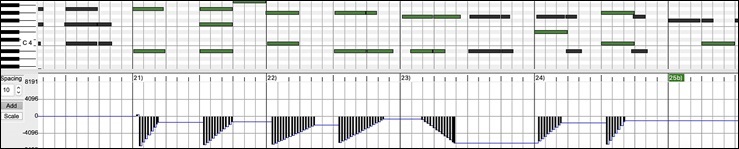
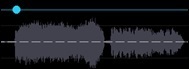
When you open the Audio Edit window and show the background vocal track, there is an audio section in bars 21-27, and you may notice that the first half section is a bit louder than the second half. You could use the volume slider in the Mixer, but that would decrease the volume for both sections. There is a better way to adjust the volume and to give you more control. |
![]() First, press the volume automation mode button on the window’s toolbar.
First, press the volume automation mode button on the window’s toolbar.
|
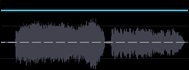
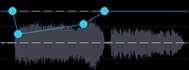
This will show blue lines on the track. The waveform is still visible but it’s darker so that we can focus on the blue lines right now. |
|
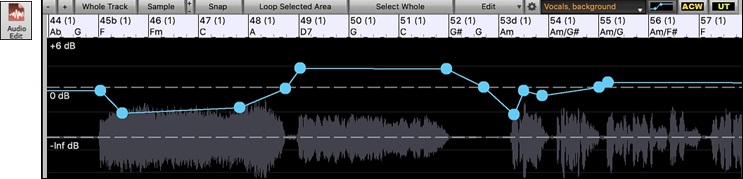
You can click anywhere on the blue line to add a node (a small blue dot), which acts as an anchor. |
|
If you add more nodes and then move some of them up or down, the blue line will be drawn between nodes that you’ve entered. And the position of the blue line at any given point determines the amount in decibels that the audio is increased or decreased at that point. When you play the song, the volume of the background vocal is essentially balanced out between two sections. |
|
You could have the background vocal start off quieter and have it gradually become louder. |

Drum Stems
Drum stems are separate tracks from the different microphones used during the actual recording sessions.
Currently, drums stems are available for over 50 RealDrums, but there are more to come. You can find which RealDrums have drums stems if you look at the “Stems” column in the RealDrums Picker. It will tell you how many microphones were used for recording.

When you select a RealDrums that has stems, you will see what they are just below the list. Using the checkboxes, you can load all stems, the selected stems, or the mix of all stems for your song.

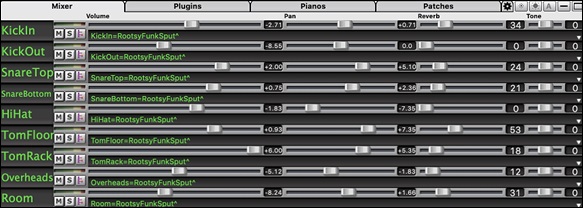
If you select all or individual stems, each stem will be loaded to separate tracks, so you can control volume, pan, etc. for each stem using the Mixer.
Track Settings and Actions
There is a convenient “one-stop-shopping” dialog where you can select RealTracks, Loops, MIDI SuperTracks, etc., set volume/ reverb/panning/tone, mute, solo, freeze, save as Performance Tracks, and do many other things for all 24 tracks.
You can open this dialog in several ways.
- Press F7 or T return keys.
- Use the Edit | Track Settings and Actions menu item.
- Right-click on the Chord Sheet and select Track Settings and Actions from the contextual menu.
- Right-click on the track radio button at the top of the screen and select Track Settings and Actions Dialog from the contextual menu.
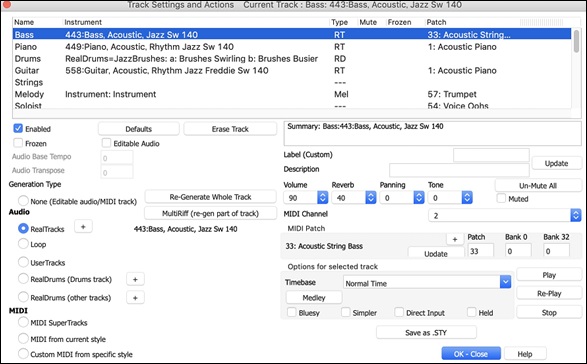
In the list at the top of the dialog, you can see which instruments are currently selected for each track. It also shows the type of the track (RT/RD/MST), the mute or frozen status, and MIDI patches. Select a track in the list and select settings for that track at the bottom half of the dialog.
Enabled: If you uncheck this, the track will not be generated.
[Defaults]: This sets the track settings to defaults. Note that any settings from the underlying style will remain. To prevent style tracks from playing, disable the track.
[Erase Track]: This erases both audio and MIDI data from the track.
Frozen: If this is checked, no new data will be auto-generated.
Editable Audio: This changes the track to an editable audio track, which will be saved as a WAV. This is usually done for vocals or other recordings.
Audio Base Tempo: If the track type is an editable audio track, this is the tempo that the audio was recorded or created at.
Audio Transpose: You can transpose the track if it’s an editable audio track.
[re-Generate Whole Track]: For a RealTrack, this will re-generate the whole track.
[MultiRiff (re-gen part of track)]: This allows you to interactively create sections of RealTracks by choosing from multiple candidates (up to 20).
Generation Type - None: If this is set, no auto- generation will occur except for an underlying style. To prevent generation from an underlying style, disable the track.
Generation Type - RealTracks: Click on the radio button to open the RealTracks Picker, or click on the [+] button to select a RealTrack using other dialogs.
Generation Type - Loop: Click on this radio button to select a Loop.
Generation Type - UserTracks: Click on this radio button to select a UserTrack.
Generation Type - RealDrums (Drums Track): To select RealDrums on the Drums track, select this radio button to open the RealDrums Picker or the click on the [+] button to select RealDrums using other dialogs.
Generation Type - RealDrums (Other Tracks): This can be used for a second drum track or Drum Stems.
Generation Type - MIDI SuperTracks: Click on this radio button to select a MIDI SuperTrack. MIDI SuperTracks are high-quality MIDI tracks, based on performances by studio musicians.
Generation Type - MIDI from current style: This is a MIDI track from the current style.
Generation Type - Custom MIDI from specific style: You can select a MIDI track from another style.
Summary: You can copy this summary and paste it into a custom description.
Label: This allows you to customize the short track label.
Description: This allows you to customize the long track description.
[Update]: Press this button if you have entered a label and/or description.
Volume/Reverb/Panning/Tone: You can control mixer for the track.
[Un-Mute]: This will un-mute all tracks.
Muted: This will mute the track.
MIDI Channel: This allows you to re-route the MIDI events on the current track to another channel.
MIDI Patch: You can select a MIDI patch for the MIDI track by pressing the [+] button and using the menu. If you know the General MIDI patch number, Bank 0, and Bank 32, enter the numbers and press the [Update] button.
Timebase: With this option, you can hear an audio-type track (RealTracks, RealDrums, etc.) at normal, half time, double time, or triple time. If the style tempo is 80, a 160 tempo should be set to double time.
Medley: This allows a RealTracks medley (multiple consecutive or simultaneous RealTracks on the same track).
Bluesy: This option will play major triad like C as if they were C7, so the track sounds bluesy.
Simpler: This makes the arrangement use “simpler” playing, with less notes and embellishments.
Direct Input: This option is for electric guitar RealTracks that were recorded any effects so that you can add your own effects by amp simulators.
Held: If you check this, the track will make a simple arrangement, mostly playing held chords.
[Play]: This plays the song, using the current track settings and re-generating the tracks.
[Re-Play]: This replays the song without regenerating the tracks.
[Stop]: This stops playback.
[Save as .STY]: This allows you to create a new style with a new name. The style will contain the current auto-generated tracks in the song.
Remix Full Vocal Songs
We’ve made over 50 original songs (Pop, R&B, and Modern Country) with high-quality, great sounding vocals, harmonies and Band-in-a-Box arrangements. Use these to remix new arrangements, starting from these high-quality, great sounding tracks.
They are included in the new Artist Performance sets 11 and 12.
Applications/Band-in-a-Box/Artist Performance Sets/Artist Performance Set 11 - Songs with Vocals volume 1
Applications/Band-in-a-Box/Artist Performance Sets/Artist Performance Set 12 - Songs with Vocals volume 2
![]()
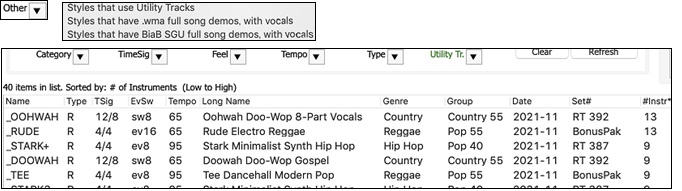
Load a song from these folders and listen to a great performance!
To hear audio demos, press the [Other] filter button in the StylePicker, and select Styles that have .m4a full song demos, with vocals from the drop-down menu.
![]()
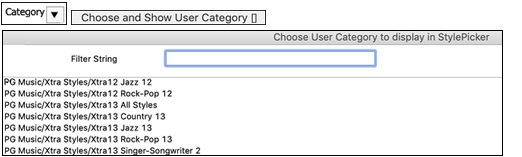
Or, press the [Category] filter button, select Choose and Show User Category from the drop-down menu, and select “PGMusic\Style Demos with Vocals\All Style Demos with Vocals” from the list.
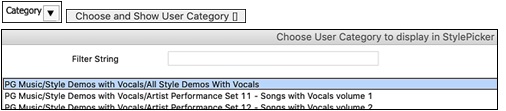
This will list styles that have full vocal audio songs. You can then click on a style in the list to listen to a demo.

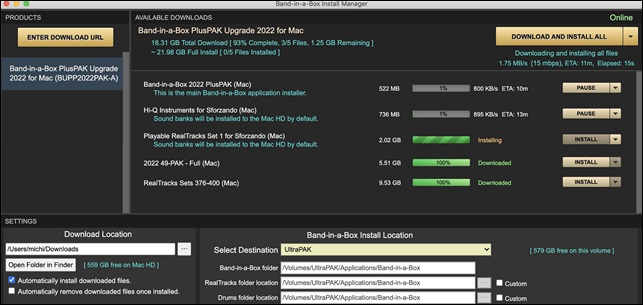
Install Manager - One-Click to Download and Install
You can download and install the entire package of your order with the new one-click Install Manager. This is a much simpler alternative to manually downloading and installing all the files individually that are listed on the “My Products” page in your account. This is particularly useful for “download-only” (e-delivery) versions of the Band-in-a-Box Pro, Mega, and UltraPAK, since there can be 100 GB of files to download and install.
After you place your order, click on the link(s) in your order confirmation email to go directly to your Downloads page for each product. If the Install Manager is available for the product, there will be a link to download it at the top of your download page list.
Once this setup file is downloaded, run it to install the Install Manager program on your computer. The program will be installed into the Applications folder on your Mac system hard drive.
Run the Install Manager. Press [Enter Download URL] and paste in the link to your download page for any product. Then, press [Download and Install All]. Files will be downloaded to the specified download folder and installed to your Band-in-a-Box folder.
New Songs Default to 1 Chorus
Previously, new songs defaulted to 3 choruses, but now, they default to 1 chorus.
![]()
Settable Default Length and Choruses for New Songs
You can now change the default number of bars and choruses. For example, you can have new songs default to 64 bars with 1 chorus, 24 bars with 3 choruses, etc.
Click on the [Prefs] toolbar button to open the Preferences dialog. Then, in the Defaults for new songs area, enter the number of bars for each chorus and the number of choruses.
![]()
Now, when you start new songs, the End bar and the Choruses buttons will show whatever you have selected in the dialog.
![]()
New Column and Option in RealDrums Picker
The new “Stems” column tells you the number of microphones used for recording.
Using the new Stems options below the list, you can load all drum stems or selected drums stems to separate tracks, or the mix of all drum stems to a same track.
Audio Edit Window Enhanced
The volume automation mode has been added. This allows you to achieve volume changes like fades, crescendos or other node-based volume automation.
The marker mode selector has been replaced by three intuitive buttons.
![]()
StylePicker Picker Enhanced
Additional row has been added to the mixer for Utility tracks, so you can see which instruments are included in the style and you can control settings for those tracks within the StylePicker window.
The “Other” filter button has more menu items. You can filter the list to show styles that use Utility tracks or Styles or styles that have full song demos with vocals.
The “Set #” column shows HalfDouble for Half-time/Double-time variation styles.

We’ve added more user categories (e.g., Xtra13 All Styles, XPro Styles Set 3, Style Demos with Vocals, etc.).
Notation Enhacements
You can now insert/remove a trill (tr symbol) for a note with the Notation window right-click menu.
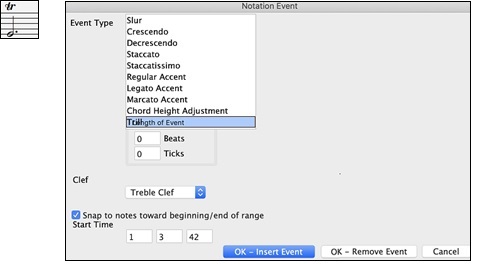
Band-in-a-Box can also read trills from XML files.
![]()
When loading an XML file from Guitar Pro that has two clefs of guitar notation on 1 part, Band-in-a-Box will correctly load the tab clef and ignore the redundant other clef.
![]()
New Hotkeys
T return opens the Tracks Settings and Actions dialog.
M return opens the Set MicroChords dialog.
F6 now opens the Set MicroChords dialog. Previously, this key opened the Save MIDI File dialog.
F7 now opens the Tracks Settings and Actions dialog. Previously, this key let you open a MIDI file.
F8 now opens the MultiRiff RealTracks dialog. Previously, this key opened the Jukebox Options dialog.

…and more!
Thank you for taking time to read this introduction to Band-in-a-Box 2022!
Unconditional 30-Day Money Back Guarantee on all PG Music products purchased from PG Music Inc.
PG Music Inc.
29 Cadillac Ave Victoria BC Canada V8Z 1T3
Sales: 800-268-6272, 250-475-2874,+ 800-4746-8742*
* Outside USA & Canada where International Freephone service is available.
Access Codes
Tech Support: Live Chat, support@pgmusic.com
 Online now
Need Help?
Customer Sales & Support
|
Phones (Pacific Time) 1-800-268-6272 1-250-475-2874 |
||
| Live Chat | ||
| OPEN | Online Ordering 24/7 |
|
| OPEN | Forums, email, web support |