
Search Manual
Band-in-a-Box® 2023 for Mac® Upgrade Manual
Chapter 3: GuickStart Tutorial
Let’s take a close look at the great new features in Band-in-a-Box 2023!
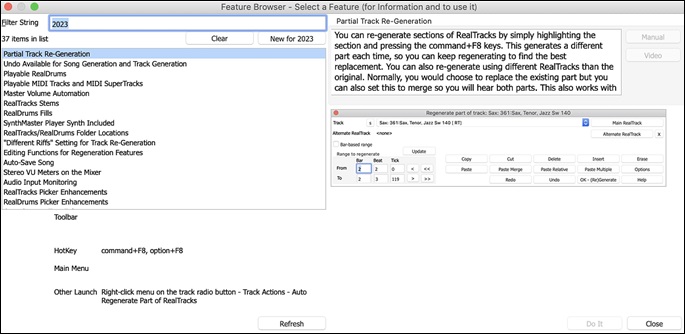
Partial Track Re-Generation
Now you can re-generate sections of RealTracks by simply highlighting the section and pressing F8. This generates a different part each time, so you can keep regenerating to find the best replacement. You can also re-generate using different RealTracks than the original. Normally, you would choose to replace the existing part but you can also set this to merge so you will hear both parts. This also works with different RealTracks than the original on the same track.
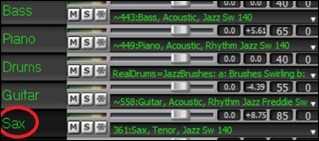
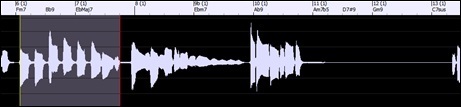
Let’s open a song that has a soloist (e.g., saxophone soloist). Now, press PLAY to generate the song. We’ll focus on the sax soloist track since we want to fine tune the solo to our liking.
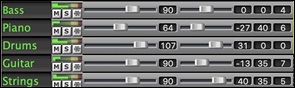
First off, select the track using the Mixer.
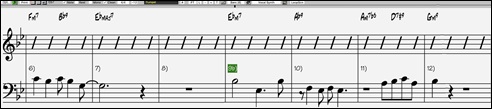
Now, listen to the solo. Let’s say you don’t like what the sax plays for four bars, starting at bar 9. Highlight the bars 9-12 by dragging on the Chord Sheet. You can also do this in the Audio Edit or Notation window.

Let’s generate the selected section. Either press F8 or right-click on the track radio button and go to Track Actions | Auto Regenerate Part of RealTracks.
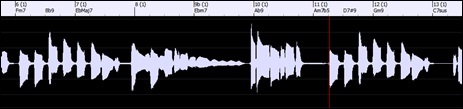
That’s it. You will now hear the song start playing at bar 8 (one bar before the section to provide a lead-in) and then you will hear the new solo that’s generated just for these two bars.
A great thing about this is that the solo generated will be different from the previous one(s) you’ve generated. If you don’t like the new one, try again and generate another one. You can keep going and generate up to 40 variations. And another great thing is that they all will be different from each other. This is new for 2023, as previously it was “hit or miss” if you’d get a different variation or not. And there are more variations available now (typically 40 instead of 20 in previous versions).
If you find one you like, great! Just stop and continue, maybe moving to another section of the song or switching to a different track or something else entirely.
So, the F8 keys can become your “Fix-it” tool for fixing any section of any RealTracks that you don’t like, including soloist, background tracks, comping etc.
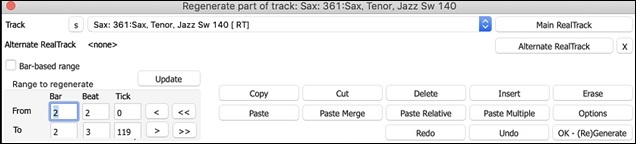
If you prefer not to make a selection or you want a more customized approach to regenerate these sections, there is an optional floating Regeneration window, which allows you to make settings to customize the type of re-generations.
Let’s press option+F8 or right-click on the track radio button and go to Track Actions | Regenerate Window.

This isn’t a dialog; it’s a floating window, so you can do any other Band-in-a-Box function as you keep this window open.
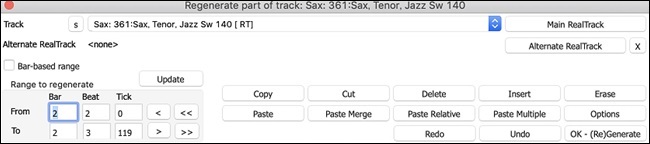
Let’s review this dialog:
There’s a track selector to confirm or change what track you want to re-generate.
You can set or change the current track using the [Main RealTrack] button.
You can generate a different RealTracks by pressing the [Alternate RealTrack] button and selecting an alternate RealTracks. For example, you may want 4 bars of a flute solo instead of sax but want to keep sax as the main soloist on the track.
Pressing the [X] button will clear this selection.
The [S] button will solo the track.
The [Undo] button will undo the last generation. (Note that you can also choose Edit | Undo or command+Z to do this.)
You can generate based on either the full bar boundaries or precise regions including bars/beat and ticks. This is done with the Bar-based range option. When this option is selected, you will see Bar, Chorus and Number of bars. The [<<] button will set to the beginning of the song, and [>>] button sets to the end. When this option is not selected, you will see a precise range in bars/beats/ticks. The [<] button moves to the beginning of the bar. The [<<] moves to start of song. [>] moves to end of bar. [>>] moves to end of song.
If you make selections on the Chord Sheet, Audio Edit, Piano Roll, or Notation window, these settings for range will update. For example, if you select a range on the Audio Edit window, you will get that precise range as long as the “Bar based range” option de-selected.
The [Copy] button copies a range of riff to the clipboard.
The [Paste] button pastes the riff to the current location, overwriting the existing riff at the destination.
The [Paste Relative] button pastes the riff to the same relative location in the bar as the copied portion. For example, if the copied range started at beat 2, the relative paste will start at beat 2
The [Paste Multiple] button lets you select the number of pastes. Hold down the Shift key as you click on this button to make the pastes merge with existing riffs.
The [Paste Merge] button pastes the riff to the current location and merges it with the existing riff so you will hear both riffs/
The [Cut] button removes a range of riff and copies it to the clipboard.
The [Erase] button erases a range of riff.
The [Insert] button inserts the selected amount of space and shifts all audio following the inserted region to a later time.
The [Delete] button deletes the selected region. All audio following the deleted region will be shifted to an earlier time.
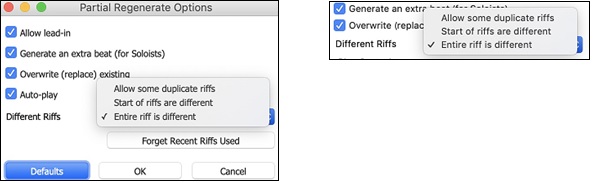
The [Options] button shows options for the partial regenerations.

Allow lead-in allows some of the re-generations to start early as a pickup to the range you’ve selected.
Generate an extra beat will finish the riff up to 1 beat after the selected range.
Overwrite (replace) existing will make the generation replace the existing part. Setting it to false will merge with the existing generation. For example, maybe you have a sax solo and would like to have sax and flute soloing together for a few bars. You can use this setting to accomplish this by setting this option to false. Remember to set it back to normal when you prefer the re-generations to “replace” instead of “merge.”
Auto-play will play the song from the bar before the selected range, so you can hear what it sounds like.
Different Riffs determines how the riffs will be different from previous ones. If it’s set to “Entire riff is different,” each generation will be different from previous ones. If it’s set to “Start of riffs are different,” the first bar of the section generated will be different from previous one. If it’s set to “Allow some duplicate riffs,” the generation might be similar to the previous one.
[Forget Recent Riffs Used] allows Band-in-a-Box to “forget” the previous ones so that you can generate using all the available ones. Note that re-generation from a different bar, different track or different song will “forget” the previous re-generations, so you likely won’t need to press this button much, if at all.
Undo available for Song Generation and Track Generation
When you generate (or re-generate) a full song or part/whole track, you can undo it to get back to the previous generation. As with other Undo functions, choose menu Edit | Undo Tracks Generation or menu Edit | Undo Generation of Song Tracks, or just press hotkey command+Z.

Playable RealDrums
You can now customize the RealDrums performance by adding your own notes. You will then hear those notes using a MIDI sound created from the RealDrums recording. This means you can get the RealDrums to play the notes you want at key parts of the performance, either augmenting or replacing what the RealDrums is playing, for any sections in the song. This includes full drum kits in GM note number format. You can enter the notes in the Notation (using drum notation) or the Piano Roll window.
To add some Playable RealDrums, load a song that has RealDrums. Press PLAY to generate it. Choose a track with Drums. Open the Notation window, and you will see the notation for the Drums track.

![]() Switch the Notation window to the Editable or Staff Roll mode to enable editing of the Drums track.
Switch the Notation window to the Editable or Staff Roll mode to enable editing of the Drums track.
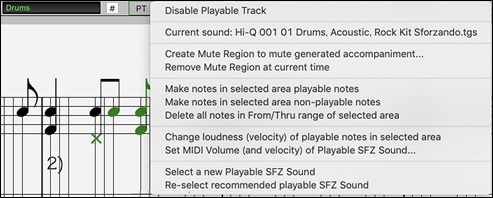
![]() Press the [PT] button and select Enable Playable Track from the menu. When this menu item is enabled, you can choose a MIDI Drum sound that will match the selected RealDrums. You can use the same functions as for Playable RealTracks. Inserting your own notes (green color) and muting sections of the RealDrums will allow you to add notes to the current RealDrums or replace sections of the RealDrums. For example, add a cymbal crash, control the volume using the velocity of the MIDI note (or overall volume setting using the [PT] button menu).
Press the [PT] button and select Enable Playable Track from the menu. When this menu item is enabled, you can choose a MIDI Drum sound that will match the selected RealDrums. You can use the same functions as for Playable RealTracks. Inserting your own notes (green color) and muting sections of the RealDrums will allow you to add notes to the current RealDrums or replace sections of the RealDrums. For example, add a cymbal crash, control the volume using the velocity of the MIDI note (or overall volume setting using the [PT] button menu).
Playable MIDI Tracks and MIDI SuperTracks
You can now customize the MIDI generated tracks by adding your own notes (on the same track). This uses the same sound as the MIDI tracks. You can use this to replace or augment sections of the performance. You can re-generate the MIDI tracks, and your customizations will remain.
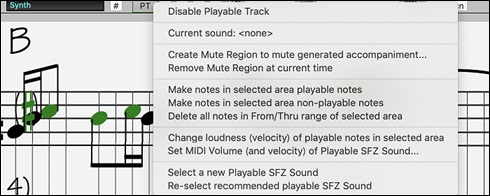
![]() In a manner similar to the Playable RealTracks and RealDrums, press the [PT] button in the Notation window (Editable or Staff Roll mode) and select Enable Playable Track from the menu. This allows you to add or replace sections of the MIDI track or MIDI SuperTracks. These additions you make won’t get erased when you generate new MIDI tracks.
In a manner similar to the Playable RealTracks and RealDrums, press the [PT] button in the Notation window (Editable or Staff Roll mode) and select Enable Playable Track from the menu. This allows you to add or replace sections of the MIDI track or MIDI SuperTracks. These additions you make won’t get erased when you generate new MIDI tracks.
Master Volume Automation
This node-based volume automation allows fine volume control of the Master track. This allows easy creation of fades, crescendos, mutes, etc. This is in addition to the individual track volume automation.
Open the Audio Edit window, select the Master track, and press the volume automation mode button.
![]()
This will show blue lines on the Master track. You can click anywhere on the blue line to add a node (a small blue dot), which acts as an anchor. If you add more nodes and then move some of them up or down, the blue line will be drawn between nodes that you’ve entered. And the position of the blue line at any given point determines the amount in decibels that the audio is increased or decreased at that point.

RealTracks Stems
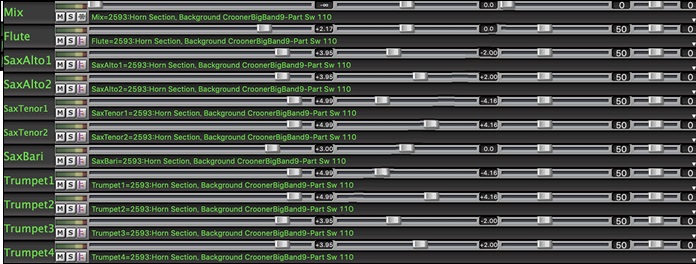
Some RealTracks have multiple track recordings, such as quartet vocals, string quartet, blues horns, crooner big band and more. Previously, you could only generate a single track with the entire group. Now, you can generate the “stems,” which are the individual tracks as recorded. So, for example, for a string quartet you would get 5 tracks - the full mix and 4 separate tracks for each of the instruments. This allows you to mix them as you’d like and also mute parts if you want to play along.
![]() In the RealTracks Picker, you can find which RealTracks have stems if you look at the “Stems” column. It will show you.the number of individual instruments/voices available for the RealTrack.
In the RealTracks Picker, you can find which RealTracks have stems if you look at the “Stems” column. It will show you.the number of individual instruments/voices available for the RealTrack.

You can also find them using the RealTracks Stems Available and/or Found menu item in the [#] filter button.
![]()
When you select RealTracks that have stems, you will see what they are just below the list. Using the checkboxes, you can load all stems, the selected stems, or the mix of all stems.
![]()
If you select all or individual stems, each stem will be loaded to separate tracks, so you can control volume, pan, etc. for each stem using the Mixer.
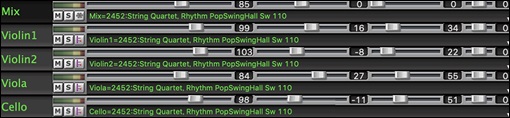
There is a demo song “RealTracks Stems - Crooner Jazz Horn Section stems.SGU” inApplications/Band-in-a-Box/Tutorials/Tutorial - BB2023. When you open this songs, a mix of stems and 10 individual stems will be loaded to the Utility tracks.
RealDrums Fills
RealDrums fills can be controlled, so you can get a drum fill at any bar (without needing a part marker section change). You can also get no drum fill on the bar before a part marker. Previously, the only way to get the drums to play a fill would be to put a part marker on the bar following the fill.
![]() Press the [Bar Settings] toolbar button or the F5 key to open the Edit Settings for Current Bar dialog.
Press the [Bar Settings] toolbar button or the F5 key to open the Edit Settings for Current Bar dialog.
![]() If you enable the “Drum Fill” option, you’ll get a drum fill at the current bar.
If you enable the “Drum Fill” option, you’ll get a drum fill at the current bar.
![]() If you are at a bar before a part marker and you don’t want a drum fill, then disable the “Drum Fill” option.
If you are at a bar before a part marker and you don’t want a drum fill, then disable the “Drum Fill” option.
SynthMaster Player Synth Included
This award-winning synth by KV331 Audio has thousands of presets that are especially useful for modern, techno and arpeggiator sounds.
SynthMaster support built into Band-in-a-Box includes:
- MIDI SuperTracks that use sounds with arpeggiators.
- Access to SynthMaster sounds using the Hi-Q patch dialog, so that choosing a sound can be done just by picking a patch.
- MIDI SuperTracks Set for SynthMaster synth is included, using a mix of SynthMaster sounds, MIDI SuperTracks with arpeggiators and RealTracks.
- Styles can be made to play with SynthMaster sounds without need to load it.
The SynthMaster VST file is installed to the /Library/Audio/Plug-Ins/VST folder by default.
To select MIDI SuperTracks that use SynthMaster sounds, right-click on a track button and choose Select MIDI SuperTrack for this track from the menu.
![]()
This will open the Select MIDI SuperTracks dialog. Type a “SynthMaster” text to filter the list.
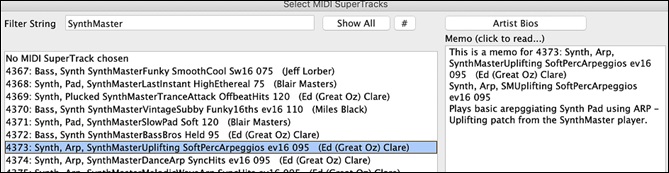
Some of them have arpeggiators in the sounds. Select one you like and press OK and answer yes to the confirmation message.

![]() You will see that the track label has turned blue to indicate that it is a MIDI SuperTrack.
You will see that the track label has turned blue to indicate that it is a MIDI SuperTrack.
![]()
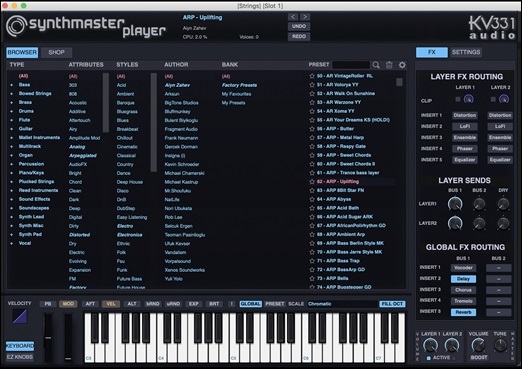
If you want to customize the sound, click on the SynthMaster synth in the Plugins tab to open the synth window.
You can access SynthMaster sounds using the Hi-Q patch dialog. Right-click on a track radio button, and go to Select MIDI Instrument (Patch) | Select Hi-Q MIDI Patch Plugin.
![]()
This will open the dialog that lists Hi-Q patch plugins (.tgs). Type a filter of “SynthMaster” and select any of the presets that PG Music has made.
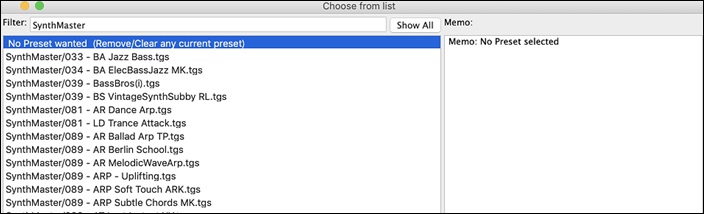
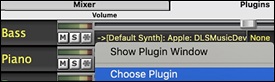
SynthMaster comes with thousands of sounds. To choose a sound, right-click on the [Plugin] the Mixer and select Choose Plugin.
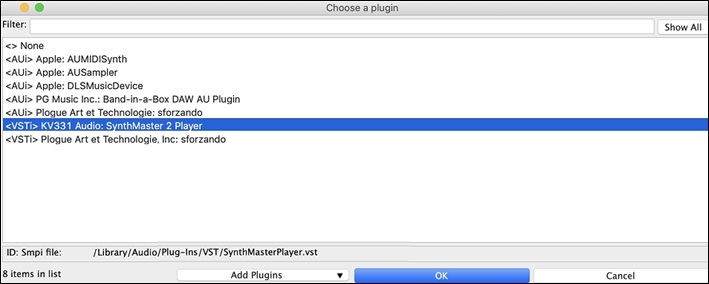
Then, select “<VSTi> KV331 Audio: SynthMaster 2 Player” from the list of plugins and press OK.
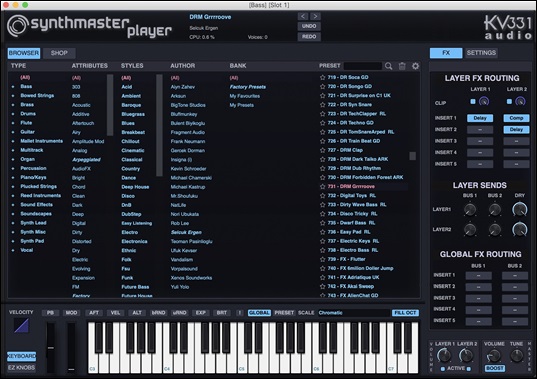
You can now choose from many sounds in the SynthMaster panel.
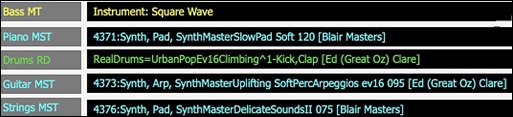
Some styles use MIDI SuperTracks that automatically play with SynthMaster sounds. They are included in MIDI SuperTracks Set 39.
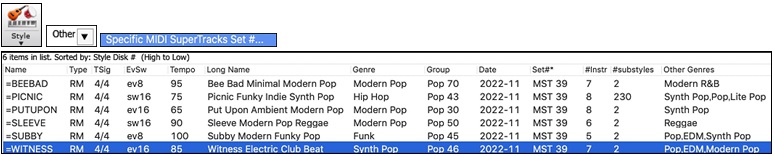
When you look at the mixer area in the StylePicker, you can see which tracks use SynthMaster sounds.
To make a style that plays with SynthMaster sounds, open the StyleMaker and press the [Settings]. Then, in the Miscellaneous Style Settings dialog, select the track and MIDI SuperTracks in the “Assign Soloist, RealTracks or MIDI SuperTracks” area.

EZ RealTracks/RealDrums Folder Location Dialog
When you rebuild a style list, you can confirm and set the correct locations of your RealTracks and RealDrums folders. Previously, setting these folders took time as they were set in different locations and not incorporated into the style rebuild. Now, there is a dialog that shows the current locations (e.g., C:\bb\RealTracks and C:\bb\Drums) and the number of RealTracks and RealDrums present in these locations. This allows you to confirm that you are using the correct locations as you see the expected numbers of RealTracks and RealDrums found in the folders.
![]() The dialog will display in the StylePicker when rebuilding the styles list. It will also show once when you run the program first time after installation or update.
The dialog will display in the StylePicker when rebuilding the styles list. It will also show once when you run the program first time after installation or update.

In the dialog, you can see how many RealTracks and RealDrums are found in the selected folder.
![]()
The dialog is also accessible with the [Set RT/RD Folders] button in the Track Settings and Actions dialog (F7).
"Different Riffs" Setting for Re-Generation
The Regeneration window (option+F8) and MultiRiff dialog (command+F8) have settings for “Different Riffs.” If the option is set to “always,” each generation will be different from previous ones. If it’s set to “start,” the first bar of the section generated will be different from previous ones. If it’s set to “none,” the generation might be similar to previous ones. For example, when you set it to always different and regenerate a few bars of a sax solo, you should hear different phrases each time.
You can change this setting in the Regeneration window (option+F8 – [Options]). You can also set this in the MultiRiff dialog (command+F8).
Editing Functions for RealTracks /RealDrums Tracks
You can now copy, cut, paste, delete, insert, and do other editing functions to the RealTracks and RealDrums tracks. This allows you to edit the tracks while preserving the ability for the tracks to regenerate new material, and the file size saved is tiny as the track isn't converted to audio.
You can use these functions on the Chord Sheet, Notation window or Audio Edit window.
There are two ways to use the functions. One is to use the new items in the track’s right-click menu.
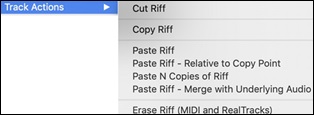
Cut Riff removes a range of riff and copies it to the clipboard.
Copy Riff opies a range of riff to the clipboard..
Paste Riff pastes the copied riff to the current location, overwriting the existing riff
Paste Riff - Relative to Copy Point pastes the copied riff to the same relative location in the bar as the copied portion. For example, if the copied riff started at beat 2, the relative paste will start at beat 2.
Paste N copies of Riff pastes the copied riff to the current location and repeats the paste by the specified number of times.
Paste Riff - Merge with underlying audio pastes the copied riff to the current location and merges it with the existing riff so you will hear both riffs.
Erase Riff (range of MIDI and RealTracks) erases a region of RealTracks and related MIDI notation.
Another way is to use the buttons in the Regenerate window (option+F8). For example, if you like a certain riff and you want it at other location, highlight it on the Audio Edit window.
When you look at the Regenerate window, the range is automatically selected for the highlighted area. Now, press the [Copy] button to copy the riff to the clipboard.
Move the time line to the location you want to paste the copied riff and press the [Paste] button. This will paste the riff to the destination.
If you want to paste the riff and merge it with the existing riff at the destination, press the [Paste Merge] button instead. You can paste the riff to the same relative location in the bar as the copied portion with the [Paste Relative] button. For example, if the copied range started at beat 2, the relative paste will start at beat 2. The [Paste Multiple] button lets you select the number of pastes. Hold down the Shift key as you click on this button to make the pastes merge with existing riffs. The [Paste Merge] button pastes the copied riff to the current location and merges it with the existing riff so you will hear both riffs.
Auto-Save Song
If you did not close Band-in-a-Box properly in the last session, when you restart it, you will see a message dialog that asks if you want to load the auto-saved song. This prevents losing your work if something crashes on your system.

Stereo VU Meters on the Mixer
In the Mixer window, the VU meters for individual tracks now show panning information.
Audio Input Monitoring
This is like “Audio Thru” and it routes incoming audio to Audio Out.
To use this feature, you need to arm the track that you are recording to. Right-click on the track button in the Mixer and select the Arm Track for Audio Input Monitoring menu item, or right-click on the VU meters and select Arm Track from the menu.

![]() The VU meters right-click menu has options to select an audio input. For example, if your audio interface has two inputs (right/left) and you want to record from a microphone plugged into the right input, select the Mono Right to Stereo menu item.
The VU meters right-click menu has options to select an audio input. For example, if your audio interface has two inputs (right/left) and you want to record from a microphone plugged into the right input, select the Mono Right to Stereo menu item.
When the track is armed, blue borders are drawn around its VU meters. You can now monitor audio input along with the effects that you select on that track. For example, if you want to add a tremolo effect to your recording, right-click on the first slot in the Mixer, select Choose Plugin from the menu, and select a tremolo effect. Now, when you sing or play an instrument though the microphone, you will see it on the VU meters and you will hear it along with the tremolo effect.
![]()
RealTracks Picker Enhancements
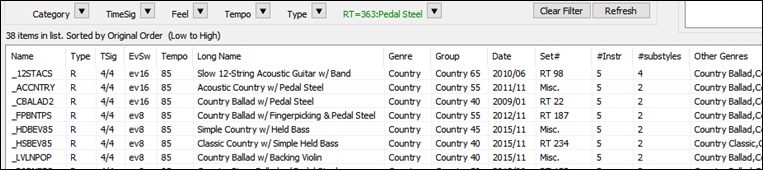
The “Stems” column is added to show you the number of individual instruments/voices available for the RealTrack.

There is a new menu item in the [#] filter button to find RealTracks with stems.
![[#] filter button](images/3/bbm2023upgrade_RT_picker_02.jpg)
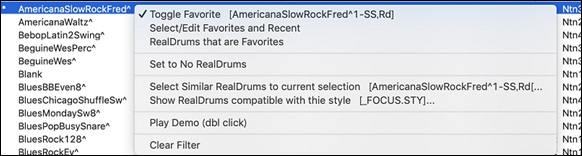
A right-click menu is added with commonly used functions (e.g., clear filter, set or edit favorites, show similar RealTracks, etc.).

You can launch the StylePicker that will show only styles that use the selected RealTracks. You can do this with the Launch StylePicker showing styles with selected RealTrack right-click menu item. For example, if you right-click on” Pedal Steel, Background Ev 085” and select this menu item, the StylePicker will open and show you styles that use this RealTracks.

You can set favorites by using the right-click menu or clicking on the [*] (Set as Favorite) button.

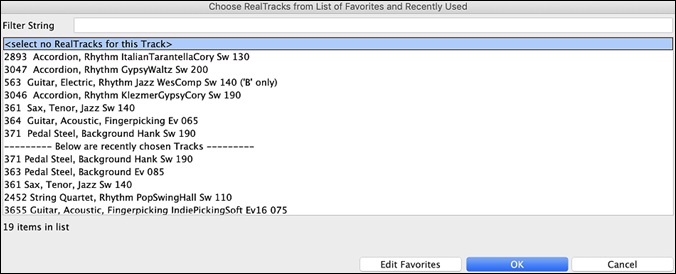
![]() The Choose RealTracks from Favorites and Recently Used dialog shows favorites followed by recently used RealTracks. The list can be filtered with text string. For example, type banjo to find the ones with banjo in the name.
The Choose RealTracks from Favorites and Recently Used dialog shows favorites followed by recently used RealTracks. The list can be filtered with text string. For example, type banjo to find the ones with banjo in the name.
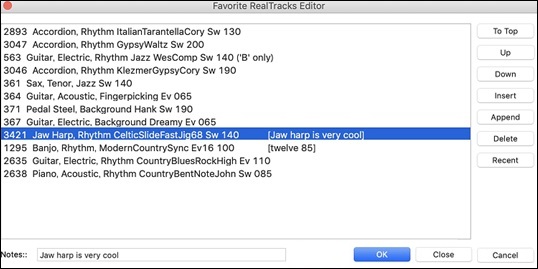
The [Edit Favorites] button in the Choose RealTracks from Favorites and Recently Used dialog opens the Favorite RealTracks Editor that allows you to re-arrange/add/remove your favorites. You can also add comments, which are searchable in the Choose RealTracks from Favorites and Recently Used dialog.
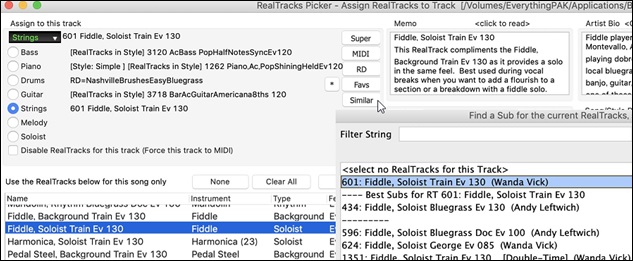
A “Similar” button is added that will show RealTracks similar to the currently selected one. For example, if you have a RealTracks like “Fiddle, Soloist Train Ev 130” chosen and want to find similar RealTracks, press the Similar button, and you’ll see the Find a Sub dialog that lists similar RealTracks.
RealDrums Picker Enhancements
![]()
A right-click menu is added with commonly used functions (e.g., clear filter, set or edit favorites, show similar or compatible RealDrums, etc.).
You can set favorites by using the right-click menu or clicking on the [*] column.

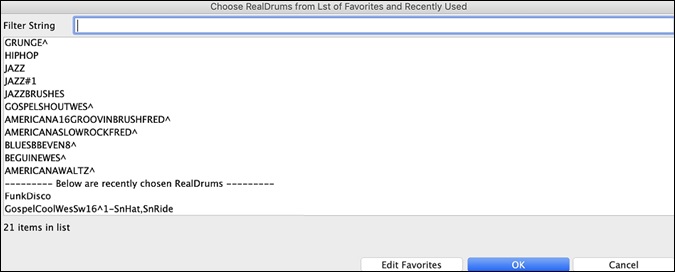
![]() The Choose RealDrums from Favorites and Recently Used dialog shows favorites followed by recently used RealDrums. The list can be filtered with text string. For example, type fusion to find the ones with fusion in the name.
The Choose RealDrums from Favorites and Recently Used dialog shows favorites followed by recently used RealDrums. The list can be filtered with text string. For example, type fusion to find the ones with fusion in the name.
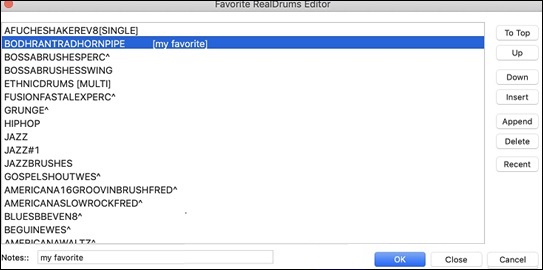
The [Edit Favorites] button in the Choose RealDrums from Favorites and Recently Used dialog opens the Favorite RealDrums Editor that allows you to re-arrange/add/remove your favorites. You can also add comments, which are searchable in the Choose RealDrums from Favorites and Recently Used dialog.
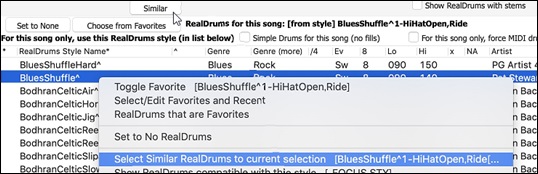
Pressing th new [Similar] button or choosing Select Similar RealDrums to current selection from the right-click menu shows RealDrums that are similar to the currently selected one. For example, if you want RealDrums similar to “Blues Shuffle,” highlight the style, press the [Similar] button. You will then see a list of other compatible Blues RealDrums, other RealDrums in Pop/Rock 4/4 Swing 8 and tempo 85, and other RealDrums in Pop/Rock 4/4 Swing 8 and tempo 85.
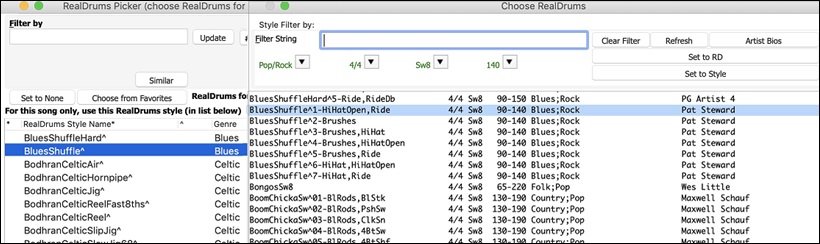
There is a new menu item in the [#] filter button to find RealDrums with stems.
![the [#] filter button to find RealDrums with stems](images/3/bbm2023upgrade_RD_picker_09.jpg)
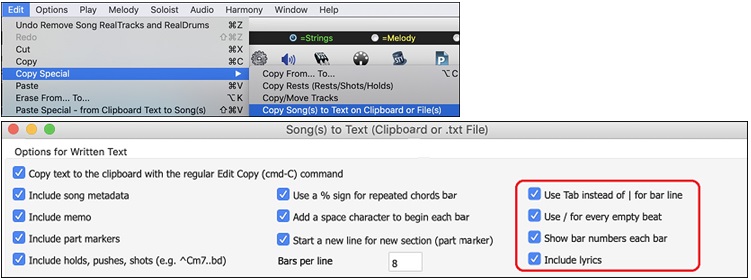
Copy Song to Text Enhancements
The feature that copies the song as a text to clipboard or .txt file has been enhanced with options to:
- Add lyrics as a [Lyrics] section.
- Use Tab delimiter for bars, so the text can be pasted into a spreadsheet with columns for each bar.
- Use a slash for every beat to see | C / / / | instead of | C |.
- Add bar numbers to each bar.
Launch the Song(s) to Text dialog with main menu Edit | Copy Special | Copy Song(s) to Text on Clipboard of File(s).
SongPicker Enhancements
The SongPicker auto-rebuilds for folders if there are less than a specified number of songs. This means the SongPicker will show all songs including new ones without needing to rebuild. You can set this with the new option in the SongPicker Options dialog.
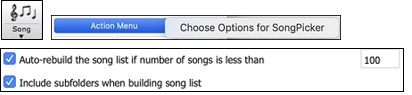
There is also an option to include/exclude subfolders from the song list.
A message about rebuilding is now a question so that pressing YES saves the extra step of needing to rebuild it.

Chord Track Added
Chord track is added, for use with a VST (e.g., arpeggiators want a chord track) or for simple “Pad” (held chords) tracks.
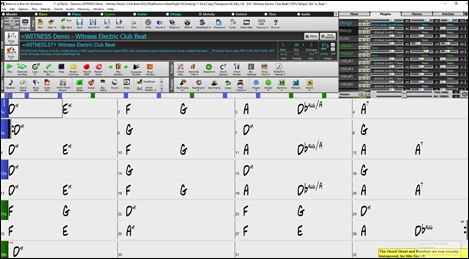
Chord track can be generated on any track. For example, to add a chord track to the Strings track, right-click on the Strings track button and select Edit MIDI | Generate Chord Track on this track from the menu.
![]()
You will then see the Output Chords to Track dialog with options about the chord track to be generated.
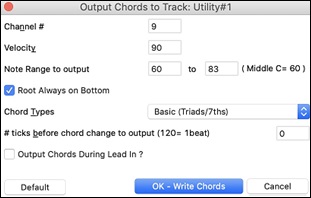
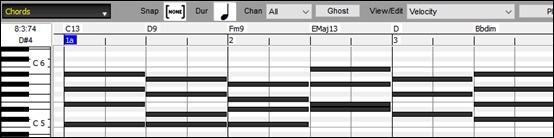
These options include channel, velocity, note range, chord types, root at bottom, ticks before the chord change, and chord output during lead in. If the chord types are set to "triads, 7ths only," a chord like C13 will be played as a C7, but if they are set to "complex chords," a C13 chord will be played as C13. The default setting for "# ticks before chord change to output" is 0, which means chords will be exactly on the downbeat, but if you enter a number other than 0, the chords will start a little bit earlier and may have sufficient time to swell.
For example, if you select the "60-72" note range and "triads and 7ths" chord types, you will see in the Piano Roll window that the chords are generated within the 60-72 (C5-C6) note rage and the simpler chords are written for complex chords.
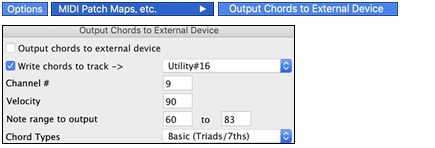
In addition, using the Output Chords on Channel dialog (Options | MIDI Patch Maps, etc. | Output Chords to External Device), you can set a chord track to be always written to a certain track (e.g., Utility track #16.)
Specific MIDI SuperTracks are added that generate a simple chord track (triads/7ths) or a chord track including 9ths/13ths. Adding these MIDI SuperTracks to your track will write a chord track in the range set, for use with arpeggiators or other VSTs wanting a chord track. With each play a new chord track is written. To do this, open the Select MIDI SuperTracks dialog and choose one that has “Arpeggio” in the name.

Fit-to-Note-Range MIDI Transpose Added
This will take any existing MIDI track and transpose the octave of the notes so that they enter the note range specified. For example, if you have a bass MIDI track and the notes are going too low for your MIDI patch, then you can transpose to the instrument range, and notes will have the octave raised as needed. This function is available for MIDI SuperTracks.
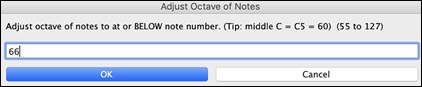
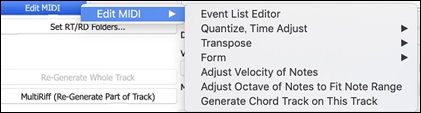
To transpose an existing track using the MIDI Note Range, right-click on a track button select Edit MIDI | Adjust octave of Notes to fit Note Range from the menu.
![]()
You will be given two dialogs. In the first dialog, enter a note number that will be the lowest of the range and press OK.

In the next dialog, enter a note number that will be the highest of the range and press OK.
Now the track will be transposed for any note that is below or above your range so that it is within the range.

Yellow Messages Enhancements
The notification messages that appear at the bottom right of screen are enhanced. They are smaller, occupying less of the screen.
The flash message colors can now be chosen in the Display Options dialog (Options | Preferences | [Display Options]).

A handy function is added to see the flash message log. Type L O G Enter, and FlashMessageLog.txt will open.

Help for "Style Not Found"
If a style is not found when loading it, you will be given an option to open the StylePicker showing compatible styles that you do have. Also, it shows information about the missing style like instrumentation, genre, and audio demo so you get an idea of what replacement you need.
For example, you have a song that needs the style _OMENS+.STY but you don’t have that style. Previously, you would load it, get a message that you don’t have it, and it would just get set to a default style. Now, if Band-in-a-Box knows about that style, you will get a message like this:
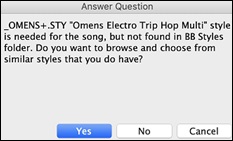
You get a little more information about the style like the full name “Omens Electro Trip Hop Multi,” which helps, and you also can choose “Yes” to launch the StylePicker.
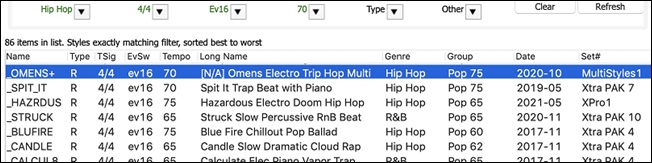
The StylePicker shows you a lot of information about the style that you don’t have, such as genre (Hip Hop), time signature (4/4), feel (even 16), tempo (70), and the Styles Disk that it comes from (MultiStyles 1).
Double-clicking on the style will play a pre-made demo so you can hear what the style should sound like if you have it.
The rest of the StylePicker shows you styles that you do have that would be good substitutes. For example, the first one is “+Spit It Trap Beat with Piano,” which is a Hip Hop style with the same tempo, feel and time signature. So, you can try out these other hip hop styles to find the best substitute for the missing style.
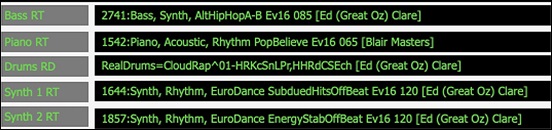
If you highlight the missing style “_OMENS+,” you will also see a list of the RealTracks and RealDrums used. This is useful as you may have many of the RealTracks, and can use this to add them to the style that you do choose.
StylePicker Enhancements
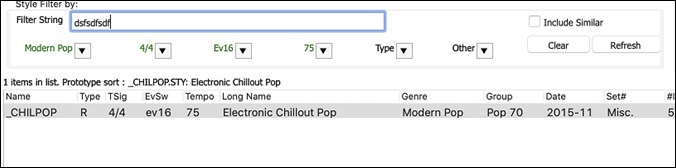
A style chosen as a prototype always shows in the list, even with a filter applied. For example, if you make _CHILPOP a protype by right-clicking it and choosing Mark as Prototype from the menu, then you will see a list of styles compatible with _CHILPOP.
![]()
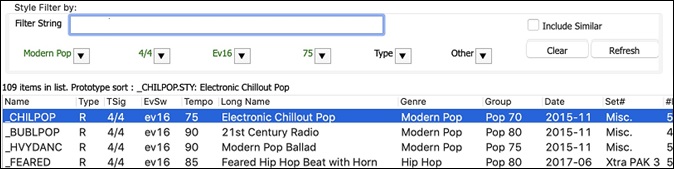
Now, if you type an unusual filter, like “dsfsdfsdf” that no style will contain, you won’t lose the prototype style as it will always display.
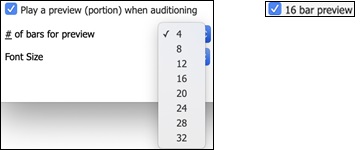
4-bar preview is now settable to 4, 8, 12, 16, 20, 24, 28 or 32 bars.
![]()
![]() If you want more than 4 bars as a preview, press the [Action] button and select Set Dialog Options from the menu. This will open the StylePicker Options dialog. With the “# bars for preview” option, select a number of bars. If you select 16, for example, then the checkbox in the StylePicker will show “16 bar preview.”
If you want more than 4 bars as a preview, press the [Action] button and select Set Dialog Options from the menu. This will open the StylePicker Options dialog. With the “# bars for preview” option, select a number of bars. If you select 16, for example, then the checkbox in the StylePicker will show “16 bar preview.”
Double-click on a style can be set to play the Chord Sheet chords instead of the pre-made demo. To set this, StylePicker Options dialog by pressing the [Action] button and selecting Set Dialog Options, and enable the “Double click on style plays Chord Sheet instead of pre-made demo.”
![]()
A progress bar will show at the top of the StylePicker during style rebuild.
![]()
Style rebuild first shows a dialog to confirm RealTracks and RealDrums folder locations.

If a style is not found, the StylePicker will launch and suggest replacement styles. (This is described in the “Help for Style Not Found” section.)
The [Action] button - Reset Dialog to Default menu item sets both the StylePicker main screen and the StylePicker Options dialog to defaults.
![]()
Generate Intros Using Song Chords
An option is added to incorporate the chords in any section into the intro. For example, you can use the last 4 bars of the song as an intro.
Let’s use a demo song for _CHILPOP.STY, which doesn’t have an intro.

Then, open the Generate Chords for Intro dialog (Edit | Song Form | Generate Chords for Intro), and select 4 bars from the bar 21 for the new “Use Chords from Bar” option.
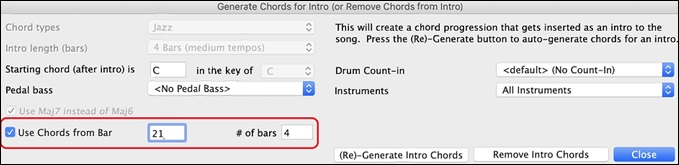
Now, when you press the [(Re)-Generate Intro Chord] button, you will get an intro that uses the last 4 bars, which works well.

More Track's Right-Click Menu Items
Menu items are added to the track’s right-click menu.
- Track Actions | Copy/Move Tracks
- Track Actions | Auto (Re)Regenerate Part of RealTracks (F8)
- Track Actions | Regenerate Window (option+F8)
- Edit MIDI | Adjust Octave of Notes to Fit Note Range
- Edit MIDI | Generate Chord Track on this Track
- (Drums track) Find a Drums Sub for Style - This will list RealDrums that would work for the current style.

Track Settings and Actions Dialog Enhancements
The dialog that opens with the T return keys has a new button for various MIDI editing commands like transpose, generate chord track, transpose octave to note range, etc.
![]() There is also a new button to copy/move tracks.
There is also a new button to copy/move tracks.
Summary Section in "What Add-ons do I have?” Dialogs
The dialog that opens with the Help | What add-ons do I have? menu item or the StylePicker’s [Add-ons] button lists the percentage (%) of RealTracks, RealDrums, Styles and add-on styles with links to pgmusic.com with more information.
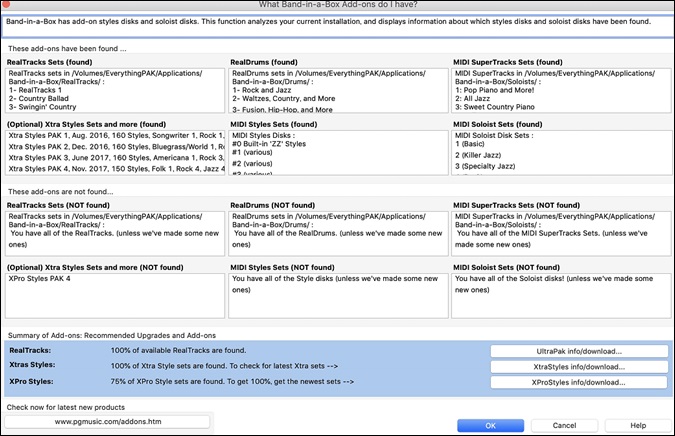

For example, on this installation you can see that:
- 100% of RealTracks and RealDrums are found
- 100% of Xtra Styles Sets are found
- 75% of XPro Styles Sets are found
In addition, there are buttons to launch pgmusic.com site with pages of more information and download information.
Pre-made "Showcase" Audio Demos for Playable RealTracks and RealDrums
These show how the Playable sound (MIDI.sfz) compares to the audio RealTracks and RealDrums, by playing 4 bars of Playable sound, then 4 bars of Playable sound with a band, then 4 bars of RealTracks with a band.
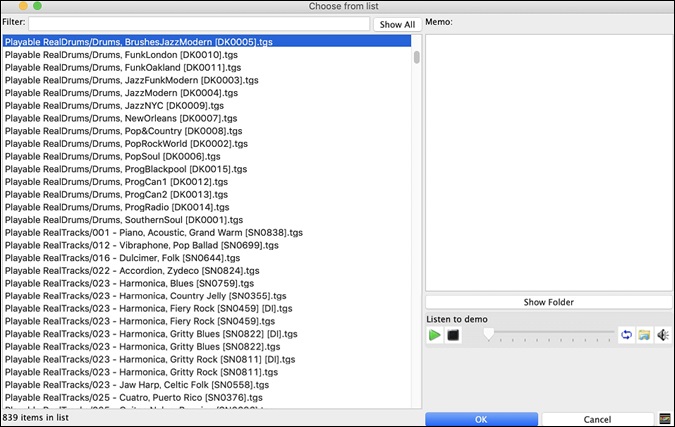
Press the [PT] button in the Notation window and choose the Select a new Playable SFZ Sound menu item, or right-click on the track button and go to Select MIDI Instrument (Patch) | Select Hi-Q MIDI Patch Plugin.
![]()
Now double-click or press the green PLAY button to hear a demo. The demos of the Playable RealTracks allow you to compare the original RealTracks (real musicians and instruments) with the MIDI sound playing the same part, by playing 4 bars of Playable sound, then 4 bars of Playable sound with a band, then 4 bars of RealTracks with a band.
Playable Tracks Enhancement
You can now easily increase/decrease volume of the playable MIDI sounds.
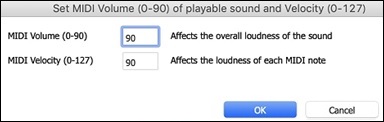
![]() Pressing the [PT] (Playable Tracks) button and choosing the menu item Set MIDI Volume and Velocity of Playable Sound opens the dialog with an additional setting for the MIDI Velocity. The MIDI Volume setting is 0-90, so if it is 90, you can’t make it higher, but the MIDI Velocity can be set separately and you can make that louder or softer.
Pressing the [PT] (Playable Tracks) button and choosing the menu item Set MIDI Volume and Velocity of Playable Sound opens the dialog with an additional setting for the MIDI Velocity. The MIDI Volume setting is 0-90, so if it is 90, you can’t make it higher, but the MIDI Velocity can be set separately and you can make that louder or softer.
Chord display for Nashville Notation and Roman Numerals now shows minor keys as 1m
For example, Am in the key of Am would be 1m. This is settable if you prefer 6m.
![]()
Display Option of Red Lines in Bars on Chord Sheet
There is an option to hide the red lines in bars that have changes. This can be done per song or global setting. You can toggle the setting back on when you want to see them again, but it gives the Chord Sheet a cleaner look when you are just playing songs.
![]()
You can control if you see these red lines on songs with bar changes. Use the “Red Line on Chord Sheet” option in the Edit Settings for Current Bar dialog (F5).

The "All" checkbox applies to all songs and it's enabled by default.
The "Auto/No/Yes" dropdown applies to the current song only and overrides the global setting. If you select "No" when "All" is checked, you won't see the red lines in the current song. If you select "Yes" when "All" is unchecked, you will see the red lines in the current song. If “Auto” is selected, the global setting will apply to the current song.
Notation Enhancements
The Notation window (Editable or Staff Roll mode) has hotkeys for changing note times left/right. When a note is highlighted in red (using the shift+arrow R/L keys), use the command+optionlt+srrow R/L keys to change the note time +/- 5 ticks (120 ticks per beat).
Rests now transpose from treble to bass. For example, in this image the Melody track contains some rests on the treble clef.
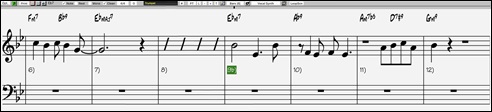
If you visually transpose the song, the rests will display on the bass clef.
You can now highlight an area of non-editable notation.

The Lead Sheet can set the number of staves to one per page in Options.
![]()
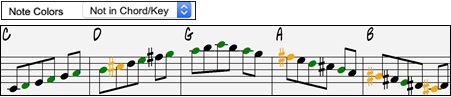
There is a new notation setting for note colors: black (a chord tone), green (not a chord tone) and orange (not a chord tone and not a scale tone).
Notation Printing Enhancements
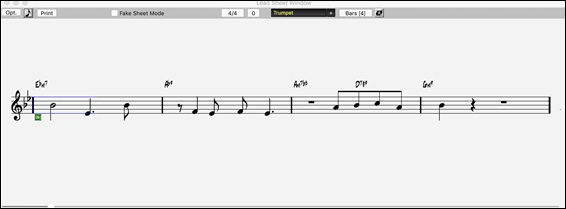
There is a new File menu item Print Song in Lead Sheet Mode that prints the song using the Lead Sheet options (such as fake sheet). The hotkey is shift+command+P. This is in addition to File | Print Song (command+P) that prints using the Notation window options.
![]()
When you do not include staff lines in printout, there is an option to show chords above instead of inside each bar. This is set with the “Regular chord posirion when no staff lines” option.

Band-in-a-Box remembers all items in the Print Options dialog when returning to it and after reboot.
The Print Options dialog has hotkeys for [OK - Preview/Graphics] and others.
Print Range remembers last settings and uses that as default.
XML Enhancement
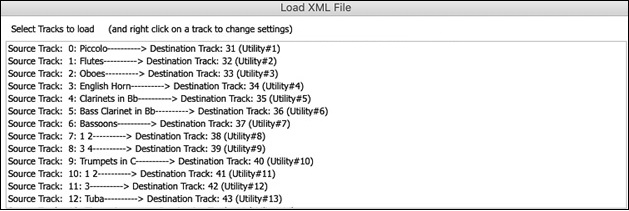
Importing a MusicXML file to Utility tracks is enhanced, so tracks don’t default to all going on the Melody track.
New Hotkeys
command+A selects all in the various windows like Chord Sheet, Notation, Audio Edit and Piano Roll.
option+shift+Z solos the current track on the Mixer.
L O G return opens the FlashMessageLog.txt.
(Audio Edit window) command+shift+V mix-pastes audio.
(Audio Edit window) shift+delete deletes a region of audio.
(Piano Roll window) + (plus) increases velocities of the selected notes by 1.
(Piano Roll window) shift++ (plus) increases velocities of the elected notes by 5.
(Piano Roll window) - (minus) decreases velocities of the selected notes by 1.
(Piano Roll window) shift+- (minus) decreases velocities of the selected notes by 5.
(Piano Roll window) ~ (tilde) randomizes velocities of the selected notes (-1 to +1).
(Piano Roll window) shift+~ (tilde) randomizes velocities of the selected notes (-5 to +5).
Miscellaneous
Songs loaded that previously had audio but no longer have audio files will remove the audio settings (tempo, transpose) from the track.
You can now drop VST plugins (.dll files) onto the plugin selector dialog to add them to the Band-in-a-Box plugin lists.
A song setting to allow chord variations in repeated sections is added.
The DAW button turns red to clearly indicate the DAW plugin mode is currently on.
The “Select Hi-Q MIDI Patch Plugin” menu item always shows in the track button menu.
MIDI tracks that use their own MIDI plugin display VU meters based on audio output rather than estimated MIDI events.
Increase/decrease note velocity adjusting features are added to the Piano Roll window. These can be accessed from the right-click menu or hotkeys.
Feature Browser Enhancements
The Feature Browser (accessed from the / Enter keys) is updated to include the latest 2023 features.
There is a new button to filter the list to show the latest 2023 features. You can add keywords to find new features for topics of interest.
…and more!
Thank you for taking time to read this introduction to Band-in-a-Box 2023!
Unconditional 30-Day Money Back Guarantee on all PG Music products purchased from PG Music Inc.
PG Music Inc.
29 Cadillac Ave Victoria BC Canada V8Z 1T3
Sales: 800-268-6272, 250-475-2874,+ 800-4746-8742*
* Outside USA & Canada where International Freephone service is available.
Access Codes
Tech Support: Live Chat, support@pgmusic.com
All of our XPro Styles PAKs and Xtra Styles PAKs are on sale until May 15th, 2026!
It's the perfect time to expand your Band-in-a-Box® style library with XPro and Xtra Styles PAKs. These additional styles for Band-in-a-Box® offer a wide range of genres designed to fit seamlessly into your projects. Each style is professionally arranged and mixed, helping enhance your songs while saving you time.
April 22, 2026 Band-in-a-Box 2026 for Mac Videos With the release of Band-in-a-Box® 2026 for Mac, we’re rolling out a collection of brand-new videos on our YouTube channel. We’ll keep this forum post... Online now
Need Help?
Customer Sales & Support
|
Phones (Pacific Time) 1-800-268-6272 1-250-475-2874 |
||
| Live Chat | ||
| OPEN | Online Ordering 24/7 |
|
| OPEN | Forums, email, web support |