
Search Manual
Band-in-a-Box® 2021 for Windows® Upgrade Manual
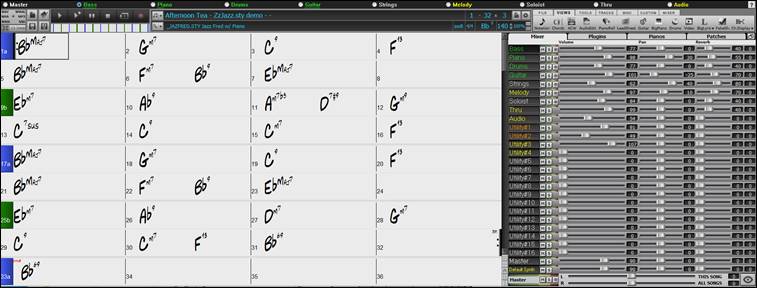
Chapter 3: GuickStart Tutorial
Let’s take a close look at the great new features in Band-in-a-Box 2021!
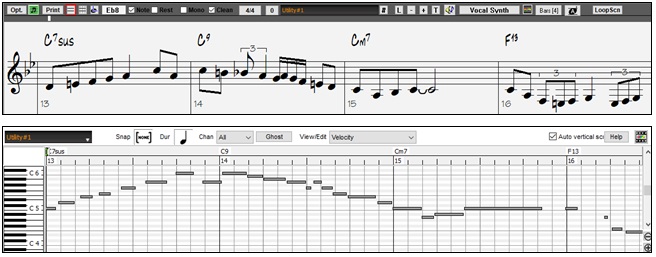
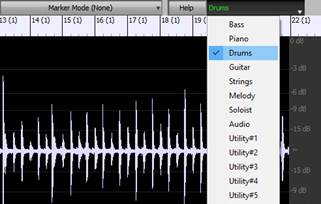
Utility Tracks
There are 16 new editable Utility tracks, which can be used for audio and/or MIDI. You can generate RealTracks on the Utility tracks, where you can hear and edit the audio RealTracks, or view and edit the RealCharts MIDI. You can record audio or import an audio file to the Utility tracks to play, edit, or harmonize the audio. You can copy or move audio, MIDI, or both from other tracks to the Utility tracks. You can record MIDI or import a MIDI file to the Utility tracks for playback, notation display, or editing.
To generate RealTracks on a Utility track, right-click on that track in the Mixer and go to Generate | Select and Generate RealTracks. If you want to generate RealTracks for a region, highlight the region on the Utility track in the Audio Edit window. Then, select a RealTracks in the Best RealTracks dialog and press OK.
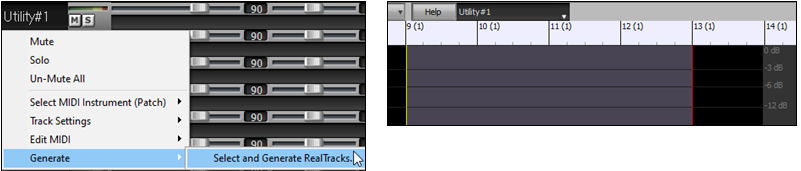
When the RealTracks is generated, you can view the audio in the Audio Edit window.
Press the [Play] button on the toolbar to hear the RealTracks on the Utility track. You can use the Mixer to control volume, panning, etc. for the Utility track.
![]()
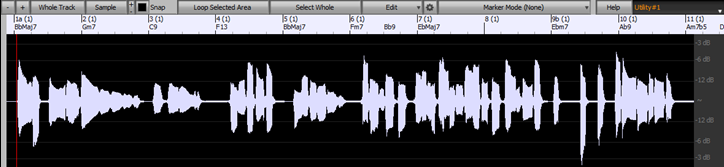
You can regenerate a region of the RealTracks on the Utility track. To do this, Highlight the region, press the [Edit] button, and go to Generate | Generate RealTracks. If you want to regenerate a region using a different RealTracks, use the Select and Generate RealTracks menu item instead.

During the regeneration, the whole track becomes blank for a moment, but when it’s finished, everything except the highlighted region is the same as it was before.
You can repeat this process until you are satisfied, and since it supports the Undo and Redo, you can use the Ctrl+Z or Shift+Ctrl+Z keys to go back to what you like most.
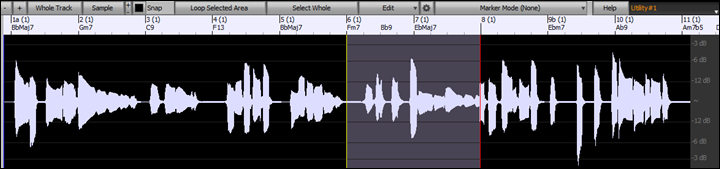
The audio on the Utility tracks can be edited in the Audio Edit window with the [Edit] button menu, the right-click menu, or the standard hotkeys (e.g., Ctrl+C, Ctrl+V). For example, you can highlight a region and move it to another location of the track, or you can select the whole track, copy it, and paste it into another Utility track. When the regions are edited, the beginning and ending of the regions cross-fade to make a smooth transition, so you won’t hear unpleasant clicks or pops at the joints during playback.
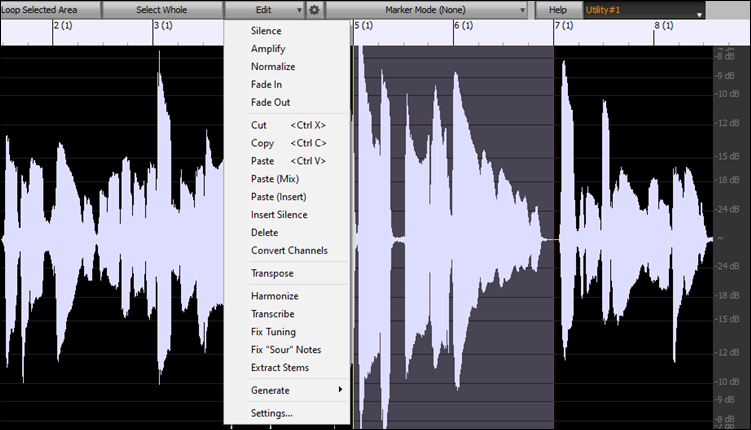
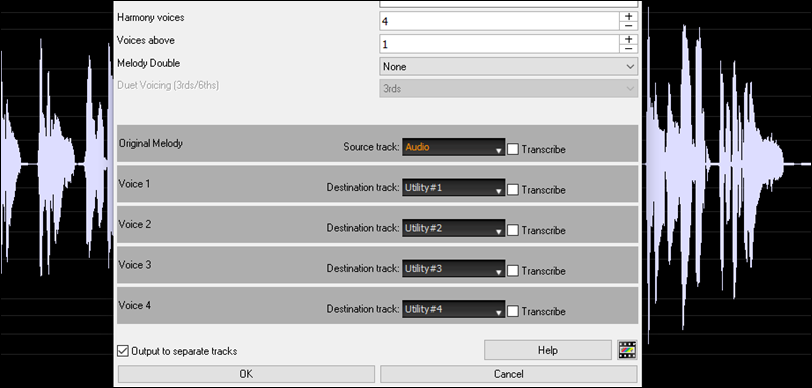
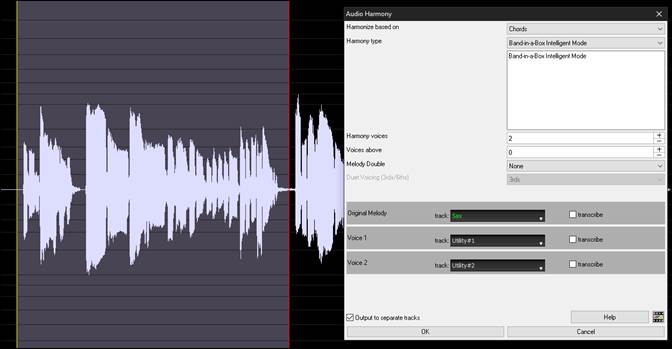
You can harmonize the audio on any track, and send the separated harmonies to the Utility tracks. In the Audio Edit window, press the [Edit] button, and select Harmonize from the menu to open the Audio Harmonies dialog. Then, set the number of harmony voices and other options, select the source track, enable the “Output to separate tracks” option, and select destination tracks for each harmony voice.
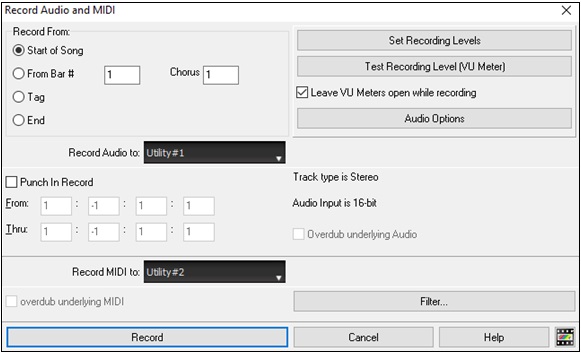
You can record audio to the Utility tracks. Previously you could record only to the Audio track, but now you can use 16 additional tracks. Press the [Record Audio] button on the toolbar, then in the dialog that opens, set the “Record Audio to” option to a Utility track. If you want to record audio and MIDI at the same time, also set to record MIDI to a Utility track.
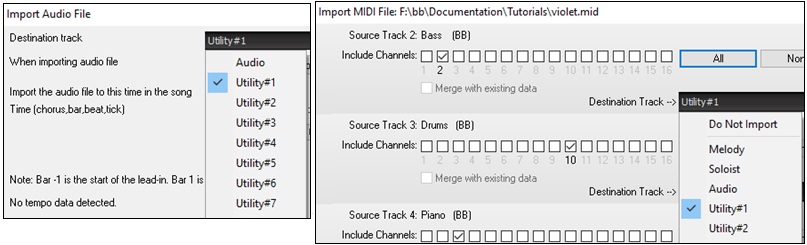
You can import an audio or MIDI file to a Utility track. Drag a file and drop it anywhere on the Band-in-a-Box screen, and when the Import dialog opens, select a Utility track as the destination.
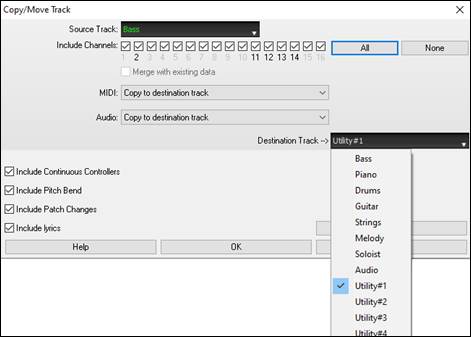
You can copy or move the whole audio and/or MIDI from other tracks to a Utility track using the Copy/Move Track dialog. Open the dialog with the Edit | Copy Special | Copy/Move Tracks menu item, and select a Utility track as the destination for copying or moving audio and/or MIDI.
When a Utility track contains MIDI, you can view notation, see the playing on the guitar fretboard or the piano keyboard, or edit in the Notation or Piano Roll window.
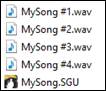
When you save the song, the Utility tracks will be saved as audio files (.WAV) with the same name in the same folder. For example, if you save the song as MySong.MGU, Utility track #1 will be saved as MySong #1.WAV, Utility track #2 will be saved as MySong #2.WAV, etc. Then, next time you open MySong.MGU, these audio files will be loaded to the Utility tracks.
High Bit Depth Audio Playback
Audio playback is no longer restricted to 16 bit. The highest setting available will be used, either 16, 24, or 32 bit depending on your audio interface. Also, user-made Audio tracks are not restricted to 16 bit so you can edit your audio and save it with minimal data loss.
Improved Audio Rendering
![]()
![]()
Rendering is faster.
The default bit depth is 24 bit.
![]()
The highest quality tempo stretching setting for élastique is used when rendering. You may be using a lower quality setting for playback in order to increase performance, but this is not necessary when rendering to an audio file.
![]()
When generating separate audio files for each track, Band-in-a-Box can ignore the Mixer settings of each track and use the default settings (Volume = 0 dB, Pan = 0, Reverb = 0, Tone = 0) instead.
![]()
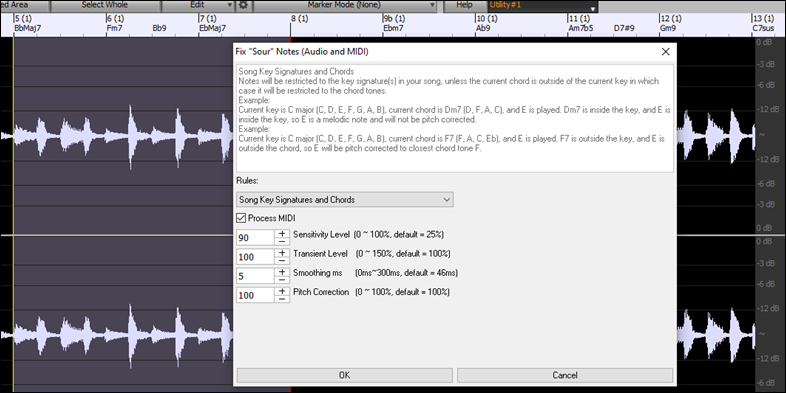
Auto-Fix “Sour” Notes
There is a new feature to auto-fix out-of-tune notes in polyphonic audio, either for the generated RealTracks or any audio track. This means that if a chord is played with multiple notes at once, this feature can fix certain notes within that chord so that the note won’t clash with the chord progression or other tracks. For example, if a G# note is played on a CMaj7 chord (C, E, G, B), that note will be pitch corrected down to a G note. This feature can be applied as a track setting for any RealTracks or can be used for editing the Audio or Utility tracks.
For the RealTracks, right-click on the track radio button on the main screen, and go to Track Settings | Auto Fix “Sour” Notes. You can then select one of the rules for the auto-fix.
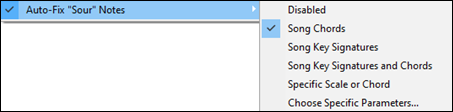
Song Chords: Any note outside of the current chord will be corrected to a closest chord tone. For example, if a G# note is played on a CMaj7 chord (C, E, G, B), that note will be pitch shifted to a G note.
Song Key Signature: Any note outside of the key signature of the song will be corrected to a closest key tone. For example, an Eb note played on a C major key (C, D, E, F, G, A, B) will be pitch shifted to an E note.
Song Key Signatures and Chords: Notes will be restricted to the key tones unless the current chord is outside of the current key, in which case notes will be restricted to the chord tones. For example, on a C major key (C, D, E, F, G, A, B), an E note played on a Dm7 chord (D, F, A, C) won’t be corrected, but an E note played on an F7 chord (F, A, C, Eb) will be pitch shifted to the closest chord tone F.
Specific Scale or Chord: Notes will be corrected based on a specific scale or chord that might not have anything to do with the current song. This option will use the scale or chord that are selected in a dialog which opens with the next menu item.
Choose specific Parameters: This allows you to customize the rules.
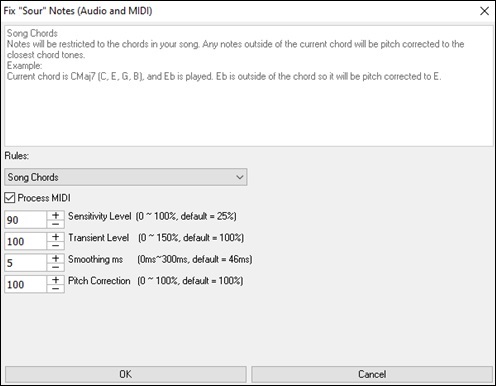
Rules : The defines the rules for the pitch correction. You can see the description for each rule in the above area
Process MIDI: If this option is enabled, any MIDI on the track will be processes as well. Notes within the selected region will be changed according to the chosen rules.
Sensitivity Level : Increasing the sensitivity level will cause weaker notes to be detected. Decreasing it will cause weaker notes to be ignored and unaffected by the pitch correction.
Transient Level : Increasing the transient level will make transients (e.g. beats like plucking sounds or drum hits) louder. Decreasing it will make transients quieter.
Smoothing ms : This is the length of time that notes will take to change in milliseconds. Increase this for instruments that sound better with slower bending between notes like vocals or pedal steel. Decrease for rigid sounding instruments like piano.
Pitch Correction : This will correct the tuning of notes. For example, a guitar might have one string out of tune, and notes played on that string will be pitch corrected.
The auto-fix feature can be used for any audio track including the Utility tracks, and can be applied to the whole track at once or a small region at a time. You can use the feature not necessarily to fix “sour” notes, but just to make certain regions of the audio conform more closely to the chord progression. To use the feature, open the Audio Edit window and highlight the region of the track on which you want to correct notes. Then, press the [Edit] button and select Fix “Sour” Notes from the menu. In the Fix “Sour” Notes dialog, select one of the rules for the auto-fix and press OK.
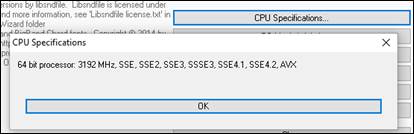
Higher Audio Playback Performance
Band-in-a-Box and RealBand now support SIMD (SSE2, SSSE3, AVX, AVX2) features in your CPU. This means that audio DSP (Digital Signal Processing) will be at least 4 times faster, depending on your CPU. This allows more tracks, more plugins, higher quality élastique stretching, etc. during playback without causing audio dropouts.
The [CPU Specifications...] in the About dialog (Help | About Band-in-a-Box) displays available SIMD features of your CPU.
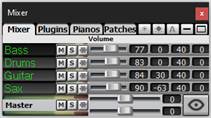
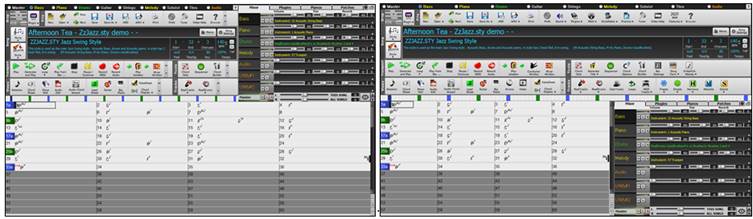
Improved Mixer
The floating Mixer can be resized vertically. Horizontal resizing is less limited, which allows it to be more compact.
 |
When it’s the smallest, it still retains some very useful functions like displaying the master VU meter or allowing the master volume control for the current song or all songs. |
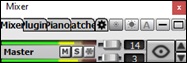
The Mixer can be embedded in the main screen and is horizontally resizable to allow more room for the Chord Sheet, Notation, Piano Roll, or Audio Edit window.
In the normal screen mode, the Mixer can be embedded at the top right of the screen or the bottom right. You can set this with the “Embedded Mixer Top Right” option in the Settings tab.
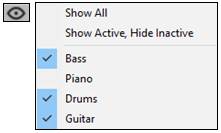
You can select the tracks to display in the Mixer. Click on the “eye” button at the bottom right corner and check the tracks to display.
The Mixer can scroll visible track panels. Use the arrow buttons at the bottom right corner, or the mouse wheel if it is not used for controlling sliders and dials.

The Mixer automatically shows active tracks and hides unused tracks when playback starts. You can set this with the “Auto Show/Hide Tracks When Starting Playback” option in the Settings tab.

You can change the track panel height by moving the mouse wheel while holding down the Ctrl key.

When resizing the window, the track panel height will be restricted to the customized settings. For example, if the maximum panel height is set to a low value, then when you expand the window, there will be black portion below the track panels, but if it’s set to a higher value, then when you expand the window, each track panel will be stretched to fill the window.

A Settings tab is added to set options for the Mixer.
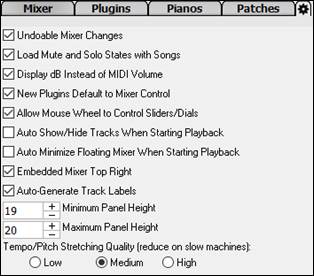
You can set Volume and Panning to display as decibels instead of MIDI values. This makes sense when you are mostly dealing with RealTracks, RealDrums, and audio tracks. To display as decibels for all tracks, enable the “Display dB Instead of MIDI Volume” option in the Settings tab. To set for each track, right-click on a track and select Track Settings | Display dB Instead of MIDI volume.
The Mute and Solo states of each track will be saved in the songs and will be loaded the next time you open them. This behavior is controlled by the “Load Mute and Solo States with Songs” option in the Settings tab.

You can use the mouse wheel to control sliders and dials if you enable the “Allow Mouse Wheel to Control Sliders/Dials” option in the Settings tab. Hover the mouse cursor over a slider or dial, and move the mouse wheel to change the value.
![]()
You can double-click on the track label to rename it.
Improved Plugin Control
Plugins can be accessed directly from the Mixer. Click on a plugin name, and use the menu to choose a plugin, load or save a preset or a group of plugins, change plugins settings, and do more.

Each MIDI track can send its MIDI output to another track. By default, all accompaniment tracks route to the default synth, but now you can choose a plugin on another track. This is accessed from the Plugin’s context menu on the Mixer.
MIDI plugin’s audio output can be controlled in the Mixer with 3 new settings. This allows MIDI plugin’s sound to be controlled the same way as audio tracks (RealTracks, RealDrums, etc.). These settings are accessed from the Plugin’s context menu on the Mixer.
 |
Attenuate Synth Output Volume and Panning: This will change the gain of the plugin’s audio output based on the Volume and Panning controls on the Mixer. When this is enabled, MIDI controllers for volume will not be sent to the plugin. This setting is useful for plugins that do not respond to MIDI controllers. |
Multiple plugins GUI windows can be used simultaneously. These can be accessed from the Plugins section of the Mixer. Right-click on a plugin button to automatically show or hide the plugin’s GUI, or left-click and choose Show Plugin Window from the menu.
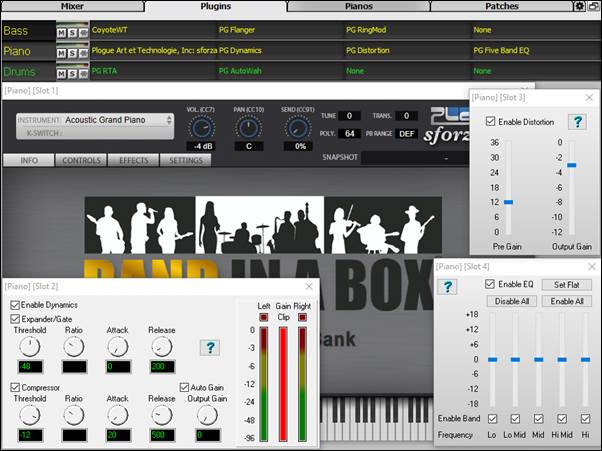
WAVES VST plugins are now supported.
![]()
Improved Audio Editing
You can view audio on any track (Bass, Piano, Melody, etc.), not just the Audio track, and copy regions of audio to Utility tracks. The track selector button launches a menu for selecting the track, or you can just use your mouse wheel over it to quickly shift through tracks.
New options are added to the Audio Edit Settings dialog.
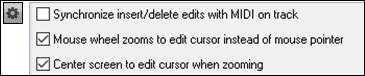
- “Synchronize insert/delete edits with MIDI on track”: If this is enabled, then when inserting or deleting regions of audio, MIDI on the same track will be shifted accordingly to keep the MIDI and audio in sync.
- “Mouse wheel zooms to edit cursor instead of mouse pointer”: If this is enabled, the mouse wheel will zoom to the edit cursor instead of zooming to the mouse cursor.
- “Center screen to edit cursor when zooming”: If this is enabled, the edit cursor will scroll to the center of the window when zooming with the mouse wheel. This is only applicable if “Mouse wheel zooms to edit cursor instead of mouse pointer” is enabled.
Hotkeys are added.
- Home will move the cursor to the beginning of a track.
- End will move the cursor to the end of a track.
- Shift+Home will move the left cursor of the selected region to the beginning of a track. If no region is selected, this will select a region from the cursor to the beginning of a track
- Shift+End will move the right cursor to the end of a track. If no region is selected, this will select a region from the cursor to the end of a track
- Ctrl+A will select the whole track.
Multi-Track Audio Harmonies
Audio harmonies can now be generated onto individual tracks. This way you can use the Mixer to control the volume and panning, adjust reverb, add effects, etc. for each voice.
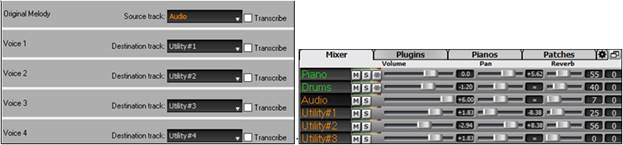
You can view a RealTrack in the Audio Edit window, select a region, and harmonize it to new Utility tracks.
Improved Audio Chord Wizard
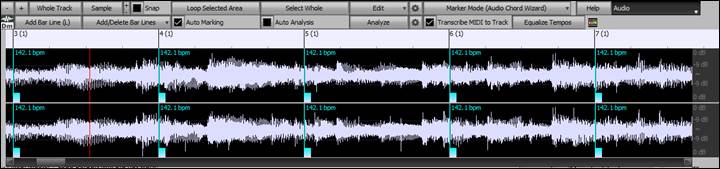
The chord analysis is more accurate.
The wizard analyzes audio files that are out-of-tune.
There is an option to limit chords to at least one bar in length.
There are presets to limit chords to certain chords in the key.
The wizard now transcribes MIDI notes to the same track. Previously, transcribed MIDI notes were written to the Soloist track.
![]()
Improved Chord Sheet
Previously, in order to change the number of rows and columns displayed on the Chord Sheet, you needed to visit the Display Options dialog. Now, you can use the new zoom buttons located at the bottom right on the Chord Sheet..
![]()
![]() These will change the number of rows.
These will change the number of rows.
![]()
![]() These will change the number of columns.
These will change the number of columns.
![]() This will revert back to auto.
This will revert back to auto.
You can also use the mouse wheel to change the number of rows and columns.
- Moving the mouse wheel while holding down the Ctrl key changes the number of rows.
- Moving the mouse wheel while holding down the Shift key changes the number of columns.
Time signature changes can be displayed on the Chord Sheet. This is enabled by a new option in the Display Options dialog.

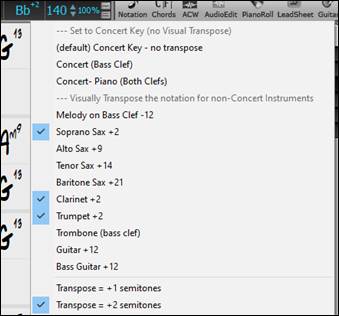
Visual Transpose Setting on Key Button
The Visual Transpose setting is now displayed next to the song key on the main toolbar. Clicking on it will launch a menu for selecting the setting.
Copy/Paste Chords as Simple Text
Chords can be copied as a simple text format and be pasted into another song in Band-in-a-Box or a text file in a program like Notepad. You can also copy chords in all songs in a folder to the clipboard, or save them as individual text files or a single text file. You can type chords in a text file and paste them into a Band-in-a-Box song.
Chord from a Band-in-a-Box song
Select the chords on the Chord Sheet, and press the standard Ctrl+C keys to copy them. You can then press Ctrl+V in another song or a text file to paste them.

If chords are not selected on the Chord Sheet, Ctrl+C copies the whole song including all chords and additional information (title, key, tempo, form, memo, etc.) to the clipboard. When you press Ctrl+V in a text file, the whole song will be pasted into the text file. If you want to paste the whole song into another song, press Ctrl+Shift+V or go to menu Edit | Paste Special - from Clipboard text to Song(s) to open a dialog and select the items to paste.
By default, part markers as well as rests, shots, holds, and pushes are included in text, but you can change this with the options in the Song(s) to Text (clipboard or .txt file) dialog. This dialog also allows you to select the items that will be included when you copy the whole song. Using this dialog, you can also copy all songs in a specific folder to the clipboard or save them as text file(s). The dialog can be accessed with the Edit | Copy Special | Copy Song(s) to Text on clipboard or file(s) menu item.
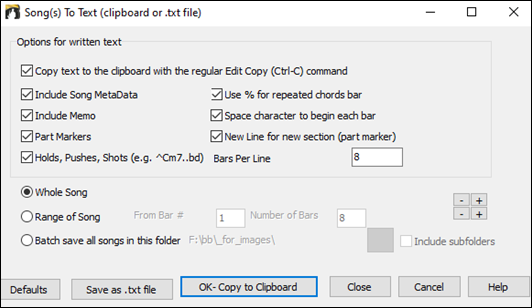
Copy text to the clipboard with the regular Edit Copy (Ctrl-C) command: This has to be enabled in order to copy chords with the standard Ctrl+C keys.
Include Song MetaData: This option applies when you copy the whole song. If this is checked, the song metadata (title, key, tempo, form, style, etc.) will be included.
Include Memo: This option also applies when you copy the whole song.
Part Markers: By default, part markers are copied, but you choose not to copy them.
Holds, Pushes, Shots: By default, rests, shots, holds, and pushes entered in chords are copied, but if you don’t want them, uncheck this option.
Use % for repeated chords bar: If this is enabled, a % sign will be used for a blank bar.
Space character to begin each bar: If this is enabled, a space will be added at the beginning of each bar.
New Line for new section (part marker): If this is enabled, every section (part marker) will start a new line.
Bars per line: You can set the number of bars of chords to write per line.
Whole Song: If you select this mode, you can press [OK - Copy to Clipboard] to copy the whole song (chords and additional information selected) or [Save as .txt file] to save it as a text file.
Range of Song: If you select this mode, you can press [OK - Copy to Clipboard] to copy the chords in the selected range or [Save as .txt file] to save them as a text file.
Batch save all songs in this folder: With this mode, you can copy or save all songs in a specific folder. Press the folder icon to select the folder, and choose the option to include subfolders of that folder. Then select the destination with the Batch Save As option. You can copy all songs in a specific folder to the clipboard, save them as individual text files in the same folder, save them as individual text files in another folder, or save them as a single text file
The [Defaults] button resets all options to default settings. The [Close] button closes the dialog, saving the settings but not copying anything.
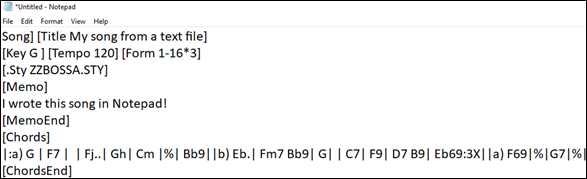
Chords from a text file
You can copy chords in a text file and paste them into a Band-in-a-Box song. Type chords in a text file using a vertical line for a bar line. If you want a blank bar, leave a space or type a % sign between vertical lines. For example, you can type | D | G7 | | F | or | D | G7 | % | F |. You can use shortcuts and non-standard chord display (e.g., | 1j | 2h | 53 |). To add breaks (rests/shots/holds), type period(s) after the chord. To add pushes, enter caret(s) before the chord. If you want a part marker, type a or b and a parenthesis after a vertical line. You can type as many bars as you like on each line.

You can even enter a whole song with a text file. The easiest way is to use the text file that you pasted the whole song into. Some of the information pasted into that text file cannot be pasted back into Band-in-a-Box because they are not applicable for a new song. For example, “Song Summary” is no applicable because this is automatically generated in the song and cannot be edited by a user. However, it will not cause problems if you leave them in the text file. You can include a title, a key, a tempo, a form, a style file name, and a memo.
When you are ready, press Ctrl+A to select all and Ctrl+C to copy. Then, in Band-in-a-Box, press Ctrl+Shift+V or go to menu Edit | Paste Special - from Clipboard text to Song(s). This will open the Paste text to Song(s) dialog.
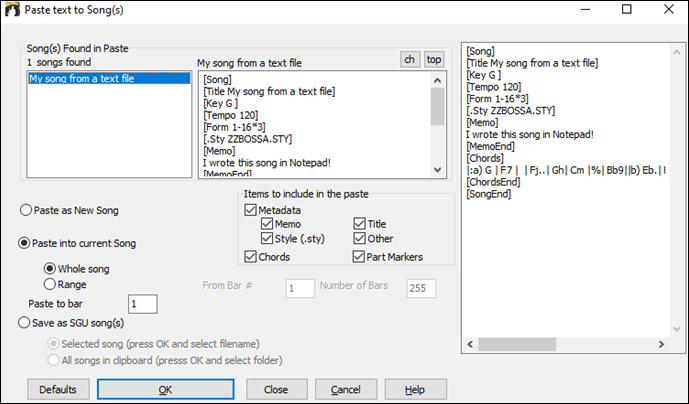
Song(s) Found in Paste: If you created multiple songs in the text file, you can select the song to paste.
Items to include in the paste: Check the items you want to include in the paste.
Paste as New Song: This mode will paste all the chords in the selected song into a new song
Paste into current Song: This mode will paste into the selected bar in the current song. You can select either the Whole song option to paste all chords in the song or the Range option to paste the chords in the selected range of the song.
Save as SGU song(s): This mode will save the selected song or all songs on the clipboard as new song(s). To save the selected song as a new song, select the Selected song option. Then, press OK, select a folder, and type a file name. To save all songs as new songs, select the All songs in clipboard option, press OK, and select a folder.
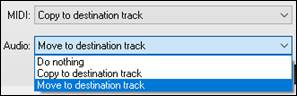
Improved Copy/Move Track
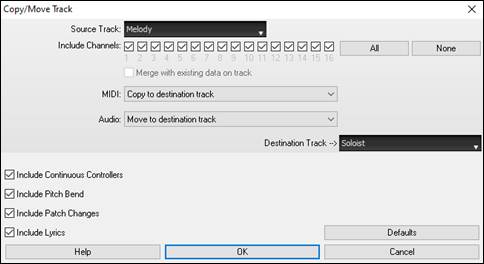
The dialog now lets you copy or move audio from one track to another. Previously, you could only copy or move MIDI.
Hovering the mouse cursor over the channel selector checkbox shows you the number of events on that channel.
![]()
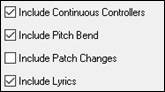
When copying MIDI, you can now filter out various types of events.
Improved Copy Chords/Melody
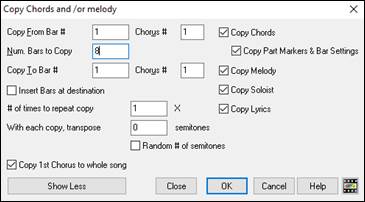
Typing kk opens the Copy Chords and/or Melody dialog. Typing kk followed by two numbers separated by a comma opens the dialog with presets. For example, hitting kk4,1<Enter> at bar 9 opens the dialog with presets to copy 4 bars from bar 1 and paste them to bar 9.
The dialog now has a setting to include part markers.
![]()
There is now a “Close” button, so you can make presets and apply them to the k copy command. (Note that k and kk copy command will preserve the current settings in this dialog. Use kk or Edit | Copy Special | Copy From.. To.. if you want to change these settings.)
Bar-based lyrics and section text layers will be copied when the “Copy Lyrics” option is enabled.
![]()
Track Selection for Auto Intro
In the previous version, we added the option to play the auto-generated intro by “all tracks,” “drums only,” or “bass and drums only.” Now, you can also select “drums then drums and bass,” “bass then bass and drums,” any track (e.g. “piano only”), or any combination of tracks.
Improved MIDI Import
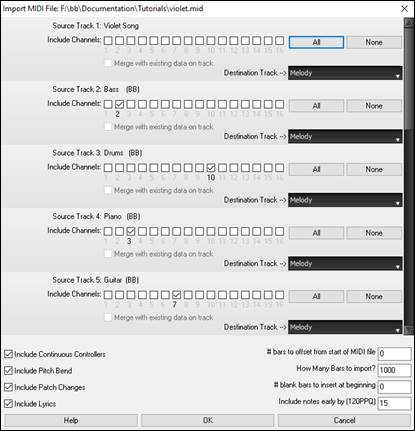
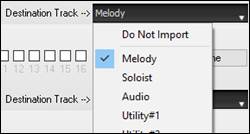
You can now choose the destination track for multi-track MIDI files.
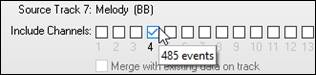
Hovering the mouse cursor over the channel selector checkbox shows you the number of events on that channel.
There are separate settings for filtering Continuous Controller events and Pitch Bend events. Previously, there was a combined setting for these.
![]()
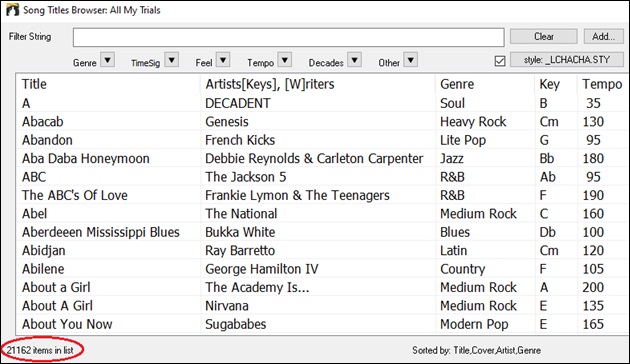
7,000 More Titles for Song Titles Browser
We’ve added 7,000 more song titles including requests from users, so there are now over 21,000 titles.
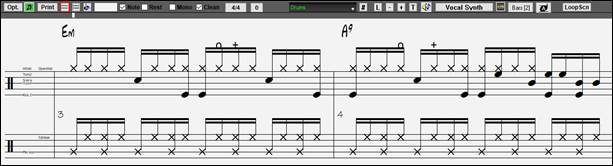
RealCharts for all RealDrums
We’ve added over 300 additional RealChart (with accurate Drum Notation and MIDI to trigger drum sounds) for RealDrums. This means that now all RealDrums have RealChart.
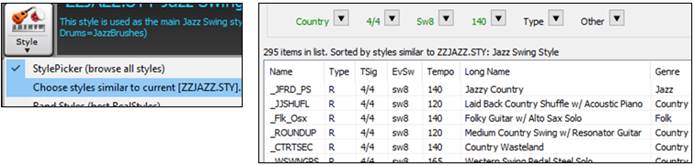
Similar Style Selection
Band-in-a-Box can show a list of styles that are similar to the current style, sorted by similarity. Access this feature from the [Style] button, right-clicking on the style on the main screen, or File | Load Style Special menu item.
Define C/D Using Same Style
There is a new option “Define c/d using same style” in the right-click menu on the Chord Sheet. This is the same as the existing “Define c/d” option, except it would not open the StylePicker. It would just treat as if you went into the SylePicker and picked the same style. It’s for being able to define c/d for display purposes without caring about the style itself.

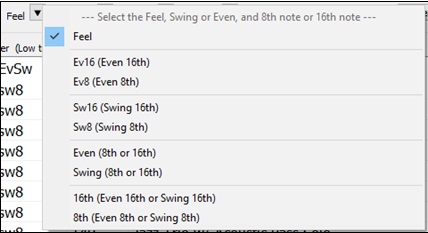
More Feel Filters in StylePicker
The StylePicker has Feel filters added for Even (Even 8th or Even 16th), Swing (Swing 8th or Swing 16th), 16th (Even 16th or Swing 16th), and 8th (Even 8th or Swing 8th).
Avoid Transpositions for RealTracks Settable for All Songs and Individual Tracks
All tracks in all songs and individual tracks in the current song can be set to avoid transpositions for RealTracks. Previously, only all tracks in the current song could be set for this.To set for all tracks in all songs, enable “Avoid Transpositions” in the Global Song Override dialog (Options | Preferences | Override). To set for individual tracks in the current song, right-click on the track radio button and go to Track Settings | Set track to avoid transpositions.

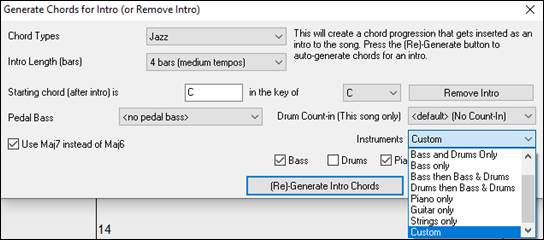
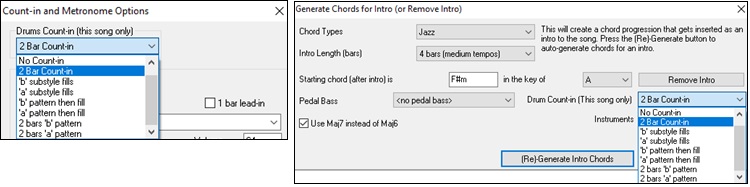
Custom Lead-in Option
You can set the lead-in option (yes/no and type) for the current song. This is in the Song Settings, Generate Chord for Intro, and Count-in and Metronome Options dialogs.
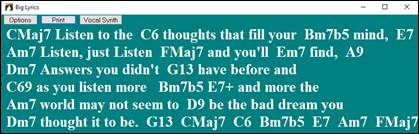
Bar-based Lyrics Improved
Bar-based lyrics now display in the Big Lyrics window.
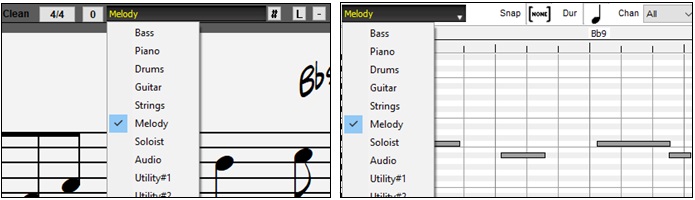
Track Selector with Full Track Names
In windows like Notation, Lead Sheet, Audio Edit, Piano Roll, etc., the track selector buttons that showed the initials of the track names have been replaced by a track selector that shows the full track names. You can press it and select a track from the menu, or just hover the mouse cursor over it and use the mouse wheel to quickly switch tracks.
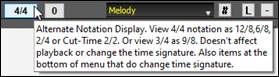
New Notation Features
The time signature button has a better menu with options to select alternate notation display and to open dialogs like Set Time Signature and Edit Settings for Current Bar to change the time signature.
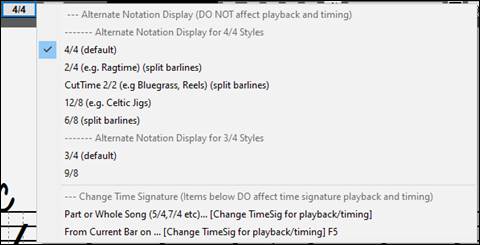
A hint is added to the time signature button.
A button is added for the visual transpose. Click on the button and type a number of semitones to transpose.

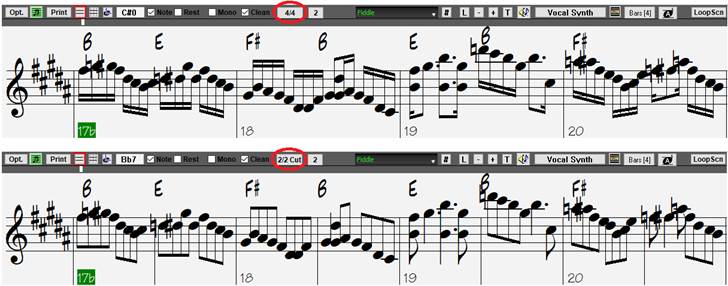
If the song is in 4/4, there is an option to display it as cut time. For example, a bluegrass song that is currently displaying with 16th notes will display using 8th notes. This allows easier readability and is ideal for displaying the notation of songs that were specifically written in cut time.
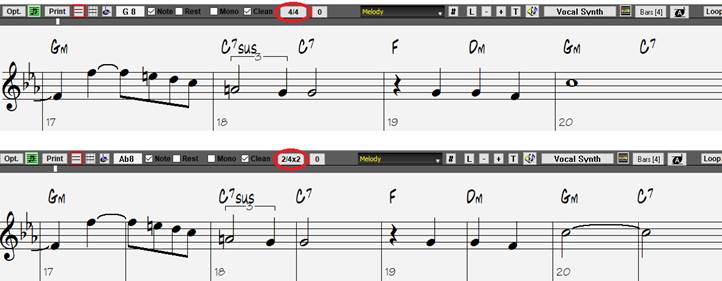
If the song is in 4/4, you can display it as 2/4 instead of 4/4, without changing the main time signature of the song to 2/4. This special 2/4 notation display mode lets you continue to generate better sounding RealTracks, etc. than if you had switched the main time signature of the song to 2/4.
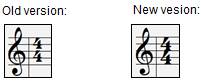
The time signature displays with a better size. The height of the time signature fills the whole height of the staff.
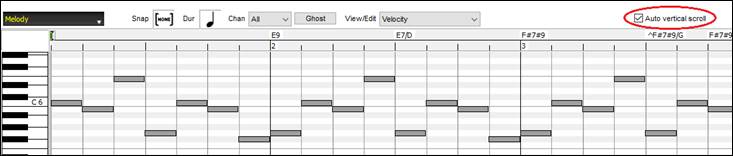
Automatic Vertical Scroll in Piano Roll Window
Previously, the auto scroll was always on, but now the new option allows you to disable it. This is useful when you want to compare the similar tracks when you switch the tracks. For example, if you duplicate MIDI in the Utility track #1 to the Utility track #2 and filter out notes on channel 11 (e.g. a Bass track), you can see the differences between these tracks when you shift back and forth the tracks.
New Hotkeys
There is a hotkey to insert N bars at the current location. For example, in8<Enter> would insert 8 bars at the current location. This command is also added to the right-click menu on the Chord Sheet.
![]()

There is a hotkey to copy the last N bars and insert them to the current location. For example, ki8<enter> or ik8<Enter> would copy the last 8 bars and insert them to the current location. This command is also added to the right-click menu on the Chord Sheet.
![]()

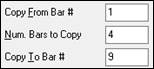
There is a hotkey to copy N bars from the bar M and insert them to the current location. For example, ik8,9<enter> or ki8,9<enter> would copy 8 bars from the bar 9 and insert them to the current location. ikk8,9<enter> or kki8,9<enter> would do the same, but launch the Copy Chord and/or Melody dialog, which allows you to choose what to copy.

Alt+Shift+T will auto-generate a title to the current song.
![]()
Alt+Shift+F will open the Favorite Folders dialog.
![]()
Alt+Shift+S will save the current song to a favorite folder. This command is also added to File | Save Special submenu.
![]()
…and more!
Thank you for taking time to read this introduction to Band-in-a-Box 2021!
Unconditional 30-Day Money Back Guarantee on all PG Music products purchased from PG Music Inc.
PG Music Inc.
29 Cadillac Ave Victoria BC Canada V8Z 1T3
Sales: 800-268-6272, 250-475-2874,+ 800-4746-8742*
* Outside USA & Canada where International Freephone service is available.
Access Codes
Tech Support: Live Chat, support@pgmusic.com
 Online now
Need Help?
Customer Sales & Support
|
Phones (Pacific Time) 1-800-268-6272 1-250-475-2874 |
||
| Live Chat | ||
| OPEN | Online Ordering 24/7 |
|
| OPEN | Forums, email, web support |