
Search Manual
Band-in-a-Box® 2024 for Windows® Upgrade Manual
Chapter 3: GuickStart Tutorial
Let’s take a close look at the great new features in Band-in-a-Box 2024!
New Tracks Window
This is similar to tracks window seen in most DAWs, allowing lossless data manipulation of tracks in a familiar environment for DAW users. It includes specific support for making loops and phrases from the RealTracks and RealDrums, so for example, you can select a RealTracks phrase and turn it into a loop on a different track.
![]() To open the Tracks window, press the [Tracks] toolbar button or go to the Window menu and select Tracks Window.
To open the Tracks window, press the [Tracks] toolbar button or go to the Window menu and select Tracks Window.
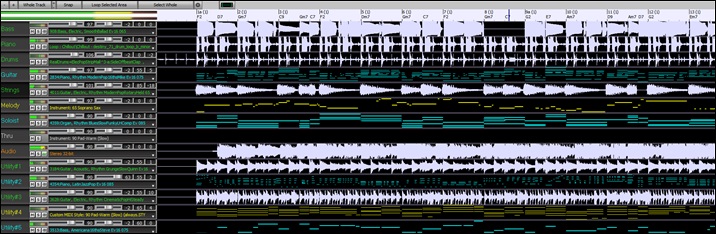
You can horizontally zoom in/out with the mouse wheel. Moving the mouse wheel while holding down the Ctrl key changes the height of each track panel.
The numbered scale at the top of the window indicates bars and beats, with a full height vertical division for each bar and a short vertical line for each beat or quarter note. Bars with part markers also include the A or B part marker letter with the bar number (1a, 9b).
![]()
On the left of the window, there are mixer settings for each track that can be adjusted as the song is playing.
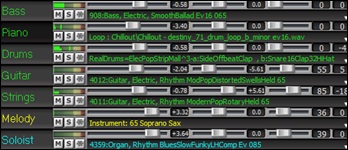
To adjust volume, pan, reverb and tone, click on a slider and move it horizontally. They can also be controlled by right-clicking on a number dial and typing in a new number. You can also adjust them with the mouse wheel while the mouse cursor is over the sliders or number dials. Hold the Ctrl key down as you click on the slider or drag the thumb of the slider. This will force all tracks to move to the same absolute location as the original track. Hold the Shift key and it will move all tracks relative to the move of the original track. Double-clicking on the slider sets the value to a default value.
Each track has its own VU meter to show the sound level, and buttons to mute, solo and freeze the track.
You can double-click on the track label to rename it.
Right-clicking on a track label or a down arrow open as menu of settings and actions for the selected track. The menu is organized into groups allowing easier selection of track types: audio (RealTracks, UserTracks, Loops) or MIDI (MIDI SuperTracks, classic MIDI tracks) and track settings/actions.
You can drag a track label and drop it to the Drop Station at the top of the screen to render an audio or MIDI file.
There are toolbar buttons to control the display of the Tracks window.
![]()
Use the [-] and [+] buttons to zoom horizontally. You can also zoom with the mouse wheel..
The [Whole Track] button zooms out as far as possible, showing the entire track.
The small [+] and [-] buttons change the height of the track panel. You can also move the mouse wheel while holding down the Ctrl key.
When the Snap mode in enabled, selecting a region of data will snap to the closest beat.
The [Loop Selected Area] button plays and loops the selected region.
The [Select Whole] button selects the whole track.
The wheel button will open the settings dialog, which allows you to customize the appearance of the waveform.
You can select a phrase by clicking on the starting point and dragging it. To select a large phrase, click on the starting point and Shift+click on the ending point.
Following hotkeys are available.
- Home moves the cursor to the beginning of a track.
- End moves the cursor to the end of a track.
- Shift+Home moves the left cursor of the selected phrases to the beginning of a track. If no phrase is selected, this will select phrases from the cursor to the beginning of a track.
- Shift+End moves the right cursor to the end of a track. If no phrase is selected, this will select phrases from the cursor to the end of a track.
- Ctrl+A selects the whole track.
- Ctrl+C copies the selected phrases to the clipboard.
- Ctrl+X cuts the selected phrases.
- Ctrl+V pastes the copied phrases to the current location and overwrites the existing phrases.
- Ctrl+Shift+V pastes the copied phrases and merges them with the existing phrases instead of overwriting them.
- Delete erases the selected phrases.
- Shift+Delete deletes the selected phrases.
![]() When the Edit Phrases and Loops Mode is on, the boxes will be drawn for phrase segments that are put together by Band-in-a-Box, and these phrases can be easily edited.
When the Edit Phrases and Loops Mode is on, the boxes will be drawn for phrase segments that are put together by Band-in-a-Box, and these phrases can be easily edited.

[Tip: You can change the color of the phrase boxes in the settings dialog, which can be accessed with the wheel button on the toolbar of the Tracks window.]
In this mode, you can select a phrase by clicking on a box. Shift+clicking on multiple boxes selects multiple phrases.

You can press the Ctrl+C to copy the selected phrase, place the cursor at a different location, then press the Ctrl+V to paste it to that location.

If you want to erase a phrase, click on the box and press the Delete key.

You can shorten a phrase so that you will hear just the first note on the downbeat at a certain bar on a track. Click on the box, hover the mouse cursor over the right of the box, and when the left-right curser appears, drag it to left to shorten the phrase.

If you want to start a phrase earlier, click on the box, hover the mouse cursor over the left of the box, and when the left-right curser appears, drag it to left.

You can also turn a whole or a portion of a phrase into a loop. For example, if you want to use just a 2-bar segment of a 6-bar phrase as a loop, drag the right of the phrase box to left until you will have 2-bar segment of the phrase.
![]()
[Tip: If you want an exactly 2-bar segment of the phrase, enable the [Snap] mode button on the toolbar.]
Now, if you hover the mouse cursor over the top right corner of the phrase box, a loop icon appears, and you can drag it as long as you want. You will then see dotted lines within the segment. This means that the 2-bar segment was turned into a loop with the dotted lines indicating the loop starting points.

New MultiPicker Library Window
This is a one-stop-shopping floating window to pick a style and/or any of the 8 track types (RealTracks, RealDrums, Loops, UserTracks, MIDI SuperTracks, Custom MIDITracks, MIDI Soloists, and Melodists). All pickers show a common interface with a similar look and functions for filters, searching, selection. It allows selection and generation of the whole or partial track. Demos, memos, and multi-column information are available for all. You can filter by genre, popular song titles, feel, instruments, and more.
![]() You can open this window with the [MultiPicker Library] toolbar button or the Edit | MultiPicker Library menu item. The hotkeys are F7 or M Enter.
You can open this window with the [MultiPicker Library] toolbar button or the Edit | MultiPicker Library menu item. The hotkeys are F7 or M Enter.
You can open the MultiPicker window with the F7 or M Enter keys.
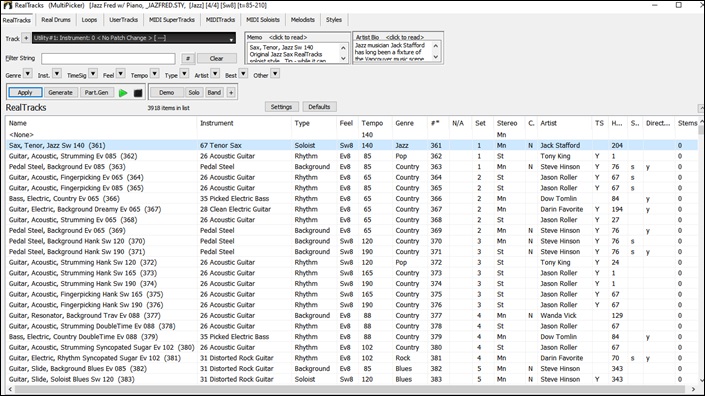
Use the tab buttons at the top of the window to switch the type of tracks.
![]()
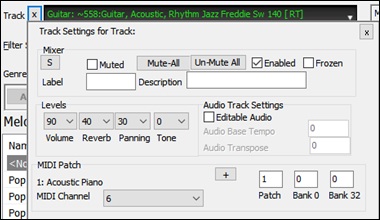
The track selector allows you to select a track that the selected item on the list will be applied to.
![]()
Clicking on the [+] button beside the track selector will display a small panel, where you can solo, mute, freeze, set volume/reverb/panning/tone, change the track label, write the track description, and do more for the current track
The list can be sorted by clicking on the column headings.
![]()
You can use the filter function to search items on the list.

For example, type a text (e.g., bossa) in the Filter String field, and the list will be filtered to show only the items that have the word “bossa” somewhere in the name, genre, memo, etc. The [#] button allows you to filter the list by many elements including feel, time signature, set numbers, artists, etc. You can also use the arrow buttons to quickly filter the list by a genre, instrument, time signature, feel, etc. Press the [Clear] button to clear the filter and show all available items on the list.
For the StylePicker, there is also an Include Similar checkbox. If this is unchecked, then the filtered list will show the exact match only, but if this option is checked, then the list will show the exact match and the similar styles. The [Clear] button will clear any filter so all styles will display.
You can read memos and artist bios (if available).

Audio demos are available.
![]() To hear them, press the [Demo] button. Double-clicking on or pressing the spacebar also plays the audio demos unless you have enabled the Double-Click (or Spacebar) plays Chord Sheet (not pre-made demo) option in the [+] button. For RealTracks, RealDrums and MIDI SuperTracks, each demo has a “band” version with all instruments and a “solo” version with just one instrument. The demos play the band version first if the Demo button Plays “Band” (not “Solo”) menu item in the [+] button is enabled. If this is disabled, then the solo version will be played first. You can also press the [Band] button for the band version or the [Solo] button for the solo version. The [+] button shows a menu with options to allow use of the Internet to play audio demos, adjust the volume of the audio demos, load demo songs for the selected style, open the folder of audio demos if the file is being played on your hard drive, etc
To hear them, press the [Demo] button. Double-clicking on or pressing the spacebar also plays the audio demos unless you have enabled the Double-Click (or Spacebar) plays Chord Sheet (not pre-made demo) option in the [+] button. For RealTracks, RealDrums and MIDI SuperTracks, each demo has a “band” version with all instruments and a “solo” version with just one instrument. The demos play the band version first if the Demo button Plays “Band” (not “Solo”) menu item in the [+] button is enabled. If this is disabled, then the solo version will be played first. You can also press the [Band] button for the band version or the [Solo] button for the solo version. The [+] button shows a menu with options to allow use of the Internet to play audio demos, adjust the volume of the audio demos, load demo songs for the selected style, open the folder of audio demos if the file is being played on your hard drive, etc
![]()
The [Apply] button applies the selected item on the list to the current track. This won’t generate a track but if you press the [Generate] button, a whole track will be generated and the song will play from the current position. Shift+clicking on this button generates a whole track and plays the song from the start.
The green arrow button plays the song from the current position. Shift+clicking on it plays the song from the start. The black square button stops the song or the audio demo.
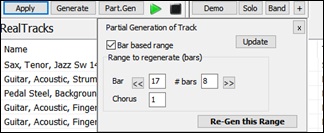
If you want to generate just for a portion of the track, press the [Part.Gen] button to open a small panel. You then specify the range based on either the full bar boundaries or precise regions in bars/beat/ticks and then press the [Re-Gen this Range] button.
![]() For some types of tracks, there is a [Settings] button that opens a small panel or a menu for additional settings.
For some types of tracks, there is a [Settings] button that opens a small panel or a menu for additional settings.
RealTracks Settings and MIDI SuperTracks Settings Panels

The Timebase option is to play the selected RealTracks/MIDI SuperTracks at normal, half time, double time or triple time.
The [Medley] button allows you to create a medley of RealTracks on the same track.
If Bluesy is checked, the selected RealTracks/MIDI SuperTracks will play in a bluesy style, where major triads are treated like 7th chords.
If Simpler is checked, the selected RealTracks/MIDI SuperTracks will play a simpler arrangement (less busy, less embellished). See the “Simple Available” column for availability of simpler RealTracks/MIDI SuperTracks.
If Direct Input is checked, the selected RealTracks/MIDI SuperTracks will use a “clean signal” guitar so that you can add your own effects. See the “Direct Input Available” column for availability of clean recordings.
If you check the Held option, the selected RealTracks/MIDI SuperTracks will play held chords.
Select Disable RealTracks for this track (Force this track to MIDI) if you don't want RealTracks for this track, even if the current style specifies a RealTrack.
RealDrums Settings Panel
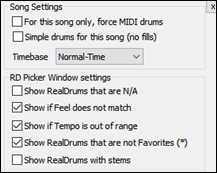
Check For this song only, force MIDI drums if you don’t want the RealDrums set in the current style.
If Simple Drums for this song (no fills) is checked, RealDrums will play a simpler arrangement without fills.
You can select a Timebase (normal, half-time, double-time, or triple-time) for any RealDrums.
Check Show RealDrums that are N/A if you want to see RealDrums that are not installed in the Drums folder.
Show if Feel does not match will show a song where the drums are in even feel and the style is swing (or vice versa).
Check Show if Tempo is out of range to see RealDrums that wouldn’t work well at the current song tempo.
Uncheck the Show RealDrums that are not Favorites (*) to see only RealDrums that you have assigned as favorites.
If Show RealDrums with stems is checked, only RealDrums that include stems will be listed.
Melodist Settings Panel
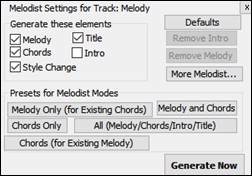
In this panel, you can select the elements (melody, chords, song title, etc.) that the Melodist will generate .If the Chords checkbox is enabled, the Melodist will generate chords, but if you want to keep the current chord progression already entered on the Chord Sheet, then uncheck this option. By default, the Melodist will use the associated style, but if you don't want the current style changed, then uncheck the Style Change option. You can also use the preset buttons to quickly select the elements; for example, the [Chords Only] button checks the "Chord" option and unchecks all other elements. The [Chords (from Existing Melody)] generates chords based on the existing melody using the Reharmonist feature. The [More Melodist] button opens the Melodist dialog to select additional settings and options.
MIDI Soloist Settings Menu
![]()
The Allow Style Changes with MIDI Soloists menu item lets you enable/disable style changes. You can select More MIDI Soloist Settings to open the Select Soloist dialog for additional settings.
Defaults Panel
![]() The [Defaults] button opens a panel where you can reset to defaults separately for the font size, the column width, and the window size.
The [Defaults] button opens a panel where you can reset to defaults separately for the font size, the column width, and the window size.
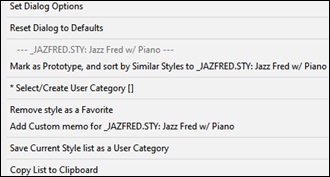
Style Options
![]() For styles, there is an [Options] button that shows a menu with options to select/create User Category, add the current style to the User Category, set styles as favorites, etc.
For styles, there is an [Options] button that shows a menu with options to select/create User Category, add the current style to the User Category, set styles as favorites, etc.
New Chord Progression Builder
This shows you the best next chords at any point, in pop or jazz, and allows you to interactively create your own progression.
![]() To launch the Chord Progression Builder, press the [Chord Builder] toolbar button or the Ctrl+Shift+B keys and then click on the [Progression Builder] tab.
To launch the Chord Progression Builder, press the [Chord Builder] toolbar button or the Ctrl+Shift+B keys and then click on the [Progression Builder] tab.
This is a floating window so it can be left open as you work entering chords onto the Chord Sheet.
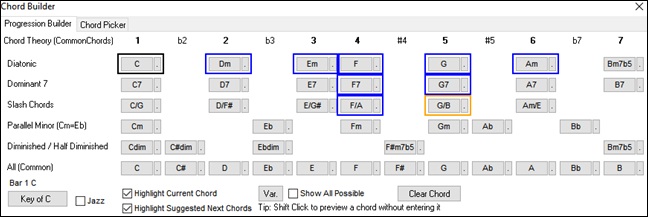
The Chord Progression Builder displays and suggests the best next chords in the current key. The top row shows diatonic chords made up only of notes in the key. They are the most common chords used in the key, with the 1, 4, and 5 chords being the most common. Other rows add additional chords that are part of the key, such as dominant 7th approach, slash chords, parallel minor, diminished, and more. You can enable the “Jazz” checkbox to see jazz chords (e.g., sevenths like Maj7) instead of pop chords (e.g., triads like C).
The Chord Progression Builder displays and suggests the best next chords in the current key. The top row shows diatonic chords made up only of notes in the key. They are the most common chords used in the key, with the 1, 4, and 5 chords being the most common. Other rows add additional chords that are part of the key, such as dominant 7th approach, slash chords, parallel minor, diminished, and more. You can enable the Jazz checkbox to see jazz chords (e.g., sevenths like Maj7) instead of pop chords (e.g., triads like C).
The current chord is highlighted in black and the suggested good chords to come after it are highlighted in colors. These occur if the Highlight Current Chord and Highlight Suggest Next Chords options are enabled. The blue color indicates common chords and the orange color indicates less common but more interesting chords. Normally, you will see just one or two interesting chords but you can cycle through the interesting chords by pressing the [Var.] button. If the Show All Possible option is enabled, you will see all the interesting chords.
Shift+clicking on one of the suggested chords lets you preview. Clicking on it enters it to the current cell on the Chord Sheet and then the Builder will suggest the best chords for the next. You can repeat this process until you get a great chord progression for your song.
The [Clear Chord] button erases the chord already entered on the current cell.
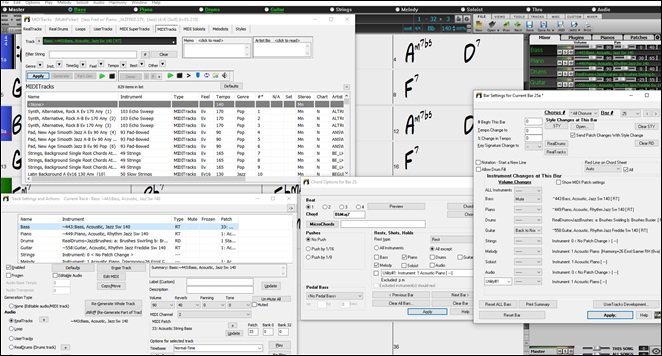
Enhanced Bar Settings
Previously, the settings in the Bar Settings (F5) dialog did not apply to the Utility tracks, but now they apply to all 24 tracks.
The dialog is now a floating (non-modal) dialog so can be kept on-screen while you are doing other things. It’s resizable, so you drag a corner of the dialog to resize it.
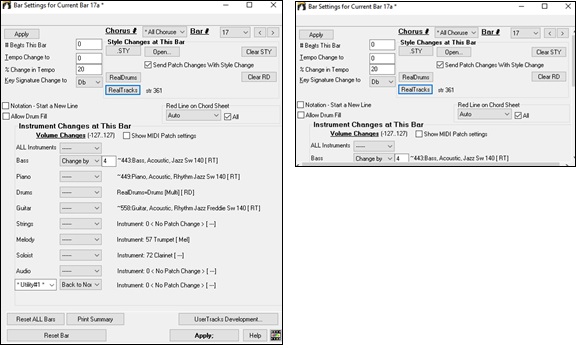
The Utility track selector is added to the dialog so you can control the volume of each Utility track at any bar.

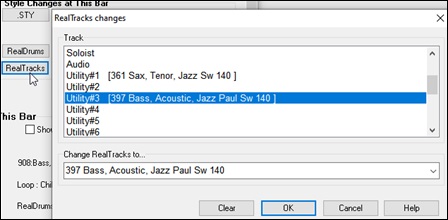
You can now change the RealTracks on any track including the Audio and Utility tracks. Press the [RealTracks] button to open the RealTracks changes dialog. Select a track and the RealTracks to use on that track from the current bar and press OK.
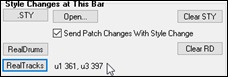
When you return to the Bar Settings dialog you can see which RealTracks will be used on which tracks (e.g. u1 361, u3 397).
Floating Windows Everywhere!
Legacy modal dialogs have been redone as non-modal floating windows so they can be used interactively with other functions. These include new floating windows for styles, RealTracks, RealDrums, Loops, UserTracks, MIDI SuperTracks, Custom MIDITracks, MIDI Soloists, Melodists, as well as Bar Settings (F5), Track Settings & Actions (Ctrl+F7), and Chord Options (Alt+F5) dialogs.
Enhanced Custom MIDITracks
There are now 829 custom MIDITracks you can use in a song. They can be easily chosen from the [MIDITracks] tab on the new MultiPicker Library window (F7).
.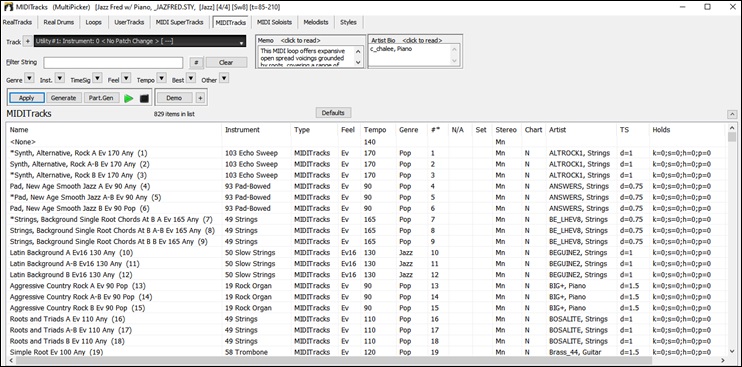
Audio demos are available that demonstrate how custom MIDITracks will sound. To hear the audio demos press the [Demo] button. You can also double-click on the list or press the spacebar if Double-Click (or Spacebar) plays Chord Sheet (not pre-made demo) in the [+] button is unchecked. You can adjust volume of the audio demos with a menu item in the [+] button.
![]()
Custom MIDI tracks can be generated on any track for the whole track or a specified region. To select a track, use the track selector at the top of the window.
![]()
When you have selected a custom MIDITrack from the list, press the [Apply] button to apply it to the current track. his won’t generate a track but if you press the [Generate] button, a whole track will be generated. You can press it again to regenerate the whole track. If you want to generate just for a portion of the track, press the [Part.Gen] button instead. This will open a small panel, which lets you specify the range based on either the full bar boundaries or precise regions in bars/beat/ticks. You then press the [Re-Gen this Range] button.
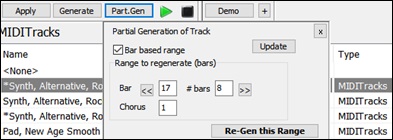
Partial Track Generation Now Available for Any Track Type
Partial track generation is now available for any track types including RealDrums, Loops, UserTracks, MIDI SuperTracks, and Custom MIDITracks.
Open the MultiPicker Library window with the F7 key and press a track type tab at the top.
![]()
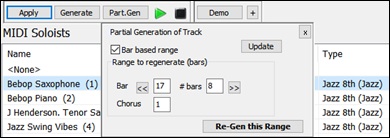
Then, select an item from the list and press the [Part.Gen] button. This will open a small panel, where you can specify the range based on either the full bar boundaries or precise regions in bars/beat/ticks. You can also highlight a region on the Chord Sheet or the Tracks window. You then press the [Re-Gen this Range] button.
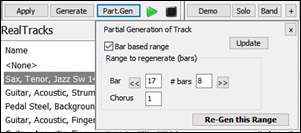
The track will be generated for the specified region.
![]()
Enhanced Filter by Popular Song Title
This now allows you to filter any of the track types by typing in a name of a popular song, and this will set filters for genre, feel (even/swing), tempo, and time signature.
Open the MultiPicker Library window with the F7 key and select any track type with the tabs at the top of the window. Then, click on the “Best” arrow button and select Best for Popular Song Title from the menu.
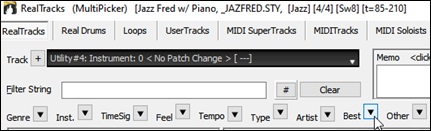
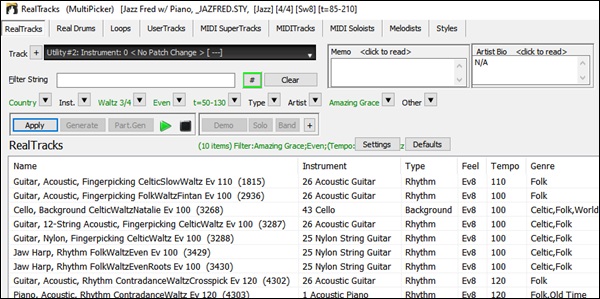
This will open a small panel. Type in a song title and press the [Enter] key. For example, to find RealTracks that are similar to the American traditional song “Amazing Grace,” type in “amazing,” click on the song to select it, and press [Enter].
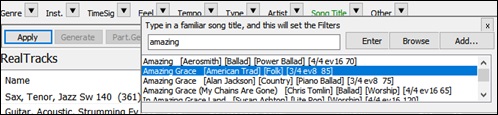
This is an even 8th slow waltz folk song, and the list will be filtered to show RealTracks that match these elements.
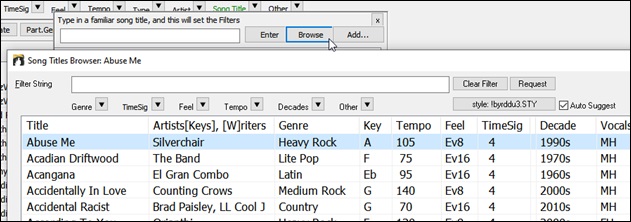
You can also press the [Browse] button to open the Song Titles Browser window, which lets you browse the huge list of over 21,000 popular song titles.
Setting Favorites Available for All 8 Track Types
Previously, favorites were available for RealTracks and RealDrums only. Now, favorites also available for Loops, UserTracks. MIDI SuperTracks, Custom MIDITracks, Melodists, and MIDI Soloists. To do this, right click on the list in the MultiPicker Library window and select Toggle Favorite from the menu. The favorite items will have an asterisk at the beginning of the name on the list. Using the right click menu, you can select or edit the favorites, or show only the favorites on the list.

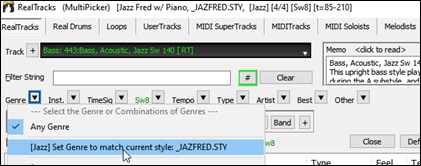
Filter by Style's Feel, Genre, Tempo, etc. for Any Track Type
In the MultiPicker Librarywindow, click on the “Feel” arrow button and select Set Feel to match current style from the menu.

This will immediately filter the list by the feel of the current style.
The same is available for other filters like genre, tempo and time signature.
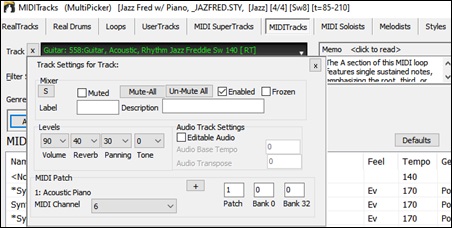
Convenient Track Settings Panel
This is available for any track types in the MultiPicker Library window, allowing you to make track settings directly via a common interface.
Press the [+] beside the track selector. This will display a small panel, where you can solo, mute, freeze, set volume/reverb/panning/tone, change the track label, write the track description, and do more for the current track.
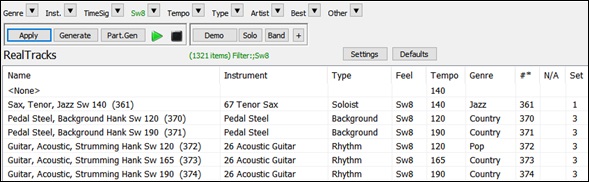
Enhanced MIDI Soloists
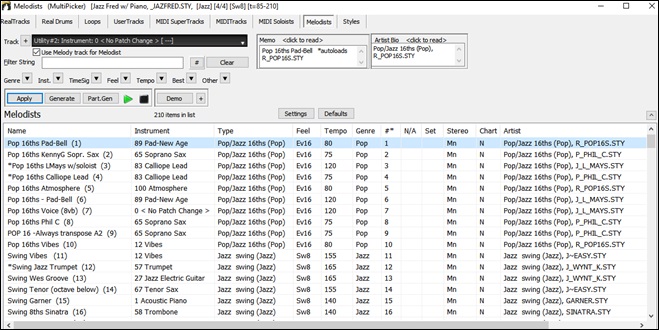
The MIDI Soloist can be picked from a floating window with many new filters. Open the MultiPicker Library window with the F7 key and press the [MIDI Soloist] tab at the top of the window. You will see the list of 360 MIDI Soloists in different genres.
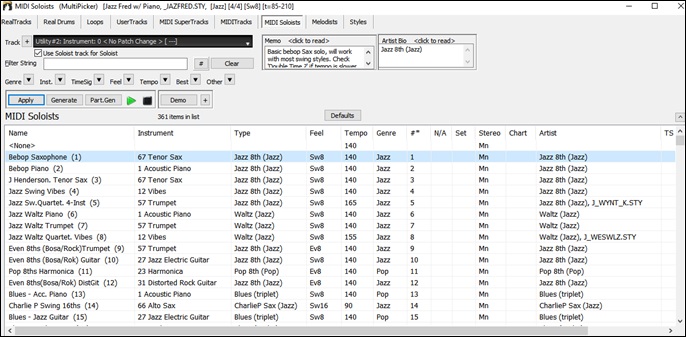
The MIDI Soloist can generate a solo on any track, not just the Soloist track. Use the track selector to select a tack. If you select a track other than the Soloist track, disable the Use Soloist track for Soloist checkbox.
![]()
You can use the filter function to search MIDI Soloists.
![]()
For example, type a text (e.g., bossa) in the Filter String field, and the list will be filtered to show only the Soloists that have the word “bossa” somewhere in the name, genre, memo, etc. The [#] button allows you to filter the list by many elements including feel, time signature, set numbers, artists, etc. You can also use the arrow buttons to quickly filter the list by a genre, instrument, time signature, feel, etc. Press the [Clear] button to clear the filter and show all available Soloists on the list.
![]() Audio demos are available for all MIDI Soloists. To hear an audio demo of the selected MIDI Soloist, press the [Demo] button. You can also double-click on the list or press the spacebar if Double-Click (or Spacebar) plays Chord Sheet (not pre-made demo) in the [+] button is unchecked. You can adjust volume of the audio demos with a menu item in the [+] button.
Audio demos are available for all MIDI Soloists. To hear an audio demo of the selected MIDI Soloist, press the [Demo] button. You can also double-click on the list or press the spacebar if Double-Click (or Spacebar) plays Chord Sheet (not pre-made demo) in the [+] button is unchecked. You can adjust volume of the audio demos with a menu item in the [+] button.
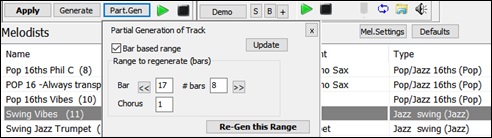
When you have selected a Soloist from the list, press the [Generate] button to generate a solo for the whole track. You can press it again to regenerate for the whole track. If you want to generate a solo just for a portion of the track, press the [Part.Gen] button to open a small panel. You then specify the range based on either the full bar boundaries or precise regions in bars/beat/ticks and then press the [Re-Gen this Range] button.
Enhanced Melodists
The Melodist can be picked from a floating window with many new filters. Open the MultiPicker Library window with the F7 key and press the [Melodist] tab. You will see the list of 209 Melodists.
The Melodist can generate a melody on any track, not just the Melodist track. Use the track selector to select a tack. If you select a track other than the Melodist track, disable the Use Melody track forMelodists checkbox.
![]()
You can use the filter function to search Soloists.
![]()
For example, type a text (e.g., bossa) in the Filter String field, and the list will be filtered to show only the Melodists that have the word “bossa” somewhere in the name, genre, memo, etc. The [#] button allows you to filter the list by many elements including feel, time signature, set numbers, artists, etc. You can also use the arrow buttons to quickly filter the list by a genre, instrument, time signature, feel, etc. Press the [Clear] button to clear the filter and show all available Soloists on the list.
![]() Audio demos are available for all Melodist. To hear an audio demo of the selected Melodist, press the [Demo] button. You can also double-click on the list or press the spacebar if Double-Click (or Spacebar) plays Chord Sheet (not pre-made demo) in the [+] button is unchecked. You can adjust volume of the audio demos with a menu item in the [+] button.
Audio demos are available for all Melodist. To hear an audio demo of the selected Melodist, press the [Demo] button. You can also double-click on the list or press the spacebar if Double-Click (or Spacebar) plays Chord Sheet (not pre-made demo) in the [+] button is unchecked. You can adjust volume of the audio demos with a menu item in the [+] button.
![]() The [Settings] button opens a small panel where you can select the elements (melody, chords, song title, etc.) that the Melodist will generate.
The [Settings] button opens a small panel where you can select the elements (melody, chords, song title, etc.) that the Melodist will generate.
|
If the Chords checkbox is enabled, the Melodist will generate chords, but if you want to keep the current chord progression already entered on the Chord Sheet, then uncheck this option. By default, the Melodist will use the associated style, but if you don’t want the current style changed, then uncheck the Style Change option. You can also use the preset buttons to quickly select the elements. For example, the [Chords Only] button checks the “Chord” option and unchecks all other elements. The [Melody and Chords] button checks “Melody” and “Chords.” The [More Melodist] button opens the Melodist dialog to select additional settings and options. |
When you have selected a Melodist from the list, press the [Generate] button to generate selected elements (melody, chords, etc.) for the whole track. You can press it again to regenerate for the whole track. If you want to generate just for a portion of the track, press the [Part.Gen] button to open a small panel. You then specify the range based on either the full bar boundaries or precise regions in bars/beat/ticks and then press the [Re-Gen this Range] button.
Rests, Shots, Holds Now Work for All Tracks
Previously, rests, shots, and holds worked for only 5 tracks (Bass, Piano, Drums, Guitar, and Strings), but now they work for any of the 24 tracks.
If you type C. on the Chord Sheet, a rest will apply to all tracks in your song.
To exclude tracks from rests, shots, and holds, you can now use M for Melody, L for Soloist, A for Audio, and U1 to U16 for Utility #1 to Utility #16 in addition to B, P, D, G, and S. For example, if you type C.mu1, all tracks except the Melody track and the Utility #1 track will rest. If you type C..au2, all tracks except the Audio track and the Utility #2 track will play a shot.
![]()
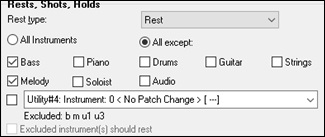
You can also use the Chord Options dialog to do this. Open the dialog with Alt+F5, and select a rest type in the “Rest, Shots, Holds” area. If you want to exclude tracks, enable the All except radio button, and check the tracks that you want to exclude.
Support for LyricLab
LyricLab is a third-party program from Joanne Cooper that generates lyrics and chords for songs. Now, the LyricLab text files can be imported into Band-in-a-Box where you can choose a style and generate melodies based on the song chords.
[Note: For more information about LyricLab, visit lyriclab.net.]
To open a LyricLab file, go to the main menu File | Open Special | Open LyricLab Chords-Lyrics file or press L L Enter keys.
![]()
For Band-in-a-Box, each line in a text file represents a bar. Therefore,when you save the lyrics and chords generated by LyricLab in a text file, make sure there is one chord on each line before opening it in Band-in-a-Box. Otherwise, when you open the file, only the first chord on the same line will be imported to Band-in-a-Box.
For example, if a text file contains two chords on each line, then when you open the file in Band-in-a-Box, the second chord on each line will be ignored.

But if you add a line break to the file so that each line contains one chord, then all the chords will show on the Chord Sheet.
The lyrics from a LyricLab text file will display on the Bar Lyrics Layer of the Chord Sheet, the Lead Sheet window, and the Big Lyrics window.


Better Data Validation in Data Input
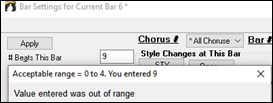
This allows updating of settings as you type.This allows updating of settings as you type. For example, if you enter 9 as a number of beats for the current bar, Band-in-a-Box immediately validates it and tells you that the number is invalid. Previously, this did not occur until you closed the dialog.
Hotkey Additions and Changes
F7 opens the new MultiPicker Library window. Previously, it opened the Track Settings and Actions dialog.
Ctrl+F7 opens the Track Settings and Actions dialog.
M Enter opens the new MultiPicker Library window. Previously, it opened the Set MicroChords dialog.
M M Enter opens the Set MicroChords dialog.
L L Enter lets you open a LyricLab file.
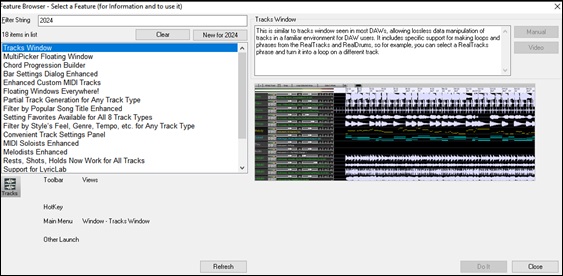
Updated Feature Browser
The Feature Browser (/ Enter) has been updated to include the latest 2024 features. Press the [New to 2024] button to see the new features.
…and more!
Thank you for taking time to read this introduction to Band-in-a-Box 2024!
Unconditional 30-Day Money Back Guarantee on all PG Music products purchased from PG Music Inc.
PG Music Inc.
29 Cadillac Ave Victoria BC Canada V8Z 1T3
Sales: 800-268-6272, 250-475-2874,+ 800-4746-8742*
* Outside USA & Canada where International Freephone service is available.
Access Codes
Tech Support: Live Chat, support@pgmusic.com
 Online now
Need Help?
Customer Sales & Support
|
Phones (Pacific Time) 1-800-268-6272 1-250-475-2874 |
||
| Live Chat | ||
| OPEN | Online Ordering 24/7 |
|
| OPEN | Forums, email, web support |