
Band-in-a-Box® for Mac & GarageBand
You can import your Band-in-a-Box® compositions into GarageBand for fine-tuning, or to play them with the GarageBand software instruments.
Last updated: Thursday, 08 November 2018
Importing Audio files into GarageBand
Band-in-a-Box® 2009 (and higher) have the capability of rendering to audio files. You can render your song as AIFF (uncompressed audio - lossless), M4A (compressed audio - lossy but much smaller than AIFF), or WAV (uncompressed audio - lossless, Windows format). In addition, you can render a full mix of your song, just RealTracks, just MIDI tracks, or individual tracks. To do this, simply click the Audio button on the main toolbar in Band-in-a-Box®, select the options you want, and press the [Render] button. Another method of rendering individual tracks to audio, is to control-click on the track in the instrument panel at the top of the screen, and select 'Save track as AIFF'.
When your plan is to work on an audio file in another program such as GarageBand, it is normally best to save as uncompressed AIFF. You will probably not be able to hear the difference between M4A and AIFF, but there *is* some degredation in sound quality. In addition, the file would need to be uncompressed to AIFF in order to be edited in another program, and if you keep uncompressing and compressing the file you will be degrading the sound quality each time. Save as M4A when it will be the finished product - the small filesize will make it convenient for many things, for example saving on an iPod, uploading to the web, or emailing as an attachment.
By default, the rendered audio files are saved within the /Applications/Band-in-a-Box®/Song Renders/ folder. To import into GarageBand, you can simply open a project, then drag the file(s) from the Song Renders folder into GarageBand. Before you do this, you may want to set the tempo in GarageBand to match the Band-in-a-Box® song tempo. One reason you may want to import the song into GarageBand, is to record additional audio tracks.
The "Advanced Features Video" on this page has more information on importing your songs into GarageBand.
Importing MIDI files into GarageBand
GarageBand version 2 (and higher) support the direct import of MIDI files. Click on the .MID button to save your Band-in-a-Box® song as a MIDI file, then open GarageBand and import the MIDI file by dragging it from the Finder into the GarageBand timeline. The MIDI file will appear in GarageBand with each instrument on a separate track. The tracks will play using the MIDI software instruments included with GarageBand. You can select a different instrument from the Track Info window (select the track and press Command+I).
Alternate method of burning a CD from songs imported into GarageBand
You can use GarageBand to convert your song to an audio file and burn a CD. This process uses the GarageBand software instruments for the MIDI. Here are the basic steps:
- After you have finished composing your song in Band-in-a-Box®, press the .MID button on the main Band-in-a-Box® toolbar to save the song as a standard MIDI file. Save it as a 'File on Disk'.
- Open iTunes and GarageBand.
- Drag the MIDI file onto the GarageBand user interface (the main window).
- Go to the Share menu and select Send song to iTunes.
- Repeat this for as many songs as you want on your CD, then go to the File menu in iTunes and select Burn playlist to disc.
The exact steps may change with newer versions of these applications, but the general idea is the same.
OLDER TUTORIAL - GarageBand Version 1 and an alternate method of importing MIDI files.
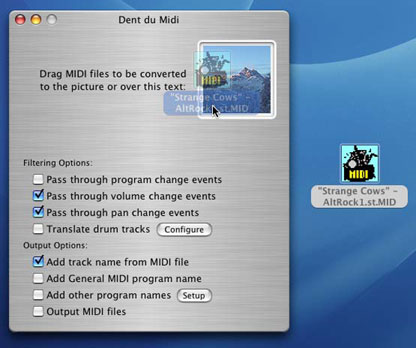
Since GarageBand version 1 could not import MIDI files directly, there were a few extra steps that were necessary to get your Band-in-a-Box® song into GarageBand. This tutorial may also be helpful if you have any trouble importing a specific MIDI file that GarageBand doesn't recognize. To follow this tutorial, you will need a program called Dent-du-MIDI, which is available at http://homepage.mac.com/beryrinaldo/ddm/.
The first thing you need to do is create a song in Band-in-a-Box®. Get it sounding the way you want with levels, tempo and patches. For this tutorial, we will use the AltRock1.sty demo (available with Styles Set 32) titled "Strange Cows". Once you have your song sounding the way you want it, you need to take note of the meter, the key, the tempo, and what instruments (patches) are utilized for the various Band-in-a-Box® parts. The meter of this particular song is 4:4, the key is E, and the tempo is 170. For the instruments, the bass patch is "Fender Bass", the Piano part is not a piano at all, but is a distorted guitar, the drums patch is a standard rock kit, the Guitar part is an acoustic guitar sound, the Melody patch is a "Charang", which is has a similar sound to the distorted guitar. The Strings patch is "Echo Sweep", which is a synth strings sound. The GarageBand sounds are different from the standard General MIDI patches that you find in Band-in-a-Box®, so the point is to try and listen to what the instruments sound like rather than simply focus on the names of the patches.
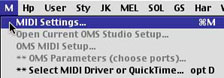
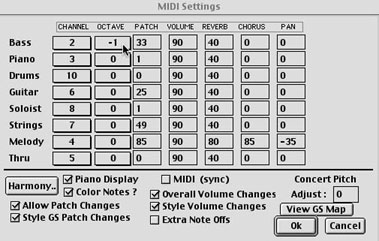
Next, you will need to raise the bass an octave. The process of bringing this file into GarageBand will result in a bass that is an octave too low unless you follow this step. Go to the "M" menu, and select "MIDI Settings". The "Octave" column will be at -1, but you should change this to 0. Just remember to change it back to -1 when this process is finished, otherwise your songs will sound strange when played in Band-in-a-Box®.
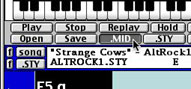
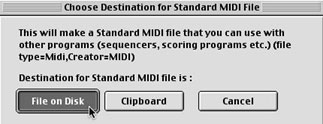
The final step you need to complete in Band-in-a-Box® is to save your song as a MIDI file. To do this, simply press the ".MID" button on the main Band-in-a-Box® screen. Save your song as "File On Disk", and then choose a location. A handy place to save would be the desktop, but you can save it wherever you like.
You can now close Band-in-a-Box® (but remember to change the bass octave back to -1 before you do!) and open the Dent-du-MIDI application. Dent-du-MIDI will convert the MIDI file into AIFF files which can be imported into GarageBand. Simply drag the MIDI file that you saved onto the picture of a mountain in Dent-du-MIDI, and drop it.
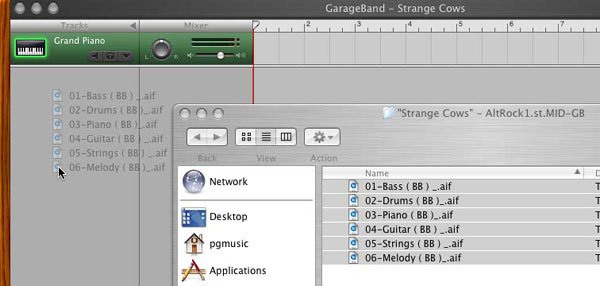
A folder will be created in the same location as the MIDI file, with "-GB" appended to it. In our case, the folder is located on the desktop, and it is named '"Strange Cows" - AltRock1.st.MID-GB'. If you open that folder, you will see that there are separate .aif files for each track, or part, of the original Band-in-a-Box® song.
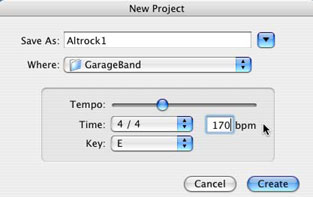
It is now time to load these files into GarageBand. First, you need to open GarageBand and create a new song. Now you will need to recall some of the information that you noted in Band-in-a-Box®, namely the meter, key and tempo. In this example, you will recall, the meter is 4:4, the key is E, and the tempo is 170. You can also enter the title here. When you have entered this information, press "Create".
When the main GarageBand window appears, you are ready to import your files. You can do this in the same way as with Dent-du-MIDI. Simply highlight the .aif files in the folder, and drag them to the empty portion of the "Tracks" column in GarageBand, and drop them. The individual .aif files will each become its own track.
The next step is to pick the instrument patches for the individual parts. To do this, simply double-click on the track in question under the "Tracks" column. You can then make your instrument choice in the proceeding dialog box.
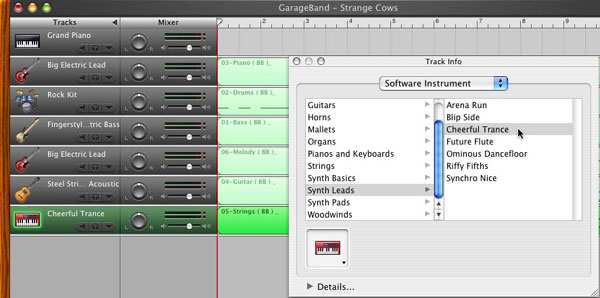
Some of the choices will be rather easy. In our example, we will pick "Rock Kit" for the drum part, "Fingerstyle Electric Bass" for the bass part, and "Steel String Acoustic" for the guitar part. For others, you need to recall the patches, and more specifically the sounds that were played in Band-in-a-Box®, and find a close match from the list of GarageBand instruments. As you recall, the Piano part in Band-in-a-Box® utilized the "Distorted Guitar" patch, so in GarageBand we will pick "Big Electric Lead". The Melody also had a sound that was similar to a distorted guitar, so we will pick the same "Big Electric Lead" patch for that part. For the "Strings" part, we listened to the part trying many of the different synth sounds available, and finally picked "Cheerful Trance". This is where some creativity comes into play. You can listen to these parts with any combination of instruments, and pick the ones you like the best. A final step would be to listen to all of the instruments together and mix the levels. If a track is too loud, you can lower the volume for that track. To perminently alter the levels for a track, click the small downward-pointing arrow on that track to open the "Track Volume" display. Put a check in the "Track Volume" box, and then click and drag the green dot below the track in question to where you want the level to be.

You can also use this display to change the level of an instrument at a section in the middle of the song. In our example, the "Strings" part was too loud, so we lowered the level by about 50%.
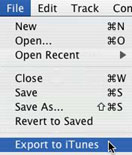
If you would like to convert this GarageBand file to an audio file. To do this, go to the "File" menu, and select "Export to iTunes".
This will automatically convert your song to a single aiff file which can then be either burned to an audio CD, or converted to MP3 to be shared with friends over the internet!
Unconditional 30-Day Money Back Guarantee on all PG Music products purchased from PG Music Inc.
PG Music Inc.
29 Cadillac Ave Victoria BC Canada V8Z 1T3
Sales: 800-268-6272, 250-475-2874,+ 800-4746-8742*
* Outside USA & Canada where International Freephone service is available.
Access Codes
Tech Support: Live Chat, support@pgmusic.com
 Online now
Need Help?
Customer Sales & Support
|
Phones (Pacific Time) 1-800-268-6272 1-250-475-2874 |
||
| Live Chat | ||
| OPEN | Online Ordering 24/7 |
|
| OPEN | Forums, email, web support |