
Using the Band-in-a-Box® Stylemaker - Part II
This is a continuation of the previous StyleMaker tutorial, with some more advanced topics.
Last updated: Tuesday, 13 November 2018
Drum layout, fills and endings
The more patterns you add to a style, the more variation you will have as Band-in-a-Box® plays and thus, a more realistic sound. You can keep it as simple or as complex as you want.
We're going to create a drum style during this tutorial. Lets get started.
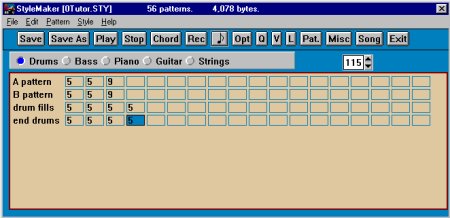
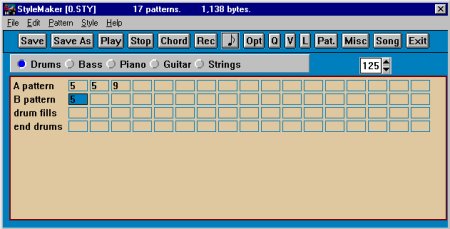
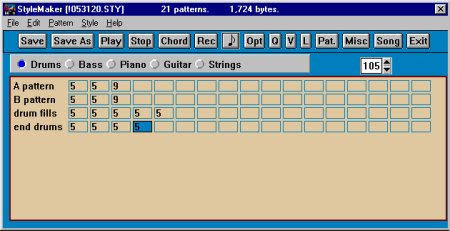
This Drum Style has a very simple layout.
- The A pattern row consists of 3 patterns.
- The B pattern row consists of 3 patterns.
- The drum fills pattern row consists of 2 A patterns and 2 B patterns.
- The end drums pattern row consists of 2, 2 bar endings.
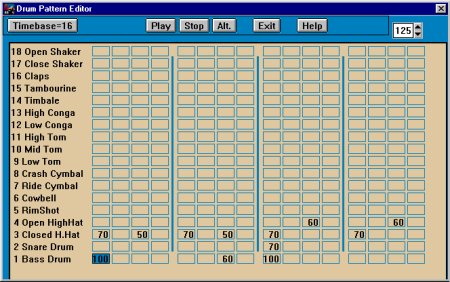
First, pattern 1 was created by selecting the "REC" Icon or the "note" beside it for the main drum groove.

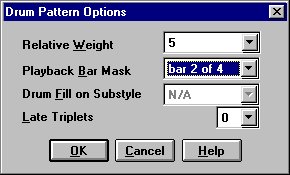
We add the appropriate volume velocities by left mouse clicking on a cell and adding the values with numbers or the hot keys. When we press exit, the Options window is displayed.
We place a Relative Weight of 5 and a Bar Mask of "bar 1 of 2" so that randomness is removed and pattern 1 and 2 switch back and forth on even and odd bars. This will happen until Band-in-a-Box® sees a fill marker and places a fill for us. More on that later.

Next, we copy the first pattern (using CTRL+C) to the second cell (using CTRL+V) and modify slightly with the addition of some slight open and closed Hi-Hat sounds.
On exiting, we set this pattern to a value of 5 and a Mask of "bar 2 of 4".
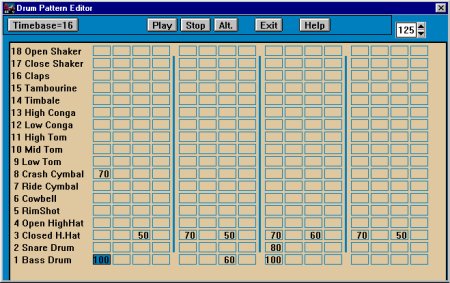
This sets this pattern to play on the even bars until Band-in-a-Box® sees a fill marker and places a fill for us. The first pattern was copied to cell 3 and a crash cymbal is set on the first beat of the pattern. The Hi hat is removed on this beat, with a value of 0 or by pressing the Z key. As a Drummer (we must start thinking like one or we will not be creating very realistic patterns) we could not hit a crash cymbal and a Hi-hat at the same time as a snare beat.
We press exit and then select a weight of 9 this time. This means that this pattern will always play if certain criteria exists. In this case the criteria will be "post fill" (after a fill). We Select "Bar Mask" and go to the very bottom of this pull down menu, selecting "post fill".
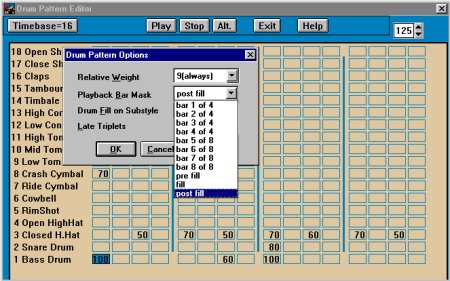
This causes cell or pattern 3 to play only after a fill has been triggered, thus causing the first bar after a fill to have a crash cymbal accent in it.
We will create the B pattern section exactly the same as we did the A pattern section
- Copy the first cell in the A Pattern row using CTRL+C and paste it to the 1st cell in the B Pattern row using CTRL+V.
- Press the "REC" or the "note" icon and remove all the Hi-Hats from the Hi-Hat row.
- Be creative (and listen)-- add some Ride Cymbal sounds to taste.
- You could add some more Kick or Bass drum sounds as well. Remember to keep the original groove.

We add the appropriate volume velocities again by left mouse clicking on a cell and adding the values with numbers or the hot keys. When we press exit, the Options window is displayed.
We place a Relative Weight of 5 and a Bar Mask of "bar 1 of 2" so that randomness is removed and pattern 1 and 2 switch back and forth on even and odd bars. Play the pattern to see how it sounds and modify as needed. Once again copy the 1st cell in the B pattern row, to the 2nd cell in this row and click on the "REC" or Note icon. Delete and add ride cymbal sounds to create a variation of cell 1. Do the same thing one more time to cell 3 and this time add the crash cymbal on the first beat of the cell and remove the Hi-Hat from the first beat of the Hi-Hat row. Press the Exit when satisfied as to how it sounds and set the weight to 9 and the mask to "Post fill". This pattern will then play the first bar after a B fill marker is placed. When in the Pattern Edit Window, You will also see the "Alt" button. This brings up the window below. This is the Alternate Drum note selection box.
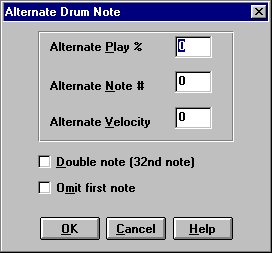
You can choose an alternate drum sound or note and set it to play a % of time if you choose. This results in more randomness in the patterns and thus more realism. This feature is useable in all drum patterns and virtually gives you an almost infinite possibility of notes played in the drum patterns.
Drum Fills
Drum fills and endings generally carry a similar feel to the verse and chorus sections of a style but with the addition of toms and cymbal sounds. Fills are triggered automatically when you place a Part Marker, You can do this by mouse clicking on a bar number or by selecting the first cell in a bar and then pressing the "P" key on the computer keyboard. This will toggle between the Blue (verse) and Green (chorus) Sub style markers and "No Selection". The fill will happen in the bar before the Marker. What I usually do is using the CTRL+C keys, copy a cell from the A Pattern to the first cell in the Fills Row and add toms, cymbals and extra snare sounds to create the fills a drummer would use to signal the band there was a change coming in the song moving it to a Chorus, Bridge, Verse or ending.
This is the A pattern pasted into the first cell in the Fills row with toms added.
Play with it till you get it sounding the way you want. When you press exit the Options window will appear.
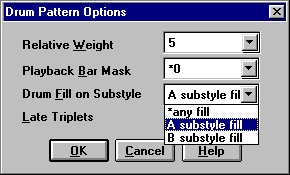
As you can see, you have the ability to once again place a weight value for this fill. The "Masking" allows you to assign whether this is an A or a B pattern fill. Select the A substyle fill, and press OK.
Now copy this cell with the same CTRL+C key strokes, and paste it into the second cell in the fill row. You can edit this pattern, changing and adding info to give you a second variation of the A substyle fill. You can make as many as you like. There is a limit of 30 cells for each row so you would have a maximum of 15 A fills and 15 B fills. Remember, the more patterns you have, the more realistic your songs are going to be. You could theoretically have 30 A and 30 B patterns in a style, 15 A and 15 B fills and endings. More on endings later.
The same process is followed for the B section fills, copying and pasting cells and then editing the toms and cymbal sounds. The Drum Pattern Options window will always come up when you click on "Exit" and then you choose the A or B substyle mask for this pattern. I try to keep the A fills and the B fills grouped together.
Drum Endings
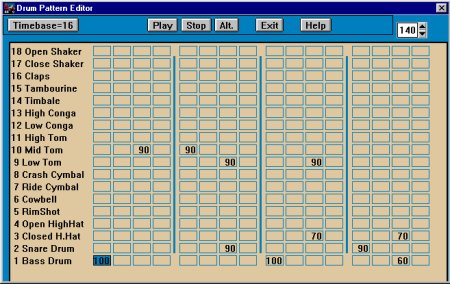
2 bar Drum endings are basically built over a set of 2 bar patterns. The first bar is similar to a fill and can be copied from the fill cells if you choose. The second cell in a simple drum ending would have values placed on the first 16th notes of the Kick, Snare, and the Crash rows. In this case we see there are 2 End drums for this style. Cells 1 and 3 are fills and the cells 2 and 4 are the accented end patterns.
Cell 2 and 4 from the Drum Endings.

When '2 bar ending' is selected from "Other Song settings", these patterns will be selected to play. They should play randomly Cell 1 and 2 or cell 3 and 4 to make up the 2 bar Drum endings. You can have up to fifteen 2 bar endings in Band-in-a-Box®.
Until next time,
Braden Carbol
Support Technician
PG Music Inc.
Unconditional 30-Day Money Back Guarantee on all PG Music products purchased from PG Music Inc.
PG Music Inc.
29 Cadillac Ave Victoria BC Canada V8Z 1T3
Sales: 800-268-6272, 250-475-2874,+ 800-4746-8742*
* Outside USA & Canada where International Freephone service is available.
Access Codes
Tech Support: Live Chat, support@pgmusic.com
 Online now
Need Help?
Customer Sales & Support
|
Phones (Pacific Time) 1-800-268-6272 1-250-475-2874 |
||
| Live Chat | ||
| OPEN | Online Ordering 24/7 |
|
| OPEN | Forums, email, web support |