
Search Manual
Band-in-a-Box® 2018 for Mac® User's Guide
Chapter 10: Working with MIDI
Overview
Band-in-a-Box has a built-in sequencer allowing you to record and edit up to two MIDI tracks. One track is the Melody track, the other is the Soloist track, and they are identical in function. Most often melodies are recorded, but the two sequencer tracks can be used for any type of MIDI recording – overdubs, extra parts, or 2-part melodies. MIDI can be recorded into Band-in-a-Box in several ways:
- From a MIDI keyboard or MIDI controller connected to your computer.
- In the Notation window using your mouse.
- With the Wizard feature using your QWERTY keyboard.
Real Time Recording
|
To record using your MIDI controller (keyboard, guitar, wind, etc.), click on the [Record MIDI] button or press the [control]+[R] keys. |
The Record MIDI dialog will appear.
|
Select Soloist track if you want to record onto the Soloist track. |
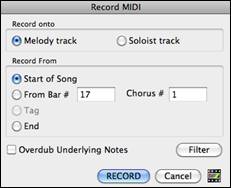
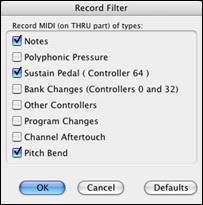
The [Filter] button opens the Record Filter dialog. This dialog lets you choose which MIDI information you want to record and which you want to leave out. You can eliminate unnecessary MIDI information or select new MIDI information, like controllers, to add to an existing track. Click [OK] to return to the Record dialog and press the [Record] button or the [control]+[R] keys again to begin recording. |
|
If you select Overdub Underlying Notes, you will hear the melody that you are overdubbing.
When the recording is finished, you have several options.
 |
[OK - Keep Take] will save the take that was just recorded. Copy 1st Chorus to Whole Song: If you have recorded one chorus of the song, checking this at the end of the recording will copy the same recording to all the choruses. Overdub Underlying Notes: You have the option to merge the recording with existing melody. If there is no underlying melody - this option will be grayed out. Retain Past Last Recorded: You have the option to keep or erase any melody after the last recorded note. |
Step Edit Notes
You can step edit a recorded track or create a new track in the Edit Note/Time Etc., dialog. Select Step edit Notes from the Melody menu.
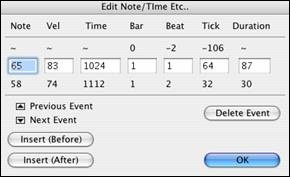
This feature is very useful if you have recorded a good take with just a minor glitch. Rather than scrap the take, you can use the step edit feature to fix the track and save it.
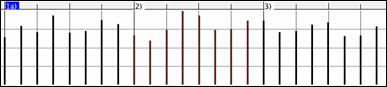
Input the MIDI Note Number. There are 128 MIDI notes. Every C note is a multiple of 12, which makes middle C (called C5 for the 5th octave) note number 60. For example, C5 = 60, C#5 = 61, D5 = 62 etc.
Velocity: Type in a velocity to control the volume that the note is played at. Change the velocity to zero to stop a note from being played. Note that you can globally change the volume of a melody track, from the melody pull down menu.
Time: Represents the total time in ticks for the current event from the beginning of the song. At 120 ppq resolution, a quarter note equals 120 ticks and a bar of 4/4 time is 480 ticks. This number includes the lead-in bar of 480 ticks.
Bar, Beat, Tick: The Bar, Beat, and Tick show the time that the note is played. Ticks are the smallest unit, equal to 1/120th of a quarter note.
Duration: This is the length of time that the note is played. 120 ticks of duration = 1 beat (quarter note).
Previous/Next Event: Use these arrow controls to move through the MIDI track one note at a time.
Insert Before/After: This allows you to insert an event before or after the currently displayed event.
Entering Notes Manually in the Notation Window
You can enter melody notes directly to the track in the Notation window in either the Editable Notation Mode or the Staff Roll Mode.
![]() Enter the Editable Notation mode with a single mouse click on the Editable Notation button.
Enter the Editable Notation mode with a single mouse click on the Editable Notation button.
In the Editable Notation mode, you can enter, move, and edit notes and rests using standard mouse techniques – point and click, drag and drop, and option+click to open the Note Edit dialog box.
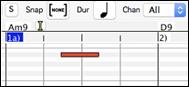
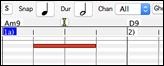
You can copy melodies in a range of bars and paste them to another bar. Select Edit | Copy Special | Copy From.. To .. or press option+C to open the Copy Chords and/or Melody dialog.
|
The dialog allows you to specify the location to copy from, the number of bars to copy, the location to copy to, and the option to copy any or all of the chords, melody, and/or soloist. |

Recording with the Wizard Feature
This is a very helpful feature if you do not have a MIDI keyboard, but you want to record with a “live” feel. Use the Wizard to record notes from the computer’s QWERTY keyboard for a track that is more natural than step time.
Here is how it works:
Click the [MIDI] toolbar button and check MIDI QWERTY Keyboard Wizard, or press the control+W keys.
![]()
![]()
Press the [r] key to record.
As the song plays, play the melody on any keys on the bottom two rows of the QWERTY keyboard, in the rhythm of the melody. The “wizard” notes will not be the correct melody of course, but don’t worry about that as you record. When you are finished, look in the Notation window. You will see notes in the right places and with the correct durations, but with the wrong pitches.
Drag the notes with the mouse and drop them on the correct place on the staff. You will hear the notes play as you drop them, and the names will show in the note name box. For sharps, flats, and naturals, hold down the shift key, control key, or ![]() key respectively. You will end up with a melody that sounds like it was recorded live, without the rigid feel of tracks entered in step time.
key respectively. You will end up with a melody that sounds like it was recorded live, without the rigid feel of tracks entered in step time.
Importing MIDI Files
Standard MIDI files can be read in to the Melody or Soloist tracks from MIDI files or from the clipboard. You can read in all of a MIDI file, or selected channels and a specific range of bars. Use one of the following two commands:
- Melody | Import Melody from MIDI File to select a MIDI file from disk using the file dialog.
- Melody | Import Melody from Clipboard - when the MIDI data is already copied from another program to the clipboard.
Once chosen, the Import MIDI File dialog box opens.
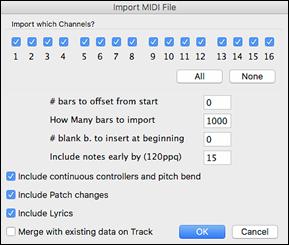
Import Which Channel(s)?
You will need to know which channel(s) of your MIDI file the melody is on. You then select these channels for Band-in-a-Box to read in. If you select all channels, Band-in-a-Box will read all of the channels and merge them to the Melody track. You can import and play the complete file on the Melody track if the Track Type is set to “Multi (16) Channel” in the Melody menu. If you have such a MIDI guitar part that was recorded with separate pitch bend information on 6 channels, you can import the 6 channels into Band-in-a-Box. Set the Melody track to be a guitar track (Melody | Track Type), and then use the Guitar Settings dialog (in the Guitar window) to set the “Output guitar tracks on 6 channels for this song” to be true. This has been done for the “Nashville Solos” files like NG001.MGU (available as an add-on to Band-in-a-Box). When this option is set, the patch changes, panning and so on will be sent on all 6 MIDI channels.
# bars to offset from start
If you want to start reading from the beginning of the MIDI file, select 0 as the offset. If you want to be read starting at bar 32, for example, select an offset of 32 (bars).
How many bars to import
Leave this setting at the default of 1000 to read-in the entire file (unless it’s longer than 1000 bars!) or set it to the number of bars that you are interested in if you don’t want the whole file.
# blank b. to insert at beginning
This will insert blank bars into the Melody track. Remember that Band-in-a-Box normally has a 2-bar lead-in count. If your MIDI file has no lead-in, then you need to set this to = 2 to compensate for the 2 bars of lead-in.
Include notes early by (120 ppq)
If you are reading in a MIDI file starting at bar 5, it would be annoying to have a note that was played 1 tick earlier than bar 5 left out of the MIDI file that is read in. To include it, you can set this, and the note will be read in.
Include continuous controllers and pitch bend
Enable this if you want to import these MIDI data.
Include Patch changes
This will load the patch changes to the track.
Include Lyrics
If the MIDI file contains note-based lyrics, you can import to your song.
Merge with existing data on Trackbr /> You can choose to merge the imported data with the existing data in the destination track.
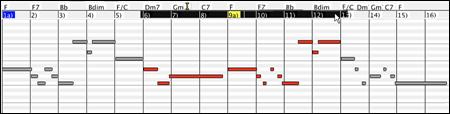
Record using The Melodist
There is always the option to let Band-in-a-Box do it all by writing an original melody with its Melodist feature. It will do this over the chord changes you enter in the Chord Sheet, or it will generate its own changes for whatever style you select from the Melodist dialog.
This feature is useful for stimulating ideas, for creating instant songs for sight reading exercises, to demonstrate different musical styles, or for background music.
Additional Options for Melody/Soloist Track
Manipulation of melodies is done with functions like insert/delete beats, time shift track, copy melody from bar... to bar..., etc. Press option+C to Copy Chords and /or Melody over a range of bars.
Time Shift Melody
This will move (slide) the melody a certain number of ticks. There are 120 ticks per quarter note. For example, to give the song a more laid-back feel, time shift it about 10 ticks ahead.
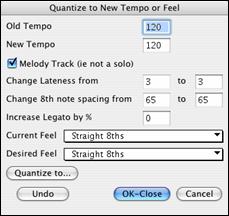
Quantize Melody and Soloist track
The Melody or Soloist track can be quantized. Go to menu Melody | Edit Melody Track | Quantize, Time Adjust | Quantize Melody. This opens the Quantize to New Tempo or Feel dialog box. To quantize the Soloist track, access this feature from the Soloist menu.
|
Resolution: Choose the division you would like the track quantized to. Choosing 16 will quantize to 16th notes. Starting at Bar# / Chorus #: Quantization will begin at the place you select and applied for the number of bars. #Bars to quantize: Leave at 999 to quantize the entire track or specify 1 or more bars. Quantize durations %: Choose 100% if you want the notes quantized exactly to the division. Otherwise, the notes will be moved the % toward the target quantization. Quantize Start Times: By default, this option is set to true. If you do not want the beginnings of the notes quantized, set it to false. Quantize Durations: This quantizes the END of the notes. By default, this is set to off. |

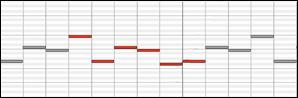
Intelligent Humanize of Melody and Soloist track
Most quantize routines can leave the music sounding stiff and unmusical. Some attempt to “humanize” a part by adding “randomization,” which rarely has the desired effect since humans do not randomly change timing or volume. Band-in-a-Box uses intelligent humanization routines that can humanize a melody from one feel to another, from one tempo to another, and vary the amount of swing to 8th notes. The results are very musical, with natural sounding melodies.
In this example, Melody | Edit Melody Track | Quantize, Time Adjust | Humanize Melody is selected. To humanize the Soloist track, go to the Soloist menu.
 |
We have broken down the Humanize effect into 5 main categories:
|
The best way to learn how these parameters combine is to try them. You can always press [Undo] button if you don’t like the results. For example, try changing the tempo of a song to see the changes that this will make to the 8th note spacing and lateness.
These categories are very straightforward, and you should have no trouble achieving the desired results. Remember to apply such parameters as Legato and Lateness sparingly.
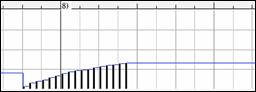
Insert Beats/Delete Beats in Melody
For example, to insert 2 bars in the melody at bar 5, go to Melody | Edit Melody Track | Quantize, Time Adjust | Insert Beats In Melody, and select bar 5, and select 8 beats (2 bars) to insert.
Additional Copy function for Melody
This allows you to Copy Chords and/or Melody for a range of bars. Go to menu Edit | Copy Special | Copy From.. To.. or press option+C.
Event List Editor
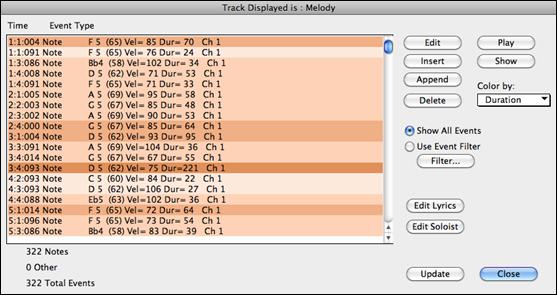
You can edit events including all MIDI events and lyric events using the Event List Editor, which can be opened by pressing the event list button [#] in the Notation window toolbar.
The list uses a color-coding based on Event Type, Channel, Duration, or Velocity.
 |
If the color-coding is based on “Event Type,” the list shows the event as follows.
|
The Event List Editor allows you to modify, insert, and delete notes.
- Double-click on an event to edit it (or press the [Edit] button).
- [Insert] puts an event before the current event.
- [Append] puts an event at the end of the track.
- [Delete] removes an event.
- [Show] exits the dialog and highlights the note in the Notation Window.
- [Play] plays the current event moves the next event.
- [Update] redraws the notation screen.
- [Edit Lyrics] – [Edit Soloist] – [Edit Melody] selects which track to edit.
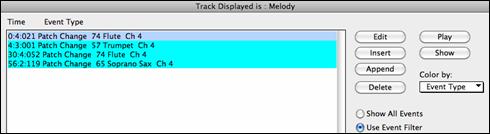
Event List Filter
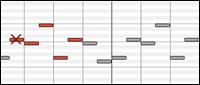
There is a filter for the Event List Editor, allowing you to quickly spot all patch changes.
 |
For example, to examine the patch changes on the Melody track, choose “Use Event Filter,” and then press the [Filter…] button. |
In the Event List Filter, select the type of information you want to display. In this case, it is program changes (patches) only.

The track will then display with the program changes only.
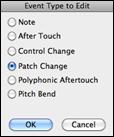 |
The Event Type to Edit dialog opens when either the [Insert] or [Append] buttons are pressed in the Event List Editor. This dialog allows you to select which type of event to insert or append - note, controller, pitch bend, etc. – and then opens the selected edit dialog. |
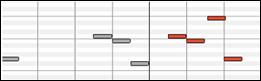
Piano Roll Window
The Piano Roll window enables precise graphic editing of note timing and duration. You can also graphically edit note velocity, controllers, program changes, channel aftertouch, and pitch bend.
|
You can open the Piano Roll window with the toolbar button or Windows | Piano Roll Window menu item. |

![]() Select the track - Bass, Piano, Drums, Guitar, Strings, Melody, or Solo.
Select the track - Bass, Piano, Drums, Guitar, Strings, Melody, or Solo.
 |
Selections, Inserted Notes, or Edited Notes will snap to the grid spacing. If you do not want snap-to-grid, select [NONE] in the drop-down menu. |
Note Duration
 |
Set the default duration of new inserted notes. It is easy to mouse-edit a note’s duration after a note is inserted, so it is usually sufficient to select a typical note duration that makes sense for your purposes and then mouse-edit the duration of “exception” notes after they are inserted. |
View/Insert Channel
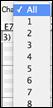 |
If a track contains multiple channels, “All” will display MIDI events on all channels. Otherwise, select the channel that you need to see. If “All” is selected, new MIDI events are inserted on the Band-in-a-Box track’s assigned channel. Except for perhaps multi-channel Guitar tracks, Band-in-a-Box plays all track events on the assigned track channel. Therefore, in almost all cases, the channel of track events does not matter. For instance, if the Melody track is set to transmit on channel 4, all events on the Melody track will be sent on channel 4 regardless of the “actual channel” of each track event. |
Ghost Notes
When viewing a single channel, notes on other channels can be ghost-displayed in light gray. This is useful when viewing multi-channel tracks. |
View/Edit
 |
Determine what graphic data to view or edit in the Graphic Event Panel. Choose Velocity, Controller, Program Change, Channel Aftertouch, and Pitch Bend. If “Chan” is not set to “All,” only the selected channel events will be displayed. |
Keyboard Pitch Panel
Click on a single note of the keyboard to select all notes of the clicked pitch. Click-drag on the keyboard to select all notes in a pitch range. |
Cursor Location Info Panel
|
The Info Panel shows the cursor’s Bar:Beat:Tick and MIDI note or controller value (depending on the cursor location). In cursor locations where a value would be nonsensical, the status text values are blank. |
For instance, in the Note Panel, Bar:Beat:Tick and Pitch are displayed. In the Ruler panels, only Bar:Beat:Tick is displayed. In the left Piano Panel, only Pitch is displayed. In the Graphic Event panel, Bar:Beat:Tick and Event Value are displayed.
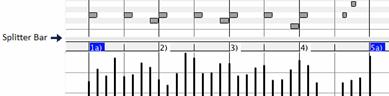
Chords Ruler and Note Time Ruler Panel
There are two rulers. The Chords Ruler displays chords and the playback location indicator. The Note Time Ruler displays bars and bar subdivisions. When zoomed-in, more subdivisions are displayed. When zoomed-out, fewer subdivisions are displayed.

Click or drag in the Chords Ruler to set the insertion point. If the song is playing, a Chords Ruler click will stop playback.
Double-click in the Chords Ruler to start playback at the indicated bar. You can also set the insertion point and then tap Control+F to start playback at the desired location.
Splitter Bar
A Splitter Bar sits between the Note and Graphic Event panels. Drag the splitter bar down to maximize the Note Panel and drag it up to maximize the Graphic Event Panel.
Zoom Buttons
|
These buttons will zoom the Note Panel vertically. |
|
Select notes and click this button. The vertical pitch range and horizontal time range will adjust to fill the Note Panel with the selected notes. |
|
This will return to the previous view range after zooming in on a region. |
|
This will zoom the window so that all track notes are visible at a glance. |
|
These buttons will zoom the window horizontally. |
Note Panel

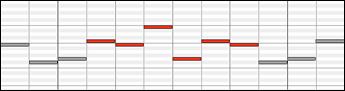
Horizontal bars represent notes. Notes can be selected, edited (start time, pitch, duration), inserted, and deleted.
Overlapped notes are displayed in bold aqua color, making them easy to identify. They can be eliminated from the right-click menu in this window.

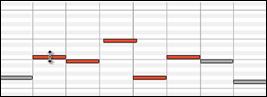
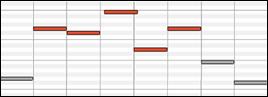
Note Selection
Selected notes are red.
1.Click on individual notes to select.
2. Shift-click on individual notes to add to the selection.
3. Command-click on a note to invert (toggle) its selection.
Click on white space and then drag a rectangle around notes to select a group of notes.
|
|
|
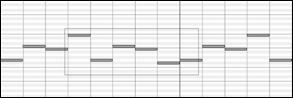
Shift-drag a rectangle to add another group of notes to the selection.
2. Command-drag a rectangle to toggle the selection of the notes in the rectangle.
Notes can be selected with the Note Time Ruler.
1. Click-drag on the Note Time Ruler to select a time-range of notes.
2. Shift-click-drag to add a time-range of notes to the selection.
3. Command-click-drag to invert the note selection of a time range.
For instance, you could drag to select all notes in bars 2 thru 7. Then you could command-drag to toggle off note selections in bar 4. By using the shift and command keys, very flexible time selections can be made.
Edit Note Time
Hover the cursor over the left of a note. When the cursor becomes a left-right arrow ![]() , click-drag horizontally to a new time.
, click-drag horizontally to a new time.
|
|
|

If multiple notes are selected and you want to move all selected notes, use shift-click-drag. Otherwise, a click on a note will deselect the previous selection, and it will only select/edit the clicked note.
 |
|
|
Edit Note Pitch
Hover the cursor over the middle of a note. When the cursor becomes an up-down arrow ![]() , click-drag vertically to a new pitch.
, click-drag vertically to a new pitch.
|
|
|

If multiple notes are selected and you want to transpose all selected notes, use shift-click-drag. Otherwise, a click on a note will deselect the previous selection, and it will only select/transpose the clicked note.
|
|
|
Edit Note Duration
Hover the cursor over the right of a note. When the cursor becomes a right arrow ![]() , click-drag horizontally to change the duration.
, click-drag horizontally to change the duration.
|
|
|


If multiple notes are selected and you want to change duration of all selected notes, use shift-click-drag. Otherwise, a click on a note will deselect the previous selection, and it will only select/edit the clicked note.
|
|
|


Insert a Note
When you hold the shift+command keys, the cursor becomes a pencil. Click where you want the note and it will be inserted with a duration from the “Dur” drop-down menu and on the channel selected by the “Chan” drop-down menu.
|
|
|

If “Snap” is enabled, the note is inserted at the nearest grid boundary. For instance, if the snap-to-grid setting is a quarter note, inserted notes will snap to the nearest quarter note boundary.
There are many on-screen visual cues to assist cursor positioning. The Cursor Position Time Markers in the Time Rulers can assist time positioning. The Cursor Pitch Marker in the Keyboard can assist pitch positioning. The Cursor Location Info Panel gives precise time and pitch info. Also, the Note Panel has time grid markings, and pitch accidentals are marked in light gray on the background.
Delete a Note
Select a note or multiple notes, then tap the fn+delete keys or choose Delete Selected Events from the right-click menu.
You can also use an eraser tool. Hold the shift+command keys and hover the cursor over a note. When the cursor becomes an eraser ![]() , click on a note to delete it. If multiple notes are selected, all selected notes will be deleted.
, click on a note to delete it. If multiple notes are selected, all selected notes will be deleted.
|
|
|

Graphic Event Panel

This panel graphically displays non-note MIDI events, which are specified in the Chan, View/Edit, and Controller Type controls.
Zero-value events are drawn as small hollow squares, to make them easy to identify.
When graphically inserting controller and pitch bend events the event density is adjustable from one event per 1 tick up to one event per 30 ticks.
With events such as pitch bend or controllers like modulation and sustain, it is important to take care to end a “gesture” with a zero-value event. Otherwise, subsequent notes will be affected, with an unwanted “hanging” permanent pitch bend, permanent vibrato, or sustain pedal locked down.
Velocity
![]() Set the “View/Edit” control to “Veocity,” and the velocity events will display in the Graphic Event panel.
Set the “View/Edit” control to “Veocity,” and the velocity events will display in the Graphic Event panel.

Controller Type
When “View/Edit” is set to “Control,” the Controller Type control becomes visible. The Graphic Event Panel will display the chosen controller type. If “Chan” is not set to “All,” only the selected channel events will be displayed.

![]() Select “11 Expression MSB” in the Controller Type control.
Select “11 Expression MSB” in the Controller Type control.

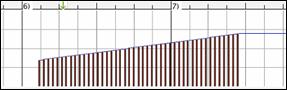
The Expression controller is recognized by most modern synthesizers including most General MIDI synths. However, some older synths do not recognize this controller. Expression is an alternative to “7 Main Volume MSB.” Use the Expression controller for individual tracks and reserve the main Volume controller for overall track loudness. That way, you can use the Band-in-a-Box main window Volume controls without affecting individual notes in the track.
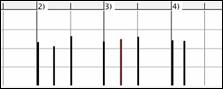
In the example shown, the intro flute ostinato pattern fades in, and then fades back out, via the expression controllers. These events were entered with the Line Tool. Notice that before the trumpet comes in, there is a single expression event of value 127, to kick the loudness up to normal.
Single controllers are inserted by moving the mouse cursor to the desired position and then clicking the mouse button.
![]() Select “1 Mod Wheel MSB” in the Controller Type control.
Select “1 Mod Wheel MSB” in the Controller Type control.

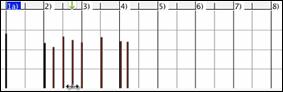
The Modulation controller is not firmly defined, but it is usually a Vibrato or Tremolo effect (especially in General MIDI synths).
Play the demo song and watch how Modulation has been added to some notes to add Vibrato. It is usually best to use a modest amount. With graphic edits, too much is almost always too much!
Program Change
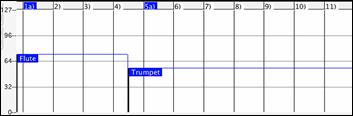
![]() Set the “View/Edit” control to “Program,” and the program changes will display in the Graphic Event Panel. Program changes are zero-based. For example, General MIDI piano is zero rather than one. The demo song intro has a flute program change. Then the first chorus is trumpet, the second chorus is flute, and the third chorus is soprano sax.
Set the “View/Edit” control to “Program,” and the program changes will display in the Graphic Event Panel. Program changes are zero-based. For example, General MIDI piano is zero rather than one. The demo song intro has a flute program change. Then the first chorus is trumpet, the second chorus is flute, and the third chorus is soprano sax.
Channel Aftertouch
![]() Set the “View/Edit” control to “ChnAfter” and you can see the Channel Aftertouch events in the Graphic Event Panel.
Set the “View/Edit” control to “ChnAfter” and you can see the Channel Aftertouch events in the Graphic Event Panel.

Pitch Bend
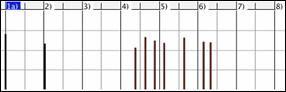
![]() Set the “View/Edit” control to “Pitch Bend.” Play the demo song and watch how a few pitch bends have been inserted to “scoop” some note attacks, “sting” the middle of a note, or “fall off” some note releases.
Set the “View/Edit” control to “Pitch Bend.” Play the demo song and watch how a few pitch bends have been inserted to “scoop” some note attacks, “sting” the middle of a note, or “fall off” some note releases.

Graphic Event Selection
Selected graphic events are red.
Graphic events can be selected with the Graphic Event Ruler.
![]()
Select the type of MIDI events specified in the Chan, View/Edit, and Controller Type controls. When you make a Ruler Time selection, ONLY THE VISIBLE events in this time range are selected. Other MIDI events in this time range are not selected.

Graphic Events Editing Modes
There are two modes for editing graphic events.
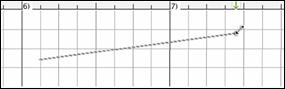
1. Add Mode : This will add/subtract the same amount to all selected events.
2. Scale Mode : This will scale the selected events. Select one or more Graphic Events and move the mouse over one of the events. Shift-drag vertically, and the events are scaled in a proportional fashion. Large-value events are scaled more than small-value events. This keeps the same shape of a gesture but makes the gesture bigger or smaller.
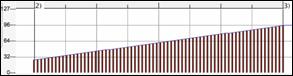
Velocity Line Tool
![]() With the Add Mode, note velocities will exactly match the slope of your drawn line.
With the Add Mode, note velocities will exactly match the slope of your drawn line.
|
|
|


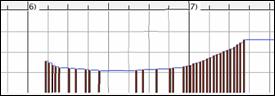
![]() With the Scale Mode, the Line Tool will shape the dynamics, but velocities are scaled to follow the approximate shape of your drawn line. With this mode, you can insert a Velocity fade, or change the velocity of a region, while preserving the Velocity dynamics of the music.
With the Scale Mode, the Line Tool will shape the dynamics, but velocities are scaled to follow the approximate shape of your drawn line. With this mode, you can insert a Velocity fade, or change the velocity of a region, while preserving the Velocity dynamics of the music.
|
|
|


Edit Graphic Event Value
Hover the cursor over the top half of an event. When the cursor becomes an up-down arrow ![]() , click-drag vertically to scale the event value.
, click-drag vertically to scale the event value.
|
|
|
To scale a selected group of events, shift-click-drag vertically on one of the events in the selection.
|
|
|

Edit Graphic Event Time
Hover the cursor over the bottom half of an event. When the cursor becomes a left-right arrow ![]() , click-drag horizontally to slide the event in time.
, click-drag horizontally to slide the event in time.
|
|
|

To slide a selected group of events, shift-click-drag horizontally on one of the events in the selection.
|
|
|
Insert a Graphic Event
Line Tool
With no modifier keys, the “white space” cursor is a Line Tool. Move the cursor to white space and then click-drag to draw a line. When the mouse button is released, a series of events are inserted which follow the line slope.
|
|
|
To avoid choking the MIDI stream, the maximum event density is one event per 10 ticks. Repeated events of the same value are not inserted. Therefore, long gradual Line Tool fades have a lower density than short extreme Line Tool fades.
|
The Spacing controls how often the events are drawn. For example, if this is set to 30, events will be spaced apart by 30 sticks. |
|
|

Pencil Tool
Move the cursor over white space and hold the shift+command keys. A Pencil Tool appears. Shift+command-drag to freehand-draw a curve. If you don’t get the curve quite right on the first pass, just keep holding the mouse button and move the mouse back-and-forth to draw your desired freehand curve. When the mouse button is released, a series of events are inserted to follow the freehand curve.
|
|
|

To avoid choking the MIDI stream, the maximum event density is one event per 10 ticks. Repeated events of the same value are not inserted. Therefore, many freehand curves have a fairly low density.
Delete a Graphic Event
Select an event or multiple events, then tap the fn+delete keys or choose Delete Selected Events from the right-click menu.
You can also use an eraser tool. Hold the shift+command keys and hover the cursor over an event. When the cursor becomes an eraser ![]() , click on an event to delete it. If multiple events are selected, all selected events will be deleted.
, click on an event to delete it. If multiple events are selected, all selected events will be deleted.
|
|
|

>Right-Click Contextual Menu
The pop-up menu can be accessed by right-clicking on the notes, graphic events, or any of the rulers.
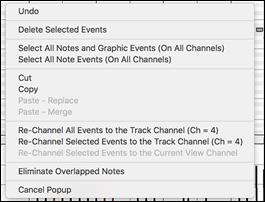
Undo - Duplicates the Band-in-a-Box Edit | Undo (or command+Z) action.
Delete Selected Events - Deletes any selected events (highlighted in red). This can also be accomplished by tapping the delete key.
Select All Notes and Graphic Events - If the “Chan” combo box is set to “All,” this item will select ALL EVENTS on ALL CHANNELS (all events in the track). Otherwise, ALL EVENTS are selected which match the CURRENT MIDI CHANNEL.
Select All Note Events (Of Current Channel) (right-click the Note Panel or Note Ruler) - If the Chan combo box is set to All, this item will select ALL NOTES on ALL CHANNELS, but it will not select any non-note events. Otherwise, ALL NOTES are selected which match the CURRENT MIDI CHANNEL.
Select All Note Events (Of Current Channel):(right-click the Graphic Event Panel or Graphic Event Ruler) - If the “Chan” combo box is set to “All,” this item will select ALL GRAPHIC EVENTS of the CURRENT VIEW/EDIT TYPE on ALL CHANNELS. Otherwise, ALL GRAPHIC EVENTS of the CURRENT VIEW/EDIT TYPE are selected which match the CURRENT MIDI CHANNEL. For instance, you could select all channel 4 modulation events, then Delete, to easily remove all of those events from the track.
Cut - Copy selected events to the clipboard and then remove them from the track. Can also be accomplished with the menu Edit | Cut (or command+X) action. If you wish, it is possible to cut from the Piano Roll, and then paste into the Notation window, or vice-versa.
Copy - Copy selected events to the clipboard can also be accomplished with the menu Edit | Copy (or command+C) action. If you wish, it is possible to copy from the Piano Roll, and then paste into the Notation window, or vice-versa.
Paste - Replace (If no events are on the clipboard, this item is dimmed.) - The paste occurs at the time location of your right-click. Move the mouse cursor to the desired insert location. Right-click on the Note Panel, Graphic Event Panel, or any of the Rulers. Then choose this item from the pop-up menu. Any previous event types in the paste range which match event types in the clipboard are removed before the clipboard data is added to the track.< If the “Chan” combo box is set to “All,” pasted events keep their original (copied) MIDI channel. Otherwise, the pasted events will be re-channeled to match the “Chan” combo box.
Paste - Merge (If no events are on the clipboard, this item is dimmed.) - The paste occurs at the time location of your right-click. Move the mouse cursor to the desired insert location. Right-click on the Note Panel, Graphic Event Panel, or any of the Rulers. Then choose this item from the pop-up menu. Events from the clipboard are merged with existing data in the track. If the “Chan” combo box is set to “All,” pasted events keep their original (copied) MIDI channel. Otherwise, the pasted events will be re-channeled to match the “Chan” combo box. The feature can also be accomplished with the menu Edit | Paste (or command+V) action (to match the Notation window, which also uses a merge style of pasting). Before using the main menu Edit | Paste (or command+V), first make sure the insertion marker is set to your desired paste time location. This is easy to do. Just click or drag in the Chord Ruler to place the insertion marker where you want it. Then tap command+V.
Re-Channel All Events to the Track Channel (Ch = xx) - Re-channel all notes and graphic events (the entire track) to the MIDI Output channel assigned for this track. Sometimes this can come in handy to bring some “sanity” into Piano Roll editing. For instance, though the default Melody output channel might be channel 4, meaning that Band-in-a-Box transmits any events in the Melody track on channel 4. The actual events in the Melody track might be channel 1, or a mixture of several channels. For ordinary playback or note tweaking, it doesn’t matter if the event channels are “mixed up,” as long as you have the view channel set to All. But if you wish to use Paste - Replace, the Paste - Replace function is smart enough not to “stomp on” a track’s events that differ from the channels of the clipboard MIDI data. So if you force all events to the track channel, the Paste - Replace function will always replace appropriately.
Re-Channel Selected Events to the Track Channel (Ch = xx) - Re-channel only the selected events to the track channel.
Re-Channel Selected Events to the View Channel - When editing a multi-channel guitar part or editing an imported multi-channel MIDI file, this command may be useful. Beware that it might initially appear confusing. For instance, one might set the view channel to ALL, and make a selection (intending to set these events to Ch 12). Then set the view channel to 12, and of course the selected events disappear (if the events had some other MIDI Channel). But then when you invoke “Re-Channel Selected Events to the View Channel,” the MIDI events will reappear on the Piano Roll.
Eliminate Overlapped Notes - Overlapping notes are displayed in bold aqua color, making them easy to identify. Selecting this menu command will remove the overlap.
Unconditional 30-Day Money Back Guarantee on all PG Music products purchased from PG Music Inc.
PG Music Inc.
29 Cadillac Ave Victoria BC Canada V8Z 1T3
Sales: 800-268-6272, 250-475-2874,+ 800-4746-8742*
* Outside USA & Canada where International Freephone service is available.
Access Codes
Tech Support: Live Chat, support@pgmusic.com
 Online now
Need Help?
Customer Sales & Support
|
Phones (Pacific Time) 1-800-268-6272 1-250-475-2874 |
||
| Live Chat | ||
| OPEN | Online Ordering 24/7 |
|
| OPEN | Forums, email, web support |