
Search Manual
Band-in-a-Box® 2018 for Windows® User's Guide
Chapter 14: User Programmable Functions
The StyleMaker
The StyleMaker is the section of the program that allows you to create brand-new styles or edit existing styles. This is done by recording patterns for each of the drums, bass, piano, guitar and strings parts, or by entering these parts in the StyleMaker Pattern Editor Notation window. If you don’t want an instrument in a style you don’t need to record any patterns for it.
| |
The StyleMaker window is accessed by pressing the [StyleMaker] toolbar button on the main screen and selecting the Edit current style in Stylemaker menu command. |
The window is also accessible from the File | StyleMaker menu by choosing any one of:
- New – Make a New Style to create an entirely new style from a blank template.
- Edit a Style (Alt+F9 keys) to open any style for editing.
- Edit Current Style (Ctrl+Shift+F9 keys) to open the current style in use for editing.

StyleMaker Pull-Down Menus
The StyleMaker has a separate pull-down menu to the main program. Many of the menu commands can be accessed directly with the on-screen buttons in the StyleMaker window.
File
Save Style (F2) Saves the style, using the current style name. This will overwrite a previous style!
Save Style As (Alt+F2) This saves the style, allowing you to rename the style if desired.
Exit (Alt+F4) Exits the StyleMaker, prompting you to Save the Style. If you don’t save the style upon exit you will lose any changes that you’ve made.
Edit
Cut Pattern - Cuts whichever pattern is highlighted in a row.
Copy Pattern - Copies a pattern to the clipboard.
Paste - Pastes a single pattern from the clipboard. Can paste between styles by opening and closing styles and copying and pasting.
Delete Pattern (Delete) - Erases a Pattern. Can also delete a Pattern by typing a weight of 0.
Cut from Notation - Highlight and cut notes from a pattern.
Copy from Notation - Highlight and copy notes in a pattern.
Paste from Notation - Paste notes into a pattern.
Pattern
Play Pattern (F4) - Plays the pattern using the currently selected style. Loops after 2 bars. If you want to play the song while the StyleMaker is open, you need to press the PLAY button on the Main screen, as the F4 key will not play the song, it will play the StyleMaker pattern.
Play Pattern on Chord(F8) - This plays back a pattern as it would sound in a song on a certain chord. This is useful to see the effects of smooth voice leading or macro notes in a pattern.
Record Pattern (F3) - Records a pattern. For drums it enters the STEP EDIT Drum Editor. For the other instruments, it starts a real time record (2 bar lead in then record 2 bar pattern).
Options (F10) - Allows you to set or change options (masks) for a specific pattern. This same dialog also appears at the end of recording a pattern.
Quantize Pattern(Alt+Q) - Quantifies a pattern to a given resolution. You can apply a percentage setting to adjust the “strength” of the quantization.
Slide Pattern - This time shifts the pattern X ticks (120 ticks per beat).
Volume adjust (this pattern)(Ctrl+Alt+W) - The Pattern | Volume adjust (this pattern) command displays the average velocity (volume) of the pattern and lets you set a new volume. Styles sound smoother if all patterns of one instrument are at similar volumes.
Volume adjust (this row)(Alt+V) - Pattern | Volume adjust (this row) sets the volume of all patterns in the selected row.Volume Adjust (all patterns) - (Alt+J) You can quickly set the volume for an entire instrument by using the Pattern | Volume Adjust (all patterns) command. For example, if the strings are too loud, turn the [Strings] button “on,” select Volume Adjust (all patterns), then type a number from 0 to 127 lower than the number that is currently displayed.
Legato Adjust - This adjusts the legato of each note. Units are 120 ticks/beat. Legato is the length of each note. Useful if you find a pattern that’s too percussive or too legato.
Transpose Pattern - This transposes the pattern X semitones. For example, +12 would transpose the pattern one octave up.
Trim Pattern - This deletes notes from the end of a Pattern.
Velocity Adjust - This function adds or reduces the velocity of a single pattern, row of patterns, or all patterns in an instrument. Choose the menu items for 1 pattern, 1 row, or the whole instrument and input the velocity change to make for the pattern(s). This will add or subtract a certain velocity value to the patterns, useful for reducing or increasing the volume of an entire instrument or fine-tuning the velocities in a style.
When adjusting velocities, use a single note only - When this menu item is selected, only the MIDI note number that is specified will have its velocity adjusted, unless a note number of 0 is entered. If the note number is entered as 0 then all notes in the pattern(s) will have their velocity adjusted.
Import Pattern - This allows you to import pattern(s) from the Melody track, MIDI file, or MIDI data on the clipboard. The dialog that appears allows you to select the # of patterns you want to import. Normally this will be one. If it is more than one (say, 4), then 4 consecutive patterns would be imported on to the current row of the StyleMaker.
Style
Patch Assignments(Alt+F10) - Assign patches to a style. See Patch Assignment dialog.
Misc. Settings(Ctrl+F10) - Assign miscellaneous settings to a style. See Misc. Settings dialog.
Next Instrument (F6) Previous Instrument (Shift+F6) - Changes the instrument setting between Drums/ Bass/ Piano/ Guitar/ Strings.
Import Instr. from Style (Alt +F3) - Import an instrument from one style into another. See Import Instrument dialog.
Import Drums from .MID to Drum Kit - Since you can define a custom drum kit for the grid editor, this function allows you to use the instruments that are found in a MIDI file. A quick way of building up a kit. For example, if you are making a Latin style called “mambo” you could load in a Mambo MIDI file that you made, and then the StyleMaker’s “Style | Import notes from .MID to Drum Grid…” menu command would extract the drum notes from the MIDI file and put them on the drum grid.
Define a Custom Drum Kit - Since the Drum Grid Editor uses 19 instruments, this allows you to define which instruments will be used and create a custom drum kit.
Copy all “a” substyle patterns to “b” Copies all “a” substyle patterns to “b” slots. This feature is handy when only a volume increase tweaking is required for the “b” substyle.
Copy Current Row to Row ___ - Copies an entire row of patterns to the new row specified.
Delete all Patterns in this Row - Deletes all of the patterns in the selected row.
Delete Instrument (all patterns, all rows for this instrument) - Completely removes the selected instrument from the style leaving rows of blank cells in the StyleMaker grid. This function is handy if you need to remove an instrument from a style.
Style Checker - Analogous to a “Spell Checker,” this function analyzes your style-in-progress and identifies possible problems.
The Style Checker results are output to a text window, allowing you to examine the patterns and fix them if required. It identifies patterns that might be “too busy” or incorrect macro notes etc. in a text report about the style, listing possible problems with the style. Here is a sample printout.
-----Start of style checking ------JAZQUINT.STY
Drums: Row 1, Column 1 First pattern of instrument shouldn’t contain masks in it. It should be generic.
Bass: Row 1, Column 1 First pattern of instrument shouldn’t contain masks in it. It should be generic.
Piano: Row 1, Column 3 Non Chord tones found (other than C, E, G, Bb) and pattern is not set to a chord mask, riff based or MACRO
…etc., etc.
-----end of style checking ------
Style Summary - This displays a text window summary of the style, including lots of information about the style such as # patterns, # patterns for each substyle, patches, pushes, volume changes, guitar patterns, and more.
Add required 8 beat and blank patterns - Styles must have some 8-beat patterns and at least one “a” substyle pattern if “b” substyle patterns are present. This will create them by duplicating lower rows.
Flip current instrument - Swaps the “a” substyle and “b” substyle patterns for the current instrument.
Flip entire style - Swaps the “a” substyle and “b” substyle patterns for the entire style.
Set embellish … current instrument - Opens options for embellishing the currently selected instrument part. Embellish does not apply to bass and drums.
Set embellish …all Piano/Guitar/Strings - Opens options for embellishing all Piano, Guitar, and Strings parts. Embellish does not apply to bass and drums.
Reduce style (to 16th notes) - For styles that you want to reduce from 8th notes to 16th notes, e.g., an 8th note style at a tempo of 260 to a 16th note style at a tempo of 130.
Expand style (to 8th notes) - To expand a 16th note style to 8th notes, e.g., a 16th note style at a tempo of 130 into an 8th note style at a tempo of 260.
Help
These menu items are quick links to the main Help and to StyleMaker topics in particular.
Index (F1)
Topic Search (Ctrl+F1)
StyleMaker Overview
Tutorial 5 Editing an Existing Style
Tutorial 6 Making a New Style
Drum Patterns
Bass Patterns
Piano/Guitar/String Patterns
How To (Shift+F1)
StyleMaker Toolbar Buttons
These options are also available from the StyleMaker window pull-down menus.
| |
Saves and overwrites existing style using current name. |
|
Saves the style but allows you to rename it first. |
|
Plays the current pattern. |
|
Stops the playback of the current pattern. |
|
Plays the current pattern over a specific chord. |
|
Allows creation or editing of a drum grid pattern. |
|
Begins live recording of a Bass/Piano/Guitar/Strings pattern after a 2-bar intro. |
|
Displays current pattern in notation, allowing editing of pattern in notation. |
|
Change the volume of the selected pattern. |
|
Increases or decreases note durations for the pattern. |
|
Assign instruments to the style. |
|
Overall style settings including master volumes. |
|
Assign instruments to the style. |
|
Miscellaneous settings for the style. |
|
Plays the current song using the new style you’re making. |
|
Exits the StyleMaker and closes the window. |
|
A right-mouse menu has options to Play Pattern, Play Pattern on Chord, or Mute Pattern. |

Exploring the StyleMaker
To become familiar with the StyleMaker, it is easiest to begin with an existing style and examine its makeup. This example uses ZZLITROK.STY, a basic Light Rock style. Patterns are played back from the main StyleMaker screen.
![]()
The StyleMaker displays current patch numbers for the parts on the main window.
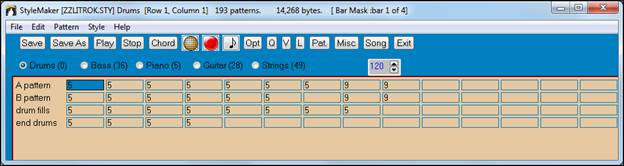
The StyleMaker always opens to the Drums window, as indicated by the highlighted button to the left of Drums. Other parts are selected by clicking on their buttons, just as in the main Band-in-a-Box screen.
The rows of cells are for the musical patterns that have been recorded for the style. Each numbered cell is a pattern; the blank cells are for new patterns. The numbers are the weights assigned to the pattern, a higher number, or weight, means that a pattern will be played more often. The average weight is 5.
In the example above, you will notice that there are 4 rows of drum patterns.
- A pattern is the row to record drum patterns for the A substyle.
- B pattern is the row to record for the B substyle.
- Drum fills are recorded on the drum fills row.
- End drums are ending patterns (2 consecutive patterns of 1 bar).
This style shown has nine drum patterns for its “a” substyle, and eight more for the “b” substyle variation. It also has eight drum fills and four ending patterns.
What’s a pattern?
A pattern is one musical figure, a single element of a musical style. When Band-in-a-Box combines the various note patterns into arrangements we hear what the different instrumentalists would play for a song in that style.
Drum Patterns
In our example, the drum patterns are what the drummer plays for a Light Rock song.
![]() You can view any drum pattern in the row if you click on the box and then on the drum grid button to open the Drum Pattern Editor.
You can view any drum pattern in the row if you click on the box and then on the drum grid button to open the Drum Pattern Editor.
The Drum Pattern Editor grid shows which drums in an 18-piece kit are being played on what beats and with what velocity (force) they are being hit. Each group of columns separated by a vertical line represents one beat in a four-beat bar, sub-divided into 16th notes. If there was a number in each cell across the row for any instrument, that instrument would play sixteenth notes for the whole bar.
In a swing style each beat would be sub-divided into eighth-note triplets, with three columns to a beat.
Let’s examine the pattern in detail.
The highlighted cell shows that the Bass Drum is being played on beat 1 at a velocity of 83. (The loudest possible note has a velocity of 127, while 0 is silent.) Moving to the right, you will see that the Bass Drum plays again on the second eighth note of beat 2 with a velocity of 73, and then on beat 3 with a velocity of 93, the familiar “boom-ba-boom” Pop/ Bossa Nova beat.
The Closed High Hat plays straight eighth notes at different velocities.
The Snare Drum plays on beats 2 and 4 in a typical Light Rock backbeat.
You can easily create new patterns of your own by selecting an empty box in a row of patterns and then clicking the [Rec] button to open a blank Drum Pattern Editor grid. To hear the pattern you have made, click on the [Play] button. Click on the [Help] button for more tips and details.

Defining a Custom Drum Kit
To set up a custom drum kit, select the menu item Style | Define Custom Drum Kit in the StyleMaker window to launch the Define Custom Drum Kit dialog. You can choose the 18 drum instruments to be used on the drum grid. Any of the GM instruments may be chosen. Kits may be saved and loaded to disk.
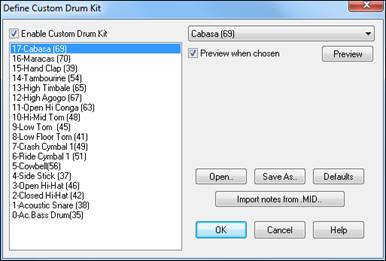
In defining a custom drum kit in the StyleMaker, you can use the drum notes found in a MIDI file.
![]() For example, if you are making a Latin style called “mambo,” you could load in a Mambo MIDI file that you made, and then the [Import notes from .MID…]
For example, if you are making a Latin style called “mambo,” you could load in a Mambo MIDI file that you made, and then the [Import notes from .MID…]
function would extract the drum notes from the MIDI file and put them on the drum grid.
Drum Screen Alternate Notes
What are alternate notes?
Alternate notes can be entered for any note. This tells Band-in-a-Box to randomly choose a different note to the one specified. For example:
- You might want a note to be a closed high hat 80% of the time, and an open high hat 20% of the time.
- You might want a note to be high conga 60% and low conga 40% of the time.
- Or high tom 30% of the time and NO note the other 70%
This allows one drum pattern to sound like many, because it will be played different ways depending on which of the notes are picked.
How To Put In An Alternate Note
Click on the cell in the Drum Pattern Editor where you want to add an alternate note. Then press the [Alt.] button or press the F5 key to open the Alternate Drum Note dialog.

Type in the #s as you see here.
- The Alternate will play 50% of the time.
- The Alternate note #4 is Open High Hat (you will see the list of note #s at the side of the screen.
- The Alternate note will play at a velocity of 90.
Check the “Double note (32nd note)” checkbox to have the alternate note play as a doubled 32nd note.
“Omit first note” works together with the Double note feature to play only the second 32nd note.
![]() When you exit the dialog, you will see that the note cell now has a red border indicating that an alternate note is located there.
When you exit the dialog, you will see that the note cell now has a red border indicating that an alternate note is located there.
Click on the [Exit] button to return to the Drum window.
The Drum Pattern Options dialog will open.
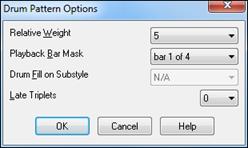
These options determine how and when an individual drum pattern gets played.
Relative Weight (Usual Setting =5) Relative Weight is the number that you assign to the pattern from 1-9. Numbers from 1-8 indicate how often you want the pattern to be played in relation to the other patterns on the same row. A weight of 9 is a special setting that ensures that the pattern will ALWAYS be played. Patterns assigned a weight of 9 usually have other options set which instruct the pattern to only be played at certain times (bar after a drum fill for example).
Playback Bar Mask (Usual Setting =0) Playback Bar Mask determines on what bars of the song the pattern will play. The bar numbers are counted relative to the last part marker. Bar 1 is the first bar after a part marker for example. A bar mask setting of 0 is the default. This lets the pattern be played at any time.
Other bar mask settings:
- Bar 1 of 4
- Bar 2 of 4
- Bar 3 of 4
- Bar 4 of 4
- Bar 5 of 8
- Bar 6 of 8
- Bar 7 of 8
- Bar 8 of 8
- pre-fill - refers to the bar before a fill
- fill - refers to the bar of a fill. This is not applicable to drums because there is a special row for drum fills.
- post-fill - refers to the bar after a fill, which is the same as the first bar after a part marker.
Drum Fill On Substyle (Usual Setting =0) This setting is only relevant on the Drum Fills line. It lets you specify if you want the drum fill to be used on the “a” substyle, the “b” substyle, or either. The default setting is “either.”
Late Triplets (Usual Setting =0) This is only relevant in drum patterns with time base =12 (triplet feel). If you want the 3rd triplet to be played late, as is usually done in slow Jazz styles, then set a number from 0-10. The default is 0 = not late at all. A typical setting for a slow triplet style is triplets late =5 where one unit is 120/beat.
This type of pattern is found in earlier Band-in-a-Box styles. Later styles use live MIDI drums, which are edited as notation. The same options are used.
Editing Live Drums Patterns (or patterns imported from a MIDI file)
Live drum patterns are recorded in real time from a MIDI controller - either MIDI drum pads or a velocity sensitive MIDI keyboard. You can also import MIDI patterns from any standard MIDI file with the StyleMaker’s Pattern | Import Pattern from MIDI file command.
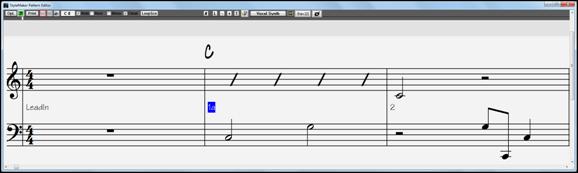
![]() To edit these patterns, press the notation button in the StyleMaker toolbar to open the Pattern Editor Notation window. Edit the drum notes in the Editable Notation or Staff Roll view, just as you would edit regular notation.
To edit these patterns, press the notation button in the StyleMaker toolbar to open the Pattern Editor Notation window. Edit the drum notes in the Editable Notation or Staff Roll view, just as you would edit regular notation.
RealDrums Styles
RealDrums are actual recordings of studio drummers, pieced together by Band-in-a-Box to create a unique “real” drum track that is played along with the MIDI tracks created by Band-in-a-Box styles.
![]() It is possible to assign RealDrums (audio drums) to a particular Band-in-a-Box style in the Misc. Style Settings dialog.
It is possible to assign RealDrums (audio drums) to a particular Band-in-a-Box style in the Misc. Style Settings dialog.
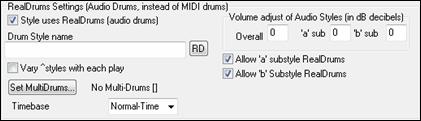
RealDrums Settings (Audio Drums, instead of MIDI drums)
Enable “Style uses RealDrums (audio drums)” in order to designate a RealDrums style, and then press the [RD] button to select your RealDrums style. Whenever the current style is played, it will use your RealDrums style provided that RealDrums are enabled in the RealDrums Settings dialog. There are also additional volume controls here.
To make your overall dB setting a bit higher or lower for this particular Band-in-a-Box style you can enter a setting here. There are also fields for adjusting the “a” or “b” subsection volumes only.
If you remove the check mark from either “Allow “a” substyle RealDrums” or “Allow “b” substyle RealDrums” the one with the checkmark remaining will be used for the entire song, regardless of what substyle is currently called for in the song.
See the following tutorial on Making RealDrums Styles.
Bass Patterns
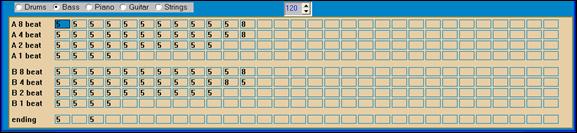
Click on the button to the left of Bass to open the bass pattern window. Notice that the status bar gives the Row and Column number for the current pattern.
![]()
You will see that this window is different from the Drums window, it has rows for different lengths of patterns – 8 beat, 4 beat, 2 beat and 1 beat – for both the A and B substyles, and a row for endings.
![]() To see a bass pattern, select any numbered box and click on the notation button. The StyleMaker Pattern Editor will open, showing the selected pattern as notation.
To see a bass pattern, select any numbered box and click on the notation button. The StyleMaker Pattern Editor will open, showing the selected pattern as notation.
![]() Click on this button to enter the Editable Notation mode. In this mode notes can be edited, added, or deleted as in the regular notation
Click on this button to enter the Editable Notation mode. In this mode notes can be edited, added, or deleted as in the regular notation

A new pattern can be created by selecting an empty cell in the StyleMaker grid and then opening the StyleMaker Pattern Editor window to enter notes with your mouse. A quicker way to make a new pattern is to record it live from a MIDI keyboard or any other MIDI controller that is connected to your computer.
Recording a New Pattern
New patterns are recorded by playing them live in real time as the StyleMaker plays an accompaniment on the drums and other instrument parts for the style. If you don’t want to hear other parts - say you just want to play along to the drums – any part can be muted with a right mouse click on the instrument name in the Band-in-a-Box main screen.
Go to the correct row for the length of the pattern you want to record (8 beat, 4 beat, etc.) and click on an empty cell. Recording is started with the [Rec] button. When it is clicked, the drums and any other parts that are present will start to play but recording has not begun.
The StyleMaker gives you a 2-bar intro to get ready to record the new pattern, so you can play along with the intro for a “flying start” or just use the 2 bars to count yourself in. Recording then begins and continues for another 2 bars, no matter what length of pattern you are recording. If you are just recording a 4-beat pattern you will still hear the 2-bar intro and then another 2 bars of accompaniment while the pattern records. You would just play your 4-beat pattern and then wait until recording stops.
When recording stops, the Bass Pattern Options dialog opens.

The options determine how and when each individual Bass pattern gets played. They can always be changed after the style has been saved.
Click OK to save the pattern with the default options. Click Cancel to erase the take and record the pattern again.
To hear the pattern you have just recorded, click on the [Play] button or, better yet, click on the [Chord] button in the StyleMaker toolbar to hear how it sounds playing different chords.
Bass Pattern Options
Relative Weight (Usual Setting = 5) Set this # higher/lower if you want the pattern to be played more/less often than the other patterns on the same row. This number is also displayed on the main StyleMaker screen. A setting of 9 (always) is a special setting that instructs the pattern to always be played instead of the other patterns on the same row. These patterns always have other options set which specify the times that this pattern would be eligible to be played.
Playback Bar Mask (Usual Setting = 0) Playback Bar Mask determines on what bars of the song the pattern will play. The bar numbers are counted relative to the last part marker and range from 1-8. Bar 1 is the first bar after a part marker for example.
Other bar mask settings:
- Bar 1 of 4
- Bar 2 of 4
- Bar 3 of 4
- Bar 4 of 4
- Bar 5 of 8
- Bar 6 of 8
- Bar 7 of 8
- Bar 8 of 8
Special Bar Masks:
- pre-fill - refers to the bar before a fill
- fill - refers to the bar of a fill (this allows you to put in “bass fills” for example)
- post-fill - refers to the bar after a fill, which is the same as the first bar after a part marker.
Playback Beat Mask (Usual Setting = 0) Set the beat mask to a beat from 1-4 if you want the pattern to only be played on certain beat #s. 1= Beat 1, 2= Beat 2, 3= Beat 3, 4= Beat 4.
Roman Numeral Mask (Usual Setting = 0) If you have a pattern that should only be played on the I chord or the IV chord (of the key), you can use these Roman Numeral Masks. This setting is rarely used.
Chord Type (Usual Setting = Any) This setting is very useful. This allows you to record patterns that will only work on certain types of chords. For example, you can record a specific riff that will only work on a minor 7th chord. You then play the pattern on a Cmin 7 (not a C7). There are chord types for most types of chords.
Interval To Next (Usual Setting = Any Interval) This setting allows you to restrict the pattern to be played only if the next chord is a certain interval away. For example, you can record a bass pattern that is walking up a fourth and then assign an Interval of Up 4th so that the pattern would only be played if you’re going up a 4th.
Half Octave range (Usual Setting = Full Octave) This is a new setting in the StyleMaker. Usually a pattern will be picked on any of the 12 roots. You can select a smaller range, either A to D, or Eb to Ab. In this case the pattern would only be picked if the chord in the song is in that range.
Play Pattern Pushed how often (Usual Setting = 0 %) / # Ticks to Push Pattern (Usual Setting = 0) Pushed patterns are patterns that are played before the chord begins. Jazz styles typically use pushed patterns for the piano. Patterns are recorded in the normal way (non-pushed) and then you assign the % of time and amount (in ticks, 120 ticks = 1 beat) to push the pattern. The pattern only plays pushed in the song, not when played in the StyleMaker window.
OK to use Macro Notes (Bass Usual Setting = No) Bass macros are special notes that you record. When they are played back they are replaced by a function.
List of Bass Macro Notes
Note# 72 (C): Pop Walking Note(s). Playback with the [F8] key and note #72 will be replaced by up to 4 intelligent notes per pattern walking in a Pop/Country mode to the next chord.
Note# 76 (E): Note a semitone below root of next chord.
Note# 77 (F): Root of next chord.
Note # 78 (F#): Note a semitone ABOVE root of next chord.
Note # 79 (G): Best fifth (a fifth above or below the root depending on how high the root is. Stays on the root if in a slash chord (C7 /E).
Remember that to get Bass Macros working you must:
- Hit the right note # (you may be out by an octave).
- Set “OK to use macros” to “Yes.”
- Playback the Pattern with [F8] key or [CHORD] button. The [F4] playback key gives you a literal playback with strange sounding high macro notes.
Chord Selection Dialog
![]() This section is accessed by the [Chord] button, the F8 key or by choosing Pattern | Play Pattern on Chord from the pull-down menu.
This section is accessed by the [Chord] button, the F8 key or by choosing Pattern | Play Pattern on Chord from the pull-down menu.

This plays back a pattern on a specific chord that you choose in either the key of C or the key of F. You can hear what patterns will sound like in a style by “trying them out” on certain songs. Macro notes recorded in a pattern will play their corresponding chords; smooth voice leading is demonstrated etc.
Just choose a chord and press OK.
Piano, Guitar, and String Patterns
Piano, Guitar and String patterns are recorded in the same way as live Drums or Bass patterns, but with added features and options. Guitar styles can be created with authentic strumming and rhythm patterns using correct fret positions.
Piano/Guitar String Pattern Options dialog
The StyleMaker shows summary information about non-default settings in a pattern at the top title bar, so they are easy to spot.
![]()
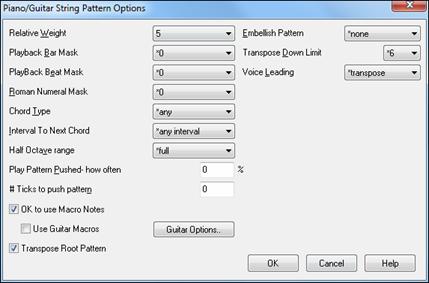
Relative Weight (Usual Setting = 5) Set this # higher/lower if you want the pattern to be played more/less often than the other patterns on the same row. This number is also displayed on the main StyleMaker screen. A setting of 9 (always) is a special setting that instructs the pattern to always be played instead of the other patterns on the same row. These patterns always have other options set which specify the times that this pattern would be eligible to be played.
Playback Bar Mask (Usual Setting =0) Playback Bar Mask determines on what bars of the song the pattern will play. The bar #s are counted relative to the last part marker, and range from 1-8. Bar 1 is the first bar after a part marker for example.
Other bar mask settings:
- Bar 1 of 4
- Bar 2 of 4
- Bar 3 of 4
- Bar 4 of 4
- Bar 5 of 8
- Bar 6 of 8
- Bar 7 of 8
- Bar 8 of 8
Special Bar Masks:
- pre-fill - refers to the bar before a fill
- fill - refers to the bar of a fill (this allows you to put in “bass fills” for example)
- post-fill - refers to the bar after a fill, which is the same as the first bar after a part marker.
Playback Beat Mask (Usual Setting=0) Set the beat mask to a beat from 1-4 if you want the pattern to only be played on certain beat #s. 1= Beat 1, 2= Beat 2, 3= Beat 3, 4= Beat 4.
Roman Numeral Mask (Usual Setting = 0) If you have a pattern that should only be played on the I chord or the IV chord (of the key), you can use these Roman Numeral Masks. This setting is rarely used.
Chord Type (Usual Setting = Any) This setting is very useful because it allows you to record patterns that will only work on certain types of chords. For example, you can record a specific riff that will only work on a minor 7th chord. You then play the pattern on a Cmin 7, not a C7. There are chord types for most types of chords.
Interval To Next Chord (Usual Setting = Any Interval) This setting allows you to restrict the pattern to be played only if the next chord is a certain interval away. For example, you can record a bass pattern that is walking up a fourth and then assign an Interval of Up 4th so that the pattern would only be played if you’re going up a 4th.
Half Octave Range (Usual Setting = Full Octave) Usually a pattern will be picked on any of the 12 roots. You can select a smaller range, either A to D or Eb to Ab. In this case the pattern would only be picked if the chord in the song is in that range.
Play Pattern Pushed – how often (Usual Setting = 0 %) / # Ticks to push pattern (Usual Setting = 0) Pushed patterns are patterns that are played before the chord begins. Jazz styles typically use pushed patterns for the piano. Patterns are recorded in the normal way (non-pushed) and then you assign the % of time and amount (in ticks, 120 ticks = 1 beat) to push the pattern. The pattern only plays pushed in the song, not when played in the StyleMaker window.
OK to use Macro Notes (Usual Setting = No) Piano Macros are special notes that you record. When they are played back they are replaced by a function, as listed below.
List of Piano Macro Notes (same as Guitar/String macro notes)
MIDI Note # 83 B: Pop Chord Diatonic Below
MIDI Note # 84 C: Pop Chord
MIDI Note # 85 C#: Pop Chord Diatonic Above
MIDI Note # 88 E: Jazz Chord Chromatic Below
MIDI Note # 89 F: Jazz Chord
MIDI Note # 90 F#: Jazz Chord Chromatic Above
Remember that to get macro notes working you must:
- Hit the right note # (you may be out by an octave).
- Set OK to use macros to Yes.
- Playback the pattern with [F8] key or [CHORD] button. The [F4] playback key gives you a literal playback with strange sounding high macro notes.
Check “Use Guitar Macros” to enable guitar macro notes for this pattern.
Click the [Guitar Options..] button to specify guitar macro note parameters.
Transpose Root Pattern (Usual Setting = No) This is a rarely used setting. It only is relevant when voice leading is set to smooth. It determines where the center of the pattern is considered to be. If set to “Yes,” the center of the pattern will be moved to the key of the song.
Embellish Pattern (Usual Setting = None) If set to “embellish 1” the pattern will be embellished. This is useful in Jazz styles. “Embellish 1” embellishes the chord once in the pattern, whereas “embellish 2” changes the embellishment during the pattern.
Transpose Down Limit (Usual Setting = 6) This setting is quite useful. It controls the range that the pattern will be played over. For example, if the transpose down range is set to =2 the pattern (recorded in C) will be transposed a maximum of 2 semitones down, and therefore up to 10 semitones up to play all 12 possible roots of the chords.
Voice Leading (Usual Setting=Transpose) The easiest type of voice leading is transpose only. If the notes C-E-G-Bb were played as a C7 pattern, then Band-in-a-Box would transpose that voicing to an F7 chord as F-A-C-Eb, which is fine but not very smooth.
A more pleasant setting would be “smooth” voice leading. Then the F7 would be voiced automatically as C-Eb-F-A.
“Riff based” voicing is used when you have recorded a pattern with a melodic riff in it. This setting ensures that Band-in-a-Box will not try to transform any of the notes into chord tones.
Guitar Styles with the StyleMaker
Guitar Styles with incredible authenticity are possible in the StyleMaker. You can use new macro notes to be played back as a Jazz, Folk, or Pop guitar chord using correct fret positions for accurate guitar-friendly chords.
Playing back Guitar Styles
Guitar Styles are identified by the exclamation point (!) in the style name. This is not a requirement but is usually present in the style name. For the typical user who is just using the styles for playback and isn’t making their own styles there’s not much that you need to know about the styles, since they play normally like other Band-in-a-Box styles.
![]()
You can see which tracks have intelligent guitar parts by looking at the title window of the Guitar fretboard, when the track is highlighted. If it is a Guitar Style track, it will say [Guitar Voicings] after the name of the track. The usual track that has the intelligent guitar styles is of course the Guitar Part. Some of the styles have more than 1 guitar, so the piano and/or strings part might also have an intelligent guitar part. In these cases, you can also view the guitar on those tracks.
The styles can be set to use different types of voicings for guitar. For example, there are Jazz, Pop, and Folk (open position) voicings. Also, some of the styles allow the guitar to play advanced chords and inversions. Some of the styles play chord patterns, so the chord in the song might be F7, but the guitar plays a “walking-chord” pattern of F7, Cm7/G, Abdim, F7/A on each beat. There can be fingerpicking styles that have a lowest note alternate between root and 5th.
Guitar Parts use channels 11 to 16 for the notes, corresponding to strings 1 to 6 of the guitar. When you make a MIDI file, the notes will all get written on a single guitar channel. Sequencers like PowerTracks Pro Audio will recognize guitar parts on all 6 channels, so if you want to write the MIDI file from an intelligent guitar style, you can set Band-in-a-Box to do this from the Options | Preferences… | Write Guitar part on 6 channels option.
To make a Guitar Style:
![]()
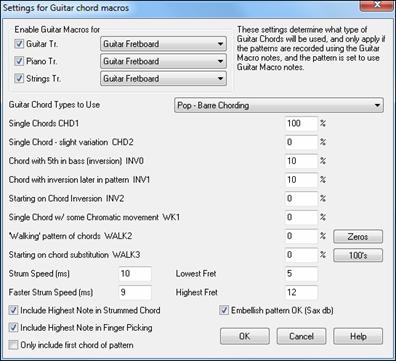
![]() Press the [Misc] button to enter the Misc. Style Settings window, and then press the [Guitar Macros] button to launch the Settings for Guitar chord macros dialog.
Press the [Misc] button to enter the Misc. Style Settings window, and then press the [Guitar Macros] button to launch the Settings for Guitar chord macros dialog.
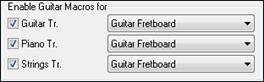 |
In the Settings for Guitar chord macros dialog choose the tracks that you want to put guitar parts on. Use the Piano and Strings to layer multiple guitar parts. |
|
In the dropdown “Guitar Chord Types to Use” combo box, set the type of chords to use: Jazz, Pop, Folk, Half Note (sax), Ukulele, Mandolin, 5-string Banjo or alternate guitar tunings. |

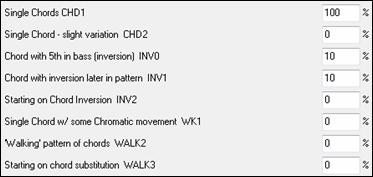
Set the complexity of the chords to use. These can be single chords, chords with variations, inversions, and chord “walking” patterns. If you want a simple guitar style, set the first one to 100%, and the rest to 0%.
![]()
Set the strum speed and fret range that should be played on the guitar.
![]() The Guitar styles have an option to keep the same chord for the whole pattern when using databases that have changing chords within the pattern. If set, databases that have changing chords like the “Half Note (sax)” chords will only use the first chord in the pattern.
The Guitar styles have an option to keep the same chord for the whole pattern when using databases that have changing chords within the pattern. If set, databases that have changing chords like the “Half Note (sax)” chords will only use the first chord in the pattern.
Exit the dialog and record a guitar pattern using Guitar Macro notes.
| |
When the recording of the pattern finishes, set “OK to use Macro Notes” and “Use Guitar Macros” to Yes. |
Save the style, using the convention of putting an exclamation (!) somewhere in the name (e.g., as the first character in the filename) to indicate that it is an intelligent guitar style.
Guitar Macro Notes
The main Guitar Macro notes to use are:
Strummed Chords
C6 : Plays a guitar chord, with a slow strum.
D6 : Plays a guitar chord, with a faster strum.
For example, if you want a simple 4-in-the-bar pattern that plays a slow-fast-slow-fast strumming pattern, play the notes C6 D6 C6 D6 for the pattern.
Additional strumming macros are:
F#6 : Back strum, chromatic below.
G6 : Back strum.
G#6 : Back strum, chromatic above.
A6 : Back strum, chromatic above, fast strum.
Single Strings in chord
C4 : Plays a single string that is the low root of the chord.
G4, C5, E5: Plays single string (D string, G string, B string).
G5 : Plays high E string.
F5 : Plays high E string, but if none available will play G string.
Additional notes for fingerpicking, not part of chord
G3 : Fifth below the low root of the chord for fingerpicking.
E4 : Fifth or 3rd above the low root for fingerpicking.
Override Guitar Style Options for this pattern only
You don’t need to set any Guitar Style Options, unless you want to override the settings already made in the Misc. Style Settings dialog, for this pattern only. In the StyleMaker window, press the [Opt] button and then the [Guitar Options..] button to see the options for the current pattern.
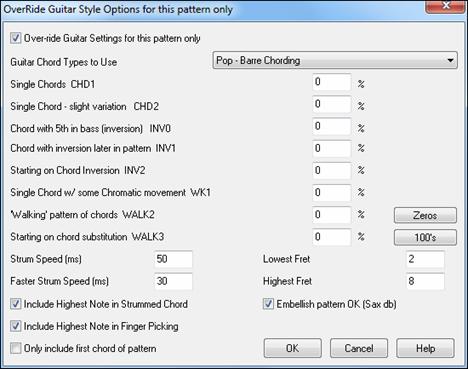
Check the “Over-ride Guitar Settings for this pattern only” checkbox to set new parameters for this pattern only.
Guitar Chord Types to Use Use this feature to set the type of guitar chords to use for this pattern from the list, which includes alternate tunings.
Single Chords CHD1 The Single Chords feature will play the chord as intended in the pattern for the percentage value entered.
Single Chord - slight variation CHD2 This will play a slight variation of the specified chord for the percentage value entered.
Chord with 5th in bass (inversion) INV0 This feature will play your chord with a 5th in the bass.
Chord with inversion later in pattern INV1 This feature will play your chord with inversion later in the pattern.
Starting on Chord Inversion INV2 This feature will play your pattern starting on chord inversion.
Single Chord w/ some Chromatic movement WK1 This feature will play single chord with some chromatic movement.
‘Walking’ pattern of chords WALK 2 Walking pattern of chords.
Starting on chord substitution WALK 3 Walking pattern starting on chord substitution.
Strum Speed (ms) This setting in milliseconds (ms) affects the rate in which the guitar chord is strummed.
Faster Strum Speed (ms) The Faster Strum Speed setting affects the rate in which the guitar chord is strummed. Note that a lower setting in ms equals a faster strum.
Include Highest Note in Strummed Chord Check to include the highest note (for Strummed Macros) when played as a macro.
Include Highest Note in Finger Picking
Check to include the highest note (for Single String Macros) when played as a macro.
Only include first chord of pattern Check to play the first chord only.
Lowest Fret The Lowest Fret feature will limit the notes not to be played beneath the fret specified.
Highest Fret The Highest Fret feature will limit the notes not to be played above the fret specified.
Embellish pattern OK (Sax db) This allows embellishment of the pattern from the Sax patterns database.
[Zeros] Click this button to reset all percentage fields to zero.
[100s] Click this button to set all percentage fields to 100.
Miscellaneous Style Settings

This dialog allows you to set some miscellaneous settings for the style. They are:
Long Name (32 chars) A long style name can be stored in the style (up to 32 characters), and this will appear on screen and in StylePicker.
Waltz? If you want to make a waltz with the StyleMaker, check the “Waltz?” checkbox in the Misc. Style Settings dialog. Then the StyleMaker will record and play patterns in 3/4 time. The “8 beat row” will record “6 beat” (2 bar patterns); the “4 beat” will record 3 beat (1 bar) patterns. The “2 beat” and “1 beat” still record 2 and 1 beat patterns. The new style is made as a waltz, and will play with a 3/4 lead in. There is no need to put a 3/4 time signature change in bar 1.
Jazz Style? This lets Band-in-a-Box know if the style you’ve made is a Jazz style or not. If it’s a Jazz style it will use the Jazz Snare/Bass Drum instead of the Pop Snare/Bass Drum, and also makes some other decisions based on this setting.
Tempo This allows you to set the default tempo for the Style. This is stored with the style. You can also change this tempo by the tempo button on the StyleMaker main screen. Tempos can also be changed by the [ and ] keys. When creating a new song, the tempo will be set to the default tempo for the style/
Resolution Styles can either have Triplet (swing eighth notes) Straight (even eighth or sixteenth notes) resolution.
Use Latin Drum Kit Check to use a Latin drum kit in this style with instruments like maracas, cabasa, and agogo.
Velocity Boost of pushes Pushes can get a velocity boost, so that they are played louder than other patterns. A usual setting would be 10.
# ticks to push Styles can be pushed with the StyleMaker. This will cause the patterns to be played a little ahead of the beat, a certain % of time, which gives your arrangement a more human (musical) feel.
Band-in-a-Box uses a resolution of 120 PPQ, i.e., 120 ticks to a quarter note.
- 30 ticks = sixteenth note
- 40 ticks = triplet eighth note (Swing)
- 60 ticks = eighth note
Choose the number of ticks for each push to use.
Substyle Pushes The % of notes that are pushed can be set separately for each instrument part and for the “a” and “b” substyles.
In this example, the Bass part patterns will get pushed (randomly) 10% of the time in the “a” substyle and 20% of the time in the “b” substyle.
![]()
Allow Volume Changes with Style (Usually = No) Usually you don’t want specific volume changes in a style. But if you decide to change the volume of instruments, you can do it by setting this to YES and then entering the Volumes you want in the settings below. (A better way to change the volume of a part is to use Pattern | Volume Adjust (Alt+W) to set the volume of each pattern individually.)
MultiStyles
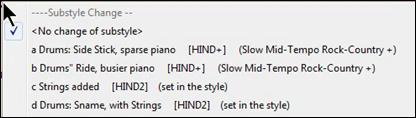
Styles can now have names stored for the substyles. This is especially useful for Multistyles to describe the various substyles.

When MultiStyle names are set, they are visible when right-clicking on a bar number.
‘Riff’ voicing type uses chord tones
This is an option for piano, guitar, and string patterns. If selected, voicing modifies to match the chord and scale. Deselect for a simple transpose ignoring chord type.
RealDrums Settings (Audio Drums, instead of MIDI drums)
It is also possible to assign RealDrums (audio drums) to a particular Band-in-a-Box style.

Enable “Style uses RealDrums (audio drums)” in order to designate a RealDrums style, and then press the [RD] button to select your RealDrums style. Whenever the current style is played, it will use your RealDrums style provided that RealDrums are enabled in the RealDrums Settings dialog. There are also additional volume controls here.
To make your overall dB setting a bit higher or lower for this particular Band-in-a-Box style you can enter a setting here. There are also fields for adjusting the “a” or “b” subsection volumes only.
If you remove the check mark from either “Allow “a” substyle RealDrums” or “Allow “b” substyle RealDrums” the one with the checkmark remaining will be used for the entire song, regardless of what substyle is currently called for in the song.
Choose “Vary ^ styles with each play” to hear a different variation each time [Play] is pressed, so the song sounds fresh each time. One time you will hear it with brushes, the next time with sticks and ride cymbals, etc.
The [Set MultiDrums] button will open the Create Multi-Drums dialog, which allows you to create the Drums track with multiple drum/percussion parts, drum loops, UserTracks drums, and even RealTracks.
You can select a timebase (normal-time, double-time, half-time, or triple-time) for the Drums track with the ‘Timebase” option.
![]() These settings determine what type of guitar chords will be used, and only apply if the patterns are recorded using the guitar macro notes, and if the pattern is set to use guitar macro notes.
These settings determine what type of guitar chords will be used, and only apply if the patterns are recorded using the guitar macro notes, and if the pattern is set to use guitar macro notes.
Allow Late Notes
![]() This opens the Settings for Making Late notes quieter dialog. Notes played near the end of a pattern will usually conflict with the next chord. So, it’s best to prevent notes near the end of a pattern from playing. In the Arrangement Options dialog under Options | Preference | [Arrange] button there a global setting for “Allow late notes in pattern, just before chord change” and a percentage setting for how often they will be allowed.
This opens the Settings for Making Late notes quieter dialog. Notes played near the end of a pattern will usually conflict with the next chord. So, it’s best to prevent notes near the end of a pattern from playing. In the Arrangement Options dialog under Options | Preference | [Arrange] button there a global setting for “Allow late notes in pattern, just before chord change” and a percentage setting for how often they will be allowed.
More Settings (for Rests, Pushes, RealTracks)
![]() Press the [More..] button for the More Settings (for Rests, Pushes, RealTracks) dialog.
Press the [More..] button for the More Settings (for Rests, Pushes, RealTracks) dialog.

Since rests can be “shots” that play a chord on beat 1, the style can define what instrument to use for this, and at what volume.
Similarly, each push is accompanied by a drum stab, and the style can define what instrument to use and at what volume.
The Lowest Bass Note setting defaults to the low E on the bass guitar or acoustic bass. It can be changed to match the range of other bass instruments, such as a tuba, or to extend the range of the bass for keyboards or 5-string and 6-string basses.
Assign Soloist (MIDI) or RealTracks (audio) to style
Styles can contain RealTracks and RealDrums or MIDI soloists.
To assign RealTracks to a style set the “Instrument” to use, and the RealTracks #. In the following example, we are using RealGuitar for the Guitar track.

Styles can have multiple RealTracks. For example, you could have a Real Guitar and Real Bass - and also RealDrums for the drum track.
Styles can also use MIDI soloists. For example, make a style with a banjo part that has the same quality as the Band-in-a-Box Banjo Soloist. Here we are assigning an Earl Scruggs Bluegrass solo to the Strings part.

Use the dB offset to match the level of your RealTracks audio or MIDI soloist to the rest of the style.
![]()
The Timing offset can be used to offset the selected track by a certain number of ticks, either plus or minus. A minus number will give the style a laid-back feel, a plus number will “push” the part.
![]()
Timebase allows styles to use Half-Time and Double-Time RealTracks. We include some of these styles.
 |
For example, you can make a Jazz Ballad style (tempo 65) that uses a Sax Soloist at tempo 140 (playing double time). |
Custom Settings
Styles can have settings such as custom panning, reverb, and tone, plus plug-ins and loops. Simple versions of RealTracks, ‘held’ notes only versions of RealTracks, and Direct Input (DI) instruments can be used.
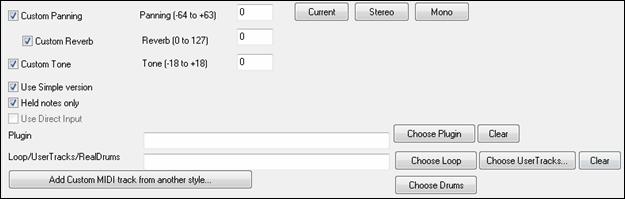
Plugin If you want to save a style with specific plug-ins (MIDI synths or audio plug-ins like AmpliTube) you can set them here. Plug-ins use .tgs files, which must be in the C:\bb\DX Settings folder.
Loop/UserTracks/RealDrums You can assign a loop, UserTracks, or RealDrums for any track.
[Add Custom MIDI track from another style] You can add a custom track from another MIDI style by using the main menu of the StyleMaker, Style | Import Instrument from Style.
Assign Instruments to Style Dialog
![]() Select the [Pat.] button in the StyleMaker tool bar to open the Assign Instruments to Style dialog.
Select the [Pat.] button in the StyleMaker tool bar to open the Assign Instruments to Style dialog.

This dialog allows you to assign instruments to a style. When the song is played back using the style, these patch changes will be sent to your synthesizer. Remember, these are General MIDI Instrument numbers, not the patch numbers of your synth (unless you have a General MIDI synth).
If you don’t require a specific instrument for the style, leave the setting at 0 < No Patch Change >.
Styles can have different instruments (patches) for the “a” and “b” substyle. For example, you can have drum brushes on the “a” substyle, and sticks on the “b” substyle, or acoustic piano for the “a” and electric piano for the bridge.

The patch changes take effect immediately in the style, so that when you are recording Bass parts for example, you will hear the bass patch that you have selected.
Melody Patch/Soloist Patch If set to other than 0 < No Patch Change >, all Melodies/Soloists will be played on the specified instrument. If you’re making a “Grover Washington” style for example, you might want any melodies to be automatically set to saxophone.
Thru Patch If you set the Thru patch to other than 0 < No Patch Change >, the instrument that the user plays along to your style will be the patch that you set. If you’re making a “Heavy Rock” style, you might want to set the Thru patch to be Rock Guitar if you expected that the user would want to always play along on Rock Guitar.
Advanced Editing Of Patterns
Patterns can be “tweaked” with the other advanced features in the StyleMaker - Trim Pattern, Late Notes, and the Event List Editor.
Trim Pattern
The Trim Pattern routine deletes notes past the end of a pattern, or (optionally) a specified distance from the end of a pattern. This can be accessed from the Pattern | Trim Pattern(s), row(s) command.

In the dialog displayed, we are trimming 50 ticks from an 8 beat pattern. This means that all of the information past 8 beats (less 50 ticks) will be deleted. This feature is useful to erase “busy playing” that is present near the end of a pattern, and also delete notes that are just taking up space in the style.
Pattern Velocity Adjust
This function adds or reduces the velocity of a single pattern, row of patterns, or all patterns in an instrument. It is useful for reducing or increasing the volume of an entire instrument or fine-tuning the velocities in a style. Choose the StyleMaker menu item Pattern | Velocity Adjust for 1 pattern, 1 row or all patterns, and input the velocity change to make for the pattern(s). This adds or subtracts a certain velocity value to the patterns.
Late Notes
The [Late Note] button is found inside the StyleMaker’s Misc. Style Settings dialog. It opens a dialog with “Settings for Making Late notes quieter.” There are settings for allowing or not allowing late notes, and for how late the notes can be.

The global setting for late notes in Options | Preferences [Arrange]will reduce the volume of the late notes for a smoother transition from one chord to another.
Event List Editor
![]() The [#] button in the StyleMaker Pattern Editor notation window opens an event list for editing, inserting, or deleting notes in the patterns.
The [#] button in the StyleMaker Pattern Editor notation window opens an event list for editing, inserting, or deleting notes in the patterns.

Style Log Options
For people making styles, the Style Log text file shows exactly which pattern was used in the song generation for every instrument and bar/beat. This is useful in fixing errant patterns.
To set a style log, choose the StyleMaker Style | Write BBStyleLog##.txt file menu option Display BB StyleLog##.txt” in Notepad with each play.

Then, a file called BBStyleLog##.txt will be displayed. Here is a sample:
Bass: Bar 1 Beat=1, Row= 1, Col=12, Location=13, Chord= C
Piano, Bar 1 Beat=1, Row= 1, Col=17, Location=140, Chord= C
Guitar, Bar 1 Beat=1, Row= 5, Col=8, Location=287, Chord= C
Strings, Bar 1 Beat=1, Row= 5, Col=23, Location=274, Chord= C
This tells you that when the song was generated, for the bass track, at bar 1 the pattern found in row 1, column 12 of the StyleMaker was chosen.
Alternatives to Recording Patterns
It’s not always necessary to record every pattern for a style, or any patterns, for that matter. The import features in the StyleMaker make it possible to assemble an entirely new style from existing styles, or to import patterns from favorite MIDI files.
Hybrid Styles
The “Hybrid Styles” feature allows you to play and create a style that has instruments from up to five different styles! You can, for example, play a song with a Reggae bass, Rock drums, Salsa piano, or any combination of up to five styles that you want. Create a name for your hybrid style and you can save it with the song so that it will play that way in the future.
|
To use the Hybrid Styles feature, choose File | StyleMaker | Make a Hybrid style, or click on the [StyleMaker] button in the toolbar and select Make a hybrid style from the pulldown menu. You will then see the Make a Hybrid style dialog. |

Your hybrid style can be up to five instruments, each from a different style. For example, you can have a Latin drum part, with a Zydeco bass, and Jazz guitar part, and strings from a Classical style!
Select the instrument (e.g. Bass), and then select a style by pressing the [.STY] button. Repeat for up to five instruments.
When you’re ready to generate the Style, press [OK- (re) Generate style with name ->] and choose a name for your style.
Remember that style names in Band-in-a-Box can be a maximum of eight characters, with no spaces! (This is to ensure compatibility with Macintosh® and previous versions of Band-in-a-Box.)
Press [Play] in Band-in-a-Box and you can hear the results. You can revisit the Make a Hybrid style dialog to make any changes.
Editing a Hybrid Style
You can edit a hybrid style just like any other style. Open the StyleMaker to view the patterns.
Importing Instruments from Other Styles
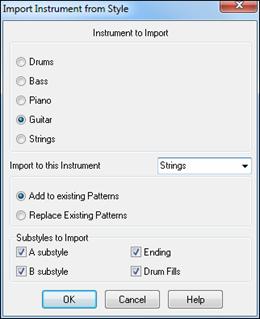
This is a great way to have fun with the StyleMaker, and to create great new styles in no time. The dialog is accessed from the Style | Import Instrument menu item.
Choose the instrument you want to import and select the desired options. Click on [OK] and a standard Windows® Open dialog will be launched so you can select any style on your computer as the source for the instrument. Mix and match instruments from different styles to create fresh new arrangements.
|
Notice the selector box to choose an instrument to import and the destination instrument in “Import to this instrument.” |
Importing Patterns from a MIDI file
You can use any MIDI file as a source for new StyleMaker patterns by accessing Pattern | Import Pattern from MIDI file menu item.
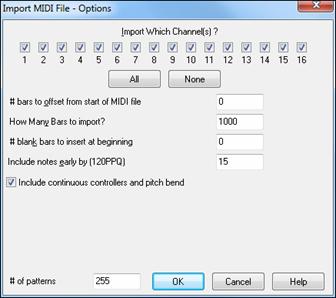
Use the options to specify the channels and the exact bars to import, and also to include or exclude controllers.
The import # patterns option allows you to import more than one at a time.
In the StyleMaker, when you choose Pattern | Import from a MIDI File (or clipboard or Melody track) the dialog shows a further option at the bottom.
For example, if you import 8 patterns, the 8 patterns will be inserted in the first available 8 positions on the current row. They will be offset by the # of beats present on the current row. For example, if you are on the “4 beat” row, the patterns will get inserted offset by 4 beats, so you’d get patterns for each bar in the 8 bars imported.
Convert Track to C7 chord
Choose Melody | Edit Melody Track | Map Melody track to C7 chord. The purpose of this function is to allow you to quickly import any MIDI file track into the StyleMaker and make a style from it.
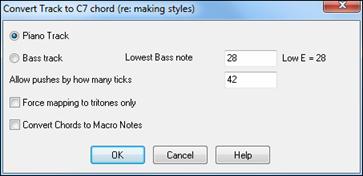
Once you choose the option, you select whether it is a bass track to import, or a piano track (actually any part other than bass or drums). A bass track uses notes below C4 (MIDI note #48) and above the lowest note you select in the dialog.
If you select piano track the notes will all be mapped to a C7 chord, it is not important that the chords on the spreadsheet are correct. However, if you are importing a bass track, it is important that the chords are correct. You can select options to allow patterns that are anticipations, and also convert chords to “macro notes.” Force mapping to “tritones” is useful for guitar or string parts that you might only want 2 notes for.
Once you have mapped the track to the notes, you can examine the Melody track to make sure the results are what you want, and then use the Pattern | Import From Melody track command, and set the # of patterns to import, etc. This function allows you to read in any track of music from a MIDI file that you’ve created, and quickly convert it to patterns in the StyleMaker. Since the StyleMaker requires all patterns based on a C7 chord, this function automatically maps the entire track to notes on a C7 chord. You can then import any # of patterns (using the function to choose the number of patterns to import).
Editing Patterns
Slide Pattern X ticks
This is another option available on the StyleMaker menu. This allows a pattern to be time shifted any number of ticks, based on a PPQ setting of 120.
The StyleMaker screen displays the number of patterns, which combined with the map to C7 function, allows you to quickly import any MIDI file track into the StyleMaker and make a style from it.
There are other additional StyleMaker features such as definable instruments on the drum grid, 32nd notes on the drum grid, “live” drums, the ability to load-in patterns from MIDI file to the drum grid or live drums, etc. to facilitate importing patterns from MIDI files.
Velocity Adjust
This function adds or reduces the velocity of a single pattern, row of patterns, or all patterns in an instrument. It is useful for reducing or increasing the volume of an entire instrument or fine-tuning the velocities in a style.
Choose the menu items Pattern-Velocity Adjust (for 1 pattern, 1 row, or whole instrument) and input the velocity change to make for the pattern(s). This will add or subtract a certain velocity value to the patterns.
Style Checker
Analogous to a “Spell Checker,” this function analyzes your style-in-progress and identifies possible problems. The results are output to a text window, allowing you to examine the patterns and fix them if required. It identifies patterns that might be “too busy” or incorrect macro notes etc.
To access the Style Checker, open the StyleMaker (Ctrl+F9), and choose Style | Style Checker. You will then get a text report about the style, listing possible problems with the style. Here is a sample printout:
-----Start of style checking ------JAZQUINT.STY
Drums: Row 1, Column 1 First pattern of instrument shouldn’t contain masks in it. It should be generic.
Piano: Row 1, Column 3 Non Chord tones found (other than C, E, G, Bb) and pattern is not set to a chord mask, riff based, or MACRO.
Style Summary
This displays a text window summary of the style, including lots of information about the style such as # patterns, # patterns for each substyle, patches, pushes, volume changes, guitar patterns, and more. To access the style summary, from the StyleMaker, choose Style | Style Summary. You will then see a detailed text summary of the Style.
Using the MIDI File to Style Wizard
The Style Wizard converts any MIDI file to a Band-in-a-Box style. In this tutorial, we’re going to load in the violet.MID found in the C:\bb\Documentation\Tutorials folder and convert it to a style, which we will call Violet.STY.
| |
Start with a new song and press the [StyleMaker] button and select Style Wizard from the pulldown menu to launch the Style Wizard. Or choose File | StyleMaker | Style Wizard. |

The dialog is largely empty because we haven’t chosen a MIDI file yet.
Press the [Open] button and load in the file C:\bb\Documentation\Tutorials\violet.MID. The Style Wizard then does the following automatically.
The chords for the MIDI file are interpreted and written on the Chord Sheet.
The “part markers” for the file are displayed on the Chord Sheet. For violet.MID, the Style Wizard has found the correct part markers – by looking for drum fills and other signs of a part change – and has assigned substyle “a” to all of them. We will change some of them to “b” later.
| The channels used in the MIDI file are displayed in the dialog, with the patches used and # of notes played on each channel. (For violet.MID you can see that channels 2, 3, 4, 6, 7, and 10 are used.) The Style Wizard analyzes the parts and guesses at which Band-in-a-Box part - Bass, Piano, Drums, Guitar, or Strings to use for each track. Band-in-a-Box has correctly assigned 5 instruments – not assigning a part to the Melody. |
|

The Style Wizard suggests which bars (“snapshots”) to include in the style. The suggested bars are bars with all of the “BB Part” instruments. |
|

Usually you’d want to customize these snapshot bars to control which bars get included in the “a” or “b” substyle. In the violet.MID style, the Style Wizard has offered to include Bars 9-101 (inclusive) and wants to put them all on the “a” substyle. Continuing on, we want to make a great sounding style, so it is important that we have the following two items correct:
 |
The “BB Parts” have to be correct. We can audition the MIDI file by playing a loop and listening to the MIDI file and muting channels by clicking on the “Channel” checkboxes. From that, we can hear the individual parts and assign them correctly, as we would like them in the style. By playing the MIDI file inside the Style Wizard we can tell which bars to use for the “a” and “b” substyles. |
The Snapshot Bars should be correct for the “a” and “b” substyle. You need to tell the program what bars to use for the “a” substyle and for the “b” substyle. The program makes an attempt to guess at this, but since MIDI files can contain many different substyles (and a Band-in-a-Box style allows only 2), you’d likely want control over these snapshots yourself.
Tip to help you choosing which bars to use:
To listen to the MIDI file, you can either exit the Style Wizard dialog and just play the song like any other Band-in-a-Box file or play a looped section inside the Style Wizard using the [Play], [Stop], and “Loop at Bar” settings.
![]()
OK, the Style Wizard has already made the correct settings for the “BB Parts” for us, so we don’t need to make any changes there. Let’s move to the Snapshots section and enter the bar numbers that correspond to the substyles that we’d like for the Jazz tune. After listening to the tune, we notice that there is a “2-feel” Jazz section, and a “4-in-the-bar” section. We want those as “a” and “b” substyles, so we enter the bar #s that correspond to these settings.

In the Snapshots area of the Style Wizard:
- Enter “1-20” for the bars for the “A” Substyle.
- Enter “21-28, 37-68” for the “B” Substyle.
- Enter “12, 20” for the “A” Drum Fills.
- Enter “28, 36, 44, 52, 60, and 68” for the “B” Drum Fills.
![]() Press [Generate NEW style…] and choose a name for your style.
Press [Generate NEW style…] and choose a name for your style.
Let’s call it Violet.STY. Now to hear your style! You could play the style with any song of course, by loading in a song and then loading in the Violet.STY. It is easily available from the Favorite Styles dialog (Shift+F9).
For this tutorial, load in the song V_TEST.MGU that we made for you. That’s a Jazz Swing song using different chords than Violet, and it uses the Violet.STY (So you need to have made that style before you try to play the song or you will get a “Violet.STY not found” message.)
Save the existing song before loading in the new song. When Band-in-a-Box saves a song that has an entire MIDI file on the Melody or Soloist tracks it gives it a special MGX extension. So, you will be saving the file as Violet.MGX.
Alternatively, if you’d prefer to play the Violet.STY style without loading in another song, you can do it as follows. Since the Violet.MGX file currently has the entire MIDI file on the Melody track, the first thing we need to do is mute the Melody (Alt+8 or right-click on the Melody part at the top of the screen). The next thing is enable the style, by choosing File | Load Style Special | Style is Enabled so that this item has a checkbox.
Auto Endings for Styles without Endings
If you’ve made a style, and haven’t included an ending, a 2-bar ending can be generated automatically, based on the style. This makes it easier to make complete styles using the Style Wizard. To hear an example, load in the song C:\bb\Documentation\Tutorials\Tutorial - BB 2005 Demos\No Ending.MGU. This song uses NOENDING.STY, a style that doesn’t have an ending. An ending will be generated automatically for this style.
So, we’ve made our first style! In summary, making styles with the Style Wizard is a process involving:
- Loading a MIDI file into the Style Wizard.
- Listening to the MIDI file by muting channels to identify parts.
- Picking the channels to use for the BB Parts.
- Picking the snapshot bars for the “a” and “b” substyle.
- Pressing the [Generate NEW style…] button.
Advanced Settings and Preferences
![]() Click on the [More] button to open the Style Wizard Advanced Settings and Preferences dialog.
Click on the [More] button to open the Style Wizard Advanced Settings and Preferences dialog.

There are 2 sections to this dialog: Advanced Instrument Settings and Preferences.
Advanced Instrument Settings
The advanced instrument settings allow settings for the instruments (drums / bass / piano / guitar / strings) to be included in the style. The settings are:
 |
The Substyles determines whether the instrument is included in the “A,” “B,” or both “A&B” substyles. For example, if you want to make a style that only uses the strings on the “B” substyle, set the strings instrument part to “B” only. |
The Voicings settings determine, for the various instruments:
 |
Drums (“voicings”): Whether the patterns will use live or grid style patterns. Default mode is “auto,” which normally uses live patterns, but you can force it to use live or grid style patterns. Live patterns have higher resolution and can use more instruments, so in general are the better choice. |
|
Bass (“voicings”) determine if the bass part will use All notes / Scale tones only / Root 3rd, 5th,7th / Root, 3rd, 5th / Root and 5th / or just the Root. The default is “Auto-select” which usually allows all 12 semitones. |
|
Piano, Guitar, and Strings Voicings determine how the Piano patterns will be voiced. The choices are “Auto,” “Include Full Voicings,” “Tritones only (3rd/7ths),” “Power Chords (Root/5th),” “Chord Mask Half Octave,” and “Chord Mask Full Octave.” The auto-setting usually uses the “Include full voicings.” If the part uses 2-note chords, you should over-ride this setting to “use tritones” so that the most important notes of the chord (the tritone) will get included. |

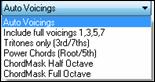
You can also use chord masks so that specific patterns over chords will get added to your style, and they will play exactly as in your MIDI file (just transposed). Set the voicings to use “Chord Mask Full Octave” or “Chord Mask Half Octave.”
![]() You wouldn’t make a Style Wizard style from scratch using chord masks because there need to be generic patterns in the style. Therefore, you do it as a 2-stage process.
You wouldn’t make a Style Wizard style from scratch using chord masks because there need to be generic patterns in the style. Therefore, you do it as a 2-stage process.
First, make the style using generic patterns (e.g. Voicing type “Auto”) and then change voicings to Chord Mask, and add those to the style. As with other Style Wizard features, it is important that the chords and part markers on the Chord Sheet be very accurate. If they aren’t, you should fix them before generating a style.
![]() The Emb. (Embellish) checkbox determines if the patterns for Piano, Guitar, and Strings will be embellished. If embellish is selected on a chord like D7 (in the key of C) 13ths, 9ths, and #11 notes might be added to embellish the chord. A Jazz piano style would likely use this.
The Emb. (Embellish) checkbox determines if the patterns for Piano, Guitar, and Strings will be embellished. If embellish is selected on a chord like D7 (in the key of C) 13ths, 9ths, and #11 notes might be added to embellish the chord. A Jazz piano style would likely use this.
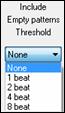 |
The Include Empty Patterns Threshold setting defaults to None. Possible settings are None / 2 beat / 1 bar / 2 bars. If set to “None,” the instrument will always play in the style, and if set to “1 bar,” there will be “spaces of silence” up to 1 bar long (perhaps longer if chained together) in the style for that instrument. If an instrument is used sparsely in a style, set this setting to something higher than none. |
|
|
The Velocity Adjust will make an instrument louder or softer in the style. |
|
Preferences
Preferences affect the style itself.
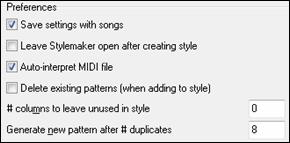 |
Save settings with songs - The song will be saved as an MGX file, since the Melody track type is Multichannel and contains the MIDI file. If you select this, the Style Wizard settings are all saved with the MGX file. |
Leave StyleMaker open after creating style - If set, after generating the style, the StyleMaker is left open for you to examine/edit the style directly.
Auto-interpret MIDI file (Default = Yes) - When set, the Style Creation Wizard will set the channels, BB Parts, and snapshots for you. Normally this setting should be left on.
Delete existing patterns (when adding to the style) (Default = No) - If this option is set when you create style patterns to add to an existing style, the entire instrument will first be erased in the style for any instrument used in the new style. When you generate a style by adding to an existing style, the StyleMaker is then opened up, allowing you to pick a new name for the style (so you don’t overwrite the existing style).
# columns to leave unused in the style (Default = 0) - If set to zero (the default), the Style Creation Wizard can create the biggest style possible – filling up the rows completely with patterns. But if you set this to a non-zero value it will limit the # of patterns that can be made. Since there are 30 rows in the StyleMaker, you can set this setting from 0 to 29.
Generate new pattern after # duplicates - The Style Creation Wizard won’t insert patterns unless they are unique compared to the ones already entered. But (with this setting at the default of 8), after 8 duplicates of the same pattern, a 2nd pattern will get entered that is a duplicate of another pattern. Setting this to zero would mean that every pattern would get entered (regardless of whether it was unique); setting it to a high number like 200 would mean that only truly unique patterns are entered. To maintain the correct balance in the style, since the maximum weight of a pattern in the StyleMaker is 8, this setting should be left at 8 in most situations. If your style is “filling up” all of the available columns, then set this to a higher number.
| |
Allow Pitch Bend in style - If set, pitch bend present on the MIDI file will be included in the style. Make sure that the MIDI file pitch bend range = two semitones. |
Allow pushes in style - If set, the style will allow pushes (playing instruments before the beat). This is done by setting the push values in the individual pattern’s options.
Making RealDrums Styles
Introduction to RealDrums ™
RealDrums are actual recordings of studio drummers, pieced together by Band-in-a-Box to create a unique “real” drum track that is played along with the MIDI tracks created by Band-in-a-Box styles. You can combine any RealDrums style with any Band-in-a-Box style, so the potential combinations are endless!
A RealDrums style consists of a wave file containing various bars of drum patterns, and a text file with instructions on how Band-in-a-Box should interpret the wave file. In order for the style to work, the text file needs to be located in the main Band-in-a-Box directory in the “Drums” folder, and then in a sub-directory that is the name of the style group. The file-name needs to be the same as the style group, followed by an underscore (_) and a three-digit number representing the tempo. Additionally, “_Style” has to be in the filename after the tempo.
For example, for a “JazzBrushes” style that is 120 beats-per-minute, this text file needs to be present:
C:\bb\Drums\JazzBrushes\JazzBrushes_120_Style.txt
The wave file also needs to be in a subdirectory of the “Drums” folder. It is usually located in the same place as the text file:
C:\bb\Drums\JazzBrushes\JazzBrushes_120_Style.wav
However, it can be in a different directory, and there are some instances where this is necessary (see “Reduced Styles” below).
“RealDrums style groups” are multiple RealDrums styles that have the same basic feel but were recorded at different tempos. In the example above, “JazzBrushes” is the group, and “JazzBrushes_120_Style” is the style. In that particular example, the JazzBrushes group contains 10 RealDrums styles:
JazzBrushes_045_Style
JazzBrushes_060_Style
JazzBrushes_070_Style
JazzBrushes_100_Style
JazzBrushes_120_Style
JazzBrushes_145_Style
JazzBrushes_175_Style
JazzBrushes_210_Style
JazzBrushes_250_Style
JazzBrushes_300_Style
The easiest way to make a style is to use a text-file template.
Making a RealDrums Style Using an Existing Template
Templates are available for download from http://nn.pgmusic.com/pgfiles/realdrums_stylemaking_templates.zip.
The information given below is all you need to create a RealDrums style using any of several provided templates.
For a more in-depth look at the intricate details of creating styles, please read on to the following topics under Elements of RealDrums Styles.
Recording your wave file
For the wave file that will be used for your RealDrums style, you can either record a drummer, or you can piece together a wave file using drum loops. If you use drum loops, just make sure you have the necessary permission from the original artists and/or publishers of the loops.
Regardless of the method that you choose for creating your drum wave file, you need to have it conform to one of these descriptions in order to have it match the accompanying template:
1. 32_bars_of_drumming.txt
2. 32_bars_of_drumming_with_shots.txt
3. 32_bars_of_drumming_with_shots_two_endings.txt
4. 64_bars_of_drumming.txt
5. 64_bars_of_drumming_with_shots.txt
6. 64_bars_of_drumming_with_shots_two_endings.txt
1. 32_bars_of_drumming.txt
Bars 1-2 – count-in for two bars (i.e., “one, two, one-two-three-four”)
Bars 3-18 will use the same basic groove:
3 – PostFill (usually a bar of playing with a cymbal shot at the downbeat, or some kind of bar that would sound good after a fill)
4-9 – normal playing
10 – Fill
11 – PostFill
12-17 – normal playing
18 – Fill
Bars 19-34 will use a slightly different groove (‘B’ section) than 3-18
19 – PostFill
20-25 – normal playing
26 – Fill
27 – PostFill
28-33 – normal playing
34 – Fill
35-36 – ending, lasting two bars (usually the second bar ends on the downbeat, with a cymbal decaying)
2. 32_bars_of_drumming_with_shots.txt
This is exactly the same as 1, with these bars added:
37 – single drum hit, which will be used for “shots” in Band-in-a-Box
38 – single drum hit, which will be used for “pushes” in Band-in-a-Box
3. 32_bars_of_drumming_with_shots_two_endings.txt
Bars 1-2 – count-in for two bars (i.e., “one, two, one-two-three-four”)
Bars 3-20 will use the same basic groove:
3 – PostFill (usually a bar of playing with a cymbal shot at the downbeat, or some kind of bar that would sound good after a fill)
4-9 – normal playing
10 – Fill
11 – PostFill
12-17 – normal playing
18 – Fill
19-20 – two bar ending
Bars 21-36 will use a slightly different groove (‘B’ section) than 3-20
21 – PostFill
22-27 – normal playing
28 – Fill
29 – PostFill
30-35 – normal playing
36 – Fill
37-38 – ending, lasting two bars (usually the second bar ends on the downbeat, with a cymbal decaying)
39 – single drum hit, which will be used for “shots” in Band-in-a-Box
40 – single drum hit, which will be used for “pushes” in Band-in-a-Box
4. 64_bars_of_drumming.txt
Bars 1-2 – count-in for two bars (i.e., “one, two, one-two-three-four”)
Bars 3-34 will use the same basic groove:
3 – PostFill (usually a bar of playing with a cymbal shot at the downbeat, or some kind of bar that would sound good after a fill)
4-9 – normal playing
10 – Fill
11 – PostFill
12-17 – normal playing
18 – Fill
19 – PostFill
20-25 – normal playing
26 – Fill
27 – PostFill
28-33 – normal playing
34 – Fill
Bars 35-66 will use a slightly different groove (‘B’ section) than 3-18
35 – PostFill
36-41 – normal playing
42 – Fill
43 – PostFill
44-49 – normal playing
50 – Fill
51 – PostFill
52-57 – normal playing
58 – Fill
59 – PostFill
60-65 – normal playing
66 – Fill
Bars 67-68 – ending, lasting two bars (usually the second bar ends on the downbeat, with a cymbal decaying)
5. 64_bars_of_drumming_with_shots.txt
This is exactly the same as 5, with these bars added:
69 – single drum hit, which will be used for “shots” in Band-in-a-Box
70 – single drum hit, which will be used for “pushes” in Band-in-a-Box
6. 64_bars_of_drumming_with_shots_two_endings.txt
Bars 1-2 – count-in for two bars (i.e., “one, two, one-two-three-four”)
Bars 3-36 will use the same basic groove:
3 – PostFill (usually a bar of playing with a cymbal shot at the downbeat, or some kind of bar that would sound good after a fill)
4-9 – normal playing
10 – Fill
11 – PostFill
12-17 – normal playing
18 – Fill
19 – PostFill
20-25 – normal playing
26 – Fill
27 – PostFill
28-33 – normal playing
34 – Fill
35-36 – 2 bar ending
Bars 37-70 will use a slightly different groove (‘B’ section) than 3-18
37 – PostFill
38-43 – normal playing
44 – Fill
45 – PostFill
46-51 – normal playing
52 – Fill
53 – PostFill
54-59 – normal playing
60 – Fill
61 – PostFill
62-67 – normal playing
68 – Fill
69-70 – 2 bar ending
71 – single drum hit, which will be used for “shots” in Band-in-a-Box
72 – single drum hit, which will be used for “pushes” in Band-in-a-Box
Editing the text file
For the most part, the text files are ready-to-go. There are, however, a few small essential changes that you need to make to the text file, and some other small changes you can make to improve your style.
Essential Changes
The first thing you need to do is change the filename of the wave-file and the text file to match the RealDrums style group to which to which you want your style to belong. For example, if you want your style group to be called “MyFunkyStyle,” and the style you recorded was at 70 beats per minute, your wave file would have to be called “MyFunkyStyle_070_Style.wav” and your text file would have to be called “MyFunkyStyle_070_Style.txt.” Both files would have to be placed in your main Band-in-a-Box directory (usually C:\bb) in the “Drums” folder, and from there in a folder that is named for the style group. In this case, it would be C:\bb\Drums\MyFunkyStyle\.
The second thing you have to do is to change the first line of the text file so that it has the same name as the wave file. In this case, you would change “wavename=mystyle.wav” to “wavename=MyFunkyStyle_070_Style.wav”
The last thing you would need to do would be that if your style were a waltz (3:4) style, you would need to change “TimeSig=4” to “TimeSig=3”. If, however, you are making a 4:4 style, your style is ready to be used!
Additional Changes
There are a few additional changes that could be made to fine-tune your style. The first is to enter a different value in the “Offset=” line. Drummers often hit a drum a few milliseconds before the beat, because the actual sound of the drum tends to peak a few milliseconds after it is hit. Because of this, you want Band-in-a-Box to “grab” a bar of drums a few ticks (1 beat = 120 ticks) early to compensate for this. The amount entered in the template is –5 (ticks), but if you are finding that the drum hits at the beginning of bars are not starting properly, you can experiment by setting a different offset value. –6 or lower (since it’s a negative number “lower” means –7, -8, -9, etc.) will mean the bar is “grabbed” earlier, and a higher number (-4, -3, -2, -1, 0, etc.) means that it will be “grabbed” closer to the bar line.
Another thing you can change is the volume. If you are finding your style is too loud in Band-in-a-Box, you can reduce this by entering lower numbers in the “dbAdjust=” line. The default is 0, but if you enter –1, -2, -3, etc., the drum volume will be lowered.
For the patterns and the shots, all of the patterns that are entered in the templates will match your wave file, provided that the wave file was recorded to the specifications listed above. You can make changes to the patterns and shots, but it is a good idea to read further into the specific meaning of all of the elements of these lines. This can be done in the complete RealDrums style making documentation.
Testing your RealDrums style
Once you have made your RealDrums style, you can test it in Band-in-a-Box by loading a song and setting the tempo near to the tempo of the style you just created. You would then go into the RealDrums Settings dialog (either by selecting Options | Preferences | RealDrums or by pressing the [RealDrums] toolbar button) and make sure RealDrums are enabled. Put a checkmark beside “For this song only, use this RealDrum style,” and then select your style from the “RD” button. When you close the dialog and play your song, your RealDrums style should be playing as well. To make sure that it is playing, you can look at the Band-in-a-Box title bar. If your style is “MyFunkyStyle_070_Style,” you should see [RealDrums=MyFunkyStyle_070].

Elements of RealDrums Styles
For an in-depth explanation of all elements of creating a RealDrums style, please read below.
Elements of the Wave File
The wave file must contain a 2-bar count-in. This can be a metronome sound, a drummer actually counting in, or even a two-bar drum fill. These two bars will always be played at the beginning of a Band-in-a-Box song, unless the count-in is disabled in the preferences. It is important to note that the beginning of the wave file should not contain a bar of drum playing that is intended to be used in the middle of a song. If this bar were to be chosen, there would likely be an audible gap of silence at the beginning of the bar when playing in Band-in-a-Box (this is due to the “ms offset” which will be discussed later)
The majority of the wave file can then contain any number of bars of drumming, keeping in mind that there are two “substyles” available in Band-in-a-Box. This means that the basic groove should be the same throughout the first half of the drum bars, and then the groove can change and should remain basically the same through to the end. Keep in mind also when you either record or piece together your wave file, that in each “substyle”, there need to be examples of fill, normal bars, and post-fills (bars specifically designed to come after fills, often containing a crash cymbal which completes a fill). You also need at least one 2-bar ending.
After the bars of drumming should be a short section of single drum hits. These will be used to mix in with the bars of drumming to emulate pushes and shots.
Example 1 shows an entire RealDrums style wave file. You can see that the first two bars contain the count-in, then the majority of the file is taken up by regular drumming (you can see that halfway through the pattern is different – this represents the “B” subsection), then at the end there are 4 “shots” (single drum hits).
Elements of the Text File
The text file contains three main portions, global settings, pattern definition, and shots definition. We will examine each one separately.
Global Settings
Wavename=x.wav
The first line of the text file must be “wavename=x.wav”, where “x” is the name of the filename. For example, the first line of the JazzBrushes_120 text file is “wavename=JazzBrushes_120_Style.wav”. This file usually is in the same directory as the text file but does not have to be. For example, you could make an alternate style that used JazzBrushes_120_Style.wav called JazzBrushesAlternate. The text file would have to reside in C:\bb\Drums\JazzBrushesAlternate\JazzBrushesAlternate_120_Style.txt, but the first line would still be “wavename=JazzBrushes_120_Style.wav”.
ForceWavTempo=x
This is only used if the tempo of the style in question is different from the tempo that is in the filename of the wave file being used. These are called “reduced” or “expanded” styles and will be discussed further below.
TimeSig=3
This would be used if you are making a waltz style. The line can simply be omitted when making 4:4 styles.
OFFSET=x
Often a drummer will hit a drum or cymbal slightly before a beat so that the actual peak of the sound occurs on the beat itself. The offset determines how many ticks (1 beat =120 ticks) before the downbeat a bar of drums will be taken from the style wave file, which is intended to compensate for any occurrence of this early playing on the drum track. It is important to note that iv a bar is taken 10 ticks early from the style wave file, it is also placed 10 ticks early on the Band-in-a-Box drum track, so there will be no shifting of the actual groove.
If no offset amount is entered, the program defaults to an offset of 0.
To determine a good offset amount for a particular wave file, you can use an audio editor (such as PowerTracks Pro Audio) to zoom in on the downbeats of all (or a sampling) of the bars. You can then measure the number of ticks between the start of the drum hits and the actual bar line. The highest example would be entered as the offset amount.
In example 2, the beginning of the drum hit at bar 15 occurs at 14:04:118, or 2 ticks before the downbeat of bar 15. If all other bars were similar, you would enter an offset of –2.

Example 2: The left edge of the highlighted area represents the beginning of the drum hit that occurs at bar 15, and the right edge of the highlighted area represents the actual downbeat of bar 15.
dbadjust=x
If a value is entered here, when the RealDrums track is played in Band-in-a-Box, the volume will be raised (or lowered if a negative value is entered) by the amount entered. This is used to balance the RealDrums against the other DXi instruments. This amount can be fine-tuned once the style is completed and it is possible to test it in Band-in-a-Box.
If no dbadjust amount is entered, the program defaults to an adjust of 0.
dbadjustA=x
dbadjustB=y
You can adjust the volume of the A section and B section patterns separately in the same manner as “dbadjust” using “dbadjustA=” and “dbadjustB=.” The final volume of the parts will be based on the “dbadjust” amount added to the adjust for the substyle in question. For example, let’s assume these values were entered:
Dbadjust=-5
DbadjustA=-2
DbadjustB=3
The total volume adjust for the A section would be (-5) + (-2) = -7. The total volume adjust for the B section would be (-5) +3= -2.
MultibarPatternPercent=x
When Band-in-a-Box is choosing a RealDrums pattern (see “patterns” below) for a particular bar in a song, it randomly selects from all possible patterns that fit based on their relative weight. If, however, a percentage is entered here, then before this step it determines whether the current bar will be use a multi-bar pattern based on the percentage. If this occurs, Band-in-a-Box eliminates all 1-bar patterns as possibilities for the current bar of music. For example, if “MultibarPatternPercent=20” is entered, then every time Band-in-a-Box searches for a pattern, there is a 20% chance that it will eliminate 1-bar patterns as possibilities. If “MultibarPatternPercent=80” is entered, then every time there will be an 80% chance that 1-bar patterns will be eliminated as possibilities. If such an instance occurs, but no multi-bar patterns will fit in the Band-in-a-Box bar in question, a 1-bar pattern will be allowed.
If no amount is entered here, then Band-in-a-Box simply always picks between all possible patterns based on their relative weights.
PushAmount8=x
PushAmount16=x
When pushes are entered in Band-in-a-Box (with either “^” for an 8th note push or “^^” for a 16th note push, entered before a chord”), the RealDrums mix single drum hits with the bars of regular playing to emphasize the push. These settings determine how many ticks prior to a beat the pushes are played.
Mathematically, since 1 quarter-note is 120 ticks, in a straight 8th style the 8th-note will be 60 ticks and the 16th-note will be 30 ticks, and in a swing 8th style the 8th-note will be 40 ticks. However, since drummers (thankfully!) do not play mathematically, these numbers will vary based on their individual style, and the amount of “swing” in their playing. A good amount to enter for these values can be determined by closely examining the drummers playing in an audio editor and measuring the number of ticks between a few 8th-notes prior to beats.
In this straight-8ths style (example 3), this eighth note played prior to the downbeat of bar 6 is played at 5:04:058, or 62 ticks before the downbeat. The rest of the file could be examined in a similar fashion (or random samplings), but based on this example you would enter PushAmount8=62.
Example 3: The left edge of the highlighted area represents the eighth note before the downbeat of bar 6, and the right edge of the highlighted area represents the downbeat of bar 6.
If no amount is entered for these values, Band-in-a-Box determines the amount based on whether or not the Band-in-a-Box style being used is a swing or straight 8th style.
ASubstyleAllowed=NO
BSubstyleAllowed=NO
Using either one of these lines blocks all patterns for the specified substyle, and then uses the patterns of the remaining substyle for the entire song, regardless of the substyle selected in Band-in-a-Box.
This can be useful for altering an existing style. For example, if you have a style made that uses brushes at the A section and sticks at the B section, but you want to change it so that it only uses sticks, you can enter the line “AsubstyleAllowed=NO” into the text file. All of the B section patterns will be used for both A section parts and B section parts in Band-in-a-Box. This is also a useful tool in making “Alternate” styles (see “Alternate Styles and Expanded/Reduced Styles” below).
It is important, however, to not enter both of these lines. If you do this, Band-in-a-Box will not be able to find any patterns at all, and you will get an error message.
Pattern Definition
All patterns are defined in the text file using lines of text containing seven elements, with each of the seven elements separated by a comma. The seven elements are: 1) the text “pattern”, 2) type of pattern, 3) section definition (A, B or all), 4) weight (how often the pattern will be played), 5) Mask (restrictions on where the pattern can be played), 6) duration of the pattern in bars, 7) the location of the pattern in the style wave file.
Here are some examples of defined patterns:
pattern,Normal,A,2,1,2,75
pattern,Fill,A,1,0,1,58
pattern,PostFill,B,8,0,8,3
pattern,Ending,0,6,0,2,114
pattern,Count-in,0,5,0,2,-1
As you can see, each example here starts with the text “pattern.” This simply lets Band-in-a-Box know that the line contains information regarding drum parts that will be inserted into the RealDrums track. The next element is the type of pattern, and here we have examples of “normal,” “fill,” “PostFill”, “Ending” and “Count-in” types of patterns. The next element is the section definition, and we have examples of “A” section patterns, “B” section patterns and “0” patterns, for which sections are not applicable. The next element is the weight. In these examples we have weights of 2, 1, 8, 6, and 5. The higher the weight, the more frequently the pattern will be chosen. The next element is the mask. There are examples here of “0” masks, which impose no additional restrictions on where the pattern can be played and a “1” mask, which does impose certain restrictions. The next element is the duration in bars, and we have examples here of patterns that last 1, 2 or 8 bars long. The final element is the location of the pattern in the style wave file. These numbers represent bars; however, you will notice that one of the examples has a location of –1. This is because Band-in-a-Box uses a –1 based numbering system for bars of music in a song, which will be explained in more detail below.
The six elements that come after the text “pattern” are explained here in further detail:
1. Type of pattern
There are 5 different types of patterns, “Fill,” “PostFill,” “PreFill,” “Normal,” “Ending” and “Count-in.”
Fills
Fills always occur in the bar immediately prior to part markers. In Band-in-a-Box songs, part markers (A or B) are used to delineate musical phrases. Since drum fills are also used to conclude musical phrases, drum fills always occur in the last bar before a part marker. Unlike other patterns, fills can only be 1 bar long.
Here are some examples of Fill patterns defined:
- pattern,Fill,A,1,0,1,8
- pattern,Fill,B,6,0,1,32
- pattern,Fill,B,5,0,1,58
PostFills
As the name implies, PostFills bars occur after Fills. That means that PostFill bars always occur in bars in which there are part markers. Typically, PostFill bars are generally bars that have a cymbal crash on the downbeat, which is intended as a completion to the fill that occurred in the previous bar. PostFills can be any number of bars long.
Here are some examples of PostFill patterns defined:
- pattern,PostFill,A,8,0,8,1
- pattern,PostFill,A,5,0,1,9
- pattern,PostFill,B,4,0,2,17
PreFills
PreFill bars occur immediately before Fills. PreFills are not essential for a style to work but can be useful in situations where a drummer begins an elaborate fill a bar early. When Band-in-a-Box picks patterns for bars that precede fills, it picks from among the pool of normal and prefill patterns. PreFills can either be 1 or 2 bars long. Prefills can be 1 or 2 bars long, with the 2-bar prefill containing the actual fill as well.
Here are some examples of PreFill patterns defined:
- pattern,PreFill,A,4,0,2,7
- pattern,PreFill,B,7,0,1,57
Normal patterns
Normal patterns generally make up the bulk of a Band-in-a-Box song. Any bar that is not immediately before or after a part marker, and is not a count-in or ending, will be taken from the pool of normal patterns.

Example 4: All of the highlighted bars in this example are “normal” bars.
Here are some examples of Normal patterns defined:
- pattern,Normal,A,2,0,1,3
- pattern,Normal,A,5,3,2,11
- pattern,Normal,B,5,1,2,75
- pattern,Normal,B,2,5,2,64
Endings
Endings are always 2 bars long, and generally have characteristics of fills for the first bar, but then end with a drum hit on the 2nd bar, sometimes with a cymbal on the downbeat, but also often with a particular rhythmic figure. You should check the ending in the Band-in-a-Box style that you will be using the RealDrum style with to see what kind of rhythm should be used in the drums to match up. Endings can only be 2 bars long, and you need to have at least one ending defined for a style to work.
![]()
Example 5: The two highlighted bars show where an ending is played in Band-in-a-Box.
Count-ins
Count-ins are always 2 bars long, and always occur at the beginning of a song (unless the count-in is disabled in settings). Count-ins are usually sidestick tapping “one… two… one, two, three, four”, but you can put anything in these two bars. You can have a person actually counting in, or you can have 2 bars of drum fills as your count-in, etc.
2. Section Definition
Band-in-a-Box styles and RealDrums styles have two “subsections,” an “A” subsection and a “B”‘ subsection. When defining patterns, you need to specify whether the pattern is intended to be played during “A” section or the “B” section. For patterns to which the section is not applicable, you can fill this space with a “0.” These include the count-in and the ending. You can make an exception for the ending, if you want to specifically designate an ending to occur only when the preceding bar is “A” or “B.” Instead of “0,” you would enter “Aending” or “Bending.” Just remember that if you do this, you need to cover both eventualities. If you enter a “0” ending, this on its own covers both cases.
Here are some examples of “A” patterns:
- pattern,Fill,A,1,0,1,8
- pattern,PostFill,A,8,0,8,1
- pattern,PostFill,A,5,0,1,9
- pattern,PreFill,A,4,0,2,7
- pattern,Normal,A,2,0,1,3
- pattern,Normal,A,5,3,2,11
Here are some examples of “B” patterns:
- pattern,Fill,B,6,0,1,32
- pattern,Fill,B,5,0,1,58
- pattern,PostFill,B,4,0,2,17
- pattern,PreFill,B,7,0,1,57
- pattern,Normal,B,5,1,2,75
- pattern,Normal,B,2,5,2,64
Here are some examples of “0” patterns:
- pattern,Count-in,0,5,0,2,-1
- pattern,ending,0,1,0,1,33
Here are some examples of special-case endings:
- pattern,ending,Aending,5,0,2,37
- pattern,ending,Bending,5,0,2,77
3. Weight
Every time that Band-in-a-Box needs to find a RealDrums pattern to insert into a Band-in-a-Box bar, it first finds all possible patterns that would fit (based on the type of pattern, the section definition, the mask and the length), and then it picks randomly from those patterns based on the weight assigned.
The weight is a number between 1 and 8 (there are special cases where you can use 0 or 9 which we will examine at the end of this section). When Band-in-a-Box has amassed the list of possible patterns, it then adds up the weights of all of these patterns, and then the chances that each pattern will be selected is based upon a percentage determined by the weight of the pattern divided by the total.
For example, if Band-in-a-Box is finding a “normal” pattern for bar 3 of the song, and it has determined that these four patterns are the only possibilities:
- pattern,Normal,A,5,1,4,11
- pattern,Normal,A,1,0,2,17
- pattern,Normal,A,7,3,2,13
- pattern,Normal,A,2,1,1,20
The first thing it would do would be to add up all of the weights. In this case, 5+1+7+2=15. The chance that each pattern will be picked in this instance is determined by its own weight divided into the sum. Here then, are the chances for each pattern to be picked in this instance:
- pattern,Normal,A,5,1,4,11: 5/15=0.333 or 33%
- pattern,Normal,A,1,0,2,17: 1/15=0.066 or 7%
- pattern,Normal,A,7,3,2,13: 7/15=0.466 or 47%
- pattern,Normal,A,2,1,1,20: 2/15=0.133 or 13%
When 9 is entered as a weight, the program treats it slightly differently. A 9 weight means that any possible patterns that have a weight of 8 or less are completely eliminated as possibilities.
With the previous example, if you changed the weight of the first two patterns to 9, but left the last two as 7 & 2, then the last two would be eliminated as possibilities, and the percentages would change to:
- pattern,Normal,A,9,1,4,11: 50%
- pattern,Normal,A,9,0,2,17: 50%
- pattern,Normal,A,7,3,2,13: 0%
- pattern,Normal,A,2,1,1,20: 0%
It is therefore important that you are very careful when using a weight of 9. It is usually used in conjunction with a mask (masks will be explained in greater detail below). For example, if you had a mask that stated that a normal pattern could only be played 7 bars after a part marker, if you then gave it a weight of 9, any time Band-in-a-Box needed to find a pattern 7 bars after a part marker it would always use that pattern. However, it would not affect any other bars.
The other special case is a 0 weight. This is only used for fills. When Band-in-a-Box finds possible patterns, if a particular pattern is going to end where a fill is required due to the part-marker placement, then the pattern will only be included as a possibility if that bar in the style wave file has been designated as a fill at some point in the text file. Likewise, a pattern that ends with a fill will not be considered a possibility if the fill doesn’t match up in the Band-in-a-Box song.
For example, let’s say that Band-in-a-Box is searching for a pattern to place at bar 5, where bar 6 will need to be a fill:

Example 6: Pattern needed for bar 5.
It will be looking for a normal pattern, and it can use a normal pattern that is 1 or 2 bars long. However, if it picks a 2 bar pattern, it needs to make sure that in the style wave file, the second bar is designated as a fill.
Let’s assume that this pattern is entered in the text file:
- Normal,A,5,0,2,15
This is a 2-bar normal pattern beginning on bar 15 of the style wave file. This pattern could only be picked in this instance if there was another line somewhere in the text file defining bar 16 of the style wave file as a fill:
- Fill,A,5,0,1,16
However, it may be that this fill would not work well as a stand-alone bar (perhaps there is a cymbal decay that crosses over bars 15 & 16 that you do not wish to break up – see “Duration” for more information on this). In this case, you would still want to define the bar as a Fill, so that multi-bar patterns ending in this fill would be used at the right place, but you would never want the fill to be picked on its own. In this case, you could give it a weight of 0:
- Fill,A,0,0,1,16
4. Mask
A Mask can be used to specify that a pattern should only be used a certain number of bars after a part marker. It only applies to Normal patterns, and all other patterns should be given a weight of 0 (0 means no mask).
Here is a list of the possible masks, and what effect they will have:
- 0 – No mask: This pattern can be used anywhere
- 1 – Odd bars only: 3, 5, 7, 9, 11, 13, etc. bars after a part marker
- 2 – Even bars only: 2, 4, 6, 8, 10, 12, etc. bars after a part marker
- 3 – 3, 7, 11, 15, etc. bars after a part marker
- 4 – 4, 8, 12, 16, etc. bars after a part marker
- 5 – 5, 13, 21, etc. bars after a part marker
- 6 – 6, 14, 22, etc. bars after a part marker
- 7 – 7, 15, 23, etc. bars after a part marker
- 8 – 8, 16, 24, etc. bars after a part marker
- etc.
Many drum beats use 2-bar rhythms that then repeat, so it’s very common for the “1” and “2” masks to be used. If you have assigned a “1” mask to several Normal patterns, and a “2” mask to several others, you will always be sure that the 2-bar grouping remains consistent. Just remember that you have to make sure that there are enough patterns to cover all possibilities. If you have only patterns with “1” masks, and no patterns with “2” masks, then Band-in-a-Box will not be able to find any patterns for even bars. The safest thing to do is to use a mask of “0,” but this may not be the most musical approach. A mask of 4 is often used for more subtle fills that would highlight 4 bar phrases. Masks higher than 8 are not commonly used, as it would mean that the pattern would be played very rarely.

Example 7: Normal pattern needed for bar 13.
In example 7, if Band-in-a-Box is trying to find a normal pattern for bar 13, it will look for patterns with a mask of 0, 1 (because it is an even number of bars from the part marker) or 5. If it were trying to find a normal pattern for bar 14, it would look for patterns with a mask of 0, 2, or 6.
5. Duration
PostFill and Normal patterns can be any number of bars long, however there is a practical range that is commonly used. Other patterns are restricted to a certain number or range of bars. Here is a list of the pattern types, and the ranges of durations:
Fills – 1 bar long only
PostFills - 1 bar or higher, generally no higher than 8 bars
PreFills – 1 or 2 bars long only
Normal – 1 bar or higher, generally no higher than 8 bars
Endings – 2 bars long only
Count-ins – 2 bars long only
The difference between favoring short patterns and long patterns is a balance between consistency and variation. Long patterns may sound more consistent, because you will be hearing large portions of raw audio, exactly as the drummer played it. On the other hand, with short patterns, there will be more variety in the phrases, because there will be many more possible combinations when single bars are mixed and matched together. Many people will favor a combination of long and short patterns. Also, while it is possible to have very long patterns, it is important to remember that patterns will not cross part markers, so if you designate 16 bar patterns, but in your Band-in-a-Box songs you have part markers every 8 bars, those 16 bar patterns will never be played.

Example 8: Normal pattern needed for bar 5.
In example 8, if Band-in-a-Box is trying to find a Normal pattern for bar 5, it can pick a 1, 2, or 3 bar pattern, or a 4-bar pattern that ends with a fill. It cannot pick a pattern that is more than 4 bars long.
Another thing to keep in mind is that for any given bar in the style wave file, you can have as many different patterns defined as you like. So, for example, you can define a 1 bar pattern that starts at bar 5, you can then also define a 2-bar pattern that starts at bar 5, a 4 bar pattern, 8, etc.
In deciding what lengths of phrases will work well, an important thing to consider is whether or not certain bar lines make good cut-off points. For example, let’s assume that in a style wave file, at the 4th beat of bar 15 there is a crash cymbal that decays into bar 16, but fades out before the end of bar 16. Bar 15 would likely not be very good as a 1 bar pattern, because you would have situations where bar 15 would be used and would then go directly to a different random bar that likely does not have a cymbal decay, so you would hear an abrupt cut-off which would greatly reduce the musicality of the drum part. In situations like these, you would then make sure that other patterns did not end with bar 15 as well. For example, a pattern at bar 14 would not be good as a 2-bar pattern, because it would cut off in the same place, but it would be good as a 3-bar pattern. Conversely, bar 16 would not likely make a good pattern at all, because it will start with a cymbal decay that had no start to it. This doesn’t mean that bar 16 will never be used, it will just never be the start of a pattern.
A good rule to follow is to try and have at least one 1-bar PostFill, Normal, and Fill patterns for each subsection, just to make sure that all possible circumstances will be covered. Once you have that, you can determine what other patterns will work well based on the phrasing of the drummer.
6. Location
The final element in pattern definition is the location of the pattern in the style wave file. This number represents the bar number in the wave file, but it is important to remember that this is a –1 based numbering system. The first two bars of the wave file are reserved for the count-in, which are considered to be bars –1 and 0. The drumming starts at the third actual bar of the wave file but is referred to as bar 1. So, if you are viewing bars in an audio editor, remember that when you reference these bars in your text file, you need to subtract 2 before you enter them in the patterns.
If this is confusing to you, there are two ways you can simplify this. Some audio editors allow you to designate bar “1” at any point in a wave file. Simply go to bar 3 and designate that as bar 1. Then, any bar number you see will directly match what needs to be entered into the text file. The other thing you can do is that while you are actually working on the style, you can cut the 2 count-in bars, which will shift the rest of the track back by 2 bars, and any bars you see will be the same bar numbers you need to enter into the text file. Once you have finished the text file, you can then paste the count-in back in to the beginning of the file.
Shots Definition
In Band-in-a-Box, shots and holds are entered by putting either 2 or 3 periods after a chord (2 periods for a shot, 3 for a hold). With RealDrums, when a shot or hold is entered, the drums stop for the duration of the chord, and a single drum hit is played in place of the drum beat. Pushes are entered by typing either 1 or 2 caret symbols (“^”) before the chord in question (1 caret for an 8th-note push, and 2 carets for a 16th-note push). With RealDrums, when a push is entered, the regular drum beat continues throughout, but a single drum hit is added to the mix to emphasize the push.

Example 9: Bar 1 shows a shot, bar 3 shows a hold, bar 4 shows an 8th-note push, and bar 7 shows a 16th-note push.
The single drum hits are generally recorded at the end of the wave file, after the main drum groove, but they do not have to be.
Like patterns, shots are also defined in the text file using lines of text containing several elements: 1) the text “shot”, 2) type of shot (0 for shot or hold, 1 for pushes), 3) the bar number of the shot in the style wave file, 4) the number of ticks (1 beat = 120 ticks) before or after the bar number the shot occurs, 5) the duration of the shot in ticks, 6) weight, 7) volume of the shot
Here are some examples of defined shots:
Shot,1,82,-2,455,1,100
Shot,0,83,5,360,1,90
Shot,1,171,240,200,1,80
The six elements that come after the text “shot” are explained here in further detail:
1. Type of shot
The type of shot needs to be either 0 or 1. If 0 is entered, the shot will be used when chords are entered with two periods (shot) or three periods (hold). If 1 is entered, the shot will be used when chords are entered with two or three carets before them (8th & 16th note pushes).
2. Bar number in style wave file
Like with patterns, you need to remember that RealDrums styles use –1 based numbering, so you need to subtract 2 from the bar number as you see it in your audio editor. More than one shot can be played in a single bar, and you would use the tick adjust amount to distinguish between the two.
3. Tick adjust
The shots do not necessarily have to occur at the bar lines, and the tick adjust can be used to tell Band-in-a-Box exactly where the shot starts. Simply measure the number of ticks from the downbeat of the bar number entered to the start of the shot, and that is the number that should be entered here. If the shot starts before the bar number that was entered, a negative number should be entered here.
For example, if a shot is recorded at bar 82, but on closer examination it appears that the shot was played two ticks early, it would be entered as such:
- Shot,1,82,-2,455,1,100
In another example (see example 10 below), a shot is played at the third beat of bar 171. In this case you need to use the tick adjust to indicate that it a full two beats after bar 171. Since one beat is 120 ticks, two beats would be 240 ticks, and it would therefore be entered as such:
- Shot,1,171,240,200,1,80

Example 10: Here the shot begins at bar 171 (173-2), at the third beat, or 240 ticks into the bar.
Unlike patterns, which use numbers of bars for durations, the shots use ticks for durations. So, for example, if a shot lasts for three beats, you would enter 360 (3 beats * 120 ticks per beat).
Here is an example of a shot that lasts for three beats:
- Shot,0,83,5,360,1,90
For the best effect, the sound of the shots should decay naturally, and the entire length of the shot including the decay should be entered in the text file. This is especially important when all other instruments are silent, and all you hear is the decaying sound of the drum hit.
5. Weight
The weight for shots works exactly the same as the weight for patterns, except that there is no need for the use of 0 or 9 weights. This number should be between 1 and 8, with higher numbers representing a greater chance that the shot will be selected each time.
6. Volume
The volume of the shots is represented by a number between 1 and 127. If 90 is entered, the volume will not be adjusted at all. If a number between 1 and 89 is entered, the volume will be lowered accordingly, and if a number between 91 and 127 is entered, the volume will be raised accordingly. It is generally easiest to test the volume amounts once the style has been completed.
Additional Entries in the Text File
Bars Blocked
During the testing of your style, you may come across instances where a particular bar from the style wave file simply does not sound good going into another specific bar from the style wave file. When this happens, you can enter a “BarsBlocked” line into your text file to ensure that these bars are never played back-to-back.
When “BarsBlocked” is typed into the text file, followed by bar numbers separated by commas, Band-in-a-Box takes the first number, and all of the bar numbers that follow are “blocked” from ever following the initial number.
So, for example, if this line is entered:
- BarsBlocked,24,35,41
then bar 24 can never be followed by bars 35 or 41.
However, when using this feature, you need to be very careful that you are not creating situations where Band-in-a-Box will not be able to find a possible match for a bar. When you block a bar, you need to make sure that there are patterns defined starting on other bars that would also work.
Comments
When you create your style, you may want to add comments into the text file as reference points, or as reminders about certain aspects of the style. This can be done in two ways: 1) semicolon comments 2) Pascal-style comments.
If you type a semicolon into the text file, whether it’s at the beginning of a line, or at the end of a pattern definition, and text that is typed after the semicolon is ignored, which allows you to type comments. For example:
- ;this entire line will be ignored by Band-in-a-Box
- pattern,normal,A,5,0,4,15;this text will also be ignored by Band-in-a-Box
Pascal-style comments are comments that are enclosed by { and } characters. Any text enclosed by these characters will also be ignored by Band-in-a-Box. Unlike the semicolons, these comments can occur in the middle of a pattern definition, and the line can continue after the comment. For example:
- {this entire line will be ignored by Band-in-a-Box}
- pattern,normal,{this text will be ignored}A,5,0,4,15
Alternate Styles & Expanded/Reduced Styles
Alternate Styles
It is possible for a wave file to be used for more than one style. For example, you may want to duplicate a style, but omit certain fills, or assign different weights to certain patterns.
In this case, you still need to create a new RealDrums style group by creating a new sub-directory in the “Drums” folder, and the text file for the style needs to be present. The only difference is that in the text file you would have the name of the wave file you are using, and that name will be different from the text file name.
For example, if you have a “MyFunkyStyle” style at 90 bpm, these files would be present:
C:\bb\Drums\MyFunkyStyle\MyFunkyStyle_090_Style.txt
C:\bb\Drums\MyFunkyStyle\MyFunkyStyle_090_Style.wav
To make an alternate style, you could create this file:
C:\bb\Drums\MyFunkyStyleALT\MyFunkyStyleALT_090_Style.txt
The first line of this text file would be:
wavename=MyFunkyStyle_090_Style.wav
Expanded/Reduced Styles
Often you will find examples of drum grooves where the pulse can be treated as 8th notes or 16th notes. For example, different musicians may disagree on whether a groove is 90 bpm with a 16th note pulse, or 180 bpm with an 8th note pulse. In Band-in-a-Box, some styles are treated as 8th note styles and others are treated as 16th note styles, and you may find examples where a drum beat that is intended for 8th note styles may work equally well on 16th note styles at half the tempo. In these cases, you can create two separate styles that both point to the same wave file and treat it as two different tempos. The same method as described in “Alternate Styles” above could be used, with one addition. For the style in which the tempo is different in the text file then it is in the wave file filename, you would need to add the “ForceWavTempo=“ line to the text file.
For example, if you have a “MyFunkyStyle_90” Style, the following files would be present:
C:\bb\Drums\MyFunkyStyle\MyFunkyStyle_090_Style.txt
C:\bb\Drums\MyFunkyStyle\MyFunkyStyle_090_Style.wav
For an expanded style, you could create this file:
C:\bb\Drums\MyFunkyStyleEXP\MyFunkyStyleEXP_180_Style.txt
The first line of this text file would be:
wavename=MyFunkyStyle_090_Style.wav
And an additional line would be needed:
ForceWavTempo=180
There some additional points in making expanded and reduced styles. First of all there is the issue of bars correctly matching up. If the number of bars in a particular group of bars in the higher tempo version are an odd number, this can throw off the slower tempo version. For example, if your high tempo version has an A Postfill, an A Normal, and an A Fill, then a B Post, this will mean that in the slower tempo version, the A Postfill and A Normal will become a single PostFill bar, which is fine, but the A Fill and the B Post will also become a single bar, which will not work. This could then mess up everything that came after. It would have been better if the high tempo version had an A Postfill, an A Normal, another A normal, then the A Fill, and then the B Post. For this reason, if you know a drum part is going to be used at two tempos, it is quite a bit easier to record or piece together the drum part with the slow tempo version in mind first, and this can then be expanded.
The other things you need to take into account are the count-in and endings. The count-in will be different for the two tempos, so it’s best to record two completely different count-ins. The alternate one can be pasted onto the end of the file if necessary. For endings, it’s also good to simply record two versions of them, which also can be at the end of your file.
Testing Your RealDrums Style
Once you have made your RealDrums style (or, depending on the level of completion, even during the making of it) you can listen to it and test it in Band-in-a-Box. If your text file is named with the convention detailed in the introduction, and is located in the correct directory, it should automatically appear in Band-in-a-Box. The easiest way to select your RealDrums style is to enter the RealDrums Settings Dialog in Band-in-a-Box (Options | Preferences | RealDrums), or simply pressing the RealDrums toolbar button). Make sure RealDrums are enabled, and then put a checkmark beside “For this song only, use this RealDrums style.” If you then click on the RD button, a list of all available RealDrums should appear, and your style should be among them. When you exit this dialog and play your song, you should be hearing your RealDrums style.
You can make and save changes to the text file, and when you press play again in Band-in-a-Box, any changes in the text file will take effect. If, however, you make any changes to the wave file, the wave file needs to be reloaded for the changes to take effect. To do this, simply select a song that uses different RealDrums, press play. Then stop and reload the song you were working on.
Adjusting volume levels
If the balance between the RealDrums and the MIDI instruments needs to be adjusted, you can do this by simply adjusting the dbadjust= setting in your text file, saving it, and pressing play again in Band-in-a-Box. You can continue to do this until you have found a good balance.
For the volume levels of the shots and pushes, the best way to test this is by testing one at a time. If you have more than one shot or push, you can “comment-out” all but one, then you will always be hearing only that shot or push. For example, let’s assume you have three shots entered:
- Shot,0,82,120,547,1,110
- Shot,0,83,188,1151,1,90
- Shot,0,85,380,1058,3,90
To test the first one, add a semicolon to the beginning of the 2nd and 3rd lines:
- Shot,0,82,120,547,1,110
- ;Shot,0,83,188,1151,1,90
- ;Shot,0,85,380,1058,3,90
Band-in-a-Box will therefore ignore those lines, and you will only hear the first shot. You can then adjust the volume level until you have it right, then do the same with the second shot, etc.
Developer Mode
It is also extremely useful when testing RealDrums styles to use “Developer mode.” This is a checkbox in the RealDrums settings. When it is turned on, Band-in-a-Box does two things. First of all it spell-checks your text file when you play a song. If it finds an error, it reports the error to you before beginning the song. When Developer mode is off, if there are typos in the text file, the entire pattern definition is simply ignored. For example, if you misspell “pattern” as “pattrn,” you will see an error message when you start that will tell you the typo as well as the line number where you can find it in the text file. When you press OK, the song resumes.
The other thing that developer mode does is generate a “DrumAudioResults.txt” text file every time you press play. This text file tells you exactly what patterns from your text file were picked for every Band-in-a-Box bar. The file also has other global and statistical information. This information can be extremely valuable as you fine-tune your style.
Developer mode for RealDrums enhanced. (Note: This feature is only for those people developing their own RealDrums files). If the file C:\bb\NumberedDeveloperFiles.txt exists, the DrumAudioResults.txt with information get numbered and written to C:\bb\Results folder (Note: you need to create a C:\bb\Results folder first).
DrumAudioResults.txt file.
The first information that the DrumAudioResults.txt file gives you is global information about the style and song. It tells you the wave file that was used, the song tempo, the total number of bars, and the total number of times you’ve played the song in the current session.
The next information it displays is a separate line for every bar of the song. The first item for every bar is the actual bar number in the song, but the type of information that is displayed after that depends on whether the bar represents the start of a pattern, or a subsequent bar in a multi-bar pattern.
If the file C:\bb\NumberedDeveloperFiles.txt exists, the DrumAudioResults.txt file with information gets numbered and written to C:\bb\Results folder. (Note: You need to create a C:\bb\Results folder first.)
Here is an example of a bar where a pattern begins:
- Bar# 12,relbar=4, MaxBars=5, Chose pat#21, line #26
- Normal,a sub.,mask=2,dur#bars=2, wrote 2,WavBar=14, Candidates=11 ,time=0:26
Here is an example of a bar where a pattern is continuing:
- Bar #13 WavBar=15 ,time=0:28
For bars where patterns begin, here are the items that follow the bar number:
1. relbar=x
This number represents the number of bars since the last part marker. This number therefore determines whether or not Normal patterns with masks assigned can be used. For example, if relbar=4, a normal pattern with a mask of 0, 2 or 4 could be chosen, but patterns with masks of 1, 3, 5, 6, etc. could not be chosen.
2. MaxBars=x
This number represents the number of bars to the next part marker. Since patterns cannot cross part markers, any patterns that have a duration greater than the MaxBars= amount cannot be chosen.
3. Chose pat#x, line #y
This is the actual pattern selected, shown in two different ways so that it’s easy to identify in the text file. If you count down from the first pattern in the text file, pat#x will show you how many patterns to count to find the one that was used and does not take the global info at the beginning of the file into account. Line #y shows you the actual line of the text file, which would include lines for the global settings and any comment lines. If your text editor has line numbers, this is the easiest way to find the pattern that was chosen.
4. Type, subsection, and mask
The next information is the type (Normal, PostFill, etc.), subsection (A or B) and mask of the pattern chosen.
5. dur#bars=x, wrote y
The dur#bars= amount tells you the number of bars in the pattern, and the “wrote y” amount tells you the actual amount of bars written. In most cases, this number should be the same, because Band-in-a-Box will always try and keep the defined patterns intact. Sometimes, however, multi-bar patterns may need to be cut short, for example if it needs a 1 bar pattern but you have only designated 2 bar patterns.
6. WavBar=x
This tells you the bar of the actual style wave file that was used for the current Band-in-a-Box bar. Remember that this is using –1 based numbering.
7. Candidates=x
This tells you how many possible patterns there were for Band-in-a-Box to choose from for the current bar. If there were 3 or less possible candidates, this line appears instead as “FEWCandidates=“. This lets you know that perhaps there are not enough of a certain type of pattern. As long as there is at least 1, you will not get any actual errors, but for the sake of variety, the more possibilities the better. If there are no possible candidates, you will get an error message “******* Unable to pick a drum audio bar for bar #x”. In this case, you need to examine your text file to see why this is occurring. It could be because there are simply not enough patterns defined, but it could also be because of the overuse of the “barblocked” feature.
8. time=
This tells you the time in minutes and seconds where the bar is located. This is useful if you have rendered a file, and you are listening to the rendered audio file for problems.
For bars where patterns are continuing, the only items shown are “WavBar=x” and “time=“. The one exception is where Fills are concerned, in which case you may see one of two messages tagged on to the end of the line. “BB song has fill, WAV is at end of multi bar pattern. WAV file has a fill also” means that a Fill was designated in the text file, and the current pattern is ending with that Fill. The other message you may see is “*** BB song has no fill, but WAV has a fill ***(Could be Error2 if mask0)” This means that Band-in-a-Box has recognized that a bar that is designated as a Fill occurred within the pattern, but not at a place where a Fill is required. Fills often sound good 4 bars into phrases, even if no fill has been designated, so in these cases, this could be fine. If, however, the Fill sounds out-of-place, you made need to examine this further in your text file.
At the end of the DrumAudioResults.txt file there is statistical information about the song you just played. Because of the random nature of styles, this information will likely be different every time you play the same song, however you may see some patterns develop that can help you fine tune your style.
The total bars will always be the same for the same song, but the number of patterns written will be different depending on how many short or long patterns were randomly selected. The average bars per pattern gives you an overview of the length of patterns selected. Long patterns are desirable because they generally sound more consistent, while short patterns are desirable because they lend themselves to greater variation. It’s therefore good to get a balance between the two, and a good average is between 2 and 4 bars.
It’s also good to have a high average candidates amount, as this is also a sign that your style will have good variation. If any Band-in-a-Box bars had 3 or less patterns to choose from, they were flagged as “FEWCandidates,” and the total number is listed at the bottom. This lets you know if you need to define more patterns. “MultiBarPatternPercent=” simply lets you know the setting you have entered in your text file.
Using your RealDrums style in Band-in-a-Box
As we have shown above, you can select your RealDrums style for a particular song in the RealDrums Settings. It is also possible to assign your RealDrums style to a particular Band-in-a-Box style. This is done in the StyleMaker. If you have either a new or existing Band-in-a-Box style open in the StyleMaker, simply select “Style | Misc. Settings” or press Ctrl+F10. This opens the Misc Style Settings dialog. At the bottom of this is the RealDrums Settings.

Example 11: RealDrums settings in the StyleMaker.
You can enable “Style uses RealDrums” in order to designate a RealDrums style. If your style is in the correct directory, it should appear when you press the “RD” button. You can then select your RealDrums style, and whenever the current style is played, it will use your RealDrums style (provided that RealDrums are enabled). There are also additional volume controls here. If you have your dB setting exactly where you want it in your style file, but with this particular Band-in-a-Box style you want it a bit higher or lower, you can enter a setting here. There are also fields for adjusting the “A” or “B” subsection volumes only.
You can also remove the check mark from either “Allow ‘a’ substyle RealDrums” or “Allow ‘b’ substyle RealDrums”, which means that for this style, the one with the checkmark remaining will be used for the entire song, regardless of what substyle is currently called for in the song.
The Harmony Maker
The Harmony Maker allows you to create or edit your own or existing harmonies. This can be used in the program to harmonize melodies or for live playing on the Thru channel. Sophisticated options control usage of passing harmonies (diatonic, dominant approach and chromatic), drop octave voicings (e.g., drop 2), octave doubling, patch selection, and more.
| |
You can open the Harmony Maker by pressing the [Edit] button in the Select Melody Harmony dialog. |
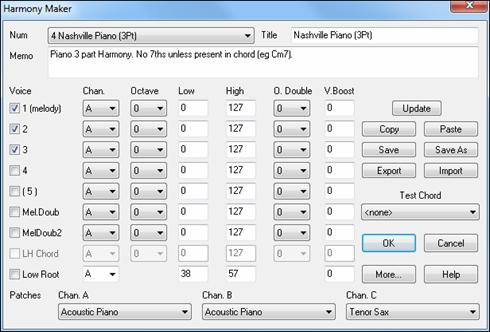
You will see the voices down the left side of the dialog.

Each harmony can use up to 3 channels.
Harmony Channel A, B, and C. If your harmony only has one instrument, then you will use Channel A for all the voices. If your harmony uses Flute and Bass, then you could use Flute on Channel A and Bass on Channel B.
Settings for Each Voice
![]()
Chan. A 1-instrument harmony will use Channel A only. Additional instruments can use Channel B and C.
Octave This allows the harmony to “drop-down” or “go up” by a number of octaves.
O. Double (Octave Double) This setting lets you double any voice. Usually you want to do this by doubling an octave below (i.e. octave = -1), but you can set the octave from -2 to +2. The doubling will always be on the same channel, if you want a different instrument to double the voice, and then use the Melody Doubling Voices.
V. Boost (Velocity Boost) This allows you to increase or decrease the velocity (loudness) of each voice, to make the voice stand out more or less in the harmony. Default = 0.
| |
The Patches setting at the bottom allows you to assign a patch to the harmony. If you set “No patch,” the harmony won’t change the patch. This is a useful setting for making a generic harmony that doesn’t change the patch of the Melody or Thru channel, for example. |
![]() Changes that you make to the harmony settings won’t take effect until you press the [Update] button.
Changes that you make to the harmony settings won’t take effect until you press the [Update] button.
![]()
![]() You may Copy a Harmony to the clipboard, and then move to a new harmony and Paste the harmony to the new location.
You may Copy a Harmony to the clipboard, and then move to a new harmony and Paste the harmony to the new location.
![]()
![]() Because the harmony is saved automatically for you, you won’t need to ever press these buttons.
Because the harmony is saved automatically for you, you won’t need to ever press these buttons.
All of the 256 harmonies are saved in a single .har file called default.har. If you have run out of harmonies, you can start a new harmony file by pressing the [Save As] button. For example, if you make a 3rd party disk of add-on harmonies, save it as your name MyName.HAR. Then you can load in your bank of harmonies (from the Harmonies | Harmonies Editor | Edit a Harmonies File) without disrupting the existing default.har file.
![]()
![]() Each .har file has 256 harmonies, so you probably need only 1 default.har for all your harmonies. However, if you’ve made a great harmony and want to give it to a friend, you can export a single harmony as an .h1 file. Your friend can then import this harmony into their own .har file.
Each .har file has 256 harmonies, so you probably need only 1 default.har for all your harmonies. However, if you’ve made a great harmony and want to give it to a friend, you can export a single harmony as an .h1 file. Your friend can then import this harmony into their own .har file.
| |
The best way to develop a harmony is to hear it as it’s playing. The preferred way to do this is to have a song playing that has a melody in it. Any changes to the harmony will be heard on the melody as soon as you press the [Update] button. |
You can also play along as the song is playing and hear the new harmony on the Thru channel.
If you don’t want to have a song playing, and want to hear the harmony, then set the [Test Chord] to a certain chord. If set to CMAJ7, then you can play on the MIDI keyboard (with no song playing) and hear your harmony. This allows you to examine exactly what notes the program is using to make your harmony.
Additional Harmony Options
![]() Press the [More…
] button to launch the Additional Harmony Options dialog.
Press the [More…
] button to launch the Additional Harmony Options dialog.

Use Close Harmony This only applies to 2 and 3-part harmonies.
If set to = 0 it will use only close harmonies, mainly 3rds for 2-part harmonies.
If set to = 1 it will use mostly 3rds, with some 6ths for 2-part harmonies.
If set to = 99 it will use mostly 6ths, with some 3rds for 2-part harmonies.
If set to = 100 it will use only wide harmonies, mainly 6ths for 2-part harmonies.
If set to > 2 < 98 it will vary between close and open harmonies.
Use Passing Chords (melody) Band-in-a-Box will sort out when to use passing harmonies, based on factors like the duration of the note, the next note, the chord tone, the velocity, previous notes, and other factors. You can visually see when the harmony is using a passing chord. The harmony display is usually blue, but when there is a passing chord, it displays as RED. If you don’t want passing chords, set this value to 0.
Lowest Harmony Note You can set a lowest note for the harmony to play. When the melody is low, harmonies begin to sound “muddy,” so you can avoid the harmony being played below a certain note.
Overall Harmony Octave This sets the overall octave of the harmony. For example, in the 5-part Trumpets harmony the harmony is always be played an octave higher than the recorded melody. This is because the 5-part harmony is spread over 2 octaves.
No Harmony if duration less than nn milliseconds You can specify a harmony to only occur for notes longer than a given duration. If every note is harmonized unrealistic harmonies result, since a piano player doesn’t harmonize notes of a short duration. You can specify a harmony to only occur for notes longer than a given duration. Notes shorter than that will not be harmonized. There are also options for how the program “fixes” the harmony when chord changes occur during a sustained note harmony.
OK to make new harmony with new chord Most harmonies have a feature that changes the pitch of the harmony voices under the Melody note when the chord changes if the underlying voice wouldn’t be a chord tone. For some harmonies it would be unrealistic for the instruments to change the inner voicings in this manner. Deselect this option and the voices that conflict with the new chord stop playing instead of changing to new notes.
Use Guitar Harmony Voicings Harmony Maker will use real guitar chord voicings that display correctly on the guitar fretboard. Selecting this checkbox means that guitar chord voicings will be used, instead of any other voicings specified in the Harmony Maker. Check out Harmony #32 (J Pass) for an example of this
Use voicings in 4ths Modern Jazz harmonies often voice chords in 4ths.
 |
For example, a C chord with C melody might be voiced C, G, D, A, E. You can select 4ths voicings easily in Band-in-a-Box to harmonize the Melody, Soloist, or Thru parts using 3, 4, or 5-part voicings in 4ths. We’ve added presets for these harmonies, so you can easily select them. Use these sophisticated 4ths harmonies on your existing melodies to create a new sound. |
|
To use the harmonies with any song, choose harmonies in the range 213 to 219. Each of these is a harmony using 4ths. For example, Harmony 218 uses 4 trombones in 4ths. |
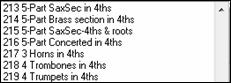
![]() To make your own harmony using 4ths for the harmonies, enter the Harmony Maker, press the [More] button, and select the “Use Voicing in 4ths” checkbox. Then the harmonies will be voiced in 4ths. You can make a 2, 3, 4, or 5-part harmony (+ melody doubling, + low root note).
To make your own harmony using 4ths for the harmonies, enter the Harmony Maker, press the [More] button, and select the “Use Voicing in 4ths” checkbox. Then the harmonies will be voiced in 4ths. You can make a 2, 3, 4, or 5-part harmony (+ melody doubling, + low root note).
The Soloist Maker
This module allows you to define your own soloists. For example, let’s say you want to create a soloist in a style similar to John Coltrane - the legendary jazz saxophonist. The Soloist Maker allows you to define the parameters essential to the particular soloist’s playing, such as instrument range (i.e. tenor saxophone), extra legato playing, playing more on top of the beat than most Jazz musicians, and playing straighter 8th notes than usual swing 8th notes.
In addition, you can set phrasing options, such as how long the phrase should be, and how much “space” to leave between phrases. You can also set how “outside” the playing should be. (For Coltrane it would be set to maximum!)
| |
Access the Soloist Maker by pressing the Soloist Maker [Edit] button within the Select Soloist dialog. |

Insert the title of your “soloist” in the Title box, and any memo note you wish to add. (The Num field will be filled in for you.)
![]()
For the Memo box, you can put in information like “extra legato, straighter 8th notes, on top of the beat, laid back, etc.
![]()
The “Soloist is” box allows you to define what type of notes the Soloist will play (i.e. swing 8th notes, straight 8th notes, 16th notes, etc.)
![]()
There are several databases of Solo ideas to choose from.
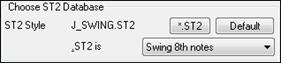
![]() This button will launch an Open File dialog for the C:\bb\Soloists folder where you can select a database (ST2 or ST3) appropriate for the type of song the Soloist will be playing over (e.g., J_SWING.ST2 for Jazz Swing songs).
This button will launch an Open File dialog for the C:\bb\Soloists folder where you can select a database (ST2 or ST3) appropriate for the type of song the Soloist will be playing over (e.g., J_SWING.ST2 for Jazz Swing songs).
![]() Press the [Choose] button in the Soloist Editor to select the instrument the Soloist should play (i.e. Tenor Saxophone).
Press the [Choose] button in the Soloist Editor to select the instrument the Soloist should play (i.e. Tenor Saxophone).
 |
You may also select an instrument from the “Patch Change” window but selecting an instrument with the [Choose] button also fills in the specific note range for that instrument. |
![]() If you wish to have a harmonized solo, select the harmony type by clicking on the Harmony box and choosing from the drop-down list.
If you wish to have a harmonized solo, select the harmony type by clicking on the Harmony box and choosing from the drop-down list.
![]() “Change Instrument” allows you to quickly set how the Soloing will “take turns” with other instruments. Use this option to change instruments every chorus, every 4, 8, 16 bars, etc. Press the [Set..] button to choose the instruments you would like to change to, including the appropriate note rang for each instrument.
“Change Instrument” allows you to quickly set how the Soloing will “take turns” with other instruments. Use this option to change instruments every chorus, every 4, 8, 16 bars, etc. Press the [Set..] button to choose the instruments you would like to change to, including the appropriate note rang for each instrument.
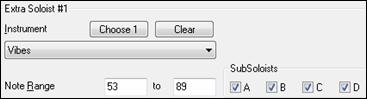
The Sub-Soloist checkboxes are for use ONLY with add-on hybrid soloists such as the ones found on the SOLOISTPAK for Band-in-a-Box. These checkboxes can be used to “sub” a different instrument and playing style in a Soloist which contains more than one playing style, such as BG_BAND.ST2 found on Soloist Disk Set #5. For more information on additional Soloist Disk Sets and the additional features available with them, contact PG Music.
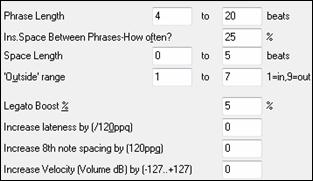
To modify (if required) the “Phrase Length,” “Space Length,” and “Outside Range” parameters, simply click in the box you wish to change and type-in the new number.
For example, change the “Legato Boost %” to 10 %. This will add 10% to the duration of the notes.
Adjust the lateness by -5 to have the Soloist play the notes more “on the beat” than other Jazz soloists.
Adjust the 8th Note spacing by -5 to have your Soloist play 8th notes in a more even feel than other Jazz soloists.
The “Increase Velocity” setting will increase the velocity of each note in the solo by the value entered or DECREASE the velocity if a negative value is entered.
![]() You can control the maximum number of notes per quarter note that the Soloist will use. For example, you can set a “Rock Guitar” Soloist to use nothing shorter than 16th notes. This would produce less “guitar hero” solos with bursts of 32nd notes etc. Or you could create a Jazz solo that uses only quarter notes or longer to help with sight-reading or student study.
You can control the maximum number of notes per quarter note that the Soloist will use. For example, you can set a “Rock Guitar” Soloist to use nothing shorter than 16th notes. This would produce less “guitar hero” solos with bursts of 32nd notes etc. Or you could create a Jazz solo that uses only quarter notes or longer to help with sight-reading or student study.
![]()
![]() Use the [Import] button to bring a soloist in from a disk and use the [Export] button to save your Soloist to a disk to share Soloists with your friends.
Use the [Import] button to bring a soloist in from a disk and use the [Export] button to save your Soloist to a disk to share Soloists with your friends.
![]()
![]() Individual Soloists can be copied and pasted to make variations.
Individual Soloists can be copied and pasted to make variations.
![]() The Soloists are saved in the DEFAULT.SOL file, but if you want to save them in another file, press the [Save As] button.
The Soloists are saved in the DEFAULT.SOL file, but if you want to save them in another file, press the [Save As] button.
![]() Pressing the [OK] button will update the DEFAULT.SOL file with the current settings.
Pressing the [OK] button will update the DEFAULT.SOL file with the current settings.
Editing RealTracks Soloists
![]() The Soloist Editor dialog allows editing of many RealTracks parameters.
The Soloist Editor dialog allows editing of many RealTracks parameters.
Press the [More…] button in the Soloist Editor.
This launches the Edit Extra Soloist Information dialog. This allows you to change parameters about the RealTracks.
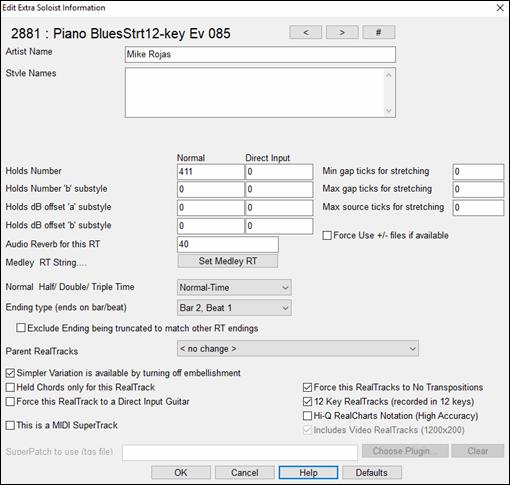
![]() If you have the number of the RealTracks instrument to edit, you can select it by clicking on the [#] button and typing in the numbers.
If you have the number of the RealTracks instrument to edit, you can select it by clicking on the [#] button and typing in the numbers.
![]()
![]() These buttons will step back and forth through the list of RealTracks soloists to make your selection.
These buttons will step back and forth through the list of RealTracks soloists to make your selection.
The “Artist Name” is given, and also the “Style Names” for styles that use the particular instrument.
The “Holds Number” and “Holds Number B Substyle” identify the location of the files played when shots or held chords are entered into a song. The “Normal” column applies to the normal version of RealTracks (e.g. an electric guitar RealTracks that was recorded with an amplifier), and the “Direct Input” column applies to the Direct Input version of RealTracks (e.g. an electric guitar that was recorded directly, bypassing an amplifier).
The volume level of the “Holds” that play can be adjusted in a range of +/- 64 dB. There are separate settings for “a” and “b” substyles.
The “Audio Reverb” for the instrument can be adjusted.
![]() Similar to the Soloist Medleys, it is possible to have multiple RealTracks instruments change in sequence.
Similar to the Soloist Medleys, it is possible to have multiple RealTracks instruments change in sequence.
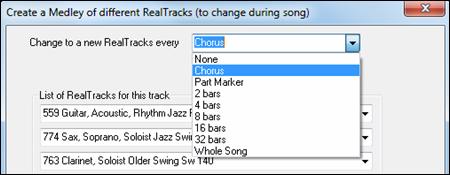
![]() There is also the option to have all ten instruments in the list of RealTracks for the track play together.
There is also the option to have all ten instruments in the list of RealTracks for the track play together.
![]() The option to “Start on second item in the list” is useful if you want to start on a different instrument or start with “Silence.”
The option to “Start on second item in the list” is useful if you want to start on a different instrument or start with “Silence.”
The new élastique Pro V2 time stretching and pitch transposition engine by zplane.development expands the possibilities for playing RealTracks in half, double, or even triple-time.

Min gap ticks for stretching For filling silent gaps between riffs, the end of the previous riff will be stretched. This is the minimum duration of the gap in ticks for this to take effect.
Max gap ticks for stretching For filling silent gaps between riffs, the end of the previous riff will be stretched. This is the maximum duration of the gap in ticks for this to take effect.
Max source ticks for stretching For filling silent gaps between riffs, the end of the previous riff will be stretched. This is the maximum duration of audio in the previous riff (in ticks @ 1200ppq) to be used for stretching. A longer duration will result in a better quality stretch but should be set to a shorter duration to avoid including note starts.
Force Use +/- files if available If this is checked, RealTracks will be generated using source files that have + or - in the file name.
Ending type (ends on bar/beat) specifies the ending type of the RealTracks and the beat that the last held chord occurs on. Do not edit this value.
Exclude Ending being truncated to match other RT endings is used for RealTracks that have various endings, such as soloing RealTracks. Do not change this setting.
For RealTracks that are variants, such as Bluesy variants, the parent is the non-bluesy variant or the main RealTrack that uses the database. Do not change the Parent RealTracks setting.
Simpler Variation is available by turning off embellishment is a PG Music setting only and is set if a simpler RealTrack is available.
If Held Chords only for this RealTrack is checked, the RealTracks will only play held chords instead of the normal style.
If Force this RealTrack to a Direct Input Guitar is set, the RealTracks will always use a Direct Input guitar.
This is a MIDI SuperTrack sets the soloist to play as MIDI SuperTrack instead of a RealTrack.
12 Key RealTracks (recorded in 12 keys) If this is checked, the RealTracks were recorded in all 12 keys. This is set by PG Music.
If Hi-Q RealCharts Notation (High Accuracy) is selected, highly accurate and readable notation in available including new graphical markings for bends, slides, hammer-ons, and pull-offs, for the RealTrack. This is set by PG Music.
If Includes video RealTracks is checked, a video is available for the RealTrack. This is set by PG Music.
SuperPatch to use (tgs file) allows you to load a custom synth with the MIDI SuperTrack.
Use the [Choose Plugin] button to make your selection and [Clear] to remove the selection.
10 easy steps to make a Soloist
- Bring up the Soloist window by pressing the [Soloist] Button.
- Select a blank spot in your list of soloists and press the [Edit] button.
- Insert the title of your soloist and any memo note you wish to add. The Num field will be filled in for you. Call this one Bebop Saxophone. The memo might say, “extra legato, straighter 8th notes, on top of the beat.”
- Choose the type of soloist (i.e. swing 8th notes, straight 8th notes, 16th notes, etc.) This should be set to Swing 8ths.
- Press the [Choose] button to select the instrument the soloist should play (i.e. Tenor Saxophone).
- Modify (if required) the phrase length, space length, and outside range parameters.
- Change the Legato Boost to 10 %. This will add 10% to the duration of the notes. Press the [Help] button in the Soloist Editor window if you require additional details.
- Adjust the Lateness by -5. This will play the notes more “on the beat” than other Jazz soloists.
- Adjust the 8th Note Spacing by -5. This will play the 8th notes in a more even feel than other Jazz soloists.
- Press [OK], and you’re done. Then, give the program a few moments to load its “knowledge base” of solo ideas and new parameters, and a few moments more to analyze the chords. Playback will begin automatically as soon as the Soloist has performed the operations mentioned above.
The Melodist Maker
In addition to the Melodists supplied with the program, this module lets you define or edit your own Melodists. You can choose the parameters to control the type of chords, melody and intro to be generated, as well as a number of settings controlling song form, theme continuity, endings type, anticipations, feel, style, harmony, soloist, patch changes and more.
| |
Press the Melodist Maker [Edit] button from the Select Melodist dialog to launch the Melodist Editor. |
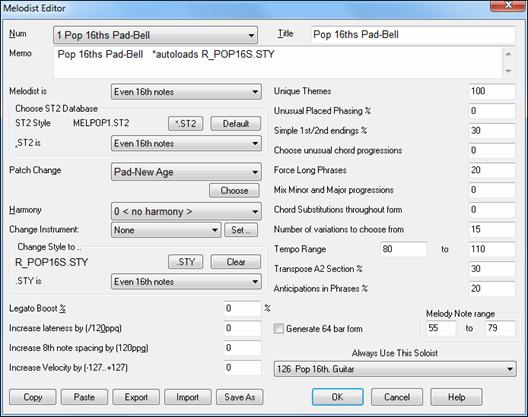
Num The Num selection box allows you to select the Melodist that you’d like to edit.
The top area of the Melodist Maker screen also allows you to set the Title of the Melodist and supply a Memo.
Choose ST2 Database Select the associated ST2 database for the Melodist. Some ST2 Melodist databases are MEL1.ST2=Jazz Swing (8th notes), MELPOP1.ST2 (Pop Ballads, 16th notes), MELWLZ1.ST2 (Waltzes, 8th notes), and MELROK1.ST2 (Rock, 8th notes).
|
The Patch Change area allows you to select an instrument and Harmony, and to set Change Instrument setting for when you would like to change to a new Melody patch (e.g. Each Chorus). |
|
In the Change Style to .. window you can choose a style for the Melodist and specify the feel for the style in the .STY is box. |
|
Legato Boost % changes the legato (length) of the notes generated. Instruments like Saxophone have longer legato phrasing. |


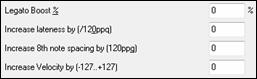
Increase lateness by (/120ppq) refers to how much after the beat the notes are played. This is normally left at zero for Melodists.
Increase 8th note spacing by (/120ppq) is usually left at zero (0). If set to a nonzero value, the 8th notes will be farther apart (based on units of 120 PPQ).
The rest of the settings in the Melodist Maker allow you to select options that control what type of melody will be generated.
Unique Themes This is normally left at 100%. But if you want to force the Melodist to stick with the same theme throughout the song, set this to a lower value (say 80%). It shouldn’t be set much lower than 80. Default = 100.
Unusual Placed Phrasing The Melodist tries to make phrases that are appropriate for the position in the song. For example, the first 2 bars of the melody are appropriate for “opening phrases.” But if you want to experiment with phrases that don’t follow these rules, set the Unusual Placed Phrasing to a value higher than 0%. Default = 0.
Simple 1st and 2nd Endings This setting only applies to Melodists that are using the Jazz Swing (MEL1.ST2) or Waltz (MELWLZ1.ST2) databases. This determines the % of time that endings of the A sections (in AABA forms) will be simple endings (1 or 2 notes) instead of complete phrases. Usually AABA tunes end with simple phrases at the end of the A section, so this option is normally left at 80% or higher. Default = 80%.
Choose Unusual Chord Progressions If set to a value other than zero, the Melodist will generate atypical chord progressions. For example, instead of a Dm7 | G7 | Cmaj7, the Melodist might generate Dm7 | Db7 | Cmaj7 Am7. Default = 0.
Force Long Phrases This determines the % of time that the Melodist will try to generate long phrases (4 bars or more). The downside to setting it higher than 20 will be a loss of uniqueness in the phrases generated. The setting shouldn’t be set much higher than 20. Default = 20.
Mix Minor and Major Chord Progressions Typical major key chord progressions have progressions like (in the key of C) Dm7 | G7 | Cmaj7, whereas in the key of Am, they would be |Bm7b5| E7 |Am6. This setting determines how much the two types of progressions should be mixed in a single song. Default = 0.
Chord Substitutions Throughout the Form Normally an AABA song has identical chords for each A section. If this setting is greater than zero, the Melodist will generate chord substitutions throughout the various A sections, while preserving the identical melodies! Default = 0.
Number of Variations to Choose From As the Melodist is determining what type of phrase to generate, it will narrow the possibilities to the number of variations set in this variable. Setting a higher number results in more interesting melodies, but the chord progressions are more unusual. Default = 15.
Tempo Range / Auto Tempo The Tempo Range setting determines the tempo range that the tune will be created with (it will be a random tempo in the range). The Auto Tempo setting must be set on the Melodist Selection screen for the tempo range to work. Default from 110 to 180 bpm.
Transpose A2 Section In songs with an AABA form, it is common for the second “A” section to be transposed. For example, the first “A” section might be in the key of Eb, and the second would be transposed up to the key of Gb. Melodists store these settings, and some Melodists are set to transpose the A2 sections. This setting determines the % chance that the song will be generated with a transpose. The transpose will be usually 2, 3, or 4 semitones. The song will only get transposed if the A2 transpose setting isn’t set to “none” on the Melodist selection screen. Default = 30.
Anticipations in Phrases Melodic phrases often begin a little before the beat. This is referred to as anticipation. This setting determines what % of the phrases will be anticipated. Default = 20.
Always Use this Soloist
Since Melodists can also generate Solos, a specific Soloist can be set in this setting. If set to “0 - no Soloist” the program will intelligently make a selection from all of the Soloists in the list.
![]()
![]() Melodists can be copied and pasted to make new Melodists that are variations of each other.
Melodists can be copied and pasted to make new Melodists that are variations of each other.
![]()
![]() You can export (save) and import (load) individual as Melodists.M1 files. This would be useful if you wanted to send a Melodist to a friend, for example.
You can export (save) and import (load) individual as Melodists.M1 files. This would be useful if you wanted to send a Melodist to a friend, for example.
![]() The entire Melodist file, with up to 256 Melodists, can be saved to a .MEL file. The usual file is DEFAULT.MEL.
The entire Melodist file, with up to 256 Melodists, can be saved to a .MEL file. The usual file is DEFAULT.MEL.
The DEFAULT.MEL file is saved every time the [OK] button is pressed, so you don’t need to explicitly save this file by the [Save As] button unless you want to save alternate .MEL files and go beyond 256 Melodists.
The Guitarist Maker
Band-in-a-Box will intelligently arrange any melody to a guitar chord solo by inserting real guitar voicings throughout the piece. There are many preloaded Guitarists to choose from, or you can customize existing Guitarists’ settings or make your own Guitarists from scratch in the Guitarist Maker.
| |
The Guitarist Maker is accessed from the Guitarist window. Click on the [Ch Sol…] button to open the Generate Guitar Chord Solo dialog, and then press the Guitarist Maker [Edit…] button to launch the Guitarist Editor. |

Num: Select the Guitarist from this field.
Title: Title the Guitarist.
Memo: This field allows a 100-character memo about the Guitarist.
Guitar Patch: Select the guitar patch in this field.
Frets To Move: If set to zero, the guitar chord solo will be limited to chords that can be played within the current position. If set to 5 (for example), the chords will be limited to chords that can be played within the current position and up to 5 frets away from the current position.
Force Open Position: This option forces all of the guitar voicings to the open position. The exception is when the Melody notes are so high that they can’t be played using open position voicings. If the Melody is in a high range, and you want a “forced open position” you should likely transpose the Melody to a lower octave prior to generating the solo.
Note Duration thresholds: The settings for Note Duration thresholds to get a chord refer to how long a note must be before a chord will be generated. (Quarter note = 120 ticks)

Looking at the settings above these would be interpreted as follows:
- If a note occurs and it is the “First Note of a New Chord” and the note is not followed by another note for at least 50 ticks (120 ticks = 1 quarter note), then a chord will get voiced 90% of the time.
- If a note occurs (not the first note of a chord), that is on “Beat 1 of a bar,” and the note is not followed by another note for at least 50 ticks (120 ticks = 1 quarter note) then a chord will get voiced 90% of the time.
- Similar interpretations for notes occurring on “Beat 2, 3 and 4.” You can see that the threshold is higher for notes on beat 2 and 4, which is how a guitar player makes chord solos.
- “Passing notes” are defined as short duration notes that aren’t on the beat and are followed by a note that is on the beat. In this example, passing notes will never be voiced as chords since the tick threshold is set to zero.
Time Threshold to get a chord

A further threshold is applied to the possibility that a note is voiced to a chord. These are defined as durations in milliseconds. In the settings shown, if the note occurs less than 100ms (Time to Previous Note) after the previous note, the note will not be voiced as a chord. If the note is followed by another note within 80ms (Time to the next note), the note will not be voiced as a chord.
Strumming Settings: If the Guitar Chord is all played at the same time, it will sound as if it was plucked. Guitar playing is more typically a strum.
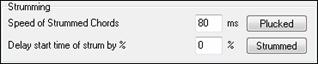
Speed of the Strummed Chords: If the setting is 80ms, then the guitar chord will be “strummed” over a period of 80milliseconds.
Delay start time of strum by %: If the Delay start time is left at zero, the strum will end at the original time of the melody note. If you set it to 50% delay, the strum will be in its midpoint at the original start time of the Melody note, while if it’s set to 100%, the strum won’t start till the time of the original note. The most musical setting is about 50% delay. A delay of 0% also sounds good and has the added advantage that it doesn’t shift the actual time of the Melody note (relevant if you keep regenerating the solo on the Melody track).
Plucked / Strummed: Pressing these buttons will set the settings to preset values.
Chord Types to Include: You can decide which types of chords should be included in the chord solo.
 |
Best Chords: The most commonly played chords by pro guitarists. |
Include Chords with this # of Notes
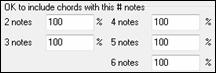 |
You can select the # of notes for chords to be included in the chord solo. In the example above, chords with 2-6 notes will be included. |
Embellish Chords

Embellish how often: Allows you to specify the frequency of embellishment.
Embellishment types: Allows setting of the types of embellishments to do.
- Pop Guitarists should be set to use 9ths only. This will change C7 chords to C9 and Cm7 to Cm9.
- The “7ths/9ths” setting should be used for Jazz. This adds the embellishments of C to Cmaj7 and Cm to Cm7.
- The “7/9/11/13” embellishment should be used for “Advanced Jazz” Guitarists add 11ths and 13ths voicings.
![]()
![]()
![]()
![]() Individual Guitarists can be copied, pasted, exported, or imported to/from disk.
Individual Guitarists can be copied, pasted, exported, or imported to/from disk.
![]() The Guitarists are saved in the DEFAULT.GIT file, but if you want to save them in another file, press the [Save As] button.
The Guitarists are saved in the DEFAULT.GIT file, but if you want to save them in another file, press the [Save As] button.
![]() Pressing the [OK] button will update the DEFAULT.GIT file with the current settings.
Pressing the [OK] button will update the DEFAULT.GIT file with the current settings.
Unconditional 30-Day Money Back Guarantee on all PG Music products purchased from PG Music Inc.
PG Music Inc.
29 Cadillac Ave Victoria BC Canada V8Z 1T3
Sales: 800-268-6272, 250-475-2874,+ 800-4746-8742*
* Outside USA & Canada where International Freephone service is available.
Access Codes
Tech Support: Live Chat, support@pgmusic.com
 Online now
Need Help?
Customer Sales & Support
|
Phones (Pacific Time) 1-800-268-6272 1-250-475-2874 |
||
| Live Chat | ||
| OPEN | Online Ordering 24/7 |
|
| OPEN | Forums, email, web support |