
Search Manual
Band-in-a-Box® 2018 for Windows® User's Guide
Chapter 5: Playing Songs
Opening Files
Band-in-a-Box supports most popular song formats in addition to its own native song files. It will open most audio file formats, and its powerful Audio Chord Wizard feature will interpret the chords from an audio file and write them to a Band-in-a-Box song file. You can also play karaoke files, including Karaoke MP3/CDG files with scrolling graphical lyrics, in Band-in-a-Box.
You can quick-load a song by typing only. In chord entry mode type the word “Song” followed by a file name, or partial file name, and the song will get loaded in. For example, type C:\a\MySong.sgu to load in that exact song name. Type “bossa” to load in the first song with bossa in the name AFTER the current song name, in the current folder.
You can load a song from the [Open] or [Song] button on the toolbar.
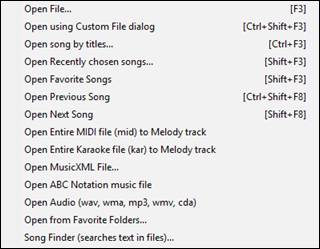
The [Open] button opens a menu of commands for opening files by various methods. |
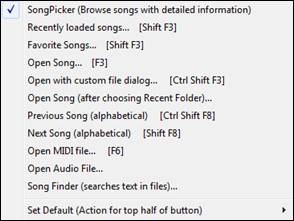
The [Song] button is a split button. Clicking on the top half opens a song selection dialog using the default method assigned to the button. Clicking on the bottom half of the button opens a menu of the options for opening songs. |
|
The default method for the top half of the button is assigned from this menu. For example, if there is a check mark beside “SongPicker,”clicking on the top half of the button will launch the SongPicker dialog. If “Recently loaded songs” is checked, clicking the button will go directly to the Recently Played Songs list, and so on. |
Open File
The Open File dialog is opened with the menu command Open File or the F3 function key.
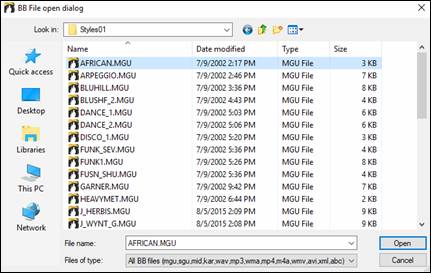
It shows and opens all available file types.
![]()
If MySong.MGU is loaded, and a same named audio file (MySong.WMA, MySong.MP3, MySong.WAV, etc.) is present, Band-in-a-Box will open the audio file to the audio track. This allows third parties to make audio files with chords in them, by making a MySong.MGU and MySong.MP3 pair of files, which will load into Band-in-a-Box, yet will have the audio compressed to take up little disk space. For example, make a teaching set of trombone files for Band-in-a-Box, with audio trombone track, and Band-in-a-Box file with chords, all fitting in a small file size.
Open Using Custom File dialog
This menu command, or the keystroke combination Ctrl+Shift+F3, launches the custom Open File dialog to load a song. You can make it the default dialog if you go to Options | Preferences and select “Use custom filename dialog” under the Environment Options in the Preferences dialog. Then pressing the [Song] button and choosing the menu command Open File, or the F3 key, will launch the custom Open File dialog. The custom Open File dialog has several advantages over the traditional Windows® dialogs:
- The window is much bigger than the traditional one, allowing more room.
- There is a selectable font size and typeface.
- You can adjust the widths of the various columns.
- The window remembers your settings.
- There are tabs at the top that allow sorting by name, date etc.
- Additional information is displayed (file size, time of file).
- You can open a song without typing the extension. For example, to open the song MySong.MGU you just have to type MySong, without MGU.

![]() The Font Selection button lets you pick a font, size, and
The Font Selection button lets you pick a font, size, and
![]() The Search button allows you to search for a file by its name or part of a name.
The Search button allows you to search for a file by its name or part of a name.
![]() The Favorite Folders button remembers the last few directories that you’ve used, allowing you to easily change between directories.
The Favorite Folders button remembers the last few directories that you’ve used, allowing you to easily change between directories.
Open Song by Titles (SongPicker)
The SongPicker lists all of the songs in the current directory and, optionally, its subdirectories. You can lock the SongPicker to always open in the same folder and use the same list to keep track of all songs on your disk.
The first time you open the SongPicker, Band-in-a-Box automatically writes the song list. The current folder name is displayed in the title bar, with the total # of songs displayed.
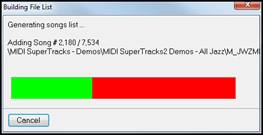 |
Song List generation has a [Cancel] button so that it can be interrupted. |
Once the list is built, songs can be selected by title from the alphabetical list.

You can change the width of any of the columns by dragging the boundary. This customization will be remembered between sessions.
Songs can also be sorted by any of the column headings, by clicking the mouse on the heading at the top of the column. Either a plus (+) or minus (-) sign will appear beside the selected column heading.
![]() A plus sign indicates that the column is sorted in ascending order; a minus sign indicates that it is sorted in descending order.
A plus sign indicates that the column is sorted in ascending order; a minus sign indicates that it is sorted in descending order.
As you move your mouse over the column headings, a fly-by hint at the left of the screen gives information about each column.

![]() The “minus sign” column heading is for missing styles or style elements. This could be a style that is not included in your version, or that you haven’t purchased yet. A letter “d” in this column indicates a missing RealDrums set, and a letter “t’ means that a RealTracks set is missing. If you have a fully installed UltraPlusPAK or EverythingPAK this column is normally blank.
The “minus sign” column heading is for missing styles or style elements. This could be a style that is not included in your version, or that you haven’t purchased yet. A letter “d” in this column indicates a missing RealDrums set, and a letter “t’ means that a RealTracks set is missing. If you have a fully installed UltraPlusPAK or EverythingPAK this column is normally blank.
![]() A letter “M” in this column shows that the song has a Melody track present. A blank column means that the Melody track is empty.
A letter “M” in this column shows that the song has a Melody track present. A blank column means that the Melody track is empty.
![]() A letter “S” in this column shows that a Soloist is present. If the column is blank the Soloist track is empty.
A letter “S” in this column shows that a Soloist is present. If the column is blank the Soloist track is empty.
![]() This is the column for line-based lyrics, i.e., lyrics that display in a line above the notation. A letter “L” shows that the song has line-based lyrics.
This is the column for line-based lyrics, i.e., lyrics that display in a line above the notation. A letter “L” shows that the song has line-based lyrics.
![]() This column shows if note-based lyrics are present. A letter “N” means that the song has note-based lyrics; lyrics where each syllable is aligned with the corresponding note in the melody.
This column shows if note-based lyrics are present. A letter “N” means that the song has note-based lyrics; lyrics where each syllable is aligned with the corresponding note in the melody.
![]() The number shown is the numerator of the time signature, so a “4” means the song is in 4/4 time and a “3” means it is in 3/4 time.
The number shown is the numerator of the time signature, so a “4” means the song is in 4/4 time and a “3” means it is in 3/4 time.
Filter
Use the filter to search by column, song title, file name, or style.
![]()
Folder Settings
The folder settings are at the bottom of the SongPicker window.
![]()
![]() The current folder name is displayed.
The current folder name is displayed.
![]() If checked, the selected song is automatically played as soon as you press [OK].
If checked, the selected song is automatically played as soon as you press [OK].
The folder can be changed, either by:
 Selecting the new folder.
 Choosing a folder from recently used favorites folder.
 Changing the current folder to the BB home folder.
 Going “up” a folder (e.g. from C:\bb\Demos to C:\bb).
When the new folder is chosen, the song list for that folder will be displayed. The song list may need to be rebuilt; the program will do that automatically.
![]() If the “Always open in this folder” item is selected, the SongPicker will always open in the specified folder. So, if you put all of your songs in C:\songs, you can make the SongPicker always open to the C:\Songs folder.
If the “Always open in this folder” item is selected, the SongPicker will always open in the specified folder. So, if you put all of your songs in C:\songs, you can make the SongPicker always open to the C:\Songs folder.
![]() If “Include Subfolders” is selected, the SongPicker list will contain songs from the folder and any subfolders. So, if you have subfolders to C:\songs like C:\songs\country and C:\songs\jazz, you can see/search them all in the same SongPicker dialog.
If “Include Subfolders” is selected, the SongPicker list will contain songs from the folder and any subfolders. So, if you have subfolders to C:\songs like C:\songs\country and C:\songs\jazz, you can see/search them all in the same SongPicker dialog.
![]() Choose a song from the Favorite Songs dialog.
Choose a song from the Favorite Songs dialog.
![]() Open a song (or any media type) using the Open File dialog.
Open a song (or any media type) using the Open File dialog.
![]() Find a song using the Find song files dialog.
Find a song using the Find song files dialog.
![]() Copy the song list to the Windows® clipboard where it can be pasted into any word processing program and printed.
Copy the song list to the Windows® clipboard where it can be pasted into any word processing program and printed.
![]() Search for song by keyword will find the search term if it is present in any field. The filter (upper right) can also be used to search the song list.
Search for song by keyword will find the search term if it is present in any field. The filter (upper right) can also be used to search the song list.
![]() This is the Search Again button. It repeats the previous search starting from the current point.
This is the Search Again button. It repeats the previous search starting from the current point.
![]() This will exit the dialog and build or rebuild the song list file by loading in all of the songs in the directory. It will then launch the SongPicker dialog with the updated information.
This will exit the dialog and build or rebuild the song list file by loading in all of the songs in the directory. It will then launch the SongPicker dialog with the updated information.
![]() This will export the list as a Comma Separated Value text file that can be opened by spreadsheets.
This will export the list as a Comma Separated Value text file that can be opened by spreadsheets.
![]() Click here to change the fonts in the SongPicker dialog
Click here to change the fonts in the SongPicker dialog
Open Recently Chosen Songs / Open Favorite Songs
There’s a dialog for these favorites with separate lists of Recently Played and Favorite songs. There are 2 radio buttons in this dialog, showing both recently used songs and a list of “favorites” that you select. Use the menu commands or the keystrokes Shift+F3 to open the lists.
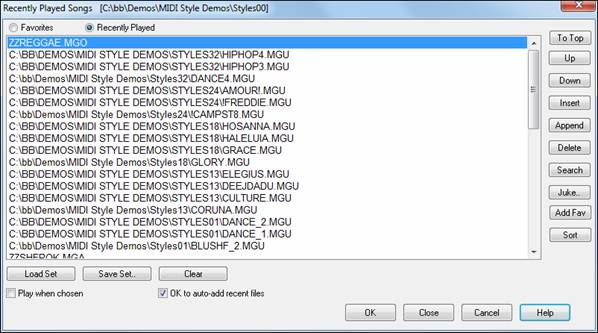
![]() The “Favorites” and “Recently Played” Radio buttons toggle between a list of your recently played songs and your favorite songs.
The “Favorites” and “Recently Played” Radio buttons toggle between a list of your recently played songs and your favorite songs.
When “Save As” is used to save a song with a different name, the new name will be added to the Recently Played song dialog.
![]()
![]()
![]() Use these buttons to navigate up and down the list or to jump to the top of the list.
Use these buttons to navigate up and down the list or to jump to the top of the list.
![]() This button allows you to search a file by a keyword.
This button allows you to search a file by a keyword.
![]() The lists can be edited, sorted, saved/loaded, and used with the jukebox. You can add an unlimited number of favorites.
The lists can be edited, sorted, saved/loaded, and used with the jukebox. You can add an unlimited number of favorites.
![]() The list will start off as an empty one. But you can add songs as your favorites, by clicking the [Add Fav] button (this button is also found in the StylePicker).
The list will start off as an empty one. But you can add songs as your favorites, by clicking the [Add Fav] button (this button is also found in the StylePicker).
![]() The [Sort] button sorts the list alphabetically.
The [Sort] button sorts the list alphabetically.
![]()
![]() You can save and load sets of favorites or recently played songs (or styles). Once you have the set, you can press the [Juke...] button. This will play the set file in order, not randomly. It will start from the currently selected song.
You can save and load sets of favorites or recently played songs (or styles). Once you have the set, you can press the [Juke...] button. This will play the set file in order, not randomly. It will start from the currently selected song.
![]() You can make a new list of songs for a set by using the [Clear] button to clear the Favorites list, followed by the [Append], [Insert], and [Delete] buttons to add songs.
You can make a new list of songs for a set by using the [Clear] button to clear the Favorites list, followed by the [Append], [Insert], and [Delete] buttons to add songs.
![]() If this is enabled, when you press the [OK] button the song will play automatically.
If this is enabled, when you press the [OK] button the song will play automatically.
![]() If this is enabled, every song you load will be added to the top of the Favorites list.
If this is enabled, every song you load will be added to the top of the Favorites list.
Open Next Song
This command opens the next song in alphabetical order in the currently active folder.
Open Previous Song
This command opens the previous song in alphabetical order in the current folder.
Open Entire MIDI File (mid) to Melody Track
This command launches the Open File dialog showing a list of available MIDI files in the current folder and opens the file selected to the Melody track.
Open Entire Karaoke File (kar) to Melody Track
This command launches the Open File dialog showing a list of available Karaoke files in the current folder and opens the selected file to the Melody track.
Open MusicXML File
Band-in-a-Box supports MusicXML so you can easily import MusicXML files including notes, chords, lyrics, guitar tab, bends, hammer-ons, pull-offs, and slides, from your notation programs such as Finale, Sibelius, and Guitar Pro to Band-in-a-Box.
When you select this menu command and select a MusicXML file, the Load XML File dialog will open.
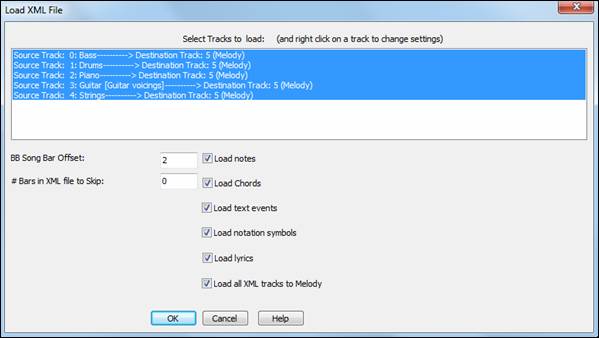
First, select a track that you want to load. To select multiple tracks, hold down the CTRL key and click a track.
If you want to change the destination track, right-click on a track and select Destination Track.

|
Select elements that you want to load from the XML file. If you do not want all the tracks to be merged into the Melody track, disable the “Load all XML tracks to Melody” option.
Press [OK], and the XML file will be loaded to Band-in-a-Box. |
Open ABC Notation File
ABC notation is the simple text-based notation system used by musicians worldwide to store chords, melody, and lyrics of songs. You can find out more information about the songs and ABC notation at abcnotation.com.
Open Audio File
This command launches the Open File dialog with a list of audio files of all supported types (.WAV, .WMA, .MP3, .MP4, .M4A, .WMV audio, and audio CD) found in the current folder.
Open from Favorite Folders
The menu command File | Open Special | Favorite Folders launches the Favorite Folders dialog with a list of recently used folders. To open a song using this dialog you first select the folder from the list, and then you can directly open the song from that folder. This allows you to quickly find a song in another folder.
Song Finder
This launches the Find song files dialog that allows you to find a Band-in-a-Box song (or any file that Band-in-a-Box can open). This dialog also opens from the menu File | Open Special | Find File.
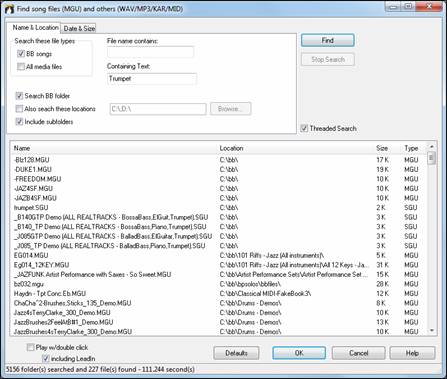
You can define your search by the name and location of the file, or by the date and size.
Name & Location - This includes filtering by words found in the file name or any text in the file. For example, you can
- get a listing of all Band-in-a-Box songs on your PC with the word “Blues” in the title.
- get a listing of all Band-in-a-Box songs in the BB folder with the word “Reggae” in them.
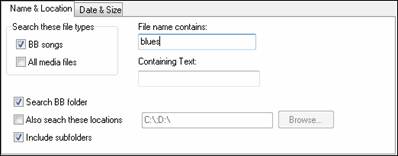
Date & Size - Use this window to search in a particular range of dates or times. This can be useful if you have multiple versions of a file from different dates and sessions.

File Associations
Go to the menu item File | File Utilities to associate the file types for Band-in-a-Box songs and styles in Windows®. Once set, this means that you can double-click on a song or style and Band-in-a-Box will open with that song or style.
Choose the menu items File | File Utilities | Associate File types (songs, styles) with Windows… to associate the Band-in-a-Box file types, and Remove File Associations (songs, styles) with Windows… to remove the associations.
Global Song Overrides
These overrides let you ignore settings that were saved in song files.
|
The global overrides are found in Preferences [Overrides], and they allow you to set the overall song looping (always OFF, always ON, or as set in the song). |
Similar overrides are available to see which other information gets loaded from a file, such as patches, harmonies, volume, reverb, chorus, panning, and bank changes. For example, you can set every song to load with looping ON, and don’t load any reverb settings from songs.
Overall Looping of song

For example, if you want every song loaded to have looping set to on, then set the Overall Looping of song option to “Always set loop to ON.” But if you are going out on a playing job, and don’t want any songs to loop, then set it to “Always set loop to OFF.” If you want the settings to work the same way they did in previous versions, choose “As set in the song” or press the [Defaults] button.
 |
Allow Songs to load settings for Convert line-based lyrics to bar-based lyrics OK to Load Notation Symbols with songs |
The options under Defaults for new songs are settings from the Song Settings dialog.
When Vary Style in Middle Choruses is selected (default), the song will play in substyle B throughout the middle choruses, playing substyle A for the first and last choruses only. If this setting is not selected, then the substyle changes will follow the part markers entered on the Chord Sheet.
When Force to Simple Arrangement is selected, the song plays a simpler (less busy or embellished) arrangement.
The [Pop/Country] preset button turns both of these settings off for a typical Pop or County arrangement that follows part markers and does not embellish chords.
The [Jazz] preset button turns both of these settings on for a typical Jazz arrangement to support soloing over the middle choruses and allow Jazz chord embellishments.
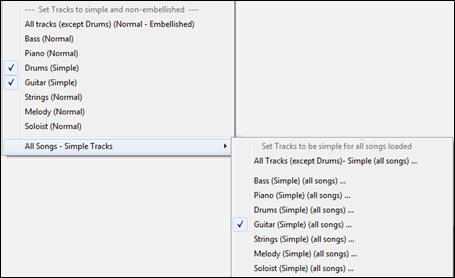
Use the options under Force Tracks to Simple Arrangements for All Songs to set individual tracks or all tracks to simple arrangements for all songs. If you want to force simple arrangements on a song-by-song basis, use the [Simple] button on the toolbar.
Changing the Style
|
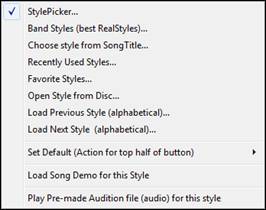
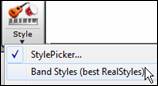
The [Style] button is a split button. Clicking on the top half opens a style selection dialog using the default method assigned to the button. Clicking on the bottom half of the button opens a menu of the options for selecting styles. |
|
The default method for the top half of the button is assigned from this menu. For example, if there is a check mark beside “StylePicker,” clicking on the top half of the button will launch the StylePicker dialog. “Band Styles” opens a list of style categories. If “Recently Used Styles” is checked, clicking the button will go directly to the Recently Played Styles list, and so on. |
The StylePicker
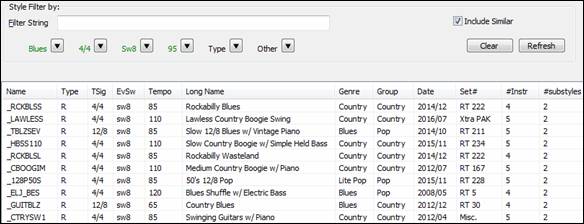
The StylePicker window lists all styles with full information. It has a great filter feature for finding a perfect style for your song by selecting elements such as time signature, feel, or tempo, or by simply typing in a familiar song title.
You can browse styles by sorting columns or hear an “instant” preview of the style by double-clicking on the list. If style has both MIDI and RealDrums available, you can hear both, and choose which one you want. This makes it much faster to find the style that fits your song.

Quick Filter
Type a text and/or press the arrow button to select a category, time signature, feel, etc., and you will immediately see the filtered list. If “Include Similar” is unchecked, then the filtered list will show the exact match only, but if this option is checked, then the list will show the exact match and the similar styles.

Style suggestion
Just type in a familiar song title, artist name, or genre of music, and the StylePicker will filter the list by the genre, feel, tempo, and time signature of that song title.
Type in a text, click on a song to select it, and press [Enter]. Then, the list will be filtered to show styles that match the elements of the song. You can see what filters are in place when you look at the “Style Filter by:” area. If you enable the “Include Similar” option, the filtered list will include similar styles, but if you want to see only the exact match, then uncheck this option.

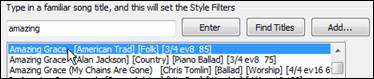
Song Titles Browser
The Song Titles Browser window allows you to browse and filter the huge list of over 10,000 popular song titles. You can, for example, filter by a certain artist, and then sort all the songs by tempo, key, feel, time signature, and more.
You can open this window with the [Find Titles] button. |

![]() Once you have found a song, press the [OK - Find Matching Styles] button. This will take you to the StylePicker window with styles that best match the tempo, feel, and genre of the selected song title.
Once you have found a song, press the [OK - Find Matching Styles] button. This will take you to the StylePicker window with styles that best match the tempo, feel, and genre of the selected song title.
Instant Preview of Styles
You can audition a style without changing your existing arrangement, by using the preview control.
![]()
It has Play and Stop buttons, a progress bar, a Loop button and a file button.
![]() Also, when the control is playing, if there are 2 files that can be played, there is a toggle button displayed. This appears for previewing MIDI styles, because there are MIDI drums and RealDrums available for most MIDI styles, and now you can easily hear both.
Also, when the control is playing, if there are 2 files that can be played, there is a toggle button displayed. This appears for previewing MIDI styles, because there are MIDI drums and RealDrums available for most MIDI styles, and now you can easily hear both.
![]() To hear a preview, simply double-click on a style name in the list. Or highlight a style and press the Play button.
To hear a preview, simply double-click on a style name in the list. Or highlight a style and press the Play button.
The demos are pre-made, so they play instantly. And they are a good idea of what the style is supposed to sound like.
The style demos are found in 2 possible places:
1. On your hard drive, in the Data\Style Demos Audio folder of your RealTracks folder, usually C:\bb\RealTracks\Data\Style Demos Audio(some of the demos are included on disk, but to save space not all of them are included).
2. On the Internet, at www.pgmusic.com (all of the demos are there).
When you demo a style, the program will play the version on disk if available; otherwise will play from the Internet.
![]() The style demos sometimes play files from the internet. You can download a file that is being played from the internet by clicking this button. If the file is being played on your hard drive, this button will show the file in a folder.
The style demos sometimes play files from the internet. You can download a file that is being played from the internet by clicking this button. If the file is being played on your hard drive, this button will show the file in a folder.
![]() This button allows you to control the volume of demos.
This button allows you to control the volume of demos.
Play Your Song with the Styles
You can also audition a style by actually playing it over the current chord progression of your song.
![]()
Pressing the [Play] button will generate arrangement for your song with the currently highlighted style. You can speed up the generation if you enable the “4 bar Preview” option, which will play only for the first 4 bars.
RealStyles and Styles with RealTracks
RealStyles are Band-in-a-Box styles that use RealTracks only. The style names for RealStyles are prefaced by an underscore, _.
![]()
![]()
![]()
Band Styles
|
When you select this menu item, you will see a directory of style types, with submenus sorted into the listed categories. |
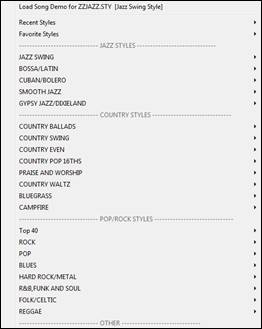
For example, in the Jazz section you will see styles for Jazz Swing, Bossa/Latin, Cuban/Bolero, Smooth Jazz, and Gypsy Jazz/Dixieland. Each heading opens a list of selected RealStyles, sorted by tempo and type.

![]() You can also load in a song demo by choosing the menu item.
You can also load in a song demo by choosing the menu item.
This list of styles can be customized by the user. You can create a text file of styles to add to the top and/or bottom of the list (i.e. above or below the list of styles provided by PG Music). To customize this list at the top, create a file called C:\bb\Data\RealCombos_User_Top.txt, to customize this list at the bottom create a file called C:\bb\Data\RealCombos_User_Bottom.txt.
The format of the file is identical to the one that PG Music includes, which is called C:\bb\Data\RealCombos.txt. You can list a line of text (for a heading) e.g.
---- My Favorite Country Styles ----
or a line with a style on it e.g.
_JAZFRED$ Jazz Style with 4 in the bar Guitar
On this line, the $ character is a delimiter between the style name and the description.
Press the [Video Help] toolbar button for a tutorial on editing the Band styles list. |
Playing/Pausing/Stopping Songs
|
This will replay the song without regenerating the tracks, unless regeneration is required. The current arrangement is preserved. (Freeze the song or save to a MIDI file to permanently save the arrangement.) |
|
This will create a new arrangement and plays the song. If you don’t want your tracks regenerated use [Play]. |
|
Click this button for a menu of looping selections. You can play the highlighted section of the Chord Sheet or Notation window in an endless loop. Click and drag the mouse to highlight a section of bars to loop. If the checkbox is selected, the entire song will loop. |
|
This will play the song starting at the selected chorus and bar number. Use it to jump to any bar in the song. You can also start playback from any bar by right-clicking on the bar and selecting the Play from Bar menu item. |
|
This will stop song playback. |
|
This will pause playback with the [Pause/Continue] button; resume from the same location by pressing it again. |
You can also use the Play menu commands or keystrokes.
You can double-click on any bar on the Chord Sheet or Notation window to start playback at that location.
![]()
There is also an option in the Preferences dialog to start and stop playback with the spacebar. The spacebar or double-click can be used on an ending bar (or a bar in the tag), and it will play from the ending (or tag).
You can also right-click on the Chord Sheet or the Notation window to start playing. |
|

Options for Simpler Arrangements
The [Simple] button on the toolbar allows you to set individual tracks or all tracks to unembellished arrangements. The simple arrangement option can be set on a song-by-song basis or for all songs.
If you set the Drums track to be simple, then the Drum track will avoid fills or post fills (cymbal crashes). You can also set a Drums track to be simple in a style. UserTracks will also follow this setting for Drums and play a simpler arrangement without fills if you set the Drums track to Simple.
|
Lead-In Counts and Metronome
|
These settings are made in the Preferences dialog. Click on the [Count-in/Met.] button to open the Count-in and Metronome Options dialog. |

The default count-in is two bars, but there is an option to shorten it to a 1 bar lead-in.
You can select any drum instrument for the count-in and choose different count-in rhythms (e.g. Tap on 2 and 4 instead of 1-2-3-4).
The Smart Lead-in feature avoids playing the count-in drum sound during a Melody pickup.
There’s an option to play the drum count-in in all circumstances, useful when the style doesn’t have drums or for drummers who play along with Band-in-a-Box by muting the drum track.
|
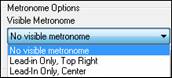
You can display the Visible Metronome on-screen during the entire song (or just the lead-in). Choose the screen position, the size (up to near full screen size), and the visual metronome pattern. The on-screen metronome is a great way for a student to learn to keep on the beat, and with a settable size, students can view this from across the room. |
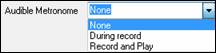
The Audible Metronome can be set to sound “During record,” during “Record and Play,” or “None” - turned off entirely.
Part Settings for Playback
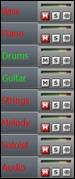
The individual instrument parts are controlled with the Mixer.
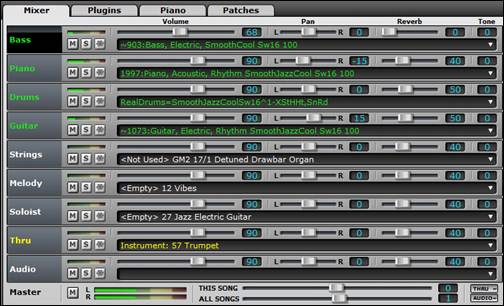
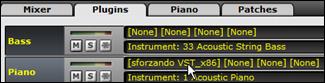
![]() Each track in the Mixer shows the name of the instrument assigned to it.
Each track in the Mixer shows the name of the instrument assigned to it.
![]() Yellow text indicates a MIDI instrument.
Yellow text indicates a MIDI instrument.
![]() Green text indicates RealTracks or RealDrums.
Green text indicates RealTracks or RealDrums.
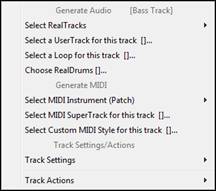 |
Right-click or double-click on a part name for a menu of settings and actions for the selected part. The menu is organized into groups allowing easier selection of track types: audio (RealTracks, UserTracks, Loops) or MIDI (MIDI SuperTracks, classic MIDI tracks) and track settings/actions. |
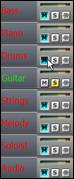
Mute, Solo, and Freeze Tracks
|
Each track has its own VU meter as well as buttons to [M]ute, [S]olo, and [*] Freeze the track. |
Muting a Track
![]() Click on the Mute button to silence the selected track. The button will turn red to show it is active.
Click on the Mute button to silence the selected track. The button will turn red to show it is active.
![]() To mute/unmute all parts as the song is playing, simply press Alt+ 2 or right-click on the “Master” radio button at the top of the screen and select Mute in the menu.
To mute/unmute all parts as the song is playing, simply press Alt+ 2 or right-click on the “Master” radio button at the top of the screen and select Mute in the menu.
Solo a Track
![]() While listening to Band-in-a-Box, you can solo (isolate) a certain part by clicking on the Solo button.
While listening to Band-in-a-Box, you can solo (isolate) a certain part by clicking on the Solo button.
Or you could hold the Ctrl key and mouse click (left or right) on the track button at the top of the screen. For example, if you want to hear only the Piano track, Ctrl+click on the Piano track button. If you want to use hot keys for this, you can press Alt+2 (Mute-All) and then Alt+4 (Unmute Piano).
You can change the solo and the mute status of other tracks by right-clicking on a blue mute button.
|
→ |
|
For example, if the Guitar track is in the solo status, when you right-click on the blue mute button on the Drums track, the Drums track will be un-muted AND the Guitar track will be un-soloed. |
Freeze a Track
![]() Any track can be frozen (MIDI or RealTracks). When frozen, it won’t get changed or re- generated. This saves time when replaying previous songs, and lets you freeze an arrangement that you like. The [*] buttons on the Mixer freeze the individual tracks.
Any track can be frozen (MIDI or RealTracks). When frozen, it won’t get changed or re- generated. This saves time when replaying previous songs, and lets you freeze an arrangement that you like. The [*] buttons on the Mixer freeze the individual tracks.
Use the snowflake button on the toolbar for additional options, which include freezing the whole song. |
Changing Volume, Panning, Reverb, Tone
Each track in the Mixer has its own set of controls including volume, pan, reverb, and tone. Use them to make your own mix for the arrangement.
Volume slider and value: ![]()
Pan slider and value: ![]()
Reverb slider and value: ![]()
Tone settings: -18 (bass) to +18 (treble): ![]()
Hold the Ctrl key down as you click on the track slider or drag the thumb of the slider. This will force all tracks to move to the same absolute location as the original track. Hold the Shift key and it will move all tracks relative to the move of the original track.
Double-clicking on the slider sets the value to a default value.
There is also a Master section with a Mute button, VU meters, and Master Volume controls.
![]()
Master Mute: ![]()
VU Meters (stereo): ![]()
Master Volume (this song) And Master Volume (all songs):
![]()
The Master Volume is a new type of volume setting for Band-in-a-Box, and is a true Master Volume, in that it applies a decibel (dB) boost to the master signal, independent of the tracks volumes. So for example, if you want all Band-in-a-Box songs to be louder, you can simply set the “All Songs” Master volume slider (e.g. +6 dB) and this boost will apply to audio output from all instruments (MIDI and audio) for all songs.
Slide Tracks
This is a menu command (Edit | Slide Tracks…) that allows you to move any of the Bass, Drums, Piano, Guitar, Strings, Melody, or Soloist tracks ahead or behind by a definable amount. For example, slide the Bass track a little ahead of the rest of the band to make the bass player “drive the band.”
To slide tracks, select the Slide Tracks option from the Editmenu. The values are measured in “ticks-per-beat” with 120 ticks being the equivalent of a quarter note. The musically useful range is from -10 to 10.

Allow Any Slides: If you want the slides to occur, then set this to YES.
Humanize Slides:If set to YES, the slides will be humanized to slide the track a different amount for each note. The amount varies from 0 ticks (none) to the slide setting for the instrument.
Press the [Default] button to fill the tracks with default slide values.
Press the [Zeros] button to “zero-out” the slide values for all tracks.
Press the [Update] button to affect your changes and hear the result instantly.
Play Selected Area as a Loop
Shift-click on the [Play] button or press F10 (Play Selected Area as Loop), and the program will play a selected region and loop the selection. For example, you can select bars 10 and 11 and then press F10, and bars 10 and 11 will play looped.
To use this function, select a region on the Chord Sheet.

Choose Play | Play & Loop Highlighted Section (or press F10). The selected region will then play and continues looping until STOP is pressed.
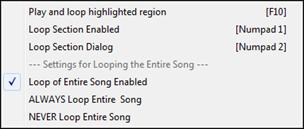
Loop Button Menu
The [Loop] toolbar button opens a menu with the full list of looping options.
Click on the looping option you want, either the entire song or just a section that you select. Selecting the checkbox on the button enables looping for the entire song. The Loop Section Settings dialog lets you choose exactly what to loop.
|
|
Loop any Section of the song
You can loop any section of the song. The program will then start playback at the first loop point and play the looped section until stopped.
Looping of a section of the song is enabled in the Loop button menu or with the keystroke [NUMPAD 1]
![]()
Select Loop Section Dialog from the Loop menu button to open the Loop Section Settings dialog, or press [NUMPAD 2].
![]()
Looping of a section of the song is enabled in the Loop button menu or with the keystroke [NUMPAD 1].
![]()
Select Loop Section Dialog from the Loop menu button to open the Loop Section Settings dialog, or press [NUMPAD 2].
![]()
The Loop Section Settings dialog will then display.
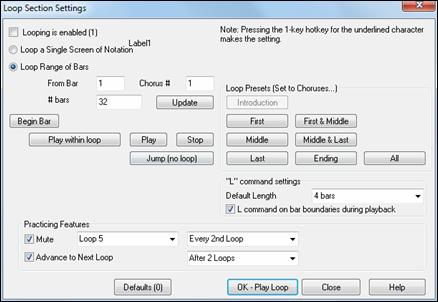
The “Play within loop” command allows you to quickly play a looped section. Highlight the range of bars to loop on the Chord Sheet, press NUMPAD 2 to open the Loop Section Settings dialog, and click the [Play within loop] button.
To enter settings manually in this dialog, you start by choosing either “Loop a Single Screen of Notation” or “Loop Range of Bars.”
“Loop a Single Screen of Notation” (Ctrl+NUMPAD 7) loops a single screen of notation at the current song location. The length of the loop is determined by the number of “Bars/Screen” specified in the Notation Window Options.
Select “Loop Range of Bars” if you want a custom range of bars, then enter the starting “From Bar” number, the “Chorus #,” and the “# bars” for the length of the looped section. You can then play the song with the [Play within loop] button and then [Close] the dialog.
Presets are available to set the loop points to Introduction, First / Middle /Last Choruses or First & Middle, Middle & Last combinations, Ending, or All.
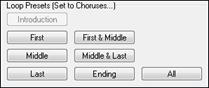 |
As the different buttons are selected you will see the “Loop Range of Bars” settings update. |
Hot keys are also available for these, look in the Play menu under the Looping submenu.
Loop Practicing Feature
![]() Getting the mute to loop every Nth time is helpful to learn a certain phrase. For the loops, you play along with the phrase, and then “you’re on your own” when the phrase gets muted every Nth loop. You can choose the track to mute and how often the track mutes.
Getting the mute to loop every Nth time is helpful to learn a certain phrase. For the loops, you play along with the phrase, and then “you’re on your own” when the phrase gets muted every Nth loop. You can choose the track to mute and how often the track mutes.
![]() The “Advance to next loop every Nth loop” option allows you to practice and learn a whole song, by getting each section repeated a certain number of bars.
The “Advance to next loop every Nth loop” option allows you to practice and learn a whole song, by getting each section repeated a certain number of bars.
Once you have these settings made, you can just start a loop the usual way. For example, highlight a region, press the [Loop] button, and select Play and loop highlighted region (or press [F10]). Or you can type L4 <enter> to start a 4-bar loop.
Loop Keystroke Commands (useful for live performance)
NUMPAD 1 |
Toggle looping on/off. |
NUMPAD 2 |
Open Loop Section Settings dialog. |
Ctrl+NUMPAD 1 |
Play with last chorus looped. |
Ctrl+NUMPAD 2 |
Play with middle choruses looped. |
Ctrl+NUMPAD 3 |
Play with middle and last choruses looped. |
Ctrl+NUMPAD 4 |
Jump to last chorus. |
Ctrl+NUMPAD 5 |
Jump to ending. |
Ctrl+NUMPAD 7 |
Loop Notation screen. |
NUMPAD [DEL] |
Advances the Notation, Lead Sheet, and Guitar windows by one chord (group of notes). |
NUMPAD [INS] |
Backs up the Notation, Lead Sheet, and Guitar windows by one chord. |
Notebook users should set “Simulate NUMPAD Keys” to “ON” in the Preferences dialog, then use the regular number keys to trigger looping.
The Title bar at the top of the main screen indicates the looping status. If a song has a looped section, this will be listed at the top of the screen (e.g. “Will loop Middle Choruses” or “Currently looping Middle Choruses”). So you can tell what is going to happen with the looping during a live performance.
Quick command for Looping
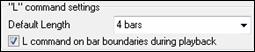
Looping has been enhanced with an “L” command for quickly setting a loop.
For example:
- L Enter will loop at the current point for 4 bars. (The “4” is a selectable value. See below.)
- L 8 Enter will loop for 8 bars.
- L 8, 12 Enter will loop for 8 bars starting at bar 12.
- L 8, 12, 2 Enter will loop for 8 bars starting at bar 12 of chorus 2.
![]()
The “Default Length” option in the Loop Section Settings dialog determines the number of bars looped when you hit L [Enter] keys. For example, if this is set to 4 bars, then L [Enter] will loop 4 bars.
“Conductor”- Live Looping/Playback control
|
As the song is playing, many “single key” hot keys are now available to control the playback and looping of the song. |

Play along with your MIDI Controller Keyboard
If you have an external MIDI keyboard controller connected to your computer system, you can use the MIDI THRU features to play along with the program.
![]() When playing along on a keyboard to the Band-in-a-Box “band,” if the sound of your keyboard is too quiet and increasing the THRU Volume doesn’t help enough, use this option to boost the THRU velocity and make your playing on the THRU channel louder. To set this “THRU velocity boost,” open the MIDI Settings dialog (Options | Preferences | Channels). Click on the [Options] button and set “Boost THRU Velocity by” to a value in the range of –127 to +127 in the MIDI Options dialog. (Default is 0.)
When playing along on a keyboard to the Band-in-a-Box “band,” if the sound of your keyboard is too quiet and increasing the THRU Volume doesn’t help enough, use this option to boost the THRU velocity and make your playing on the THRU channel louder. To set this “THRU velocity boost,” open the MIDI Settings dialog (Options | Preferences | Channels). Click on the [Options] button and set “Boost THRU Velocity by” to a value in the range of –127 to +127 in the MIDI Options dialog. (Default is 0.)
Harmonize your play along part by choosing MIDI Thru Harmony (Alt+F11) from the [Harmony] menu button to choose a harmony, just as you would for the Melody. |
Play Along with the Wizard
The Wizard is an intelligent play along feature that is controlled with the bottom two rows of your computer’s QWERTY keyboard or your connected MIDI keyboard. The bottom row of keys plays chord tones; the second row plays passing tones. You play any key in either row and never make a mistake! The Wizard keys are active during playback.
![]()
To use this feature, press the [MIDI] toolbar button and enter a check for MIDI Keyboard Wizard Enabled.
You can also select the Wizard Playalong feature option from the Play menu.
In the Play menu, toggle Wizard uses “Smart” notes to “off” (unchecked) to have the Wizard provide you access to the chromatic scale. Toggle it “on” to have access only to the notes based on the chord/key of the song.
Also, the Wizard works with the harmony feature, so you can play along live in 4-part saxophone harmony for example. |
Melody Wizard
For songs with melodies, there are QWERTY keys (Enter, \ , T, 6) that trigger notes from the melody as the song is being played. Other keys trigger 1-4 approach notes from below or above. The notes can be recorded, to humanize a stiff melody with better timing, and approach notes also useful for sight reading, rhythm practice or to perform. Works with harmonies
- Melody notes: T, 6, Enter, \
- Same Melody note: 5
- Approach notes: QWER YUIO
- Octave set: 1, 2, 3
MIDI notes also work (if Preferences [Transpose] is set to “Allow Melody Wizard on THRU part”).
- Octave set: E(40), F(41), G(43)
- Melody notes: F(53), G(55)
- Approach notes: B(47), C, D, E A, B, C, D(62)
To use the Melody Wizard, make sure the MIDI Keyboard Wizard is enabled on the [MIDI] menu button.
![]()
This will also enable the MIDI Wizard on the QWERTY keys.
If you also want to use the Melody Wizard on MIDI notes, go to Preferences [Transpose] and enable “Allow Melody Wizard on THRU part” in the Settings for transposing songs when loaded or “Do it Now” dialog.
*.MGU |
Then, choose a song that has a Melody track. |
|
Mute the Melody track by right-clicking on the Melody track (Alt+8). |
|
Play the song. |
ENTER or \ |
As you play the song, you can use the Enter key or the \ key (or T or 6 above the T) to play Melody notes. |
W,E,R,T |
These will be approach notes up to the melody. You can start on any note. |
Q,E,R,T |
Starting on a Q instead of W will use wider voicings for approach notes. |
I,U,Y,T |
These will be approach notes down to the melody. Start on any note. |
O,U,Y,T |
Starting on an O instead of I will use wider voicings for approach notes. |
MIDI Keyboard Wizard
![]() By turning on this Wizard setting in the Options | Preferences Transpose dialog, notes played on a Thru channel MIDI keyboard will be played through the Wizard. C, E, G, and Bb will be mapped to chord tones while D, F, A, and B will be passing tones.
By turning on this Wizard setting in the Options | Preferences Transpose dialog, notes played on a Thru channel MIDI keyboard will be played through the Wizard. C, E, G, and Bb will be mapped to chord tones while D, F, A, and B will be passing tones.
Changing Instruments / Settings for the Wizard
|
As a play along instrument, the Wizard uses the Thru instrument part. To change the instrument patch, volume, reverb, etc. for the Wizard select the Thru instrument in the Mixer. |
MIDI Normalize
If performing a live set, or at a jam session, it helps to have the volume of all of the songs be similar. Now, with a MIDI Normalize feature, you can level the volumes to a setting in the program options. For example, you can set all volumes to be 70 and the program will make each song play within those levels. This is done in the Preferences [Arrange] tab.
![]() When you have set the normalize to “on” the title window at the top of the screen reports that Normalization is set to 70, and that the velocity of the currently playing song has been increased from 65 to 70.
When you have set the normalize to “on” the title window at the top of the screen reports that Normalization is set to 70, and that the velocity of the currently playing song has been increased from 65 to 70.
The normalization will affect bass, drums, piano, guitar, and strings. If you select the “Including melody and Soloist” option, the normalization will also affect the Melody and Soloist parts.
Outputting MIDI to an External Device
Some external music hardware devices require chords played in root position to drive them in real time.
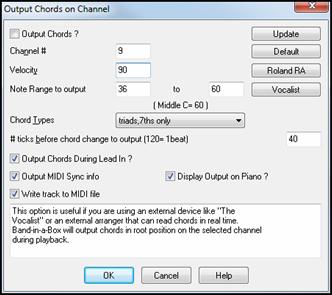
An example of this is the Vocalist. It will let you sing into a microphone and harmonize your voice according to the chords that are input to the device. Band-in-a-Box has the capability of outputting a separate channel with the chords in root position to support such external devices automatically.There are also settings such as complexity of chords, output channel, velocity, and note range. It will also drive“Real time Arrangers” like the Roland RA series. The best way to accomplish this is to access the Options | Preferences and select the [OutputCh.] button. You will then be given a dialog like this:
|
Click on the [Vocalist] button if you have such a device connected to your MIDI system. Band-in-a-Box will then send it the appropriate chord information automatically as your song is playing (e.g., root position triads). |
Changing MIDI Instrument
To select a MIDI Instrument for any MIDI track, right-click on the track radio button at the top of the screen and go to Select MIDI Instrument (Patch) and choose one of the menu commands.

Select Hi-Q Patch Plugin - Use this menu command if you want to select a preset of a Hi-Q MIDI instrument and a VST plugin (e.g. sforzando).
Select no MIDI Patch - This will remove the current selection of the MIDI Instrument.
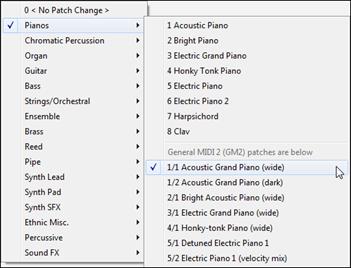
Select General MIDI Patch - This will allow you to select an instrument from the list of GM patches.
Select GM 2 Patch - This will allow you to select an instrument from General MIDI 2 patches.
Select Higher Bank Patch (from .Pat file) - This will allow you to select a higher bank instrument on your particular synthesizer.
About Patch Changes
Patch changes are embedded in the Band-in-a-Box styles and these patches are loaded with songs by default. They can be disabled in the MIDI Options dialog found in the Preferences. Alternate patches can be saved with a song (Alt+F2).
General MIDI 2 support
General MIDI 2 standard (GM2) adds 128 more MIDI instruments to Band-in-a-Box styles and songs, including ukulele, mandolin, 12-string guitar plus many new and improved piano, organ, guitar, brass, and string sounds.
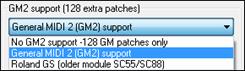
The type of GM2 support is set in the MIDI Driver Setup dialog (Options | MIDI/Audio Driver Setup). The choices are:
- General MIDI 2 support: If you’re using a newer Sound Canvas then choose this GM2 support.
- Roland GS (older Modules): “Older” Sound Canvases (SC55/SC88) support GS, but not GM2. The good news is that they have the same patches available, just at different locations. So if you choose this option, Band-in-a-Box will find the patches at the “GS” locations instead of the “GM2” locations. If you have a newer GS module like the SC8820 that supports both GM2 and GS you should likely choose GM2.
- No GM2 support: Most sound cards don’t have GM2 support yet, so just support the original 128 General MIDI sounds. Band-in-a-Box will use the closest instrument in these cases.
|
|
Additional Patches
A “patch” is a MIDI instrument name. Examples of patches are Acoustic Bass, Electric Piano, and Violin. Patches are used to emulate real instruments through MIDI playback. Band-in-a-Box defaults to using the standard bank of General MIDI patches used by all MIDI manufacturers, but many MIDI synthesizers and sound cards have additional patches available as alternatives to the basic GM list. These sounds are typically found on higher banks in memory.
Patches on Higher Banks Dialog
![]() You can select a higher bank patch in the Select MIDI Patch submenu of the Track (right-click) menu. This opens the Patches on Higher Banks dialog for easy access to patches on all other banks as well as General MIDI.
You can select a higher bank patch in the Select MIDI Patch submenu of the Track (right-click) menu. This opens the Patches on Higher Banks dialog for easy access to patches on all other banks as well as General MIDI.
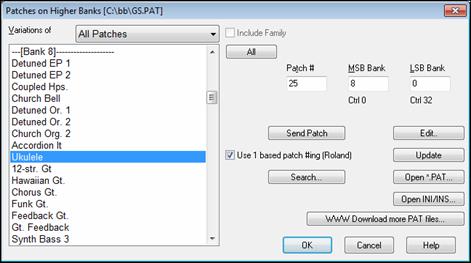
To narrow your sound search you can do one or all of the following:
- Open the patch list and select an instrument (i.e. Electric Bass, Acoustic Piano, etc.)
- Click on the “Include Family” checkbox to have other offerings of similar type shown. (i.e., all bass family patches, all keyboard family patches, etc.)
- Find a patch by keyword by clicking the [Search…] button and typing some letters that you know are in the name (e.g., “mando” will find your mandolin patch and any others containing “mando”).

![]() Click on this button to go to the PG Music web page where you can download more patch files from https://www.pgmusic.com/support_miscellaneous.htm .
Click on this button to go to the PG Music web page where you can download more patch files from https://www.pgmusic.com/support_miscellaneous.htm .
Converting Synthesizer Patch Lists in Band-in-a-Box
Band-in-a-Box can read a patch file list generated by PowerTracks Pro Audio or Cakewalk and convert it to a .PAT file for use in Band-in-a-Box.
Converting PowerTracks patch list to Band-in-a-Box .Pat files.
PowerTracks stores its patch lists in a single file, called PATCHES.INI. This file contains all of the patch lists for the synths supported by PowerTracks. Band-in-a-Box stores the patch list for each synth in a separate file, with an extension of .PAT.
To convert a PowerTracks patch file to a Band-in-a-Box Patch file, you will be choosing the C:\pt\patches.ini, and then choosing the synth that you want to convert to a .PAT file.
![]() Open the Patches on Higher Banks dialog from the Select MIDI Patch submenu of the right-click tracks menu.
Open the Patches on Higher Banks dialog from the Select MIDI Patch submenu of the right-click tracks menu.
![]() Press the [Open INI/INS…] button to launch the Open File dialog.
Press the [Open INI/INS…] button to launch the Open File dialog.
|
Choose the file C:\pt\patches.ini. |
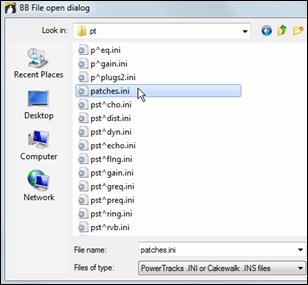
You will then see a menu of synths stored in the patches.INI file. Select one to convert.
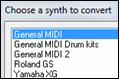
Create a name for the .PAT file (e.g. My Patch List.PAT) and save it to C:\bb\Data\Util\Synth Kits.

Converting a Cakewalk .Ins file to a Band-in-a-Box .Pat file.
This is done using the same process described above for PowerTracks, except that you open the individual .INS file instead of a PATCHES.INI file. For example, if you have a Cakewalk file called “My Synth.INS” you would select this file name. You would then save that converted list to C:\bb\Data\Util\Synth Kits\My Synth.PAT.
Hi-Q MIDI Instruments for sforzando
We have added a new VST synthesizer, with support for popular .SFZ sound format, as well as PG Music’s Hi-Q sounds. Many sounds that have been developed with the .SFZ format are available on the internet and are ready to play with Band-in-a-Box using this synth. Your existing Band-in-a-Box Hi-Q sounds will play using this synthesizer, so previous songs or styles you made will play with this new synth. This synth is installed with Band-in-a-Box and is ready to play and does not require configuration.
 <
<
Most of the interaction between Band-in-a-Box and the sforzando synth will be behind-the-scenes, so you don’t need to do anything. Just “pick a style and press play” as usual. This is because the styles that need to use the synth are coded to do so in the style, using the Hi-Q patch.
![]()
If you want to add a specific Hi-Q sound, right-click on the track button and go to Select MIDI Instrument (Patch) | Select Hi-Q MIDI Patch Plugin.
This will display a list of available Hi-Q sounds.

When you choose a Hi-Q sound from the list, sforzando will be loaded, with the Hi-Q instrument.

If you want to use a custom sound, such as a .SFZ sound that you have acquired, then you can launch the sforzando synth on the track that you want, by clicking on the Mixer’s [Plugin] tab and then selecting sforzando.
|
Note: You need to pick a MIDI track for this, not a “green” audio track. |

VST Plugin Selection Dialog
This is where you select VSTi or DXi synthesizers and/or VST and DirectX audio effects to assign to a track. This dialog opens by clicking on a slot in the Mixer window’s Plugins panel.
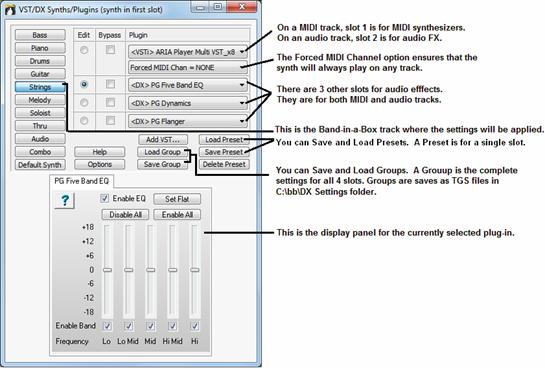
You can add new VST plug-ins by using the drop-down list, and selecting the last item, which is “Add VST Plugin.” From this, select the VST plug-in, which is a DLL, usually found in C:\Program Files (x86)\Steinberg\VSTPlugins or C:\Program Files\Steinberg\VSTPlugins. (Note: On Windows® XP, the folder name doesn’t contain (x86).)

Examples: VST Synths to add to MIDI Track
- Add a Garritan Jazz Big Band VST to the Melody track, to get a great sounding MIDI Saxophone sound.
- Add a dedicated piano VST to the MIDI piano track.
- Add a dedicated Drum VST to the Drums Track
- Add your favorite B3 Organ VST synth to the Organ (Piano) track
Examples: Audio F/X to add to Audio Tracks
- Add “AmpliTube 3 CS” (Guitar Amp Simulator) to a “Clean Signal” Guitar RealTracks. Then you can tweak the guitar sound, by choosing the amp type, stomp box effects etc.
- Add your favorite Reverb to certain tracks.
- Add an “Exciter” Plugin to improve the sound.
- Add an Auto-Tune type of Plugin to improve intonation on your recorded audio track.
Save Your Mixer Settings
|
Save your song with the [Save As] button, choosing the menu item Save Song with Patches Harmony, or with the menu command File | Save Special | Save Song with Patches & Harmony, to save all of your Mixer settings. |
Direct Input (DI) Guitars and AmpliTube®
A Guitar Amp Simulator (AmpliTube CS) is included in Band-in-a-Box along with over 150 “Direct Input” guitar-based RealTracks. You can customize the DI guitar RealTracks using the new Guitar Amp Simulator that is included (AmpliTube CS). With “Direct Input” guitar RealTracks, all of the added effects come from the Guitar Amp Simulator.
There are a few ways that you can use the AmpliTube 3 CS Plug-in in Band-in-a-Box.
- Load a Band-in-a-Box song that is set to use it. These will be found in the C:\bb\Documentation\Tutorials\Tutorial BB2012 folder. Just load a demo song with “AmpliTube” in the name, and press play.
- Load a Band-in-a-Box Style that is set to use AmpliTube. To find these, open the StylePicker, and type the word “AmpliTube” in the search filter to find these styles.
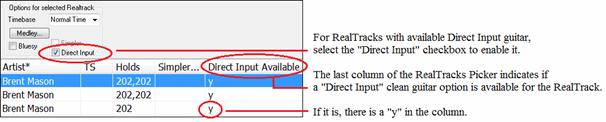
- Add it yourself to any song. First select a Guitar RealTracks that has Direct Input Guitar available (see the last column of the RealTracks Picker for indication if Direct Input is available).
Tutorial Demo Songs – Direct Input Guitars and Amplitude
To see AmpliTube and the DI Guitars in action, open the C:\bb\Documentation\Tutorials\Tutorial - BB2012 folder.
This file automatically loads the DI version of the “PopShining” guitar soloist, and automatically applies the “Pop Rock Lead” AmpliTube preset:
_SHINAMP Demo (AmpliTube Demo using DI Guitar Soloist with Pop.SGU
These files have 3 different DI instruments using AmpliTube, and show you the progression from the instruments as the used to sound, then with just the DI instruments swapped out, and then with AmpliTube presets applied to the different DI instruments:
_ELECROK Demo (Uses same styles as _ELECAMP, but with original amp sounds).SGU
_ELECAMP Demo (Uses ONLY DI guitars with no AmpliTube, for comparison).SGU
_ELECAMP Demo (AmpliTube demo using ElecRock RealTracks DI Guitars).SGU
|
When you play these songs, press the [Memo] button to read about the feature and the demo song. |
To add a Direct Input Guitar to a song:
First select a Guitar RealTracks that has Direct Input Guitar available (see the last column of the RealTracks Picker for indication if Direct Input is available)
The last column of the RealTracks Picker indicates whether a “Direct Input” Clean Guitar option is available for that RealTracks.
If it is, there is a “Y” in the Column. You can then select the “Use Direct Input” checkbox to make that RealTracks use a Direct Signal (clean, without processing).
![]()
![]()
Then, for that track, select the Plugins Tab of the mixer, and then select AmpliTube as a Plugin for that track. You can then play the song and tweak the settings in AmpliTube by clicking on the AmpliTube name on the Mixer.
When you save your Band-in-a-Box song, the settings will be saved with AmpliTube 3.
Adding Real Instruments – RealDrums and RealTracks
Your songs, styles, and solos can use live audio tracks recorded by studio musicians. These live recordings can be assigned to the Band-in-a-Box tracks in the RealDrums Settings or RealTracks Settings dialogs.
RealDrums
There are several ways to hear RealDrums with new or existing Band-in-a-Box songs.
We provide many styles that already have RealDrums. These styles can be identified by the style name beginning with a minus sign. For example, “-ZZJAZZ.STY” is a version of the ZZJAZZ.STY that uses RealDrums.
|
Styles(.STY) can have RealDrums (e.g. “–ZZJAZZ.STY”). This setting is found in the StyleMaker’s Misc. Style Settings dialog. |

|
You can set the RealDrum style inside the StyleMaker, by pressing the [Misc] button, and then typing the name of the RealDrum style. |
||
|
RealDrums can be substituted for MIDI drums on existing styles in the RealDrums Settings dialog, which opens with Ctrl+click on the RealDrums toolbar button or with the [RealDrums] button in the Preferences dialog. |
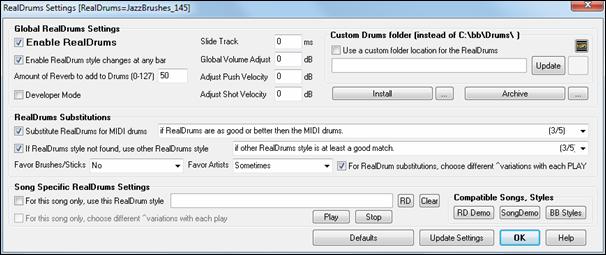
![]() With “Enable RealDrums” checked, RealDrums may be used rather than MIDI. There is also a hot key combination to turn RealDrums on/off (Ctrl+Shift+F6). The hot keys also work while the song is playing.
With “Enable RealDrums” checked, RealDrums may be used rather than MIDI. There is also a hot key combination to turn RealDrums on/off (Ctrl+Shift+F6). The hot keys also work while the song is playing.

This will substitute RealDrums for MIDI styles. You can change the setting from 1 to 5. If set to 1, almost all MIDI drums will get substituted by RealDrums. If set to 5, only RealDrum styles that match the style perfectly will get substituted.
![]()
Individual songs can have RealDrums assigned to them. You can set the desired style in the RealDrums Settings dialog with the “For this song only, use this RealDrum style” setting. This will let the current song use the specific RealDrums style.
![]() The [RD] button opens the RealDrums Picker where you select the specific RealDrums style that you would like to assign to your song.
The [RD] button opens the RealDrums Picker where you select the specific RealDrums style that you would like to assign to your song.
|
You can also open the RealDrums Picker directly from the toolbar with the RealDrums button. |
|
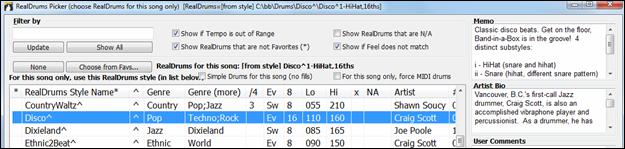
![]() Your recent RealDrums selections are saved, and available in the various dialogs that allow you to choose RealDrums. In the RealDrums Picker, click on the [Choose from Favs] button to
Your recent RealDrums selections are saved, and available in the various dialogs that allow you to choose RealDrums. In the RealDrums Picker, click on the [Choose from Favs] button to
open a list of up to 400 most recent selections. Use the Filter String to narrow the selection by entering a term like “bossa” or “swing” to see only RealDrums with those words in the name.

RealDrums are normally saved with songs, unless you have unchecked “Save all Settings with Songs” in the Assign Instruments and Harmonies to Song dialog. In that case, you can select and save a RealDrums style with your song by going to File | Save Special | Save Song with Patches & Harmony (Alt+F2) to assign a RealDrums style.
![]()
![]() The Edit Settings for bar… dialog (F5 key) lets you use multiple RealDrums styles within a song - either using the RealDrums from a Band-in-a-Box style or specifying a RealDrums style to use at a particular bar.
The Edit Settings for bar… dialog (F5 key) lets you use multiple RealDrums styles within a song - either using the RealDrums from a Band-in-a-Box style or specifying a RealDrums style to use at a particular bar.
RealTracks
What are RealTracks?
Just as RealDrums replace the MIDI drum track with live audio recordings of top session drummers, RealTracks add “Real” instruments recorded by top studio players and recording artists. These tracks replace the MIDI track for that instrument and can be controlled just like the MIDI instrument (volume changes, muting, etc.). Best of all, they follow the chord progression that you have entered, so that you hear an authentic audio accompaniment to your song. These are not “samples,” but are full recordings, lasting from 1 to 8 bars at a time, playing along in perfect sync with the other Band-in-a-Box tracks. RealTracks can be built in to the style, and would replace the Bass, Guitar, Piano, or Strings track, or they can be generated to the Soloist (or Melody) track using the Soloist feature.
We include a selection of Pop, Jazz, and Country RealTracks Combos with Band-in-a-Box Pro. Many more RealTracks are available as separate add-ons or bundled into the various Band-in-a-Box PAKs for better value.
Using RealTracks in Songs - Assign RealTracks to Track Dialog
The Assign RealTracks to Track dialog assigns a RealTracks instrument to any of the Band-in-a-Box instrumental tracks. It also shows any RealTracks that are assigned to Band-in-a-Box tracks.
This dialog is launched by several ways:
- Clicking on the [RealTracks] toolbar button and selecting RealTracks Picker Dialog, or shift-clicking on this button.

- Right-clicking or double-clicking on a Track radio button at the top of the main screen and choosing Select RealTracks in the menu.
![]()
 Pressing the [Assign to Track…] button in the RealTracks Settings dialog.
The dialog allows you to assign a specific RealTracks instruments to a track in a song. It also displays any RealTracks that are currently assigned to each track.
|
To use the dialog, first select the track that you want to assign. Then, select the RealTracks that you want in the list below it. |

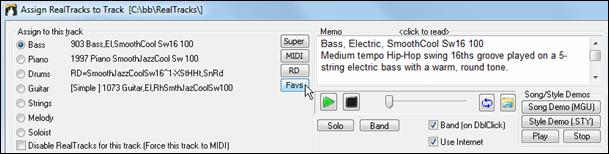
Instant Preview of RealTracks
You can instantly hear an audio demo of RealTracks by double-clicking a RealTrack on the list. Since this doesn’t affect your song, you can quickly audition many different RealTracks, and find the best ones for your song.
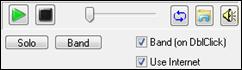 |
You can choose which of band or solo plays first when you double-click on the list, by the “Band (on DblClick)” checkbox. Otherwise, press the [Band] or the [Solo] button. |
![]() The preview sometimes plays files from the internet. You can download a file that is being played from the internet by clicking this button. If the file is being played on your hard drive, this button will show the file in a folder.
The preview sometimes plays files from the internet. You can download a file that is being played from the internet by clicking this button. If the file is being played on your hard drive, this button will show the file in a folder.
![]() You can control the volume of the demos with this button.
You can control the volume of the demos with this button.
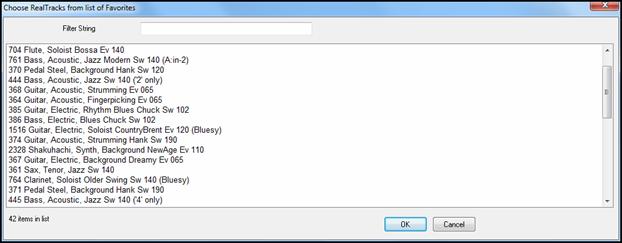
Choosing Favorite RealTracks
Your recent RealTracks selections are saved, and available in the various dialogs that allow you to choose RealTracks. The 400 most recent selections are shown, with most recent at the top.
When you use one of the “Select Best” commands in the right-click instrument menu, you will see a [Choose from Favorites] button in the dialog. |
|

Or, in the RealTracks Picker, press the [Favs] button.
You will then see a dialog with a list of your recently chosen RealTracks, most recent on top. You can filter this dialog by text, e.g. “guitar,” to find a recently used RealTracks with the word “guitar” in it.
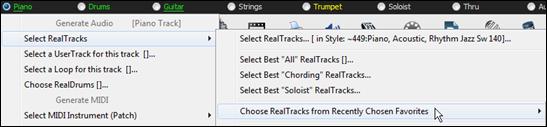
You can also see a list of recently used RealTracks if you right-click on a Track button at the top of the screen and go to Select RealTracks | Choose RealTracks from Recently Chosen Favorites. Click on a RealTrack from the list to quickly load it to the track.
Adding MIDI SuperTracks
What are MIDI SuperTracks?
MIDI SuperTracks are MIDI tracks that can be added to a track or a style and play like other MIDI tracks in a style. They are called “SuperTracks” because they are generated using a different engine than typical MIDI style tracks. Typical MIDI style tracks are generated from C7 patterns in the style and repeat these patterns over any chord. MIDI SuperTracks use actual MIDI playing from musicians (similar to RealTracks in that regard), so are not based on patterns.
Using MIDI SuperTracks
To use MIDI SuperTracks, either:
- Choose a style or song that has MIDI SuperTracks and press Play. Look in the MIDI SuperTracks Demos folder for these songs
- Add a MIDI SuperTrack to a certain track.
Adding a MIDI SuperTrack
For example, let’s add a MIDI SuperTrack to the Piano track.
|
|
Right-click on the Piano track label at the top of the screen to see a menu of options (or right-click on the Piano track in the Mixer), then choose Select MIDI SuperTrack for this track. |
You will see a list of available MIDI SuperTracks. You can type filter text to narrow down your search.

There are memos describing the individual MIDI SuperTracks, and you can click on the memo for a big window.
You can preview the MIDI SuperTracks by double-clicking on the list or using the transport control buttons.
![]() Once you choose a track, you will see that the Piano label has turned blue to indicate that it is a MIDI SuperTrack.
Once you choose a track, you will see that the Piano label has turned blue to indicate that it is a MIDI SuperTrack.
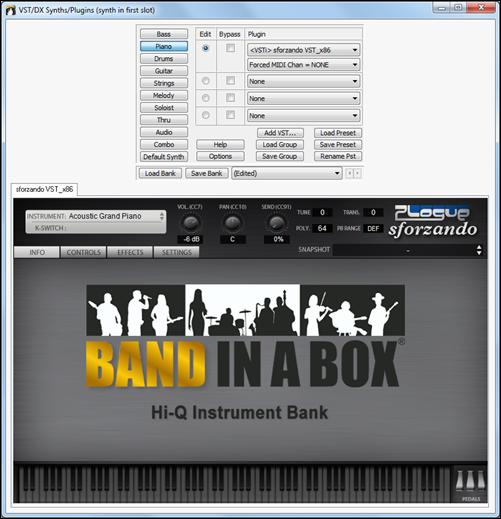
In the Mixer’s Plugins panel, you will see that a VST plugin and a Hi-Q MIDI instrument have been selected to the Piano track.

If you want to customize the sound, click on the VST name in the Mixer to open the VST/DX Synths/Plugins window, and use the panel below.
Freezing Tracks
Freezing (locking) MIDI or RealTracks/RealDrums
Any track (MIDI or RealTracks) can be frozen. When frozen, it won’t get changed or re-generated. This saves time when replaying previous songs and allows you to freeze an arrangement that you like. If you freeze the whole song, you don’t have to wait at all for the song to regenerate. The next time you press Play, it is ready to go.
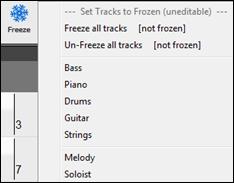
You can make frozen tracks by pressing the [Freeze] button (snowflake) on the toolbar, and then choosing the tracks that you want to freeze or unfreeze.
There are a number of reasons that you would freeze a track.
Reasons to Freeze a RealTracks track (audio):
- Frozen tracks will play back instantly, not requiring time to generate.
- They play back the same way each time, so if you like a solo, you can “freeze it.”
- If you send a song to a friend as “frozen,” they will hear the same performance.
- For the Soloist track, if you generate a solo, it can now be saved (by freezing the track).
Reasons to Freeze a MIDI track:
- You can edit the MIDI data, to customize the performance to match a certain song, and this will be saved. Use the Notation or Piano Roll window to edit the track.
More reasons to freeze any track:
- Frozen tracks play back instantly, without requiring time to regenerate.
- They play back the same way each time.
- You can change the chord progression of the song and have one part playing a different chord progression than the rest of the band. For example, type a “blowing” chord progression, generate a solo, freeze the solo track, then type a normal chord progression and generate the rest of the instruments (bass/guitar etc.) that will play the normal changes.
- Have different instruments play different styles. For example, the Bass could be generated using Reggae, then Frozen, and then the rest of the instruments generated using a Techno style.
Un-Freezing a Track(s)
 |
This is also done from the [Freeze] button. Choose a frozen track to un-freeze it or choose “Un-Freeze all tracks.” |
Forcing Generation of a Song that is Frozen
Band-in-a-Box won’t touch tracks that are frozen. But if you want to change that, without having to Un-Freeze the tracks, you can do this easily.
 |
Hold down the Shift key as you press the [Generate and Play] button (the fly-by hint will remind you of that) or choose the menu command Play | Play Special | Generate (even if tracks are frozen). |

When you do this, the song will regenerate, the tracks will get rewritten, and the song will stay frozen. So, if you’re freezing songs to get the instant playback with RealTracks but are tired of the “same-old” frozen arrangement, just press Shift+Play, generate a new arrangement, and press Save. Then the new “fresh-frozen” arrangement will play instantly, even with many RealTracks.
Editing and Saving Tracks
MIDI tracks for bass, drums, piano, guitar and strings can be edited and saved with the file. If you freeze a track, edits can be still made to it, because it is only frozen from Band-in-a-Box making changes to it (you can still edit it). The MIDI track will be saved to the file. So, you can customize the bass part to match a certain song, and save it with a frozen bass part, so that Band-in-a-Box won’t overwrite your edits. This includes RealCharts – if you wanted to edit the notation of a RealTracks solo for example.
To edit a MIDI track (bass, drums, piano, guitar, strings), or the MIDI part of a RealTracks that has a RealChart (MIDI transcribed solo), simply open the Notation window (or Piano Roll window) and click on the track and edit it. Make sure to Freeze the track by pressing the [Freeze] button and choosing Freeze for that track, or right-clicking on the instrument at the top of the screen and choosing Freeze. Now your edited tracks will save with the song.
Non-Concert Visual Transpose
This feature displays the chords and notation for non-concert key instruments like trumpet and saxophone in the non-concert key (Bb, Eb) while the music plays in concert key.
Note: This does not transpose the music. To do that, use the song key box to the right of the Style area. |
|
![]() Pressing the [Chord Display] button opens a list of concert and non-concert instruments. There are also settings for guitar capo, tuning the guitar down, and visual transpose of any number of semitones.
Pressing the [Chord Display] button opens a list of concert and non-concert instruments. There are also settings for guitar capo, tuning the guitar down, and visual transpose of any number of semitones.

Guitar Settings
 |
|


The Guitar Window
This is a window for guitar and bass players! The on-screen fretboard displays any track on guitar, bass, mandolin, ukulele, or banjo. This feature has many option such as auto-setting of correct positions, notes named on-screen, auto-octave adjust to play in selected position, and a resizable guitar fretboard.
Launching the Guitar Window
|
To launch the Guitar window, press the [Guitar] button in the Views toolbar, or Ctrl+Shift+G, or choose the Window | Guitar Window menu item. |
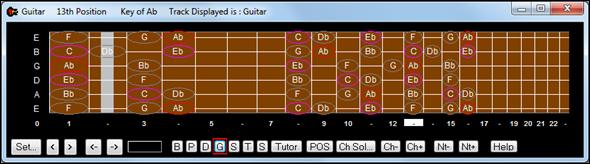
- The top title bar states the key of the song, the current track, and the fret position.
- The fretboard is displayed with the highest notes of the guitar at the top, and the open position of the guitar on the left.
- There are names for the open strings displayed on the left (E B G D A E).
- There are fret positions marked at the bottom of the fretboard. You can mouse click on these positions to change the current fret position.
- There are Note Names displayed for two positions on the guitar fretboard. One of the positions is the scale beginning with the third of the scale on the lowest string. In the key of F, this is the 5th position beginning on an A note (the third of the scale). Because it begins on the third of the scale, this position is referred to as the Phrygian Position (since an A Phrygian scale is the same as an F scale). Similarly, the other popular scale is the scale beginning on the 6th of the scale, in the key of F, this is up at the 10th position, and is called the Aeolian Position.
- There are note names displayed in color, with ellipses around the notes that are in the scale. The root note of the scale is highlighted in red, the third and fifth of the scale are in purple, and the rest of the scale tones are circled in gray.
- Pitch bends show up on the Guitar Fretboard. As the pitch bend occurs, a blue line moves along the string in real time, illustrating the height of the pitch bend. Load in the C:\bb\Documentation\Tutorials\Tutorial - BB 2005 Demos\Pitch Bend on Guitar Demo.MGU song. You will then see pitch bends written as a blue color moving along the string.
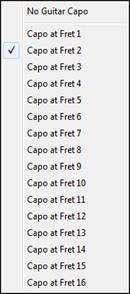
- A capo is drawn if you set a capo value with the [Chord Display] toolbar button menu.
- Clicking on the black area to the left of the zero fret notes in the Guitar window will delete the notes on just the channel of that string on the current notation time line rather than all notes at that time line.
- Clicking on a note will delete the note from the Notation window if the note is currently highlighted. If no notes are highlighted in red, then clicking on a note will first delete any notes on the current notation timeline and channel before inserting a new note.
Automatic Settings for Guitar Display
Band-in-a-Box does a lot of things automatically on the Guitar window to ensure that the notes are displayed intelligently on a guitar fretboard. These include:
- Automatically setting the two positions that will display the note names based on the key.
- Auto-Scanning the track to be played and adjusting the display octave on the guitar fretboard to ensure that the best octave is picked to minimize the number of notes that will be outside of the current position displayed on the fretboard.
- After Auto-scanning the track, the best position for displaying the music on the guitar is determined. This is always one of the two positions, Aeolian or Phrygian, though you may over-ride this by clicking on any fret position.
- Color-coding note displays. In addition to the note names being outlined in the colors, when the note is played it is highlighted in green if it is a scale note and yellow if it is an out-of-scale note.
Alternate Guitar Tunings
The Guitar window supports alternate tunings, including DADGAD, Drop D, Double Drop D, Open G, and 11 others. You can also select “Nashville High Strung” tunings, which tune certain strings up an octave. These tunings are supported in Styles, Chord Diagrams, Guitar Tutor, Notation, Tab, and Printout. Learn how to play these tunings by watching the on-screen Guitar Fretboard or Notation/Tab window. Easily change any style to use the alternate tuning that you want.
In this discussion, we will be referring to DADGAD tuning, a popular alternate tuning. The same reasoning applies to all of the other alternate tunings available.
There are four ways you can use Band-in-a-Box playing in DADGAD (or any alternate) tunings.
- See any Melody (or Soloist track) displayed in DADGAD tuning. This will display on the guitar fretboard, tab, and printout.
- See guitar parts (chording etc.) in DADGAD tuning, using correct chord shapes. For this, choose a style that has DADGAD tuning, and view the guitar part.
- Use the Guitar Tutor, to view DADGAD chording for any style.
- View guitar chord diagrams in DADGAD tuning, by setting the Notation Window Options “Guitar Chord” to “DADGAD.”
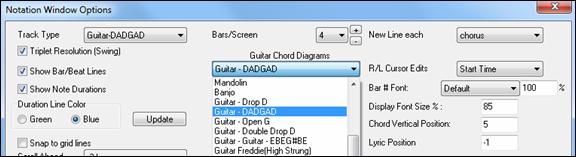
Guitar Fretboard
To see the guitar neck displayed in DADGAD, choose Melody | Track Type | Guitar – DADGAD Tuning.
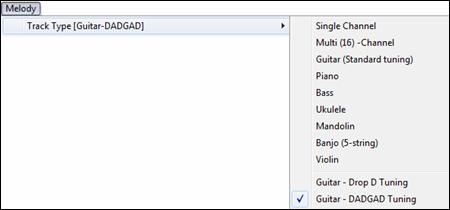
When you open the Guitar window and choose the Melody track, you will see the DADGAD tuning. |
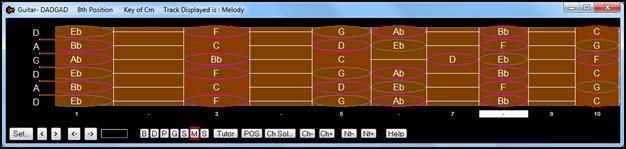
Any melody will now display in the chosen tuning. Similarly, you can set the Soloist track to an alternate guitar tuning with the Soloist | Track Type menu.
The Guitar track (or Piano, Strings) is controlled by the style, and will only reflect the type of tuning stored in the style. Load in some alternate tuning styles included in Styles Set #44 – Requested 4 to see guitar chording in alternate tunings. Another way to see the guitar play chords in alternate tunings is to use the “Guitar Tutor.”
![]() Select DADGAD tuning and enable Guitar Tutor.
Select DADGAD tuning and enable Guitar Tutor.

Now, during playback, you will see guitar chords on the guitar fretboard in DADGAD tuning.
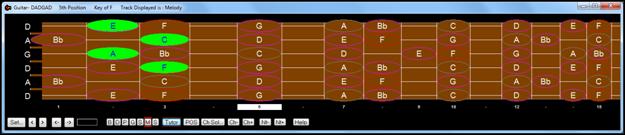
The examples above are for DADGAD tuning but apply similarly to all 11 alternate tunings included.
Some of the tunings are “Nashville High Strung.” These tuning have the lowest 3 strings tuned up an octave, to achieve a close sound. So, a DADGAD High Strung tuning would have the lowest 3 strings “DAD” tuned up an octave. Listen to some style examples that use this tuning.
![]() One of the tutors uses 3 note Jazz voicings to simulate the famous Big-Band chord guitar comping styles. If you use this tutor you will only see 3 notes in the chords of course. Since it sometimes helps to see the entire 4 chord voicing in this case, there is the option to show the muted note as well.
One of the tutors uses 3 note Jazz voicings to simulate the famous Big-Band chord guitar comping styles. If you use this tutor you will only see 3 notes in the chords of course. Since it sometimes helps to see the entire 4 chord voicing in this case, there is the option to show the muted note as well.
The Tutor normally just shows the guitar part without writing it to any track. If you want to see the track in notation copy it to the Melody or Soloist track. |
If copying a Guitar Tutor part to Melody or Soloist track, the track type now gets auto-set to the correct tab and fretboard. So, if you are using a ukulele tutor, you can copy and see the tab for ukulele chords.
Guitar Window Toolbar
At the bottom of the Guitar window is the toolbar.
![]() The [Set…] button opens the Guitar Settings dialog, which allows you to set the guitar options.
The [Set…] button opens the Guitar Settings dialog, which allows you to set the guitar options.
![]()
![]()
![]()
![]() These buttons will chord step advance or note-step advance. The chord step advance is the most commonly used function. It is also accessible by the hot keys Ins and Del on the numeric keypad and will advance or go back one chord at a time, leaving the chord displayed on the guitar.
These buttons will chord step advance or note-step advance. The chord step advance is the most commonly used function. It is also accessible by the hot keys Ins and Del on the numeric keypad and will advance or go back one chord at a time, leaving the chord displayed on the guitar.
![]() This is the name of the current note that the mouse is over. If you click on the guitar at that position, the note will sound. If the Notation window is open (in Editable Notation or Staff Roll mode), that note will get inserted on the notation at the current position on the timeline – you can disable that option to insert notes.
This is the name of the current note that the mouse is over. If you click on the guitar at that position, the note will sound. If the Notation window is open (in Editable Notation or Staff Roll mode), that note will get inserted on the notation at the current position on the timeline – you can disable that option to insert notes.
![]() When you open the Guitar Window, the first thing you want to do is choose the track that you want to display. Usually this will be a Melody track or a Soloist track. In the diagram here, the Melody track is the current track, and it has a red rectangle around it to indicate this. To get to the Soloist track, you would click on the [S] button or use the hot key Ctrl+F5, which toggles between the Melody and the Soloist. Similarly, you can display other tracks like Bass, Piano, or Strings.
When you open the Guitar Window, the first thing you want to do is choose the track that you want to display. Usually this will be a Melody track or a Soloist track. In the diagram here, the Melody track is the current track, and it has a red rectangle around it to indicate this. To get to the Soloist track, you would click on the [S] button or use the hot key Ctrl+F5, which toggles between the Melody and the Soloist. Similarly, you can display other tracks like Bass, Piano, or Strings.
![]() There is a Guitar Tutor button.
There is a Guitar Tutor button.
![]() The “position” button. This toggles between the two popular positions displayed with note names.
The “position” button. This toggles between the two popular positions displayed with note names.
![]() Generate a guitar chord solo based on the existing Melody track using correct guitar fret positions.
Generate a guitar chord solo based on the existing Melody track using correct guitar fret positions.
![]()
![]() When you have a note or chord highlighted press the [Ch-] or [Ch+] (insert guitar chord) button on the guitar, or [7] or [8] on the NUMPAD keypad. Each time you press the [Ch-] or [Ch+] you will see that the guitar chord changes to a different voicing, cycling through the available 5-10 voicings possible for each chord. (Some notes won’t have any chord voicings, for example a C# note on a Cmaj7 chord, because it is always a passing tone.)
When you have a note or chord highlighted press the [Ch-] or [Ch+] (insert guitar chord) button on the guitar, or [7] or [8] on the NUMPAD keypad. Each time you press the [Ch-] or [Ch+] you will see that the guitar chord changes to a different voicing, cycling through the available 5-10 voicings possible for each chord. (Some notes won’t have any chord voicings, for example a C# note on a Cmaj7 chord, because it is always a passing tone.)
![]()
![]() In a similar manner, you can convert a chord to a guitar note using the insert guitar note button. Pressing the [N+] (or [3] or [4] on the NUMPAD keypad) repeatedly cycles through playing the same note on all 6 strings.
In a similar manner, you can convert a chord to a guitar note using the insert guitar note button. Pressing the [N+] (or [3] or [4] on the NUMPAD keypad) repeatedly cycles through playing the same note on all 6 strings.
Displaying MIDI files from Guitar Pro® on the Guitar Fretboard
MIDI files can be read from Guitar Pro® and displayed correctly on the Guitar Fretboard in Band-in-a-Box. You can then import the audio file, and using Audio Chord Wizard, you can sync up the original audio recording with the Guitar Pro® MIDI file. So you then listen to the original audio as you watch the guitar transcription (from Guitar Pro® playing in Band-in-a-Box).
To export MIDI files on 6 channels in Guitar Pro®, you need to:
|
Turn the RSE off (menu Sound - Realistic Sound Engine). |

|
|
Press the Guitar Settings button on the left of the Guitar Pro® window and then enable the force 11-16 channels option. |
|
Export the Track (menu File - Export - MIDI). |
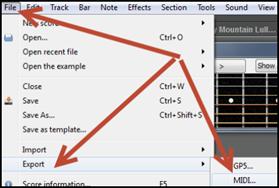
|
Then, in Band-in-a-Box, click on the [Open] button and choose the menu item Open MIDI File to load a Guitar Pro® MIDI file into Band-in-a-Box. |
You can then play the file and watch the guitar fretboard to see it. Band-in-a-Box has a large guitar fretboard, sizable with many options, so you may like displaying some of your Guitar Pro® files in Band-in-a-Box.
Big Piano Window
The Big Piano window can display the notes of any track on a resizable piano keyboard. You can also set the range of the piano and number of octaves to display. Additionally, you can display notes names or guide notes --showing the scale notes of the current key. Notes can be displayed using a different color for each note. There’s an “Auto-Octave” setting that will scan the track to be displayed and auto-size the piano to the largest size that would display all of the notes. This “Big Piano” makes it easier to learn piano parts from within Band-in-a-Box.
|
The Big Piano window is launched (or closed) by pressing the piano icon on the Views toolbar, or by pressing Ctrl+Shift+N, or choosing Window | Big Piano Window. |
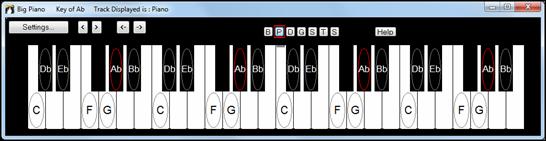
- The default settings for this feature can be customized by pressing the [Settings…] button.
- The Big Piano window displays a single track on the piano.
- The piano can be resized by dragging the bottom of the window to enlarge it vertically.
- The key of the song is displayed at the top.
- The range of the piano is set automatically (based on the actual notes in the track) to show the largest possible piano).
- The notes of the scale are circled on the piano, with the note names included.
- The root of the scale is colored in red. As the song plays, scale tones are colored green; other notes are colored yellow.
- The name of the note that the mouse cursor is over is highlighted at the top of the window. Clicking on the Big Piano plays a note (using the Thru part) and this can be recorded or sent to the Notation window when entering notation. You can select the track to use by clicking the [B|D|P|G|S|M|S] line of buttons.
- RealTracks (and MIDI style) piano parts that are on the piano track will appear with hands-split (right hand in red, left hand in blue) in the Big Piano window.
- Clicking on the black area to the left of the piano will delete highlighted red notes from the Notation window. If no notes are highlighted in red, then clicking to the left of the piano will delete any note on the current notation timeline.
- Clicking on a note will delete the note from the Notation window if the note is currently highlighted in red.
The Conductor
The Conductor provides live looping and playback control. As the song is playing, there are options to allow control the flow of playback by one of three methods:
- Conductor window
- QWERTY hot keys
- MIDI keyboard
Many “single key” hot keys are available to control the playback and looping of the song. For example, pressing the “4” key will ensure that the middle chorus is the next one played, and pressing the “S” key will ensure that the middle section is looped. This would be useful to extend a song that has the last chorus playing. Custom loop points can also be set for each song. These settings are ideal for live performance or “jam sessions” where you aren’t entering new Band-in-a-Box songs but want full control of the playback. These loops happen seamlessly at the end of the chorus, so are suitable for the “dance floor.” In addition, you can control Band-in-a-Box from a standard MIDI keyboard, pressing MIDI keys corresponds to program functions. For example, load the next song, play/pause/tempo adjust/change thru patch/jump to middle choruses/open the notation or lead sheet window – all from your MIDI keyboard!
The Conductor is launched with the [Conductor Window] button on the Transport toolbar, the Ctrl + tilde (~) hot keys, or menu option Window | Conductor Window. |
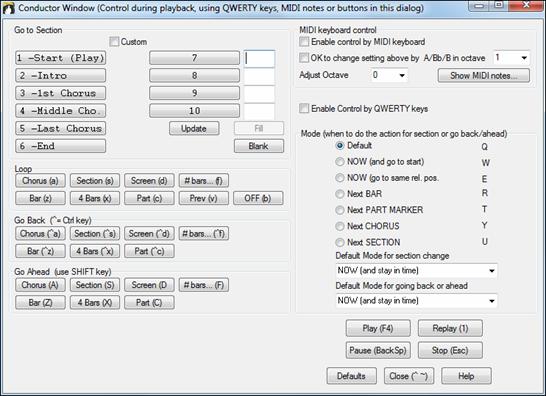
![]() You must enable the QWERTY keys to be active for the Conductor during playback. This is done by selecting the “Enable Control by QWERTY keys” checkbox on the Conductor window.
You must enable the QWERTY keys to be active for the Conductor during playback. This is done by selecting the “Enable Control by QWERTY keys” checkbox on the Conductor window.
![]() If you want to control the Conductor using the MIDI keyboard, you need to enable this by selecting the checkbox “Enable control by MIDI keyboard.” When this setting is enabled, any MIDI input will be interpreted as a hot key for the Conductor, and you won’t hear MIDI thru.
If you want to control the Conductor using the MIDI keyboard, you need to enable this by selecting the checkbox “Enable control by MIDI keyboard.” When this setting is enabled, any MIDI input will be interpreted as a hot key for the Conductor, and you won’t hear MIDI thru.
![]() If you’d like the ability to switch your MIDI keyboard between Conductor mode and regular playing mode, you can do this using the lowest “A-natural” MIDI note on your keyboard. This is A1 on an 88-note keyboard. Note A1 will turn the Conductor off, Bb1 turns it on, and B1 will toggle the Conductor on only when the Bb1 note is held down. If you don’t have an 88-note keyboard, you can set the octave setting to a number higher than 1, for example if you set it to “3,” then notes A3/Bb3/B3 will turn the Conductor Off/On/Toggled.
If you’d like the ability to switch your MIDI keyboard between Conductor mode and regular playing mode, you can do this using the lowest “A-natural” MIDI note on your keyboard. This is A1 on an 88-note keyboard. Note A1 will turn the Conductor off, Bb1 turns it on, and B1 will toggle the Conductor on only when the Bb1 note is held down. If you don’t have an 88-note keyboard, you can set the octave setting to a number higher than 1, for example if you set it to “3,” then notes A3/Bb3/B3 will turn the Conductor Off/On/Toggled.
Using the Conductor QWERTY or MIDI keys, you can:
- define and jump to up to 10 user defined sections in the song,
- jump back 1 bar/4 bars/# of bars/screen/part/chorus/section,
- jump ahead 1 bar/4 bars/# of bars/screen/part/chorus/section,
- LOOP 1 bar/4 bars/# of bars/screen/part/chorus/section,
- pause/stop the song.
In addition, using the MIDI keyboard, you can also use the Conductor to:
A1 |
(note#21)Turn MIDI Conductor OFF |
Bb1 |
Turn MIDI Conductor ON |
B1 |
Turn MIDI Conductor ON only as note is held down |
Here are the various functions available using the Conductor. The MIDI key and QWERTY hot key are shown.
C3 |
Normal Tempo |
Ctrl = |
C# |
Half Speed Tempo |
Ctrl - |
D3 |
Quarter Speed Tempo |
|
Eb3 |
Eighth Speed Tempo |
|
E3 |
Loop Section Enabled |
NUMPAD 1 |
F3 |
Play with last chorus looped |
Ctrl-NUMPAD 1 |
F#3 |
Play with middle choruses looped |
Ctrl-NUMPAD 2 |
G3 |
Play with middle and last choruses looped |
Ctrl-NUMPAD 3 |
G#3 |
Jump to last chorus (no loop) |
Ctrl-NUMPAD 4 |
A3 |
Jump to ending (no loop) |
Ctrl-NUMPAD 5 |
Bb3 |
Loop notation screen |
|
B3 |
Decrease Tempo by 1 |
Shift [ |
C4(48) |
Increase Tempo by 1 |
Shift ] |
Db4 |
Decrease Tempo by 5 |
[ |
D4 |
Increase Tempo by 5 |
] |
Eb4 |
Tap Tempo |
- (press 4 times) |
E4 |
Tap Tempo and play |
= (press 4 times) |
F4 |
Play |
F4 |
F#4 |
Stop |
Escape |
G4 |
Pause |
Backspace (or Ctrl H) |
G#4 |
Replay |
Ctrl A |
A4 |
MIDI Panic |
F12 |
Bb4 |
Previous Song |
Ctrl-Shift-F8 |
B4 |
Next Song |
Shift-F8 |
C5(60) |
This is a control character for THRU patches. When C5 is held down, pressing MIDI notes 61/62 decrease/increase the THRU patch by one, and 63-72 change THRU patches to Favorite patches. |
|
Db5 |
Open Notation Window |
Ctrl-W |
D5 |
Lead sheet Window |
Alt-W |
Eb5 |
Reduce All Volumes by 5 |
Ctrl-Alt-Shift-Q |
E5 |
Increase all Volumes by 5 |
Ctrl-Alt-Shift-W |
F5 |
ALL Mute/Unmute |
Alt-2 |
F#5 |
Bass Mute/Unmute |
Alt-3 |
G5 |
Piano Mute/Unmute |
Alt-4 |
G#5 |
Drums/Unmute |
Alt-5 |
A5 |
Guitar Mute/Unmute |
Alt-6 |
Bb5 |
Strings Mute/Unmute |
Alt-7 |
B5 |
Melody/Unmute |
Alt-8 |
C6 |
Soloist Mute/Unmute |
Alt-9 |
Db6 |
THRU Mute/Unmute |
Alt 0 |
D6 |
Audio Mute |
|
F6 to D7 |
Jump to Sections 1-10 of the song |
1-9 and 0 |
Eb7 |
Loop Current Chorus |
a |
E7 |
Loop Current Section |
s |
F7 |
Loop Current Bar |
z |
F#7 |
Loop Current 4 Bars |
x |
G7 |
Loop current Part |
c |
Ab7 |
Looping ON, previous setting |
v |
A7 |
Looping OFF |
b |
Bb7 |
Go Back 1 Chorus |
Ctrl a |
B7 |
Go Back 1 Section |
Ctrl s |
C8 |
Go Back 1 Screen |
Ctrl d |
Db8 |
Go Back 1 Bar |
Ctrl z |
D8 |
Go Back 4 Bars |
Ctrl x |
Eb8 |
Go Back 1 Part marker |
Ctrl c |
E8 |
Go Ahead 1 Chorus |
Shift A |
F8 |
Go Ahead 1 Section |
Shift S |
F#8 |
Go Ahead 1 Screen |
Shift D |
G8 |
Go Ahead 1 Bar |
Shift Z |
Ab8 |
Go Ahead 4 Bars |
Shift X |
A8 |
Go Ahead 1 Part marker |
Shift C |
Customizing the Sections
Sections: This allows you to define up to 10 points in the song that are sections. By default, the following sections are defined for each song.
- Section 1: Start of song
- Section 2: Intro
- Section 3: First Chorus
- Section 4 :Middle Chorus (i.e. start of chorus #2)
- Section 5: Last Chorus
- Section 6: Ending
- Sections 7-10 are user definable. To do this, type in any bar # using the bar/chorus format (e.g. 21/2 would be bar 21, chorus 2).
If you prefer to enter custom values for the section numbers, you can do this if you check the “custom” checkbox, and then type in up to 10 bar numbers for each section.
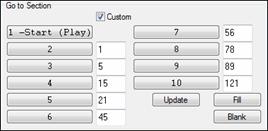
The section numbers are saved with the song. Once you have defined the sections, you can jump to a certain section of the song as the song is playing, simply by:
- Pressing the 1-9 or 0 key on the QWERTY keyboard or,
- Opening the Conductor window (Ctrl + ~ hot key) and clicking on the section button or,
- Pressing MIDI keys 77-86 (F6 to D7) corresponding to sections 1-10.
Mode (when to do the action)
By pressing a QWERTY hot key prior to an action, you can control when the action will take place. If no mode hot key is pressed prior to an action, the default mode will occur.
 |
The default is set in the “Default Mode for section change” or “Default Mode for going back or ahead” combo box. |
For example, by default, the section change will occur as soon as you press the key, and it will go to the equivalent place in the bar immediately before the beginning of the target section (so that the music stays in time, and next section begins at the end of the bar). But you can change the default for the action to take place at the end of the current bar or current part marker etc.

Example uses of the Conductor:
In this example, we don’t have custom sections set, so the default sections apply (middle chorus = section 4 etc.).
- Jump to the start of middle choruses during playback (press “4”).
- Loop the middle chorus (press S, which is Loop Section).
- Jump to the end of the song (press 6).
- Pause the song (Backspace).
- Go back 1 chorus (Ctrl a).
- Go ahead 1 chorus (Shift A).
At the end of the current chorus, go back 1 section, press Y then Ctrl S.
These actions can also be done with the MIDI keyboard. See the MIDI keyboard mapping diagram for details.
Example using the MIDI keyboard
Assume Charlie is a piano player who uses his MIDI keyboard with Band-in-a-Box, and would like to play his keyboard, but also use it to control Band-in-a-Box.
![]()
He sets the Conductor to allow his MIDI keyboard lowest notes A/Bb/B to turn the Conductor mode OFF/ON/Toggled-when held.
When he turns it off (low A note), he can play his keyboard normally.
If he wants to pause the song, he holds down the low B3 note as he presses the MIDI key for pause, which is G4. The song will pause, and the Conductor mode turns off as he lets go of the B3 key, and he can resume his piano playing. If Charlie didn’t plan on using the MIDI keyboard for piano playing, he could leave it in Conductor mode by turning it on with the A3 key.
The Jukebox
|
Use the Jukebox for continuous playback of a whole list of Band-in-a-Box songs or to play all or the songs in a folder. The <- button plays the previous song in the directory; the -> button plays the next song in alphabetical order. |
The Jukebox will continue to play while you move to other Windows® programs, providing continuous background music. Click the [Play Jukebox] button to open the Options for Juke Box dialog.
Jukebox Options
|
Only Play song with melodies: If set to YES, the program plays only songs with melodies, that is, songs with an .MG? file extension. If NO, the Jukebox will include ALL songs in the subdirectory. |
Audible Count-in Click: While listening to the Jukebox, you might not want to hear the Count-in Click. If set to “No,” you won’t hear the count-in click.
Harmony Settings: Set the Change Harmony box to true/enabled if you would like harmonies in a given number range to be randomly assigned for use with the Melody and Soloist/Thru tracks (if applicable to the song).
Generate Solos: Set this option to “On” to permit the Soloist to play a Solo over all the songs selected for Jukebox Playback.
- Change to this directory by loading/opening a song from the C:\bb\Demos\Soloist Demos\SOLODEMO directory.
- Instead of playing the song you have loaded, press the [Juke] button.
- Ensure that the Generate Solos checkbox is set to “Yes.”
- Select [PLAY JUKE BOX]. The Soloist Select Dialog will pop up with a suggestion to use a Soloist for the first song in the Jukebox list. This is normal. Press [OK] to accept the Soloist suggestion. (The Jukebox will not bother you with the Select Soloist dialog again; it will simply choose an appropriate Soloist for any given song in the Jukebox song list.)
Preview: The Jukebox Preview mode will optionally play just one chorus of each song or a number of bars of each song (e.g. 8 bars).
Delay between songs: The user can set a selectable time delay (in seconds) between songs.
![]() Check “Loop Jukebox at end” for continuous jukebox play rather than stopping at the end of the list.
Check “Loop Jukebox at end” for continuous jukebox play rather than stopping at the end of the list.
Change Directory:
![]() You can change the directory before starting the Juke Box with the [Change Directory] button. You can also type a folder name directly, instead of using the folder dialog.
You can change the directory before starting the Juke Box with the [Change Directory] button. You can also type a folder name directly, instead of using the folder dialog.
![]()
In the main screen, click on the [Song] button and choose Favorite Songs to open the Favorite Songs dialog and make your own custom set lists for the Jukebox. |
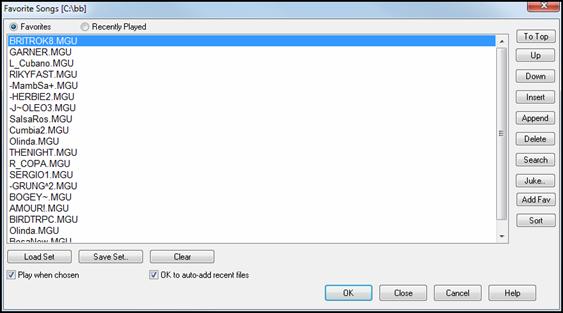
- Use the [Clear] button to blank the list.
- Songs can be added or removed from the list with the [Insert], [Append], and [Delete] buttons. [Add Fav] also adds a song to the Favorite Songs list.
- Use the [Save Set] button to save the list of selected songs.
- The [Load Set] button loads a saved list of songs.
- The [Juke] button plays through the list of songs automatically, like a jukebox.
This is a great feature for saving a list of current song projects, or for performing a live set with Band-in-a-Box accompaniment.
Medley Maker
Would you like to make a medley of various Band-in-a-Box songs (MGU) using Band-in-a-Box? This is easily done with the Medley Maker. Inside the Medley Maker, simply select the songs that you want, and Band-in-a-Box will make the medley for you. A medley is not simply joining songs together. A good medley uses a “transition” area between songs to introduce the new style, key, and tempo. The Medley Maker automatically creates a nice transition area for you, writing in chords that would smoothly modulate to the next song, style, key, and tempo!
To open the Medley Maker, click on the [Song Form] button in the Tools toolbar and choose MedleyMaker from the menu, or choose File | Import | Medley Maker. This launches the Medley Maker dialog. |

Unconditional 30-Day Money Back Guarantee on all products purchased from PG Music Inc.
PG Music Inc.
29 Cadillac Ave Victoria BC Canada V8Z 1T3
Sales: 800-268-6272, 250-475-2874,+ 800-4746-8742*
* Outside USA & Canada where International Freephone service is available.
Access Codes
Tech Support: Live Chat, support@pgmusic.com
 Online now
Need Help?
Customer Sales & Support
|
Phones (Pacific Time) 1-800-268-6272 1-250-475-2874 |
||
| Live Chat | ||
| OPEN | Online Ordering 24/7 |
|
| OPEN | Forums, email, web support |