
Band-in-a-Box® for Mac - DAW Plugin Help
Latest Updates
The latest version of Band-in-a-Box DAW Plugin is included in the Band-in-a-Box patch.
Download the latest Band-in-a-Box patch here.
- Band-in-a-Box DAW Plugin version 8.0 is included with Band-in-a-Box 2026
- Band-in-a-Box DAW Plugin version 7.0 is included with Band-in-a-Box 2025
- Band-in-a-Box DAW Plugin version 6.0 is included with Band-in-a-Box 2024
- Band-in-a-Box DAW Plugin version 5.0 is included with Band-in-a-Box 2023
- Band-in-a-Box DAW Plugin version 4.0 is included with Band-in-a-Box 2022
- Band-in-a-Box DAW Plugin version 3.0 is included with Band-in-a-Box 2021
- Band-in-a-Box DAW Plugin version 2.0 is included with Band-in-a-Box 2020
- Band-in-a-Box DAW Plugin version 1.0 is included with Band-in-a-Box 2019
About the Band-in-a-Box® DAW Plugin
With the Band-in-a-Box® Plugin, you can type in chords, choose the style you'd like, and generate your arrangement from the comfort of your Digital Audio Workstation (DAW). We've taken the features you love in our classic Band-in-a-Box application and created a plugin that can be used in your DAW.
The Band-in-a-Box Plugin is separate from the Band-in-a-Box® application and works directly inside your DAW (GarageBand, Logic, Pro Tools, Reaper, Digital Performer, Ableton, PreSonus, etc.) The Plugin uses the content (RealTracks, Styles, etc.) present in your normal Band-in-a-Box folder to generate audio or MIDI tracks that you can then drag/drop from the Plugin into your DAW.
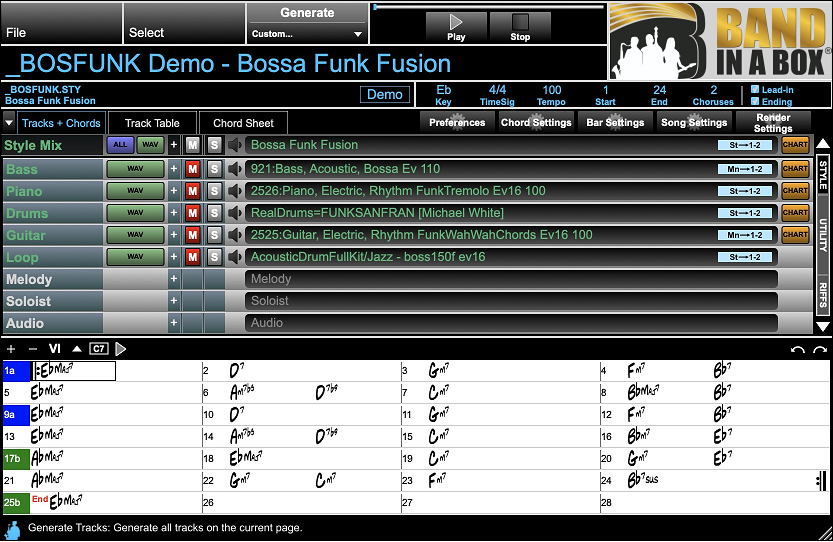
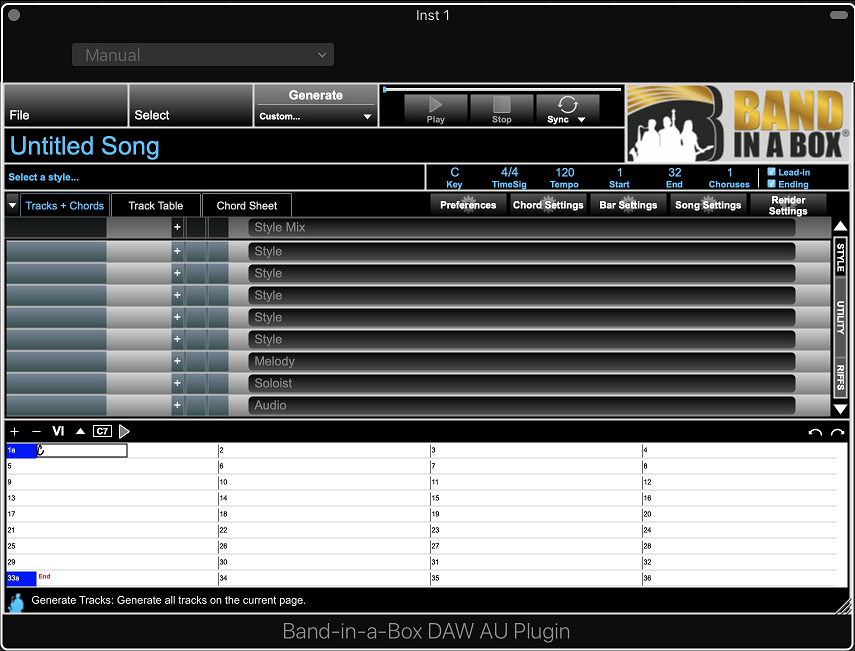
Band-in-a-Box Plugin Main Screen
Installation
The Band-in-a-Box Plugin is installed when you install the main Band-in-a-Box program. There are three types of plugin files included: Audio Units (AU), VST3, and AAX. The plugin types share the same features. Which type you'll use partly depends on what your DAW supports (for example, GarageBand only supports AU plugins, while Pro Tools has it's own AAX plugin format, and many other programs support VST).
For your reference, the Band-in-a-Box Plugin files are located in the normal Band-in-a-Box folder in the BBPlugin folder. You don't normally need to do anything with these files since they are also installed automatically to the standard plugin locations in the Mac system Library. You will however find the Band-in-a-Box Plugin "Stand-alone" app here: /Applications/Band-in-a-Box/BBPlugin/Files/Band-in-a-Box DAW Plugin Standalone.app. The Stand-alone version of the plugin also has the same feature set but is used outside of any DAW. It's useful in specific situations such as troubleshooting a problem with a specific DAW, or as a quick way to generate and render tracks outside of the full Band-in-a-Box application.
The Plugin's generated tracks are also saved in the BBPlugin folder in the SavedTracks subfolder.
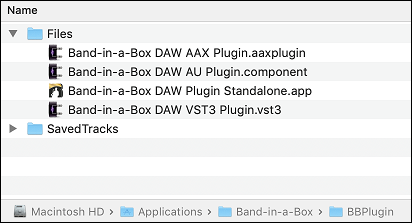
Band-in-a-Box BBPlugin folder location
The plugin files are stored in the following standard locations, and your DAW should normally find them automatically. If not, check your DAW's plugin settings to make sure it is scanning the correct location. Note: The plugin is 64-bit, and there is no 32-bit version. A program like jBridge could allow the plugin to work with a 32-bit DAW.
- Audio Units: /Library/Audio/Plug-Ins/Components/Band-in-a-Box DAW AU Plugin.component
- VST3: /Library/Audio/Plug-Ins/VST3/Band-in-a-Box DAW VST3 Plugin.vst3
- AAX: /Library/Application Support/Avid/Audio/Plug-Ins/Band-in-a-Box DAW AAX Plugin.aaxplugin
Getting Started
We'll use Apple's GarageBand to demonstrate using the plugin for the first time, since it is available on most Macs. You can follow the basic steps for any DAW, except that each DAW has a different method for loading plugins.
1. Open your DAW.
If you are following in GarageBand, Start a new empty project (File | New) and if asked to select a track type, select "Software Instruments".
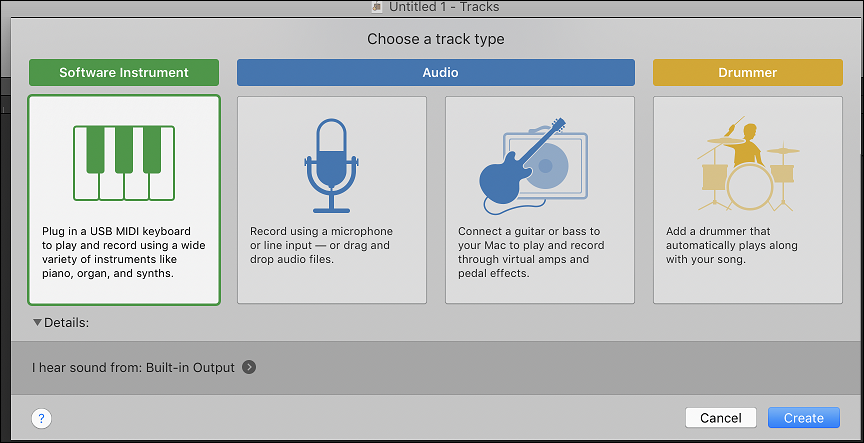
GarageBand - new project
2. Load the Band-in-a-Box Plugin.
As mentioned, this will be different for each DAW. For GarageBand, first make sure that the 'Smart Controls' area is visible (View menu | Show Smart Controls). This is typically at the bottom of the screen. In the Plug-Ins section of the Smart Controls area, click on the Instrument drop-down menu, point to AU Instruments | PG Music Inc. and click Band-in-a-Box DAW AU Plugin.
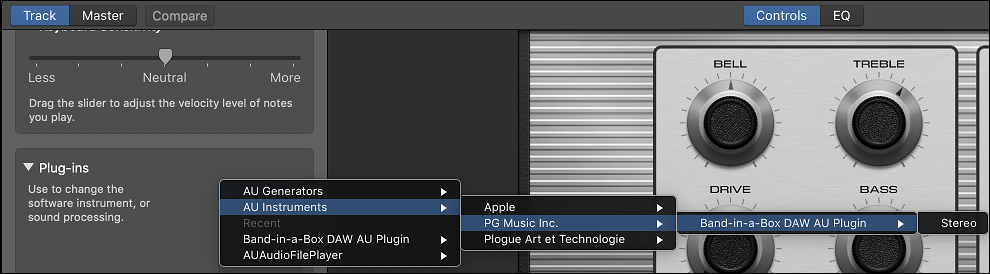
GarageBand - Smart Controls - Choosing Plugin
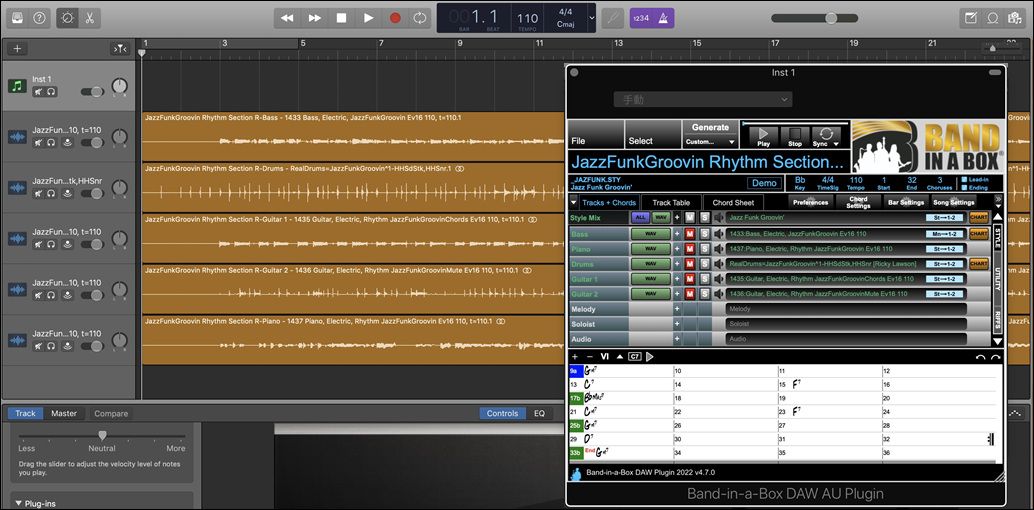
You should now see the Plugin window:
Band-in-a-Box Plugin inital main screen
The tracks section of the main screen is empty since we have not loaded a style or song, and the status icon at lower left corner of the plugin is white, indicating that the plugin is idle and not connected to Band-in-a-Box
3. Verify the location of your Band-in-a-Box folder.
The plugin needs to know the location of your Band-in-a-Box folder. Typically you won't need to make any changes to this setting, since the plugin determines the folders automatically, but you should verify that it has chosen the correct folders. Press the [File] button and select Preferences. Scroll down to the Folder Locations section. If you have Band-in-a-Box installed on your Mac's internal hard drive, the "Path for Band-in-a-Box" should read /Applications/Band-in-a-Box". If you are using an external "Band-in-a-Box UltraPAK" hard drive (for example), then the path should read /Volumes/Band-in-a-Box UltraPAK/Applications/Band-in-a-Box/.
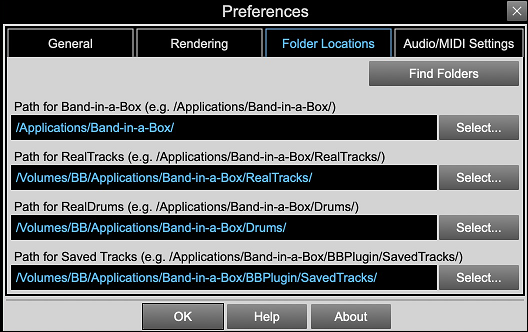
File | Preferences - folder locations.
The RealTracks and RealDrums folders are typically located in your Band-in-a-Box folder, however it is possible to store them in a different location (the purpose of this is to allow users to put these folders, which are much larger than the rest of the Band-in-a-Box files, on a separate external hard drive if need be).
As mentioned earlier, the "SavedTracks" folder is in the BBPlugins folder by default, however a custom location can be specified. This folder can grow large if many tracks are generated and not cleared.
Press OK to exit the Preferences
4. Generate tracks.
The Band-in-a-Box DAW plugin works just like the full Band-in-a-Box program. You type in your chords in the chord sheet, set the chorus begin/end bars, set the tempo, etc., and choose a style. For the purposes of this tutorial we'll just load in pre-made style demo using the StylePicker.
Press the [Select] button | Select a Style. At this point, the plugin will connect with Band-in-a-Box and the status icon (lower left) should turn blue. After a few seconds the familiar StylePicker will appear. Select a style and press [Load Song Demo]. For this tutorial, we'll choose the style _JAZFUNK.STY because it is included in all Band-in-a-Box packages and has several RealTracks. Press OK to exit the StylePicker.
At this point, you'll notice that the tracks area is filled with the names of the tracks in the style, and there are some empty green and blue squares beside each track:
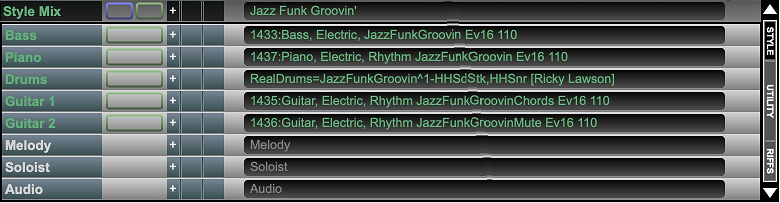
Track area with song loaded, before generation.
Press the [Generate] button. Generation time depends on your song, but is typically 5-20 seconds. When complete, you'll notice that the green and blue squares are now a solid colour and have a little waveform symbol, which indicates that they are generated audio tracks. For some tracks you could also see a yellow square with a note symbol - this is the RealCharts (MIDI notation track) if it happens to be available for that track.
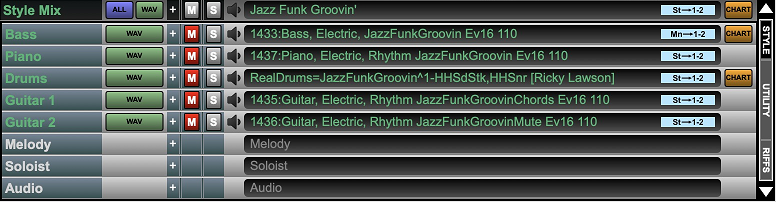
Track area after generation - ready to be dragged to DAW
You can demo the generated tracks by pressing the Play button at the top of the Band-in-a-Box Plugin window.
5. Drag tracks to DAW.
When the blue (master - all tracks), green (audio track), and/or yellow (MIDI track) squares are a solid colour with a symbol, this means they are ready to be imported (drag-n-dropped) into your DAW. You can drag a single track by clicking on the green square and dragging to your DAW. Alternatively, you can drag-n-drop ALL tracks at once by dragging the blue square - this is what we'll do in this tutorial. In GarageBand, first set your tempo to 110 so that it is the same as the _JAZFUNK style demo. Make sure the Tracks area is visible, then drag-n-drop from the blue square to the beginning of an empty track in the Tracks area. Here is the result in GarageBand:
GarageBand after Master drag-n-drop
Summary of features
Resizing the plugin
The Plugin can easily be resized by dragging the bottom-right corner of the Plugin to the desired size. This information is saved so that any time you open an instance of the plugin to edit/create your song, it will open at the same size.
Open saved MGU/SGU file
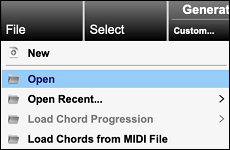
You can open your Band-in-a-Box file to generate tracks for your DAW. Simply click on the [File] button and select the Open menu item.
Save session to SGU file
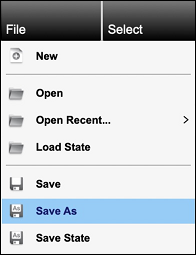
Create and save a song session so that you can open it in Band-in-a-Box or Realband, or share with your friends! Find the Save As option under the [File] menu and choose the location you would like to save to.
Edit song settings (name, key, tempo, start, end, #choruses, leadin/ending on or off)
Along with entering chords and selecting various tracks to generate, you can also edit the song settings to specify things like the song name, key, tempo, start bar, end bar, number of choruses, and whether to include a 2-bar lead-in and/or a 4-bar ending.
![]()
Plugin attempts to retrieve tempo and playback information from DAW
When you first use the Plugin, it will attempt to retrieve tempo information from your DAW. However, you can still change the tempo in your DAW or the Plugin independently from one another. If playback information is available from the host, the Plugin will use this information to highlight bars in the chord sheet during playback.
Note: If the Plugin cannot access this information, it will use the default information set.
Enter chords in chord table and playback from position. Chord table can be zoomed in/out
Just like Band-in-a-Box, you can enter chords in a chord sheet to use for the generation. Enter chords for any song using standard chord symbols or Band-in-a-Box shortcuts and hotkeys. You can cut, copy, and paste from any bar to another bar to make copying sections of a song easy. If you want to play a track from a specific bar, just double click the cell and playback will begin from that position. You can also zoom in/out of the chord sheet using the +/- symbols in the top left corner.
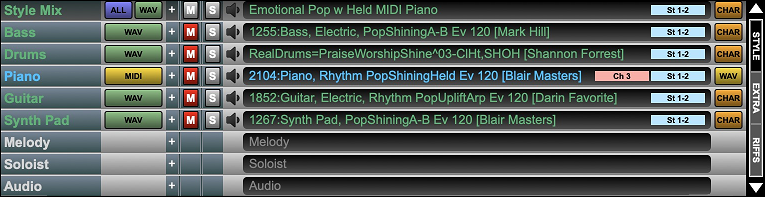
Select/Generate style tracks
Select from thousands of Band-in-a-Box styles and build your song by adding chords, setting your key, number of bars, choruses, lead-in and ending. When you are ready, hit the generate button to generate all the tracks you have in your track table. If you would like more custom generation options you can click to reveal the menu options for generation. Then sit back and relax while Band-in-a-Box does all the work!

Select/Generate up to 16 utility tracks (RT, UT, Loop, MST, RD, MIDI Solo, MDI Harmony)
Apart from selecting a style, you can also select up to 16 utility tracks. This includes RealTracks, UserTracks, Loops, MIDISuperTracks, RealDrums, MIDI Soloist and MIDI Harmony for a MIDI Melody.

Select/Generate RealTracks for 7 Multi-Riffs
You can also select a RealTrack to use for generating Multi-Riffs. Use the Select Menu to choose from a list of available RealTracks or the most previously used RealTrack.
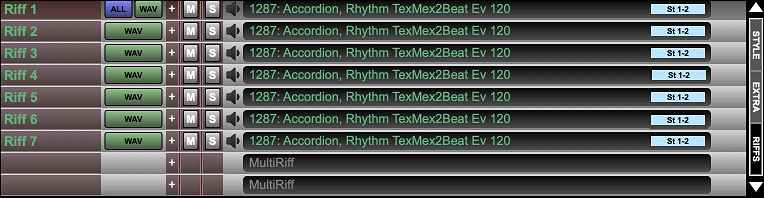
3 pages of tracks (1 = Style, 2 = Utility, 3 = MultiRiffs)
There are 3 pages in the track table in total. The first page is used for Style tracks and is the default page when there are no tracks (or only style tracks) selected. The second page is used for Utility tracks like additional RealTracks, UserTracks, Loops, MIDI SuperTracks, RealDrums, MIDI Soloist, and MIDI Harmony for a MIDI Melody. The third page is used for MultiRiff tracks.
Note: The second and third pages will become visible only if they contain a track. Otherwise, the track table view will default to the first page for style tracks.
Play/Pause/Stop generated track
After selecting and generating tracks, you can preview them by pressing the [Play] button or double clicking on the track square. You can also use shortcut keys like Ctrl+A (to play from start) and Esc (to stop playback). This lets you preview your generated tracks before you add them to your digital audio workstation.

Play Demo track of style
Once you have selected a style, you can preview a demo by simply clicking on the [Demo] button. This will play a generic demo of the style just like in Band-in-a-Box!

Drag and drop track into another location (DAW or Explorer)
One of the greatest features of our Plugin is the ability to drag-n-drop a generated track right into your project without having to leave your digital audio workstation. Once a track has been generated, you can drag the [WAV] or [MIDI] buttons on the left and drop it onto DAW. Real charts are also generated and can be dragged from the [CHAR] buttons on the right. The master track and first multi riff track both have the [ALL] and [WAV] buttons to give you the ability to drag all the tracks on that page together.
Location of saved tracks
The Plugin creates a unique (time-stamped) folder in the "SavedTracks folder every time you generate a track or set of tracks so that when you drag a track to your audio workstation, the original render is saved. However, tracks that have not been dragged to another location will be deleted upon the following generation.
Tip: You can clear your SavedTracks folders in the Preferences dialog of the Plugin.
 Online now
Need Help?
Customer Sales & Support
|
Phones (Pacific Time) 1-800-268-6272 1-250-475-2874 |
||
| Live Chat | ||
| OPEN | Online Ordering 24/7 |
|
| OPEN | Forums, email, web support |