47. I need assistance with a hard drive version of Band-in-a-Box® that I purchased.
Using the USB Hard Drive - General Information
When you plug the hard drive into a USB port, it should be mounted on your desktop automatically. Before disconnecting the drive, make sure to 'eject' it first.
The hard drive may have a 'Y' cable with two USB connectors on one end. The large connector is the main data connector and needs to be plugged in. The smaller connector is for extra power, in case a single USB port on your computer doesn't supply enough power for the drive. If you are having trouble with the drive, and you have another empty USB port, plug that second cable in.
Run the 'Band-in-a-Box® Setup' package to install the PG Music fonts and (if you wish) install Band-in-a-Box® on your Macintosh hard drive. Then use Band-in-a-Box® directly from the pre-installed Band-in-a-Box® folder on the hard drive, or from your Macintosh Hard Drive, whichever you prefer.
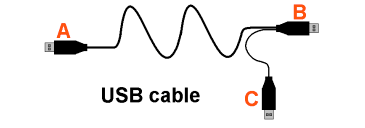
Detailed Hard Drive Connection Instructions
- Turn on your computer and wait for it to boot up.
- Plug USB connector A into the hard drive (see diagram below).
- Plug USB connector B into an available USB port on your computer.
- Connector C is an extra connector for use when additional power is needed, it isn't used for data transmission. You can plug this connector into another available port if you have one.
- At this point, you should see the hard drive icon appear on your desktop. Double-click to view the contents of the hard drive. You can look at the ReadMe First text file, which has a lot of the same information as this FAQ topic.
- Double-click on Band-in-a-Box® Setup and follow the on-screen instructions. You can install Band-in-a-Box® on your internal Macintosh hard drive, or just run Band-in-a-Box® directly from the external USB hard drive. To run it from the USB drive, open Applications/Band-in-a-Box® and double-click on the Band-in-a-Box® application icon.
- Before disconnecting the drive, make sure to 'eject' it first. To do this, either drag the icon to the trash, or click on it and press command-E.
You have three basic choices for how to run Band-in-a-Box®
#1 - You can run Band-in-a-Box® directly from the USB hard drive, and not copy anything to your computer's internal hard drive.
To do this, first run the "Band-in-a-Box® Setup" installer located on the root level of the hard drive. This will install the PG Music fonts on your computer, necessary for viewing the Notation Window. You don't need to select the option to install BIAB to your internal hard drive. You can use Band-in-a-Box® simply by double-clicking on the Band-in-a-Box® application in the \Applications\Band-in-a-Box® folder on the drive. You can make an alias for it (command-L) or add it to the dock if you wish.
#2 - You can install Band-in-a-Box® on your computer's hard drive, but leave the RealTracks and RealDrums on the USB hard drive.
To do this, run the "Band-in-a-Box® Setup" installer located on the root level of the hard drive, and select the option to install BIAB to your internal hard drive. Band-in-a-Box® will be installed to the /Applications/Band-in-a-Box® folder. Note that you will need to specify a custom location in the RealTracks and RealDrums Settings dialogs within Band-in-a-Box® - that is, point to the 'Drums' and 'RealTracks' folders in the Band-in-a-Box® folder on the USB drive.
This choice is useful because it allows you to keep a backup of the factory Band-in-a-Box® program files on the USB drive, but save space on your Macintosh hard drive by not copying the 'real files'.
#3 - You can install Band-in-a-Box®, RealTracks, and RealDrums on your computer's hard drive, and leave the USB hard drive entirely for backup.
Exactly how to do this depends on when you purchased your hard drive....
-
If you purchased it prior to September 2010: Run the "Band-in-a-Box® Setup" installer located on the root level of the hard drive, and select the option to install BIAB to your internal hard drive. Band-in-a-Box® will be installed to the /Applications/Band-in-a-Box® folder, like option #2. You'll need to then copy the 'RealTracks' and 'Drums' folders manually from the USB drive. They aren't installed automatically. Note that you only need to copy those two folders - 'Drums', and 'RealTracks' - nothing else. The Band-in-a-Box® Setup installer will have taken care of all the other files.
-
If you purchased it September 2010 or later: Run the "Band-in-a-Box® Setup" installer located on the root level of the hard drive, and select the options to install BIAB to your internal hard drive AND install the RealTracks to internal hard drive. Band-in-a-Box® will be installed to the /Applications/Band-in-a-Box® folder like option #2, and the RealTracks and RealDrums will be copied to the /Applications/Band-in-a-Box®/Drums and /Applications/Band-in-a-Box®/RealTracks folders respectively.
Note that copying the RealDrums and RealTracks to your Macintosh hard drive may take 60 minutes or longer to complete, depending on how fast your computer is, and requires a lot of free hard disk space. You should check how much free hard disk space you have beforehand - you can do this by selecting your Mac HD and press Command+I (Get Info). Do the same for the Band-in-a-Box® folder on the PG Music hard drive to see exactly how much space you will need for your particular hard drive edition.
Installing Band-in-a-Box® updates to the hard drive
If you are installing updates or add-ons to a USB hard drive version of Band-in-a-Box®, and you are running the program directly from the hard drive, select [Change Install Location] on the "Installation Type" screen of the installer, then click "Install on a specific hard drive". This will allow you to install the update directly to the Band-in-a-Box® folder on the hard drive, rather than on your Mac system drive.
Troubleshooting hard drive problems
If the hard drive does not show up on your desktop, if it freezes when accessed, if Band-in-a-Box® freezes, or if you get an error message when copying files to/from the hard drive, it is most likely because the hard drive is not getting enough power. Try one or more of the following to get more power to the hard drive:
-
Plug in connector C (see diagram above) to any available USB port on your computer (so connector B and C are both plugged in).
-
Plug in both B and C to USB ports on the main body of your computer. Ports on a non-powered USB hub or on your keyboard often provide less power. In addition, try different combinations of plugs, since different ports often provide different amounts of power.
-
If you are using a laptop, it is best to plug in the power cable rather than use battery power. Also, check the energy/power options in the System Preferences - USB power may be shut down when the computer goes to sleep.
Do not hesitate to contact us if you need further assistance.