
Search Manual
Band-in-a-Box® 2019 for Mac® User's Guide
Chapter 11: Working with Audio
Audio Track
The Audio track can contain your live recording or the imported audio file.
Import Audio File to Audio Track
You can import an audio file (WAV, AIFF, MP3, M4A, etc.) to the Audio track. To do this, go tomenu File | Import | Import Audio and select an audio file. You can also access this feature from the Audio menu. You will then see the Import Audio File dialog.
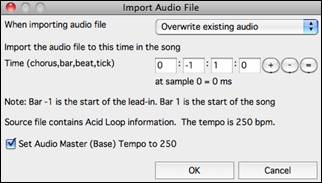 |
The dialog allows you to select the point to insert the audio file and whether to merge with or overwrite existing audio in the range. If the audio file contains Acid Loop or Apple ® Loop information, the dialog shows an option to set the audio base tempo of the current song to the tempo of the audio file. |
Audio Settings
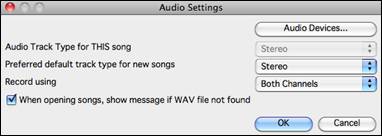
The Audio Settings dialog allows you to choose the Audio track type (mono or stereo) for the current song or the new songs, and channels (left/right/both) to record the audio. The dialog can be accessed from the [Audio] button in the Preferences dialog.
Audio Track Type for THIS song
This allows you to choose either mono or stereo for the Audio track in the current song. If you change this, then you will be asked if you want to convert the existing Audio track after exiting the dialog.
Preferred default track type for new songs
This allows you to choose either mono or stereo for the Audio track of the new songs.
When opening songs, show message if WAV file not found
If the song you are loading has the associated WAV audio file, the audio file will be loaded to the Audio track. If you enable this option, then when the associated file is not found, an error message will display. Uncheck this option if you do not want an error message popup when the WAV file is not found.
[Audio Devices]
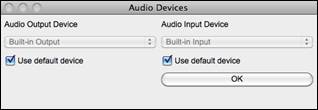
This will launch the Audio Devices dialog where you can select input and output audio devices.
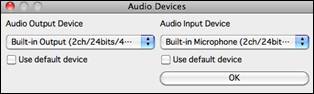 |
If “Use default device” is checked, Band-in-a-Box will use the device currently selected by your operating system (System Preferences > Sound). Disable this if you want to manually select a device. |
Record Audio
You can record vocal or instrument to the Audio track.
Press the [Record Audio] button to open the Record Audio dialog. |
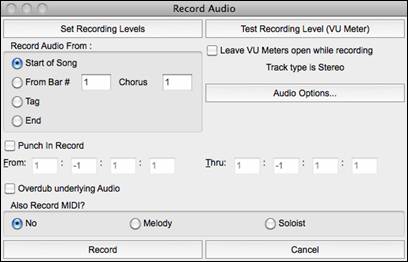
The [Audio Options] button will open the Audio Devices dialog where you can select a recording device.
|
|
The list of devices will update in real time if you connect or disconnect an audio interface. If “Use default device” is checked, then the selected device will automatically update when you change the input device in System Preferences. Checking this should also change to the system’s default input if that is not currently selected. |
The [Set Recording Levels] will launch System Preferences > Sound where you can select a recording device and recording levels for that device.
Pressing the [Test Recording Level] will open the VU Meters.
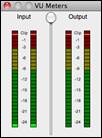 |
The meters show the average strength of the signal, with a dB scale, and a clip indicator. Clipping indicates that the signal has overloaded and will sound distorted (clipped). |
Record Audio From: You can record from the start of the song or anywhere in the middle.
Punch-In Recording: This option allows you to punch-in record or overdub a section of audio. For example, if you messed up in bars 2 and 3, then set these bars as your range. Recording will take place only for this range.
Overdub underlying Audio: If there is already data in the Audio track and you want to overdub it (to add a harmony, for example), then you should enable this option. It is not essential to select it at this point, since you will get another chance at the end of the recording.
Also Record MIDI?: You can simultaneously record MIDI to the Melody or Soloist track while recording audio.
Press the [Record] button to start recording. If you have chosen to start recording from the beginning of the song, the song will start with a lead-in count. If you are starting from elsewhere in the song, recording will start instantly.Pressing the [Stop] button on the toolbar or [esc] key will stop the recording and open the Audio Recorded - Keep Take? dialog.
|
|
Copy 1st chorus to whole song: If you have recorded only the first chorus, you can choose the option to copy that to the whole song. This will fill up the whole song with the audio by repeating it as many times as necessary. Overdub underlying Audio: If this is enabled, any existing data in the track will be merged with the new recording. |

Retain audio past last recorded: If this is unchecked, any audio that follows the end of the current take (i.e. recorded from a previous recording) will be erased.
Press the [OK - Keep Take] button if you are happy with the recording. Then the audio will be added to the Audio track. You can listen to the result by pressing the [Play] button on the toolbar. If you are not happy with the results, you can go to the menu Edit | Undo Record Audio and you will be back to where you were prior to the recording. You can also reopen the Record Audio dialog and press the [Take Again] button to cancel the recording.
Converting Audio Channels
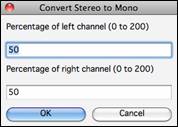
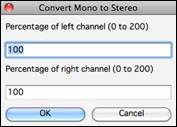
You can easily convert the Audio track from stereo to mono, or vice versa, with the Audio | Edit Audio | Convert Channels (mono/stereo) menu command. When you convert the channel, you can choose the percentage of each channel.
Generating Synthetic Vocal
Your Melody or Soloist track with lyrics can be rendered to a vocal audio track, with built-in support for the popular online vocal synth “Sinsy.”
To access this feature, you should first enter melodies and note-based lyrics to the Melody or Soloist track. If no lyrics are present, you can still generate a vocal synth using the syllable of your choice (e.g. la la la).
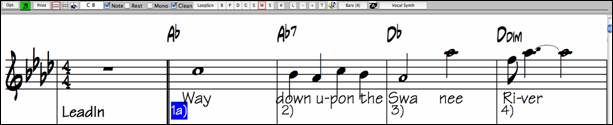
Press the [Vocal Synth] button on the Notation window toolbar or right-click on the Notation window and select either of the Vocal Synth menu items.
![]()
With the manual mode, Band-in-a-Box creates a Sound.XML file, which you need to upload to the Sinsy server. When the Sinsy has generated an audio file with a vocal synth, import it to Band-in-a-Box.
Normally, you would use the auto mode, which does this process automatically for you. When you choose an auto mode, the Generate Synthetic Vocal dialog will open.
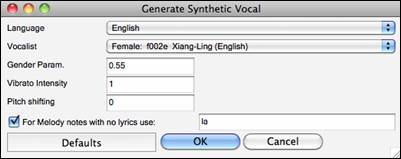
Language: The choice is English or Japanese. Select English unless your lyrics are entered in Japanese.
Vocalist: Choose one of the female or male vocalists. If the language is set to English, you can only select an English singer.
Gender Parameters: You can adjust the gender of the voice in a range from -0.8 to +0.8. Higher values are more masculine. The default is 0.55.
Vibrato Intensity: This controls the amount of vibrato in the voice. The range is from 0 to 2. The default is 1.
Pitch Shifting: This setting will shift pitch in semitones. The range is from -24 to +24. A setting of -12 would be down one octave. The default is 0.
For Melody notes with no lyrics use: If the track does not include lyrics, you can enter a syllable (.e.g. la) to use for notes with no lyrics. (Note: If you select a Japanese vocalist, you need to enter a Japanese syllable.)
When you press [OK], your song will be sent automatically to the Sinsy server and will be rendered to a vocal synth. This may take a few minutes.
When the vocal synth has been generated and imported to the Audio track, a flash message shows, and the Mixer expands to show the Audio panel.
![]()
![]()
Press the [Play] toolbar button to hear the vocal synth singing your song! |
Editing the Audio File (Audio Edit Window)
This window shows a digital waveform for the Audio track. In this window, you can select, play, and edit the audio data.
|
To open this window, press the [Audio Edit] button, or go to menu Window | Audio Edit Window. |
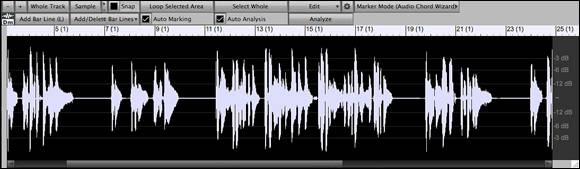
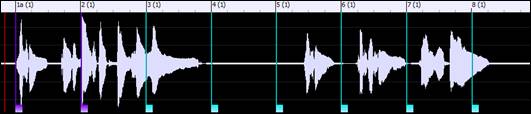
The numbered scale at the top of the window indicates bars and beats, with a full height vertical division for each bar and a short vertical line for each beat or quarter note. Bars with part markers also include the part marker letter with the bar number (e.g. 1a, 9b). The decibel (dB) scale is shown at the right of the window.
A region of the audio data can be selected by clicking and dragging the mouse. To expand or reduce the selection, hold down the shift key while clicking on the desired new boundary. The selection can be played using the [Loop Selected Area] button.
There are some handy features for stretching regions of audio. To use these features, select a region of audio, then click & drag while holding the command key. Clicking within the region and dragging to somewhere else within the region will stretch both halves of the region (one will become longer, and the other will become shorter). Clicking outside the region and dragging to somewhere in the region will shorten the region. Clicking within the region and dragging to somewhere outside the region will lengthen the region. These features can be useful for quantizing beats, or correcting mistakes in a recording.
![]() This button zooms out horizontally to display a larger area of the audio. Zoom focus will be on audio cursor. You can also zoom with the mouse wheel, which focuses on the mouse cursor.
This button zooms out horizontally to display a larger area of the audio. Zoom focus will be on audio cursor. You can also zoom with the mouse wheel, which focuses on the mouse cursor.
![]() This button zooms in horizontally to display a smaller area of the audio. Zoom focus will be on audio cursor. You can also zoom with the mouse wheel, which focuses on the mouse cursor.
This button zooms in horizontally to display a smaller area of the audio. Zoom focus will be on audio cursor. You can also zoom with the mouse wheel, which focuses on the mouse cursor.
![]() This will zoom out as far as possible, showing the entire audio track.
This will zoom out as far as possible, showing the entire audio track.
![]() This will zoom in to the sample level, which displays individual sample points (digital audio), and the curve of the waveform (analog audio). This is band limited interpolation which represents the waveform as it will be heard in reality once converted from digital to analog.
This will zoom in to the sample level, which displays individual sample points (digital audio), and the curve of the waveform (analog audio). This is band limited interpolation which represents the waveform as it will be heard in reality once converted from digital to analog.
![]() These buttons change the height of the waveform display. [+] increases the height of the waveform display, [-] decreases the height of the display.
These buttons change the height of the waveform display. [+] increases the height of the waveform display, [-] decreases the height of the display.
![]() Enable this to snap to the closest beat when selecting a region of audio.
Enable this to snap to the closest beat when selecting a region of audio.
![]() This will start playback and loop the selected region.
This will start playback and loop the selected region.
![]() This will select the whole audio track.
This will select the whole audio track.
![]() This button lets you access various features for editing the selected audio region and also allows you to change your settings for the Audio Edit Window.
This button lets you access various features for editing the selected audio region and also allows you to change your settings for the Audio Edit Window.
|
Silence - This will silence the audio. Amplify - This will increase or decrease the volume of the audio by a chosen number of decibels. A positive value will make the audio louder, or a negative value will make the audio quieter. Normalize - This will increase or decrease the volume of the audio in order to make the loudest point match the chosen decibel level. For example, if you choose -6 decibels and the loudest point in your audio is -8 decibels, then the audio will be increased by +2 decibels. Fade In - This will gradually change the volume of the audio. The audio will begin silent, and then gradually increase to full volume at the end. You can change the type of amplification curve in the Audio Edit Settings dialog. |
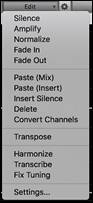
Fade Out - This will gradually change the volume of the audio. The audio will begin at full volume, and then gradually decrease to silence at the end. You can change the type of amplification curve in the Audio Edit Settings dialog.
Paste (Mix) - This will mix the audio from the clipboard with the existing audio instead of overwriting it. You will be given the option to set the percentage of the existing audio to keep and the pasted audio to mix in.
Paste (Insert) - This will insert the audio from the clipboard to the current location, instead of overwriting the existing audio. The audio to the right of the insertion point will be shifted to make room for the new audio.
Delete - This will delete the selected region of audio.
Insert Silence - This will insert silence at the cursor. The duration of the silence inserted will be equal to the duration of the selected region.
Convert Channels - If the audio is stereo, this will convert it to mono. If it’s mono, this will convert it to stereo. You will be given the option to set the percentage of the left and right channels to include.
Transpose - This will transpose the audio by a specified number of cents.
Harmonize - This will add harmonies to the audio.
Transcribe - This will transcribe the audio to the Melody or Soloist track as MIDI data.
Fix Tuning - This will automatically correct the tuning according to the key of your song. For example, in the key of C, if a C# is detected then it will be transposed down to C or up to D depending on which one is closer.
Settings - This allows you to customize the appearance of the window.
![]() This button will open the Audio Edit Settings dialog, which allows you to customize the appearance of the window.
This button will open the Audio Edit Settings dialog, which allows you to customize the appearance of the window.
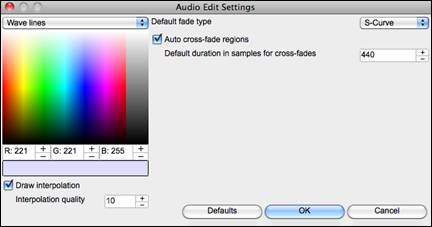
You can change the quality setting of interpolation or turn it off completely (quality vs. drawing speed). There is also an automatic feature to “auto cross-fade regions.” When a region of audio is being modified or replaced, the beginning and ending of the region will be cross-faded with the existing audio to make a smooth transition. This applies to Cut, Paste, Silence, Amplify, and Normalize.
![]() This button allows you to change the Marker Mode. When you select the Audio Chord Wizard or UserTracks mode, the markers will be visible and editable.
This button allows you to change the Marker Mode. When you select the Audio Chord Wizard or UserTracks mode, the markers will be visible and editable.
Each marker mode displays editable markers for various purposes. The Audio Chord Wizard mode shows bar line markers for making a tempo map, and the User Track mode shows bar/beat markers for defining rules in your UserTrack.
Audio Chord Wizard (Built-in)
The following buttons will appear if you select the Audio Chord Wizard marker mode.
![]()
In this mode, the first task is to locate bar lines in the audio so that the Audio Chord Wizard can detect chords accurately and the audio will play in sync with the Band-in-a-Box song.
![]() You can add bar lines with the [Add Bar Line] button or with the L key on your keyboard. A bar line will be placed at the audio edit cursor or at the playback cursor if the song is currently playing.
You can add bar lines with the [Add Bar Line] button or with the L key on your keyboard. A bar line will be placed at the audio edit cursor or at the playback cursor if the song is currently playing.
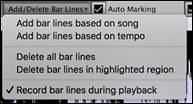
![]() The [Add/Delete Bar Lines] button menu has options to add bar lines based on your song structure or tempo. You can delete all the existing bar lines or only the ones within the highlighted region.
The [Add/Delete Bar Lines] button menu has options to add bar lines based on your song structure or tempo. You can delete all the existing bar lines or only the ones within the highlighted region.
![]() If “Auto Marking” is enabled, then Band-in-a-Box will automatically add and arrange bar lines based on the bar lines you have added manually. The “auto” bar lines will show in light blue, and the “user” bar lines will show in purple. You can change these colors in the Audio Edit Settings dialog if you want.
If “Auto Marking” is enabled, then Band-in-a-Box will automatically add and arrange bar lines based on the bar lines you have added manually. The “auto” bar lines will show in light blue, and the “user” bar lines will show in purple. You can change these colors in the Audio Edit Settings dialog if you want.
![]() If “Auto Analysis” is enabled, then Band-in-a-Box will re-analyze the chords in the audio whenever you add or move a bar line, or when you edit the audio data. Keep this setting disabled if you prefer to set all bar lines first (i.e. establishing tempo), and then analyze the chords when you are done.
If “Auto Analysis” is enabled, then Band-in-a-Box will re-analyze the chords in the audio whenever you add or move a bar line, or when you edit the audio data. Keep this setting disabled if you prefer to set all bar lines first (i.e. establishing tempo), and then analyze the chords when you are done.
Bar lines can be moved with the mouse. Just click and drag the thumb control at the bottom. If you move an “auto” bar line, it will become a “user” bar line.
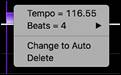 |
You can also right-click on the thumb control to get a context menu with options to switch a marker type (“user” or “auto”), delete the bar line, or set the time signature for the bar. The menu also shows you the tempo of the bar, based on the time signature of the bar and the position of the next bar line. |
When you add or move bar lines, Band-in-a-Box will automatically make a tempo map, so your song is in sync with the Audio track.
Any changes you make in the Audio Chord Wizard mode are undo-able. This was previously not possible with the standalone Audio Chord Wizard.
![]() Use the [Analyze] button to analyze the chords in the audio. The chords detected in the audio will be written into the Chord Sheet. You don’t need to do this if you have “Auto Analysis” enabled, but you might want to if you have erased or made changes to the chords in the Chord Sheet.
Use the [Analyze] button to analyze the chords in the audio. The chords detected in the audio will be written into the Chord Sheet. You don’t need to do this if you have “Auto Analysis” enabled, but you might want to if you have erased or made changes to the chords in the Chord Sheet.
When you open the Chord Sheet, you will see the Audio Chord Wizard has entered the chords and the tempo map.

Audio Harmonies
The audio harmonies include following features.
- Harmonizing the audio with up to 4 voices.
- Correcting out-of-tune notes.
- Transcribing the audio to notation.
Harmonize the Audio Track
First, import an audio file or open a Band-in-a-Box song file with audio. Then, go to the menu Audio or Harmony, and select Audio Harmonies, Pitch Tracking, Fix Tuning (Audio Edit).
![]() or
or ![]()
![]()
This will open the Audio Edit window and the Audio Harmony dialog.

Choose one of the 4 harmonizing modes.

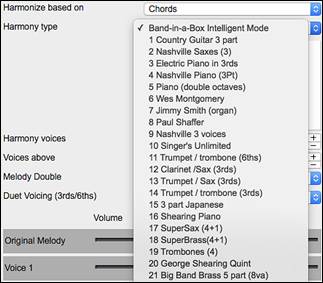 |
1) The “Chords” mode will harmonize the audio based on the chords in your song. Choose a type of harmony from the “Harmony type” option. Choose either the intelligent mode, which allows you to select the number of voices and other options, or one of the harmony presets. Then, set the volume and the stereo balance of each voice in the harmony. When you select the intelligent mode, you can also use the “Melody Double” option to make one of the harmony voices double the original melody. For the 2-part harmony, you can make the harmony voice 3rds or 6ths above/below the original melody depending on the “Voice above” setting or a combination of 3rds and 6ths with the “Duet Voicing” setting. |
|
2) The “Melody track” mode will add voices to the audio, based on melodies in the Melody track. You can choose the number of voices (up to 4 voices), and the volume and the stereo balance of each voice. |
|
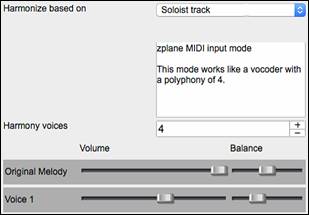
3) The “Soloist track” mode will add voices to the audio, based on melodies in the Soloist track. You can choose the number of voices (up to 4 voices), and the volume and the stereo balance of each voice. |
|
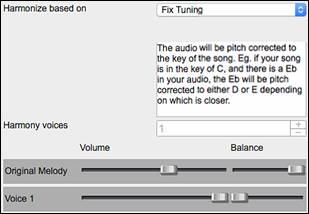
4) The “Fix Tuning” mode will analyze the Audio track and corrects out-of-tune notes in the selected region according to the key of your song. Normally, you do not want to keep out-of-tune notes after the fix tuning is done, but you can mix the original voice with the fixed one by moving the volume slider for “Original Melody” to the right. |

![]() You can use the “Transcribe original audio to Melody track” option to transcribe the original audio to MIDI on the Melody track.
You can use the “Transcribe original audio to Melody track” option to transcribe the original audio to MIDI on the Melody track.
![]() If “Transcribe harmony voices to Soloist track” is enabled, the harmony voices generated will be transcribed to MIDI on the Soloist track.
If “Transcribe harmony voices to Soloist track” is enabled, the harmony voices generated will be transcribed to MIDI on the Soloist track.
Fix Tuning for Audio Track
This feature analyzes the Audio track and corrects out-of-tune notes in the selected region according to the key of your song. For example, in the key of C, if a C# is detected, then it will be transposed down to C or up to D depending on which one is closer. To use this feature, press the [Edit] button in the Audio Edit window and select Fix Tuning from the menu.
![]()
![]()
Auto-Transcribe of Audio Track to Notation (MIDI)
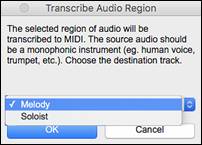
This will transcribe the selected region of audio to the Melody or Soloist track as MIDI data.
To access this feature, press the [Edit] button in the Audio Edit window and select Transcribe from the menu. You can then select the destination track.
|
|
Render Song to Audio Track
This will convert all tracks in the current song into audio data and move them to the Audio track. To use this feature, right-click on the Master radio button, and select Render Song to Audio Track (and mute tracks) from the menu.
![]()
![]()
If you want to restore the tracks, right-click on the Master radio button and select Un-Render Song from Audio Track (Enable tracks, erase audio track).
![]()
![]()
Unconditional 30-Day Money Back Guarantee on all PG Music products purchased from PG Music Inc.
PG Music Inc.
29 Cadillac Ave Victoria BC Canada V8Z 1T3
Sales: 800-268-6272, 250-475-2874,+ 800-4746-8742*
* Outside USA & Canada where International Freephone service is available.
Access Codes
Tech Support: Live Chat, support@pgmusic.com
 Online now
Need Help?
Customer Sales & Support
|
Phones (Pacific Time) 1-800-268-6272 1-250-475-2874 |
||
| Live Chat | ||
| OPEN | Online Ordering 24/7 |
|
| OPEN | Forums, email, web support |