
Search Manual
Band-in-a-Box® 2022 for Mac® User's Guide
Chapter 12: Tools, Wizards, Tutors, and Fun
Install Manager
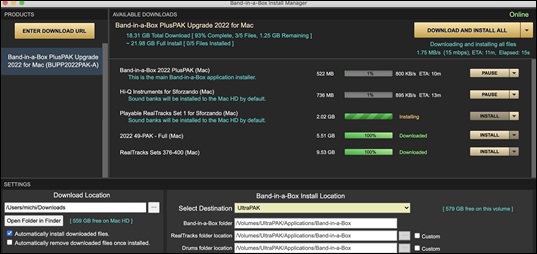
You can download and install the entire package of your order with the one-click Install Manager. This is a much simpler alternative to manually downloading and installing all the files individually that are listed on the “My Products” page in your account. This is particularly useful for “download-only” (e-delivery) versions of the Band-in-a-Box Pro, Mega, and UltraPAK, since there can be 100 GB of files to download and install.
After you place your order, click on the link(s) in your order confirmation email to go directly to your Downloads page for each product. If the Install Manager is available for the product, there will be a link to download it at the top of your download page list.
Once this setup file is downloaded, run it to install the Install Manager program on your computer. The program will be installed into the Applications folder on your Mac system hard drive.
Run the Install Manager. Press [Enter Download URL] and paste in the link to your download page for any product. Then, press [Download and Install All]. Files will be downloaded to the specified download folder and installed to your Band-in-a-Box folder.
DAW Plug-In Mode
There is a “plug-in” mode for your favorite sequencer (GarageBand, ProTools, Logic, Nuendo, Reaper and more). With the plug-in mode, Band-in-a-Box is open as a small window, and acts as a plug-in for your favorite DAW sequencer, so you can drag and drop MIDI and audio (AIFF, M4A) tracks from Band-in-a-Box to your favorite sequencer.
The DAW Plug-in mode is a mode within the regular Band-in-a-Box program. This mode allows you to transfer tracks or parts of tracks, to other DAW sequencers or Finder.
![]() You can enter and exit the plug-in mode easily by pressing the small [DAW] button on the main toolbar.
You can enter and exit the plug-in mode easily by pressing the small [DAW] button on the main toolbar.
When you do this, the window size of Band-in-a-Box becomes small. (You can resize it to the size/position that you want, and it will remember that).
Drag and Drop
|
This is the Drop Station where you drop a track after dragging it to get an audio or MIDI version of the track. There are 4 quadrants, and they are labeled according to the types of files that will be made by the drop: Audio Files (WAV, M4A, AIFF) or MIDI file (MID). |
|
When you drop the track onto the Drop Station, you will see an orange color, indicating that the track is accepted, and the file is being prepared. |
|
When the file is ready, the Drop Station turns green. You can now drag it to your favorite DAW or Finder. |
|
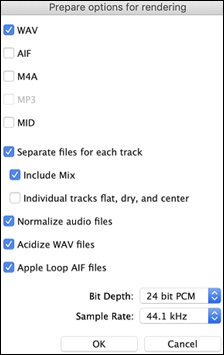
When you drop the track to the [+], you are presented with a dialog, where you can choose a file format and other render options. |
|
You can choose a format (WAV, AIF, M4A, or MID) of the file. When you have dragged the Master radio button, you can select the Separate files for each track option. Check the Include Mix option to render a mix of all tracks to a separate file. If the Individual tracks flat, dry, and center option is enabled, each track will render ignoring its Mixer settings (Volume, Pan, Reverb, and Tone), and the default settings will be used instead. The default settings are Volume=0 db, Pan = 0, Reverb= 0, Tone = 0). If this option is disabled and there is no lead-in in the Melody track, the lead-in will be skipped in the rendered file.If Normalize audio files is selected, the file will be normalized. Normalizing boosts the volume to a maximum level without distortion. Most professional music tracks are normalized. If you want to add ACID information (tempo, key, and time signature) to the WAV file, check the Acidize WAV files option. The dialog also has settings for bit depth (16, 24, 32 bit) and sample rate (44.1, 48.0, 96.0 kHz). |
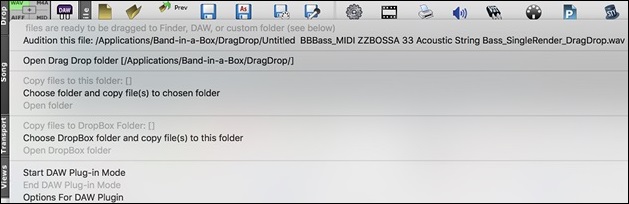
There is a right-click menu allowing you to copy the resulting file to a favorite folder, open the favorite folder, start/stop the DAW Plug-in mode, upload to Dropbox and more.
Dragging Master Track
![]() If you want the entire performance, drag the Master button to the Drop Station. Then when it turns green, drag to a DAW or Finder.
If you want the entire performance, drag the Master button to the Drop Station. Then when it turns green, drag to a DAW or Finder.
It will be dragged as audio, unless you have set it to be dragged as MIDI with the “Drag Master track as audio” option in the Plugin Settings dialog.
By default, a single file is dropped, with the entire arrangement, but if you want all tracks transferred as separate files, you can enable the “Drag Master as separate tracks” option in the Plugin Settings dialog. (Note that your DAW will need to support dropping of multiple files and will typically put them on consecutive tracks.)
Dragging a Single Track
![]() If you want a single track transferred, drag that track button to the drop station. (For example, drag the Bass button to transfer the bass track.) Then when the Drop Station turns green, drag that to a DAW or Finder.
If you want a single track transferred, drag that track button to the drop station. (For example, drag the Bass button to transfer the bass track.) Then when the Drop Station turns green, drag that to a DAW or Finder.
If the track is a RealTrack (green), then it will be transferred as Audio. If it is a MIDI track (yellow), then it will be transferred as MIDI.
If you want MIDI tracks transferred as audio, you can set this in Plug-In Options dialog.
Dragging Selected Regions
![]()
If you would like to transfer only a portion of the performance, you can do this by selecting the region in Band-in-a-Box and then dragging the track button to the Drop Station (don’t drag the selected region). You will then get just the selected region dragged to a DAW or Finder.
Dropbox Support
You can easily drag/drop files from Band-in-a-Box directly to your Dropbox folder, or save audio to Dropbox, without leaving the main Band-in-a-Box screen. To do this, drag a track (or the Master button for all tracks) to the Drop station, and when it turns green, you can right-click on the [Drop] button, and choose “Copy files to Dropbox Folder.”
![]()
Plug-In Options
|
To get to the DAW Plug-in options, press the [Plugin] button and choose the menu item “Options for DAW Plug-in” or go to the Preferences dialog and click the [DAW Plugin] button. |
You will then see the plug-in options.
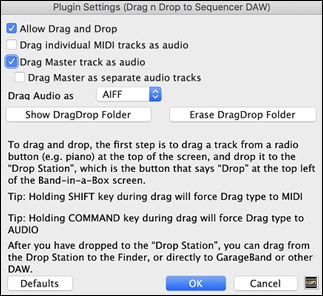
Allow Drag and Drop: If disabled, the Drag and Drop feature will not work. There shouldn’t be a reason to disable this.
Drag Individual MIDI tracks as audio: When enabled, the chosen MIDI tracks get converted to audio, using Apple® Synth.
Drag Master track as audio: When enabled, the entire arrangement gets converted to audio, using Apple® Synth. If not selected, the MIDI tracks in the arrangement get transferred as MIDI, in a single file.
Drag Master as separate tracks: If set to true, when dragging the Combo button, the drop will result in multiple files, one for each track.
Drag Audio as: You can choose the format of the audio files that will be created.
[Show DragDrop Folder]: This will show Finder where the dropped files reside. When you drag a file to your DAW, the file is created on disk and stored in the DragDrop folder inside the Band-in-a-Box folder.
[Erase DragDrop Folder]: This will erase (trash) all the dragged audio/MIDI files in the DragDrop folder. Note that some DAW sequencers require these files to reside permanently (or until you use a “consolidate” command in the DAW), so don’t erase these files unless you are sure that they are not needed.
“Woodshed” Tempo Feature
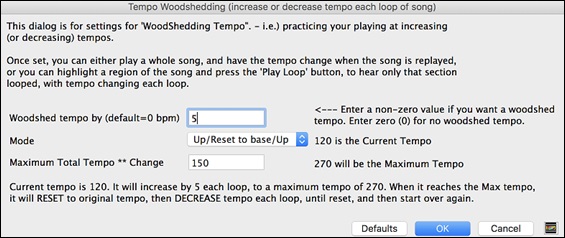
When practicing (or “woodshedding”) a tune, it is useful for the tempo to speed up every time the section loops or the song restarts from the beginning. To use this feature, press the [Practice] button on the toolbar, select the menu item Woodshed (increasing) tempo practice and set the “Woodshed tempo” value in the Tempo Woodshedding dialog.
For example, if you set the value to 5, the tempo will speed up by 5 each time the song (or a highlighted section) loops to the beginning. The idea is that you start off with a slow tempo, playing the part perfectly, and keep this up as the song tempo increases.
When you press Stop, the tempo reverts to the original tempo.
There are four modes to the woodshed tempo field.
- “Up only,” which is getting faster each loop “forever,” well until tempo = 500, which is BB’s maximum tempo.
- An “up then down” mode that goes up by [a settable increment] up to a [settable maximum] and then starts going down by the increment back to the original where it restarts. For example, a song with a tempo of 140, if you set the tempo to increase by 5, to a maximum increase of 100, the song will go from 140,145,150 etc. to 240, then go to 235,230… back to 140 and cycle again.
- An “Up then Reset” mode, that goes up in increments up to the settable maximum, then resets to the original and starts again. For example, a song with a tempo of 140, if you set the tempo to increase by 5, to a maximum increase of 100, the song will go from 140,145,150 etc. to 240, then go to 140 and start again.
- An “Up and stay at Max” mode that goes up until the maximum and stays there.
Modes 2 and 3 are analogous to a “treadmill workout,” with programmed changes in speed.
Playalong Wizard
The Playalong Wizard is an intelligent play along feature that uses your QWERTY keyboard to play along with Band-in-a-Box. This also allows you to record to the Melody or Soloist track without an external MIDI keyboard, and can even be used to trigger the Soloist Wizard. Also, play along using the Wizard can use the harmony feature, so you can play along live from your QWERTY keyboard in 4-part Saxophone harmony for example.
Turning the Wizard On/Off
Click on the [MIDI] toolbar button and check MIDI Keyboard Wizard Enabled. You can also select the Wizard Playalong option from thePlaymenu, or press option+W.
![]()
![]()
Playing the Wizard
The Wizard keys are only active during playback. The active keys are the lower 2 rows of the keyboard.
A S D F G H J K L ; < This row plays PASSING tones (second, fourth, sixth)
Z X C V B N M , . < This row plays CHORD tones (root, third, fifth, seventh)
Changing Instruments / Settings for the Wizard
The Wizard is a play along instrument, so is treated just like the THRU instrument. Changing Instruments, Volume, Reverb, etc. for the Wizard is therefore the same as for the THRU instrument. (i.e., Click on the THRU button, then select instrument etc.) You can record the Wizard and it will use THRU harmonies if selected.
Play Regular Notes
There is an option to play regular “non-smart” notes, for those of you up to the task of poking out actual melodies on your QWERTY keys.
In the Song menu, toggle Wizard Uses ‘Smart’ Notes off (unchecked) to have the Wizard provide you access to a chromatic scale, and toggle on to have Band-in-a-Box provide you with notes based on the chord/key of the song.
Soloist Wizard
Additionally, you will find another great Wizard feature in the Soloist menu; the Solo Wizard. Toggling this option “on” enables the Soloist Wizard. As you play notes on the MIDI or QWERTY keyboard, the program will play “correct” notes in the style of the current Soloist! This means that you can play a perfect solo every time, simply by pressing any key on your MIDI keyboard or QWERTY keys.
Beyond impressing your friends with your newfound improvisational prowess, this feature has practical implications as well. For example, you can concentrate on practicing your solo phrasing and playing “in time” without concerning yourself with which notes to play (Band-in-a-Box will supply the correct notes: see the next section for details.)
Recording Using the Wizard
To record the Wizard, press the [Record MIDI] button to record, and play the Wizard. This will be recorded. You can use the feature of recording the Wizard to enter music without a MIDI keyboard that doesn’t sound as stiff as most music entered in step time. This is how it works:
- Press the [Record MIDI] button.
- As the song plays, play the melody that you want on any Wizard key, using the same key for each note, in the rhythm of the melody. The Wizard notes won’t be the exact melody, but don’t worry about that as you record.
- When you are finished, go to the Notation window. You now have the notes with the correct durations and times, but the wrong pitches.
- One by one drag the notes up to the correct melody note, holding down the shift, control, and
 key for sharps, flats, and naturals respectively. You will then have entered a melody that sounds like it was recorded from a keyboard, without the stiff sound of a melody entered in step time!
Scales Wizard
When students are practicing Jazz tunes, it is helpful to see the scales that are used for each chord. The Scale Wizard allows you to easily generate these scales, which appear as notation on the Soloist track. Options include Instrument Range, Patch Selection, Jazzy Mode (will use Lydian dominant scales for some 7th chords), and Diatonic Mode (keeps scales relative to the song key).
The Soloist | Scales menu items allow you to generate scales for a certain song, or auto-generate them for all loaded songs. View the scales in the notation or the on-screen guitar and piano.

Scale Direction - When playing a new scale, either start on the root of the scale (going up) or start with the closest scale tone (moving up or down). The two modes are:
1. Ascending. The scales will always start on the root that is in the octave above the Lowest Note that is set and will play in ascending order.
2. Walking. The scales will start on the nearest scale tone to the previous tone that was played. The notes will ascend to the Highest Note setting, and then descend (by scale tones) down to the Lowest Note.
Write to Track - Choose Melody or Soloist track to write the scales to.
Lowest Note is the lowest note to play for any scale. C5 (note 60) is middle C.
Highest Note is the highest note to play, used when the scale direction is up and down (Walking).
Scale Tones Diatonic to Key Signature - If diatonic, minor scales will be according to the key (VI minor is Aeolian etc.). Otherwise, all minors will be Dorian.
Use Jazz Scales - If set, will use Lydian b7 chords. Chords like Bb7 in the key of C will have Lydian b7 scales (i.e. A#4 in the scale).
Patch - Send this MIDI patch (instrument) when playing the scale.
[Defaults] sets to default values.
[OK- Generate Scales] writes the scales to the notation of the selected track, Soloist or Melody.
MIDI File Chord Interpretation Wizard
Many people who play music by ear think of songs in terms of “Chords and Melody.” However, many MIDI files lack chord symbols, so they become difficult to learn without the user having to figure out the chords in a time-consuming process.
Now you can open any MIDI file in Band-in-a-Box, and Band-in-a-Box will automatically figure out the chords of the song for you. It automatically analyzes the MIDI file, figures out where the Bass, Piano, Melody, and other tracks are, and then figures out the chord changes for the song. The chords are written onto the Chord Sheet like any other song. This allows you to quickly learn how to play a song from a MIDI file - just read it into Band-in-a-Box and you’ll see the chord symbols, and then learn the melody! You can also read tracks into the Melody and Soloist tracks.
To interpret MIDI chords, first blank the Chord Sheet, by choosing File | New. Then select the menu item File | Import | Import Chords, Tracks and Lyrics from MIDI File or press the keystrokes control+option+I. This launches the Chord Wizard dialog.
Press the [Open (Change)…] button to select the MIDI file that you’d like to import. If you select the “All” checkbox, then all files will be displayed. If you deselect the “All” checkbox, then only filenames ending with .MID will be displayed.
Once you have selected the file, you can press the [INTERPRET CHORDS NOW] button. When you do that, the chords will be interpreted from the MIDI file, and written onto the Chord Sheet. Prior to pressing the button, you might want to make some custom settings.
When you load in the MIDI file, Band-in-a-Box automatically interprets many things from the MIDI file for you. Normally you’d want this to happen, but if for some reason you’d prefer to make the settings yourself, you can set Auto Interpret settings from MIDI file to false.
The settings that are determined automatically for you are:
- The key signature of the song (MIDI file). Some MIDI files contain a special event that states the key signature of the file, but most don’t. For the ones that don’t, Band-in-a-Box analyzes the tracks and makes a “best guess” at the correct key signature for the song. It usually gets it right, but if it’s wrong, it’s likely out by a 4th or 5th interval.
- Tempo, time signature.
- The channels used for the Bass part, Piano (comping) parts.
- The channels used for the Melody parts.
- The number of bars in the song to import, including the number of lead-in bars in the song.
Once you have loaded in the MIDI file, (by pressing the [Open (Change)…] button), and assuming that you have the “Auto Interpret” set to true, you’ll see that the dialog displays the settings that the Chord Wizard has found in the MIDI file for the key signature and channels used for the song.
Let’s work with an example song called Violet Song.MID.
This should be included in your Songs folder. For this example, we are going to interpret the chords of this MIDI file and read them into Band-in-a-Box.
Start with a blank Chord Sheet by choosing File | New.
Choose the MIDI file Chord Wizard dialog by choosing File | Import Chords from MIDI File.
Press the [Open (Change)…] button to select the MIDI file, and then choose the file that you would like to import. In this case, it is called “Violet Song.MID.”
Once you load in the file, you will notice that the Chord Wizard has analyzed the MIDI file and made these determinations for you.
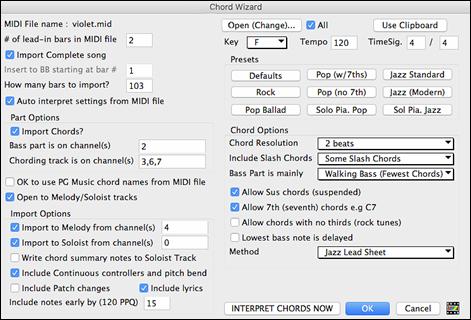
It has automatically determined that the “Violet Song.MID” file
 has 2 bars of lead-in,
 has 103 bars of chords,
 is in the key of F with a 4/4 time signature, and a tempo of 120.
 The Bass part is found on channel 2.
 The chording (comping) parts are found on Channels 3, 6 and 7.
 The Melody is found on Channel 4.
 There are no other parts like the Melody that should be put on the Soloist track.
Now, after loading in the MIDI files, you’d normally have a look at these settings to see if they seem reasonable for your MIDI file. If they are not, you can change the settings. For example, if you know that they key signature of the song is not F but is C, then you would set that. Similarly, if you knew that the Melody channel was on channel 3, you could set that to override the Chord Wizard settings.
Presets: Once you have done that, choose one of the Presets to quickly enter the settings to the type of song that you are trying to interpret. Preset choices are Jazz Standard, Jazz (Modern), Pop (with seventh chords), Pop (with no seventh chords), Rock, Pop Ballad, Solo Piano, and Solo Piano (Jazz).
Chord Options: When you choose one of these presets, it automatically makes a number of settings in the Chord Options section of the dialog, but you can override them in this dialog. These include,
Chord Resolution: (Range from 1 beat to 4 bars, default = 2 beats) This is the minimum number of beats for a chord. For example, if you set it to 2 beats, then the Chord Wizard will never attempt to come up with different chords that are only a beat apart.
Include Slash Chords: If set, the Chord Wizard will include “slash chords” like F7/A or Cm/G.
Bass Part is mainly: You can set this to “Root only,” “Root third and 5th,” or “Walking bass.” If you choose “Root Only,” the Chord Wizard will assume that any bass note is the root of the chord. Choosing “Root-3-5” will cause the Chord Wizard to assume that the bass pattern is mainly on the root-3-5 of the chord. If you choose “Walking bass,” it will assume that the bass notes can be changing and can include many notes beside the root. Setting the “Walking bass” line will likely result in fewer chords overall than setting the “Root only” option.
Allow Sus Chords / Allow 7th chords / Allow chords with no thirds: The setting for “Allow Sus” chords determines if chords like Csus or Bbsus7 will be included. The “Allow 7th chords” specifies if 7th chords like C7 or Bbm7 would be allowed. Simple Rock songs might not have 7th chords or SUS chords. Allowing chords with no thirds should be set in a hard rock song, or similar song with “power chords” that might not contain the 3rd of the chords.
Lowest bass note is delayed: Usually a bass player plays the root of the chord at or near the time when the chord changes. But in solo piano playing or some bass styles, the bass doesn’t state the root until later on, and this setting should be set to “delayed” in a solo piano style of this type.
Method: You can also set the primary style of the song to Jazz or Pop using the Lead sheet Method combo box.
Using the Chord Options Presets to make settings for Violet Song.MID.
For the song “Violet Song.MID,” we know that this is a Jazz Swing type of song, so we press the preset called “Jazz Standard.” By doing this, we see that the chord options have then been set to Chord Resolution of 2 beats, no slash chords, walking bass, sus chords, 7th chords, and Jazz lead sheet. These settings look OK for our Jazz song; if we wanted to customize it (for example to allow slash chords) we could do it at this point.
So, to recap, using the Chord Wizard is a 3-step process.
- We loaded in the song “Violet Song.MID.”
- Pressing the preset button called “Jazz Standard,” we then looked at the Chord Options settings for the various channels and they looked OK, so we didn’t make any changes.
- We then press the [INTERPRET CHORDS NOW] button – this gets the Chord Wizard to interpret the chords and write them to the Chord Sheet.
Once we’ve pressed the [INTERPRET CHORDS NOW] button, we can see the results by looking at the Chord Sheet. Here are the chords that were interpreted.
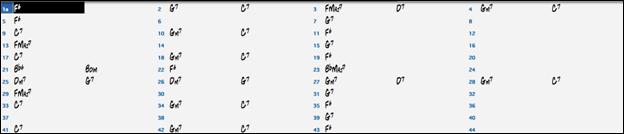
So that we can see how well the Chord Wizard did, we can compare it to the “correct chords” of the song, input by a musician listening to the song. You can see these by loading in the song “Violet Song.MGU.”
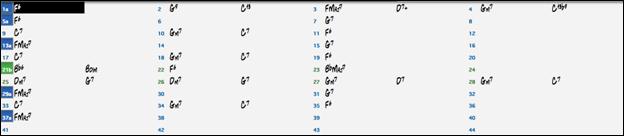
As you can see, by comparing the two sets of chords, the Chord Wizard got almost all the chords correct in this example. The Chord Wizard purposely avoids chords like “C13,” it will put a simpler “C7” instead, since this is more like a typical lead sheet.
If you have read in the entire MIDI file, you have 103 bars of chords on the Chord Sheet. This actually contains 3 choruses of the song. You might want to reduce that to a single chorus, by setting the chorus end of the song to bar 36, and then erasing the excess bars (after bar 36) by choosing Edit | Erase.
Examining the song that has been interpreted by the Chord Wizard.
You will notice that the title (Violet Song), key (F,) and tempo (120) have been set to the values found in the file. Part markers are not set; the Chord Wizard doesn’t try to guess where part markers might be occurring. You need to put the part markers in yourself. You also need to choose the style to use (a Jazz Swing style in this case).
If you examine the Melody track by opening the Editable Notation window and option clicking on some notes you will notice that the Melody track contains notes from Channel 4, which is what we specified in the Chord Wizard dialog.
Importing part of a MIDI file or redoing a section of the Chord Sheet.
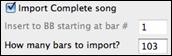
Normally we’d want to import an entire MIDI file worth of chords. But if you only want to import some bars, you can deselect the “Import Complete Song” checkbox, and then specify where to start in the MIDI file (i.e. “the # of lead-in bars in MIDI file”) and what bar to start at in Band-in-a-Box (“Insert to BB starting at bar #”) and the # of bars to import (“How many bars to import”).
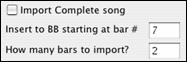
For example, using the song “Violet Song.MID,” we could redo a section of the song using different settings (for example, a chord resolution of 1 beat instead of 2 beats). If we were unhappy with the results at bar 7 and 8, we could redo this by making the settings as follows:
Other Settings for the Chord Wizard
OK to use PG Music Chord names from MIDI File: Band-in-a-Box and PowerTracks Pro songs contain special events that write the exact chord names into the MIDI file. So, if the Chord Wizard sees these events, it will use them instead of interpreting the chords, since they are likely to be completely accurate. If you’d prefer the Chord Wizard to ignore these chord events, you set the “OK to use PG Music Chord names from MIDI file” to false.
Write Chord Summary Notes to Soloist track: The setting for “Write chord summary notes to Soloist Track” is only used for diagnostic or special purposes. If set, the Soloist track will contain a special track that has a chord written every 2 beats (or whatever the setting for chord resolution is) that contains every note found for the chord. This shows you the type of logic that the Chord Wizard was basing its decisions on. If you encounter a song that gives incorrect results for the chords, you can try this setting, and then examine the Soloist track to see the actual notes of the chords.
Include continuous controllers and pitch bend / Include Patch Changes / Include Lyrics: You can optionally include controllers, pitch bend, patch changes, and lyrics from the MIDI file.
Include notes early by: Use this setting to allow for playing in the original MIDI file that is pushed ahead of the beat. At the Band-in-a-Box resolution of 120 PPQ, a setting of 15 equals a 32nd note (i.e., 1/8th of a quarter note).
You can optionally include controllers, pitch bend, patch changes, and lyrics from the MIDI file.
Chord Breaks
|
|
Insert Breaks (silence) in arrangement, also called Chord Breaks, is found in the Preferences 2 dialog. This is a great feature for practicing tempo control. |
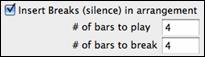
Select the # of bars, and Band-in-a-Box will play for, say 4 bars (selectable), and then will rest all instruments for the next 4 bars. During the silence, you keep playing (comping, drums, melody, etc.), trying to stay in tempo. Drummers can mute the drum part. When the band comes back in after the 4 bars, you will get instant feedback on how well you have maintained the tempo, if the band comes in time with you or not.
Once set, this feature works automatically with all songs until you turn it off.
Guitar Tutor
Use the “Guitar Tutor” to analyze any song. This feature will show the chords that are playing on the virtual guitar fretboard, in your choice of a Jazz, Pop, or Folk perspective. The Guitar Tutor is a fun way to learn about new guitar chords while playing along with your favorite Band-in-a-Box tune.
The Guitar Tutor is most useful on styles that aren’t guitar styles. This would apply to styles that don’t have an exclamation point (!) in the file name. This is because the guitar styles already have a guitar part that you can learn from, on the Guitar part.
Using the Guitar Tutor, you can see (and optionally hear) guitar chords played on the guitar fretboard. This teaches you how to play the chords on guitar.
|
|
To turn the Guitar Tutor on, launch the Guitar window and press the [Tutor] button. |
Using the Guitar Tutor
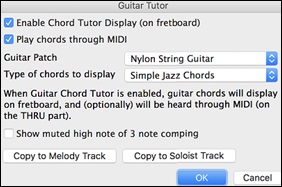
Enable the Chord Tutor display by setting that checkbox. This will silently display the chords on the guitar fretboard. If you would also like to hear the notes, select the “Play chords through MIDI” checkbox.
The Tutor part uses the MIDI Thru part to playback on. You can control volume, pan, reverb, and tone by using the Thru settings in the Mixer. You can also select the patch here.
![]()
The tutor will display Jazz, Pop, and Folk voicings in easy, medium, and advanced forms. The advanced forms use inversions, and changing patterns of chords, while the easy ones just stick to the common “campfire” chords.
Show muted high note of 3 note comping: One of the tutors uses 3-note Jazz voicings to simulate the famous Big Band chord guitar comping styles. If you use this, you will only see 3 notes in the chords of course. Since it sometimes helps to see the entire 4 chord voicing, in this case there is the option to show the muted note as well.
The Guitar Tutor stays enabled until you change the Guitar track to another track (for example, to change it to the Bass track). You can easily re-enable it by clicking on the [Tutor] button again.
Turn the tutor off by disabling the “Enable Chord Tutor Display” setting.
Guitar Window
This is a window for guitar and bass players! The onscreen fretboard displays any Band-in-a-Box track on guitar or bass. Guitar players can “read-along” to a Melody/Solo simply by looking at the guitar fretboard.
|
To launch the Guitar window, press the guitar button, or control+shift+G or choose the menu item Windows | Guitar Window. |

The window can be resized by dragging the bottom right corner.
The top title bar states the key of the song, the current track is displayed, and the fret position.
The fretboard is displayed with the highest notes of the guitar at the top, and the open position of the guitar on the left.
There are names for the open strings displayed on the left (E B G D A E). If the Bass track is selected the display changes to the four bass strings (G, D, A, E).
There are fret positions marked at the bottom of the fretboard. You can mouse click on these positions to change the current fret position. In the diagram above, the current position is position 5.
There are Note Names displayed. They are displayed for two positions on the guitar fretboard. One of the positions is the scale beginning with the third of the scale on the lowest string. In the key of F, this is the 5th position beginning on an A note (the third of the scale). Because it begins on the third of the scale, this position is referred to as the Phrygian Position (since an A Phrygian scale is the same as an F scale). Similarly, the other popular scale is the scale beginning on the 6th of the scale, in the key of F, this is up at the 10th position, and is called the Aeolian Position.
There are note names displayed in color, with ellipses around the notes that are in the scale. The root note of the scale is highlighted in red, the third and fifth of the scale are in purple, and the rest of the scale tones are circled in gray.
A capo is also drawn if you set a capo value with the [Chord Display] toolbar button menu.
Clicking on the [x] button on a string will delete the notes on just the channel of that string on the current notation time line. Clicking on the bottom [x] button will delete all notes on the current notation time line.
It supports the left-handed (in addition to the right-handed) guitar and student view. The student view is the view a student (or YouTube video watcher) would have of the (right-handed) guitar facing him with the head at the right and low notes at the top. There’s also a left-handed student view, so all 4 possible views are supported. To change the view, open the Guitar Settings dialog with the [Settings] button
Automatic Settings for Guitar Display
Band-in-a-Box does many things automatically on the guitar window, to ensure that the notes are displayed intelligently on a guitar fretboard. These include:
- Automatically setting the 2 positions that will display the note names based on the key.
- Auto-Scanning the track to be played and adjusting the display octave on the guitar fretboard to ensure that the best octave is picked to minimize the number of notes that will be outside of the current position displayed on the fretboard.
- After Auto-scanning the track, the best position for displaying the music on the guitar is determined. This is always one of the 2 positions (Aeolian or Phrygian) as discussed above, though you may over-ride this by clicking on any fret position.
- Color coding note displays. In addition to the note names being outlined in the colors (as discussed above), when the note is played, it is highlighted in green if it is a scale note, and yellow if it is an out-of-scale note.
Guitar Window Toolbar
![]()
The [Settings] button opens the Guitar Settings dialog, which allows you to set the guitar options.
The [<] [>] [<-] [->] buttons will chord step advance or note-step advance. The chord step advance is the most commonly used function. It is also accessible by the hotkeys Ins and Del on the numeric keypad and will advance or go back one chord at a time, leaving the chord displayed on the guitar.
You will see the name of the current note that the mouse is over. If you click on the guitar at that position, the note will sound. If the Notation window is open (in Editable Notation or Staff Roll mode), that note will get inserted on the notation at the current position on the time line – you can disable that option to insert notes.
To change the track to display, click on the track selector button and select a track from the menu. You can also hover the mouse cursor over it and use the mouse wheel to quickly switch tracks.
The [Tutor] button runs the Guitar Tutor.
The [POS] button toggles between the two popular positions displayed with note names.
The [Chord Solo] button generates a guitar chord solo based on the existing Melody track using correct guitar fret positions.
When you have a note or chord highlighted using the Chord Step Advance keys ([Ins] or [Del] on the NUMPAD keypad), press the [Ch-] or [Ch+] (insert guitar chord) button on the guitar, or [7] or [8] on the NUMPAD keypad. Each time you press the [Ch-] or [Ch+] you will see that the guitar chord changes to a different voicing, cycling through the available 5-10 voicings possible for each chord. (Some notes won't have any chord voicings, for example a C# note on a Cmaj7 chord, because it is always a passing tone.)
In a similar manner, you can convert a chord to a guitar note using the insert guitar note button. Pressing the [N-] or [N+] (or [3] or [4] on the NUMPAD keypad) repeatedly cycles through playing the same note on all 6 strings.
Guitar Settings Dialog
The Guitar Settings dialog opens with the [Settings…] button in the Guitar window.
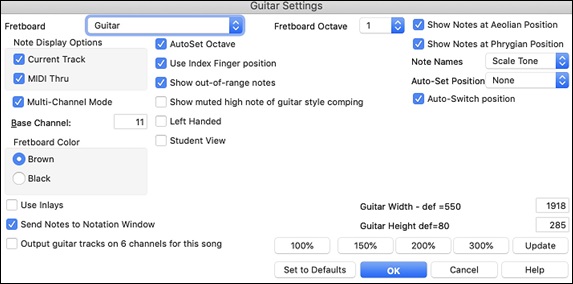
Use these settings to control the appearance and output of the Guitar window.
Fretboard: You can choose the regular guitar, bass, ukulele, mandolin, banjo, and violin as well as the alternate tunings available in Band-in-a-Box, such as DADGAD, Double Drop D, and Nashville high-strung tunings.
Note Display: If “MIDI Thru” is selected (Default=On), the Guitar will display the music played on a MIDI keyboard. If “Current Track” is selected (Default=On), the current track will be displayed.
Multi-Channel Mode / Base Channel: The guitar will display information on channels 11 to 16 on strings 1 to 6 if “Multi-Channel Mode” is set to on (default). Channel 11 is referred to as the base channel (Default=11). You can edit notes on the notation to set the channels of the notes. Guitar controllers will also record information in this manner, so you can record on a MIDI guitar and see the display on the guitar fretboard. The base channel is normally 11, but you can set it to any channel (e.g. if set for channel 5, this would mean that channels 5 to 10 would be the guitar channels).
Fretboard Color: The fretboard color can be brown or black. (Default=brown)
Use Inlays: If you elect to not display note names, you can select “Use Inlays” and a Guitar inlay will be displayed along the neck. The inlays will only display if note names are not being displayed.
Send Notes to (Editable) Notation Window: If set, when you click on the Guitar notes (and the Notation window is open in editable notation mode or note roll mode), the note will be inserted at the current time line on the Notation window.
Output guitar track on 5 channels for this song: If you would like to have Melody and Soloist parts written specifically for guitar, set this to “Yes.” Then the notes that are played on the six different strings will be assigned to six separate MIDI channels.
Fretboard Octave / Auto Set Octave:
You can set the fretboard octave. For example, if the music is very low, and you need to boost the octave to display it on the guitar, set the guitar octave to 1 or 2. If “Auto Set Octave” is enabled, the guitar octave will get set automatically.
Use Index Finger position: If you enable this option, the scale will use the “index finger” to play notes that are one fret outside of the normal position, instead of the little finger.
Show out-of-range notes: If this is enabled, any note will be displayed on the guitar, regardless if it is the range of the guitar or not.
Show muted note of guitar style comping: If this is enabled, the applicable high note that is muted or left out with three note jazz voicings will be displayed.
Left-Handed: With this option, the Guitar window displays for the left-handed users.
Student View: This is a view a student (or YouTube video watcher) would have of the (right-handed) guitar facing him, with the head at the right and low notes at the top. (With the combination with Left-Handed and Student View options, the Guitar window has 4 possible views - Right-Handed, Left-Handed, Right-Handed & Student View, Left-Handed & Student View.)
Show Notes at Aeolian Position / Show Notes at Phrygian Position:
The note names will get displayed in up to two positions, depending on the settings for Show Notes at Aeolian Position and Show Notes at Phrygian Position (Default=True).
Note Name: You can choose which notes will be displayed on the fretboard from None, Root Only, Chord Tone and Scale Tones.
Auto-Set Position: The position can be auto-set to None, Aeolian or Phrygian.
Auto-Switch position: This setting allows the program to automatically switch the display of the guitar when a new track is loaded in. This auto-chooses the best position to display the track.
Fretboard Size:
The Guitar can be resized using the Width and Height setting or the preset buttons that set the size. You can also resize the Guitar by dragging the bottom right corner of the window. The [Update] button will apply any change you have made to the fretboard size.
[Set to Defaults]: This button sets the Guitar window to factory defaults.
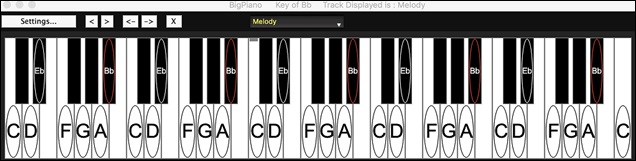
Big Piano Window
This resizable window displays notes on a piano keyboard.
|
Open the Big Piano Window with the [Big Piano] button or with the Windows | Big Piano Windows menu item. |
The window can be resized by dragging the bottom right corner.
Use the track selector to switch tracks to display.
The range of the piano is set automatically (based on the actual notes in the track) to show the largest possible piano.
The key of the song is displayed at the top of the window.
Clicking on the key plays a note (using the Thru part).
The notes of the scale are circled, with the note names included.
The root of the scale is colored in red. As the song plays, scale tones are colored in green; other notes are colored in yellow.
[<][>][<-][->] buttons step-advance one note or chord at a time within the current track.
Clicking on the [x] button will delete highlighted red notes from the Notation window.
Clicking on a note will delete the note from the Notation window if the note is currently highlighted in red.
The piano display can be customized by pressing the [Settings…] button.
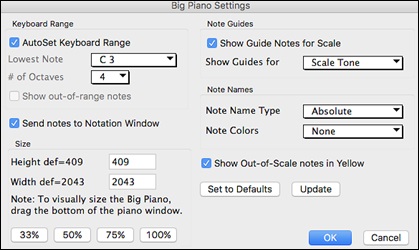
If AutoSet Keyboard Range is unchecked, you can choose the Lowest Note and # of Octaves.
Show out-of-range notes ensures that all notes will be displayed.
If Send Notes to Notation Window enabled, clicking a key on the Big Piano will insert a note to the Notation Window. (Note: The Notation Window must be opened and set to Editable Notation mode.)
The size of the keyboard can be changed by typing values in Height and Width or pressing the preset buttons.
Note Guides are numbers or letters displayed on the keyboard. The guide can be scale tones, chord tones, or roots only.
You can select a Note Name Type. If “Relative to Key” is selected, numbers will show. For example, if the key were Eb, the Eb would be 1; F would be 2, etc.
The Note Colors apply when the song is playing. The colors can be relative to the key, relative to chords, absolute or none.
Show Out-of-Scale notes in Yellow applies only if the “Note Colors” option is set to none.
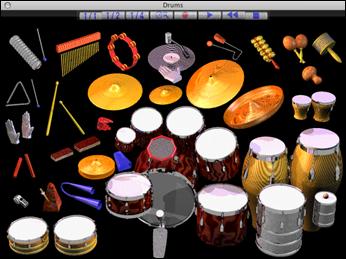
Drum Kit Window
Note: This feature is not implemented yet in the current 64-bit build of Band-in-a-Box 2020 but is available in the current 32-bit build and should be available in a future patch build of the 64-bit build.
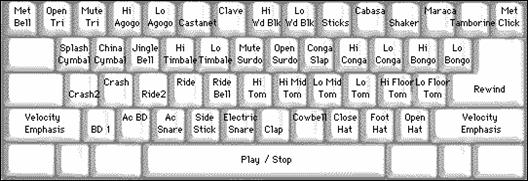
This sizable window is a cool animated 3D display of a complete drum kit, with all 61 Drum sounds displayed on their instruments. Watch the various drum instruments being played, or play-along/record on any of the drum instruments by using QWERTY keys or a mouse. Very educational and lots of fun!
| To launch the Drum Kit window, click the [Drums] button, or choose the Windows | Drum Window option. Then the Drums Kit window will display an animated display of a complete GM drum kit. |
You can do several things with the Drums Window:
- Watch the Drum part being played on the Drums Window in real time.
- Play along with the drums in real time by mouse clicking on the Drum Instrument or using QWERTY keys (the key names to use are listed on the Drums Window).
- Record a drum part into Band-in-a-Box. To do this, simply press RECORD in Band-in-a-Box and play along.
Drum Display
All the General MIDI percussion instruments are shown.
Acoustic Bass Drum |
Bass Drum 1 |
Side Stick |
Some percussion instruments are triggered by multiple MIDI notes. When controlled by more than one MIDI note, a percussion instrument will show different behavior in response to the different notes. For instance, the Hi-Hat responds differently to Close Hat, Pedal Hat, and Open Hat MIDI notes.
The on-screen instruments may be played by mouse-click or computer keys. When playing by mouse-click or computer keys, the shift key adjusts velocity between two user-specified levels.
Drums that you play show up in blue (the computer played drums are red). There is an option to display all the QWERTY names on the drums at the same time, so that you can see what keys to hit without having to mouse over the instrument. The drums can be moved off-screen without snapping back to the middle.
To display the QWERTY keys on the notes, select the option in the Drums Window Settings dialog to “Display QWERTY Chars on Drums.”
Multi-note instruments send different notes depending on where you click on the instrument. For instance, the Kick Drum can send three different notes, Ac. Bass Drum (MIDI note 35), Bass Drum 1 (MIDI note 36), and Square Kick (MIDI Note 32).
The hint line at the top of the window describes the current control under the mouse cursor. Use the hint line to learn the mouse-responsive areas of each drum instrument.
Multi-Note Drums Instruments
Kick Drum - Ac. Bass Drum, Bass Drum 1, Square Kick
Snare - Acoustic Snare, Side Stick
Hi Hat - Closed, Pedal, Open
Floor Tom - Low, High
Electronic Pad - Multi-zoned for Hi-Q, Slap, Electric Snare
High Conga - Mute, Open
Surdo - Mute, Open
Cuica - Mute, Open
Metronome - Bell, Click
Whistle - Long, Short
Triangle - Mute, Open
Guiro - Long, Short
Scratch - Push, Pull
Computer “QWERTY” Drum Keys
Numeric Keypad Drum Keys
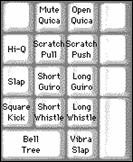
Strike computer keys to play drums.
Drums are grouped on the computer keyboard by category. The kick, snare, and hi-hat sounds are on the lowest keyboard row. The lower-middle row contains toms and cymbals. The upper-middle row contains Latin drums, and the top row contains Latin hand percussion.
The numeric keypad keys contain the remainder of the Latin hand percussion plus the electronic tones.
Drum Kit Main Window
The Drums main window can be resized to tile with other windows of interest.
On 256 color displays, the image does not look its best. The window looks its best if the computer is in Thousands-of-colors (16 bit) or Millions-of-Colors (24 bit) video mode.
Drum Transport Controls
![]()
Place the mouse cursor on each control to see its function.
- Record: Place Band-in-a-Box in Record mode so drum instruments can be recorded.
- Play: Start Band-in-a-Box song playback.
- Rewind: Stop and return to song start.
- Stop: Stop Band-in-a-Box playback.
- Size Buttons 1/1, 1/2, 1/4: Preset the window to full size, half size, or quarter-size. If the window has been changed to a size different from these, by dragging a window border, none of the size buttons will be down.
- Settings Dialog: Adjust program behavior.
Drum Window Settings
In the Drum window, press the [Settings] button (to the left of the Record button), to adjust the Drum Window Settings.
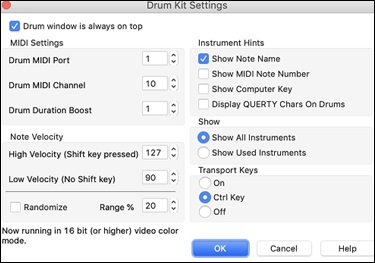
Drum window is always on top: Use this checkbox to keep the Drums window on top of other program windows.
Note Velocity: When playing drums with a mouse or computer keys, the shift key toggles between two levels of note velocity. The two velocity levels can be set any way desired. For instance, if you want the shift key to send quieter notes you can set the shift velocity lower than the non-shift velocity.
Randomize: Use this checkbox to enable the program to send random velocity levels when playing the drums. This is handy when using non- velocity sensitive devices. “Range” controls the amount of velocity randomization. Usually a small range works best, around 10% to 30%. For example, if velocity is set to 127, and the random range is set to 20%, notes would randomly vary between a maximum velocity of 127 and a minimum velocity of 102.
Instrument Hints: Customize the appearance of the Hint line.
-
Show Note Name
-
Show MIDI Note Number
-
Show Computer Key
Show
-
"Show All Instruments” shows all instruments in the drum window.
-
“Show Used Instruments” displays the basic trap kit but does not display any extra instruments unless they are used in a song.
Unconditional 30-Day Money Back Guarantee on all PG Music products purchased from PG Music Inc.
PG Music Inc.
29 Cadillac Ave Victoria BC Canada V8Z 1T3
Sales: 800-268-6272, 250-475-2874,+ 800-4746-8742*
* Outside USA & Canada where International Freephone service is available.
Access Codes
Tech Support: Live Chat, support@pgmusic.com
 Online now
Need Help?
Customer Sales & Support
|
Phones (Pacific Time) 1-800-268-6272 1-250-475-2874 |
||
| Live Chat | ||
| OPEN | Online Ordering 24/7 |
|
| OPEN | Forums, email, web support |