
Search Manual
Band-in-a-Box® 2023 for Mac® User's Guide
Chapter 13: User Programmable Functions
Band-in-a-Box offers users the ability to program many of its most powerful features from scratch. Those with the interest and enthusiasm can create their own personalized versions of these features:
- Styles
- Harmonies
- Soloists
- Melodists
- Guitarists
Have fun!
The StyleMaker
Overview of the StyleMaker
The StyleMaker is the section of the program that allows you to create brand-new styles or edit existing styles. This is done by recording patterns for each of the Drums, Bass, Piano, Guitar, and Strings tracks. If you don’t want an instrument in a style, you don’t need to record any patterns for it.
|
The StyleMaker opens with the [StyleMaker] toolbar button. It also opens from the File | StyleMaker | Make a New Style) or Edit Current Style. |
MIDI Styles
The simplest style consists of 1 pattern each for the instruments that you want in the style. If you like, you can use options available to you called “masks.” Masks are options that you set for a pattern to specify when you want the pattern to be played. There is a list of masks below.
Masks Available for Patterns
Complex styles can be made allowing patterns to be recorded that are played only at certain times. These are referred to as masks.
Substyle masks: Substyle A or Substyle B
Chord duration masks: On chords lasting 1,2,4 or 8 beats
Bar masks: On certain bar numbers
Beat masks: On certain beat numbers
Chord masks: On certain types of chords
Roman Numeral masks: On certain Roman numerals (e.g., II chord)
Next interval masks: Only when next chord of song is certain interval (e.g., up a fourth)
But the StyleMaker is loaded with options and features that allow your styles to grow in complexity and number of patterns. For example, it is possible to input up to 600 patterns in a given style.
In addition, patterns can be classified by many ways allowing them to be played only at appropriate times. For example, patterns can be given varying lengths or can be assigned to certain types of chords or only to be played on even or odd number bars and many others. We believe that the StyleMaker satisfies both the need to create simple styles with repetitive patterns and the ability to create complex styles intelligently.
To create a style, you will be creating Bass / Piano / Guitar / Strings patterns (in the key of C) and Drum patterns. Once made, the styles are saved to disk and are then ready to be used by the program for playing any song in the selected “User style.” Styles end up as files with a .STY extension, different from song files, which have a .SG? or an .MG? extension.
The StyleMaker has been designed to be as flexible as possible. A simple style would consist of three patterns (one each for bass, drums, and piano) but more complex styles are created by using more patterns.
The styles consist of two substyles, “a” and “b.” Typically, the “a” sub-style would be the more “laid -back” portion of the style such as a verse or, in the case of a Jazz Swing style, a two-beat part. The “b” substyle would be a chorus section (bridge) or “Swing” part in reference to a typical Jazz Swing style.
On the StyleMaker page, you will see rows of dots that line up with their respective instruments / substyle / length in beats / etc. These are locations for your patterns that you will be recording. In order to create a Style, you will need a MIDI instrument of some sort (keyboard, MIDI guitar, drum controllers) with a MIDI Out port. Styles are made by entering Drum, Bass, and/or Piano patterns in the desired style.
Drum patterns:
- Are entered in step time, Tap mode, and Real Time from a typical drum programming screen (grid).
- Are always entered as 1-bar patterns (longer patterns may be chained together using BAR MASKS – described below).
![]()
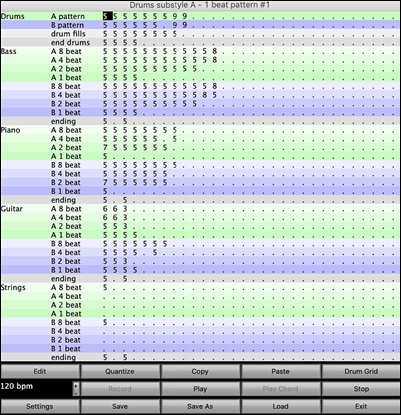
A pattern - This row is for 1 bar drum patterns for the “a” substyle.
B pattern - This row is for 1 bar drum patterns for the “b” substyle.
drum fills - This row is for 1 bar drum patterns for the “a” substyle.
end drums - This row is for endings. Endings are 2 bars (2 patterns of 1 bar each). If you’ve made a style and haven’t included an ending, a 2-bar “auto-ending” can be generated automatically, based on the style.
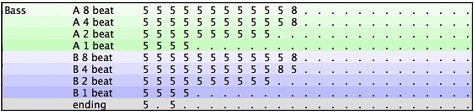
Bass / Piano / Guitar / Strings patterns:
- Are played in real time from a MIDI keyboard, MIDI guitar, etc. by clicking on [Rec] or typing “r” with the cursor placed on the first dot of the A or B section of the desired instrument starting with 8 Beat.
- Are played in based on a C7 chord (C E G Bb) though all 12 notes may be used.
The patterns for Bass/Piano/Guitar/Strings are classified by the length of the pattern, i.e., the number of notes that the chord lasts without a change of chord. or example, the row A 8 beat is for the substyle A patterns that last 8 notes.
Explanation of the numbers on the StyleMaker screen.
The StyleMaker screen is full of patterns, mostly empty indicated by a period (.). When a pattern has been recorded, there is a number in place of the period for example (5). These numbers indicate whether a pattern has been recorded at the location.
A period indicates no pattern and a number from 1 - 9 indicates that a pattern has been recorded with the actual value corresponding to the desired weight the pattern is to be given relative to other similar patterns. Patterns that you don’t want to hear very often in the style are given low weights. Usually you will use weights in the range of 0 - 8 where
0 = no pattern recorded
1 -– 8 = pattern recorded
9 = special weight that is really given a much higher weight internally by the program. A pattern with a weight of 9 will always be played (if not masked out by other options).
“a” and “b” refer to the 2 substyles available in the Band-in-a-Box program.
Explanation of the pattern lengths 8, 4, 2, and 1 beat.
You may ask, “Why would I need to have different pattern lengths in a style?” Whenever Band-in-a-Box encounters a chord change in a song it will begin to playback a new pattern, starting at the beginning of the pattern. It firsts scans the chord to see how long that chord is going to last without a chord change. For example, let’s look at these chords:
| 1a Dm7 | 2 G7 C6 | 3 FMAJ7 | 4 (These chords are in substyle “a.”)
When Band-in-a-Box is playing back your style, it starts by looking at the Dm7 chord, and counts that it lasts four beats before the next chord change to a G7 chord. It then looks to the style that you have created and sees if you have any patterns created in the A 4 beat line – if so, you will get an appropriate pattern that you have recorded for chords lasting four beats.
Then when Band-in-a-Box encounters the G7 chord, it sees that it lasts two notes before the next chord change. So, Band-in-a-Box will look for any A 2 beat patterns. There is tremendous advantage to being able to record different length patterns. Eight beat patterns might be blank for the first four beats for example; a situation that could not apply for four beat patterns or the entire pattern would be blank!
Here is another example of chords with the durations of the chords displayed for you underneath:
4 bar e.g. | F | Bb C7 | F6 | |
chord duration 4 2 2 8
Patterns may be entered for chord durations of 1, 2, 4, and 8 notes. The Band-in-a-Box program sorts out everything else about determining the length of the chord durations in the song and combining lengths for unusual lengths (3 = 2+ 1 etc.).
So now we know what the rows are for: they are for patterns of different lengths and different substyles (A and B). The columns across the screen are used to contain multiple variations of similar sounding patterns. The program will randomly pick between the similar patterns on playback. The number that is recorded and displayed on the screen refers to the weight assigned to that pattern. Normally if you have three similar patterns with equal weight they will be picked equally, but if you assign lower or higher weights in the range 0 - 8, you can fine tune how often patterns are played.
The Bass and Piano / Guitar / Strings patterns are always recorded in two bar chunks regardless of the chord duration. If a shorter chord duration is entered, the remainder of the pattern is ignored. Patterns are also entered for the A and B substyles.
Drum patterns are not of variable duration like the Bass and Piano patterns. The Drum patterns are always one bar long. Longer patterns than one bar may be chained together using bar masks (see below). When you record a new pattern (Bass / Piano or Drums), a dialog will be displayed with several options, all set to defaults of 0. If you are making a simple style, or if you don’t understand all the options, just leave them at their default settings. When you record a pattern with all the default settings, it is called a generic pattern. Generic patterns may be picked at any time by the program.
Playback of patterns in the StyleMaker is done from the StyleMaker screen:
Playing Patterns
![]() The [Play] button plays the pattern.
The [Play] button plays the pattern.
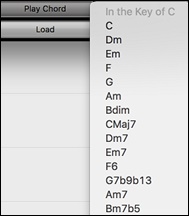
Playing Patterns on Chord
![]() The [Play Chord] button plays the pattern on a specific chord set by the user from a menu..
The [Play Chord] button plays the pattern on a specific chord set by the user from a menu..
Stopping Playback
![]() The [Stop] button stops playback of the pattern. Clicking the mouse button or pressing the < Spacebar > also stops playback of the pattern.
The [Stop] button stops playback of the pattern. Clicking the mouse button or pressing the < Spacebar > also stops playback of the pattern.
Erasing Patterns
Patterns are erased by assigning a weight of zero to the pattern. Type a 0 at the pattern.
NOTE: All user styles are entered in 4/4 time.
The Band-in-a-Box Program is capable of playing back in any time signature (via the Bar Settings option on the Edit Menu or option+B) so user defined waltz styles would be made as 4/4 but played as 3/4.
Editing Existing Styles
The easiest way to become familiar with the StyleMaker is to start with an existing style and modify it. In this tutorial, we will describe several ways to edit an existing style. These include:
- changing patches saved with style
- adding/editing drum patterns to a style
- copying and pasting drum patterns
- recording additional bass patterns
- adding strings to a style by importing strings from another style
Let’s edit the Light Rock style, which is called ZZLITROK.STY.
1. To select a style for editing from the main screen:

The Song area on the main screen indicates the style that is currently in memory. If you want to edit the current style, (in this example it is ZZLITROK.STY) then choose either File | StyleMaker | Edit Current Style or press option+Y.
If you want to edit a different style then load a different style from the StylePicker, select the File | Load Style Special | Load Style From Disk menu item, or press ![]() +u.
+u.
2. The StyleMaker window is then opened and you will see the display of the style prepared for editing.
Let’s have a closer look at the Drums.

You will notice that there are 4 rows of drum patterns:
A pattern is the row to record drum patterns for the “a” substyle.
B pattern is the row to record for the “b” substyle.
drum fills are recorded on the Fills row.
end drums are recorded on the Endings row. (2 consecutive patterns of 1 bar.) If you’ve made a style, and haven’t included an ending, a 2-bar ending based on the style can be generated automatically, based on the style.
Let’s have a closer look at the A pattern row.
Each of the numbers represents a drum pattern that has been already recorded. There are 8 patterns that have been recorded on this line. The numbers themselves are called weights. The weights can be from 1 to 8 (a weight of 9 is a special case explained below). Most of the patterns have weights of 5, which is the default. Assigning a higher or lower weight will cause that pattern to be played more or less often relative to the other patterns. The 2 patterns with a weight of 2 will be played less often than the patterns with weights of 5.
Use of a weight of 9 on one of the patterns is a special case. Patterns with a weight of 9 will always be played instead of any other patterns on the same row. These patterns usually have other options associated with them to ensure they are played under certain circumstances only. For example, the pattern on this row has an option set of “Bar Mask = post fill” which means it will be the bar after a drum fill. In this case, the pattern has a Crash cymbal on beat 1. This pattern will always be played when the song is at the first bar of a new part (which is the bar after a drum fill).
![]() You can examine the options for any pattern by selecting the pattern by mouse clicking on it, and then clicking on the [Edit] button. Move around the screen to different patterns by either using the cursor keys or mouse clicking on the desired pattern.
You can examine the options for any pattern by selecting the pattern by mouse clicking on it, and then clicking on the [Edit] button. Move around the screen to different patterns by either using the cursor keys or mouse clicking on the desired pattern.
![]() Let’s examine the Drum pattern by pressing the [Drum Grid] button. This opens the Drum Grid Editor window. This screen allows you to create or edit drum patterns in step time.
Let’s examine the Drum pattern by pressing the [Drum Grid] button. This opens the Drum Grid Editor window. This screen allows you to create or edit drum patterns in step time.
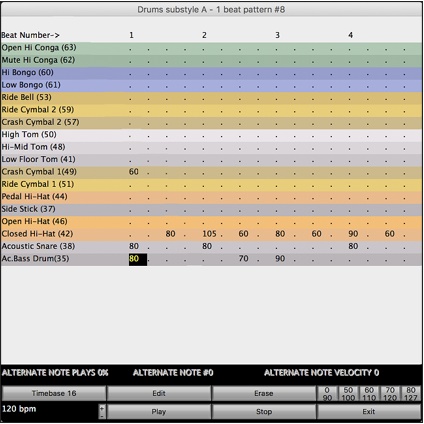
There are 16 columns, representing 1 bar of 16th notes. The numbers on this screen represent velocities from 0 to 127. Using the bottom row of the computer keyboard i.e. the XCVBNM,. / keys is the fastest way to put in commonly used velocities, or by selecting the various commonly used velocity buttons at the bottom right of the Drum Grid Editor screen. You can also just type in the number that you want. Try typing in some new drum notes and press the [Play] button to audition them.
Let’s create a new drum fill.
- Move to an empty location on the “drum fills” row.
- Press [Drum Grid] to open the Drum Grid Editor.
- Type a drum pattern in the drum grid.
- Save the pattern by pressing [Exit] to exit the Drum Grid Editor.
- Accept the generic settings in the Drum Pattern Recorded dialog.
You will see your new pattern on the Fills line as represented by a weight number.
Let’s use COPY/PASTE to simplify creating a new drum pattern.
- To make another fill, move to an existing fill.
- Press the [Copy] button to copy that drum fill to the clipboard.
- Move to an empty pattern.
- Press the [Paste] button to paste in the previous drum fill.
- Now press the [Drum Grid] button to open the Drum Grid Editor and step edit the drum fill. You will only need to change a few notes of the drum fill to make a variation of the one you have copied.
Save the style by pressing the [Save As] button. This allows you to rename the style, so you don’t affect the original ZZLITROK.STY.
Change the Patches that are assigned to the Style.
Each style can have patches assigned to it. For example, if you want the style’s Piano track to use a Rhodes piano, you can select the piano patch of 5, which is the General MIDI number for the Rhodes Electric Piano.
- Press the [Patches] button.
- This displays the Miscellaneous Style Settings dialog.
- Press the [Set Patches...] button.
- You will then see a dialog which allows you to type in patches you would like for the style. If you don’t need a specific patch, use 0 for no change of patch number.
Let’s add Strings to the Style.
There are 2 ways to do this.
1. You could move to the strings part (by clicking on the strings button) and then record the strings patterns.
-or-
2. The easiest way is to import strings from another style that already has strings. This allows you to use existing string patterns. For example, the Miami Pop style has a nice strings part.
Let’s import the “Miami Pop” strings into our style.
- Press the [Load] button.
- Select the ZZMIAMI.STY style from the file dialog.
- Select an 8-beat String pattern to copy and press the [Copy] button.
- Press the [Load] button.
- Select the ZZLITROK.STY style.
- Choose an empty 8-beat “b” String pattern (because that is where the String pattern was recorded in) and press the [Paste] button.
- Press the [Save As] button to save the Lite Rock style with Strings.
The strings will play in the “b” substyle only, because that’s how they were made in the Miami Pop style.
You could now import the Guitar from the ZZCONTRY.STY, for example, using the steps above. It is quite easy to quickly add instruments to styles by importing instruments from other styles.
Let’s record some new bass patterns.
Recording a Bass Pattern
Move the highlighted cell to an unused Bass pattern. If you’re recording a pattern lasting 8 beats, record this on the top “A 8 beat” row. This pattern will be used when the song has chords lasting 8 beats or more without a chord change.
Press the [Record] button to record the bass pattern. You will need to wait during a 2-bar lead-in. Then you record the 2-bar pattern.
Play the pattern on a C7 chord. You can use all 12 notes; just play a pattern that you would have normally played in the song if the song were on a C7 chord (C E G Bb). When you’re finished recording the pattern, you’ll see a dialog listing all the options available. Just accept all the defaults by pressing the [OK] button.
Press the [Save As] button to save your new style.
Press the [Exit] button to close the StyleMaker window and exit. Make sure that you have saved the style first, otherwise edits will be lost.
Creating New Styles
Making Drum Patterns
There are 2 screens in the StyleMaker associated with making drum patterns.
1. The StyleMaker screen with drum patterns.
2. The Drum Grid Editor, allowing step editing of patterns.
The StyleMaker screen with drum patterns looks like this:

The screen will look like this. The solid box indicates the currently selected pattern. Empty patterns are indicated by a (.), i.e., patterns that have not been recorded yet. If a pattern has been recorded there will be a number in place of the (.) indicating the weight of the pattern.
The 4 rows are for the different types of patterns, “a” substyle, “b” substyle, Fills and 2 bar Endings.
Drum Grid Editor
This window is where the Drum patterns are made.
![]() You can open the Drum Grid Editor by selecting a Drums pattern and pressing the [Drum Grid] button.
You can open the Drum Grid Editor by selecting a Drums pattern and pressing the [Drum Grid] button.
There are 16 rows across, indicating 4 beats with 4 divisions per beat.
Changing Timebase of Drum Pattern
Change the time base to 12 by clicking the mouse on the [Timebase] button. This allows for drum patterns in 3/4 time. The program will ignore the 4th column of each beat. [Timebase 12] will then be displayed in the timebase button.
Moving around the Drum Editor Screen
Move around the screen with cursor keys, or mouse click. The black flashing highlight bar indicates where you are. The different drum instruments are named along the left side and the 4 beats are displayed along the top.
Tempo Changes
Tempo changes are done using the [TEMPO] button or press the [ and ] keys from the main StyleMaker screen. |
Entering notes onto the drum editor screen.
A typical pattern may look like this:

The numbers are velocities. Move around the Drum Pattern screen and type in the numbers as above. These are velocities and should range between 0 and 127. The fastest way to put the numbers onto the screen is to use the hot keys on the bottom row of the typewriter keyboard - XCVBNM,. or the velocity buttons, 0, 50, 60, 70, 80, 90, 100, 110, 120 and 127 at the bottom right of the Drum Pattern Entry screen.
Using Alternate Drum Notes
What are alternate notes? Alternate notes can be entered for any note. This tells Band-in-a-Box to randomly choose a different note to the one specified. For example:
- you might want a note to be a closed high hat 80% of the time, and an open high hat 20% of the time.
- you might want a note to be high conga 60% and low conga 40% of the time, or
- high tom 30% of the time and NO note the other 70%.
This allows one drum pattern to sound like many, because it will be played different ways depending on which of the notes are picked.
How to put in an alternate note:
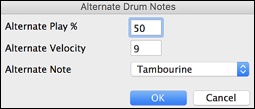
![]() In the Drum Grid Editor, press the [Edit] button. This displays the Alternate Drum Notes dialog.
In the Drum Grid Editor, press the [Edit] button. This displays the Alternate Drum Notes dialog.
|
Select the Alternate Drum Note type, such as Open High Hat or Bass Drum, from the Alternate Note drop down menu. When you exit the box, you will see that the box has a border indicating that an alternate note is located there. |
Playing the Drum Patterns
![]() Play the drum pattern by pressing the [Play] button.
Play the drum pattern by pressing the [Play] button.
![]() Stop playback by pressing the [Stop] button or the < Spacebar >.
Stop playback by pressing the [Stop] button or the < Spacebar >.
![]() Press the [Play] button again to hear the pattern again if you have made changes.
Press the [Play] button again to hear the pattern again if you have made changes.
![]() When the pattern is sounding like you want, press the [Exit] button.
When the pattern is sounding like you want, press the [Exit] button.
Drum Pattern Options
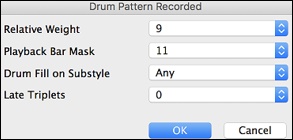
Relative Weight: (usual setting =5) Relative Weight is the number that you assign to the pattern from 1 - 9. Numbers from 1-8 indicate how often you want the pattern to be played in relation to the other patterns on the same row. A weight of 9 is a special setting that ensures that the pattern will ALWAYS be played. Patterns assigned a weight of 9 usually have other options set which instruct the pattern to only be played at certain times (bar after a drum fill for example).
Playback Bar Mask: (usual setting =0)
Playback Bar Mask determines on what bars of the song the pattern will play. The bar numbers are counted relative to the last part marker. Bar 1 is the first bar after a part marker for example. Bar mask setting of 0 is the default. This lets the pattern be played at any time.
Other bar mask settings:
- pattern played at odd number bars only 1, 3, 5, 7, 9...
- pattern played at even bars only 2, 4, 6, 8, 10...
- pattern played on 3rd of 4 bar (3, 7, 11, 15...)
- pattern played on 4th of 4 (4, 8, 12, 16, 20...)
- pattern played on 5th of 8 (5, 13, 21...)
- pattern played on 6th of 8 (6, 14, 22...)
- pattern played on 7th of 8 (7, 15, 23...)
- pattern played on 8th of 8 (8, 16, 24...)
- PRE-FILL special value - refers to the bar before a fill
- FILL refers to the bar of a fill (not applicable to drums because there is a special row for drum fills).
- POST-FILL refers to the bar after a fill (same as the first bar after a part marker).
Drum Fill on Substyle: (usual setting = Any) This setting is only relevant on the Drum Fills line. It lets you specify if you want the drum fill to be used on the “a” substyle, the “b” substyle, or either. The default setting is Any.
Late Triplets: (usual setting = 0) This is only relevant in drum patterns with time base =12 (triplet feel). If you want the 3rd triplet to be played late (as is usually done in slow jazz style), then set a number from 0 - 11. Default is 0 (not late at all). A typical setting for a slow triplet style is triplets late =5 (the units are 120/beat).
Now let’s make the ending drum pattern.
Endings are 2 bars long. In the case of the drums, this is done by 2 consecutive 1-bar patterns on the ending row. Move to the Endings row. Input a 1 bar pattern in the first column and then another 1 bar pattern in the 2nd. These 2 patterns are the ending patterns, so you should make the 2nd pattern an ending drum pattern typically with a crash cymbal on beat 3 for example.
“Auto Endings”
If you’ve made a style, and haven’t included an ending, a 2-bar ending can be generated automatically, based on the style.
Making Bass Patterns
Bass patterns are recorded live from a MIDI keyboard. If you can’t play in real time, or if you don’t have a MIDI keyboard you’ll have to import these instruments from other styles (as we will be doing with the strings).
The Bass Screen
If you’re making a simple bass pattern, you’ll only need to record pattern(s) on the A 8 beat row (the top row). These patterns will be chosen for every chord, regardless of the length. But if you want the style to play different patterns when the song is encountering chords that last 1, 2, 3, or 4 notes, you should record separate patterns on these rows.
Recording a Bass Pattern
Move to the top row of the bass area, in column 1. Press the [Record] button. This will begin the recording of the bass pattern. You will hear a 2-bar lead-in and then you record a 2-bar bass pattern. For your bass pattern, you will play a pattern based on a C7 chord. You can use all 12 notes but should just play the pattern as you would if the chord was a C7. You should center the bass patterns around MIDI note 48 (C3).
After you have recorded the bass pattern, a dialog with options will appear. This allows you to specify the conditions that must occur for this pattern to be played back in the song. These are called masks. Usually you can just accept all the defaults, which allow the pattern to be played at any time.
Bass Pattern Options
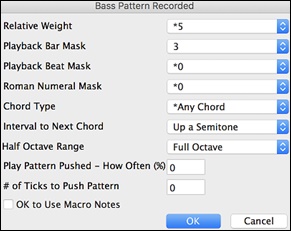
Relative Weight: (usual setting = 5) Set this number higher/lower if you want the pattern to be played more/less often than the other patterns on the same row. This number is also displayed on the main StyleMaker screen. A setting of 9 (always) is a special setting that instructs the pattern to always be played instead of the other patterns on the same row. These patterns always have other options set which specify the times that this pattern would be eligible to be played.
Playback Bar Mask: (usual setting = 0)
Playback Bar Mask determines on what bars of the song the pattern will play. The bar numbers are counted relative to the last part marker and range from 1-8. Bar 1 is the first bar after a part marker for example.
Other bar mask settings:
- pattern played at odd number bars only 1, 3, 5, 7, 9...
- pattern played at even bars only 2, 4, 6, 8, 10...
- pattern played on 3rd of 4 bar (3, 7, 11, 15...)
- pattern played on 4th of 4 (4, 8, 12, 16, 20...)
- pattern played on 5th of 8 (5, 13, 21...)
- pattern played on 6th of 8 (6, 14, 22...)
- pattern played on 7th of 8 (7, 15, 23...)
- pattern played on 8th of 8 (8, 16, 24...)
Special bar masks
- PRE-FILL special value - refers to the bar before a fill.
- FILL refers to the bar of a fill (this allows you to put in “bass fills” for example).
- POST-FILL refers to the bar after a fill (same as the first bar after a part marker).
Playback Beat Mask: (usual setting = 0) Set the beat mask to a beat from 1-4, if you want the pattern to only be played on certain beat numbers. 1= Beat 1, 2= Beat 2, 3= Beat 3, 4= Beat 4.
Roman Numeral Mask: (usual setting = 0) If you have a pattern that should only be played on the I chord or the IV chord (of the key), you can use this Roman Numeral Mask. This setting is rarely used.
Chord Type: (usual setting = Any Chord) This setting is very useful. This allows you to record patterns that will only work on certain types of chords. For example, you can record a specific riff that will only work on a minor 7th chord. You then play the pattern on a Cmin7 (not a C7). There are chord types for most types of chords.
Interval to Next Chord: (usual setting = Any Interval) This setting allows you to restrict the pattern to be played only if the next chord is a certain interval away. For example, you can record a bass pattern that is walking up a fourth and then assign an Interval of “Up a Fourth” so that the pattern would only be played if you’re going up a 4th.
Half Octave Range: (usual setting = Full Octave) This is a new setting in the StyleMaker. Usually a pattern will be picked on any of the 12 roots. You can select a smaller range, either A to D, or Eb to Ab. In this case, the pattern would only be picked if the chord in the song is in that range.
Play Pushed - How Often (%) / # of Ticks to Push Pattern: (usual setting = 0) Pushed patterns are patterns that are played before the chord begins. Jazz styles typically use pushed patterns for the piano. Patterns are recorded in the normal way (non -pushed) and then you assign the % of time and amount (in ticks, 120 ticks = 1 beat) to push the pattern. The pattern only plays pushed in the song (not in the StyleMaker).
OK to Use Macro Note: (usual setting = No)
Bass Macros are special notes that you record. When they are played back, they are replaced by a function,
List of Bass Macro Notes
- Note number 72 (C): Pop Walking Note(s).
On playback, the note number 72 will be replaced by intelligent notes walking in a Pop/Country mode to the next chord. Maximum 4 walking notes per pattern. - Note number 76 (E): Note a semitone below Root of Next Chord.
- Note number 77 (F): Root of Next Chord.
- Note number 78 (F#): Note a semitone ABOVE Root of Next Chord.
- Note number 79 (G): Best Fifth (a Fifth above or below the Root depending on how high the root is. Also stays on the root if in a slash chord (C7 /E).
Remember to get Bass Macros Working you must:
- Hit the right note number (you may be out by an octave).
- Check the “OK to Use Macro Notes” box.
- Play the pattern with the [Play Chord] button. (The [Play] button gives you an “as played” playback with the strange sounding high macro notes.)
Making Piano, Guitar, and Strings Patterns
Piano, Guitar and Strings are all considered together because they have all the same options available. They, like the Bass patterns, are recorded live from a MIDI keyboard. If you can’t play in real time, or if you don’t have a MIDI keyboard, you’ll have to import these instruments from other styles (as we’ll be doing with the Strings).
In this section we will refer to Piano patterns, but this information applies equally well to Guitar and Strings patterns.
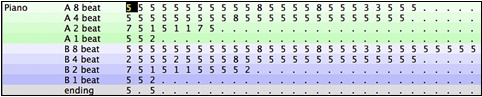
If you are making a simple piano pattern you will only need to record pattern(s) on the A 8 beat row (the top row). These patterns will get chosen for every chord, regardless of the length. But if you want the style to play different patterns when the song is encountering chords that last 1, 2, 3, or 4 beats, you should record separate patterns on these rows.
Move to the top row of the piano area, in column 1. Press the [Record] button. This will begin the recording of the piano pattern. You will hear a 2-bar lead-in, and then you record a 2-bar piano pattern. For your piano pattern, you will play a pattern based on a C7 chord. You can use all 12 notes but should just play the pattern as you would if the chord was a C7.
After you have recorded the piano pattern, a dialog with options will appear. This allows you to specify the conditions that must occur for this pattern to be played back in the song. These are called masks. Usually you can just accept all the defaults, which allow the pattern to be played at any time.
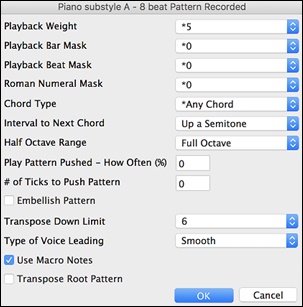
Playback Weight: (usual setting = 5) Set this number higher/lower if you want the pattern to be played more/less often than the other patterns on the same row. This number is also displayed on the main StyleMaker screen. A setting of “9 (always)” is a special setting that instructs the pattern to always be played instead of the other patterns on the same row. These patterns always have other options set which specify the times that this pattern would be eligible to be played.
Playback Bar Mask: (usual setting = 0)
Playback Bar Mask determines on what bars of the song the pattern will play. The bar numbers are counted relative to the last part marker and range from 1-8. Bar 1 is the first bar after a part marker for example.
Other bar mask settings:
- pattern played at odd number bars only 1, 3, 5, 7, 9...
- pattern played at even bars only 2, 4, 6, 8, 10...
- pattern played on 3rd of 4 bar (3, 7, 11, 15...)
- pattern played on 4th of 4 (4, 8, 12, 16, 20...)
- pattern played on 5th of 8 (5, 13, 21...)
- pattern played on 6th of 8 (6, 14, 22...)
- pattern played on 7th of 8 (7, 15, 23...)
- pattern played on 8th of 8 (8, 16, 24...)
Special bar masks:
- PRE-FILL special value - refers to the bar before a fill.
- FILL refers to the bar of a fill (this allows you to put in “piano fills” for example.)).
- POST-FILL refers to the bar after a fill (same as the first bar after a part marker).
Playback Beat Mask: (usual setting = 0) Set the beat mask to a beat from 1-4, if you want the pattern to only be played on certain beat numbers. 1= Beat 1, 2= Beat 2, 3= Beat 3, 4= Beat 4.
Roman Numeral Mask: (usual setting = 0) If you have a pattern that should only be played on the I chord or the IV chord (of the key), you can use this Roman Numeral Mask. This setting is rarely used.
Chord Type: (usual setting = Any Chord) This setting is very useful. This allows you to record patterns that will only work on certain types of chords. For example, you can record a specific riff that will only work on a minor 7th chord. You then play the pattern on a Cmin7 (not a C7). There are chord types for most types of chords.
Half Octave Range: (usual setting = Full Octave) This is a new setting in the StyleMaker. Usually a pattern will be picked on any of the 12 roots. You can select a smaller range, either A to D, or Eb to Ab. In this case, the pattern would only be picked if the chord in the song is in that range.
Interval to Next Chord: (usual setting = Any Interval) This setting allows you to restrict the pattern to be played only if the next chord is a certain interval away. For example, you can record a bass pattern that is walking up a fourth and then assign an interval of “Up a Fourth” so that the pattern would only be played if you’re going up a 4th.
Play Pattern Pushed - How Often %/ # of Ticks to Push Pattern: (usual setting = 0) Pushed patterns are patterns that are played before the chord begins. Jazz styles typically are pushed patterns for the piano. Patterns are recorded in the normal way (non -pushed) and then you assign the % of time and amount (in ticks, 120 ticks = 1 beat) to push the pattern. Pushed patterns only play pushed in the song, not in the StyleMaker.
Embellish Pattern: (usual setting = No) If checked, the pattern will be embellished. This is useful in Jazz styles.
Transpose Down Limit: (usual setting = 6) This setting is quite useful. It controls the range that the pattern will be played over. For example, if the transpose down range is set to = 2 the pattern (recorded in C) will be transposed a maximum of 2 semitones down, and therefore up to 10 semitones up to play all 12 possible roots of the chords.
Type of Voice Leading: (usual setting = Transpose Only) The easiest type of voice leading is “Transpose Only.” If the notes C E G Bb were played as a C7 pattern, the Band-in-a-Box would transpose that voicing to a F7 chord as F-A-C-Eb, which is fine but not very smooth. A more pleasant setting would be “Smooth” voice leading then the F7 would be voiced automatically as C-Eb-F-A. “Riff Based” voicing is used when you have recorded a pattern with a melodic riff in it. This setting ensures that Band-in-a-Box will not try to transform any of the notes into chord tones.
Use Macro Notes: (usual setting = No) Piano Macros are special notes that you record. When they are played back they are replaced by a function, as listed below:
List of Piano Macro Notes (same as Guitar/String macro notes)
MIDI Note number 83 B Pop Chord Diatonic Below
MIDI Note number 84 C Pop Chord
MIDI Note number 85 C# Pop Chord Diatonic Above
MIDI Note number 88 E Jazz Chord Chromatic Below
MIDI Note number 89 F Jazz Chord
MIDI Note number 90 F# Jazz Chord Chromatic Above
Remember to get Macro Notes Working you must:
- Hit the right note number (you may be out by an octave).
- Check the “Use Macro Notes” box.
- Play the pattern by pressing the [Play Chord] button. (Pressing the [Play] button gives you an “as played” playback with the strange sounding high macro notes.)
Transpose Root Pattern: (usual setting = No) This is a rarely used setting. It is only relevant when voice leading is set to smooth. It determines where the center of the pattern is considered to be. If checked, the center of the pattern will be moved to the song’s key.
Play Chord
The [Play Chord] button allows you to play a pattern on a specific chord that you choose. You can hear what patterns will sound like in a style by “trying them out” on certain songs. Macro notes recorded in a pattern will play their corresponding chords; smooth voice leading is demonstrated etc.
Micellaneous Style Settings
![]() The [Settings] button opens the Miscellaneous Style Settings dialog, which allows you to set miscellaneous settings for the style.
The [Settings] button opens the Miscellaneous Style Settings dialog, which allows you to set miscellaneous settings for the style.
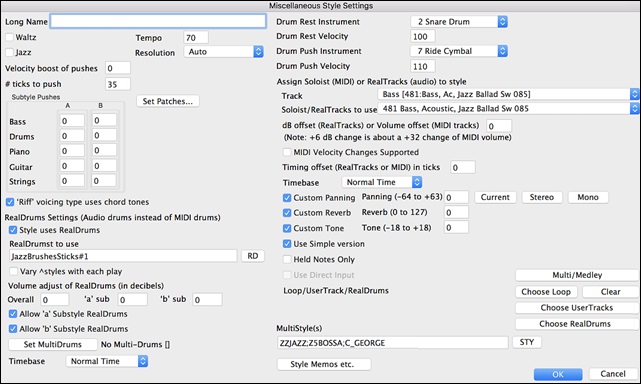
Waltz: If you want to make a waltz style, enable the “Waltz” checkbox. Then the StyleMaker will record and play patterns in 3/4 time. The “8 beat row” will record “6 beat” (2 bar patterns); the “4 beat” will record 3 beat (1 bar) patterns. The “2 beat” and “1 beat” still record 2 and 1 beat patterns. The new style is made as a waltz, and will play with a 3/4 lead in. There is no need to put a 3/4 time signature change in bar 1.
Jazz: This lets Band-in-a-Box know if the style you’ve made is a Jazz style or not. If it’s a Jazz style it will use the Jazz Snare/Bass Drum instead of the Pop Snare/Bass Drum, and makes some other decisions based on this setting.
Tempo: This allows you to set the tempo of the style. You can also change this tempo by the tempo button on the StyleMaker main screen. Tempos can also be changed by the [ and ] keys. When you create a new song, the tempo will be set to the tempo of the style.
Resolution: Styles can either have Triplet (swing eighth notes) Straight (even eighth or sixteenth notes) resolution.
Velocity boost of pushes: Pushes can get a velocity boost, so that they are played louder than other patterns. A usual setting would be 10.
# ticks to push:
Styles can be pushed with the StyleMaker. This will cause the patterns to be played a little ahead of the beat, a certain % of time, which gives your arrangement a more human (musical) feel.
Substyle Pushes: The % of notes that are pushed can be set separately for each track and for the “a” and “b” substyles.
[Set Patches]: This will open a dialog which allows you to assign instruments and set the volume for each instrument.
‘Riff’ voicing type uses chord tones: This is an option for piano, guitar, and string patterns. If selected, voicing modifies to match the chord and scale. Deselect for a simple transpose ignoring chord type.
RealDrums Settings:
You can assign RealDrums.
Enable Style uses RealDrums in order to designate a RealDrums style. If your style is in the correct directory, it should appear when you press the “RD” button. You can then select your RealDrums style, and whenever the current style is played, it will use your RealDrums style (if RealDrums are enabled).
Most RealDrums styles include several variations. Select Vary ^styles with each play to hear a different variation each time the song is played.
There are also additional volume controls here. If you have your dB setting exactly where you want it in your style file, but with this particular Band-in-a-Box style you want it a bit higher or lower, you can enter a setting here. There are also fields for adjusting the “a” or “b” subsection volumes only.
You can also remove the check mark from either Allow ‘a’ Substyle RealDrums or Allow ‘b’ Substyle RealDrums, which means that for this style, the one with the checkmark remaining will be used for the entire song, regardless of what substyle is currently called for in the song.
The [Set MultiDrums] button will open the Create Multi-Drums dialog, which allows you to create the Drums track with multiple drums/percussion, drum loops, UserTracks drums, and even RealTracks.
You can select a timebase (normal-time, double-time, half-time, or triple-time) for the Drums track with the ‘Timebase” option.
Drum Rest Instrument/Velocity, Drum Push Instrument/Velocity:
Since rests can be “shots” that play a chord on beat 1, the style can define what instrument to use for this, and at what volume. Similarly, each push is accompanied by a drum stab, and the style can define what instrument to use and at what volume.
Assign Soloist (MIDI) or RealTracks (audio) to style: Styles can contain RealTracks and RealDrums or MIDI soloists.
To assign RealTracks to a style, select a track and the RealTracks to use.
Styles can have multiple RealTracks. For example, you could have a Real Guitar and Real Bass - and also RealDrums for the drum track.
Styles can also use MIDI soloists. For example, make a style with a banjo part that has the same quality as the Band-in-a-Box Banjo Soloist. Here we are assigning an Earl Scruggs Bluegrass solo to the Strings track.
Use the dB or volume offset to match the level of the Soloist or RealTrack to the other instruments in the style. The acceptable range is a MIDI setting of –127 to 127. When applying this offset to audio (RealTracks) a value of 32 is approximately 6dB.
The Timing offset can be used to offset the selected track by a certain number of ticks, either plus or minus. A minus number will give the style a laid-back feel, a plus number will “push” the part.
The Timebase option allows styles to use Half-Time, Double-Time, or Triple-Time RealTracks. For example, you can make a Jazz Ballad style (tempo 65) that uses a Sax Soloist at tempo 140 (playing double-time).
Custom Settings:
Each track can have custom settings for panning, reverb, and tone. You can also choose to use the simple version of RealTracks, the ‘held’ notes only version of RealTracks, or the Direct Input version of RealTracks.
[Multi/Medley]: A style can have a huge number of RealTracks by using the RealTracks multi/medley feature, which allows a single track to have up to 10 RealTracks. For example, you can have choirs with different singers and several guitars on the same track. To do this, press the [Multi/Medley] button, and when the Create a Medley of different RealTracks dialog opens, select RealTracks to use and the playing option.
Loop/UserTracks/RealDrums: You can assign a loop, UserTracks, or RealDrums for any track.
MultiStyle(s): Enter the name of a style: zzjazz, or multiple styles separated by semicolons: zzjazz;zzbossa and these will appear as MultiStyles, substyles c/d/e/f etc. Enter the name of a style: zzjazz, or multiple styles separated by semicolons: zzjazz;zzbossa and these will appear as MultiStyles, substyles c/d/e/f etc. You can click on the [STY] button to choose the styles for your MultiStyle from the StylePicker window.
Importing Patterns into a Style
Importing a pattern into a style is a powerful feature that greatly speeds up the making of new styles. In the interests of not “re-inventing the wheel” with each new style, this allows you to import a pattern from another style.
How to Import a Pattern into a Style
A pattern can be copied from one style to another by copying and pasting. The Miami Pop style has a nice Strings part, in this example we’ll import the Strings from Miami Pop style into the Light Rock style, ZZLITROK.STY.
Let’s import the “Miami Pop” strings into the Light Rock style.
- Press the [Load] button.
- Select the ZZMIAMI.STY style from the file dialog.
- Select an 8-beat String pattern to copy and press the [Copy] button.
- Press the [Load] button.
- Select the ZZLITROK.STY style.
- Choose an empty 8-beat “b” String pattern (because that is where the String pattern was recorded in) and press the [Paste] button.
- Press the [Save As] button to save the Lite Rock style with Strings.
The strings will play in the “b” substyle only, because that’s how they were made in the Miami Pop style.
You could now import the Guitar from the ZZCONTRY.STY for example, using the steps above. It is quite easy to quickly add instruments to styles by importing instruments from other styles.
Intelligent Guitar Styles
Would you like to hear some realistic, accurate MIDI guitar from Band-in-a-Box styles, with strumming, picking, and accurate fret fingering? You’ll get it with Version 11! “Guitar Styles” are styles that show strummed and picked guitar parts accurately on the guitar fretboard, and they sound great. These styles also play accurate guitar voicings, in your choice of Pop, Jazz, Country, or Folk Guitar chording. There’s even a “walking guitar comping” style that plays guitar that emulates the famous “Basie Big Band” Jazz style. The “Guitar Styles” play like any regular style, and when you view them on the virtual guitar fretboard you can see exactly which strings and frets are used so it is a great learning tool as well.
Information about Guitar Styles for Playback
Guitar Styles are identified by the exclamation point (!) in the style name. This is not a requirement but is usually present in the style name. For the typical user who is just using the styles for playback and isn’t making their own styles there’s not much that you need to know about the styles, since they play normally like other Band-in-a-Box styles.
![]()
You can see which tracks have intelligent guitar parts by looking at the title window of the Guitar fretboard, when the track is highlighted. If it is a guitar style track, it will say [Guitar voicings] after the name of the track. The usual track that has the intelligent guitar styles is of course the Guitar part. Some of the styles have more than one guitar, so the Piano and/or Strings part might also have an intelligent guitar part. In these cases, you can also view the guitar on those tracks.
The styles can be set to use different types of voicings for guitar. For example, there are Jazz, Pop and Folk (open position) voicings. Also, some of the styles allow the guitar to play advanced chords and inversions. Some of the styles play chord patterns, so the chord in the song might be F7, but the guitar plays a “walking-chord” pattern of F7, Cm7/G, Abdim, F7/A on each beat. There can be “finger-picking” styles that have a lowest note alternate between root and 5th.
Guitar parts use channels 11 to 16 for the notes, corresponding to strings 1 to 6 of the guitar. When the notes are output to MIDI, they are re-channeled to the Guitar channel, so that it only uses 1 channel. When you make a MIDI file, the notes will all be written on the single guitar channel. Some other sequencers (e.g., PowerTracks Pro for Windows) will recognize guitar parts on all 6 channels, so if you want to write the MIDI file from an intelligent guitar style, you can set Band-in-a-Box to do this from the Preferences “Write Guitar part on 6 channels”option.
As previously mentioned, you don’t need to be aware of the details of how this is done; you just play the styles as usual.
Let’s Examine the Intelligent Guitar Styles
Load in the song! Freddie.MGU from the Songs folder. This is a demo song for the style !Freddie.STY. The exclamation point (!) in the name of a style is a convention to indicate that the style is an “intelligent guitar style.” This means that the patterns on the guitar part will play with correct guitar voicings on the fretboard.
Play the !Freddie.MGU song. |
|
Open the Guitar window and click on the track selector button to view the Guitar track on the guitar fretboard. |
As the song plays, you’ll see and hear the guitar played on the fretboard using correct Jazz voicings. For some chords, you’ll notice that the guitar plays different voicings on each beat in a walking pattern. For example, on an F7 chord lasting 4 beats, the guitar might play “F7, Gm7, Abdim, and F7/A,” with each chord lasting one beat, just as a professional Jazz guitarist might do.
The !Freddie.MGU style uses 3 note chord voicings in order to emphasize the lower range and to enhance the percussive rhythm effect. Since in these cases the guitarist is usually fingering the 4th note and muting it, if you want to see what the 4th note of the voicing would be you can set this option by pressing the [Settings] button in the Guitar window and checking the box for “Show muted note of guitar style comping” in the Guitar Settings dialog.
The Harmony Maker
The Harmony Maker editing module allows you to create (or edit) your own harmonies. This can be used in the program to harmonize melodies, solos, or live playing on the Thru channel.
Sophisticated options control usage of passing harmonies (diatonic, dominant approach and chromatic), drop octave voicings (e.g. drop 2), octave doubling, patch selection, and more. An unlimited number of harmonies can be created and can be saved to disk as harmonies files. Changes in harmonies can be heard “live” as a song is playing.
To get to the Harmony Maker, first press the [Harmony] toolbar button and choose either the MIDI - Melody Harmony or MIDI - Thru Harmony and then click on the [Edit] button in the Harmony Select dialog. Or you could go to the menu Harmony | Harmonies Editor | Edit Current Harmonies File.

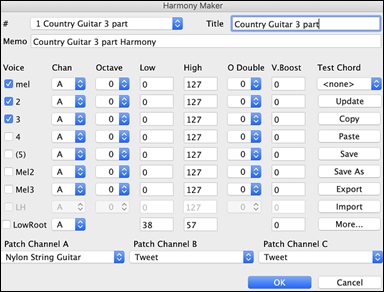
The Harmony Maker dialog allows you to design a harmony.
This harmony can be used in the future for the melody or the thru harmony part.
Each harmony can use up to 3 channels, Harmony Channel A, B, and C.
If your harmony only has one instrument, then you will use Channel A for all the voices. If your harmony uses Flute and Bass, then you could use Flute on Channel A, and Bass on Channel B.
Let’s make the Harmony called Shearing Quintet. The Shearing Quintet was a famous Jazz quintet with a distinctive sound that consisted of:
- Piano playing a 4-part harmony with the melody doubled one octave below.
- Vibes doubling the melody.
- Electric Guitar doubling the melody one octave below.
Let’s hear our Shearing harmony playing as we develop it. To do this, we need a song with a melody to be playing before we enter the Harmony Maker. So, let’s exit the Harmony Maker, and start a song with a melody playing (like Old Folks at Home.mgu). Now go back into the Harmony Maker.
Voices
You will see the voices down the left side of the dialog.
1: Voice Mel is the melody.
2: Voice 2 is a chord tone below the melody
3: Voice 3 is 2 chord tones below the melody
4: Voice 4 is 3 chord tones below the melody
(5): Voice 5 is an additional chord tone usually the 9th or 11th in the scale. (This is rarely used.)
Mel2: This is used to double the melody.
Mel3: This is also used to double the melody.
LH: The LH chord feature is not implemented in the current version.
Settings for Each Voice
![]()
Channel is described above. A 1-instrument harmony will use Channel A only. Additional instruments can use Channel B and C.
For the Shearing Quintet harmony, we will set the Piano to Channel A, the Vibes to B, and the Guitar to C.
Octave:
This allows the harmony to “drop down” or “go up” by several octaves. This octave change will only happen in a certain range, as chosen in the Low and High settings. For example, in the Shearing Quintet harmony, we want the 2nd voice of the Piano part to drop down an octave when the melody note is higher than MIDI note 68 (the Ab above middle C). So, when the melody is higher than this, the harmony will become a “drop 2” voicing.
There is also an Overall Harmony Octave setting, available by pressing the [More…] button that changes the octave of the entire harmony.
O. Double (Octave Double):
This setting lets you double any voice. Usually you want to do this by doubling an octave below (i.e. octave =-1), but you can set the octave from -2 to +2. (The doubling will always be on the same channel, if. If you want a different instrument to double the voice, then use the Melody Doubling Voices.)
For the Shearing Quintet harmony, the only voice that needs a doubling like this is the Piano melody, so we will set this to = -1 on mel (the melody voice).
V. Boost (Velocity Boost): This allows you to increase or decrease the velocity (loudness) of each voice, to make the voice stand out more or less in the harmony. Default =0. For the Shearing Harmony, we set the Melody to a boost of 10, and the vibes and guitar to a negative boost of (-5, and -20). This makes the piano stand out, and the vibes and guitar quieter.
The Patches setting at the bottom allows you to assign a patch to the harmony. If you set “No Patch change,” the harmony won’t change the patch. This is a useful setting for making a generic harmony that doesn’t change the patch of the Melody or Thru channel for example.
For the Shearing Quintet harmony, we will set the patches as follows:
Channel A: Piano
Channel B: Vibes
Channel C: Guitar
[Update]: When we have made changes to the harmony, we will hear these changes on the harmony channel.
[Copy] [Paste]: You make Copy a Harmony to the clipboard, and then move to a new harmony and PASTE the harmony to the new location.
For example, if you want to make a harmony similar to the Shearing Quintet harmony, choose [Copy], move to a new harmony, and choose [Paste]. Then rename that harmony “Shearing - modified” and you can make changes to it (such as using different instruments).
[Save] [Save As]: You should never have to press these [Save] buttons since the harmony is saved automatically for you. All the 256 harmonies are saved in a single .har file called default.har. If you have run out of harmonies, you can start a new harmonies file by pressing the [SaveAs]. For example, if you want to make a disk of add-on harmonies, you can make one and save it as MyName.HAR. Then you could share it with other Band-in-a-Box users who could load in your bank of harmonies (from the Harmony | Harmonies Editor | Edit a Harmonies File…) without disrupting their own existing default.har file.
[Export] [Import]: As stated above, each .har file has 256 harmonies, so you probably need only 1 file (default.har) for all your harmonies. But if you have made a great harmony and want to give it to your friend for example, you can export a single harmony as a.h1 file. Your friend can then import this harmony into their .har file. Or, you could upload some.h1 files that you’ve created to your favorite web site for other Band-in-a-Box users to enjoy by importing them into their default.har harmonies file.
Test Chord: The best way to develop a harmony is to hear it as it’s playing. The preferred way to do this is to have a song playing that has a melody in it. Any changes to the harmony will be heard on the melody as soon as you press the [Update] button. You can also play along as the song is playing and hear the new harmony on the Thru channel. If you don’t want to have a song playing, and want to hear the harmony, then set the Test Chord to a certain chord. Then you can play on the MIDI keyboard (with no song playing) and hear your harmony. This allows you to examine exactly what notes Band-in-a-Box is using to make your harmony.
Additional harmony settings are accessed by pressing the [More] button, which brings up the Additional Harmony Options dialog.
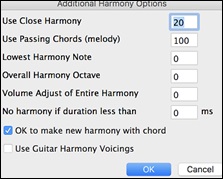
Use Close Harmony:
This only applies to 2- and 3-part harmonies.
If set to =0, then it will use only close harmonies (mainly 3rds for 2 -part harmonies)
If set to =1, it will use mostly 3rds, with some 6ths for 2-part harmonies.
If set to =99, it will use mostly 6ths, with some 3rds for 2-part harmonies.
If set to =100, then it will use only wide harmonies (i.e. mainly 6th for 2-part harmonies).
If set to between 2 and 98, it will vary between close and open harmonies (for 2- and 3-part harmonies).
Use Passing Chords (Melody): Band-in-a-Box will sort out when to use passing harmonies, based on factors like the duration of the note, the next note, the chord tone, the velocity, previous notes, and other factors. You don’t need to be aware of any of this. You can visually see when the harmony is using a passing chord. The harmony display is usually blue, but when there is a passing chord, it displays as RED. If you don’t want passing chords, set this value to = 0. We usually leave it at 100%.
Lowest Harmony Note: You can set a lowest note for the harmony to play. When the melody is low, harmonies begin to sound “muddy,” so you can avoid the harmony being played below a certain note.
Overall Harmony Octave: This is very useful setting. It sets the overall octave of the harmony. For example, when we made the 5-part Trumpets harmony, we wanted the harmony to always be played an octave higher than the recorded melody. This is because the 5-part harmony is spread over 2 octaves and needs a high
Volume Adjust of Entire Harmony: You can set an overall adjust to the entire harmony, so it will be quieter.
No harmony if duration less than: If harmonies such as “Garner Piano” harmonize every note, they produce unrealistic harmonies, since a piano player (like Garner) wouldn’t harmonize notes of a short duration. You can specify a harmony to only occur for notes longer than certain duration. In the example of Garner, we set the threshold to 200ms, notes shorter than that will not be harmonized.
OK to make new harmony with chord: This option is for how the program fixes the harmony when chord changes occur during a sustained note harmony. Most harmonies have a feature that changes the pitch of the harmony voices under the Melody note when the chord changes, if the underlying voice wouldn’t be a chord tone. This sounds unrealistic for certain types of harmonies like “Garner” or “Guitar harmonies,” since it would be unrealistic for those instruments to change the inner voicings in this manner. If you de-select the option to “Make new harmony with new chord,” the voices that would conflict with the new chord merely stop playing instead of changing to new notes.
Use Guitar Harmony Voicings: This harmony type uses real guitar chord voicings that display correctly on the guitar fretboard. Setting the “Use Guitar Harmony Voicings” checkbox means that guitar chord voicings will be used, instead of any other voicings specified in the Harmony Maker. Check out Harmony #32 (J Pass) for an example of this.
The Soloist Maker
The Soloist Maker allows you to define the parameters essential to a soloist’s playing, such as instrument range (i.e. tenor saxophone), extra legato playing, playing more on top of the beat than most jazz musicians, and playing straighter 8th notes than usual swing 8th notes.
In addition, you can set phrasing options, such as how long the phrase should be, and how much “space” to leave between phrases. You can also set how “outside” the playing should be. In the case of a John Coltrane style, you set that to the maximum! Then “turn it loose” and hear the soloist play over any song!
![]() Access the Soloist Maker by pressing the [Edit] button within the Select Soloist dialog.
Access the Soloist Maker by pressing the [Edit] button within the Select Soloist dialog.
10 easy steps to make a Soloist
- Open the Select Soloist dialog by pressing the [Solo] Button or shift+F4.
- Select a blank spot in your list of soloists and press the [Edit Soloist Maker] button.
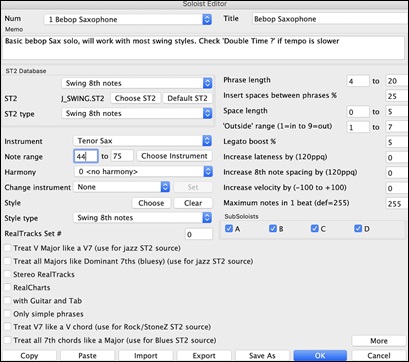
- Insert the title of your soloist and any memo note you wish to add. (The Num field will be filled in for you.) Call this one “Bebop Saxophone.” For the memo, you can put in information like, “Basic bebop Sax solo, will work with most swing styles.
- Choose the type of soloist, i.e., Swing 8th notes, Even 8th notes, Swing 16th notes, etc. This should be set to Swing 8ths.
- This style uses the default ST2 database, J_SWING.ST2. Another choice could be made from the Soloists folder by clicking on the [Choose ST2] button.
- Press the [Choose Instrument] button to select the instrument the soloist should play (i.e. Tenor Saxophone).
Note: You may also select an instrument from the Patch Change window but selecting an instrument with the “choose” button also fills in the note range information specific to that instrument. You will notice that the correct range for tenor saxophone has been filled in to the Note Range settings. - Modify (if required) the phrase length, space length, and outside range parameters.
- Change the Legato Boost to 10 %. This will % to add 10% to the duration of the notes.
- Increase the Lateness by -5. This will play the notes more “on the beat” than other jazz soloists.
- Increase the 8th Note spacing by -5. This will play the 8th notes in a more even feel than other Jazz soloists.
If your screen looks something like the one shown, press [OK]. Then, give Band-in-a-Box a few moments to load its knowledgebase of solo ideas and new parameters, and an additional few moments to analyze the chords. Playback will then begin automatically. Enjoy the solo!
The Soloist Editor dialog allows editing of many RealTracks parameters.
RealTracks Settings:
This group of settings applies to RealTracks used in soloing.
Treat V Major like a V7: The Soloist will treat a V major chord like a V7 instead of treating it like a VMaj7 chord.
Treat all Majors like Dominant 7ths (bluesy): The Soloist will treat any Major triad (C, F, etc.) like a dominant 7th (C7, F7, etc.) and use flatted 7ths for soloing.
Stereo RealTracks is set to true if the source audio files are stereo files.
RealCharts should be set to true if RealCharts (notation) are available for this track.
with Guitar and Tab should be set to true for a RealChart that also has guitar display. (Tab is not yet implemented.)
Only simple phrases can be set for RealTracks that allow it, and you can create a variation that only plays simple (unembellished) phrases.
Treat V7 like a V chord remaps V7 or V9 chords on the Chord Sheet to simple V triads for Rock solos.
Treat all 7th chords like a Major (Blues) should be set to true for a Blues soloist, then any 7th or 9th chord gets remapped to a simple triad, which matches the Blues playing.
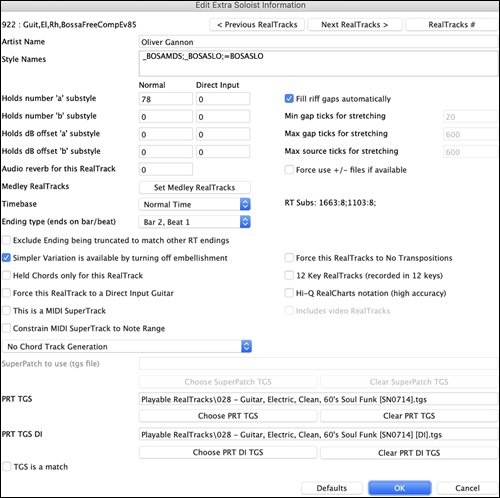
Press the [More…] button in the Soloist Editor. This launches the Extra Soloist Information dialog, where you can change additional parameters about the RealTracks.
The [< Previous RealTracks] [Next RealTracks >] buttons will step back and forth through the list of RealTracks soloists to make your selection.
If you have the number of the RealTracks instrument to edit, you can select it by clicking on the [RealTrack #] button and typing in the numbers.
The Artist Name is given, and the “Style Names” for styles that use the particular instrument.
The Holds Number and Holds Number ‘b’ Substyle identify the location of the files played when shots or held chords are entered into a song.
Holds dB offset ‘a’ substyle / Holds dB offset ‘b’ substyle: The volume level of the “Holds” that play can be adjusted in a range of +/- 64 dB. There are separate settings for “a” and “b” substyles.
Audio Reverb for this RealTrack: The Audio Reverb for the instrument can be adjusted.
>[Set Medley RealTracks]: Similar to the Soloist Medleys, it is possible to have multiple RealTracks instruments change in sequence.
Normal/Half/Double/Triple Time: The élastique Pro V2 time stretching and pitch transposition engine by zplane.development expands the possibilities for playing RealTracks in half, double, or even triple time.
Fill riff gaps automatically: If this is enabled, the settings below will be determined automatically based on the type (rhythm/soloist/background, 8th/16th, even/swing, etc.)
Min gap ticks for stretching: For filling silent gaps between riffs, the end of the previous riff will be stretched. This is the minimum duration of the gap in ticks for this to take effect.
Max gap ticks for stretching: For filling silent gaps between riffs, the end of the previous riff will be stretched. This is the maximum duration of the gap in ticks for this to take effect.
Max source ticks for stretching: For filling silent gaps between riffs, the end of the previous riff will be stretched. This is the maximum duration of audio in the previous riff (in ticks @ 1200ppq) to be used for stretching. A longer duration will result in a better quality stretch but should be set to a shorter duration to avoid including note starts.
Force Use +/- files if available: If this is checked, RealTracks will be generated using source files that have + or - in the file name.
Ending type (ends on bar/beat) specifies the ending type of the RealTracks and the beat that the last held chord occurs on. Do not edit this value.
Exclude Ending being truncated to match other RT endings is used for RealTracks that have various endings, such as soloing RealTracks. Do not change this setting.
For RealTracks that are variants, such as Bluesy variants, the parent is the non-bluesy variant or the main RealTrack that uses the database. Do not change the Parent RealTracks setting.
Simpler Variation is available by turning off embellishment is a PG Music setting only and is set if a simpler RealTrack is available.
If Held Chords only for this RealTrack is checked, the RealTracks will only play held chords instead of the normal style.
If Force this RealTrack to a Direct Input Guitar is set, the RealTracks will always use a Direct Input guitar.
This is a MIDI SuperTrack sets the soloist to play as MIDI SuperTrack instead of a RealTrack.
Constrain MIDI SuperTrack to Note Range: If this is checked, a generated MIDI SuperTrack will have its notes transposed to fit into the range specified in the Soloist Editor.
If the Chord Track Generation combobox is set other than none and the above Constrain option is set, then a simple chord track will be generated using the range set in the Soloist Editor.
12 Key RealTracks (recorded in 12 keys): If this is checked, the RealTracks were recorded in all 12 keys. This is set by PG Music.
If Hi-Q RealCharts Notation (High Accuracy) is selected, highly accurate and readable notation in available including new graphical markings for bends, slides, hammer-ons, and pull-offs, for the RealTrack. This is set by PG Music.
If Includes video RealTracks is checked, a video is available for the RealTrack. This is set by PG Music.
SuperPatch to use (tgs file) allows you to load a custom synth with the MIDI SuperTrack.
PRT TGS / PRT TGS DI: These fields show the .tgs files for the Playable RealTracks.
If TGS is a match is checked, the instrument in the .tgs was recorded by the same artist and at the same recording session as the RealTrack.
The Melodist Maker
In addition to the Melodists supplied with the program, this module lets you define or edit your own Melodists. You can choose the parameters to control the type of chords, melody and intro to be generated, as well as a number of settings controlling song form, theme continuity, endings type, anticipations, feel, style, harmony, soloist, patch changes and more.
|
The Melodist Maker is launched from the Melodist Select dialog. Press the [Edit] button to launch the Melodist Editor dialog. |
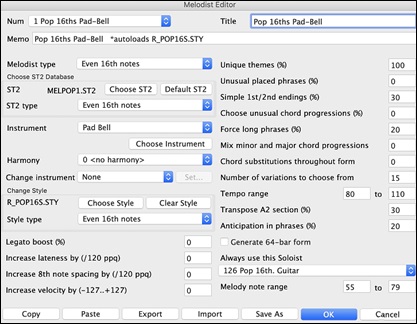
This dialog has settings that allow you to create a Melodist.
The Num selection box allows you to select the Melodist that you’d like to edit.
The top area of the Melodist Maker screen also allows you to set the Title of the Melodist and supply a Memo.
In the Choose ST2 Database area, select the associated ST2 database for the Melodist. Some ST2 Melodist databases are MEL1.ST2=Jazz Swing (8th notes), MELPOP1.ST2 (Pop Ballads, 16th notes), MELWLZ1.ST2 (Waltzes, 8th notes), and MELROK1.ST2 (Rock, 8th notes).
The Instrument/Harmony/Change instrument area allows you to select an instrument and harmony, and to set change instrument setting for when you would like to change to a new Melody patch (e.g., Each Chorus).
In the Change Style area, you can choose a style for the Melodist and specify the feel for the style.
Legato boost changes the legato (length) of the notes generated. Instruments like Saxophone have longer legato phrasing.
Increase lateness by (/120ppq) refers to how much after the beat the notes are played. This is normally left at zero for Melodists.
Increase 8th note spacing by (/120ppq) is usually left at zero (0). If set to a nonzero value, the 8th notes will be farther apart (based on units of 120 PPQ).
The rest of the settings in the Melodist Maker allow you to select options that control what type of melody will be generated.
Unique themes: This is normally left at 100%. But if you want to force the Melodist to stick with the same theme throughout the song, set this to a lower value (say 80%). It shouldn’t be set much lower than 80. Default = 100.
Unusual placed phrasing: The Melodist tries to make phrases that are appropriate for the position in the song. For example, the first 2 bars of the melody are appropriate for “opening phrases.” But if you want to experiment with phrases that don’t follow these rules, set the Unusual Placed Phrasing to a value higher than 0%. Default = 0.
Simple 1st and 2nd endings: This setting only applies to Melodists that are using the Jazz Swing (MEL1.ST2) or Waltz (MELWLZ1.ST2) databases. This determines the % of time that endings of the A sections (in AABA forms) will be simple endings (1 or 2 notes) instead of complete phrases. Usually, AABA tunes end with simple phrases at the end of the A section, so this option is normally left at 80% or higher. Default = 80%.
Choose unusual chord progressions: If set to a value other than zero, the Melodist will generate atypical chord progressions. For example, instead of a Dm7 | G7 | Cmaj7, the Melodist might generate Dm7 | Db7 | Cmaj7 Am7. Default = 0.
Force long phrases: This determines the % of time that the Melodist will try to generate long phrases (4 bars or more). The downside to setting it higher than 20 will be a loss of uniqueness in the phrases generated. The setting shouldn’t be set much higher than 20. Default = 20.
Mix minor and major chord progressions: Typical major key chord progressions have progressions like (in the key of C) Dm7 | G7 | Cmaj7, whereas in the key of Am, they would be | Bm7b5 | E7 | Am6. This setting determines how much the two types of progressions should be mixed in a single song. Default = 0.
Chord substitutions throughout the form: Normally, an AABA song has identical chords for each A section. If this setting is greater than zero, the Melodist will generate chord substitutions throughout the various A sections, while preserving the identical melodies! Default = 0.
Number of variations to choose from: As the Melodist is determining what type of phrase to generate, it will narrow the possibilities to the number of variations set in this variable. Setting a higher number results in more interesting melodies, but the chord progressions are more unusual. Default = 15.
Tempo range: This determines the tempo range that the tune will be created with (it will be a random tempo in the range).
Transpose A2 section: In songs with an AABA form, it is common for the second “A” section to be transposed. For example, the first “A” section might be in the key of Eb, and the second would be transposed up to the key of Gb. Melodists store these settings, and some Melodists are set to transpose the A2 sections. This setting determines the % chance that the song will be generated with a transpose. The transpose will be usually 2, 3, or 4 semitones. The song will only get transposed if the A2 transpose setting isn’t set to “none” on the Melodist selection screen. Default = 30.
Anticipations in phrases: Melodic phrases often begin a little before the beat. This is referred to as anticipation. This setting determines what % of the phrases will be anticipated. Default = 20.
Always use this Soloist: Since Melodists can also generate Solos, a specific Soloist can be set in this setting. If set to “0 - no Soloist” the program will intelligently make a selection from all the Soloists in the list.
[Copy] [Paste]: Melodists can be copied and pasted to make new Melodists that are variations of each other.
[Export] [Import]: You can export (save) and import (load) individual as Melodists.M1 files. This would be useful if you wanted to send a Melodist to a friend, for example.
[Save As]: The entire Melodist file, with up to 256 Melodists, can be saved to a .MEL file. The usual file is DEFAULT.MEL.
The DEFAULT.MEL file is saved every time the [OK] button is pressed, so you don’t need to explicitly save this file by the [Save As] button unless you want to save alternate .MEL files and go beyond 256 Melodists.
The Guitarist Maker
|
The Guitarist Maker (Guitarist Editor) is accessed from the Guitar Window, which opens with the [Guitar] toolbar button or the menu item Windows | Guitar Window, or the keystroke control+shift+G. Click on the [Chord Solo] button in the Guitar window to open the Select Guitarist window. Then click on the [Edit Guitarist Maker] button to launch the Guitarist Editor, where you’ll see the options for making or editing Guitarists. |
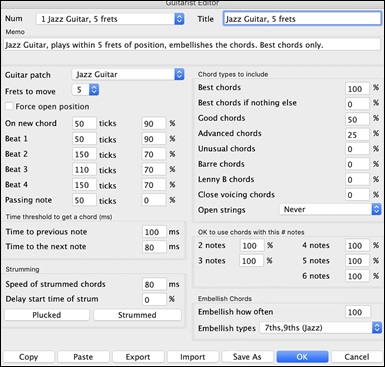
The Guitarist is selected from the Num field.
You can title the Guitarist using the Title field.
The Memo field allows a 100-character memo about the Guitarist.
The Guitar patch is selected using the Guitar Patch field.
Frets to move: If set to zero, the guitar chord solo will be limited to chords that can be played within the current position. If set to 5 (for example), the chords will be limited to chords that can be played within the current position and up to 5 frets away from the current position.
Force Open Position forces all the guitar voicings to the open position. The exception is when the melody notes are so high that they can’t be played using open position voicings. If the melody is in a high range, and you want a “forced open position,” you should likely transpose the melody to a lower octave prior to generating the solo.
The settings for note duration thresholds to get a chord refer to the length that a note must be before a chord will be generated.
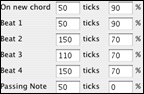
Looking at the settings above (for Guitarist #2), these would be interpreted as follows:
- If a note occurs and it is the “First Note of a New Chord,” and the note is not followed by another note for at least 50 ticks (120 ticks = 1 quarter note), then a chord will get voiced 90% of the time.
- If a note occurs (not the first note of a chord), that is on “Beat 1 of a bar,” and the note is not followed by another note for at least 50 ticks (120 ticks = 1 quarter note), then a chord will get voiced 90% of the time.
- Similar interpretations for notes occurring on “Beat 2, 3, and 4.” You can see that the threshold is higher for notes on beat 2 and 4, which is how a guitar player makes chord solos.
- “Passing notes” are defined as short duration notes that aren’t on the beat and are followed by a note that is on the beat. In the example above, passing notes will never be voiced as chords, since the tick threshold is set to zero.
Time Threshold to get a chord: A further threshold is applied to the possibility that a note is voiced to a chord. These are defined as durations in milliseconds. In the settings shown, if the note occurs less than 100ms (Time to Previous Note) after the previous note, the note will not be voiced as a chord. If the note is followed by another note within 80ms (Time to the next note), the note will not be voiced as a chord.
Strumming: If the Guitar Chord were all played at the same time, it would sound as if it was “plucked.” Guitar playing is more typically a strum.
Speed of strummed chords: If you set the Speed of the strum to, say, 80ms, then the guitar chord will be “strummed” over a period of 80ms.
Delay start time of strum: If the Delay start time is left at zero, the strum will end at the original time of the melody note. If you set it to 50% delay, the strum will be in its midpoint at the original start time of the Melody note, and if it’s set to 100%, the strum won’t start until the time of the original note. The most musical setting is about 50% delay. A delay of 0% also sounds good and has the added advantage that it doesn’t shift the actual time of the Melody note (relevant if you keep regenerating the solo on the Melody track).
The [Plucked] or [Strummed] buttons apply preset values.
Chord Types to Include:
You can decide which types of chords should be included in the chord solo.
Best chords are the most commonly played chords by pro guitarists.
Best chords if nothing else will consider best chords for inclusion if no other chords are found.
Good chords are popular alternate chords.
Advanced chords are chords that are difficult to play or have advanced voicings.
Unusual chords are voicings that should be avoided in most cases but have some uses.
Barre chords are chords that require the index finger to be played in a Barre position.
Lenny B chords sets the percentage of shell type Lenny Br. voicings, usually a shell of two notes on strings 4/5 or 5/6 and then a higher note on strings 1 or 2.
Include Open Strings can be set to Never/Sometimes/Favor. If set to “Never,” no chords that require and open string will be played. If set to “Favor,” it will play open strings whenever possible, and “sometimes” is a “middle ground” setting.
OK to use chords with this # of notes: You can select the # of notes for chords to be included in the chord solo.
Embellish Chords: You can embellish chords.
- Embellish how often: Allows you to specify the frequency of embellishment.
- Embellishment type: Allows setting of the types of embellishments to do.
- “Pop” Guitarists should be set to use 9ths only. This will change C7 chords to C9 and Cm7 to Cm9.
- The “7ths/9ths” setting should be used for Jazz. This adds the embellishments of C to Cmaj7 and Cm to Cm7.
- The “7/9/11/13” embellishment should be used for “Advanced Jazz” Guitarists and add 11ths and 13ths voicings.
[Copy] [Paste] [Export] [Import]: Individual Guitarists can be copied, pasted, exported, or imported to/from disk.
The Guitarists are saved in the DEFAULT.GIT file, but if you want to save them in another file, press the [Save As] button.
Pressing the [OK] button will update the DEFAULT.GIT file with the current settings.
Unconditional 30-Day Money Back Guarantee on all PG Music products purchased from PG Music Inc.
PG Music Inc.
29 Cadillac Ave Victoria BC Canada V8Z 1T3
Sales: 800-268-6272, 250-475-2874,+ 800-4746-8742*
* Outside USA & Canada where International Freephone service is available.
Access Codes
Tech Support: Live Chat, support@pgmusic.com
 Online now
Need Help?
Customer Sales & Support
|
Phones (Pacific Time) 1-800-268-6272 1-250-475-2874 |
||
| Live Chat | ||
| OPEN | Online Ordering 24/7 |
|
| OPEN | Forums, email, web support |