
Search Manual
RealBand® 2021 for Windows® User’s Guide
Chapter 1: Welcome
|
Welcome to RealBand, your all-in-one audio workstation and accompaniment program! |
RealBand is a program that combines the most popular features from PG Music's PowerTracks Pro Audio DAW and the award-winning Band-in-a-Box into an all-in-one sequencing program with automatic accompaniment.
RealBand offers powerful features for musicians, students, and songwriters. With intelligent automatic arrangements, RealTracks live instrument tracks, RealDrums live drum tracks, the amazing Audio Chord Wizard, seamlessly integrated digital audio/MIDI recording, built-in DirectX effects, and notation, RealBand turns a typical PC into a music production powerhouse.
This documentation will provide you with information on how to get the most out of the great features that RealBand has to offer.
Updates and improvements to this version of the program are ongoing and are freely available at www.pgmusic.com/support.realband.htm.
About RealBand
RealBand is a fully-featured and powerful music arranging, sequencing, and digital recording program. RealBand is the perfect tool for musicians, students, and songwriters alike.
Features included in RealBand
- Intelligent automatic accompaniment by Band-in-a-Box.
- RealTracks and RealDrums – automatic live instrument parts.
- Audio Chord Wizard interprets chords from audio files.
- 48-track MIDI/audio mixer with multiple FX busses (up to 16 effects per track).
- Support for popular audio file formats – MP3, WMA, WMV, WAV, and CDA.
- Built-in DirectX audio effects.
- DirectX and VST plug-ins supported.
- Band-in-a-Box files load directly.
- Compatible with all Band-in-a-Box styles and Real instruments.
- Shares native .SEQ file type with PowerTracks Pro Audio, directly compatible.
- Support for MIDI and Karaoke files.
- Karaoke lyrics window.
- Piano roll window with graphic controller editing.
- Onscreen notation and lead sheet style printout.
- Virtual guitar fretboard and piano keyboard.
- …and much more!
Have fun!
Installation
Minimum System Requirements
- Windows XP / Vista / 7 / 8 / 8.1 /10 (32 or 64-bit)
- Minimum 1GB RAM (2GB+ recommended)
- Minimum 1.0 GHz processor (2GHz+ multicore recommended)
- 1 GB free Hard Disk space for a minimal install. More space is required for RealTracks, depending on which package you buy...
- RealTracks & RealDrums: ~100-400 MB per set
- Pro RealCombos: ~6 GB
- MegaPAK RealCombos: ~12 GB
- Full UltraPAK/UltraPAK+ when installed to internal hard drive: ~70 GB - 1024x768 screen resolution (1360x768+ recommended)
- DVD-ROM drive for installation
- USB port for the Hard Drive versions of the UltraPAK, UltraPAK+, and Audiophile Edition.
- A MIDI sound source is required. This could be a sound card, a MIDI keyboard, MIDI sound module, or software synthesizer.
- Internet connection recommended for activation and updates.
Installing the Program
Use one of the following methods to install the program files into the RealBand directory. By default, this directory is C:\RealBand, but you may choose another location. If you have a previous version of RealBand installed on your computer, you should install the files to your existing RealBand directory.
Installing from the Downloaded Installer Files
If you ordered the e-delivery, download all installer files from the link provided. Double-click on each file to run the installation program.
Installing from the DVD
Insert the DVD into the DVD drive. In a few seconds, a browser window will open with a list of the DVD contents. If it does not open, access your DVD drive from the Windows® Explorer. Double-click on SETUP.EXE to run the installation program.
Installing from the USB Flash Drive
Insert the USB flash drive into the USB port. The Windows® AutoPlay should open the drive and show you the contents. If the drive does not automatically open, find the drive in the Windows® Explorer and double-click on the flash drive icon to open it. Double-click on a setup file to run the installation program
Installing from the USB Hard Drive
Larger versions of Band-in-a-Box/RealBand ship on portable USB hard drives. You can run Band-in-a-Box and RealBand directly from the hard drive by using the program shortcuts. Before you use the programs, you should double-click on Setup.exe. This will set up any files that need to be installed/registered on your computer.
Setup and Configuration
Step One - MIDI Setup
The first time the program runs you will be prompted to select a MIDI device from a list of currently installed devices (e.g., SB Audigy MIDI IO, Microsoft GS Wavetable SW Synth, etc.). If you don’t see the MIDI Driver Setup dialog automatically it can be reached by pressing the [MIDI Devices] toolbar button. Select the MIDI device (or devices) that you want to use with RealBand (optionally) set the internal MIDI clock/timer in milliseconds.
This clock/timer setting determines how often the computer should reset its “MIDI watch.” If you ever find you need an even higher degree of MIDI accuracy (and your system is extremely fast) you can decrease this number, say to 5, and the MIDI clock will be checked and reset twice as often. The default is 10 milliseconds (1/100th of a second) –which is fine for most systems.
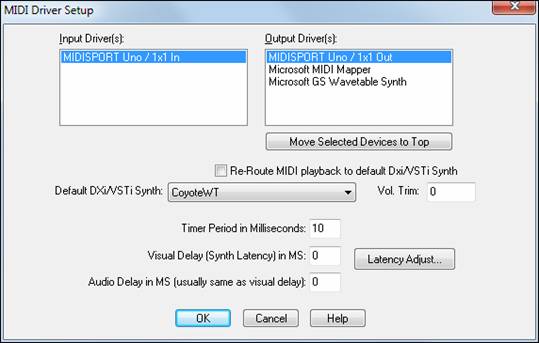
The MIDI Input Driver is the port that your MIDI controller, for example a MIDI keyboard or MIDI guitar controller, is attached to.
The MIDI Output Driver selection is the port that your MIDI synthesizer (e.g. Sound Canvas) or an internal sound card, DXi, or VSTi synth is connected to.
Software Synthesizers
RealBand supports both DirectX (DXi) and VSTi software synthesizers, which allow RealBand to play high quality sounds directly through your computer sound card, without requiring any external MIDI hardware.
DXi Synthesizer Support
To use DXi (DirectX instrument) synthesizers with RealBand, you can think of the DXi as a type of “MIDI Output Driver.” As such, you can either visit the MIDI Driver Setup dialog (Options | Preferences | MIDI | MIDI Devices) and select the “Re-Route MIDI Playback to Default DXi Synth” checkbox to send all MIDI playback to the default DXi synth, or you can assign DXi synths to individual tracks in the Tracks window.
Routing to Default DXi Synth
The “Default DXi Synth:” combo box lets you select which DXi (or VSTi) synth is used as the default software synth.
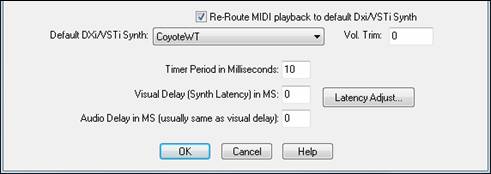
The “Re-Route MIDI playback to default DXi Synth” setting will cause RealBand to re-route all MIDI playback to the default DXi or VSTi synth. This is the easiest way to use a DXi softsynth for playback.
If this option is checked, then all MIDI tracks’ playback output will be routed to the default DXi/VST synth regardless of the individual track’s port number.
VSTi Synthesizer Support
Installing a VSTi Synthesizer
|
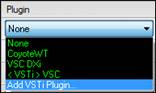
To select a VSTi synthesizer for the first time, click on the [VSTi/DXi] toolbar button to open the DirectX/VST Window. |
Select >> Synth 16<< in the Track list.
![]()
|
In the Plugin list, select “Add VSTi Plugin...” at the bottom of the list. Note: VSTi synthesizer plug-ins have the text “<VSTi>“ prepended to the plug-in name, and VST effects plug-ins have “<VST>“ prepended to the plug-in name. |
VST/VSTi plug-ins are often located in the Program Files folder in a subfolder named VST plug-ins, but they could also be in a folder named Steinberg, or wherever else they have been installed on the hard drive.
Select a VSTi plug-in .dll file in the following Select a VST plug-in dialog, and it is added to the plug-in list. After you add each VST, the plug-in is permanently added to the list. You only have to add each plug-in one time.
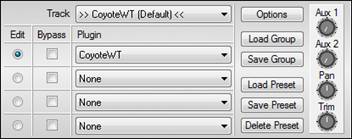
Now your VSTi synthesizer will be available along with the DXi Synth selections in the MIDI Driver Setup dialog.
![]()
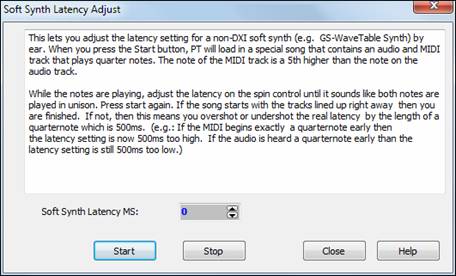
Latency Adjustment
![]()
![]()
Pressing the [Latency Adjust] button in MIDI Driver Setup or the [Soft Synth Latency Adjust] in Options | Preferences | Audio opens the Soft Synth Latency Adjust dialog. This lets you adjust for fine tuning latency settings for MIDI (non-DXi, and non-VSTi) soft synths.
This works by playing a song called LatencyAdjust.SEQ (included with RealBand) which contains a MIDI note and audio note. Pressing the [Start] button starts the playback; you can then tweak the Soft Synth Latency MS setting until you hear the MIDI and audio tracks are in sync.
Step Two - Digital Audio Setup
RealBand includes an auto-configuration utility to profile your computer’s sound card and install optimal parameters to use when recording and playing back digital audio. Go to Options | Preferences and select the Audio tab to view and edit these settings. You will see the Audio dialog.

Pressing the [Default (MME only)] button instructs the program to analyze your sound card and apply the optimal values for your system if you are using the standard MME audio drivers. These settings normally don’t need to be changed.
Project Recording Options
The options you may need to manually adjust in this dialog are:
- The “Audio File Type” shown at the top of this dialog. Select the 96 kHz, 48 kHz, 44.1 kHz or 22.05 kHz sample rate option at either 16-bit or 24-bit depth, depending on your system’s speed and storage capacity, on the number of tracks, and on the fidelity you wish to record. For CD audio use the 16-bit, 44.1 kHz setting. If you experience sluggish performance from your computer you could try the 22.05 kHz setting.
- The “Audio Driver Type” is MME by default, but if your sound card supports ASIO drivers you can choose this type. ASIO is an alternate driver system developed by Steinberg. It allows for much lower latency than ordinary MME drivers. When RealBand detects ASIO drivers it will prompt you to ask if you want to use them.
- The [Drivers…] button will opens the MME Audio Driver dialog if the Driver Type is set to MME, Windows Audio Drivers dialog if the Driver Type is set to Windows Audio, or the ASIO Audio Drivers dialog if the Driver Type is ASIO.
If using MME, the Microsoft Sound Mapper is selected by default for both input and output. If you have multiple sound cards, or a multiple I/O card, you can select more than one input or output. This will affect the computer performance when recording or playing audio tracks. The more ports that are selected, the more demand is placed on your computer. This may require a very fast computer.
“Input Channel for MONO Tracks” - Left/Right/L+R (2 Tracks). Since most digital audio sound cards are stereo you have the option of recording to your project using the left channel, the right channel, or both. To determine the best setting for your recordings you must consider the audio source being recorded. For example, if you are recording a single voice with a mono-microphone you would choose either Left or Right channel to record. If your recording source is stereo, such as a guitar preamp or a synthesizer with stereo outputs, you should select L+R (2 Tracks) from the “Input Channel for MONO Tracks” list box.
The text box that displays the path of your “Audio Temp Directory” is another important setting.
![]()
If you have only one hard drive then you do not need to worry about this setting, just leave it on the default setting of C:\windows\temp.
If you have multiple hard drives or multiple partitions you should use the [Browse] button to point to the best performing drive with the most available disk space.
If you don’t know what your “best” hard drive is, we have also included a special hard drive benchmarking utility so that you can test your hard drive(s) for their audio-recording capabilities to aid you in making this selection.
To test your hard drive(s) for their audio capabilities select the Test Audio Performance option from the Action menu. This will test your system and give you its findings on the digital audio recording capabilities.
To reapply this benchmark with another drive revisit the Audio dialog and change the path of the “Audio Temp Directory” to another drive, D:\temp for instance. Then select Test Audio Performance from the Action menu again and note the difference in the estimated number of tracks for each drive.
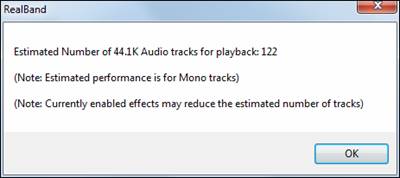
Audio performance benchmark results.
Setup for Multiple Sound Cards or Multi –Port Audio Cards
RealBand has the ability to input and output tracks of digital audio through separate channels of multiple sound cards or multiple ports of a multichannel card. If your computer system has multiple sound cards, or if you have a multiple channel audio card, you can configure RealBand for digital audio production through a mixer or other multi-channel system such as the front and rear speakers of a surround sound setup.
To configure for multiple sound cards choose the [Drivers] button from the Audio dialog to bring up the Audio Drivers dialog.
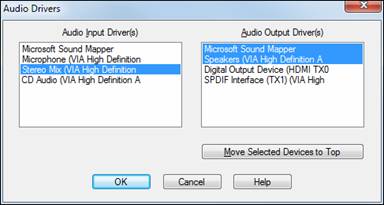
Choose the input and output digital audio devices that you want to use.
In the Tracks window you can choose which sound card to output each track of audio on by clicking on the track type icon and selecting one of the ports that you activated in the Audio Drivers dialog.

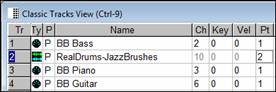
In the Classic Tracks View window you can choose which sound card to output a given track of digital audio on by double-clicking the Pt column for any given audio track. Here, we have set the Bass, Piano, and Guitar tracks to be output through the Pt 1 sound card, and the Drums to be output through the Pt 2 sound card.
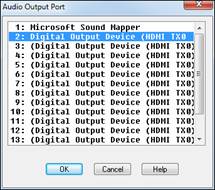 |
The Audio Output Port dialog is presented when the Pt column is double-clicked. The sound cards/drivers selected in this dialog will correspond to the number shown to the left of the driver name and in the Pt column in the Classic Tracks window. |
The Safe boot-up option gives the user the chance to boot-up RealBand with clean configuration and INI files if a crash occurred during the most recent session. This runs automatically on launching the program after a crash.
Audio Drivers
Windows Audio Session Audio Driver
RealBand supports Windows Audio Session (WASAPI) audio driver, an alternative to ASIO (a driver with low latency, but usually can be used by one program at a time) or MME (an older driver with worse latency). The Windows Audio Session driver has ultra-low latency (< 25 ms on a typical Windows PC), so audio operations like playing or sending out information via MIDI happen with no noticeable delay. Note that this supports 1 stereo input plus 1 stereo output at a time. For multiple inputs/outputs, you should continue to use either MME or ASIO.
When you boot up RealBand, it will be already set to use this driver without any action from you. If you want to confirm the selection, open the Preferences dialog (Options | Preferences | [Audio]) and see the “Audio Driver Type” option. When the WASAPI is selected for the driver type, clicking on the [Drivers] button will open Windows Audio Drivers dialog.
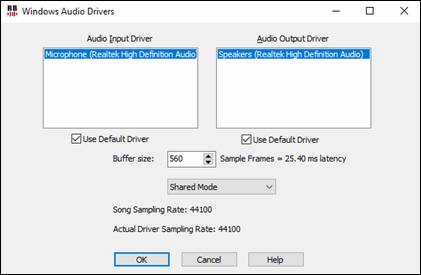
Audio Input Driver / Audio Output Driver
The Audio Input Driver is the device that will be used for recording sound (e.g. a microphone). The Audio Output Driver is the device that will be used for playing sound.
User Default Driver
If enabled, the device that is selected as the "Default Device" in your Windows Sound Control Panel will be used.
Buffer size
This is an audio buffer size in sample frames.
Exclusive Mode / Shared Mode
Shared Mode is recommended so that other programs will still be able to access the audio input/output devices.
Song Sampling Rate
This is the sampling rate of the current song.
Actual Driver Sampling Rate
This is the actual sampling rate of the audio driver. If this is different from song, then resampling will be in use.
MME Audio Driver
If the current Audio driver type is set to MME, the [Drivers…] button in the Options | Preferences Audio dialog brings the Audio Drivers dialog, which lets you select Audio Input and Audio Output drivers. This dialog is for MME drivers, and not ASIO or ASIO.
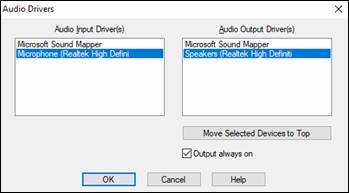
By default, the Microsoft Sound Mapper is selected for both input and output. If you have multiple sound cards, or a multiple I/O card, you can select more than one input or output. This affects computer performance; the more ports that are selected, the more demand is placed on your computer.
If Output always on checkbox is enabled, sound will always be sent to the device. If this is checkbox is disabled, sound will be sent to the device only when the song is playing. Enable this option if you want MIDI plugins to work when the song is not playing.
Order of Audio Ports
The [Move Selected Devices to Top] button lets you adjust the order of the Audio Output ports. You can choose which Audio Output devices appear as Port 1, Port 2, etc. within RealBand, and not be stuck with the default ordering for the ports determined by the Windows operating system.
If the ports are in a different order than the order you want, you can select (highlight) one or more ports, and press the [Move Selected Devices to Top] button. This will move the highlighted ports to the top of the list.
When you launch the Audio Drivers dialog, all the highlighted ports will always be shown at the top. They will be in the same order they were before, relative to each other. For example, let’s say you have 4 ports on your system, and, by default they show up sequentially:
Driver B
Driver C
Driver D
In the preceding picture, none are highlighted. Now, let’s say that you highlight the 4th port (Driver D), and move it to the top, and then you highlight the last port in the list (which is now Driver C, since Driver D was moved to the top). You now have 2 ports selected, (Driver D at the top and Driver C at the bottom). Driver D and Driver C will be ports 1 and 2 within RealBand.
Driver A
Driver B
Driver C
The next time you launch the Audio Drivers dialog, you’ll see Driver D and Driver C at the top, followed by the other two un-highlighted ports. The important point here is that the chosen order of the highlighted ports Driver D followed by Driver C was preserved, as shown in the picture below.
The Microsoft Sound Mapper will use the sound card selected as the preferred device in the Control Panel | Sounds and Audio Devices | Audio tab. You should not select both the Microsoft Sound Mapper and the device it uses. For example, if the preferred output device in the Audio Tab of the Multimedia settings in Control Panel is set to “AWE 64 Wave Out” you should NOT select both the “Microsoft Sound Mapper” and the “AWE 64 Wave Out” as two output ports in RealBand. You would just select one or the other, but not both. If you selected both you would get an error message saying you couldn’t open one of the devices.
Recording Tracks in Stereo or Mono
Each Input and Output port is a Stereo pair, with a left and right channel. For example, if you select 4 Input Ports and 4 Output Ports, then you would be actually getting 8 input and 8 output channels, since each audio port has both a left and right channel. In the Tracks window, you can select the output port for each track, and in the Mixer window you can use the pan setting for the track to control where the output gets sent (left or right channel for the port).
When recording to a stereo audio track, the track will contain both the left and right channels. If you’ve selected multiple input ports, RealBand will record to multiple stereo tracks and offer to insert stereo track(s) if necessary.
MONO tracks contain only 1 channel per track, but you could record mono tracks in pairs if you’ve set the “Input Channel for MONO Tracks” to L+R in the Options | Preferences | Audio settings.
When recording to MONO tracks, multiple ports are only utilized if the Input Channel for MONO tracks in the Options | Preferences | Audio settings is set to “L+R.” This will be set to “L+R” automatically if you select multiple input ports. The audio data will be recorded as 1 L+R pair per input port with all the data recorded on adjacent available tracks. Tracks will be inserted if necessary (same method as when recording L+R with a single port).
See the Options - Audio Preferences help topic for more information on stereo recording. Multi-port recording works the same as stereo recording, except there is more than one pair of stereo tracks being recorded by RealBand.
If the Record Channel is set to “Left” or “Right” only Input Port number 1 (the first input port in the list that was selected by you in the Audio Drivers dialog) will be recorded onto a MONO track.
MME Recording Offset
The “Recording Offset MS [MME/Windows Audio]” setting is found in the Options | Preferences Audio dialog. It can be used to correct a timing issue under Windows Vista that can cause recorded tracks to be delayed in time. Should that happen, you can increase the offset to a setting greater than zero. Usually the delay is around 50 to 60ms.
ASIO Audio Drivers
This dialog lets you choose an ASIO driver. ASIO is an alternate driver system developed by Steinberg. It has much lower latency than ordinary MME drivers.
You can arrive at this dialog in 3 different ways:
- If you haven’t used ASIO drivers, but RealBand detected them, and you answered “Yes” when asked if you want to use an ASIO driver.
- If, within the Audio Preferences, you change the audio Driver Type from MME to ASIO.
- If the audio Driver Type is already set to ASIO, but you press the [Drivers] button in the Audio Preferences.
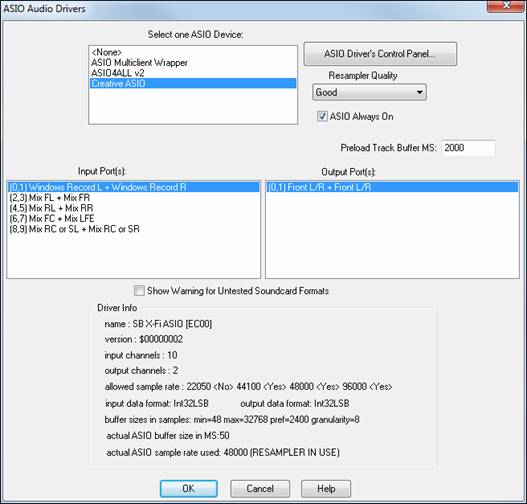
The Select one ASIO Device list box lets you select an ASIO driver to use. You can only select one ASIO driver at a time, but you can run a multiclient application like Steinberg’s ASIO Multiclient Wrapper to have several clients running with the same ASIO driver.
ASIO4All Driver Warning
There is a warning if the ASIO4All driver is “not connected”
Sometimes the ASIO4All driver will not be connected to an audio driver and output will be silent. This is usually due to a soft synth already using the audio driver. If RealBand detects that ASIO4ALL isn’t connected, it will warn you about this, so you are aware of why the audio is silent.
Support for using ASIO with multiple programs at once. Previously, if you were using an ASIO driver (so that you have low latency), you could only use ASIO with one program at a time. Now you can use multiple programs at once with ASIO - for example RealBand and Band-in-a-Box at the same time. This requires using the Steinberg® ASIO Multiclient Wrapper, which you can download here: ftp://ftp.steinberg.net/Download/Hardware/ASIO_multiclient_driver/
To get this function working:
- install the ASIO Multiclient Wrapper
- Run the ASIO Multi Server, and select your ASIO Driver (e.g. ASIO4ALL). The ASIO Server is a program located in “C:\Program Files (x86)\vidance\asiomulti\asioserver.exe”
- Run RealBand, and choose Prefs-Audio-Driver Type ASIO, and then select ASIO Multiclient wrapper” as your ASIO driver.
Note that you may have to reboot your PC after you have installed any new ASIO Drivers.
The steps above need only be done once. The next time you run RealBand, things will already be setup.
Once you have selected an ASIO driver, you will see the Input Port(s) and Output Port(s) list boxes filled with your driver’s input and output ports. By default, the first of each will be selected. You are allowed to select multiple ports with a Ctrl+click on the ports you choose in the list, and all the ports you select will be available for output within RealBand. If you do not hear input or output, then you may need to try different ports than the defaults. You may need to read your sound card’s instructions to determine the correct ports to use.
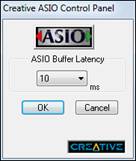
The [ASIO Driver’s Control Panel] button launches a settings dialog specifically provided by your driver manufacturer. This usually lets you adjust the latency by letting you choose different buffer sizes in milliseconds. Some drivers might let you choose the buffer size in samples, which is less convenient than milliseconds. The smaller the buffer size, the lower the latency, and the faster the response. Smaller buffers require more CPU power and if you hear dropouts or artifacts, you may need to increase the buffer size. |
|
Since many ASIO drivers do not support multiple sample rates, RealBand has a built-in resampler which lets you play and record songs that have a different sampling rate than the rate(s) directly supported by your ASIO driver.
The Resampler Quality combo lets you choose Fast, Good, Better, or Best. Fast is the quickest but is the lowest of the four levels of quality. Best is the slowest (uses more CPU time) but the most transparent and accurate quality.
See the following Understanding Latency section.
ASIO Always On is normally selected, but it can be disabled if a driver has trouble running ASIO constantly. When this setting is turned off (unchecked), the ASIO driver is only used for playback and recording and MIDI Thru will be routed to the default MIDI Output destination as selected in the MIDI Driver Setup. This minimizes MIDI Thru latency when ASIO is not on, and it is the same way MIDI Thru behaves with high-latency MME drivers.
The Driver Info field shows various characteristics of your driver.
The Name is the driver’s name.
The Version is the version number of your driver.
Input Channels is the total number of mono input channels that your sound card has. (Note: RealBand groups these into stereo pairs.)
Output Channels is the total number of mono output channels that your sound card has. (Note: RealBand groups these into stereo pairs.)
The Allowed Sample Rates field shows the sample rates allowed by your sound card’s ASIO driver. RealBand has a built-in resampler which lets you play and record files that aren’t directly supported by your ASIO driver.
Input data format and output data format is the format of the data that the ASIO driver uses (such as integer or float, 16 or 32 bit, LSB or MSB which is the ordering of the bytes).
The Buffer Sizes In Samples shows a range of allowed buffer sizes. The Pref is the preferred size, and this is the size that RealBand uses. Your driver may alter the preferred size if you’ve launched the ASIO Driver Control Panel and have selected a new buffer size from within the driver’s Control Panel. If your driver changes the preferred size, then RealBand will be aware of the new preferred size.
Actual ASIO buffer size in MS is the length of an ASIO buffer in milliseconds.
Actual ASIO sample rate used is the sample rate of the ASIO driver itself. If it says (RESAMPLER IN USE) then the .SEQ file is a different sample rate than the ASIO driver. If it says (RESAMPLER NOT IN USE) then the .SEQ file and ASIO driver both are using the same sample rate.
Understanding Latency
Latency is based on the buffer sizes. The smaller the buffer sizes the lower the latency. Lower latency lets you hear mixer volume changes quickly, as well as hear MIDI thru echoed out via a DXi soft synth practically in real time.
The latency, in MS is determined by the buffer size in samples, as well as the driver’s sampling rate.
Converting Samples to MS: For example, suppose the driver’s sample rate is 48K. A 48K sampling rate means that it is playing at 48,000 samples per second. If the buffer size were 48000 samples, then the latency would be 1 second, or 1000ms (which is very large and slow, and usually not allowed in ASIO). If the buffer size were 4800 samples, which is 1/10 second, then the latency would be 100ms. If the buffer size were 2400 samples, which is 1/20 second, the latency would be 50 ms. If the buffer size were 240 samples, which is 1/200 second, the latency would be a mere 5ms which is incredibly low and very fast.
Normally, you can change your driver’s latency by pressing the [ASIO Driver’s Control Panel] button. Normally, the driver specifies the buffer sizes in milliseconds, which equals the latency.
Low latency is faster and more responsive, but uses more CPU power.
Depending on the speed of your computer, you may find that the playback has dropouts, clicks/pops, or other artifacts if you set the buffer sizes too small. This is because smaller buffers use more CPU power and if your computer can’t handle the low latency you will hear artifacts. If this happens, you would need to use larger buffer sizes. You may need to experiment to find what works well. You may be able to use smaller buffers with songs that don’t have a lot of tracks and effects, but may find that you need to use larger buffers with songs that have more tracks and use more effects. This is because more tracks and more effects use more CPU power, which leaves less CPU power available for the audio routines to keep up with lower latencies.
Unconditional 30-Day Money Back Guarantee on all PG Music products purchased from PG Music Inc.
PG Music Inc.
29 Cadillac Ave Victoria BC Canada V8Z 1T3
Sales: 800-268-6272, 250-475-2874,+ 800-4746-8742*
* Outside USA & Canada where International Freephone service is available.
Access Codes
Tech Support: Live Chat, support@pgmusic.com
 Online now
Need Help?
Customer Sales & Support
|
Phones (Pacific Time) 1-800-268-6272 1-250-475-2874 |
||
| Live Chat | ||
| OPEN | Online Ordering 24/7 |
|
| OPEN | Forums, email, web support |