
Using Native Instruments Bandstand with PG Music software
This tutorial covers the following topics:
- Bandstand Installation
- Band-in-a-Box® for Windows
- Band-in-a-Box® for Macintosh
- PowerTracks Pro Audio and RealBand
Last updated: Friday, 09 November 2018
Bandstand Installation
Bandstand can be used with Band-in-a-Box® 2004 (Windows) or higher, and PowerTracks Pro Audio 9 and higher as a DXi plugin. It can be used with Band-in-a-Box® 2006 or higher and PowerTracks Pro Audio 11 or higher as a VSTi plugin (recommended), and can be used with Band-in-a-Box® 12 or higher for Macintosh as a stand-alone application.
Note that it is fairly important that you meet the system requirements for Bandstand - these are listed on the website as well as the on the Bandstand packaging and user manual. You need to have a DVD drive to install this product, and a minimum of 512 MB RAM. We recommend 1 GB or more.
- On Mac OSX, choose the "Install Bandstand for Mac" icon and follow the on-screen prompts. You can select either "Easy Install", or "Custom Install". Custom Install allows you to select which components you want installed. We recommend choosing Easy Install if you are not sure. This will install both the stand-alone and plug-in versions.
- On Windows XP (or later), choose the "Install Bandstand for PC" icon and follow the on-screen prompts. You will be prompted to select the components that you want installed: Bandstand Standalone Application, VST Plugin, DXi Plugin, RTAS plugin, and Bandstand Library. The only component that wouldn't be applicable to PG Music software is the RTAS Plugin. If you aren't sure, you can just install all components.
You should download and install the latest Bandstand update available from the Native Instruments website.
Band-in-a-Box® for Windows
We recommend using Bandstand as a VSTi Plugin with Band-in-a-Box®. This will work if you have Band-in-a-Box® 2006 or higher, which support VSTi. If you have Band-in-a-Box® 2004 or 2005, you will need to use the DXi plugin. Here are the basic steps:
- In Band-in-a-Box®, go to Opt. | MIDI Driver Setup. click the "Use DXi Synth" checkbox or press the [DXi Synth Settings] button. This will open the DirectX Window.
- In the top plugin slot, select "NI Bandstand" if you need to use the DXi plugin. Otherwise (if you have Band-in-a-Box® 2006 or higher), click the 'Add VSTi Plugin' item.
- You need to locate and open the BandstandVST.DLL file. This is located on your hard disk in \Program Files\Native Instruments\Bandstand\VSTPlugins.
- The Bandstand VSTi and DXi plugin user interfaces are the same. You will not need to go through the process of locating the .dll file again, unless you reinstall Band-in-a-Box®. Make sure that the item selected in the DirectX window is <VSTi> Bandstand. Note the brackets around 'VSTi'.
- You can now close the DirectX window and press OK in the MIDI Driver Setup dialog, and Band-in-a-Box® will now play through Bandstand. If you need to view the Bandstand user interface from now on, the best way to do this is to click the DXi Synth button in the main Band-in-a-Box® toolbar.
If you are having trouble getting Band-in-a-Box® to play properly through Bandstand:
- Make sure you have downloaded and installed the latest Bandstand update from the Native Instruments website.
- Check that you have it selected as a VSTi plugin rather than a DXi plugin. You should have "<VSTi> Bandstand" selected, rather than "NI Bandstand". In our testing, Bandstand works better with PG Music software as a VSTi plugin.
- Check that your computer meets the minimum system requirements for Bandstand, which includes a minimum of 512 MB RAM. We recommend 1 GB. If you have less RAM, patches may take too long to load and some instruments may drop out during playback. There may also be some stuttering. However, you may be able to get Bandstand to work acceptably with less memory with help from the next two points.
- If you have Band-in-a-Box® 2006, check that you have Build 220 (or later) installed by going to Help | About Band-in-a-Box®. If you have Build 212 or earlier, click here to go to the Band-in-a-Box® updates page on our site, and download the latest update patch available for version 2006. In Build 220, we added some special purpose settings that help make Band-in-a-Box® more compatible with Bandstand (these settings would also help with other software synths that have a large Program Change delay and use sample streaming from disk). If you have Band-in-a-Box® 2007 or higher, you will automatically have the settings.
In the Band-in-a-Box® folder (usually C:/bb) you will find a folder called 'Bandstand Technical Notes'. For a "quick fix", copy the file 'AsstSettings.ini' from the 'bb\Bandstand Technical Notes' folder to the main bb folder, then load Band-in-a-Box® and see if it works better. However, it would be best for you to take a closer look at the three files in the Bandstand Technical Notes folder. One is a PDF file that details the use of Bandstand with Band-in-a-Box®, and explains how you can tweak settings in the 'AsstSettings.ini file' to improve compatilibty for specific computers and situations. AsstSettings.ini can be opened and modified with a simple text editor like Notepad. - In Bandstand click on the Options button (the button with the checkmark near the top right-hand side) and enable the settings "Ignore Program Changes after first note" and "Ignore Mixer Settings after first Note". Also, experimenting with the DFD Buffer Size may help on some computers.
- If you have Band-in-a-Box® 2006 or higher (which support ASIO) You may get better results if you use an ASIO audio driver with "ASIO Always On" enabled. You can choose your audio driver type (MME or ASIO) in Opt. | Preferences | Audio. If your sound card doesn't have an ASIO driver, you may be able to download and use the third party program 'ASIO4ALL'.
- If you are using Bandstand as a DXi plugin and it doesn't seem to open correctly (if you can't see the user interface when you select it in the DirectX Window), press Play in Band-in-a-Box® and it should then appear. If Bandstand opens but doesn't seem to respond to Band-in-a-Box® (you don't see any activity in the Bandstand window even though Band-in-a-Box® is playing), try clicking the 'new preset' button in the top toolbar in Bandstand. This is the button directly to the right of the preset pull-down menu.
- You could also use Bandstand as a stand-alone synth along with Band-in-a-Box®, provided you have installed virtual MIDI cables on your computer. However, Bandstand doesn't install these virtual cables so you would need to obtain them from a different source. You would open both Band-in-a-Box® and Bandstand, and select the virtual MIDI cable as your output in the MIDI Driver Setup dialog. You would need to ensure that Bandstand itself is properly configured by checking the settings in File | Audio / MIDI Setup.
If you are having trouble rendering files to wave:
- You may experience note drop-outs or other problems when rendering songs to wave. This is because Bandstand has large samples which it streams from hard drive. The rendering happens too fast, so some notes are missed. Band-in-a-Box® has a special settings file that can be used to throttle the direct rendering (\bb\Bandstand Technical Notes\AsstSettings.ini). See the PDF manual in the BandStand Technical Notes folder for more information, or simply copy that file to the main bb folder. Alternatively, there is a way to throttle the rendering in Bandstand itself - See below.
Band-in-a-Box® for Macintosh
You can use Bandstand as a stand-alone application with Band-in-a-Box® 12 or higher for OS X. Here are the basic steps. You need to follow these steps in the order listed:
- Open Band-in-a-Box®.
- In Band-in-a-Box®, go to the MIDI menu and click on Select MIDI Driver.... Choose "MacOS X CoreMIDI" and press OK.
- In the 'Select Ports/Instruments' dialog, choose 'BIAB Virtual Output' for the Bass output port, then click on [Set all ports to this].
- Open the Bandstand application. If you open Bandstand before Band-in-a-Box®, Bandstand may not "see" the BIAB Virtual MIDI Out.
- In Bandstand, go to the Setup menu | Audio/MIDI Setup, and select the MIDI tab.
- Turn the "BIAB Virtual Output" ON under the Input section. Turn the other items OFF.
- Turn everything under the Output section to OFF.
If you are still having trouble, in Bandstand go back to Setup | Audio/MIDI Setup. In the Soundcard tab, make sure the correct audio device is selected. If using your built-in Mac sounds, this will be "Built-in output". Also, you may need to increase the latency setting by sliding it to the right. Start with it set all the way to the right. Later, you can experiment by decreasing the latency until you start having playback problems. Click on the routing tab and make sure the correct output is selected. This may be "Built-in output" if using the internal Mac sounds.
In Bandstand click on the Options button (the button with the checkmark near the top right-hand side) and enable the settings "Ignore Program Changes after first note" and "Ignore Mixer Settings after first Note". Also, experimenting with the DFD Buffer Size may help on some computers.
PowerTracks Pro Audio and RealBand
You can use the DXi plugin version of Bandstand with PowerTracks Pro Audio 9 and higher, or you can use the VSTi plugin (recommended) with PowerTracks Pro Audio 11 and higher, which support VSTi. Here are the basic steps:
- To select the DXi plugin, go to Options | MIDI Devices and place a checkmark in the 'Re-route MIDI playback to default DXi synth' box. Select 'NI Bandstand' as the synth plugin. All MIDI tracks will now be played through the Bandstand DXi synth.
- To select the VSTi plugin:
- First, click on the DXi Synth button in the main PowerTracks toolbar or click on one of the [Edit DXi] buttons for one of your tracks (to find this button, press the track Disclosure button, which is the little triangle in the Track info field). This will open the Directx/VSTi window.
- Select the the 'Add VSTi Plugin' item from the top plugin pull-down menu.
- You need to locate and open the BandstandVST.DLL file. This is located on your hard disk in \Program Files\Native Instruments\Bandstand\VSTPlugins. You will not need to do this again unless you reinstall PowerTracks.
- Close the DirectX/VSTi window, go to Options | MIDI Devices and place a checkmark in the 'Re-route MIDI playback to default DXi synth' box. Select '<VSTi> Bandstand'as the synth plugin. Note the brackets arount 'vSTi'. Don't select 'NI Bandstand', which is the DXi version.
- Note that you can choose your DXi/VSTi synths on a track-by-track basis rather than routing all MIDI playback to a single synth. See this FAQ topic on our PowerTracks Pro Audio FAQ page for details about how to do this.
- To view the Bandstand interface, you can click the [DXi] button in the main PowerTracks toolbar or click on the [Edit DXi] button. This will open the DirectX/VSTi Window.
If you are having trouble getting PowerTracks Pro Audio to play back properly through Bandstand.
- Make sure you have downloaded and installed the latest Bandstand update from the Native Instruments website.
- Check that you have it selected as a VSTi plugin rather than a DXi plugin. You should have "<VSTi> Bandstand" selected, rather than "NI Bandstand". In our testing, Bandstand works better with PG Music software as a VSTi plugin.
- Check that your computer meets the minimum system requirements for Bandstand, which includes a minimum of 512 MB RAM. We recommend 1 GB. If you have less RAM, patches may take too long to load and some instruments may drop out during playback. There may also be some stuttering.
- If you have PowerTracks Pro Audio 10 or higher (which support ASIO) You may get better results if you use an ASIO audio driver with "ASIO Always On" enabled. You can choose your audio driver type (MME or ASIO) in Options | Preferences | Audio. If your sound card doesn't have an ASIO driver, you may be able to download and use the third party program 'ASIO4ALL'.
- If you are using Bandstand as a DXi plugin and it doesn't seem to open correctly (if you can't see the user interface when you select it in the DirectX Window), press Play in PowerTracks and it should then appear. If Bandstand opens but doesn't seem to respond to PowerTracks (you don't see any activity in the Bandstand window even though PowerTracks is playing), try clicking the 'new preset' button in the top toolbar in Bandstand. This is the button directly to the right of the preset pull-down menu.
- You could also use Bandstand as a stand-alone synth along with PowerTracks, provided you have installed virtual MIDI cables on your computer. However, Bandstand doesn't install these virtual cables so you would need to obtain them from a different source. You would open both PowerTracks and Bandstand, and select the virtual MIDI cable as your output in the MIDI Driver Setup dialog. You would need to ensure that Bandstand itself is properly configured by checking the settings in File | Audio / MIDI Setup.
If you are having trouble rendering files to wave:
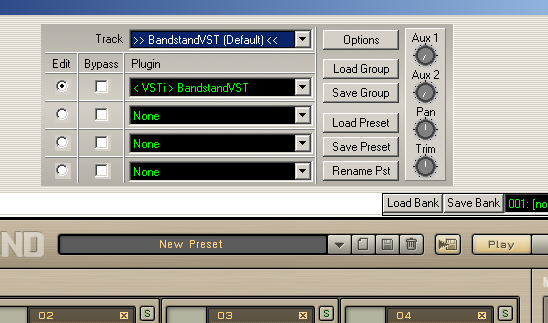
You may experience note drop-outs or other problems when rendering songs to wave. This is because Bandstand has large samples which it streams from hard drive. The rendering happens too fast, so some notes are missed. While Band-in-a-Box® has a special settings file that can be used to throttle the direct rendering, PowerTracks and RealBand do not have this file. However, you can still throttle rendering by pressing the 'direct-to-disc rendering' button in the Bandstand control panel. Open the DirectX/VSTi window to display the Bandstand panel while the song plays. Press the little button to the left of the play button - see the screenshot below - so it lights up. Now you should be able to render to wave properly.
Unconditional 30-Day Money Back Guarantee on all PG Music products purchased from PG Music Inc.
PG Music Inc.
29 Cadillac Ave Victoria BC Canada V8Z 1T3
Sales: 800-268-6272, 250-475-2874,+ 800-4746-8742*
* Outside USA & Canada where International Freephone service is available.
Access Codes
Tech Support: Live Chat, support@pgmusic.com
 Online now
Need Help?
Customer Sales & Support
|
Phones (Pacific Time) 1-800-268-6272 1-250-475-2874 |
||
| Live Chat | ||
| OPEN | Online Ordering 24/7 |
|
| OPEN | Forums, email, web support |