
How to make RealDrums Styles
This tutorial describes how you can make RealDrums styles. It is based on Band-in-a-Box® for Windows, however it can be applied to Band-in-a-Box® for Macintosh with these minor modifications...
- The default location of the Drums folder is /Applications/Band-in-a-Box®/Drums (instead of C:\bb\Drums)
- You will be working with AIFF audio files instead of WAV files.
- In the text file, it points to the audio files with "wavename=MyRealDrumsFile.WAV. This line should still end in .WAV for both Windows and Mac versions even though the actual file may be MyRealDrumsFile.AIFF, MyRealDrumsFile.M4A, or MyRealDrumsFile.WMA.
Topics covered:
- Introduction to RealDrums
- Making A RealDrums Style Using An Existing Template
- Elements of RealDrums styles: The wave file
- Elements of RealDrums styles: The text file
- Testing your RealDrums styles
- Using your RealDrums in Band-in-a-Box®
Last updated: Monday, 21 October 2019
Introduction to RealDrums
RealDrums are actual recordings of studio drummers, pieced together by Band-in-a-Box® to create a unique "real" drum track that is played along with the MIDI tracks created by Band-in-a-Box® styles. You can combine any RealDrums style with any Band-in-a-Box® style, so the potential combinations are endless!
A RealDrums style consists of a wave file containing various bars of drum patterns, and a text file with instructions on how Band-in-a-Box® should interpret the wave file. In order for the style to work, the text file needs to be located in the main Band-in-a-Box® directory in the "Drums" folder, and then in a sub-directory that is the name of the style group. The file-name needs to be the same as the style group, followed by an underscore ( _ ) and a three digit number representing the tempo. Additionally, "_Style" has to be in the filename after the tempo.
For example, for a "JazzBrushes" style that is 120 beats-per-minute, this text file needs to be present:
C:\bb\Drums\JazzBrushes\JazzBrushes_120_Style.txt
The wave file also needs to be in a subdirectory of the "Drums" folder. It is usually located in the same place as the text file:
C:\bb\Drums\JazzBrushes\JazzBrushes_120_Style.wav
However it can be in a different directory, and there are some instances where this is necessary (see "Reduced Styles" below).
"RealDrums style groups" are multiple RealDrums styles that have the same basic feel, but were recorded at different tempos. In the example above, "JazzBrushes" is the group, and "JazzBrushes_120_Style" is the style. In that particular example, the JazzBrushes group contains 10 RealDrums styles:
JazzBrushes_045_Style
JazzBrushes_060_Style
JazzBrushes_070_Style
JazzBrushes_100_Style
JazzBrushes_120_Style
JazzBrushes_145_Style
JazzBrushes_175_Style
JazzBrushes_210_Style
JazzBrushes_250_Style
JazzBrushes_300_Style
The easiest way to make a style is to use a text-file template.
Making a RealDrums style using an existing template
Templates are available for download.
The information given below is all you need to create a RealDrums style using any of several provided templates.
For a more in-depth look at the intricate details of creating styles, please read on to the following topics under Elements of RealDrums styles
Recording your wave file
For the wave file that will be used for your RealDrums style, you can either record a drummer, or you can piece together a wave file using drum loops. If you use drum loops, just make sure you have the necessary permission from the original artists and/or publishers of the loops.
Regardless of the method that you choose for creating your drum wave file, you need to have it conform to one of these descriptions in order to have it match the accompanying template:
1. 32_bars_of_drumming.txt
2. 32_bars_of_drumming_with_shots.txt
3. 32_bars_of_drumming_with_shots_two_endings.txt
4. 64_bars_of_drumming.txt
5. 64_bars_of_drumming_with_shots.txt
6. 64_bars_of_drumming_with_shots_two_endings.txt
- 32_bars_of_drumming.txt
Bars 3-18 will use the same basic groove:
3 - PostFill (usually a bar of playing with a cymbal shot at the downbeat, or some kind of bar that would sound good after a fill)
4-9 - normal playing
10 - Fill
11 - PostFill
12-17 - normal playing
18 - FillBars 19-34 will use a slightly different groove ('B' section) than 3-18
19 - PostFill
20-25 - normal playing
26 - Fill
27 - PostFill
28-33 – normal playing
34 – Fill35-36 - ending, lasting two bars (usually the second bar ends on the downbeat, with a cymbal decaying)
- 32_bars_of_drumming_with_shots_two_endings.txt
This is exactly the same as 1, with these bars added:
37 – single drum hit, which will be used for "shots" in Band-in-a-Box®
38 – single drum hit, which will be used for "pushes" in Band-in-a-Box®
- 32_bars_of_drumming_with_shots_two_endings.txt
bar# 1-2 - count-in for two bars (i.e., "one, two, one-two-three-four")
Bars 3-20 will use the same basic groove:
3 - PostFill (usually a bar of playing with a cymbal shot at the downbeat, or some kind of bar that would sound good after a fill)
4-9 - normal playing
10 - Fill
11 - PostFill
12-17 - normal playing
18 - Fill
19-20 - two bar endingBars 21-36 will use a slightly different groove ('B' section) than 3-20
21 - PostFill
22-27 - normal playing
28 - Fill
29 - PostFill
30-35 - normal playing
36 - Fill
37-38 - ending, lasting two bars (usually the second bar ends on the downbeat, with a cymbal decaying)
39 - single drum hit, which will be used for "shots" in Band-in-a-Box®
40 - single drum hit, which will be used for "pushes" in Band-in-a-Box® - 64_bars_of_drumming.txt
bar# 1-2 - count-in for two bars (i.e., "one, two, one-two-three-four")
Bars 3-34 will use the same basic groove:
3 - PostFill (usually a bar of playing with a cymbal shot at the downbeat, or some kind of bar that would sound good after a fill)
4-9 - normal playing
10 - Fill
11 - PostFill
12-17 - normal playing
18 - Fill
19 - PostFill
20-25 - normal playing
26 - Fill
27 - PostFill
28-33 - normal playing
34 - FillBars 35-66 will use a slightly different groove ('B' section) than 3-18
35 - PostFill
36-41 - normal playing
42 - Fill
43 - PostFill
44-49 - normal playing
50 - Fill
51 - PostFill
52-57 - normal playing
58 - Fill
59 - PostFill
60-65 - normal playing
66 - Fill
67-68 - ending, lasting two bars (usually the second bar ends on the downbeat, with a cymbal decaying) - 64_bars_of_drumming_with_shots.txt
This is exactly the same as 5, with these bars added:
69 - single drum hit, which will be used for "shots" in Band-in-a-Box®
70 - single drum hit, which will be used for "pushes" in Band-in-a-Box®
- 64_bars_of_drumming_with_shots_two_endings.txt
bar# 1-2 - count-in for two bars (i.e., "one, two, one-two-three-four")
Bars 3-36 will use the same basic groove:
3 - PostFill (usually a bar of playing with a cymbal shot at the downbeat, or some kind of bar that would sound good after a fill)
4-9 - normal playing
10 - Fill
11 - PostFill
12-17 - normal playing
18 - Fill
19 - PostFill
20-25 - normal playing
26 - Fill
27 - PostFill
28-33 - normal playing
34 - Fill
35-36 - 2 bar endingBars 37-70 will use a slightly different groove ('B' section) than 3-18
37 - PostFill
38-43 - normal playing
44 - Fill
45 - PostFill
46-51 - normal playing
52 - Fill
53 - PostFill
54-59 - normal playing
60 - Fill
61 - PostFill
62-67 - normal playing
68 - Fill
69-70 - 2 bar ending
71 - single drum hit, which will be used for "shots" in Band-in-a-Box®
72 - single drum hit, which will be used for "pushes" in Band-in-a-Box®
Editing the text file
For the most part, the text files are ready-to-go. There are, however, a few small essential changes that you need to make to the text file, and some other small changes you can make to improve your style.
Essential Changes
The first thing you need to do is change the filename of the wave-file and the text file to match the RealDrums style group to which to which you want your style to belong. For example, if you want your style group to be called "MyFunkyStyle," and the style you recorded was at 70 beats per minute, your wave file would have to be called "MyFunkyStyle_070_Style.wav" and your text file would have to be called "MyFunkyStyle_070_Style.txt." Both files would have to be placed in your main Band-in-a-Box® directory (usually C:\BB) in the "Drums" folder, and from there in a folder that is named for the style group. In this case, it would be C:\BB\Drums\MyFunkyStyle\.
The second thing you have to do is to change the first line of the text file so that it has the same name as the wave file. In this case, you would change "wavename=mystyle.wav" to "wavename=MyFunkyStyle_070_Style.wav"
The last thing you would need to do would be that if your style were a waltz (3:4) style, you would need to change "TimeSig=4" to "TimeSig=3". If, however, you are making a 4:4 style, your style is ready to be used!
Additional Changes
There are a few additional changes that could be made to fine-tune your style. The first is to enter a different value in the "Offset=" line. Drummers often hit a drum a few milliseconds before the beat, because the actual sound of the drum tends to peak a few milliseconds after it is hit. Because of this, you want Band-in-a-Box® to "grab" a bar of drums a few ticks (1 beat = 120 ticks) early to compensate for this. The amount entered in the template is -5 (ticks), but if you are finding that the drum hits at the beginning of bars are not starting properly, you can experiment by setting a different offset value. -6 or lower (since it's a negative number "lower" means -7, -8, -9, etc.) will mean the bar is "grabbed" earlier, and a higher number (-4, -3, -2, -1, 0, etc.) means that it will be "grabbed" closer to the bar line.
Another thing you can change is the volume. If you are finding your style is too loud in Band-in-a-Box®, you can reduce this by entering lower numbers in the "dbAdjust=" line. The default is 0, but if you enter -1, -2, -3, etc., the drum volume will be lowered.
For the patterns and the shots, all of the patterns that are entered in the templates will match your wave file, provided that the wave file was recorded to the specifications listed above. You can make changes to the patterns and shots, but it is a good idea to read further into the specific meaning of all of the elements of these lines. This can be done in the complete RealDrums style making documentation.
Testing your RealDrums style
Once you have made your RealDrums style, you can test it in Band-in-a-Box® by loading a song and setting the tempo near to the tempo of the style you just created. First make sure you have your custom RealDrums located in the Drums folder with the rest of the RealDrums, and open Band-in-a-Box. Then go into the RealDrums Picker dialog (either by right-clicking on the Drums track or by pressing the RealDrums toolbar button) and press the Rebuild button. Your style should show up in the list. Note that there will be some blank fields (e.g. genre, RD Set#), since Band-in-a-Box doesn't know some of that info about your Drums style like it does with factory styles. You can add any of your own comments in the User Comments field. When you close the dialog and play your song, your RealDrums style should be playing as well. To make sure that it is playing, you can look at the Band-in-a-Box® title bar. If your style is "MyFunkyStyle_070_Style," you should see [RealDrums=MyFunkyStyle_070].
Elements of RealDrums Styles: The wave file
The wave file must contain a two bar count-in. This can be a metronome sound, a drummer actually counting in, or even a two-bar drum fill. These two bars will always be played at the beginning of a Band-in-a-Box® song, unless the count-in is disabled in the preferences. It is important to note that the beginning of the wave file should not contain a bar of drum playing that is intended to be used in the middle of a song. If this bar were chosen, there would likely be an audible gap of silence at the beginning of the bar when playing in Band-in-a-Box® (this is due to the "ms offset" which will be discussed later).
The majority of the wave file can then contain any number of bars of drumming, keeping in mind that there are two "substyles" available in Band-in-a-Box®. This means that the basic groove should be the same throughout the first half of the drum bars, and then the groove can change and should remain basically the same through to the end. Keep in mind also when you either record or piece together your wave file, that in each "substyle", there need to be examples of fills, normal bars, and post-fills (bars specifically designed to come after fills, often containing a crash cymbal which completes a fill). You also need at least one 2-bar ending.
After the bars of drumming should be a short section of single drum hits. These will be used to mix in with the bars of drumming to emulate pushes and shots.
Example 1 shows an entire RealDrums style wave file. You can see that the first two bars contain the count-in, then the majority of the file is taken up by regular drumming (you can see that halfway through the pattern is different - this represents the 'B' subsection), then at the end there are 4 "shots" (single drum hits).
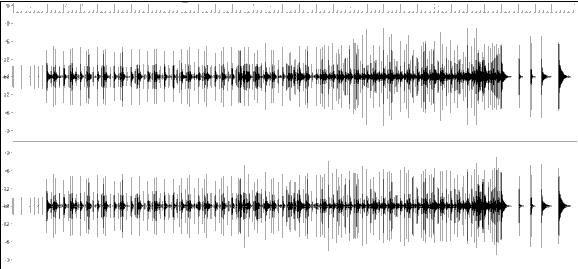
Example 1: Wave form of an entire RealDrums style wave file
Elements of RealDrums Styles: The text file
The text file contains three main portions, global settings, pattern definition, and shots definition. We'll examine each one separately.
Global Settings
Wavename=x.wav
The first line of the text file must be "wavename=x.wav", where "x" is the name of the filename. For example, the first line of the JazzBrushes_120 text file is "wavename=JazzBrushes_120_Style.wav". This file usually is in the same directory as the text file, but does not have to be. For example, you could make an alternate style that used JazzBrushes_120_Style.wav called JazzBrushesAlternate. The text file would have to reside in C:\bb\Drums\JazzBrushesAlternate\JazzBrushesAlternate_120_Style.txt, but the first line would still be "wavename=JazzBrushes_120_Style.wav".
ForceWavTempo=x
This is only used if the tempo of the style in question is different from the tempo that is in the filename of the wave file being used. These are called "reduced" or "expanded" styles, and will be discussed further below.
TimeSig=3
This would be used if you are making a waltz style. The line can simply be omitted when making 4:4 styles.
OFFSET=x
Often a drummer will hit a drum or cymbal slightly before a beat so that the actual peak of the sound occurs on the beat itself. The offset determines how many ticks (1 beat =120 ticks) before the downbeat a bar of drums will be taken from the style wave file, which is intended to compensate for any occurrence of this early playing on the drum track. It is important to note that if a bar is taken 10 ticks early from the style wave file, it is also placed 10 ticks early on the Band-in-a-Box® drum track, so there will be no shifting of the actual groove.
If no offset amount is entered, the program defaults to an offset of 0.
To determine a good offset amount for a particular wave file, you can use an audio editor (such as PowerTracks Pro Audio) to zoom in on the downbeats of all (or a sampling) of the bars. You can then measure the number of ticks between the start of the drum hits and the actual bar line. The highest example would be entered as the offset amount.
In example 2, the beginning of the drum hit at bar 15 occurs at 14:04:118, or 2 ticks before the downbeat of bar 15. If all other bars were similar, you would enter an offset of -2.
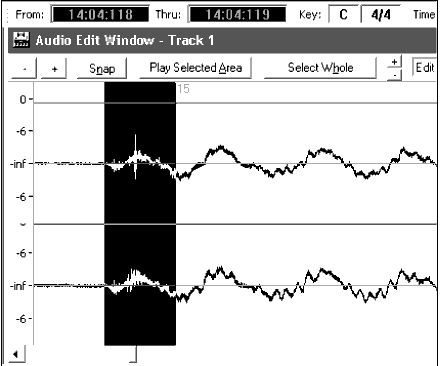
Example 2: The left edge of the highlighted area represents the beginning of the drum hit that occurs at bar 15, and the right edge of the highlighted area represents the actual downbeat of bar 15.
dbadjust=x
If a value is entered here, when the RealDrums track is played in Band-in-a-Box®, the volume will be raised (or lowered if a negative value is entered) by the amount entered. This is used to balance the RealDrums against the other DXi instruments. This amount can be fine-tuned once the style is completed and it is possible to test it in Band-in-a-Box®.
If no dbadjust amount is entered, the program defaults to an adjust of 0.
dbadjustA=x
dbadjustB=y
You can adjust the volume of the A section and B section patterns separately in the same manner as "dbadjust" using "dbadjustA=" and "dbadjustB=". The final volume of the parts will be based on the "dbadjust" amount added to the adjust for the substyle in question. For example, let's assume these values were entered:
Dbadjust=-5
DbadjustA=-2
DbadjustB=3
The total volume adjust for the A section would be (-5)+(-2)= -7. The total volume adjust for the B section would be (-5)+3= -2.
MultibarPatternPercent=x
When Band-in-a-Box® is choosing a RealDrums pattern (see "patterns" below) for a particular bar in a song, it randomly selects from all possible patterns that fit based on their relative weight. If, however, a percentage is entered here, then before this step it determines whether the current bar will be use a multi-bar pattern based on the percentage. If this occurs, Band-in-a-Box® eliminates all 1-bar patterns as possibilities for the current bar of music. For example, if "MultibarPatternPercent=20" is entered, then every time Band-in-a-Box® searches for a pattern, there is a 20% chance that it will eliminate 1-bar patterns as possibilities. If "MultibarPatternPercent=80" is entered, then every time there will be an 80% chance that 1-bar patterns will be eliminated as possibilities. If such an instance occurs, but no multi-bar patterns will fit in the Band-in-a-Box® bar in question, a 1-bar pattern will be allowed.
If no amount is entered here, then Band-in-a-Box® simply always picks between all possible patterns based on their relative weights.
PushAmount8=x
PushAmount16=x
When pushes are entered in Band-in-a-Box® (with either "^" for an 8th note push or "^^" for a 16th note push, entered before a chord"), the RealDrums mix single drum hits with the bars of regular playing to emphasize the push. These settings determine how many ticks prior to a beat the pushes are played.
Mathematically, since 1 quarter-note is 120 ticks, in a straight 8th style the 8th-note will be 60 ticks and the 16th-note will be 30 ticks, and in a swing 8th style the 8th-note will be 40 ticks. However, since drummers (thankfully!) do not play mathematically, these numbers will vary based on their individual style, and the amount of "swing" in their playing. A good amount to enter for these values can be determined by closely examining the drummers playing in an audio editor and measuring the number of ticks between a few 8th-notes prior to beats.
In this straight-8ths style (example 3), this eighth note played prior to the downbeat of bar 6 is played at 5:04:058, or 62 ticks before the downbeat. The rest of the file could be examined in a similar fashion (or random samplings), but based on this example you would enter PushAmount8=62.
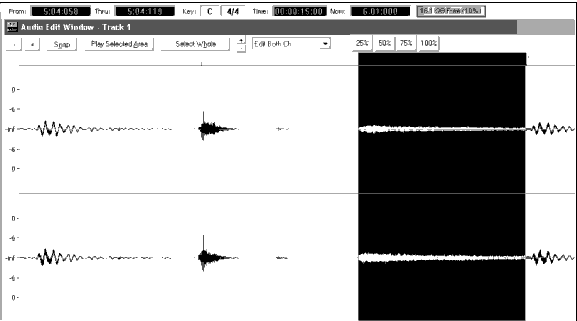
Example 3: The left edge of the highlighted area represents the eighth note before the downbeat of bar 6, and the right edge of the highlighted area represents the downbeat of bar 6.
If no amount is entered for these values, Band-in-a-Box® determines the amount based on whether or not the Band-in-a-Box® style being used is a swing or straight 8th style.
ASubstyleAllowed=NO
BSubstyleAllowed=NO
Using either one of these lines blocks all patterns for the specified substyle, and then uses the patterns of the remaining substyle for the entire song, regardless of the substyle selected in Band-in-a-Box®.
This can be useful for altering an existing style. For example, if you have a style made that uses brushes at the A section and sticks at the B section, but you want to change it so that it only uses sticks, you can enter the line "AsubstyleAllowed=NO" into the text file. All of the B section patterns will be used for both A section parts and B section parts in Band-in-a-Box®. This is also a useful tool in making "Alternate" styles (see "Alternate Styles and Expanded/Reduced Styles" below).
It is important, however, to not enter both of these lines. If you do this, Band-in-a-Box® will not be able to find any patterns at all, and you will get an error message.
MSSlide=x
This shifts the entire drum part either forwards or backwards by x number of milliseconds in relation to the MIDI parts. A negative amount will make it play slightly before the MIDI parts, while a positive amount will make it play slightly after the MIDI parts. This can be used to make slight changes to the overall feel of the drummer. Entering a negative amount will simulate a drummer playing slightly ahead of the beat, while entering a positive amount will simulate a drummer playing slightly behind the beat. Either scenario can be musically effective in its own way.
***Note: The MSSlide feature has not yet been implemented yet, but is planned to be added in a future release. However, this line of text can be added without causing any problems in the style, it will simply have no effect until the feature is implemented.
Pattern Definition
All patterns are defined in the text file using lines of text containing seven elements, with each of the seven elements separated by a comma. The seven elements are: 1) the text "pattern", 2) type of pattern, 3) section definition (A, B or all), 4) weight (how often the pattern will be played), 5) Mask (restrictions on where the pattern can be played), 6) duration of the pattern in bars, 7) the location of the pattern in the style wave file.
Here are some examples of defined patterns:
pattern,Normal,A,2,1,2,75
pattern,Fill,A,1,0,1,58
pattern,PostFill,B,8,0,8,3
pattern,Ending,0,6,0,2,114
pattern,Count-in,0,5,0,2,-1
As you can see, each example here starts with the text "pattern." This simply lets Band-in-a-Box® know that the line contains information regarding drum parts that will be inserted into the RealDrums track. The next element is the type of pattern, and here we have examples of "normal," "fill," "PostFill", "Ending" and "Count-in" types of patterns. The next element is the section definition, and we have examples of "A" section patterns, "B" section patterns and "0" patterns, for which sections are not applicable. The next element is the weight. In these examples we have weights of 2, 1, 8, 6, and 5. The higher the weight, the more frequently the pattern will be chosen. The next element is the mask. There are examples here of "0" masks, which impose no additional restrictions on where the pattern can be played and a "1" mask, which does impose certain restrictions. The next element is the duration in bars, and we have examples here of patterns that last 1, 2 or 8 bars long. The final element is the location of the pattern in the style wave file. These numbers represent bars, however you'll notice that one of the examples has a location of -1. This is because Band-in-a-Box® uses a -1 based numbering system for bars of music in a song, which will be explained in more detail below.
The six elements that come after the text "pattern" are explained here in further detail:
- Type of pattern
There are 5 different types of patterns, "Fill," "PostFill," "PreFill," "Normal," "Ending" and "Count-in."
Fills
Fills always occur in the bar immediately prior to part markers. In Band-in-a-Box® songs, part markers (A or B) are used to delineate musical phrases. Since drum fills are also used to conclude musical phrases, drum fills always occur in the last bar before a part marker. Unlike other patterns, fills can only be 1 bar long.
Here are some examples of Fill patterns defined:
pattern,Fill,A,1,0,1,8
pattern,Fill,B,6,0,1,32
pattern,Fill,B,5,0,1,58PostFills
As the name implies, PostFills bars occur after Fills. That means that PostFill bars always occur in bars in which there are part markers. Typically, PostFill bars are generally bars that have a cymbal crash on the downbeat, which is intended as a completion to the fill that occurred in the previous bar. PostFills can be any number of bars long.
Here are some examples of PostFill patterns defined:
pattern,PostFill,A,8,0,8,1
pattern,PostFill,A,5,0,1,9
pattern,PostFill,B,4,0,2,17PreFills
PreFill bars occur immediately before Fills. PreFills are not essential for a style to work, but can be useful in situations where a drummer begins an elaborate fill a bar early. When Band-in-a-Box® picks patterns for bars that precede fills, it picks from among the pool of normal and prefill patterns. Prefills can be 1 or 2 bars long, with the 2-bar prefill containing the actual fill as well.
Here are some examples of PreFill patterns defined:
pattern,PreFill,A,4,0,2,7
pattern,PreFill,B,7,0,1,57Normal Patterns
Normal patterns generally make up the bulk of a Band-in-a-Box® song. Any bar that is not immediately before or after a part marker, and is not a count-in or ending, will be taken from the pool of normal patterns.

Example 4: All of the highlighted bars in this example are "normal" bars.
Here are some examples of Normal patterns defined:
pattern,Normal,A,2,0,1,3
pattern,Normal,A,5,3,2,11
pattern,Normal,B,5,1,2,75
pattern,Normal,B,2,5,2,64Endings
Endings are always 2 bars long, and generally have characteristics of fills for the first bar, but then end with a drum hit on the 2nd bar, sometimes with a cymbal on the downbeat, but also often with a particular rhythmic figure. You should check the ending in the Band-in-a-Box® style that you will be using the RealDrum style with to see what kind of rhythm should be used in the drums to match up. Endings can only be 2 bars long, and you need to have at least one ending defined for a style to work.

Example 5: The two highlighted bars show where an ending is played in Band-in-a-Box®.
Count-ins
Count-ins are always 2 bars long, and always occur at the beginning of a song (unless the count-in is disabled in settings). Count-ins are usually side stick tapping "one_ two_ one, two, three, four", but you can put anything in these two bars. You can have a person actually counting in, or you can have 2 bars of drum fills as your count-in, etc.
- Section Definition
Band-in-a-Box® styles and RealDrums styles have two "subsections," an 'A' subsection and a 'B' subsection. When defining patterns, you need to specify whether the pattern is intended to be played during 'A' section or the 'B' section. For patterns to which the section is not applicable, you can fill this space with a "0." These include the count-in and the ending. You can make an exception for the ending, if you want to specifically designate an ending to occur only when the preceding bar is 'A' or 'B'. Instead of "0," you would enter "Aending" or "Bending." Just remember that if you do this, you need to cover both eventualities. If you enter a "0" ending, this on its own covers both cases.
Here are some examples of 'A' patterns:
pattern,Fill,A,1,0,1,8
pattern,PostFill,A,8,0,8,1
pattern,PostFill,A,5,0,1,9
pattern,PreFill,A,4,0,2,7
pattern,Normal,A,2,0,1,3
pattern,Normal,A,5,3,2,11Here are some examples of 'B' patterns:
pattern,Fill,B,6,0,1,32
pattern,Fill,B,5,0,1,58
pattern,PostFill,B,4,0,2,17
pattern,PreFill,B,7,0,1,57
pattern,Normal,B,5,1,2,75
pattern,Normal,B,2,5,2,64Here are some examples of '0' patterns:
pattern,Count-in,0,5,0,2,-1
pattern,ending,0,1,0,1,33Here are some examples of special-case endings:
pattern,ending,Aending,5,0,2,37
pattern,ending,Bending,5,0,2,77 - Weight
Every time that Band-in-a-Box® needs to find a RealDrums pattern to insert into a Band-in-a-Box® bar, it first finds all possible patterns that would fit (based on the type of pattern, the section definition, the mask and the length), and then it picks randomly from those patterns based on the weight assigned.
The weight is a number between 1 and 8 (there are special cases where you can use 0 or 9 which we will examine at the end of this section). When Band-in-a-Box® has amassed the list of possible patterns, it then adds up the weights of all of these patterns, and then the chances that each pattern will be selected is based upon a percentage determined by the weight of the pattern divided by the total.
For example, if Band-in-a-Box® is finding a "normal" pattern for bar 3 of the song, and it has determined that these four patterns are the only possibilities:
pattern,Normal,A,5,1,4,11
pattern,Normal,A,1,0,2,17
pattern,Normal,A,7,3,2,13
pattern,Normal,A,2,1,1,20The first thing it would do would be to add up all of the weights. In this case, 5+1+7+2=15. The chance that each pattern will be picked in this instance is determined by its own weight divided into the sum. Here then, are the chances for each pattern to be picked in this instance:
pattern,Normal,A,5,1,4,11: 5/15=0.333 or 33%
pattern,Normal,A,1,0,2,17: 1/15=0.066 or 7%
pattern,Normal,A,7,3,2,13: 7/15=0.466 or 47%
pattern,Normal,A,2,1,1,20: 2/15=0.133 or 13%When 9 is entered as a weight, the program treats it slightly differently. A 9 weight means that any possible patterns that have a weight of 8 or less are completely eliminated as possibilities.
With the previous example, if you changed the weight of the first two patterns to 9, but left the last two as 7 & 2, then the last two would be eliminated as possibilities, and the percentages would change to:
pattern,Normal,A,9,1,4,11: 50%
pattern,Normal,A,9,0,2,17: 50%
pattern,Normal,A,7,3,2,13: 0%
pattern,Normal,A,2,1,1,20: 0%It is therefore important that you are very careful when using a weight of 9. It is usually used in conjunction with a mask (masks will be explained in greater detail below). For example, if you had a mask that stated that a normal pattern could only be played 7 bars after a part marker, if you then gave it a weight of 9, any time Band-in-a-Box® needed to find a pattern 7 bars after a part marker it would always use that pattern. However, it would not affect any other bars.
The other special case is a 0 weight. This is only used for fills. When Band-in-a-Box® finds possible patterns, if a particular pattern is going to end where a fill is required due to the part-marker placement, then the pattern will only be included as a possibility if that bar in the style wave file has been designated as a fill at some point in the text file. Likewise, a pattern that ends with a fill will not be considered a possibility if the fill doesn't match up in the Band-in-a-Box® song.
For example, let's say that Band-in-a-Box® is searching for a pattern to place at bar 5, where bar 6 will need to be a fill:

It will be looking for a normal pattern, and it can use a normal pattern that is 1 or 2 bars long. However, if it picks a 2 bar pattern, it needs to make sure that in the style wave file, the second bar is designated as a fill.
Let's assume that this pattern is entered in the text file:
Normal,A,5,0,2,15
This is a 2-bar normal pattern beginning on bar 15 of the style wave file. This pattern could only be picked in this instance if there was another line somewhere in the text file defining bar 16 of the style wave file as a fill:
Fill,A,5,0,1,16
However, it may be that this fill would not work well as a stand-alone bar (perhaps there is a cymbal decay that crosses over bars 15 & 16 that you do not wish to break up - see "Duration" for more information on this). In this case, you would still want to define the bar as a Fill, so that multi-bar patterns ending in this fill would be used at the right place, but you would never want the fill to be picked on its own. In this case, you could give it a weight of 0:
Fill,A,0,0,1,16
- Mask
A Mask can be used to specify that a pattern should only be used a certain number of bars after a part marker. It only applies to Normal patterns, and all other patterns should be given a weight of 0 (0 means no mask).
Here is a list of the possible masks, and what effect they will have:
0 - No mask: This pattern can be used anywhere
1 - Odd bars only: 3, 5, 7, 9, 11, 13, etc. bars after a part marker
2 - Even bars only: 2, 4, 6, 8, 10, 12, etc. bars after a part marker
3 - 3, 7, 11, 15, etc. bars after a part marker
4 - 4, 8, 12, 16, etc. bars after a part marker
5 - 5, 13, 21, etc. bars after a part marker
6 - 6, 14, 22, etc. bars after a part marker
7 - 7, 15, 23, etc. bars after a part marker
8 - 8, 16, 24, etc. bars after a part marker
etc.Many drum beats use 2-bar rhythms that then repeat, so it's very common for the "1" and "2" masks to be used. If you have assigned a "1" mask to several Normal patterns, and a "2" mask to several others, you will always be sure that the 2-bar grouping remains consistent. Just remember that you have to make sure that there are enough patterns to cover all possibilities. If you have only patterns with "1" masks, and no patterns with "2" masks, then Band-in-a-Box® will not be able to find any patterns for even bars. The safest thing to do is to use a mask of "0," but this may not be the most musical approach. A mask of 4 is often used for more subtle fills that would highlight 4 bar phrases. Masks higher than 8 are not commonly used, as it would mean that the pattern would be played very rarely.

Example 7: Normal pattern needed for bar 13.
In example 7, if Band-in-a-Box® is trying to find a normal pattern for bar 13, it will look for patterns with a mask of 0, 1 (because it is an even number of bars from the part marker) or 5. If it were trying to find a normal pattern for bar 14, it would look for patterns with a mask of 0, 2, or 6.
- Duration
PostFill and Normal patterns can be any number of bars long, however there is a practical range that is commonly used. Other patterns are restricted to a certain number or range of bars. Here is a list of the pattern types, and the ranges of durations:
Fills - 1 bar long only
PostFills - 1 bar or higher, generally no higher than 8 bars
PreFills - 1 or 2 bars long only
Normal - 1 bar or higher, generally no higher than 8 bars
Endings - 2 bars long only
Count-ins - 2 bars long onlyThe difference between favoring short patterns and long patterns is a balance between consistency and variation. Long patterns may sound more consistent, because you will be hearing large portions of raw audio, exactly as the drummer played it. On the other hand, with short patterns, there will be more variety in the phrases, because there will be many more possible combinations when single bars are mixed and matched together. Many people will favor a combination of long and short patterns. Also, while it is possible to have very long patterns, it is important to remember that patterns will not cross part markers, so if you designate 16 bar patterns, but in your Band-in-a-Box® songs you have part markers every 8 bars, those 16 bar patterns will never be played.

In example 8, if Band-in-a-Box® is trying to find a Normal pattern for bar 5, it can pick a 1, 2, or 3 bar pattern, or a 4 bar pattern that ends with a fill. It can not pick a pattern that is more than 4 bars long.
Another thing to keep in mind is that for any given bar in the style wave file, you can have as many different patterns defined as you like. So, for example, you can define a 1 bar pattern that starts at bar 5, you can then also define a 2 bar pattern that starts at bar 5, a 4 bar pattern, 8, etc.
In deciding what lengths of phrases will work well, an important thing to consider is whether or not certain bar lines make good cut-off points. For example, let's assume that in a style wave file, at the 4th beat of bar 15 there is a crash cymbal that decays into bar 16, but fades out before the end of bar 16. Bar 15 would likely not be very good as a 1 bar pattern, because you would have situations where bar 15 would be used, and would then go directly to a different random bar that likely does not have a cymbal decay, so you would hear an abrupt cut-off which would greatly reduce the musicality of the drum part. In situations like these, you would then make sure that other patterns did not end with bar 15 as well. For example, a pattern at bar 14 would not be good as a 2 bar pattern, because it would cut off in the same place, but it would be good as a 3 bar pattern. Conversely, bar 16 would not likely make a good pattern at all, because it will start with a cymbal decay that had no start to it. This doesn't mean that bar 16 will never be used, it will just never be the start of a pattern.
A good rule to follow is to try and have at least one 1-bar PostFill, Normal, and Fill patterns for each subsection, just to make sure that all possible circumstances will be covered. Once you have that, you can determine what other patterns will work well based on the phrasing of the drummer.
- Location
The final element in pattern definition is the location of the pattern in the style wave file. This number represents the bar number in the wave file, but it is important to remember that this is a -1 based numbering system. The first two bars of the wave file are reserved for the count-in, which are considered to be bars -1 and 0. The drumming starts at the third actual bar of the wave file, but is referred to as bar 1. So, if you are viewing bars in an audio editor, remember that when you reference these bars in your text file, you need to subtract 2 before you enter them in the patterns.
If this is confusing to you, there are two ways you can simplify this. Some audio editors allow you to designate bar "1" at any point in a wave file. Simply go to bar 3 and designate that as bar 1. Then, any bar number you see will directly match what needs to be entered into the text file. The other thing you can do is that while you are actually working on the style, you can cut the 2 count-in bars, which will shift the rest of the track back by 2 bars, and any bars you see will be the same bar numbers you need to enter into the text file. Once you have finished the text file, you can then paste the count-in back in to the beginning of the file.
Shots Definition
In Band-in-a-Box®, shots and holds are entered by putting either 2 or 3 periods after a chord (2 periods for a shot, 3 for a hold). With RealDrums, when a shot or hold is entered, the drums stop for the duration of the chord, and a single drum hit is played in place of the drum beat. Pushes are entered by typing either 1 or 2 caret symbols ("^") before the chord in question (1 caret for an 8th-note push, and 2 carets for a 16th-note push). With RealDrums, when a push is entered, the regular drum beat continues throughout, but a single drum hit is added to the mix to emphasize the push.

The single drum hits are generally recorded at the end of the wave file, after the main drum groove, but they do not have to be.
Like patterns, shots are also defined in the text file using lines of text containing several elements: 1) the text "shot", 2) type of shot (0 for shot or hold, 1 for pushes), 3) the bar number of the shot in the style wave file, 4) the number of ticks (1 beat = 120 ticks) before or after the bar number the shot occurs, 5) the duration of the shot in ticks, 6) weight, 7) volume of the shot
Here are some examples of defined shots:
Shot,1,82,-2,455,1,100
Shot,0,83,5,360,1,90
Shot,1,171,240,200,1,80
The six elements that come after the text "shot" are explained here in further detail:
- Type of shot
The type of shot needs to be either 0 or 1. If 0 is entered, the shot will be used when chords are entered with two periods (shot) or three periods (hold). If 1 is entered, the shot will be used when chords are entered with two or three carets before them (8th & 16th note pushes).
- Bar number in style wave file
Like with patterns, you need to remember that RealDrums styles use -1 based numbering, so you need to subtract 2 from the bar number as you see it in your audio editor. More than one shot can be played in a single bar, and you would use the tick adjust amount to distinguish between the two.
- Tick Adjust
The shots do not necessarily have to occur at the bar lines, and the tick adjust can be used to tell Band-in-a-Box® exactly where the shot starts. Simply measure the number of ticks from the downbeat of the bar number entered to the start of the shot, and that is the number that should be entered here. If the shot starts before the bar number that was entered, a negative number should be entered here.
For example, if a shot is recorded at bar 82, but on closer examination it appears that
Shot,1,82,-2,455,1,100
In another example (see example 10 below), a shot is played at the third beat of bar 171. In this case you need to use the tick adjust to indicate that it a full two beats after bar 171. Since one beat is 120 ticks, two beats would be 240 ticks, and it would therefore be entered as such:
Shot,1,171,240,200,1,80
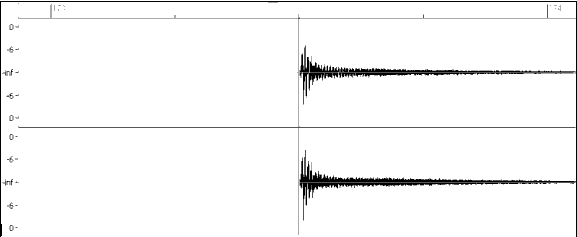
Example 10: Here the shot begins at bar 171 (173-2), at the third beat, or 240 ticks into the bar.
- Duration
Unlike patterns, which use numbers of bars for durations, the shots use ticks for durations. So, for example, if a shot lasts for three beats, you would enter 360 (3 beats * 120 ticks per beat).
Here is an example of a shot that lasts for three beats:
Shot,0,83,5,360,1,90
For the best effect, the sound of the shots should decay naturally, and the entire length of the shot including the decay should be entered in the text file. This is especially important when all other instruments are silent, and all you hear is the decaying sound of the drum hit.
- Weight
The weight for shots works exactly the same as the weight for patterns, except that there is no need for the use of 0 or 9 weights. This number should be between 1 and 8, with higher numbers representing a greater chance that the shot will be selected each time.
- Volume
The volume of the shots is represented by a number between 1 and 127. If 90 is entered, the volume will not be adjusted at all. If a number between 1 and 89 is entered, the volume will be lowered accordingly, and if a number between 91 and 127 is entered, the volume will be raised accordingly. It is generally easiest to test the volume amounts once the style has been completed.
Additional Entries in the Text File
Bars Blocked
During the testing of your style, you may come across instances where a particular bar from the style wave file simply does not sound good going into another specific bar from the style wave file. When this happens, you can enter a "BarsBlocked" line into your text file to ensure that these bars are never played back-to-back.
When "BarsBlocked" is typed into the text file, followed by bar numbers separated by commas, Band-in-a-Box® takes the first number, and all of the bar numbers that follow are "blocked" from ever following the initial number.
So, for example, if this line is entered:
BarsBlocked,24,35,41
then bar 24 can never be followed by bars 35 or 41.
However, when using this feature you need to be very careful that you are not creating situations where Band-in-a-Box® will not be able to find a possible match for a bar. When you block a bar, you need to make sure that there are patterns defined starting on other bars that would also work.
Comments
When you create your style, you may want to add comments into the text file as reference points, or as reminders about certain aspects of the style. This can be done in two ways: 1) semicolon comments 2)Pascal-style comments
If you type a semicolon into the text file, whether it's at the beginning of a line, or at the end of a pattern definition, any text that is typed after the semicolon is ignored, which allows you to type comments. For example:
;this entire line will be ignored by Band-in-a-Box®
pattern,normal,A,5,0,4,15;this text will also be ignored by Band-in-a-Box®
Pascal-style comments are comments that are enclosed by { and } characters. Any text enclosed by these characters will also be ignored by Band-in-a-Box®. Unlike the semicolons, these comments can occur in the middle of a pattern definition, and the line can continue after the comment. For example:
{this entire line will be ignored by Band-in-a-Box®}
pattern,normal,{this text will be ignored}A,5,0,4,15
Alternate Styles & Expanded/Reduced Styles
Alternate Styles
It is possible for a wave file to be used for more than one style. For example, you may want to duplicate a style, but omit certain fills, or assign different weights to certain patterns.
In this case, you still need to create a new RealDrums style group by creating a new sub-directory in the "Drums" folder, and the text file for the style needs to be present. The only difference is that in the text file you would have the name of the wave file you are using, and that name will be different from the text file name.
For example, if you have a "MyFunkyStyle" style at 90 bpm, these files would be present:
C:\BB\Drums\MyFunkyStyle\MyFunkyStyle_090_Style.txt
C:\BB\Drums\MyFunkyStyle\MyFunkyStyle_090_Style.wav
To make an alternate style, you could create this file:
C:\BB\Drums\MyFunkyStyleALT\MyFunkyStyleALT_090_Style.txt
The first line of this text file would be:
wavename=MyFunkyStyle_090_Style.wav
Expanded/Reduced Styles
Often you will find examples of drum grooves where the pulse can be treated as 8th notes or 16th notes. For example, different musicians may disagree on whether a groove is 90 bpm with a 16th note pulse, or 180 bpm with an 8th note pulse. In Band-in-a-Box®, some styles are treated as 8th note styles and others are treated as 16th note styles, and you may find examples where a drum beat that is intended for 8th note styles may work equally well on 16th note styles at half the tempo. In these cases, you can create two separate styles that both point to the same wave file, and treat it as two different tempos. The same method as described in "Alternate Styles" above could be used, with one addition. For the style in which the tempo is different in the text file then it is in the wave file filename, you would need to add the "ForceWavTempo=" line to the text file.
For example, if you have a "MyFunkyStyle_90" Style, the following files would be present:
C:\BB\Drums\MyFunkyStyle\MyFunkyStyle_090_Style.txt
C:\BB\Drums\MyFunkyStyle\MyFunkyStyle_090_Style.wav
For an expanded style, you could create this file:
C:\BB\Drums\MyFunkyStyleEXP\MyFunkyStyleEXP_180_Style.txt
The first line of this text file would be:
wavename=MyFunkyStyle_090_Style.wav
And an additional line would be needed:
ForceWavTempo=180
There some additional points in making expanded and reduced styles. First of all there is the issue of bars correctly matching up. If the number of bars in a particular group of bars in the higher tempo version are an odd number, this can throw off the slower tempo version. For example, if your high tempo version has an A Postfill, an A Normal, and an A Fill, then a B Post, this will mean that in the slower tempo version, the A Postfill and A Normal will become a single PostFill bar, which is fine, but the A Fill and the B Post will also become a single bar, which will not work. This could then mess up everything that came after. It would have been better if the high tempo version had an A Postfill, an A Normal, another A normal, then the A Fill, and then the B Post. For this reason, if you know a drum part is going to be used at two tempos, it is quite a bit easier to record or piece together the drum part with the slow tempo version in mind first, and this can then be expanded.
The other things you need to take into account are the count-in and endings. The count-in will be different for the two tempos, so it's best to record two completely different count-ins. The alternate one can be pasted onto the end of the file if necessary. For endings, it's also good to simply record two versions of them, which also can be at the end of your file.
Testing your RealDrums style
Once you have made your RealDrums style (or, depending on the level of completion, even during the making of it) you can listen to it and test it in Band-in-a-Box®. If your text file is named with the convention detailed in the introduction, and is located in the correct directory, it should automatically appear in Band-in-a-Box®. You can test it in Band-in-a-Box® by loading a song and setting the tempo near to the tempo of the style you just created. First make sure you have your custom RealDrums located in the Drums folder with the rest of the RealDrums, and open Band-in-a-Box. Then go into the RealDrums Picker dialog (either by right-clicking on the Drums track or by pressing the RealDrums toolbar button) and press the Rebuild button. Your style should show up in the list. Note that there will be some blank fields (e.g. genre, RD Set#), since Band-in-a-Box doesn't know some of that info about your Drums style like it does with factory styles. You can add any of your own comments in the User Comments field. When you close the dialog and play your song, your RealDrums style should be playing as well. To make sure that it is playing, you can look at the Band-in-a-Box® title bar. If your style is "MyFunkyStyle_070_Style," you should see [RealDrums=MyFunkyStyle_070].
You can make and save changes to the text file, and when you press play again in Band-in-a-Box®, any changes in the text file will take effect. If, however, you make any changes to the wave file, the wave file needs to be reloaded for the changes to take effect. To do this, simply select a song that uses different RealDrums, press play. Then stop and reload the song you were working on.
Adjusting Volume Levels
If the balance between the RealDrums and the MIDI instruments needs to be adjusted, you can do this by simply adjusting the dbadjust= setting in your text file, saving it, and pressing play again in Band-in-a-Box®. You can continue to do this until you have found a good balance.
For the volume levels of the shots and pushes, the best way to test this is by testing one at a time. If you have more than one shot or push, you can "comment-out" all but one, then you will always be hearing only that shot or push. For example, let's assume you have three shots entered:
Shot,0,82,120,547,1,110
Shot,0,83,188,1151,1,90
Shot,0,85,380,1058,3,90
To test the first one, add a semicolon to the beginning of the 2nd and 3rd lines:
shot,0,82,120,547,1,110;Shot,0,83,188,1151,1,90
;Shot,0,85,380,1058,3,90
Band-in-a-Box® will therefore ignore those lines, and you will only hear the first shot. You can then adjust the volume level until you have it right, then do the same with the second shot, etc.
Developer Mode
It is also extremely useful when testing RealDrums styles to use "Developer mode." This is a checkbox in the RealDrums settings. When it is turned on, Band-in-a-Box® does two things. First of all it spell-checks your text file when you play a song. If it finds an error, it reports the error to you before beginning the song. When Developer mode is off, if there are typos in the text file, the entire pattern definition is simply ignored. For example, if you misspell "pattern" as "pattrn," you will see an error message when you start that will tell you the typo as well as the line number where you can find it in the text file. When you press OK, the song resumes.
The other thing that developer mode does is generate a "DrumAudioResults.txt" text file every time you press play. This text file tells you exactly what patterns from your text file were picked for every Band-in-a-Box® bar. The file also has other global and statistical information. This information can be extremely valuable as you fine-tune your style.
DrumAudioResults.txt file
The first information that the DrumAudioResults.txt file gives you is global information about the style and song. It tells you the wave file that was used, the song tempo, the total number of bars, and the total number of times you've played the song in the current session.
The next information it displays is a separate line for every bar of the song. The first item for every bar is the actual bar number in the song, but the type of information that is displayed after that depends on whether the bar represents the start of a pattern, or a subsequent bar in a multi-bar pattern.
Here is an example of a bar where a pattern begins:
Bar# 12,relbar=4, MaxBars=5, Chose pat#21, line #26 Normal,a sub.,mask=2,dur#bars=2, wrote 2,WavBar=14, Candidates=11 ,time=0:26
Here is an example of a bar where a pattern is continuing:
Bar #13 WavBar=15 ,time=0:28
For bars where patterns begin, here are the items that follow the bar number:
- relbar=x
This number represents the number of bars since the last part marker. This number therefore determines whether or not Normal patterns with masks assigned can be used. For example, if relbar=4, a normal pattern with a mask of 0, 2 or 4 could be chosen, but patterns with masks of 1, 3, 5, 6, etc. could not be chosen. - MaxBars=x
This number represents the number of bars to the next part marker. Since patterns can not cross part markers, any patterns that have a duration greater than the MaxBars= amount can not be chosen. - Chose pat#x, line #y
This is the actual pattern selected, shown in two different ways so that it's easy to identify in the text file. If you count down from the first pattern in the text file, pat#x will show you how many patterns to count to find the one that was used, and does not take the global info at the beginning of the file into account. Line #y shows you the actual line of the text file, which would include lines for the global settings and any comment lines. If your text editor has line numbers, this is the easiest way to find the pattern that was chosen. - Type, subsection, and mask
The next information is the type (Normal, PostFill, etc.), subsection (A or B) and mask of the pattern chosen. - dur#bars=x, wrote y
The dur#bars= amount tells you the number of bars in the pattern, and the "wrote y" amount tells you the actual amount of bars written. In most cases, this number should be the same, because Band-in-a-Box® will always try and keep the defined patterns intact. Sometimes, however, multi-bar patterns may need to be cut short, for example if it needs a 1 bar pattern but you have only designated 2 bar patterns. - WavBar=x
This tells you the bar of the actual style wave file that was used for the current Band-in-a-Box® bar. Remember that this is using -1 based numbering. - Candidates=x
This tells you how many possible patterns there were for Band-in-a-Box® to choose from for the current bar. If there were 3 or less possible candidates, this line appears instead as "FEWCandidates=". This lets you know that perhaps there are not enough of a certain type of pattern. As long as there is at least 1, you will not get any actual errors, but for the sake of variety, the more possibilities the better. If there are no possible candidates, you will get an error message "******* Unable to pick a drum audio bar for bar #x". In this case, you need to examine your text file to see why this is occurring. It could be because there are simply not enough patterns defined, but it could also be because of the overuse of the "barblocked" feature. - time=
This tells you the time in minutes and seconds where the bar is located. This is useful if you have rendered a file, and you are listening to the rendered audio file for problems.
For bars where patterns are continuing, the only items shown are "WavBar=x" and "time=". The one exception is where Fills are concerned, in which case you may see one of two messages tagged on to the end of the line. "BB song has fill, WAV is at end of multi bar pattern. WAV file has a fill also" means that a Fill was designated in the text file, and the current pattern is ending with that Fill. The other message you may see is "*** BB song has no fill, but WAV has a fill ***(Could be Error2 if mask0)" This means that Band-in-a-Box® has recognized that a bar that is designated as a Fill occurred within the pattern, but not at a place where a Fill is required. Fills often sound good 4 bars into phrases, even if no fill has been designated, so in these cases, this could be fine. If, however, the Fill sounds out-of-place, you made need to examine this further in your text file.
At the end of the DrumAudioResults.txt file there is statistical information about the song you just played. Because of the random nature of styles, this information will likely be different every time you play the same song, however you may see some patterns develop that can help you fine tune your style.
The total bars will always be the same for the same song, but the number of patterns written will be different depending on how many short or long patterns were randomly selected. The average bars per pattern gives you an overview of the length of patterns selected. Long patterns are desirable because they generally sound more consistent, while short patterns are desirable because they lend themselves to greater variation. It's therefore good to get a balance between the two, and a good average is between 2 and 4 bars.
It's also good to have a high average candidates amount, as this is also a sign that your style will have good variation. If any Band-in-a-Box® bars had 3 or less patterns to choose from, they were flagged as "FEWCandidates," and the total number is listed at the bottom. This lets you know if you need to define more patterns. "MultiBarPatternPercent=" simply lets you know the setting you have entered in your text file.
Using your RealDrums in Band-in-a-Box®
As we have shown above, you can select your RealDrums style for a particular song in the RealDrums Picker.
It is also possible to assign your RealDrums style to a particular Band-in-a-Box® style. This is done in the StyleMaker. If you have either a new or existing Band-in-a-Box® style open in the StyleMaker, simply select "Style| Misc. Settings" or press ctrl-F10. This opens the Misc Style Settings dialog. At the bottom of this is the RealDrums Settings.
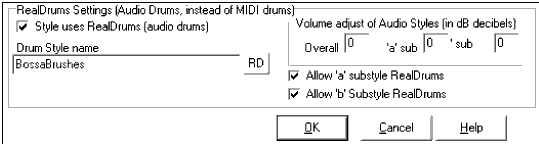
Example 11: RealDrums settings in the StyleMaker.
You can enable "Style uses RealDrums" in order to designate a RealDrums style. If your style is in the correct directory, it should appear when you press the "RD" button. You can then select your RealDrums style, and whenever the current style is played, it will use your RealDrums style (provided that RealDrums are enabled). There are also additional volume controls here. If you have your dB setting exactly where you want it in your style file, but with this particular Band-in-a-Box® style you want it a bit higher or lower, you can enter a setting here. There are also fields for adjusting the 'A' or 'B' subsection volumes only.
You can also remove the check mark from either "Allow 'a' substyle RealDrums" or "Allow 'b' substyle RealDrums", which means that for this style, the one with the checkmark remaining will be used for the entire song, regardless of what substyle is currently called for in the song.
Unconditional 30-Day Money Back Guarantee on all PG Music products purchased from PG Music Inc.
PG Music Inc.
29 Cadillac Ave Victoria BC Canada V8Z 1T3
Sales: 800-268-6272, 250-475-2874,+ 800-4746-8742*
* Outside USA & Canada where International Freephone service is available.
Access Codes
Tech Support: Live Chat, support@pgmusic.com
 Online now
Need Help?
Customer Sales & Support
|
Phones (Pacific Time) 1-800-268-6272 1-250-475-2874 |
||
| Live Chat | ||
| OPEN | Online Ordering 24/7 |
|
| OPEN | Forums, email, web support |