
Band-in-a-Box for Windows Download and Install Manager Help
The Install Manager can be used to download and install all of the files in any product that you order at pgmusic.com, with one click. This is a simpler alternative to manually downloading and installing all the files individually that are listed on your 'downloads' page or 'My Products' page in your account.
This is particularly useful for "download-only" (e-delivery) versions of the Band-in-a-Box Pro, Mega, and UltraPAK, since there are a lot of large files to download.

One Click to Download and Install!
Last updated: Wednesday, 23 August 2023
Do I need to use the Download and Install Manager?
You do not need to use the Download and Install Manager. There are several options for you to download and install files. The Install Manager is available as of November 2021, but any method that you have used in the past to download your files will still work the same. For example, if you prefer, you can download the files individually by clicking them one at a time as you may have done in the past. Or, you can copy your download links into your preferred third party download manager.
Where to find the Download and Install Manager
After you place your order, click on the link(s) in your order confirmation email to go directly to your Downloads page for each product. Note: The Install Manager will only work for orders placed on March 2021 or later. For any order (including orders placed prior to that), you can still access the downloads on your 'My Products' page by logging into your account at www.pgmusic.com and clicking on [My Products]
If the Install Manager is available for the product, there will be a link to download it at the top of your download page list (Note: Download the 64-bit version unless you have an old computer with a 32-bit OS - not very common).
Once this setup file is downloaded, run it to install the Download and Install Manager on your computer. By default, it will be installed into your Band-in-a-Box Data folder (e.g. C:\bb\Data\InstallManager) and will create a desktop shortcut icon. It is ok if you don't yet have Band-in-a-Box installed on your computer. Note - there is an older 'download mananager' that you may have in your 'bb\Data\downloadManager' folder; this is an older program that works differently.
Choosing the Product to Download
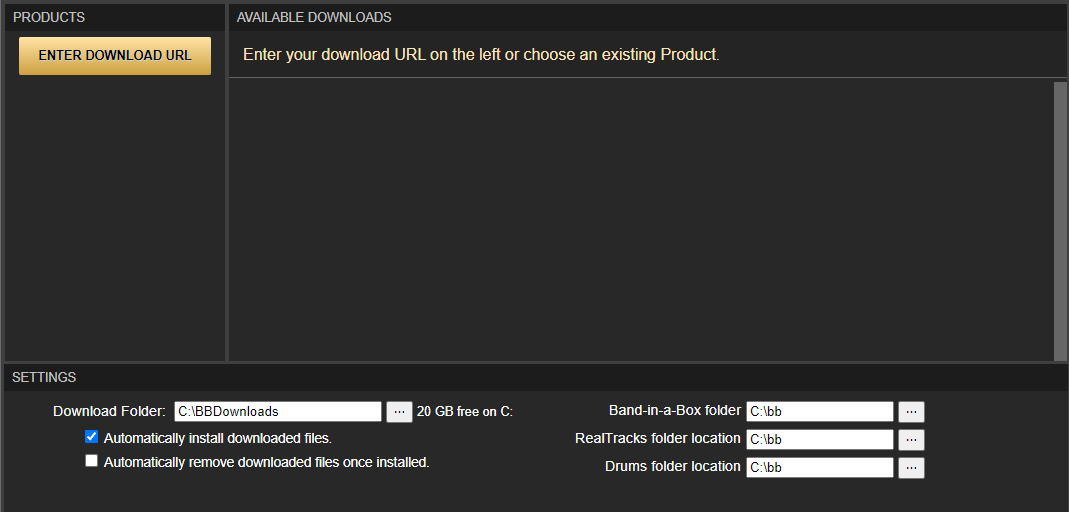
Open the Install Manager after you have downloaded and installed it:
You need to find the "Download URL" for the product that you want to download. You can find this listed at the top of the actual download page for that product, or from your order confirmation email.
Click on the [Enter Download URL] button, paste your URL into the product URL field, and press OK. Note: the url should look similar to this:
https://www.pgmusic.com/download/abcdef-abcdef-abcdef-abcdef-abcdef-abcdef
If the URL is valid, the Install Manager will retrieve the file data, and this may take a few moments. The product is added to the "Products" section on the left and selected automatically, showing the files available for download in the main "Available Downloads" section.
For Band-in-a-Box packages, the first file listed is the Band-in-a-Box program installer itself. This installer will require you to click through the Setup Wizard to agree to the license agreement and confirm some install settings. Once you have done that, no intervention should be required until the product is completely downloaded and installed.
Preparing to Download the files.
Prior to downloading, decide on a drive and location to store the downloaded files and make sure you have enough hard disk space there. The default is C:\BBDownloads, however you can choose your regular downloads folder or whatever location is best for you. The complete download size is shown in the top Product Information area. Taking installation into account, you will need a little more than double the download size. Verify your download settings:

Verify your Band-in-a-Box folder install settings:

The default install location for Band-in-a-Box is C:\bb, or the last folder that you installed a Band-in-a-Box file to. Band-in-a-Box can also be installed and run from an external USB hard drive. The drive that you install Band-in-a-Box on should be NTFS formatted, which is normal for modern computers (FAT32 is sometimes used for flash drives and will not work well for an UltraPAK install due to inherent file limits).
RealTracks and Drums folder locations are also C:\bb by default. These folders are very large relative to the main program files, since they contain large audio files. This is the reason that they can be installed to a different location than the main program. You can think of the RealTracks folder as requiring about as much space as the total download size.
Note that the Install Manager does not check if you already have each file installed in your Band-in-a-Box folder. When you start a new Install Manager session (i.e. open the program), it assumes that you will need to install the entire product. However, if you already have downloaded the product and the correct files exist in your download folder, it will not re-download them. You can move the download files / change your downloads folder any time. For example, some people might want to back up files on a different hard disk once they are downloaded.
Downloading the files
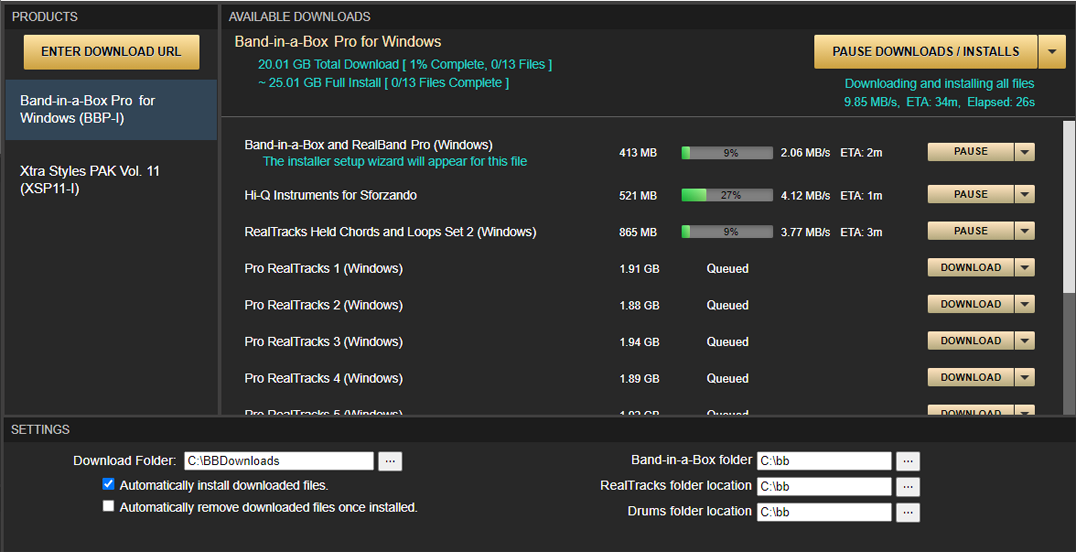
You can download and/or install files individually, or you can press [Download and Install All] button at the top of the screen. In the case of "Download-All", you should not need to do anything further while the program downloads, (except for step through the Band-in-a-Box program install wizard). The Install Manager will block some power-saving features of your computer while downloads are in progress, so that the computer doesn't go to sleep (the display can still be turned off). This feature can be turned off in [Edit | Settings] menu, however you would normally want to leave it turned on.
The length of time the download takes depends mainly on how fast your internet connection is, so varies widely. If you are curious, there are lots of websites that will test your download speed - e.g. Google search "internet speed test". As a ballpark, the UltraPAK can be downloaded in 2-3 hours with a fairly fast connection (100 mbps). Installation time (as opposed to "download" time) varies greatly between computers, a full UltraPAK taking anywhere from 20 min to a few hours.
Unconditional 30-Day Money Back Guarantee on all PG Music products purchased from PG Music Inc.
PG Music Inc.
29 Cadillac Ave Victoria BC Canada V8Z 1T3
Sales: 800-268-6272, 250-475-2874,+ 800-4746-8742*
* Outside USA & Canada where International Freephone service is available.
Access Codes
Tech Support: Live Chat, support@pgmusic.com
 Online now
Need Help?
Customer Sales & Support
|
Phones (Pacific Time) 1-800-268-6272 1-250-475-2874 |
||
| Live Chat | ||
| OPEN | Online Ordering 24/7 |
|
| OPEN | Forums, email, web support |