
Search Manual
Band-in-a-Box® 2018 for Mac® User's Guide
Chapter 3: Band-in-a-Box 2018
Overview of New Features
We’ve been busy and added over 50 new features and an amazing collection of new content, including RealTracks, MIDI SuperTracks, Instrumental Studies, Loops, Artist Performances, Amplitube presets and associated styles, 12-Key RealTracks, and Hi-Q Guitar Notation! There are 202 new RealTracks, double the 101 that we’ve often released in the past! Plus, we’re introducing Video RealTracks (40 available in Country, Pop, and Jazz), which work just like RealTracks, but also include videos of the musician’s performance! We also have an Xtra Styles PAK 4 with 160 Xtra Styles, which are styles based on previously released RealTracks. There are over 200 new RealStyles for our new RealTracks including Americana, Klezmer, Top-40, Jazz Strings Pads, Vocals (Oohs and Aahs), New Crooner “Shout” BigBand styles, and more! We have a Bonus 49-PAK with 40 additional new unreleased RealTracks on top of the 202 above, so in total an amazing 242 new RealTracks are available! The Bonus 49-PAK also includes Video RealTracks Set 1 and 2, 32 new MIDI SuperTracks, 108 new Instrumental Studies, 52 Loops, and 8 Artist Performances.
Band-in-a-Box 2018 Features and Additions
There are over 50 exciting new features in Band-in-a-Box 2018! We’re introducing “Video RealTracks,” which work like RealTracks, but also include videos of the musician’s performance. You can make a video of a single musician or a band video, optionally with a chord sheet or notation, and you can even add your own videos to the final mix. The Audio Chord Wizard has been redesigned and is now built into Band-in-a-Box. The Audio Harmonies feature has been added, including Audio Transcription, which converts a monophonic audio track to MIDI (notation), and Fix Tuning to fix an out-of-tune audio recording, and more. The new Piano Roll window enables precise graphic editing of MIDI data. You can save the Notation window to a video in sync with the audio track playback. We’ve added notation support for time signatures like 12/8, 6/8, and 9/8. The Toolbar has been enhanced with skins and more customization. You can open and save ABC notation files, which are very common song files on the internet with chords and melody. The popular Song Titles Browser is enhanced with more songs (now over 10,000), filters, and the ability to show titles that work with a specific style. StylePicker enhancements include a mixer-like control allowing clear display and style customization. The RealDrums Picker has been enhanced with the option to find similar RealDrums. The Audio Edit window is redesigned with a new GUI and additional features. And many more!
Additional New Content Available for Band-in-a-Box 2018
- 40 New Video RealTracks
- 202 more RealTracks
- 32 New MIDI SuperTracks
- 108 New Instrumental Studies
- 8 New Artist Performances
- 52 New Loops
- 40 Amplitube presets and 37 associated styles
- 2018 Bonus 49-PAK
- Xtra Styles PAK 4
40 New Video RealTracks
We have a new and exciting category of RealTracks - Video RealTracks! Have you ever listened to your favorite RealTracks guitar solo or RealDrums drum fill and wondered exactly how the player did it? Now, you can see actual footage of the musician playing along with your song! And that’s not all. You can also stack these videos in several configurations to create a video of a full band!
Video RealTracks are available in six sets:
- Video RealTracks Set 1: Pop Ballad Band - Guitar (Brent Mason), Bass (Byron House), Drums (Shannon Forrest), Piano (Mike Rojas), and Pedal Steel (Eddy Dunlap)
- Video RealTracks Set 2: Country TrainBeat Band - Guitar (Brent Mason), Bass (Byron House), Drums (Shannon Forrest), Piano (Mike Rojas), and Pedal Steel (Eddy Dunlap)
- Video RealTracks Set 3: Jazz Guitar with Oliver Gannon
- Video RealTracks Set 4: Pop, and Country Drums with Shannon Forrest
- Video RealTracks Set 5: Gypsy Jazz Guitar, and Blues Piano with Quinn Bachand, and Mike Rojas
- Video RealTracks Set 6: Celtic Guitar with Quinn Bachand
202 more RealTracks with great new Pop, Rock, World, Jazz, Blues, Latin, Country, Americana, and Celtic styles. These include:
- 74 Country, Americana and Celtic RealTracks (Sets 278-285)
This collection features an array of newly requested styles and additions to classic sets, as well as a Band-in-a-Box “first” Background Vocals (10 RealTracks)! Our new Vocal Oohs & Aahs set features a 3-part vocal arrangement with 2 male voices and 1 female voice, each doubled for a total of a 6-voice ensemble. Americana has been one of the biggest user requests, and we’ve added twenty Americana grooves, with acoustic bass, amazing electric guitar from Brent Mason and Colin Linden, vintage electric piano, and sweet fiddle. There are also Country Singer-Songwriter RealTracks, with more acoustic guitars by Brent Mason and Colin Linden. We also have new 12-key Country guitars, pedal steel, bass, and piano. There are six new harmonica styles from “Jelly-Roll” Johnson, which sound fantastic over classic country grooves. And we have new “Canadiana” RealTracks complete with old time guitar, banjo, and foot stomps. Eleven new Celtic Piano & Harp styles, featuring Scottish pianist Dave Milligan, will fit perfectly with Celtic ensembles from previous years.
- 68 Pop, Rock and World RealTracks (Sets 286-293)
RealTracks Sets 286-293 feature amazing new Pop, Rock, Klezmer, and European styles! Five new Pop & Rock guitars from Brent Mason and Joe Robinson range from funky to folky with both acoustic rhythm and electric soloist styles. The extremely popular Band-in-a-Box Pop Songwriter toolkit now has eleven new acoustic songwriter guitar styles from Brent Mason, Colin Linden, Quinn Bachand, and Fintan O’Brien. Seven new soulful Southern Pop Drums styles from top session drummer Land Richards have been added. Accent these new drums with eight new Pop Percussion Singles, including congas, cowbell, tambourine, shaker, woodblocks, and afuche-cabasa. The Fretless Bass, Pop Keys & Punk Drums set boasts a versatile line of fretless electric bass, acoustic piano, organ, and hard-edged drum styles. Eight Modern Dancehall RealTracks are a Modern-Pop must-have, featuring percussive synth basses, pads, and electronic drums. A set of spirited Klezmer styles feature world-champion accordionist Cory Pesaturo accompanied by Neil Swainson on acoustic bass and Quinn Bachand on guitar, with matching RealDrums by Terry Clarke. Cory also features alongside Neil and Quinn with fourteen new French, Italian, and Swedish World Styles.
- 60 Jazz, Blues, and Latin RealTracks (Sets 294-300)
We’ve added to our extremely popular “Crooner” Big Band styles with exciting new “Shout” Soloist RealTracks. A “Shout” Soloist is a big Band arrangement where all the instruments are playing harmonized solos! These tracks feature an 11-part arrangement of trumpets, saxophones, and flute that can be used as an ensemble or selected as groups of individual soloists. We also have other great new jazz styles in the “Jazz Potpourri” set, including new 12-key Bossa and Waltz Guitar, Jazz Ballad Strings, Soul Jazz Piano from Mike Rojas (CMA Musician of the Year), as well as a variety of Jazz Percussion Singles such as bongos, congas, and triangle. The new Modern Jazz set includes four Neil Swainson acoustic modern jazz basses and six corresponding modern jazz drum styles from the legendary Terry Clarke. New additions to our Smooth Jazz & Fusion catalogue include acoustic basses, Latin & Slow 16ths electric piano from Jeff Lorber, brushes drums, and lush mark tree fills. Building upon the traditional Latin RealTracks from last year, we have seven new Mariachi styles! The set features a 6/8 style and a waltz, with the authentic instrumentation of Guitar, Vihuela, Guitarron (7). Three new Rootsy Blues guitars and pianos are included from Brent Mason, Colin Linden, and Mike Rojas. Seven Smokin’ Fast Jazz Basses allow for smooth, fluent bass tempos up to 350 bpm!
32 New MIDI SuperTracks
>We have 32 new MIDI SuperTracks with Killer Accordion (15), Country and Folk Piano (9), and Celtic Piano (8). Because these are MIDI, you can pick whatever patches or synths you want to generate the sound, giving you complete control over the final product!
108 New Instrumental Studies
We introduced the idea of “Instrumental Studies” two years ago with guitar, and last year we added additional Instrumental Studies with piano, bass, guitar, and sax. This year we added new Instrumental Studies with electric guitar!
New Artist Performances Set 8: Traditional songs sung by Béatrix Méthé.
With Artist Performance Set 8, you’ll be delighted to hear eight well-known folk songs, sung in beautiful harmony by professional singer Béatrix Méthé. These songs date back hundreds of years and are popular all over the world. You’re sure to recognize more than a few, with origins spanning America, Ireland, Canada, and France. Each song has a handpicked Band-in-a-Box style, with the lyrics and singing professionally transcribed, so you can use the notation window, tempo stretching, and all the other Band-in-a-Box features to make sure you’re well versed in each song. In addition to the melody, each song has one or two harmony parts sung by Béatrix! We hope you will enjoy listening and learning each of these timeless songs.
52 New Loops - Percussion FX (22), “Classic Beats” Rock/Pop (10), “Classic Beats” Jazz (10), and “Classic Beats” Country (10).
40 Amplitube presets and 37 associated styles
It’s been a few years since we offered a new collection of Amplitube presets and styles, so we thought we would treat you to something special. Volume 2 of our Amplitube presets and styles will give you all kinds of killer guitar tones, from clean and mellow jazz sounds to screaming rock leads and even an acoustic bass enhancer. We threw in some pedal steel presets that you can use with DI pedal steel RealTracks too. You’ll also find some vintage tones that incorporate some of your favorite effects like spring reverb and tape delay. And of course, we’ve included 37 RealStyles to accompany the 40 new Amplitube presets so that you can easily hear the new sounds at work.
Our 2018 Bonus 49-PAK contains great additional content!
- Video RealTracks Set 1: Pop Ballad Band - Guitar (Brent Mason), Bass (Byron House), Drums (Shannon Forrest), Piano (Mike Rojas), and Pedal Steel (Eddy Dunlap)
- Video RealTracks Set 2: Country TrainBeat Band - Guitar (Brent Mason), Bass (Byron House), Drums (Shannon Forrest), Piano (Mike Rojas), Pedal Steel (Eddy Dunlap)
- 40 additional unreleased RealTracks - The Band-in-a-Box 2018 Bonus RealTracks collection features an exciting variety of RealTracks and RealDrums, including Singer-Songwriter styles, Klezmer styles, World Accordion, Latin Percussion, and more Drum Kit & Percussion styles! The Klezmer RealTracks make up twelve RealTracks/RealDrums, with Neil Swainson acoustic bass, Cory Pesaturo (world champion accordionist), Quinn Bachand guitars, and jazz legend Terry Clarke on drums. We add to our already huge collection of singer-songwriter styles with guitars by Brent Mason, Quinn Bachand, and Fintan O’Brien, as well as piano by Mike Rojas. In addition, we have cool new percussion styles, most notably Washboard Bluegrass! And more RealDrums from top studio musicians Terry Clarke, and Land Richard.
Xtra Styles PAKs
- Xtra Styles PAK 4 (Released December 2017) - This brings you great Country, Rock/Pop, and Jazz RealStyles with the addition of the first ever “Folk and Beyond.” This amazing collection encompasses everything from modern trends in music to classic reimaginings and eclectic genre combinations. Many of the great RealTracks from the 2017 release have been used in new and unique ways that are beyond their original scope. All these styles are meticulously mixed and thoughtfully arranged to save you time!
- Xtra Styles PAK 3 (Released June 2017) - 160 RealStyles for Jazz, Rock-Pop, Country, and Americana.
- Xtra Styles PAK 2 (Released December 2016) - 161 RealStyles for Jazz, Country, Rock-Pop, and Bluegrass & World.
- Xtra Styles PAK 1 (Released August 2016) - 164 RealStyles for Jazz, Country, Rock-Pop, and Singer/Songwriter.
Summary of New Features
We’ve added over 50 new features to Band-in-a-Box 2018, including...
Video RealTracks
Video RealTracks are a brand-new feature to Band-in-a-Box. We have over 2,500 available audio RealTracks, and now we have 40 available video RealTracks including two full video bands - Country and Pop Ballad. When you load a video RealTracks, you can use it just like an audio RealTracks, but you can also generate a video, which will display the musician playing your song exactly as you hear it. If you load one of the video RealTracks bands, you will have video RealTracks on 5 tracks, and you can make a video of 1-5 musicians. You can also include a chord sheet or notation in the video.
Built-in Audio Chord Wizard
The Audio Chord Wizard has been redesigned and is now built into Band-in-a-Box. Previously, the Audio Chord Wizard was a separate app and not tightly integrated into Band-in-a-Box. This app is still available from the [Audio Chord Wizard] toolbar button, but the improved built-in Audio Chord Wizard can be accessed from the Audio Edit window.
Audio Harmonies Feature Added
Harmonize the Audio track with up to 4 voices. You can choose one of the 4 harmonizing modes.
- The “Chords” mode will harmonize the audio based on the chords in your song. Choose a type of harmony from the “Harmony type” option. Choose either the intelligent mode, which allows you to select the number of voices, or one of the Band-in-a-Box harmony presets.
- The “Melody track” mode will add voices (up to 4 voices) to the audio, based on melodies in the Melody track.
- The “Soloist track” mode will add voices (up to 4 voices) to the audio, based on melodies in the Soloist track.
- The “Fix Tuning” mode will analyze the Audio track and correct out-of-tune notes in the selected region according to the key of your song.
The Fix Tuning feature analyzes the Audio track and correct out-of-tune notes in the selected region according to the key of your song. For example, in the key of C, if a C# is detected, then it will be transposed down to C or up to D depending on which one is closer.
You can use the Auto-Transcribe feature to transcribe the audio data to the Melody or Soloist track as MIDI data.
Piano Roll Window
The new Piano Roll window enables precise graphic editing of MIDI data including notes, velocity, controllers, program changes, channel aftertouch, and pitch bend.
Save Notation Window as a Video
With previous versions of Band-in-a-Box, you could make a video of the Chord Sheet, showing the highlighted bars as the song is playing. Now, you can make a video of the Notation window. This is helpful if you have a melody or a RealChart (notation for RealTracks) that you would like to see on a video.
Improved GUI
The Toolbar has been enhanced with skins support, and the Display Options dialog has more customizable color items.
Improved Mixer
Soloing/Muting functions are improved. Now you can change the solo and the mute status of other tracks by right-clicking on a blue mute button.
The floating Mixer window now has opacity controls. Left-click on them to change the opacity by a significant amount, or right-click on them to change it by a small amount.
Support for ABC Notation Format
ABC notation is the simple text-based notation system used by musicians worldwide to store chords, melody, and lyrics of songs. Now you can open and save songs in ABC notation format. You can find out more information about the songs and ABC notation at abcnotation.com.
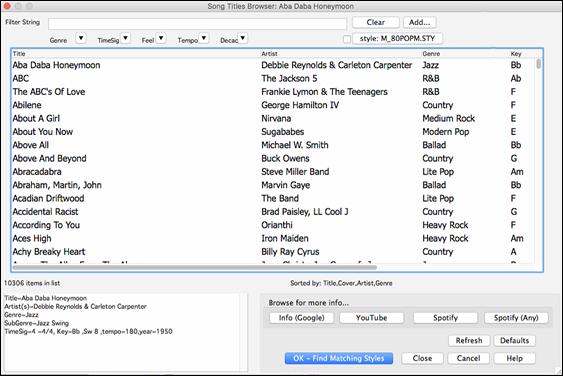
Song Titles Browser Enhancements
We’ve added 2,000 new song titles including requests from users, so there are now over 10,000 titles!
You can now filter the list by genres, time signature, feel, tempo, and decades.
The dialog can list song titles that will work with the current style.
Subgenres have been added for most song titles. Searching by a subgenre name in the text filter will display song titles in that subgenre.
Recommendation of styles has been improved. When you select a song title and press the [OK - Find Matching Styles] button, the StylePicker dialog will open and show only styles that will work with that song title. This feature has been improved so that subgenres are also considered, so the style recommendations are more accurate.
StylePicker Enhancements
Mixer-like control allows style customization within the StylePicker. This shows what tracks are used in the highlighted style in the list and color-codes them according to the track types (MIDI/RealTracks/MIDI SuperTracks). There is also a menu button on each track, which allows you to change the instrument, disable/enable the track, or perform other track actions.
A [Save as .STY] button has been added. When you have customized a style, you might want to save it so that it is added to the StylePicker list and can be used easily. For example, you might add/remove a RealTracks and save that as a new style.
Recommendations of styles is improved when using the [Find Titles] button at the top right of the dialog. This also displays subgenres and makes it easier to find styles for a certain popular song.
New user categories have been added, including Americana; Bebop and Fast Jazz; Bluegrass, Train, and Old Time; Dixieland, Gypsy, and Old Jazz; Fingerstyle Guitar; Funk, RnB, and Soul; Heavy Rock; Singer-Songwriter; and World.
The buttons to copy the styles list to the clipboard, set the dialog options, and reset the dialog to defaults have been moved to the [Action] button menu.
The two buttons to rebuild a complete or partial styles list have been combined into a single button.
Rebuilding the styles list also rebuilds lists in the RealTracks and RealDrums Picker dialogs.
The option to change the font size of the text in the styles list has been moved to the StylePicker Options dialog.
Renewed Render to Audio File Dialog
The dialog now has a simpler look and is easier to use.
RealDrums Picker Enhancements
You can now demo individual variations of the RealDrums at the tempo closest to your current song by double-clicking on them.
The “Set” column shows “VID” if the video RealDrums is installed. “VNA” means that a video is available but not installed.
RealDrums QuickList
There is now a simpler dialog for choosing RealDrums, an alternative to the RealDrums Picker. It displays all available RealDrums in a simple list, which can be easily filtered by genre, time signature, feel, and more. The list can be set to show only RealDrums that are compatible with the current style of the song. You can also set the highlighted RealDrums as a prototype RealDrums to find alternates to that RealDrums.
Audio Edit Window Enhancements
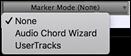
The Audio Edit window now has a nicer looking GUI, with a dedicated settings button and a Marker Mode button.
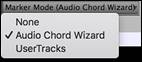
When you select the Audio Chord Wizard or UserTracks for the marker mode, the markers will be visible and editable.
Editing features can now apply to the entire track. Before version 2018, you had to highlight a region to use editing features, but now if no region is highlighted, then they will apply to the entire track.
There are some items added to the [Edit] button menu.
Guitar Window Enhancements
Clicking on the black area to the left of the zero fret notes in the Guitar window will delete the notes on just the channel of that string on the current notation time line rather than all notes at that time line.
Clicking on a note will delete the note from the Notation window if the note is currently highlighted. If no notes are highlighted in red, then clicking on a note will first delete any notes on the current notation timeline and channel before inserting a new note.
Big Piano Window Enhancements
Clicking on the black area to the left of the piano will delete highlighted red notes from the Notation window. If no notes are highlighted in red, then clicking to the left of the piano will delete any note on the current notation timeline.
Clicking on a note will delete the note from the Notation window if the note is currently highlighted in red.
MIDI File Import Enhancement
Now you can import lyrics from a MIDI file to your song.
Notation Window Enhancements
Notation supports 12/8, 9/8, and 6/8 time signatures. Previous versions of Band-in-a-Box only supported 3/4 or 4/4 notation. Now you can also select 12/8, 9/8, or 6/8. This is done by pressing the new button in the Notation window and selecting one of the time signatures from the list
Duplicate previous group of notes lets you quickly duplicate the previous chord (a group of notes on the same location) without having to reenter it. This is a menu option added to the context menu in the Notation window.
The [delete] key deletes all notes that are currently highlighted in red.
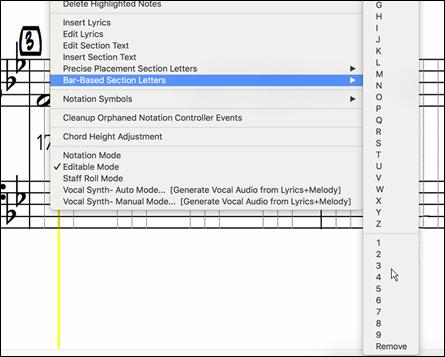
You can now enter Section Numbers. Previously, you could enter letters (A-Z) only, but now you can also enter numbers (1-9).
The vertical position of a dot of a dotted rest has been adjusted. A dot used to be drawn on the staff line, but it is now drawn between staff lines.
When loading a MusicXML file, if more than 20% of notes are triplet notes, then the overall beat resolution will be automatically set to 3 in the Notation window.
Improved algorithms are now used for drawing slurs. A slur will be drawn with a Bezier curve, which is especially helpful for notes being very close together.
Enhanced Flash Messages
Flash messages are now brighter for clarity. They also have a close button, which is useful for closing green flash messages without performing the action. Up to 4 messages can be on the screen at once. (Previously, only 2 messages could be shown.)
And more!
Introduction to Band-in-a-Box 2018
Let’s take a closer look at the great new features in Band-in-a-Box 2018!
Video RealTracks
Video RealTracks are a brand-new feature to Band-in-a-Box. We have 2,500 available audio RealTracks, and now we have 40 available video RealTracks including two full video bands - Country and Pop Ballad. When you load a video RealTrack, you can use it just like an audio RealTracks, but you can also generate a video, which will display the musician playing your song exactly as you hear it. If you load one of the video RealTracks bands, you will have video RealTracks on 5 tracks, and you can make a video of 1-5 musicians. You can also include a chord sheet or notation in the video.
You can easily find the video RealTracks in the RealTracks or RealDrums Picker. The “Set” column will show “vid” if the video RealTracks is installed.


When you select video RealTracks, [V] will show at the track buttons.
![]()
|
To make a video, click on the [Video] toolbar button and select Render Video(s) from the menu. |
This will open the Generate Video dialog.

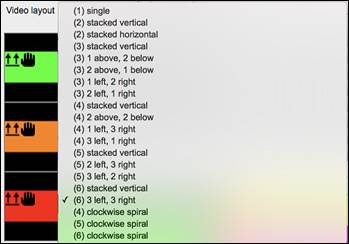
Drag one of the available tracks listed at the top of the dialog and drop it onto the layout selector below. You can also drag and drop the chord sheet or notation (if available). You can even drag a video file (.mp4 files and some .avi files) from the Finder and drop it onto the video layout selector.
If you are making a video of multiple tracks, you can choose a track layout. For example, you can stack 3 tracks vertically for a 3-track video, or 3 tracks on the left and 2 tracks on the right for a 5-track video.
|
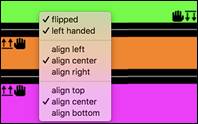
Right-clicking on the layout selector will show you a menu with options to flip a video, make a video for the left handed, or select alignment for each video. |
|
You can select the resolution for the video. The aspect ratio is determined by which tracks are included and how they are arranged, but this allows you to make the final video smaller if you want. |
![]() When you are ready, press this button and select the name and location for the video.
When you are ready, press this button and select the name and location for the video.
![]() While the video is being rendered, you can close the dialog and use other features in Band-in-a-Box.
While the video is being rendered, you can close the dialog and use other features in Band-in-a-Box.
![]() When the video has been rendered, you can click on the .mp4 file in the Finder to play the video.
When the video has been rendered, you can click on the .mp4 file in the Finder to play the video.
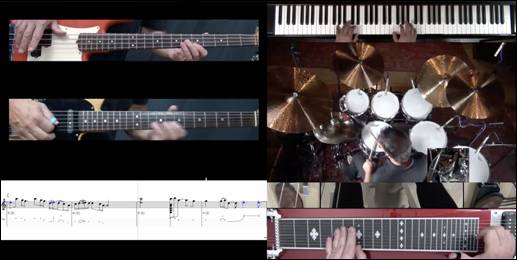
Here is an example of a modern country band (electric bass, electric guitar, piano, drums, and pedal steel).
Built-in Audio Chord Wizard
The Audio Chord Wizard has been redesigned and is now built into Band-in-a-Box. Previously, the Audio Chord Wizard was a separate app and not tightly integrated into Band-in-a-Box. This app is still available from the [Audio Chord Wizard] toolbar button, but the improved built-in Audio Chord Wizard can be accessed from the Audio Edit window.
First, import an audio file with the Audio menu item.
![]()
![]()
Next, select Audio Chord Wizard (Audio Edit) from the Audio menu. This will open the Audio Edit window with the Audio Chord Window marker mode selected.
![]()
![]()
Alternatively, you can press the [Audio Edit] button, and when the Audio Edit window opens, press the [Marker Mode] button on its toolbar and select Audio Chord Wizard from the menu.
|
|
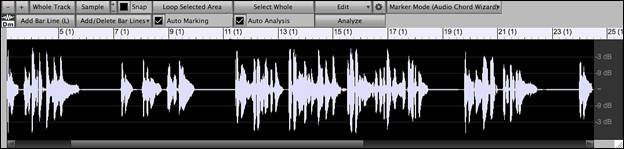
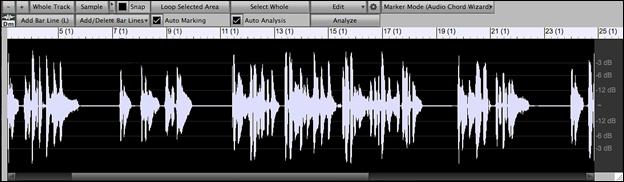
The first task is to locate bar lines in the audio so that the Audio Chord Wizard can detect chords accurately and the audio will play in sync with the Band-in-a-Box song.
![]() You can add bar lines with the [Add Bar Line] button or with the [L] key on your keyboard. A bar line will be placed at the audio edit cursor or at the playback cursor if the song is currently playing.
You can add bar lines with the [Add Bar Line] button or with the [L] key on your keyboard. A bar line will be placed at the audio edit cursor or at the playback cursor if the song is currently playing.
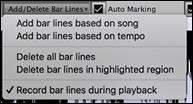
![]() The [Add/Delete Bar Lines] button menu has options to add bar lines based on your song structure or tempo. You can delete all the existing bar lines or only the ones within the highlighted region.
The [Add/Delete Bar Lines] button menu has options to add bar lines based on your song structure or tempo. You can delete all the existing bar lines or only the ones within the highlighted region.
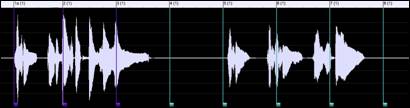
![]() If “Auto Marking” is enabled, then Band-in-a-Box will automatically add and arrange bar lines based on the bar lines you have added manually. The “auto” bar lines will show in light blue, and the “user” bar lines will show in purple. You can change these colors in the Audio Edit Settings dialog if you want.
If “Auto Marking” is enabled, then Band-in-a-Box will automatically add and arrange bar lines based on the bar lines you have added manually. The “auto” bar lines will show in light blue, and the “user” bar lines will show in purple. You can change these colors in the Audio Edit Settings dialog if you want.
![]() If “Auto Analysis” is enabled, then Band-in-a-Box will re-analyze the chords in the audio whenever you add or move a bar line, or when you edit the audio data. Keep this setting disabled if you prefer to set all bar lines first (i.e. establishing tempo), and then analyze the chords when you are done.
If “Auto Analysis” is enabled, then Band-in-a-Box will re-analyze the chords in the audio whenever you add or move a bar line, or when you edit the audio data. Keep this setting disabled if you prefer to set all bar lines first (i.e. establishing tempo), and then analyze the chords when you are done.
Bar lines can be moved with the mouse. Just click and drag the thumb control at the bottom. If you move an “auto” bar line, it will become a “user” bar line.
|
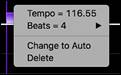
You can also right-click on the thumb control to get a context menu with options to switch a marker type (“user” or “auto”), delete the bar line, or set the time signature for the bar. The menu also shows you the tempo of the bar, based on the time signature of the bar and the position of the next bar line. |
When you add or move bar lines, Band-in-a-Box will automatically make a tempo map, so your song will play in sync with the audio.
Any changes you make in the Audio Chord Wizard mode are undo-able. This was previously not possible with the stand-alone Audio Chord Wizard.
![]() Use the [Analyze] button to analyze the chords in the audio. The chords detected in the audio will be written into the Chord Sheet. You don’t need to do this if you have “Auto Analysis” enabled, but you might want to if you have erased or made changes to the chords in the Chord Sheet.
Use the [Analyze] button to analyze the chords in the audio. The chords detected in the audio will be written into the Chord Sheet. You don’t need to do this if you have “Auto Analysis” enabled, but you might want to if you have erased or made changes to the chords in the Chord Sheet.
When you open the Chord Sheet, you will see that the Audio Chord Wizard has entered the chords and the tempo map.

Audio Harmonies Feature Enhancements
Harmonize the Audio track with up to 4 voices with the new Audio Harmony dialog
To access this feature, first import an audio file or open a Band-in-a-Box song file with audio. Then, go to the menu Audio or Harmony, and select Audio Harmonies, Pitch Tracking, Fix Tuning (Audio Edit).
![]() or
or ![]()
![]()
This will open the Audio Edit window and the new Audio Harmony dialog.
Choose one of the 4 harmonizing modes.

|
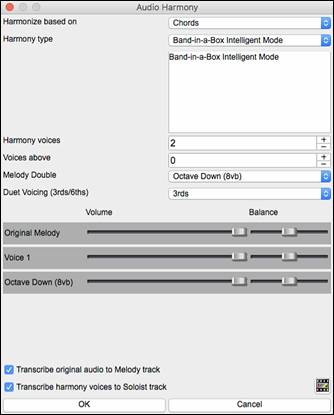
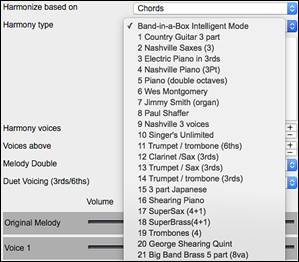
1) The “Chords” mode will harmonize the audio based on the chords in your song. Choose a type of harmony from the “Harmony type” option. Choose either the intelligent mode, which allows you to select the number of voices and other options, or one of the harmony presets. Then, set the volume and the stereo balance of each voice in the harmony. When you select the intelligent mode, you can also use the “Melody Double” option to make one of the harmony voices double the original melody. For the 2-part harmony, you can make the harmony voice 3rds or 6ths above/below the original melody depending on the “Voice above” setting or a combination of 3rds and 6ths with the “Duet Voicing” setting. |
|
2) The “Melody track” mode will add voices to the audio, based on melodies in the Melody track. You can choose the number of voices (up to 4 voices), and the volume and the stereo balance of each voice. |
|
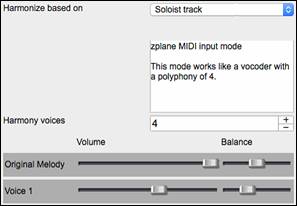
3) The “Soloist track” mode will add voices to the audio, based on melodies in the Soloist track. You can choose the number of voices (up to 4 voices), and the volume and the stereo balance of each voice. |
|
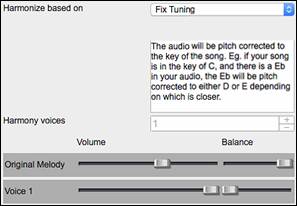
4) The “Fix Tuning” mode will analyze the Audio track and correct out-of-tune notes in the selected region according to the key of your song. Normally, you do not want to keep out-of-tune notes after the fix tuning is done, but you can mix the original voice with the fixed one by moving the volume slider for “Original Melody” to the right. |

![]() You can use the “Transcribe original audio to Melody track” option to transcribe the original audio to MIDI on the Melody track.
You can use the “Transcribe original audio to Melody track” option to transcribe the original audio to MIDI on the Melody track.
![]() If “Transcribe harmony voices to Soloist track” is enabled, the harmony voices generated will be transcribed to MIDI on the Soloist track.
If “Transcribe harmony voices to Soloist track” is enabled, the harmony voices generated will be transcribed to MIDI on the Soloist track.
Fix Tuning for Audio track
This feature analyzes the Audio track and correct out-of-tune notes in the selected region according to the key of your song. For example, in the key of C, if a C# is detected, then it will be transposed down to C or up to D depending on which one is closer. To use this feature, press the [Edit] button in the Audio Edit window and select Fix Tuning from the menu.
![]()
![]()
Auto-Transcribe of Audio track to notation (MIDI)
This will transcribe the audio data to the Melody or Soloist track as MIDI data.
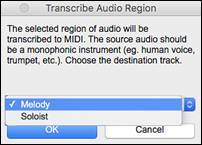
To access this feature, press the [Edit] button in the Audio Edit window and select Transcribe from the menu. You can then select the destination track.
|
|
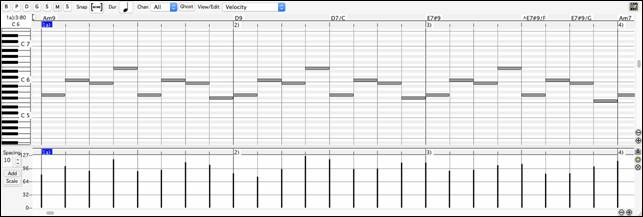
Piano Roll Window
The Piano Roll window enables precise graphic editing of note timing and duration. You can also graphically edit note velocity, controllers, program changes, channel aftertouch, and pitch bend.
|
You can open the Piano Roll window with the toolbar button or Windows | Piano Roll Window menu item. |
Note: A demo song PianoRollDemoSong.MGU in the Band-in-a-Box/Tutorials/Tutorial – BB2018 folder contains some MIDI data, which can be seen in the Piano Roll window.
Track Selection
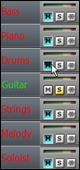
![]() Select the track - Bass, Piano, Drums, Guitar, Strings, Melody, or Solo.
Select the track - Bass, Piano, Drums, Guitar, Strings, Melody, or Solo.
Snap-to-Grid
|
Selections, Inserted Notes, or Edited Notes will snap to the grid spacing. If you do not want snap-to-grid, select [NONE] in the drop-down menu. |

Note Duration
|
Set the default duration of new inserted notes. It is easy to mouse-edit a note’s duration after a note is inserted, so it is usually sufficient to select a typical note duration that makes sense for your purposes and then mouse-edit the duration of “exception” notes after they are inserted. |

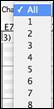
View/Insert Channel
|
If a track contains multiple channels, “All” will display MIDI events on all channels. Otherwise, select the channel that you need to see. If “All” is selected, new MIDI events are inserted on the Band-in-a-Box track’s assigned channel. Except for perhaps multi-channel Guitar tracks, Band-in-a-Box plays all track events on the assigned track channel. Therefore, in almost all cases, the channel of track events does not matter. For instance, if the Melody track is set to transmit on channel 4, all events on the Melody track will be sent on channel 4 regardless of the “actual channel” of each track event. |
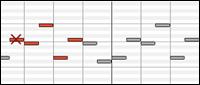
Ghost Notes
![]() When viewing a single channel, notes on other channels can be ghost-displayed in light gray. This is useful when viewing multi-channel tracks.
When viewing a single channel, notes on other channels can be ghost-displayed in light gray. This is useful when viewing multi-channel tracks.
View/Edit
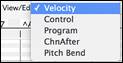
Determine what graphic data to view or edit in the Graphic Event Panel. Choose Velocity, Controller, Program Change, Channel Aftertouch, and Pitch Bend. If “Chan” is not set to “All,” only the selected channel events will be displayed.
Keyboard Pitch Panel
|
Click on a single note of the keyboard to select all notes of the clicked pitch. Click-drag on the keyboard to select all notes in a pitch range. Shift-click-drag to add another set of notes to the selection. Command-click-drag to invert a pitch selection. For instance, you could drag C5 thru C6 to select an octave of notes. Then shift-click C3 to add all C3 notes to the selection. Then command-click C5 to remove all C5 notes from the selection. |
Cursor Location Info Panel
![]()
The Info Panel shows the cursor’s Bar:Beat:Tick and MIDI note or controller value (depending on the cursor location). In cursor locations where a value would be nonsensical, the status text values are blank.
For instance, in the Note Panel, Bar:Beat:Tick and Pitch are displayed. In the Ruler panels, only Bar:Beat:Tick is displayed. In the left Piano Panel, only Pitch is displayed. In the Graphic Event panel, Bar:Beat:Tick and Event Value are displayed.
Chords Ruler and Note Time Ruler Panel
There are two rulers. The Chords Ruler displays chords and the playback location indicator. The Note Time Ruler displays bars and bar subdivisions. When zoomed-in, more subdivisions are displayed. When zoomed-out, fewer subdivisions are displayed.
![]()
Click or drag in the Chords Ruler to set the insertion point. If the song is playing, a Chords Ruler click will stop playback.
Double-click in the Chords Ruler to start playback at the indicated bar. You can also set the insertion point and then tap Control+F to start playback at the desired location.
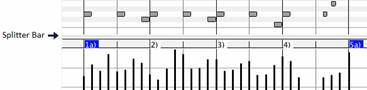
Splitter Bar
A Splitter Bar sits between the Note and Graphic Event panels. Drag the splitter bar down to maximize the Note Panel and drag it up to maximize the Graphic Event Panel.
Zoom Buttons
![]() These buttons will zoom the Note Panel vertically.
These buttons will zoom the Note Panel vertically.
![]() Select notes and click this button. The vertical pitch range and horizontal time range will adjust to fill the Note Panel with the selected notes.
Select notes and click this button. The vertical pitch range and horizontal time range will adjust to fill the Note Panel with the selected notes.
![]() This will return to the previous view range after zooming in on a region.
This will return to the previous view range after zooming in on a region.
![]() This will zoom the window so that all track notes are visible at a glance.
This will zoom the window so that all track notes are visible at a glance.
![]() These buttons will zoom the window horizontally.
These buttons will zoom the window horizontally.
Note Panel
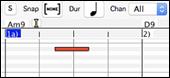
Horizontal bars represent notes. Notes can be selected, edited (start time, pitch, duration), inserted, and deleted.
Overlapped notes are displayed in bold aqua color, making them easy to identify. They can be eliminated from the right-click menu in this window.

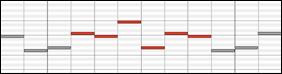
Note Selection
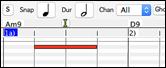
Selected notes are red.
1. Click on individual notes to select.
2. Shift-click on individual notes to add to the selection.
3. Command-click on a note to invert (toggle) its selection.
Click on white space and then drag a rectangle around notes to select a group of notes.
|
|
|
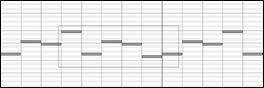
Note: Only notes that start within the rectangle are selected. If the left edge of a note is not inside the rectangle, it will not be selected.
1. Shift-drag a rectangle to add another group of notes to the selection.
2. Command-drag a rectangle to toggle the selection of the notes in the rectangle.
Notes can be selected with the Note Time Ruler.
1. Click-drag on the Note Time Ruler to select a time-range of notes.
2. Shift-click-drag to add a time-range of notes to the selection.
3. Command-click-drag to invert the note selection of a time range.
For instance, you could drag to select all notes in bars 2 thru 7. Then you could command-drag to toggle off note selections in bar 4. By using the shift and command keys, very flexible time selections can be made.
Edit Note Time
Hover the cursor over the left of a note. When the cursor becomes a left-right arrow ![]() , click-drag horizontally to a new time.
, click-drag horizontally to a new time.
|
|
|
If multiple notes are selected and you want to move all selected notes, use shift-click-drag. Otherwise, a click on a note will deselect the previous selection, and it will only select/edit the clicked note.
|
|
|


Edit Note Pitch
Hover the cursor over the middle of a note. When the cursor becomes an up-down arrow ![]() , click-drag vertically to a new pitch.
, click-drag vertically to a new pitch.
|
|
|
If multiple notes are selected and you want to transpose all selected notes, use shift-click-drag. Otherwise, a click on a note will deselect the previous selection, and it will only select/transpose the clicked note.
|
|
|
Edit Note Duration
Hover the cursor over the right of a note. When the cursor becomes a right arrow ![]() , click-drag horizontally to change the duration.
, click-drag horizontally to change the duration.
|
|
|

If multiple notes are selected and you want to change duration of all selected notes, use shift-click-drag. Otherwise, a click on a note will deselect the previous selection, and it will only select/edit the clicked note.
|
|
|
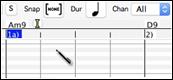
Insert a Note
When you hold the shift+command keys, the cursor becomes a pencil. Click where you want the note and it will be inserted with a duration from the “Dur” drop-down menu and on the channel selected by the “Chan” drop-down menu.
|
|
|
If “Snap” is enabled, the note is inserted at the nearest grid boundary. For instance, if the snap-to-grid setting is a quarter note, inserted notes will snap to the nearest quarter note boundary.
There are many on-screen visual cues to assist cursor positioning. The Cursor Position Time Markers in the Time Rulers can assist time positioning. The Cursor Pitch Marker in the Keyboard can assist pitch positioning. The Cursor Location Info Panel gives precise time and pitch info. Also, the Note Panel has time grid markings, and pitch accidentals are marked in light gray on the background.
Delete a Note
Select a note or multiple notes, then tap the fn+delete keys or choose Delete Selected Events from the right-click menu.
You can also use an eraser tool. Hold the shift+command keys and hover the cursor over a note. When the cursor becomes an eraser ![]() , click on a note to delete it. If multiple notes are selected, all selected notes will be deleted.
, click on a note to delete it. If multiple notes are selected, all selected notes will be deleted.
|
|
|

Graphic Event Panel

This panel graphically displays non-note MIDI events, which are specified in the Chan, View/Edit, and Controller Type controls.
Zero-value events are drawn as small hollow squares, to make them easy to identify.
When graphically inserting controller and pitch bend events, the event density is adjustable from one event per 1 tick up to one event per 30 ticks.
With events such as pitch bend or controllers like modulation and sustain, it is important to take care to end a “gesture” with a zero-value event. Otherwise, subsequent notes will be affected, with an unwanted “hanging” permanent pitch bend, permanent vibrato, or sustain pedal locked down.
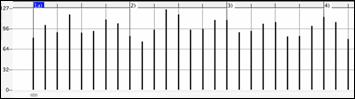
Velocity
![]() Set the “View/Edit” control to “Veocity,” and the velocity events will display in the Graphic Event panel.
Set the “View/Edit” control to “Veocity,” and the velocity events will display in the Graphic Event panel.
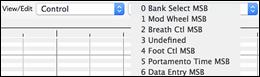
Controller Type
|
When “View/Edit” is set to “Control,” the Controller Type control becomes visible. The Graphic Event Panel will display the chosen controller type. If “Chan” is not set to “All,” only the selected channel events will be displayed. |
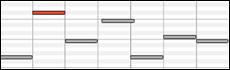
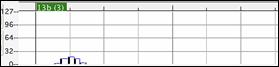
![]() Select “11 Expression MSB” in the Controller Type control.
Select “11 Expression MSB” in the Controller Type control.

The Expression controller is recognized by most modern synthesizers including most General MIDI synths. However, some older synths do not recognize this controller. Expression is an alternative to “7 Main Volume MSB.” Use the Expression controller for individual tracks and reserve the main Volume controller for overall track loudness. That way, you can use the Band-in-a-Box main window Volume controls without affecting individual notes in the track.
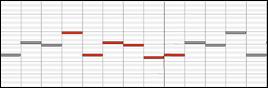
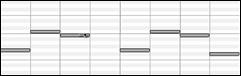
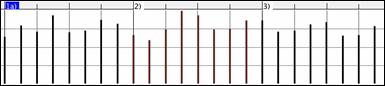
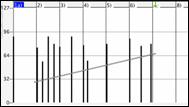
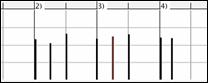
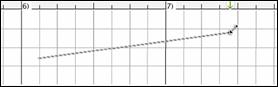
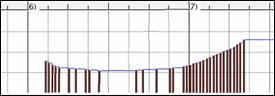
In the example shown, the intro flute ostinato pattern fades in, and then fades back out, via the expression controllers. These events were entered with the Line Tool. Notice that before the trumpet comes in, there is a single expression event of value 127, to kick the loudness up to normal.
Single controllers are inserted by moving the mouse cursor to the desired position and then clicking the mouse button.
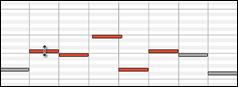
![]() Select “1 Mod Wheel MSB” in the Controller Type control.
Select “1 Mod Wheel MSB” in the Controller Type control.

The Modulation controller is not firmly defined, but it is usually a Vibrato or Tremolo effect (especially in General MIDI synths).
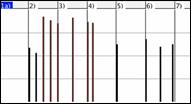
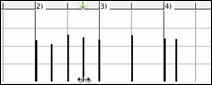
Play the demo song and watch how Modulation has been added to some notes to add Vibrato. It is usually best to use a modest amount. With graphic edits, too much is almost always too much!
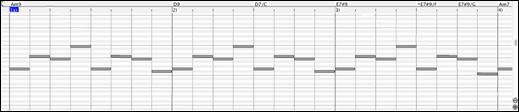
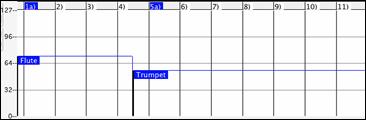
Program Change
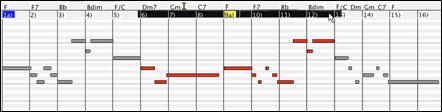
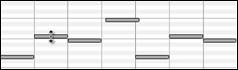
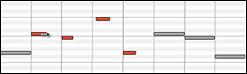
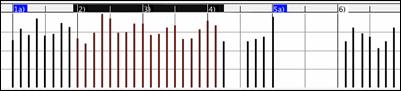
![]() Set the “View/Edit” control to “Program,” and the program changes will display in the Graphic Event Panel. The demo song intro has a flute program change. Then the first chorus is trumpet, the second chorus is flute, and the third chorus is soprano sax.
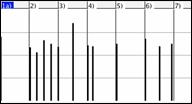
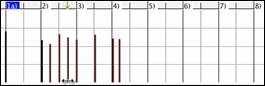
Set the “View/Edit” control to “Program,” and the program changes will display in the Graphic Event Panel. The demo song intro has a flute program change. Then the first chorus is trumpet, the second chorus is flute, and the third chorus is soprano sax.
Channel Aftertouch
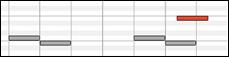
![]() Set the “View/Edit” control to “ChnAfter” and you can see the Channel Aftertouch events in the Graphic Event Panel.
Set the “View/Edit” control to “ChnAfter” and you can see the Channel Aftertouch events in the Graphic Event Panel.
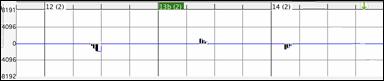
Pitch Bend
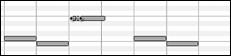
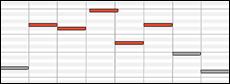
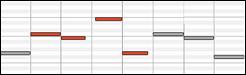
![]() Set the “View/Edit” control to “Pitch Bend.” Play the demo song and watch how a few pitch bends have been inserted to “scoop” some note attacks, “sting” the middle of a note, or “fall off” some note releases.
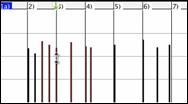
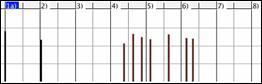
Set the “View/Edit” control to “Pitch Bend.” Play the demo song and watch how a few pitch bends have been inserted to “scoop” some note attacks, “sting” the middle of a note, or “fall off” some note releases.
Graphic Event Selection
Selected graphic events are red.
Graphic events can be selected with the Graphic Event Ruler.
![]()
Select the type of MIDI events specified in the Chan, View/Edit, and Controller Type controls. When you make a Ruler Time selection, ONLY THE VISIBLE events in this time range are selected. Other MIDI events in this time range are not selected.
Graphic Events Editing Modes
There are two modes for editing graphic events.
1. Add Mode
This will add/subtract the same amount to all selected events.
2. Scale Mode
This will scale the selected events. Select one or more Graphic Events and move the mouse over one of the events. Shift-drag vertically, and the events are scaled in a proportional fashion. Large-value events are scaled more than small-value events. This keeps the same shape of a gesture but makes the gesture bigger or smaller.
Velocity Line Tool
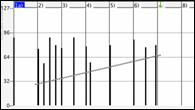
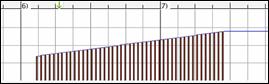
![]() With the Add Mode, note velocities will exactly match the slope of your drawn line.
With the Add Mode, note velocities will exactly match the slope of your drawn line.
 |
|
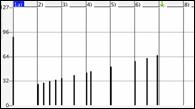 |
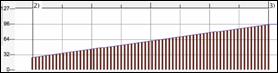
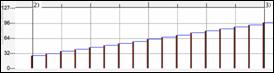
![]() With the Scale Mode, the Line Tool will shape the dynamics, but velocities are scaled to follow the approximate shape of your drawn line. With this mode, you can insert a Velocity fade, or change the velocity of a region, while preserving the Velocity dynamics of the music.
With the Scale Mode, the Line Tool will shape the dynamics, but velocities are scaled to follow the approximate shape of your drawn line. With this mode, you can insert a Velocity fade, or change the velocity of a region, while preserving the Velocity dynamics of the music.
 |
|
 |
Edit Graphic Event Value
Hover the cursor over the top half of an event. When the cursor becomes an up-down arrow ![]() , click-drag vertically to scale the event value.
, click-drag vertically to scale the event value.
 |
|
 |
To scale a selected group of events, shift-click-drag vertically on one of the events in the selection.
 |
|
 |
Edit Graphic Event Time
Hover the cursor over the bottom half of an event. When the cursor becomes a left-right arrow ![]() , click-drag horizontally to slide the event in time.
, click-drag horizontally to slide the event in time.
|
|
 |
To slide a selected group of events, shift-click-drag horizontally on one of the events in the selection.
 |
|
 |
Insert a Graphic Event
Line Tool
With no modifier keys, the “white space” cursor is a Line Tool. Move the cursor to white space and then click-drag to draw a line. When the mouse button is released, a series of events are inserted which follow the line slope.
 |
|
 |
To avoid choking the MIDI stream, the maximum event density is one event per 10 ticks. Repeated events of the same value are not inserted. Therefore, long gradual Line Tool fades have a lower density than short extreme Line Tool fades.
The Spacing controls how often the events are drawn. For example, if this is set to 30, events will be spaced apart by 30 sticks. |
|||
|
|
|
|
Pencil Tool
Move the cursor over white space and hold the shift+command keys. A Pencil Tool appears. Shift+command-drag to freehand-draw a curve. If you don’t get the curve quite right on the first pass, just keep holding the mouse button and move the mouse back-and-forth to draw your desired freehand curve. When the mouse button is released, a series of events are inserted to follow the freehand curve.
 |
|
 |
To avoid choking the MIDI stream, the maximum event density is one event per 10 ticks. Repeated events of the same value are not inserted. Therefore, many freehand curves have a fairly low density.
Delete a Graphic Event
Select an event or multiple events, then tap the fn+delete keys or choose Delete Selected Events from the right-click menu.
You can also use an eraser tool. Hold the shift+command keys and hover the cursor over an event. When the cursor becomes an eraser ![]() , click on an event to delete it. If multiple events are selected, all selected events will be deleted.
, click on an event to delete it. If multiple events are selected, all selected events will be deleted.
 |
|
 |
Right-Click Contextual Menu
The pop-up menu can be accessed by right-clicking on the notes, graphic events, or any of the rulers.
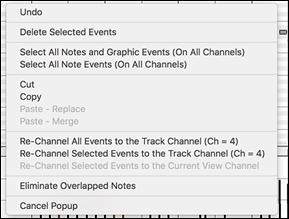
Undo:
Duplicates the Band-in-a-Box Edit | Undo (or command+Z) action.
Delete Selected Events:
Deletes any selected events (highlighted in red). This can also be accomplished by tapping the delete key.
Select All Notes and Graphic Events:
If the “Chan” combo box is set to “All,” this item will select ALL EVENTS on ALL CHANNELS (all events in the track). Otherwise, ALL EVENTS are selected which match the CURRENT MIDI CHANNEL.
Select All Note Events (Of Current Channel):(right-click the Note Panel or Note Ruler)
If the Chan combo box is set to All, this item will select ALL NOTES on ALL CHANNELS, but it will not select any non-note events. Otherwise, ALL NOTES are selected which match the CURRENT MIDI CHANNEL.
Select All Note Events (Of Current Channel):(right-click the Graphic Event Panel or Graphic Event Ruler)
If the “Chan” combo box is set to “All,” this item will select ALL GRAPHIC EVENTS of the CURRENT VIEW/EDIT TYPE on ALL CHANNELS. Otherwise, ALL GRAPHIC EVENTS of the CURRENT VIEW/EDIT TYPE are selected which match the CURRENT MIDI CHANNEL. For instance, you could select all channel 4 modulation events, then Delete, to easily remove all of those events from the track.
Cut:
Copy selected events to the clipboard and then remove them from the track. Can also be accomplished with the menu Edit | Cut (or command+X) action. If you wish, it is possible to cut from the Piano Roll, and then paste into the Notation window, or vice-versa.
Copy:
Copy selected events to the clipboard can also be accomplished with the menu Edit | Copy (or command+C) action. If you wish, it is possible to copy from the Piano Roll, and then paste into the Notation window, or vice-versa.
Paste - Replace: (If no events are on the clipboard, this item is dimmed.)
The paste occurs at the time location of your right-click. Move the mouse cursor to the desired insert location. Right-click on the Note Panel, Graphic Event Panel, or any of the Rulers. Then choose this item from the pop-up menu. Any previous event types in the paste range which match event types in the clipboard are removed before the clipboard data is added to the track.
If the “Chan” combo box is set to “All,” pasted events keep their original (copied) MIDI channel. Otherwise, the pasted events will be re-channeled to match the “Chan” combo box.
Paste - Merge: (If no events are on the clipboard, this item is dimmed.)
The paste occurs at the time location of your right-click. Move the mouse cursor to the desired insert location. Right-click on the Note Panel, Graphic Event Panel, or any of the Rulers. Then choose this item from the pop-up menu. Events from the clipboard are merged with existing data in the track.
If the “Chan” combo box is set to “All,” pasted events keep their original (copied) MIDI channel. Otherwise, the pasted events will be re-channeled to match the “Chan” combo box.
The feature can also be accomplished with the menu Edit | Paste (or command+V) action (to match the Notation window, which also uses a merge style of pasting). Before using the main menu Edit | Paste (or command+V), first make sure the insertion marker is set to your desired paste time location.
This is easy to do. Just click or drag in the Chord Ruler to place the insertion marker where you want it. Then tap command+V.
Re-Channel All Events to the Track Channel (Ch = xx)
Re-channel all notes and graphic events (the entire track) to the MIDI Output channel assigned for this track. Sometimes this can come in handy to bring some “sanity” into Piano Roll editing.
For instance, though the default Melody output channel might be channel 4, meaning that Band-in-a-Box transmits any events in the Melody track on channel 4. The actual events in the Melody track might be channel 1, or a mixture of several channels.
For ordinary playback or note tweaking, it doesn’t matter if the event channels are “mixed up,” as long as you have the view channel set to All. But if you wish to use Paste - Replace, the Paste - Replace function is smart enough not to “stomp on” a track’s events that differ from the channels of the clipboard MIDI data. So if you force all events to the track channel, the Paste - Replace function will always replace appropriately.
Re-Channel Selected Events to the Track Channel (Ch = xx)
Re-channel only the selected events to the track channel.
Re-Channel Selected Events to the View Channel
When editing a multi-channel guitar part or editing an imported multi-channel MIDI file, this command may be useful. Beware that it might initially appear confusing.
For instance, one might set the view channel to ALL, and make a selection (intending to set these events to Ch 12). Then set the view channel to 12, and of course the selected events disappear (if the events had some other MIDI Channel). But then when you invoke “Re-Channel Selected Events to the View Channel,” the MIDI events will reappear on the Piano Roll.
Eliminate Overlapped Notes
Overlapping notes are displayed in bold aqua color, making them easy to identify. Selecting this menu command will remove the overlap.
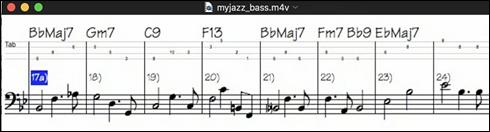
Save Notation Window as a Video
With previous versions of Band-in-a-Box, you could make a video of the Chord Sheet, showing the highlighted bars as the song is playing. Now, you can make a video of the Notation window. This is helpful if you have a melody or a RealChart (notation for RealTracks) that you would like to see on a video.
To make a video of the Notation window, press the [Save As] button and select Save as Video from the menu.
![]()
![]()
In the Make Notation Video dialog, select a track at the upper left corner. (Note: The dialog title says “Make Chord Sheet Video” until you select a track.)
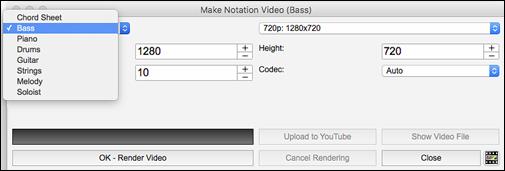
You can also set the dimension (width/height) of the video and select the number of frames per second and a specific codec.
Press the [OK - Render Video] button to start rendering the video. When the video has been created, press the [Show Video File] button.
![]() You can then double click on the file to watch the rendered video.
You can then double click on the file to watch the rendered video.
Improved GUI
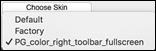
The Toolbar has been enhanced with skins support. Previously, the smaller toolbar buttons were black and white, but now there are various skin options for the buttons.
![]()
To choose a skin, open the Display Options dialog by clicking on the Chord Sheet and selecting the Display Options menu item, and press the [Choose Skin] button.
The Display Options dialog has more customizable color items: Mixer font, Song/Style bar buttons (Up), Song/Style bar buttons (Over), Song/Style bar labels, Track state muted, Track type combo, Track type empty, Track type MIDI, Track type Custom MIDI, Track type MIDI SuperTrack, Track type RealTracks, Track type RealDrums, Track type Artist Performance Track, Track type Audio, Track type UserTracks, and Track type disabled.

Improved Mixer
Soloing/Muting functions are improved.
Now you can change the solo and the mute status of other tracks by right-clicking on a blue mute button.
|
→ |
|
For example, if the Guitar track is in the solo status, when you right-click on the blue mute button on the Drums track, the Drums track will be un-muted AND the Guitar track will be un-soloed. |

The floating Mixer window now has opacity controls.
![]() Left-click on the buttons at the top right to change the opacity by a significant amount, or right-click on them to change it by a small amount.
Left-click on the buttons at the top right to change the opacity by a significant amount, or right-click on them to change it by a small amount.
Support for ABC Notation Format
ABC notation is the simple text-based notation system used by musicians worldwide to store chords, melody, and lyrics of songs. Now you can open and save songs in ABC notation format. You can find out more information about the songs and ABC notation at abcnotation.com.
To save the song in ABC notation format, press the [Save As] toolbar button and choose Save as ABC notation file from the menu.
![]()
![]()
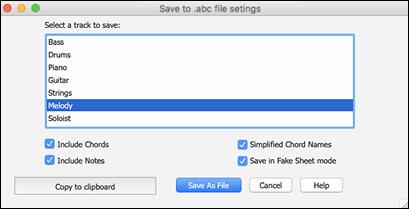
Select a track to save - Click on the track that you want to save in the file. This applies if “Include Notes” is enabled.
Include Chords - Check this to save chords in the file.
Include Notes - When this option is checked, notes on the selected track will be saved.
Simplified Chord Names - When this is enabled, complicated chords will be written as simplified names. For example, D7#5#9 will be written as D7.
Save in Fake Sheet mode - Enable this if you want to save repeats and endings in the file.
[Copy to clipboard] - Pressing this button will copy the file to the clipboard. You can then paste it into other programs.
[Save as File] - Press this button, and then you type a name and select the destination in your hard drive.
You can open an ABC notation file with the [Open] toolbar button.
![]() .
.![]()
Song Titles Browser Enhancements
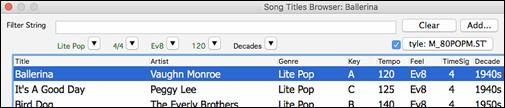
We’ve added 2,000 new song titles including requests from users, so there are now over 10,000 songs!
![]()
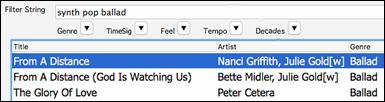
You can now filter the list by genres, time signature, feel, tempo, and decades.
![]()
The dialog can list song titles that will work with the current style.
![]()
Press the [style: ] button to filter the list by the genre, time signature, feel, and tempo of the current style. If the checkbox to the left of this button is enabled, then when you open the dialog, the list will be automatically filtered to show song titles that are similar to the current style.
Subgenres have been added for most song titles. Searching by a subgenre name in the text filter will display song titles in that subgenre.
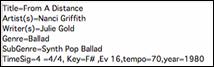
Recommendation of styles has been improved. When you select a song title and press the [OK - Find Matching Styles] button, the StylePicker dialog will open and show only styles that will work with that song title. This feature has been improved so that subgenres are also considered, so the style recommendations are more accurate.
StylePicker Enhancements
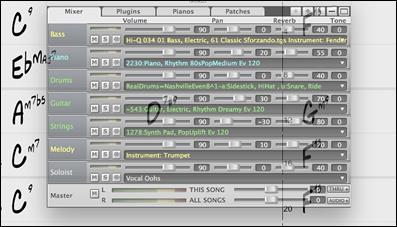
Mixer-like control shows what tracks and instruments are used in the currently selected style in the list and color-codes them according to the track types (MIDI, MIDI SuperTracks, or RealTracks).
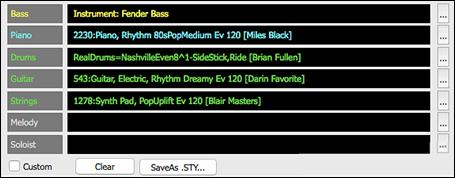
For each track, there is a menu button, which allows you to change the instrument, disable/enable the track, or perform other track actions. Previously, you had to close to the StylePicker window to do these.
When the track is customized, an asterisk will be added to the name.
![]()
![]() When the “Custom” option is checked, the tracks of the currently selected style will be overridden with the choices you have made.
When the “Custom” option is checked, the tracks of the currently selected style will be overridden with the choices you have made.
![]() The [Clear] button will clear any customized settings.
The [Clear] button will clear any customized settings.
![]() Press the [Save as .STY] button to save the style that you have customized. For example, you might add/remove a RealTracks and save that as a new style. When you save the style, it will be added to the StylePicker list.
Press the [Save as .STY] button to save the style that you have customized. For example, you might add/remove a RealTracks and save that as a new style. When you save the style, it will be added to the StylePicker list.
Recommendation of styles is improved when using the [Find Titles] button at the top right of the dialog. This also displays subgenres and makes it easier to find styles for a certain popular song.
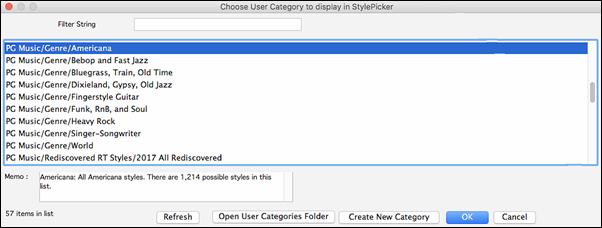
New user categories have been added, including Americana; Bebop and Fast Jazz; Bluegrass, Train, and Old Time; Dixieland, Gypsy, and Old Jazz; Fingerstyle Guitar; Funk, RnB, and Soul; Heavy Rock; Singer-Songwriter; and World.
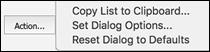
The buttons to copy the styles list to the clipboard, set the dialog options, and reset the dialog to defaults have been moved to the [Action] button menu.
The buttons to rebuild a complete or partial styles list have been combined into a single button.
![]()
Rebuilding the styles list also rebuilds lists in the RealTracks and RealDrums Picker dialogs.

The option to change the font size of the text in the styles list has been moved to the StylePicker Options dialog.
![]()
![]()
Renewed Render to Audio File Dialog
The dialog now has a simpler look and is easier to use.
|
You can open the dialog by selecting the Render Tracks to Audio with Options menu item from the [.WAV] toolbar button. |
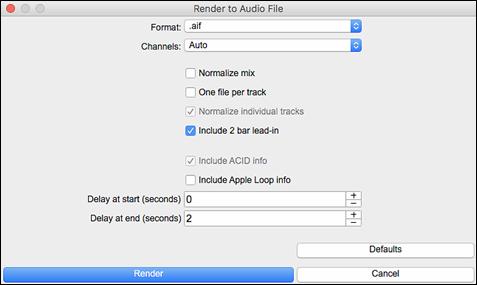
Format - Select the format of the audio file: WAV, AIF, or, M4A.
Channels - When “Auto” is selected, individual tracks will be rendered as either mono or stereo, depending on the original source. You can also force to render all tracks as stereo or mono.
Normalize mix - Enable this option if you want the audio file normalized. Normalizing boosts the volume to a maximum level without distortion, but it takes longer to render.
One file per track - If this option is enabled, you will get separate audio files, one for each track.
Normalize individual tracks - Enable this option if you want each track normalized individually. This applies if the “One file per track” option is enabled or when you drag and drop an individual track out of Band-in-a-Box.
Include 2 bar lead-in - If this option is disabled and there is no lead-in in the Melody track, the lead-in will be skipped in the rendered file.
Include ACID info - If you are rendering to a WAV audio file, you can include ACID information such as tempo, key, and time signature. The ACID information can be read by many DAW programs.
Include Apple Loop Info
If this is enabled, Apple® Loop information (tempo, key, and time signature) will be added to the AIFF audio file.
Delay at start (seconds) - This allows you to add silence in seconds at the start of the audio file.
Delay at end (seconds) - You can also add silence in seconds at the end of the audio file.
[Render] - To render the song, press this button and select the name and destination for the audio file.
RealDrums Picker Enhancements
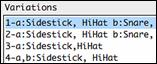
You can now demo individual variations of the RealDrums at the tempo closest to your current song by double-clicking on them.
The “Set” column shows “VID” if the video RealDrums is installed.

RealDrums QuickList
There is now a simpler dialog for choosing RealDrums, an alternative to the RealDrums Picker. It displays all available RealDrums in a simple list, which can be easily filtered by genre, time signature, feel, and more. The list can be set to show only RealDrums that are compatible with the current style of the song. You can also set the highlighted RealDrums as a prototype RealDrums to find alternates to that RealDrums.
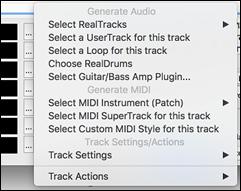
![]() To open the dialog, right-click on the Drums track button, and select [QuickList] RealDrums from the menu.
To open the dialog, right-click on the Drums track button, and select [QuickList] RealDrums from the menu.
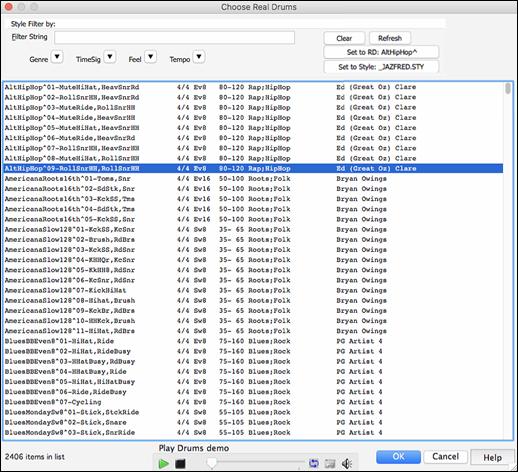
You can filter the list by genre, time signature, feel, tempo, and text. Press the [Set to Style: ] button to see RealDrums that are compatible with the current style of the song. The [Set to RD: ] button will set the highlighted RealDrums as a prototype RealDrums so you can find alternates to that RealDrums. Press the [Clear] button to clear any filter.

Audio Edit Window Enhancements
The Audio Edit window now has a nicer looking GUI, with a dedicated settings button and a [Marker Mode] button.
![]()
|
When you select the Audio Chord Wizard or UserTracks mode, the markers will be visible and editable. |
Editing features can now apply to the entire track. Before version 2018, you had to highlight a region to use editing features, but now if no region is highlighted, then they will apply to the entire track.
There are some items added to the [Edit] button menu.
|
Paste (Mix) - This will mix the audio from the clipboard with the existing audio instead of overwriting it. You will be given the option to set the percentage of the existing audio to keep and the pasted audio to mix in. Paste (Insert) - This will insert the audio from the clipboard to the current location, instead of overwriting the existing audio. The audio to the right of the insertion point will be shifted to make room for the new audio. Delete - This will delete the selected region of audio. Insert Silence - This will insert silence at the cursor. The duration of the silence inserted will be equal to the duration of the selected region. Convert Channels - If the audio is stereo, this will convert it to mono. If it’s mono, this will convert it to stereo. You will be given the option to set the percentage of the left and right channels to include. |
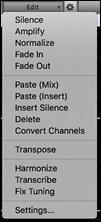
Transpose - This will transpose the audio by a specified number of cents.
Harmonize - This will add harmonies to audio.
Transcribe - This will transcribe the audio to the Melody or Soloist track as MIDI data.
Fix Tuning - This will automatically correct the tuning according to the key of your song. For example, in the key of C, if a C# is detected then it will be transposed down to C or up to D depending on which one is closer.
Guitar Window Enhancements
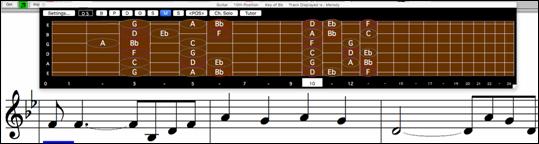
Clicking on the black area to the left of the zero fret notes in the Guitar window will delete the notes on just the channel of that string on the current notation time line rather than all notes at that time line.
Clicking on a note will delete the note from the Notation window if the note is currently highlighted. If no notes are highlighted in red, then clicking on a note will first delete any notes on the current notation timeline and channel before inserting a new note.
Big Piano Window Enhancements
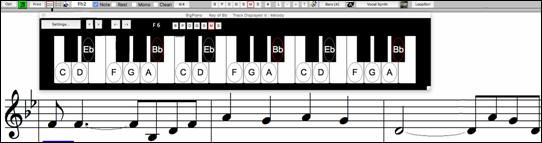
Clicking on the black area to the left of the piano will delete highlighted red notes from the Notation window. If no notes are highlighted in red, then clicking to the left of the piano will delete any note on the current notation timeline.
Clicking on a note will delete the note from the Notation window if the note is currently highlighted in red.
MIDI File Import Enhancement
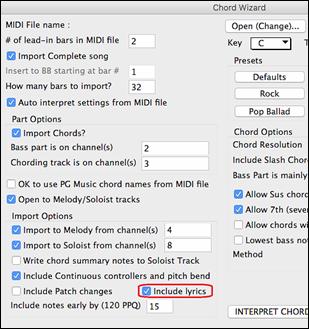
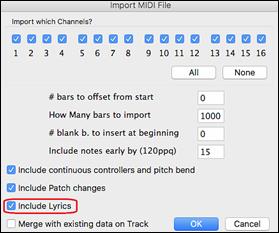
Now you can import lyrics from a MIDI file to your song. When you open the Chord Wizard or Import MIDI File dialog, you will see a new option to import lyrics.
|
|
Notation Window Enhancements
Notation supports 12/8, 9/8, and 6/8 time signatures. Previous versions of Band-in-a-Box only supported 3/4 or 4/4 notation. Now you can also select 12/8, 9/8, or 6/8. This is done by pressing the new button in the Notation window and selecting one of the time signatures from the list.

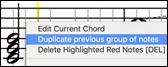
Duplicate previous group of notes lets you quickly duplicate the previous chord (a group of notes on the same location) without having to reenter it. This is a menu option added to the context menu in the Notation window.
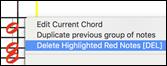
The [delete] key deletes all notes that are currently highlighted in red. This command is also added to the context menu in the Notation window.
The Staff Roll mode now has a context menu.
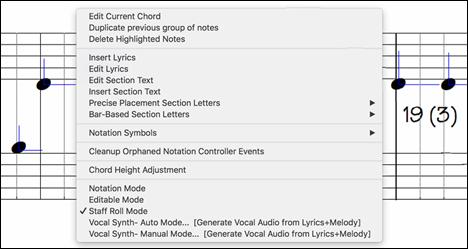
You can now enter Section Numbers. Previously, you could enter letters (A-Z) only, but now you can also enter numbers (1-9).
The vertical position of a dot of a dotted rest has been adjusted. A dot used to be drawn on the staff line, but it is now drawn between staff lines.
Old version: |
New version: |
When loading a MusicXML file, if more than 20% of notes are triplet notes, then the overall beat resolution will be automatically set to 3 in the Notation window.

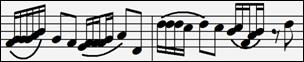
Improved algorithms are now used for drawing slurs. A slur will be drawn with a Bezier curve, which is especially helpful for notes being very close together.
Enhanced Flash Messages
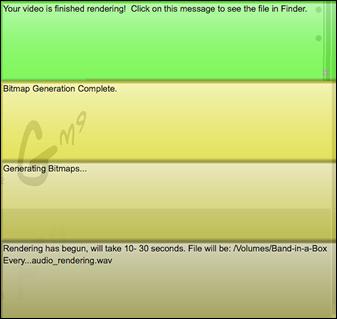
Flash messages are now brighter for clarity.
They also have a close button, which is useful for closing green flash messages without performing the action.
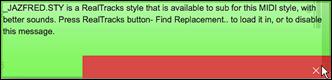
Up to 4 messages can be on the screen at once. Previously, only 2 messages could be shown.
And more!
Thank you for taking the time to read this introduction to Band-in-a-Box 2018!
Have Fun!
Unconditional 30-Day Money Back Guarantee on all PG Music products purchased from PG Music Inc.
PG Music Inc.
29 Cadillac Ave Victoria BC Canada V8Z 1T3
Sales: 800-268-6272, 250-475-2874,+ 800-4746-8742*
* Outside USA & Canada where International Freephone service is available.
Access Codes
Tech Support: Live Chat, support@pgmusic.com
 Online now
Need Help?
Customer Sales & Support
|
Phones (Pacific Time) 1-800-268-6272 1-250-475-2874 |
||
| Live Chat | ||
| OPEN | Online Ordering 24/7 |
|
| OPEN | Forums, email, web support |