
Search Manual
Band-in-a-Box® 2020 for Windows® User's Guide
Chapter 9: Automatic Music Features
Automatic Medleys - “The Medley Maker”
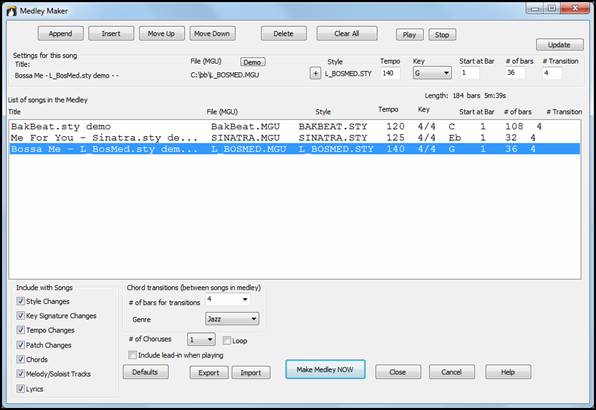
Would you like to make a medley of various Band-in-a-Box songs (MGU) using Band-in-a-Box? This is easily done with the Medley Maker. Inside the Medley Maker, simply select the songs that you want, and Band-in-a-Box will make the medley for you. A medley is not simply joining songs together. A good medley uses a transition between songs to introduce the new style, key, and tempo. The Medley Maker automatically creates a nice transition area for you, writing in chords that would smoothly modulate to the next song, style, key, and tempo!
|
To open the Medley Maker, click on the [Song Form] button in the Tools toolbar and choose Medley Maker from the menu. You can also go to menu File | Import | Medley Maker to open this dialog. |
 <
<
To make a medley,
- Add songs by pressing the [Append] or [Insert] button.
- Remove songs using [Delete].
- Change the order of the songs using [Move Up], [Move Down].
- For any song, customize using the “Settings for this song” group box, including changing the style, tempo, key, start bar, # of bars, and # of transition bars. Press [Update] to see your changes in the medley list.
- Choose the type of information to include with your medley (styles, key signature changes, lyrics, etc.) in the “Include with Songs” group box
- Choose a number of transition bars (the default is 4). Transition bars are automatic bars of chords inserted by Band-in-a-Box to transition from one song to the other, generating an “outro” and an “intro” between songs.
Press the [Make Medley NOW] button to generate a medley.
The maximum size of the medley is 255 bars (about 7 minutes).
![]() The current size and time of your medley is displayed in the Length label.
The current size and time of your medley is displayed in the Length label.
![]() You can have multiple choruses, so if you had 3 choruses of a 250-bar medley, it would last 750 bars.
You can have multiple choruses, so if you had 3 choruses of a 250-bar medley, it would last 750 bars.
Automatic Songs – “The Melodist”
Feel like composing a brand-new song? Using the “Melodist” feature, you can compose a new song in the style of your choice, complete with intro, chords, melody, arrangement, etc. All you have to do is choose from one of the many “Melodists” available and press [OK] button. The program then creates the intro, chords, melody, and arrangement in any given style. The Melodist will also generate a melody over an existing chord progression.
Once the song is generated, the chords and melody are part of the regular Band-in-Box tracks, and as such can be edited, printed, saved as MIDI file, etc. You can also regenerate any part of a song to further refine your Band-in-a-Box compositions.
A Melodist “Jukebox” mode creates and performs new compositions in succession. Besides the compositional advantages of the Melodist, utilizing this feature can also be a powerful practicing aid for improving your sight reading by reading the melodies generated in various keys using the Lead Sheet window, and improving your ear by playing along with the chord progressions in the generated songs using the ear training window.
This feature can be a powerful practicing aid for sight reading and improving your ear.
|
Press the [Melodist] toolbar button to launch the Generate Chords and/or Melody dialog. |

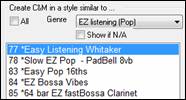
The left side of this screen displays the list of the Melodists available, including Pop, Swing, Bossa, Waltz, Rock, Bebop, and Jazz Ballad.
![]() Selecting the “All” checkbox displays all available Melodists, or they can be filtered by genre (e.g. Dixieland) to show only Melodists in that genre.
Selecting the “All” checkbox displays all available Melodists, or they can be filtered by genre (e.g. Dixieland) to show only Melodists in that genre.
 |
|
The Melodist will generate Intro, Chords, Melody Harmony, Style, and Solos using the group of settings preset with the selected Melodist.
Generate Chords / Generate Melody / Generate Intros / Auto-Titles
The items that are selected will be generated. The convenient preset buttons will automatically set the appropriate settings to popular presets.
|
The [Chords & Mel.] button will set the checkboxes to Generate Chords & Melody (but not Solos). The [All] button will generate Chords, Melody, and Solos. The [Chords] button sets the options to generate Chords only (no Melody). The [Melody] button will set the options to generate only a Melody (no chords) over an existing chord progression. |
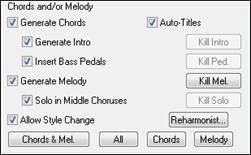
Insert Bass Pedals
When selected, a Pedal Bass figure will be inserted during the intro and at the end of sections.
Solo in Middle Choruses
This will generate an improvisation in the middle choruses of the song. Any Soloist can be selected.
Allow Style Change
When selected, this option allows a Melodist to load in an associated style. If you don’t want Melodists to change the current style that you have loaded, then de-select this option.
Form
![]()
This selection box allows you to choose between a song generated with a specific form (AABA 32 bars) or “free” form. The AABA defaults to 32-bar form, which is the most popular song form. If you’d prefer for the song to have no form, you could set the song to “no form” This wouldn’t be a very musical setting, but might be useful for practicing or ear training.
# Choruses
![]() This determines how many choruses of the song form (Melodies) are to be generated. For example, if set to 5, the Melodist will generate 5 choruses, enough for an intro chorus, ending chorus, and 3 Middle Choruses. The # choruses setting defaults to the # choruses present in the current song.
This determines how many choruses of the song form (Melodies) are to be generated. For example, if set to 5, the Melodist will generate 5 choruses, enough for an intro chorus, ending chorus, and 3 Middle Choruses. The # choruses setting defaults to the # choruses present in the current song.
Defaults
![]() This button sets the Melodist back to its default settings.
This button sets the Melodist back to its default settings.
Tempo / Auto Tempo
![]() The Tempo Setting determines the tempo of the song, and defaults to the current tempo of the previous song. If the “AutoTempo” is checked, the tempo will be set at the tempo range stored within that Melodist. For example, if a Melodist is called “Fast Waltz,” it would have a fast tempo range stored inside the Melodist, and the song would be generated at a fast tempo if the “AutoTempo” option is set.
The Tempo Setting determines the tempo of the song, and defaults to the current tempo of the previous song. If the “AutoTempo” is checked, the tempo will be set at the tempo range stored within that Melodist. For example, if a Melodist is called “Fast Waltz,” it would have a fast tempo range stored inside the Melodist, and the song would be generated at a fast tempo if the “AutoTempo” option is set.
A2 Transpose
 |
In songs with an AABA form, it is common for the second “A” section to be transposed. For example, the first “A” section might be in the key of Eb, and the second would be transposed up to the key of Gb. |
Melodists store these settings, and some Melodists are set to transpose the A2 sections. If you don’t want to allow Melodists to transpose the form in this way, set the A2 transpose to none. If set to “section plus,” it will transpose the A2 section, and might also transpose 2 bars early or 2 bars late. The song will only get transposed if the particular Melodist is set to transpose the section. This feature is discussed in more detail in the Melody Maker section.
Key
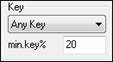 |
This area determines the key for the song. If set to “Any Key” the program will randomly pick a key for the song, weighed more heavily toward the popular keys (C, F, etc.). “min. key%” determines what % of songs are generated in minor keys vs. major keys. If set to 20, then 20% of the songs would be generated in minor keys. |
Part of Song / Whole Song
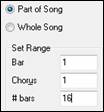 |
Select whether you want to generate the Whole Song or just part of it. If you select Part of Song, you can specify which bar and chorus to start at, and how many bars to generate. |
Replace Thru form
![]() If you have set the Melodist to “Generate Part of Song” you might choose to generate only bars 5 and 6 of the song form in the “A” section of an AABA form. If the form of the song is AABA, you’d normally want the regenerated section to be repeated throughout the form in all of the “A” sections. This option will instruct the Melodist to copy the generated bars 5 and 6 to the other “A” sections (bars 13 and 14 and bars 29 and 30).
If you have set the Melodist to “Generate Part of Song” you might choose to generate only bars 5 and 6 of the song form in the “A” section of an AABA form. If the form of the song is AABA, you’d normally want the regenerated section to be repeated throughout the form in all of the “A” sections. This option will instruct the Melodist to copy the generated bars 5 and 6 to the other “A” sections (bars 13 and 14 and bars 29 and 30).
Search / Go To #
 |
Press the [Search] button and type in part of a Melodist name, memo, style name, or other text associated with a Melodist. This will cause the Melodist selection to change to the next item containing the text. Similarly, you can type in a # of a Melodist and press the [Go To #] button. |
Memo / Database
![]()
The Memo area displays a memo for the current Melodist, as well as the name of the database (e.g. MELPOP1.ST2) used for that Melodist.
Instrument / Harmony / Style / Change Instruments

Melodists can store patch and harmony settings, and these are displayed in the Instrument area of the Melodist selection screen. By default, Melodists use RealStyles instead of MIDI styles, but if you prefer the MIDI styles, disable the “Use RealStyles” checkbox. You can also set the instrument to change each chorus. You can override the settings of the current Melodist and choose your own patch, harmony and change instrument settings in these controls.
Melodist Juke Box
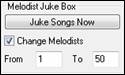 |
Press [Juke Songs Now] button to launch the Melodist Jukebox. It will continuously generate new songs and play them in Jukebox fashion. Using the “From…To”setting, you can set the range of Melodists to include in the Jukebox or keep the Jukebox on the same Melodist by deselecting “Change Melodists.” |
Write to track
![]()
Usually, the Melodist is written to the Melody track. If you prefer the Melody to be written to the Soloist track, perhaps as a counter-melody, then change this setting to Soloist.
Favorite Melodists
![]() The Favorites button allows you to pick a Melodist that you’ve used recently.
The Favorites button allows you to pick a Melodist that you’ve used recently.
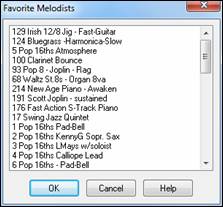 |
The Favorite Melodists dialog keeps track of the last 50 melodists that you’ve used, so you can easily recall them. Highlight the melodist you want to use and press the [OK] button or double-click on the selection you would like to make. |
Melody Maker
If you’d like to create your own Melodists, or permanently change the settings of existing Melodists, press the [Edit…] button to launch the Melodist Maker. |
Automatic Intro – Song Intros
With a single button, you can generate a 2, 4, or 8-bar intro for any song. The chords will be different each time, and you can keep pressing until you get the progression that you want. The intro generated is an appropriate chord progression in the chosen style of music (e.g. Jazz/Pop), with optional pedal bass, and leads correctly to the first chord of the song. Intros can also be removed.
Press the [Song Form] toolbar button and select Generate Intro from the pulldown menu. You can also select menu Edit | Song Form | Intro Bars. This will open the Generate Chords for Intro dialog. |
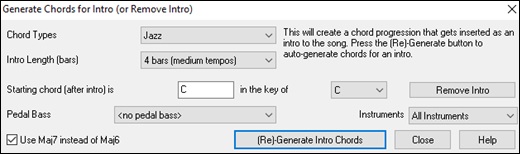
[(Re)-Generate Intro Chords] - Pressing this button will insert or replace an intro in the song, with the given settings.
Chord Types - You can choose between Jazz and Pop styles of chords.
Intro Length (bars) - This sets the duration of the intro to 2, 4, or 8 bars.
Starting chord (after intro) is - This setting assures the generated intro smoothly transitions into the song.
[Remove Intro] - Pressing this button removes the intro.
Pedal Bass - Inserts a pedal bass figure throughout the intro.
Use Maj7 instead of Maj6 - Choose between using Maj7 or Maj6 chords.
Instruments - You can have the intro be played by the whole band, drum only, or bass and drum only.
Automatic Song Title Generation
The Song Title generator names every song that the Melodist writes, if the Auto-Titles checkbox is selected. This feature can be used on its own to suggest titles for your own compositions. It will keep making titles until you get one you like.
| |
Press the [Generate Title] button and select the menu command Auto-generate a song title. |
A new title will appear immediately in the title area of the screen. Select Edit | Undo Title to go back one title.
![]()
Customizing the song title generator
These word lists stored in a text file called titl1.txt. This file has several sections, each with two sets of words that will be put together. You can add new sections, with an adjective section and a noun section. Please see the comments included in the file TITL1.TXT for details on adding text to the file.
Automatic Sound Track Generator - “SoundTrack”
The SoundTrack feature allows you to generate music in the style you choose for any length of time you specify. As the “producer,” you select the genre, length of time, instruments, and fade-in/fade-out options. The SoundTrack adjusts the tempo and duration to match the settings, and then allows you to save the file as a WAV, WMA (Windows® Media Audio), or MP3 file for further use in your own projects.
Generate original music (over 20 genres) or select from over 50 supplied SoundTrack types (Bluesy/Excite/Healing/Jazzy/Tropics, etc.). For example, you can generate a 30-second audio music clip in the genre of your choice in just a few seconds!
To use the SoundTrack feature, choose the Melody | Generate Soundtrack menu item.
![]()
![]()
You will then see the Generate SoundTrack window.
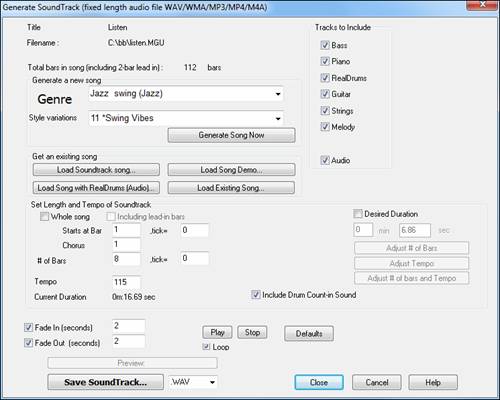
First, you should load in a song. There are several types of songs that you can load in:
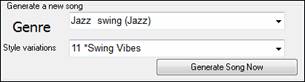 |
You can generate a brand-new-royalty free composition by pressing the [Generate Song Now] button, after choosing a Genre and variation. |
![]() You can choose from over 100 premade “SoundTrack” compositions that we have made. These are designed to be suitable for background music for various uses.
You can choose from over 100 premade “SoundTrack” compositions that we have made. These are designed to be suitable for background music for various uses.
![]()
![]()
![]()
You can load in existing songs, song demos that we have provided for the styles, or songs that have RealDrums, or finally there is a button to load in any song. Please note, if using an existing song (composed by someone else), make sure that you have sufficient rights to use the song for your project.
Once you have loaded in a song, you can now choose a portion of the song to use for your project. Assume that you want a 30 second clip of music. |
|
![]() Then press the [Adjust # of bars and Tempo] button. This will give a number of bars at a tempo that closely matches your current settings, which will last 30 seconds.
Then press the [Adjust # of bars and Tempo] button. This will give a number of bars at a tempo that closely matches your current settings, which will last 30 seconds.
Adjust the “Starts at Bar” of the music. To start at the beginning, choose bar 1. |
|
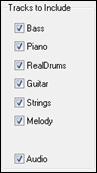
You can choose which instruments to include in the arrangement. |
|
Set Fade-in and Fade-Out options in seconds for the audio clip. |
|
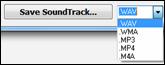
Now, generate your SoundTrack file by pressing the [Save SoundTrack] button and choosing a file format (WAV, WMA, MP3, MP4 or M4A). |
![]() You can hear your finished audio clip by pressing the [Preview] button.
You can hear your finished audio clip by pressing the [Preview] button.
Automatic Solo Generation – “The Soloist”
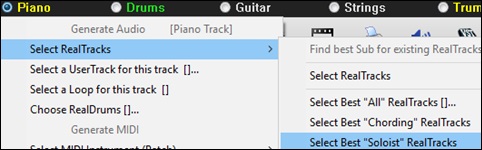
There are two ways to select and add a solo to your song. The “Best Soloist” feature presents a pre-selected list of soloists to choose from. The Select Soloist dialog gives you the full list of soloists to choose from, plus additional settings you can apply to the solo. Clicking on the [Soloist] toolbar button shows the two choices.

Pick “Best” Soloist RealTracks
This dialog shows you the best soloists that match the genre, tempo, and feel of your song. The list is displayed from best to worst. For example, if you have a Jazz Ballad style loaded (tempo 60), the list will show jazz Soloists that will work well at a tempo of 60 at the top of the list, and something like a fast, Heavy Metal Guitar Soloist at the bottom of the list.
How to Use This Feature
To add a Best Soloist to the Soloist track, press the [Soloist] button, and choose the menu option Add Best RealTracks Soloist to Soloist Track. Or Shift+click on the [Soloist] button.
![]()
To add a best Soloist to any track, right-click (or double-click) on the instrument radio button (e.g. Piano) and choose the Select Soloist | RealTracks Select Best Soloist RealTracks menu command.
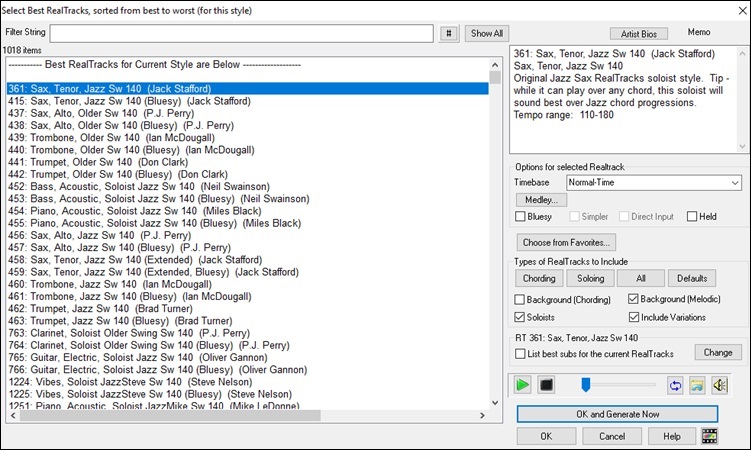
You will then see a dialog that lists the best soloists for the current style.
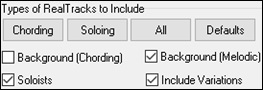 |
It will include “Soloists” and “Background (Melodic).” You can de-select these if you only want to see only “Soloists” (and not “Background”). |
![]() You can audition the RealTracks by double-clicking on the list or using the transport control buttons.
You can audition the RealTracks by double-clicking on the list or using the transport control buttons.
![]()
If you want to filter the list, enter text or press the [#] button.
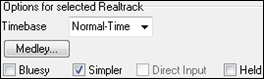
|
You can choose options (timebase, bluesy, simple, etc.) for the selected RealTrack. |
|
Enabling the "List best subs for the current RealTracks" option will list RealTracks that are similar to the currently selected RealTracks. |
Pressing the [Artist Bios] button opens the Artist Browser which lists all RealDrums artists and allows you to see more info.
Select Soloist Dialog
To select a pre-made Soloist, press Shift+F4, or choose Soloist | Generate and Play a Solo. The Select Soloist dialog opens.
You can also Ctrl+click on the [Soloist] button, or select Open Soloist Dialog to choose MIDI or RealTracks Soloist from the Soloist button dropdown menu.

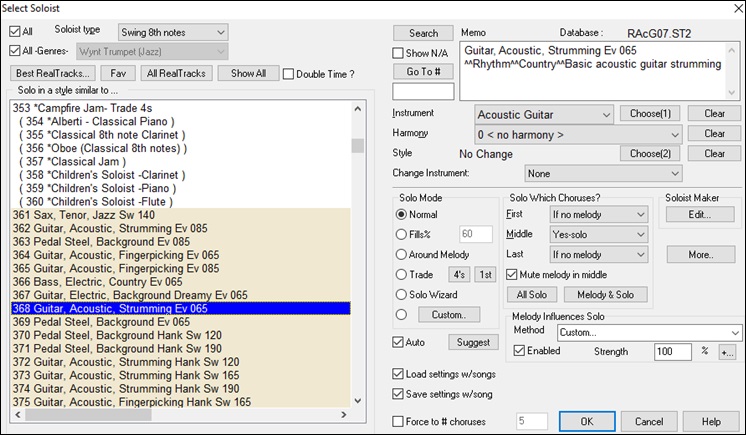
Pick a type of Soloist in the “Soloist type” list box and choose the appropriate style or enable the “Auto” checkbox and press the [Suggest] button next to it. This brings up a list of Soloists in that style; simply choose which one you like.
 |
You can select genres of soloists (e.g. Modern Jazz) and see only soloists in that genre. To do this, de-select the “All Genres” checkbox, and then check on the genre that you are interested in. |
![]() The [Fav] button brings up a list of the most recently used (favorite) 50 Soloists. The Soloists that you use most often will likely be at or near the top of this list, making it easier to select the Soloist you want than scrolling through your entire list of available Soloists.
The [Fav] button brings up a list of the most recently used (favorite) 50 Soloists. The Soloists that you use most often will likely be at or near the top of this list, making it easier to select the Soloist you want than scrolling through your entire list of available Soloists.
![]() Enable the “Double Time?” option if you want a double-time solo; 16th notes instead of 8ths.
Enable the “Double Time?” option if you want a double-time solo; 16th notes instead of 8ths.
![]() You can choose whether the list shows soloists from Soloist sets that you don’t have.
You can choose whether the list shows soloists from Soloist sets that you don’t have.
![]() If you can’t find the Soloist you’re looking for, press the [Search] button and type in part of a name.
If you can’t find the Soloist you’re looking for, press the [Search] button and type in part of a name.
| |
[Go To #] allows you to select from the list exactly which Soloist to choose (if known). |
The “Memo” field has a brief description of the Soloist style, and the name of the current database is shown.

The pre-made Soloists may set the style, instrument, and harmony, but you can change these settings to your own choices.
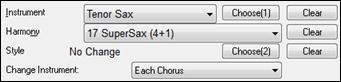
![]() The [Clear] buttons will remove the currently selected Instrument, Harmony, or Style.
The [Clear] buttons will remove the currently selected Instrument, Harmony, or Style.
![]() Use the [Choose(1)] button to select an instrument and automatically set the soloist note range for that instrument.
Use the [Choose(1)] button to select an instrument and automatically set the soloist note range for that instrument.
![]() For a harmonized solo, choose a harmony from the Harmony list.
For a harmonized solo, choose a harmony from the Harmony list.
![]() Use the [Choose(2)] button to select any style from the C:\bb\Styles folder.
Use the [Choose(2)] button to select any style from the C:\bb\Styles folder.
“Real” instruments replace the MIDI track for that instrument and can be controlled just like the MIDI instrument (volume changes, muting etc.). Best of all, they follow the chord progression that you have entered, so that you hear an authentic audio accompaniment to your song. These are not “samples,” but are full recordings, lasting from 1 to 8 bars at a time, playing along in perfect sync with the other Band-in-a-Box tracks. RealTracks can be generated to the Soloist (or Melody) track.
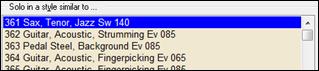
Get to Soloists of #361 and above. You can do that either by:
 Typing 361 and pressing [Go To #].
 Pressing the [All RealTracks] button.
 Unchecking “All Genres” and selecting “RealTracks (audio soloists)” from the list of genres.
![]() As with other Soloists, press the [All Solo] button to make sure that the Soloist will be generated for all choruses, or [Melody & Solo] if you just want the Soloist for a certain chorus.
As with other Soloists, press the [All Solo] button to make sure that the Soloist will be generated for all choruses, or [Melody & Solo] if you just want the Soloist for a certain chorus.
![]() Your RealTracks solo will be saved with the song, and the Soloist track will be frozen and marked with an asterisk (*).
Your RealTracks solo will be saved with the song, and the Soloist track will be frozen and marked with an asterisk (*).
Soloists generated with RealTracks are saved with the song, so you will hear the RealTracks play the same solo when you reload the song.
|
In Normal Solo Mode, Band-in-a-Box solos in the normal way of improvising choruses of the song. |
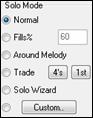
Around Melody To solo around the Melody, do the following:
- Open a song that has a Melody, preferably a sparse Melody with some space in it so that a Soloist might be able to “jump in.”
- Press the [Soloist] button. Select the Solo Mode “Around Melody.”
- Set the Soloist to play in All Choruses and uncheck the “Mute Melody in Middle” option.
- Press [OK] and the Solo will be generated, playing riffs at times when the Melody isn’t playing.
Trade There is a type of soloing where different soloists trade phrases. For example, “trading fours” refers to a solo lasting four bars, usually followed by a different melodic solo or drum solo for the next four bars. Band-in-a-Box can trade 2, 4, or 8-bar phrases. This means that you can alternate your own phrases with those played by the Soloist. Click on the number button beside the “Trade” radio button to toggle between trading 2’s, 4’s, or 8’s. Band-in-a-Box can generate the first phrase or the second phrase.
Soloist Wizard This option in the Select Soloist dialog enables the Soloist Wizard. As you play notes on either a MIDI keyboard connected to the computer or on the QWERTY keyboard, the program will play correct notes in the style of the current Soloist! This means that you can play a “perfect” solo every time, simply by pressing any key on your MIDI keyboard or QWERTY keys.
Custom Solo Generation
The [Custom] button launches the Generate Solo for a Specific Range of Bars dialog. This allows you to set the range for the solo.
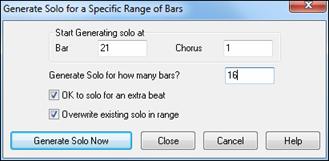 |
Tip: You can have these values preset to the values you’d like by first selecting/highlighting the range of bars that you’d like from the Chord Sheet screen, then clicking on the Soloist button. |
OK to solo for an extra beat - Usually, Soloists end a little after a bar’s end – they play a couple of extra notes, spilling over to the next bar. Selecting this option gives Band-in-a-Box soloist this ability also.
Overwrite existing solo in range - If you want to “overdub” a solo and have multiple solo tracks going at once, deselect this checkbox, and avoid getting a little messy.
Generate Solo Now - Once you press this button, the portion of the solo that you have selected will be generated. The song will start playing two bars before the new part, so you can quickly hear the new solo. Remember that the custom solo generation can be used with different soloists, so you can use a “tenor sax jazz” soloist for a few bars, and then insert a custom “bluegrass banjo” soloist for four bars and so on.
Auto-Suggest
If the “Auto” checkbox in the Select Soloist Dialog is on, you will find that an appropriate soloist is already selected for you. If you would like a different
soloist, press the [Suggest] button and Band-in-a-Box will suggest another appropriate choice. Keep pressing until you are satisfied with the choice.
Load/Save settings w/song
These settings allow the saving and loading of Soloist settings. Enable these checkboxes if you wish to load and save these settings with a song.
Force to # of Choruses
Allows you to set a song to a definable number of choruses (e.g. 5) so that there are enough choruses for everyone to take a turn Soloing. This box allows you to quickly decide how many choruses you would like Band-in-a-Box to generate without having to open the Play | Looping | Force loaded songs to # choruses menu item. The default is 5. Note that when this setting is enabled (by setting the checkbox to “true”), all songs subsequently loaded using this Soloist will also change to the number of choruses indicated in this box.
Solo Which Choruses?
Select which choruses you would like the Soloist to solo over. Choose from first, middle, last, any combination, or all three choruses.
Press the [All Solo] button if you wish to have the Soloist play over everything.
Press the [Melody & Solo] button to have the Melody play the first chorus, then have the Soloist come in on the second chorus, then have the Melody “play the tune out” on the last chorus.
Melody Influenced Solos
When musicians solo for a song, the solo is typically influenced by the melody as well as the chords. Band-in-a-Box can also allow the melody to influence the type of solo generated by its Soloist feature. The result is a much better solo generated for the song.
|
A strength (%) setting allows you to control how much the solo will be influenced by the melody. Choose the melody influence (%), and one of several presets to control the type of influence (pitches/rhythms/note density, etc.). |
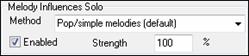
![]() To generate a solo that is influenced by the Melody, select the “Enabled” checkbox.
To generate a solo that is influenced by the Melody, select the “Enabled” checkbox.
|
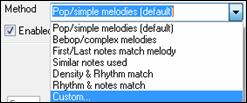
Then choose the type of influence by choosing a strength (0 to 100%) and a type. The default method works best on simple melodies or Pop tunes, and others work on Jazz and complex melodies. |
Melody Influenced Soloist Settings
A “Custom” method is available, allowing you to launch a dialog that lets you change various parameters to control how the solo will match the notes, rhythm, and density of the melody. When this method is selected a [+...] button will display.
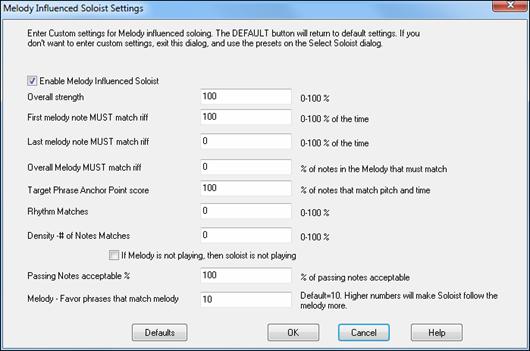
![]() Click on this button to open the Melody Influenced Soloist Settings dialog.
Click on this button to open the Melody Influenced Soloist Settings dialog.
Enable Melody Influenced Soloist – enables melody influenced soloing when selected (true).
Overall strength – how much you want the melody to influence the solo.
First melody note MUST match riff – the first note of the riff must match the pitch of the melody at this point in the song.
Last melody note MUST match riff - the last note of the riff must match the pitch of the melody at this point in the song.
Overall Melody MUST match riff – the pitch needs to be found somewhere in the riff for this condition to be true.
Target Phrase Anchor Point score – phrase anchor points are points where both the pitch and timing of the Melody note and the riff match each other.
Rhythm Matches – per cent of time that a melody note is found at the same time as the note in the riff at the same point (pitch is irrelevant).
Density -# of Notes Matches – the number of notes in the melody compared to the number of notes in the solo. For example, 8 melody, 10 solo = 80%. Note: If set to exactly 49, 59, 69 etc., soloist will stay quieter when the melody is not playing.
If Melody is not playing, then soloist is not playing
Passing Notes acceptable % - percentage of time that passing notes in the riff are OK (if not found in the melody). For example, a setting of 20% means it is OK if 20% of the notes are passing notes.
Melody – Favor phrases that match melody – higher numbers will make the soloist follow the melody more.
Soloist Maker
|
The Soloist Maker [Edit] button launches the Soloist Maker module where you can make your own or modify an existing Soloist. This feature allows you to define your own Soloists. |
More Soloist Settings
![]() This button launches the More Soloist & Melodist Settings dialog. This dialog can also be accessed from the Options | Preferences [Soloist] button.
This button launches the More Soloist & Melodist Settings dialog. This dialog can also be accessed from the Options | Preferences [Soloist] button.
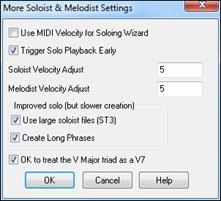 |
Set “Use MIDI Volume for Soloing Wizard” to true if you want MIDI velocity information sent to the Soloing Wizard. If you have a velocity sensitive MIDI device attached to your computer and you want to control the dynamics of the Soloist, you should enable this feature. Set the “Trigger Playback Early” to true to enable song playback to start before the Soloist has actually completed composing a solo. Otherwise, Band-in-a-Box will completely compose a solo before song playback begins. |
Soloist/Melody Velocity Adjust This box allows you to quickly boost or reduce the volume of the Soloist part relative to the other instrument parts. For a realistic mix the soloist instrument is set slightly louder than the other instruments/parts in a song. The default is 5.
Use large soloist files (ST3) is selected to use the optional large soloist databases, *.ST3 files, instead of the smaller ST2 files. The ST3 files have improved phrases, but the solos take longer to create.
Create Long Phrases Set this checkbox to “true” (enabled) if you would like the Soloist to use the longest musical phrases it “knows.”
If OK to treat the V Major triad as a V7 is set, all Jazz MIDI soloists and some Jazz and Country RealSoloists will treat the V chord as V7 (dominant seventh).
Using the Soloist Feature
- Generate a Soloist and practice the solo by looping it, slowing it down, or printing it out, until you can perform a great solo on any chord changes!
- Generate a Soloist and attach a Harmony such as “Big Band Brass” to create phenomenally quick and interesting Big Band Arrangements automatically. Generate a standard MIDI file or print them out for you and your friends.
- Have the Soloist play a solo according to your accompaniment and arrangement (along with the other members of your Band-in-a-Box, of course!)
- Trade 4’s in a call-response fashion with the Soloist (you solo for 4 bars, Band-in-a-Box solos for 4 bars, etc.)
- Concentrate separately on different aspects of your playing with assistance from the “Wizard.” From soloing with proper phrasing and “feel” (the best notes are included automatically) to accompanying a soloist with confidence and authority.Tip: Try muting out one of the tracks such as the piano or guitar track and play along to the Soloist in a supportive role - it’s fun!
- Use the Soloist track to record another part in addition to the Melody and other parts provided by Band-in-a-Box.
- Generate a Soloist on chords/keys that you would like to practice. Band-in-a-Box will play and solo with you all day without getting bored. For example, if you want to work on your II-V7-I progressions (“two-five-one”), you can just type the chords you want, and generate a solo to play over those changes. As the solo plays, you see the notation, can you can sight read along. Pressing the “Loop Screen” checkbox on the notation will loop the notation the screen so you can master each 4-bar phrase (II-V-I) and then move ahead to the next one!
1. The Soloist has its own separate channel and settings. But when the Soloist uses a harmony, it becomes linked to the Thru Harmony channels and settings. Since we are already using 12 of the available 16 MIDI channels in Band-in-a-Box, we didn’t want to use up another 2 channels on dedicated Soloist Harmony channels. So, if you want to hear a Soloist with harmony, use the THRU Harmony settings. In other words, wherever a Thru harmony is selected, the Soloist track will use the Thru Harmony settings.
2. We have designed the Soloist to not repeat any solo ideas so that the solos are always fresh, with new ideas forming and playing all the time. As a result, we have included a refresh Soloist menu item (under the Soloist menu) that, when selected, will allow the Soloist to think about all of its musical notions again.
Choosing the Refresh Soloist option is like telling the soloist “It’s O.K., you can play whatever you like, even if it’s something that you played 5 minutes ago...” It’s a good idea to refresh the Soloist regularly to ensure maximum “idea” availability.
3. The Soloist menu contains many options. It has all of the same editing options found in the melody menu, so you can treat the Soloist track as a 2nd melody track. Even if you don’t plan on using the Automatic Soloist feature, you can just use the Soloist track as a 2nd track for counter melodies, overdubs etc. The result: two melody tracks, two solo tracks, or one melody and one solo track all at your disposal for any song, without having to resort to an outboard sequencer.
Auto Piano Hand-splitting
This feature applies to the Piano, Melody, and Soloist tracks. It is found in the Notation Window Options and in both the Melody and Soloist menus.
Piano Track (Notation Options)
![]() The Piano track can be displayed on both clefs, using intelligent hand-splitting routines that dynamically change the split point. This happens automatically.
The Piano track can be displayed on both clefs, using intelligent hand-splitting routines that dynamically change the split point. This happens automatically.
When you do this, the Piano track (not any other track) will be displayed on both clefs with intelligent hand-splitting. You can print out the Piano track with the hands separated.
Melody and Soloist Tracks
You can also manually split a piano part on the Melody or Soloist track using the intelligent hand-splitting routines. The left/right hands display in red/blue on the big piano, and on bass/treble clefs on the notation. Import a piano MIDI file to the Melody track to get a split-hands display and printout!
![]()
![]()
![]()
For example, if you have a MIDI file that is a solo piano piece, File | Open MIDI file will put the music on the Melody track. Then choose Melody | Edit Melody Track | Piano Hand Split. Make sure that Melody | Track Type is set to piano. You will then see the piano part split intelligently into 2 hands.
When this is done, the left hand will be stored on channel 8, and the right hand on channel 9, on the Melody track. You can export the MIDI file to a sequencer, and these 8/9 channel assignments will be preserved.
Automatic Guitar Solos – “The Guitarist”
The Guitarist allows you to generate a guitar chord solo for any melody. Band-in-a-Box will intelligently arrange the melody to a guitar chord solo by inserting real guitar voicings throughout the piece. You can select from among many “Guitarists” in order to create your arrangement. You can also define your own Guitarists; choosing parameters such as strum speed, types of voicings (Pop/Jazz), embellishments, and much more.
|
Guitar Solos are selected from the Guitar window, which opens with the [Guitar] button. |
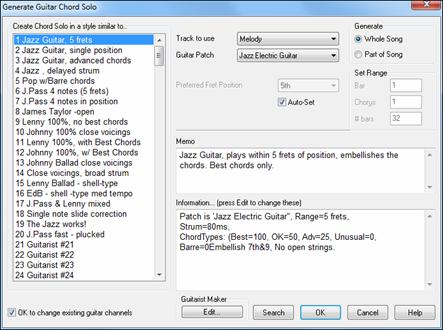
![]() Press the [Ch Sol…] button to open the Generate Guitar Chord Solo dialog.
Press the [Ch Sol…] button to open the Generate Guitar Chord Solo dialog.
It is also accessible from the Melody | Edit Melody Track | Generate Chord Solo menu item.
Here are the steps to generate a Guitar Chord Solo:
1. Select the Guitarist to use.
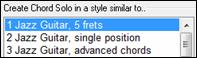
In the main list at the left of the Window, you see the list of the Guitarists that are already defined. For example, you can see that Guitarist #2 is called “Jazz Guitar, single position.” That will create chord solos that stick to a single position on the guitar neck whenever possible.
2. Select Melody (or Soloist) track.
![]()
Normally, the Guitar Chord solo is written to the Melody track, but you can also select the Soloist track as the destination.
3. Confirm the Guitar Patch selection.
![]()
The Guitarist that you pick (see item #1) will already have chosen the guitar patch to use, but you can override it with this setting.
4. Select the Range of the song to use.

You can either generate a chord solo for the whole song, or just a region of the song. In either case, remember that you need to have an existing melody to work with.
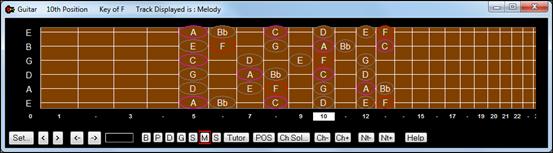
5. Select the Main Guitar Position to use.
![]()
The “Auto-Set” feature sets the main guitar position for the solo based on the key signature. For example, in the key of C, Band-in-a-Box will choose the 5th position as the best position for the chord solo to be played. If you wanted the solo to be in the 12th position, you could de-select the “Auto-Set” and then set the guitar position to 12th position.
![]() If you already have a guitar track that has guitar channels (if it was played on a guitar controller as a single string guitar part), then you might want to tell Band-in-a-Box not to change the guitar positions of the notes that it finds. Otherwise set “OK to change existing guitar channels” to true.
If you already have a guitar track that has guitar channels (if it was played on a guitar controller as a single string guitar part), then you might want to tell Band-in-a-Box not to change the guitar positions of the notes that it finds. Otherwise set “OK to change existing guitar channels” to true.
6. Press OK to generate the Solo.
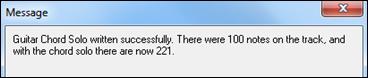
You will then see a message that tells you a solo has been added to the track.
As you listen to the solo, you will notice the following:
- Some of the notes are left as melody, and some are assigned to chords.
- A wide variety of guitar chords are used, including some advanced chords. All of them are popular chords played by real guitarists – there are no theoretical chords.
- The chords are strummed, to simulate a real guitar player.
- The Track Type for the Melody has been set to Guitar – so the notation shows [Tab], and the MIDI file will be saved with the Guitar Channels (11-16) preserved which preserves the fret positions.
- All of these items can be customized in the Guitarist Editor.
Once you have generated a guitar chord solo…
The chord solo is now part of the notation track. You can edit it like any other part, by deleting/inserting notes, etc. You can use the special guitar features discussed in the Guitar Window section to change the guitar voicings or replace a note with a chord and vice versa.
![]()
![]() When you have a note or chord highlighted press the [Ch-] or [Ch+] Insert Guitar Chord button on the guitar window (or [7] or [8] on the NUMPAD keypad). Each time you press the [Ch-] or [Ch+], you will see that the guitar chord changes to a different voicing, cycling through the available 5-10 voicings possible for each chord. Some notes won’t have any chord voicings, for example a C# note on a Cmaj7 chord, because it is always a passing tone.
When you have a note or chord highlighted press the [Ch-] or [Ch+] Insert Guitar Chord button on the guitar window (or [7] or [8] on the NUMPAD keypad). Each time you press the [Ch-] or [Ch+], you will see that the guitar chord changes to a different voicing, cycling through the available 5-10 voicings possible for each chord. Some notes won’t have any chord voicings, for example a C# note on a Cmaj7 chord, because it is always a passing tone.
![]()
![]() In a similar manner, you can convert a chord to a guitar note, and use the Insert Guitar Note button for this. Pressing the [N+] (or [3] or [4] on the NUMPAD keypad) repeatedly cycles through playing the same note on all 6 strings.
In a similar manner, you can convert a chord to a guitar note, and use the Insert Guitar Note button for this. Pressing the [N+] (or [3] or [4] on the NUMPAD keypad) repeatedly cycles through playing the same note on all 6 strings.
The solo will be saved with the song (.MGU) and exported to a MIDI file with the string positions intact because we use channels 11 to 16 for the Guitar part. You can remove the solo at any time, even after the solo has been saved or reloaded, by choosing Melody | Edit Melody Track | Remove Harmony (or guitar solo) from Melody Track menu item.
Guitarists can be customized using the Guitarist Maker, described in the User Programmable Functions chapter of this manual.
Automatic Embellishments – “The Embellisher”
Overview
When musicians see a lead sheet that has a melody written out, they almost never play it exactly as written. They change the timing to add syncopation, change durations to achieve staccato or legato playing, add grace notes, slurs, extra notes, vibrato and other effects. You can have Band-in-a-Box do these automatically using the Embellisher so that you hear a livelier, more realistic Melody - and it’s different every time. The Embellisher is only active while the music is playing; it doesn’t permanently affect the Melody track. There is an option to make the embellishment permanent, so that if you like a certain embellishment you can add it to the Melody track.
Using the Embellisher
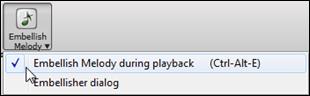
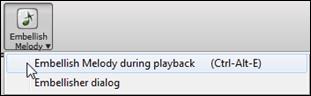
The Melody Embellisher feature is turned on and off with the [Embellish Melody] toolbar button or with Ctrl+Alt+E keys. The Embellisher only functions during playback.
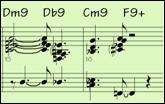
You will see the Embellished Melody on the notation as the Melody plays, so you can see the Embellished notes. When [Stop] is pressed, the notation will revert to the original (unembellished) melody. The embellishment changes timing of notes, durations, velocities, legato, as well as adding grace notes, additional notes and turns. Here is a “before and after” example that shows a typical embellishment of a Melody.
Normal (unembellished) Melody… |
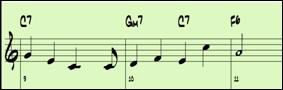
Embellished Melody… |
As you can see in the notation examples, the embellished melody adds an anticipation in bar 9, and in bar 10 adds extra notes, timing changes, and grace notes to “spice up” the melody. |

If you disable the Embellisher, by de-selecting the Embellish Melody during playback or by pressing the Ctrl+Alt+E keys, then the melody (or solo) will play as normal with no changes.
Melody Embellisher Settings
|
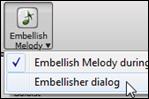
The Embellisher settings are accessed during playback with the Embellisher button in the main screen toolbar, or with the menu item Melody | Embellish Melody | Embellish Melody Dialog, or with the key strokes Ctrl+Alt+L. |
There is a Melody Embellisher dialog that allows you to:
- Customize the settings of the Embellisher or choose Embellisher presets.
- Make a particular embellishment permanent.
![]() “Live Auto-embellish during every playback” is the same setting as the Embellish Melody during playback checkbox in the [Embellish Melody] toolbar button. If enabled, embellishment will occur during every playback. If disabled, embellishment will not occur unless you choose the [Embellish NOW] button in the dialog.
“Live Auto-embellish during every playback” is the same setting as the Embellish Melody during playback checkbox in the [Embellish Melody] toolbar button. If enabled, embellishment will occur during every playback. If disabled, embellishment will not occur unless you choose the [Embellish NOW] button in the dialog.
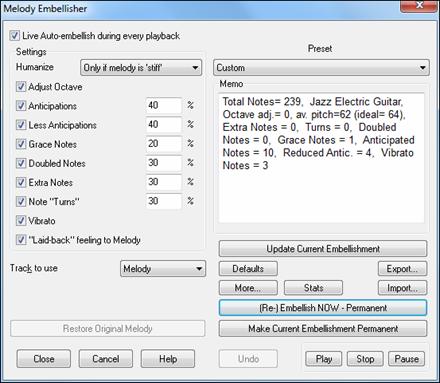
Settings The settings that affect the embellishment can be turned on and off and given a percentage strength.
Humanize The velocities, durations (legato), and timing of the notes are humanized.
 |
The original velocities etc. of the notes are ignored. The option to only humanize the timing of the music if the timing was “stiff” to begin with allows the Embellisher to leave the timing of human input melodies alone and humanize only the ones that were entered in step-time. |
Adjust Octave
The octave of the Melody is changed to the best octave for the current Melody instrument. For example, if the instrument were a piccolo, the octave would be raised to the best range for a piccolo.
Anticipations
An anticipated note is playing a note early (“ahead of the beat”).
Less Anticipations
This is the opposite of anticipations. This finds notes that are anticipated, and “embellishes” them by playing them later (on the beat).
Grace Notes
The grace notes are brief notes played just before, and a semi-tone below the original note. The grace notes intentionally don’t show on the notation, so that it will remain easily readable. They can be heard.
Doubled Notes
Melody notes are doubled with the same pitch.
Extra Notes
Extra notes are added between melody notes.
Note Turns
With a note turn, a single note is replaced by a group of notes that include the original note and semitone or scale tones above and below the note. In this “before and after” example, the C note is replaced by a turn of 3 notes with a note a scale tone above the C.
Vibrato
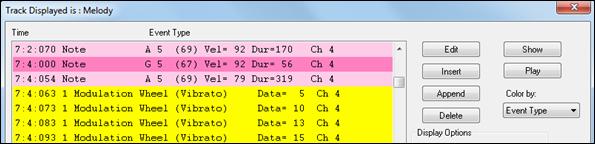
Vibrato can be added according to the additional vibrato settings available in the “More” dialog. The vibrato can’t be seen on the notation window, but you can examine the events in the Event List.
![]() If set, the Melody will be delayed a little, providing a laid-back feeling.
If set, the Melody will be delayed a little, providing a laid-back feeling.
|
The Embellisher is usually referred to as the Melody Embellisher, because you would usually want to have it on the Melody track. But if you like, you can choose to embellish the Soloist track. |
![]() If you have done this, and want to restore the original Melody, you can press the [Restore Original Melody] button.
If you have done this, and want to restore the original Melody, you can press the [Restore Original Melody] button.
|
The presets allow you to quickly choose common combinations of settings for the Embellisher. |
|
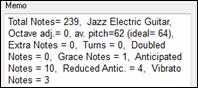
The Embellisher Memo describes the current embellishment, with statistics counting the number of embellished notes. |
![]() If the song is playing and the Embellisher is enabled, you can update the embellishment by pressing this button. This is useful if you’ve changed settings and want to hear what the new embellishment sounds like.
If the song is playing and the Embellisher is enabled, you can update the embellishment by pressing this button. This is useful if you’ve changed settings and want to hear what the new embellishment sounds like.
![]() The [Defaults] button reverts to the original Embellisher settings.
The [Defaults] button reverts to the original Embellisher settings.
![]() There are additional settings, in the Embellisher Additional Settings dialog. This allows you to set advanced settings for the Embellisher. These include:
There are additional settings, in the Embellisher Additional Settings dialog. This allows you to set advanced settings for the Embellisher. These include:
- Vibrato Depth: The amplitude of the vibrato, in a range from 0-127.
- Vibrato Speed: This is the speed of the vibrato (slow-fast) range 0-127.
- Only use Vibrato if Note is this many ticks: If set to 120 ticks (one quarter note), then only notes of duration at least 120 ticks will get vibrato.
- Start the Vibrato after this many ticks: For notes that will get vibrato, the vibrato will start after this many ticks.
- Adjust Octave Method: If the octave is to be adjusted, it will either only adjust it if the notes are outside the playable range, or always adjust it to the best octave, according to the setting you make here.
- Dynamic Range: Refers to the range of velocities used for the humanization. Useful range 30-50.
- Legato Settings: Refers to the amount of legato for the notes. Useful range 55 to 75.
![]() This displays the same thing that appears in the Memo field but will display it even when there is no current embellishment.
This displays the same thing that appears in the Memo field but will display it even when there is no current embellishment.
![]()
![]() You can save/load your own presets for the Embellisher. When you have made a custom setting in the Embellisher dialog, press the [Export] button to save the data as an .EMB file. When you want to recall the saved preset, press the [Import] button, and load in a previously made .EMB file. You can share your favorite presets with other installations of Band-in-a-Box using the EMB files.
You can save/load your own presets for the Embellisher. When you have made a custom setting in the Embellisher dialog, press the [Export] button to save the data as an .EMB file. When you want to recall the saved preset, press the [Import] button, and load in a previously made .EMB file. You can share your favorite presets with other installations of Band-in-a-Box using the EMB files.
![]() If the song is not currently playing, you can still create an embellishment and have it apply permanently by pressing the [(Re-)Embellish NOW – Permanent] button. The original melody is not affected permanently unless you have pressed the [(Re-)Embellish NOW – permanent] button.
If the song is not currently playing, you can still create an embellishment and have it apply permanently by pressing the [(Re-)Embellish NOW – Permanent] button. The original melody is not affected permanently unless you have pressed the [(Re-)Embellish NOW – permanent] button.
![]() Normally the embellishment occurs live when the song is playing and doesn’t affect the melody permanently. But if you like the Embellishment, and want to apply it permanently to the melody, you can choose the “Make Current Embellishment Permanent” option.
Normally the embellishment occurs live when the song is playing and doesn’t affect the melody permanently. But if you like the Embellishment, and want to apply it permanently to the melody, you can choose the “Make Current Embellishment Permanent” option.
![]() You can use the [Undo] button to reverse a permanent embellishment before the song is saved to file.
You can use the [Undo] button to reverse a permanent embellishment before the song is saved to file.
![]() Use these transport controls for song playback within the Melody Embellisher dialog.
Use these transport controls for song playback within the Melody Embellisher dialog.
Unconditional 30-Day Money Back Guarantee on all PG Music products purchased from PG Music Inc.
PG Music Inc.
29 Cadillac Ave Victoria BC Canada V8Z 1T3
Sales: 800-268-6272, 250-475-2874,+ 800-4746-8742*
* Outside USA & Canada where International Freephone service is available.
Access Codes
Tech Support: Live Chat, support@pgmusic.com
 Online now
Need Help?
Customer Sales & Support
|
Phones (Pacific Time) 1-800-268-6272 1-250-475-2874 |
||
| Live Chat | ||
| OPEN | Online Ordering 24/7 |
|
| OPEN | Forums, email, web support |