
Search Manual
Band-in-a-Box® 2020 for Windows® User's Guide
Chapter 12: Wizards, Tutors, and Fun
Video Window
You can load a video that you have already downloaded from YouTube or elsewhere into Band-in-a-Box Video Window. The audio is extracted from the video to the Audio track.
 |
To load and play a video, select the Open File menu item from the [Open] button and choose a video file (mp4/wmv/avi). |
|
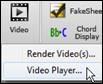
Alternatively, click on the [Video] button and select Video Player. Then, when the Video Window opens, click on the [Open] button on its toolbar and select a video file. |
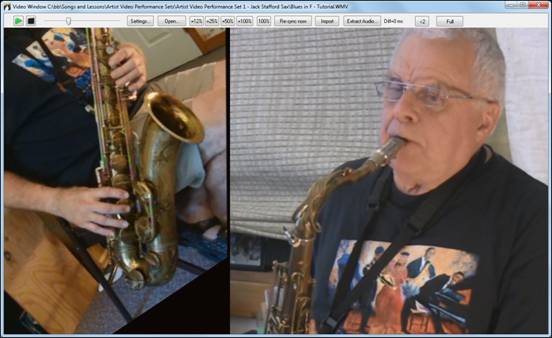
![]() Play, Stop or Move to a position in the video using the Transport toolbar.
Play, Stop or Move to a position in the video using the Transport toolbar.
![]() As the song plays, you can slow down the video, and the audio will slow down and stay in sync.
As the song plays, you can slow down the video, and the audio will slow down and stay in sync.
The quality of the audio at slower tempos is great - better than most video player programs. The video slowdown range is 50-100%. If you want slower than that, you can select values as low as 12%, which is an 8X slowdown (1 second would take 8 seconds), and still has good quality. Note: When set to values lower than 50%, the Video Window is disabled, but the audio continues at the extreme slow tempo. This is a great tool for transcription. You can select a range in the Chord Sheet window and use Transport - [Loop] button to loop a section of the video at a low tempo for example.
![]() You can size the window by dragging the corner.
You can size the window by dragging the corner.
![]() There is a [Full] button to make the video full screen, and the [Esc] key will go out of the full screen mode.
There is a [Full] button to make the video full screen, and the [Esc] key will go out of the full screen mode.
![]() This will open the Video Settings dialog which allows you to adjust the audio and video playback time.
This will open the Video Settings dialog which allows you to adjust the audio and video playback time.
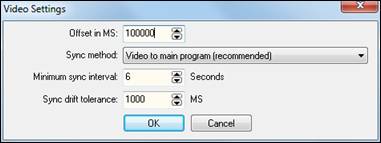
![]() This will adjust the video playback in milliseconds. A positive value will make the video play later while a negative value will make it play earlier.
This will adjust the video playback in milliseconds. A positive value will make the video play later while a negative value will make it play earlier.

When the video and the audio are out of sync. “Video to main program” will change the video position. “Main program to video” will change the audio position which may cause a noise. “Do not sync” will never attempt to re-sync.
![]() This allows you to set a minimum number of seconds between attempts to re-sync the video and the audio.
This allows you to set a minimum number of seconds between attempts to re-sync the video and the audio.
![]() This allows you to set a maximum drift time in milliseconds between the video and the audio. If they are out of sync less than this value, then the program will not try to re-sync.
This allows you to set a maximum drift time in milliseconds between the video and the audio. If they are out of sync less than this value, then the program will not try to re-sync.
“Woodshed” Tempo Feature
When practicing (or “woodshedding”) a tune, it is useful for the tempo to speed up every time the section loops or the song restarts from the beginning.
|
Press the [Practice] toolbar button and select Woodshed (increasing) Tempo… from the pulldown menu. This will open the Tempo Woodshedding dialog. |
For example, if you set the “Woodshed tempo” value to 5 in this dialog, the tempo will speed up by 5 each time the song (or a highlighted section) loops to the beginning. The idea is that you start off with a slow tempo, playing the part perfectly, and keep this up as the song tempo increases.
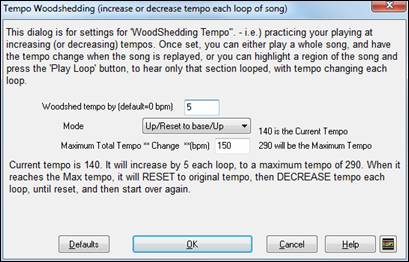
When you press Stop, the tempo reverts to the original tempo.
There are 4 modes to the woodshed tempo field.
- “Up only,” which is getting faster each loop “forever,” well until tempo = 500, which is BB’s maximum tempo.
- An “up then down” mode that goes up by [a settable increment] up to [a settable maximum] and then starts going down by the increment back to the original where it restarts. For example, a song with a tempo of 140, if you set the tempo to increase by 5, to a maximum increase of 100, the song will go from 140,145,150 etc. to 240, then go to 235,230… back to 140 and cycle again.
- An “Up then Reset” mode, that goes up in increments up to the settable maximum, then resets to the original and starts again. For example, a song with a tempo of 140, if you set the tempo to increase by 5, to a maximum increase of 100, the song will go from 140,145,150 etc. to 240, then go to 140 and start again.
- An “Up and stay at Max” mode that goes up until the settable maximum and stays there.
Modes 2 and 3 are analogous to a “treadmill workout,” with programmed changes in speed.
Audio Chord Wizard (Stand-alone)
This amazing wizard automatically figures out the chords from an audio file (MP3/MP4/WAV/WMA) and displays them in Band-in-a-Box. Just load an audio file and you will instantly see the chords.
Chord Sheet Overview
There’s a Chord Sheet window in the Audio Chord Wizard that shows the chords for the whole song on a single screen. This allows you to click on a bar on the Chord Sheet to jump to that area of the song.
You can mark sections of the song using part markers, and the sections will begin on a new line with a line space between so they are clearly seen. So, you can then also learn the form of the song, as you can see the various sections (intro/verse/chorus/break) at a glance, or quickly jump to the any section simply by double-clicking on that part of the Chord Sheet.
For this discussion, open C:\bb\Documentation\Tutorials\Tutorial - BB2007\Frontier.MP3. You will now see the song, and the Chord Sheet window in the Audio Chord Wizard is visible.
Play the song.
![]() When a new bar starts, hit the Enter key (or F8). This is called “tapping in a bar line.”
When a new bar starts, hit the Enter key (or F8). This is called “tapping in a bar line.”
The first time you do that, the program will consider that point to be “bar 1.” Tap in a few more bar lines.
Click on the Chord Sheet, and the music will jump to that location.
Now, let’s define some sections in the song.
If a bar begins a new section, click on the bar # on the Chord Sheet, or press the P key to put in a part marker. Pressing P again will change the part marker, and then turn it off.
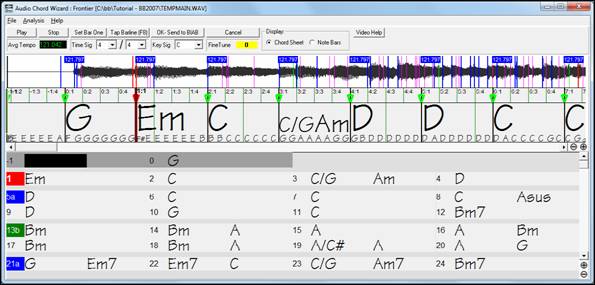
Now the song is divided into sections, with space between each section, and each section starting on a new line.
If we want to renumber the bars, right-click on the waveform timeline at the place that you would like to be bar 1, and choose “Set Bar One.”
To change the # of bars per row, or rows per screen, right-click on the Chord Sheet.
|
The +/- buttons at the bottom right of the window also change the row height. |
|
Chords may be edited in the Audio Chord Wizard with a right mouse click on the chord. When Edit Chord is selected, a highlight cell opens at the chord location. Type in the name of the new chord using standard Band-in-a-Box chord entry characters and press the Enter key to make the edit. |

![]() The edited chord name is blue in color.
The edited chord name is blue in color.
Individual edits can be removed with the Remove Chord Edit command, or all edits in the song can be removed with the Remove All Chord Edits command. Part markers, chord symbols, key signature, and tuning setting are saved in Band-in-a-Box and are passed back and forth to the Chord Wizard.
The Audio Chord Wizard is a great way to learn the chords of songs. You can add section markers and divide the song logically into sections, so it is also a great way to learn the “form” of the song, an essential part of learning popular songs.
As well as the chords of the song, the Audio Chord Wizard also figures out,
- the tempo of the file,
- bar lines throughout the song,
- fine tuning detection (e.g. 5 cents sharp from A440),
Audio Chord Wizard Window
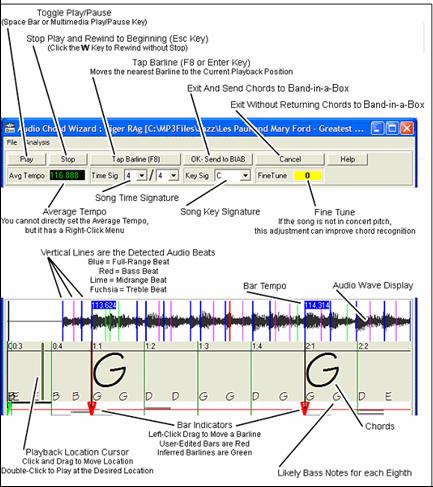
Primary Program Controls
![]() Toggle Play/Pause (Space bar or Play/Pause key).
Toggle Play/Pause (Space bar or Play/Pause key).
![]() Stop play, rewind to start with Esc key.
Stop play, rewind to start with Esc key.
![]() Set the bar 1 location. F6 key also sets the bar 1. Audio Chord Wizard works best if you set the bar 1 location before any other actions. During playback, press this button at the beginning of bar 1.
Set the bar 1 location. F6 key also sets the bar 1. Audio Chord Wizard works best if you set the bar 1 location before any other actions. During playback, press this button at the beginning of bar 1.
![]() Moves nearest bar line to current play position. F8 or Enter key also sets bar lines.
Moves nearest bar line to current play position. F8 or Enter key also sets bar lines.
![]() Song time signature, 2/4 to 12/8 supported.
Song time signature, 2/4 to 12/8 supported.
![]() Average tempo, right-click for options.
Average tempo, right-click for options.
![]() Song key signature.
Song key signature.
![]() Use to correct pitch of song if necessary.
Use to correct pitch of song if necessary.
![]() Exit and send chords to Band-in-a-Box.
Exit and send chords to Band-in-a-Box.
![]() Exit without sending chords to Band-in-a-Box.
Exit without sending chords to Band-in-a-Box.
Chord Detection
Chord Detection accuracy depends on the accuracy of the bar lines. If bar lines are not well-aligned then the Chord Detection can be expected to be rather poor. It is quick and easy to align the bar lines on most songs, once you get the hang of it.
The first task is to locate the beginning of Bar One. Since an audio file could have an arbitrary amount of silence at the beginning of the song, and many songs begin with a pickup partial bar, ACW cannot easily guess the first bar without a hint from you.
The shortcut keys and mouse playback controls make it easy to find Bar One. Tap the space bar to begin play, watch the Location Cursor, and listen for the downbeat. If the Location Cursor passes the downbeat and you were not completely certain of the location, you can tap the W key to rewind to the song beginning and replay the first part of the song, to audition the downbeat as many times as necessary to make sure of its location.
You can also single-click in the Chords panel to jump the playback position. If the rhythm is unusually complicated near the downbeat, you could repeatedly click just a little before the suspected Bar One location, to zero-in on the exact downbeat.
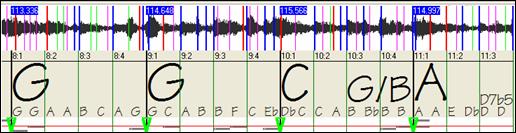
In the following example song, we have discovered the downbeat of Bar One, so we Right-click on that location to Set Bar One.
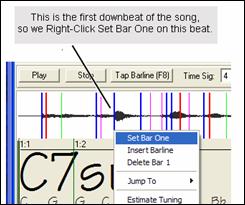 |
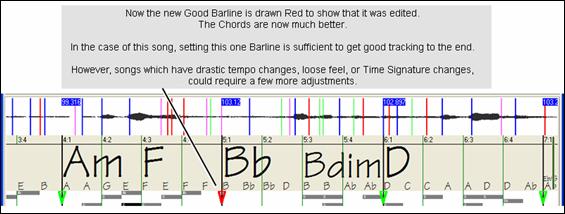
Now the Bar One bar line is red (shown below). The red Triangle bar indicator indicates that we have edited that bar line. The Red Triangles are called Good Bar Lines (GBL’s). The green Triangle bar indicators are bar lines which ACW has automatically inferred from its automatic tempo detection PLUS your edited Good Bar Lines. We call the green automatic bar lines Inferred Bar Lines (IBL’s). On this example song, the initial automatic tempo detection did a pretty good job. Simply setting Bar One has caused the first four bars to be properly aligned to the music. On some songs, Set Bar One is the only action necessary to get good bar alignment for the ENTIRE tune. |
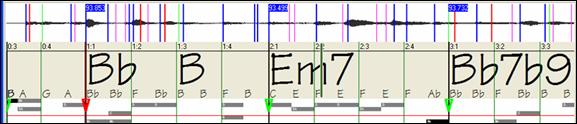
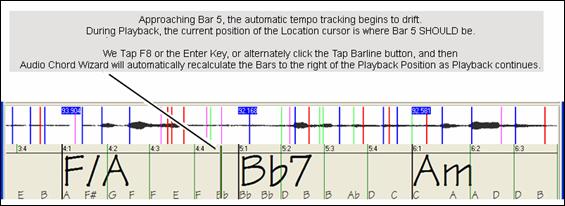
As playback continues in this example (below), we notice that ACW has made its first error approaching Bar 5. Audio Chord Wizard has estimated the tempo of Bar 4 too slow.
But that is easy to fix. If you prefer real-time control, just tap F8 or the Enter key where the downbeat should actually be.
If you prefer stopped-time editing, you can either mouse-drag Bar 5 to its desired position or drag the Playback Location Cursor to the desired position and then tap F8 or the Enter key.
When satisfied with the Bar lines and Chords, click the [OK] button to return the Chords and Tempo Map to Band-in-a-Box.
Keyboard Shortcuts
Keyboard shortcuts make it easier to navigate the song and tap in bar lines without having to work the mouse with start/stop/scroll actions.
Play/Pause - SPACE BAR, or Multimedia keyboard PLAY/PAUSE key or (certain keyboards) PLAY key
Stop - ESC key, or PAUSE key, or Multimedia keyboard STOP key
Tap Barline - F8, or ENTER key
Jump To Song Start - W key, or HOME key
Jump To Song End - END key
Jump Forward One Bar - RIGHT ARROW key
Jump Back One Bar - LEFT ARROW key
Jump Forward Four Bars - PAGE DOWN key, or DOWN ARROW key, or Multimedia keyboard NEXT TRACK key
Jump Back Four Bars - PAGE UP key, or UP ARROW key, or Multimedia keyboard PREVIOUS TRACK key
Special Cases
Time Signature:
If a song is not in the default 4/4 time signature, set the Time Signature very early before you do anything else.
Bad Initial Tempo Estimates
Double/Half Tempo:
Sometimes Audio Chord Wizard will guess double or half of the tempo you might prefer.
Slightly Wrong:
Sometimes syncopated songs can have musical anticipations which make ACW guess a tempo slightly too fast or slightly too slow.
Completely, Horribly Wrong:
Some songs have rhythms difficult for a computer to understand. Sometimes a song’s rhythmic beats are spaced in such a way that a song with a perfect Tempo of 120, might mathematically BETTER fit the audio beats at some simple (but wrong) related ratio such as 80, 100, 160, or 180 BPM.
If the initial Tempo Estimate is pretty good, the Tap Bar line function will be the easiest way to fix such errors, requiring only a few keyboard taps during playback.
But if the initial tempo estimate happens to be horribly wrong, it helps to make the initial tempo “in the ballpark” BEFORE you tap a few F8’s to make it completely right.
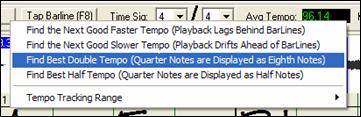
Right-click the Avg Tempo control for some easy automatic fixes.
Note: If you want to use the Avg Tempo Menu functions, use the menu very soon after you have opened a song, before you have done much bar editing. If you invoke the Avg Tempo Menu functions after you have laboriously edited a lot of bar lines, the automatic nature of these functions can ruin your previous editing.
In some cases, there is a good reason to initially set the tempo artificially slow by using the “Find Best Half Tempo” function.
For example, if the initial tempo estimate is considerably faster than the tempo that you want to tap in, the Tap Bar line function can mistakenly think that you want a very fast tempo, which fills the remainder of the song with unwanted fast-tempo bars. In that case, if you initially set the tempo very slow, ACW will be unlikely to misinterpret your Tap Bar Lines.
Set Key Signature
Once the chords look reasonable, for instance if your song looks like it is probably in the key of F, set the Key Signature control to F for better chord spelling. This only affects the cosmetic display of notes and chords (flats and sharps). The Key Signature control does not currently affect the basic accuracy of Chord Detection.
Adjust Fine-Tuning
If a song is significantly mis-tuned from concert pitch, the notes are “in the cracks,” which makes Chord Detection less accurate.
If your Chords look reasonable, there is no need to bother with Tuning. Most songs are recorded pretty close to Concert Pitch.
But if you see numerous Chord errors, it may help to adjust the Fine Tuning control.
If you are playing along with a song on your keyboard, you might decide to make an ear-estimate of how far out-of-tune is the song:
For instance, you could adjust the fine-tuning control on your keyboard until your keyboard matches the song’s pitch (according to your ear). Then you could look at your keyboard’s tuning readout and adjust ACW’s Fine Tune Control to match. Either click-drag ACW’s Fine Tune control (like a slider control), or right-click the Fine Tune control then type in a number.
The Fine Tune Control currently does not change the pitch of playback (though that would be an excellent future feature). Currently ACW’s Fine Tune control only improves Chord Detection on mis-tuned songs.
The Fine Tune control is calibrated in cents, 1/100th of a semitone. Therefore, if a song is perfectly in the key of C, but if you set Fine Tune to +100 Cents, ACW would display chords in the key of B. Similarly, if you set Fine Tune to -100 Cents, it would display that song’s chords in the key of C#.
That simple use of the Fine Tune control is just a backwards way to transpose the Chords. But if you set Fine-Tune somewhere in the middle, ACW looks for notes that are somewhere “in the cracks” between the piano keys. For instance, if your song SHOULD be in the key of C, but it was unfortunately recorded 50 Cents sharp.
There could be many reasons that a song was recorded off Concert Pitch. Maybe the recording studio had a broken tape recorder, or the singer couldn’t quite hit the highest note. Perhaps the vinyl record cutter was off-speed, or some Record Executive decided that the song was 10 seconds too long for airplay and instructed the Mastering Engineer to speed it up a little bit. In such cases ACW can get confused, mis-identifying some pitches too high and other pitches too low, detecting nonsense Chords.
So, if your favorite song was unfortunately recorded 50 Cents sharp, you can set the Fine-Tune control to +50 Cents so that ACW will properly display in the “original” key.
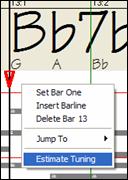
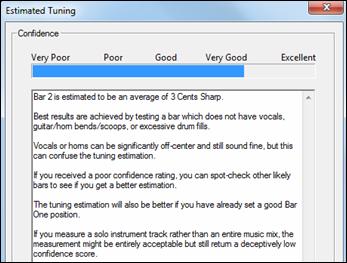
Auto Estimate Tuning
ACW can automatically estimate the tuning, which helps in some cases. Since the estimation is math-intensive, ACW only analyzes one bar of music at a time.
Right-click somewhere inside a bar and pick the Estimate Tuning function.
 |
After the process is finished, up pops the results dialog. As advised in the dialog, results can be improved by carefully picking the bar. Bars with relatively long notes are easier to analyze, compared to bars containing flashy fast melodies. It can be useful to spot-check a few bars. If several spot-checks give similar answers (within a few cents), you have good confidence that the results are actually meaningful, not being randomly affected by out-of-tune melodies or loud drums. |
However, if the first estimate reads +43 and the next measurement reads -12, then it probably means that your song is not a good candidate for automatic Tuning Estimation.
Odd Length Bars and Drastic Tempo Changes
If a 4/4 song contains occasional bars of 3/4, 5/4, or whatever, or if there are sections where the music has an extreme ritard or accelerando, sometimes you can just Tap Bar Lines to adjust it.
But it is sometimes more convenient to manually add or delete bar lines. The following example song has an overall Time Signature of 4/4, but Bar 9 should have a time signature of 2/4. If you simply Tap Bar Line on 9:3 to shorten the bar, then ACW will mistakenly decide that you wish to make all the following bar lines double-tempo 4/4.
Solution
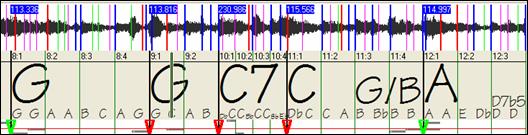
First, Right-Click on the beat 9:3, and Insert a bar line.
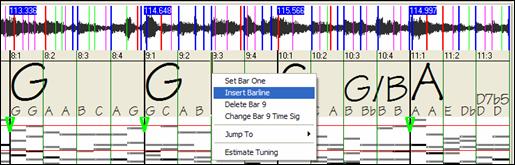
Now a new bar line is added, and three new GBL bar lines are flagged red.
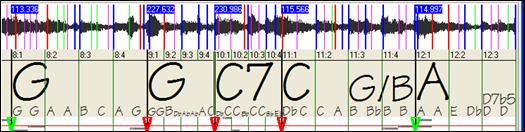
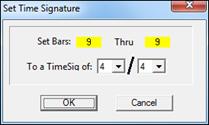
Right-Click on the new shortened Bar 9 and set the Time Signature to 2/4.
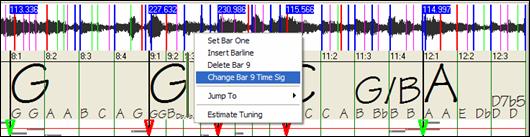
Change Bar 10 to its desired duration. Hover the mouse over the red triangle marker at Bar 11, and the mouse cursor becomes a drag cursor. Click and drag the bar line to the location marked 11:3
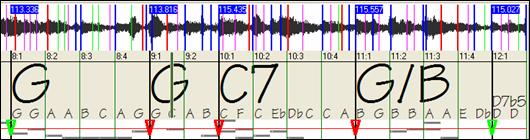
Now we have edited bar 9 to have its proper 2/4 Time Signature and preserved the song tempo on both sides of the 2/4 bar.
Notes Display
The Notes Display looks like a MIDI Piano Roll, but it is not exactly the same as a MIDI Piano Roll. Audio Chord wizard detects the strongest frequencies found in each eighth-note time slot and displays them in the Notes Display.
Sometimes the displayed frequencies REALLY ARE instrument notes played in the audio file. But they could be spurious information, such as the accidental loudest frequency of a drum beat. A midrange frequency note-bar might be showing the sum of harmonics from several instruments, each instrument’s harmonics contributing to the strength of that frequency.
The Notes Display information is real and useful but try not to assume that every displayed note-bar is a real note in the audio.
Audio Chord Wizard Utilities Dialog
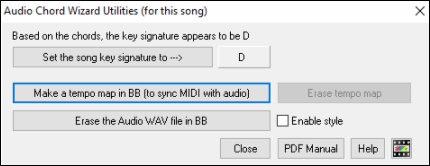
The Audio Chord Wizard Utilities dialog can be launched at any time from the menu item (File | Open Special | Audio Chord Wizard Utilities, or Audio | Audio Chord Wizard Utilities).
It is also launched automatically after returning from the Audio Chord Wizard
![]()
Automatic detection of key signature based on the chords only. This is useful for a song from the Audio Chord Wizard, where you forgot to set the key signature or for any song without the key signature set.
![]() If you agree with the analysis, you can accept the chord signature recommended for the song, by pressing the [Set the song key signature to -à] button.
If you agree with the analysis, you can accept the chord signature recommended for the song, by pressing the [Set the song key signature to -à] button.
Make a Tempo Map
![]() After an audio song (MP3/WAV/WMA) has been loaded into the AudioChordWizard, there will be bar lines assigned automatically by ACW, and perhaps modified by you. If you would like Band-in-a-Box song file to follow these bar lines, so that the BB file will play in sync with the audio file, press the [Make a tempo map in BB] button.
After an audio song (MP3/WAV/WMA) has been loaded into the AudioChordWizard, there will be bar lines assigned automatically by ACW, and perhaps modified by you. If you would like Band-in-a-Box song file to follow these bar lines, so that the BB file will play in sync with the audio file, press the [Make a tempo map in BB] button.
![]()
You will then see red boxes on the BB Chord Sheet, indicating tempo changes and the presence of a tempo map.
![]() Press this button to remove the tempo map, and the “red boxes” will disappear around the bar lines. (Note: You can always get the tempo map back, by pressing “Make a tempo map” at any time.)
Press this button to remove the tempo map, and the “red boxes” will disappear around the bar lines. (Note: You can always get the tempo map back, by pressing “Make a tempo map” at any time.)
![]() This erases the Audio track from Band-in-a-Box. If you have loaded in an MP3 file, the audio track isn’t the MP3 file, it is the WAV file copy that Band-in-a-Box has made of it. So, you wouldn’t be erasing your MP3 file! Note that you also have to SAVE the BB file to have the erasure be complete.
This erases the Audio track from Band-in-a-Box. If you have loaded in an MP3 file, the audio track isn’t the MP3 file, it is the WAV file copy that Band-in-a-Box has made of it. So, you wouldn’t be erasing your MP3 file! Note that you also have to SAVE the BB file to have the erasure be complete.
![]() If you enable the style, you will hear the audio file as well as the Band-in-a-Box style. Otherwise, you can mute the Band-in-a-Box style by disabling it here.
If you enable the style, you will hear the audio file as well as the Band-in-a-Box style. Otherwise, you can mute the Band-in-a-Box style by disabling it here.
![]() You can revisit the Audio Chord Wizard by pressing this button (this can also be done from the Audio menu). Revisiting the AudioChordWizard is useful to refine the bar lines.
You can revisit the Audio Chord Wizard by pressing this button (this can also be done from the Audio menu). Revisiting the AudioChordWizard is useful to refine the bar lines.
Tip: How to preserve chords if you revisit the Audio Chord Wizard
![]()
If you do revisit the Audio Chord Wizard and want to preserve the chords that you may have edited, first select all of the chords, choose Edit-Copy, and then, after the AudioChordWizard, choose Edit-Paste. Otherwise, the AudioChordWizard might re-interpret your chords!
Audio Chord Wizard (Built-in)
|
The built-in Audio Chord Wizard can be accessed from the [Audio Chord Wizard] toolbar button. |
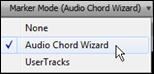
Alternatively, you can press the [Audio Edit] button, and when the Audio Edit window opens, press the [Marker Mode] button on its toolbar and select Audio Chord Wizard from the menu.
| |
|
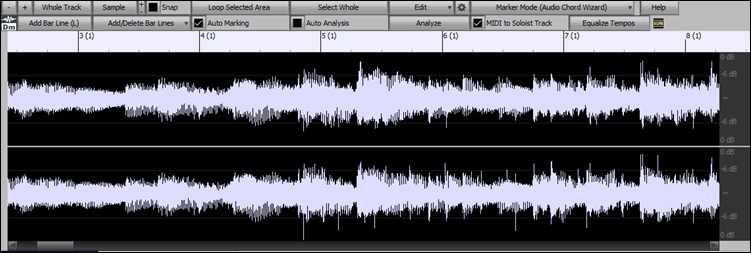
The first task is to locate bar lines in the audio so that the Audio Chord Wizard can detect chords accurately and the audio will play in sync with the Band-in-a-Box song.
![]() You can add bar lines with the [Add Bar Line] button or with the [L] key on your keyboard. A bar line will be placed at the audio edit cursor or at the playback cursor if the song is currently playing.
You can add bar lines with the [Add Bar Line] button or with the [L] key on your keyboard. A bar line will be placed at the audio edit cursor or at the playback cursor if the song is currently playing.
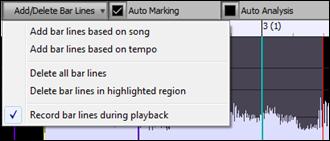
![]() The [Add/Delete Bar Lines] button menu has options to add bar lines based on your song structure or tempo. You can delete all the existing bar lines or only the ones within the highlighted region.
The [Add/Delete Bar Lines] button menu has options to add bar lines based on your song structure or tempo. You can delete all the existing bar lines or only the ones within the highlighted region.
![]() If “Auto Marking” is enabled, then Band-in-a-Box will automatically add and arrange bar lines based on the bar lines you have added manually. The “auto” bar lines will show in light blue, and the “user” bar lines will show in purple. You can change these colors in the Audio Edit Settings dialog if you want.
If “Auto Marking” is enabled, then Band-in-a-Box will automatically add and arrange bar lines based on the bar lines you have added manually. The “auto” bar lines will show in light blue, and the “user” bar lines will show in purple. You can change these colors in the Audio Edit Settings dialog if you want.
![]() If “Auto Analysis” is enabled, then Band-in-a-Box will re-analyze the chords in the audio whenever you add or move a bar line, or when you edit the audio data. Keep this setting disabled if you prefer to set all bar lines first (i.e. establishing tempo), and then analyze the chords when you are done.
If “Auto Analysis” is enabled, then Band-in-a-Box will re-analyze the chords in the audio whenever you add or move a bar line, or when you edit the audio data. Keep this setting disabled if you prefer to set all bar lines first (i.e. establishing tempo), and then analyze the chords when you are done.
Bar lines can be moved with the mouse. Just click and drag the thumb control at the bottom. If you move an “auto” bar line, it will become a “user” bar line.
 |
You can also right-click on the thumb control to get a context menu with options to switch a marker type (“user” or “auto”), delete the bar line, or set the time signature for the bar. The menu also shows you the tempo of the bar, based on the time signature of the bar and the position of the next bar line. |
When you add or move bar lines, Band-in-a-Box will automatically make a tempo map, so your song will play in sync with the audio.
Any changes you make in the Audio Chord Wizard mode are undo-able. This was previously not possible with the stand-alone Audio Chord Wizard.
![]() Use the [Analyze] button to analyze the chords in the audio. The chords detected in the audio will be written into the Chord Sheet. You don’t need to do this if you have “Auto Analysis” enabled, but you might want to if you have erased or made changes to the chords in the Chord Sheet.
Use the [Analyze] button to analyze the chords in the audio. The chords detected in the audio will be written into the Chord Sheet. You don’t need to do this if you have “Auto Analysis” enabled, but you might want to if you have erased or made changes to the chords in the Chord Sheet.
When you open the Chord Sheet, you will see that the Audio Chord Wizard has entered the chords and the tempo map.

![]() If “MIDI to Soloist Tracks” is checked, the wizard will send the transcribed MIDI notes to the Soloist track for further analysis by the user (via Piano Roll or Notation window). Note that this is a “snapshot” view every 8th note of the pitches present, not an attempt at polyphonic transcription.
If “MIDI to Soloist Tracks” is checked, the wizard will send the transcribed MIDI notes to the Soloist track for further analysis by the user (via Piano Roll or Notation window). Note that this is a “snapshot” view every 8th note of the pitches present, not an attempt at polyphonic transcription.
![]() This will remove tempo changes by stretching regions of audio so that their tempos are equal.
This will remove tempo changes by stretching regions of audio so that their tempos are equal.
MIDI File Chord Interpretation Wizard
Many MIDI files lack chord symbols, making them difficult to play along with by ear. Now you can open any MIDI file in Band-in-a-Box, and Band-in-a-Box will automatically figure out the chords of the song for you. The chords are written onto the Band-in-a-Box Chord Sheet like any other song. You can also read tracks into the Melody and Soloist tracks.
Importing Chords
You can import the chords from a MIDI file. To do this, first blank the Chord Sheet by choosing File | New. Then select the menu item File | Import | Import Chords from MIDI file to launch the Interpret Chords from MIDI file dialog.
![]() Press the [Open (Change)…] Button to select the MIDI file that you’d like to import.
Press the [Open (Change)…] Button to select the MIDI file that you’d like to import.
![]() Once you’ve selected the file, you can press the [INTERPRET CHORDS NOW] button. When you do that, the chords will be interpreted from the MIDI file, and written onto the Chord Sheet. Prior to pressing the [INTERPRET CHORDS NOW] button, you might want to make some custom settings.
Once you’ve selected the file, you can press the [INTERPRET CHORDS NOW] button. When you do that, the chords will be interpreted from the MIDI file, and written onto the Chord Sheet. Prior to pressing the [INTERPRET CHORDS NOW] button, you might want to make some custom settings.
![]() When you load in the MIDI file, Band-in-a-Box interprets many things from the MIDI file for you automatically. Normally you’d want this to happen, but if you’d prefer to make the settings yourself, you can set the Auto Interpret settings from MIDI file to false.
When you load in the MIDI file, Band-in-a-Box interprets many things from the MIDI file for you automatically. Normally you’d want this to happen, but if you’d prefer to make the settings yourself, you can set the Auto Interpret settings from MIDI file to false.
Once you have loaded in the MIDI file, and assuming that you have the “Auto Interpret” set to true, you will see that the dialog displays the settings that the Chord Wizard has found for the key signature, and channels used for the song.
Let’s work with an example song called violet.MID. This should be included in the C:\bb\Documentation\Tutorials folder.
- Start with a blank worksheet by choosing File | New.
- Choose the MIDI File chord Wizard dialog by choosing File | Import | Import Chords from MIDI file.
Press the [Open (Change)…] button to select the MIDI file, and then choose the file that you’d like to import. In this case, it is C:\bb\Documentation\Tutorials\violet.MID.
Once you load in the MIDI file, you will see that the Chord Wizard has analyzed it and made these determinations.
It has automatically determined that the violet.MID file
|
|
|
|
|
|
|
|
|
|
|
|
|
|
Now, after loading in the MIDI files, you’d normally have a look at these settings above, to see if they seem reasonable for your MIDI file. If not, you can change the settings. For example, if you knew that the Melody channel was on channel 3, you could override the Chord Wizard settings.
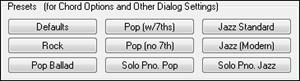
Once you have done that, you should choose one of the Presets, to quickly put the settings to the type of song that we are trying to interpret.
Chord Options - When you choose one of these presets, it makes a number of settings in the Chord Options section of the dialog. You can override them in this dialog.
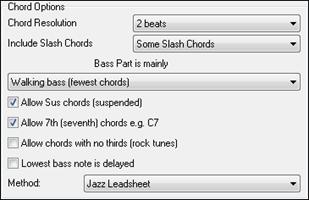
Chord Resolution - This is the minimum number of beats for a chord. For example, if you set it to “2 beats” then the Chord Wizard will never attempt to come up with different chords that are only a beat apart. If you have a song that has a short section that does include chords every beat, you can redo that section of the song with a “1 beat” resolution. (Default = 2 beats)
Include Slash Chords - If set, the Chord Wizard will include “slash chords” like F7/A or Cm/G.
Bass Part Type - You can set this to “Root,” “Root-3-5,” or “Walking Bass.” If you choose “Root,” the chord Wizard will assume that any bass note is the root of the chord. Choosing “Root-3-5” will cause the Chord Wizard to assume that the bass pattern is mainly on the root, 3rd and 5th of the chord. If you choose “Walking bass,” it will assume that the bass notes can be changing and can include many notes beside the root. Setting the Walking bass line will likely result in fewer chords overall than setting the “Root only” option.
Allow Suspended (Sus) Chords - The setting for “Allow Sus chords” determines if chords like Csus or Bbsus7 will be included. The “Allow 7th chords” specifies if 7th chords like C7 or Bbm7 would be allowed. Simple Rock songs might not have 7th chords or Sus chords. Allowing chords with no thirds should be set in a hard rock song, or similar song with “power chords” that might not contain the 3rd of the chords.
Delay Lowest Bass Note - Usually a bass player plays the root of the chord at or near the time when the chord changes. But in solo piano playing or some bass styles, the bass doesn’t state the root until later on, and this setting should be set to “delayed” in a solo piano style of this type.
Primary Style - Set the primary style of the song to Jazz or Pop/Country from the Method combo box.
![]()
Using the Chord Options Presets to quickly make settings
![]() For the song violet.MID,” we know that this is a Jazz Swing type of song, so we press the Preset Called “Jazz Standard.” By doing this, we see that the chord options have then been set to Chord Resolution of 2 beats, no slash chords, walking bass, sus chords, 7th chords, and Jazz lead sheet. These settings look OK for our Jazz song, if we wanted to customize it (e.g., to allow slash chords) we could do it at this point.
For the song violet.MID,” we know that this is a Jazz Swing type of song, so we press the Preset Called “Jazz Standard.” By doing this, we see that the chord options have then been set to Chord Resolution of 2 beats, no slash chords, walking bass, sus chords, 7th chords, and Jazz lead sheet. These settings look OK for our Jazz song, if we wanted to customize it (e.g., to allow slash chords) we could do it at this point.
So, to recap, using the Chord Wizard is a 3-step process.
 We’ve loaded in the song violet.MID.
 Pressing the preset button called [Jazz Standard], we then looked at the Chord Options settings for the various channels and they looked OK, so we didn’t make any changes.
 We then press [INTERPRET CHORDS NOW] – this gets the Chord Wizard to interpret the chords and write them onto the Chord Sheet.
Once we’ve pressed the [INTERPRET CHORDS NOW] button, we can see the results, by looking at the Chord Sheet. Here are the chords that were interpreted.
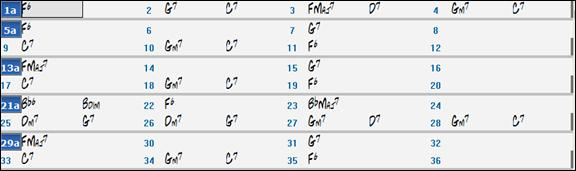
So that we can see how well the Chord Wizard did, we can compare it to the “correct chords” of the song, input by a musician listening to the song.
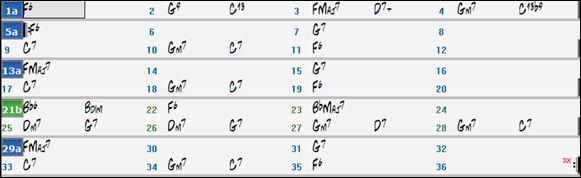
As you can see, by comparing the two sets of chords, the Chord Wizard got almost all of the chords correct in this example. The Chord Wizard purposely avoids chords like “C13.” It will put a simpler “C7” instead, since this is more like a typical lead sheet.
If you’ve read in the entire MIDI file, you have 103 bars of chords on the Chord Sheet. This actually contains 3 choruses of the song. You might want to reduce that to a single chorus by setting the chorus end of the song to bar 36 and then erasing the excess bars (after bar 36) by choosing Edit | Erase.
Examining the song that has been interpreted by the Chord Wizard.
You will notice that the title (Violet Song), key (F), and tempo (120) have been set to the values found in the file. Part markers are not set; the Chord Wizard doesn’t try to guess where part markers might be occurring. You need to put the part markers in yourself. You also need to choose the style to use (a Jazz Swing style in this case). If you examine the Melody track (by opening the Notation window and right-clicking on some notes or pressing the Event List (#) button), you will notice that the Melody track contains notes from Channel 4, which is what we specified in the Chord Wizard dialog.
Importing Part of a MIDI file or re-doing a section of the Chord Sheet)
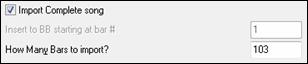
Normally, we’d want to import an entire MIDI file worth of chords. But if you want to import some bars, then deselect the “Import Complete song” checkbox, and specify where to start in the MIDI file (i.e. the number of lead-in bars in MIDI file), what bar to start at in Band-in-a-Box (Insert to BB starting at bar #), and the number of bars to import (How Many Bars to import?).
Using the violet.MID file, we could redo a section of the song using different settings. (For example, a chord resolution of 1 beat instead of 2 beats.) If we were unhappy with the results at bar 7 and 8, we could redo this by making the settings as follows:

Other Settings for the Chord Wizard
![]() Band-in-a-Box and PowerTracks Pro Audio songs contain special events that write the exact chord names into the MIDI file. So if the Chord Wizard sees these events, it will use them instead of interpreting the chords, since they are likely to be completely accurate. If you prefer to ignore these chord events, set the “OK to use PG Music Chord names from MIDI File” to false.
Band-in-a-Box and PowerTracks Pro Audio songs contain special events that write the exact chord names into the MIDI file. So if the Chord Wizard sees these events, it will use them instead of interpreting the chords, since they are likely to be completely accurate. If you prefer to ignore these chord events, set the “OK to use PG Music Chord names from MIDI File” to false.
![]() The setting for “Write Chord Summary Notes to Soloist Track” is only used for diagnostic or special purposes. When set, the Soloist track will contain a special track that has a chord written every 2 beats (or whatever the setting for chord resolution is) that contains every note found for the chord. This shows you the type of logic that the Chord Wizard is basing its decisions on. If you encounter a song that gives incorrect results for the chords, you can try this setting and then examine the Soloist track to see the actual notes of the chords. Chord-stepping through the track (using [Ins] and [Del] on the Numpad) allows you to quickly hear the chords.
The setting for “Write Chord Summary Notes to Soloist Track” is only used for diagnostic or special purposes. When set, the Soloist track will contain a special track that has a chord written every 2 beats (or whatever the setting for chord resolution is) that contains every note found for the chord. This shows you the type of logic that the Chord Wizard is basing its decisions on. If you encounter a song that gives incorrect results for the chords, you can try this setting and then examine the Soloist track to see the actual notes of the chords. Chord-stepping through the track (using [Ins] and [Del] on the Numpad) allows you to quickly hear the chords.
|
You can optionally include controllers, pitch bend, patch changes, and lyrics from the MIDI file. |

Practice Window
The Practice Window allows convenient “1-click” access to many Band-in-a-Box features that help you with practicing.
These include the Ear Training dialog, games (Pitch Invasion etc.), Metronome, CopyMe, Sight Reading, 101 Riffs series, and more.
|
To launch the Practice Window, press the [Practice] button on the toolbar and choose Practice Central from the pulldown menu. You can also go to menu Window | Practice Window or use hot keys Alt+Shift+L. |
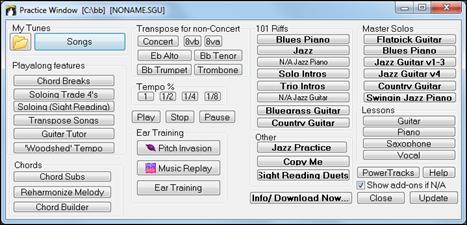
There are several purposes for the Practice Window.
|
Quick access to your favorite/preferred “practice” folders, so that you can setup load in songs without having to navigate dialogs. |
|
One-click access to many of the education-related features of Band-in-a-Box (play along soloing, Ear Training, games). |


|
Handy buttons for on-screen transposition for non-concert instruments and for playing at fractions of the original tempo. |

|
One button access to many of the Band-in-a-Box add-ons “101 Riffs” series and “Master Solos.” N/A indicates other Band-in-a-Box add-ons that are available, but not installed on your computer. |


One button access to many other PG Music educational programs and lessons.
|
Most of these items are “add-on” products, available separately, and are not included in the Band-in-a-Box program. If you have these items installed to your hard drive, the Practice Window will find them if they are installed them to the default directories, and if not, you will be able to point the program to the location of the program, which will be remembered in future sessions. |


![]() This button opens a page with more information about each of the stand-alone programs and add-ons referred to in this dialog. Internet access is required.
This button opens a page with more information about each of the stand-alone programs and add-ons referred to in this dialog. Internet access is required.
![]() PowerTracks Pro Audio is PG Music’s multitrack digital audio and MIDI sequencer. Many people import their Band-in-a-Box songs into PowerTracks and work on them further in that program.
PowerTracks Pro Audio is PG Music’s multitrack digital audio and MIDI sequencer. Many people import their Band-in-a-Box songs into PowerTracks and work on them further in that program.
![]() For items that you don’t have, you can choose to display or not display them on-screen using the “Show add-ons if N/A (not available)” setting.
For items that you don’t have, you can choose to display or not display them on-screen using the “Show add-ons if N/A (not available)” setting.
![]() Press this button if you have just installed an add-on or a program. This will allow you to access it from the Practice Window.
Press this button if you have just installed an add-on or a program. This will allow you to access it from the Practice Window.
More information about all of the add-on programs can be found at www.pgmusic.com/practice.htm
Making and Using Practice Folders
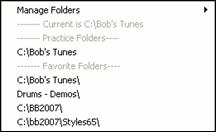
If you are preparing for a performance or a jam session with friends, you likely have a list of songs that you are working on. Let’s say they are in a folder called C:\Bob’s Tunes.
|
Click on the Folder icon. You will then see a menu that lists a Manage Folders submenu, allowing you to create/remove Practice Folders. |
|
This is list of all Practice Folders defined (there likely won’t be any to start with, so you can add them using the Manage Folders menu command). Add a folder that you use frequently to this list. |
|
After the list of Practice Folders, you see a list of “Favorite Folders” – these are the folders that you have visited recently. Once you have selected a folder, you then press the [Songs] button, and you will see a pop-up menu of the file names for that folder, with the current song having a check mark. Load in a song by choosing the menu item. |

Ear Training Tutor
Ear training is an important exercise for all musicians. Now you can practice your ear training with help from Band-in-a-Box. In addition to the common interval exercises (perfect 4th, minor 2nd, etc.), learning to “play-by-ear” for Jazz and Pop music is further enhanced by ear training exercises to recognize common chord types (e.g., Major, Minor, Dominant, etc.).
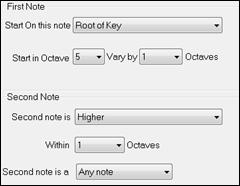
For example, Band-in-a-Box will play a chord and you will have to identify the correct root and chord type. Your score can be tracked, allowing you to monitor your progress. Clicking on the various chord types lets you instantly hear the differences between various chords. Other options include “types of roots and chords to use,” and “voicing types” (open, closed, etc.) – allowing you to customize the ear training exercises for beginner through to advanced. Interval recognition is also customizable from beginner to advanced, with such options as instrument type, octave range, up/down intervals and more.
| |
Press the [Practice] toolbar button and select Ear Training from the pulldown menu to launch the Ear Training Window. Alternatively, press Ctrl+Shift+J or go to menu Window | Ear Training. |
There are 2 modules in the Ear Training Window.
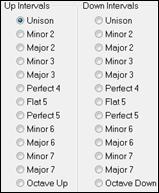
- The Interval Tutor plays note intervals for you to identify.
- The Chord Tutor plays chords (root + extension) for you to identify.
Interval Tutor
![]() Click on the [Interval Tutor] button to launch the Interval Tutor module.
Click on the [Interval Tutor] button to launch the Interval Tutor module.

Click on the intervals to hear them. For example, click on “Minor 3” to hear a minor 3rd interval.
Set the interval types to guess. Pressing the [Easy] button will set it to the easiest (within one octave, second note is always higher, etc.).
![]()
![]()
![]()
![]() Start the game by pressing the [Guess Interval] button.
Start the game by pressing the [Guess Interval] button.
You can control the starting note and the second note in the dialog.
Once the game starts, click on the interval that you think is being played.
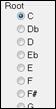
Chord Tutor
![]() Click on the [Chord Tutor] button to enter the Chord Tutor module.
Click on the [Chord Tutor] button to enter the Chord Tutor module.
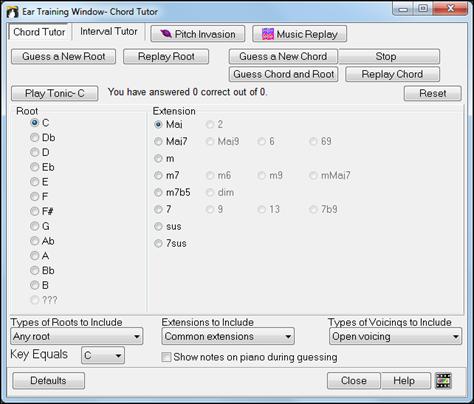
![]() Press the [Play Tonic] button to familiarize yourself with the root note of the scale as a reference point.
Press the [Play Tonic] button to familiarize yourself with the root note of the scale as a reference point.
- Click on any of the other note names to hear that root.
- Click on any of the chord extensions to hear that sound.
Guessing the root
![]() You can test yourself on roots only or root AND extension. Press “Guess a New Root” and you will hear a root played.
You can test yourself on roots only or root AND extension. Press “Guess a New Root” and you will hear a root played.
![]() Press this button to hear the root-to-guess replayed. If you need help, press [Play Tonic – C] to hear the root again.
Press this button to hear the root-to-guess replayed. If you need help, press [Play Tonic – C] to hear the root again.
 |
When you think you know the root, press the root name on the list of note names at the left. |
If you guess incorrectly, you will see a message that says, “Wrong Root.” You will then hear the note that you guessed playing, followed by the root-to-guess note again.
If you guess correctly, you will see a confirmation of that, and can play again.
![]() Press the [Stop] button to stop the game.
Press the [Stop] button to stop the game.
Guessing the Root and the Extensions
![]() The Guess a New Chord game works in the same way as the Root game, except that here you are guessing chord extensions. The root is always whatever the setting is at the left. Click on the extension to guess, and [Replay Chord] button to hear the chord again.
The Guess a New Chord game works in the same way as the Root game, except that here you are guessing chord extensions. The root is always whatever the setting is at the left. Click on the extension to guess, and [Replay Chord] button to hear the chord again.
![]() In this mode, you need to guess both the Root and the Extension. You can guess them in any order.
In this mode, you need to guess both the Root and the Extension. You can guess them in any order.
Click on the root, and when you get it correct you can move on to the extension.
Types of Roots to Include
For the Roots, you can choose which types of roots to include. This can be any of the 12 semitones, or just the scale tones, or just the 1-4-5 of the scale.
Extension to Include
For the extensions, you can include all of the extensions listed in the dialog, or just the subset that are common extensions.
Types of Voicings to Include
The chord extension will be played using the voicing type that you specify in the voicing types combo box. These can be open, closed, or root position voicings. This setting also applies to the voicing used when you are previewing a chord.
Show notes on piano during guessing
If you were an advanced musician, seeing the notes on the piano during the guessing game would be “cheating,” since you’d probably quickly recognize the chord. However, a beginner might benefit from seeing the notes played on the piano screen. If this “show notes on piano during guessing” option is selected, these chords will play on the small piano located on the main program screen.
The score is displayed on the window. You can reset these results to zero by pressing the [Reset] button.
![]()
![]()
Ear Training Games
Learning is best when it’s fun, so we’ve included these exciting games in the Band-in-a-Box Ear Training module for fun times in “the woodshed.”
![]()
![]()
The programs are available via buttons in the ear training dialog, or by dedicated buttons on the toolbar.
Pitch Invasion
![]() Pitch Invasion helps to develop perfect pitch as you shoot down “alien” notes invading from above. You hear the note sound and click on the on-screen piano/MIDI or QWERTY keyboard to shoot it down.
Pitch Invasion helps to develop perfect pitch as you shoot down “alien” notes invading from above. You hear the note sound and click on the on-screen piano/MIDI or QWERTY keyboard to shoot it down.
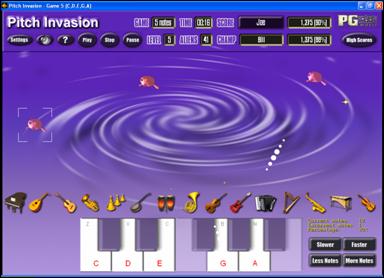
![]() For Pitch Invasion, choose a level that will specify the # of note types that will be invading. The LEVEL determines the speed of the notes.
For Pitch Invasion, choose a level that will specify the # of note types that will be invading. The LEVEL determines the speed of the notes.
To shoot the aliens, click on the on-screen keyboard, MIDI keyboard or QWERTY keys.
![]() The program settings allow you to customize the game.
The program settings allow you to customize the game.
![]() Press the [?] button for more information.
Press the [?] button for more information.
Music Replay
![]() Music Replay develops your pitch, rhythm, and melody recognition by replaying what the program plays, in note, rhythm, or melodic modes.
Music Replay develops your pitch, rhythm, and melody recognition by replaying what the program plays, in note, rhythm, or melodic modes.
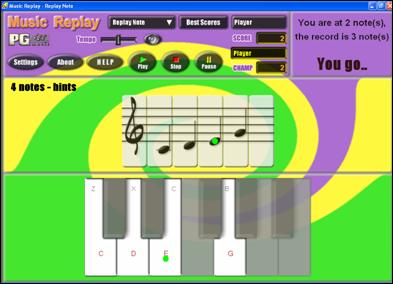
For Music Replay, choose the MODE of the game.
There are three modes:
- Note Replay
- Rhythm Replay
- Melody Replay
![]() Set the Level to make the game harder.
Set the Level to make the game harder.
Vocal Wizard
The “Vocal Wizard” displays the best song keys for your vocal range!
This feature helps you choose the best song key for your vocal range. Open the Vocal Wizard, enter your vocal type (baritone, tenor, etc.), or choose a custom range. Then the wizard analyzes the song and recommends the best keys for that song. Options available to “include/exclude falsetto range,” “restrict choices to these keys […],” and “transpose now.”
Before we enter the Vocal Wizard, we’re going to load in the song Old Folks at Home.MGU (present in the C:\bb\Documentation\Tutorials\Tutorial - BB2005 folder). This song is in the key of F, so we will use the Vocal Wizard to find the best key for a baritone.
To enter the Vocal Wizard, choose the menu item Window | Lyrics | Vocal Wizard.
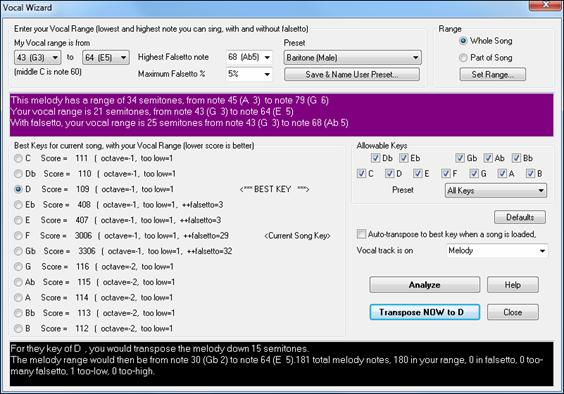
You can see from the screenshot that the Vocal Wizard has picked the key of D (colored green) as the best key for the song, using the baritone vocal range. Other recommended keys are colored yellow. Un-recommended keys are colored grey and include the current key of the song (F).
Let’s explore the areas of the Vocal Wizard screen.
There are 4 areas that require your input.
1. Entering your Vocal Range.

Here you enter your “comfortable” vocal range, from lowest note to highest note. If you can sing falsetto, you can also enter the highest falsetto note, and the % of falsetto notes that would be acceptable as falsetto notes.
You can also select a preset (like Baritone Male or Contralto Female). Or you can select one of 8 “User Preset slots” to enter and save a custom range (if you press the [Save & Name User Preset] button)
2. Selecting the keys that would be “allowable.”
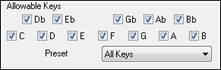
Most musicians have favorite keys, so this area allows selection of keys that would be acceptable for the Vocal Wizard to choose. For example, if we choose “Jazz” keys, we will see that the Vocal Wizard now recommends the key of C instead of D.
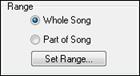
3. Setting the range of the song to analyze (usually the whole song). Normally you’d want to analyze the whole song, but this allows you to select a partial range.
4. Selecting the track to analyze. You’d usually pick the Melody track but can also choose the Soloist track.
![]()
![]() You can then analyze the Melody by pressing the [Analyze] button.
You can then analyze the Melody by pressing the [Analyze] button.
Most functions automatically re-analyze the song but pressing the [Analyze] button forces a re- analysis of the song. This displays the analysis of the song.
A purple area describes the current range of the song, low note to high note, and compares it to your vocal range.

The radio buttons show each of the 12 semitone keys and show a score for each key. The lowest score is the best.
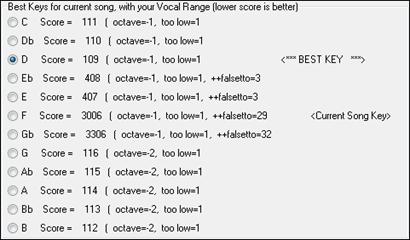
In the example Old Folks at Home, you can see that D is the best key, but any of the keys from G to Db are also good keys in the selected vocal range.
The area in black at the bottom gives an analysis of the vocal range if the song was transposed to the chosen key.

![]() Now that the Vocal Wizard has told us the best key for this song, we can either close the dialog, or transpose it now to the recommended key (or any other key that we have selected with the radio buttons.
Now that the Vocal Wizard has told us the best key for this song, we can either close the dialog, or transpose it now to the recommended key (or any other key that we have selected with the radio buttons.
![]()
The Vocal Wizard can also work in an automatic mode, transposing a song to the best key as soon as it is loaded, without having to visit the Vocal Wizard dialog. This is done by checking the “Auto-transpose” checkbox. By doing this, you can ensure that any song you load will be in the best key for your vocalist! And if the key isn’t deemed to be ideal, just visit the Vocal Wizard to see an analysis of the ranges to pick an alternate key.
Reharmonist (Chords for a Melody)
Generate Chords for a Melody
Generate chords for a melody, or an improved chord progression for a melody, with the “Reharmonist” feature. This feature generates a chord progression in the chosen genre, based only on the melody.
The idea of the Reharmonist is to generate a completely new chord progression for a melody, in a genre that you choose (Jazz, Country, etc.). This ignores any existing chords in the song.
There are 2 separate windows for the Reharmonist feature.
- Reharmonize entire song with a new chord progression.
- or -
- See a list of possible reharmonizations for a given area of a song.
Generate a New Progression
To generate an entirely new chord progression for a complete song or a portion of a song, go to menu Edit | Chords | Auto-Generate Chord Reharmonization). You will then see the Select Re-Harmonist dialog.
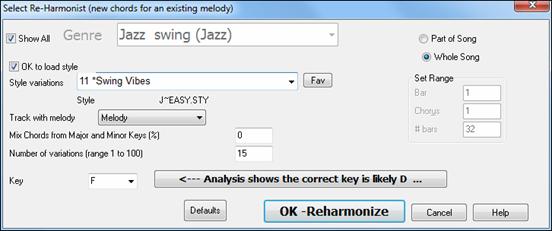
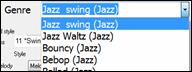
The first thing you should do is set the “Genre” for the reharmonization. For example, if you want “Jazz Swing” genre, choose that in the genre drop down.
You will then get typical Jazz chords.
Verify that the key is correct. Band-in-a-Box analyzes the melody and gives its best guess as to the best key for the song. If it is different from the current key, Band-in-a-Box will suggest the new key, and you can press the button to set the key to the new key.
![]()
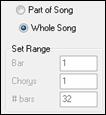 |
Set the region of the song that you want reharmonized. Usually this will be the “Whole Song.” |
![]() Press [OK-Reharmonize]. You will now get a brand-new chord progression for the melody.
Press [OK-Reharmonize]. You will now get a brand-new chord progression for the melody.
See a List of Possible Reharmonizations
Use the feature interactively by displaying a menu of possible chord progressions for a portion of the melody and audition them to choose the best one using the “Bar Reharmonist.” This allows you to hear some new chord progressions for existing melodies, or brand-new progressions for tunes without chords.
To do this, choose Edit | Chords | Chord Reharmonist Dialog (choose your own). This shows you the current bar in the song (for example, bar 7). It shows a list of suggested chord progressions for the current melody, based on the melody and genre that you choose.
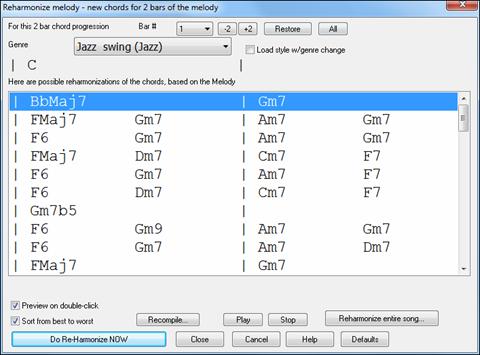
![]() Choose a chord progression, and press [Do-Reharmonize NOW] and the program will insert that progression.
Choose a chord progression, and press [Do-Reharmonize NOW] and the program will insert that progression.
![]() The progressions are sorted in alphabetical order, or from “best to worst” depending on this setting.
The progressions are sorted in alphabetical order, or from “best to worst” depending on this setting.
Chord Substitution Wizard
Reharmonizing a song with the Chord Substitution Wizard is a fun and educational way to perform or practice a familiar song in a brand-new way. For example, if you had chords such as “Dm7 G7 Cmaj7,” a list of substitutions including the tritone substitution “Dm7 Db7b5 Cmaj7” would be offered to you for use in your song.
There are 2 ways to get chord substitutions
- Let Band-in-a-Box show you a list of possible substitutions to pick from yourselfby accessing Edit | Chords | Chord Substitution Dialog menu item.
- Let Band-in-a-Box pick them automatically by accessing Edit | Chords | Auto-Generate Chord Substitutions menu item.
Chord Substitution Dialog
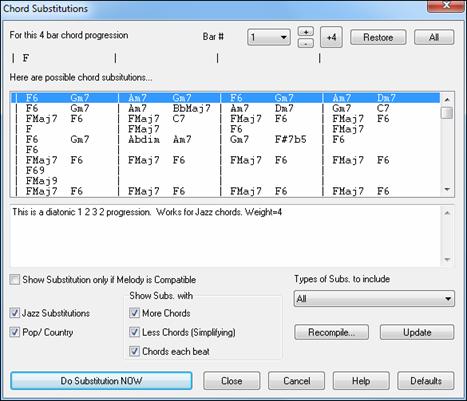
This dialog depends on what chords were present at the bar that was currently highlighted. This bar number is shown in the dialog and may be changed.
In the example shown, the chord was an F7 chord, so the substitutions shown are for an F7 chord. The substitutions shown may work for up to 4 bars, depending on the substitution. In the examples above, the substitutions work for 2 bars.
Jazz Substitutions / Pop/ Country You can control what types of substitutions to see by using these checkboxes. Some substitutions include more chords than the original, and some simplify the progression, and these can be viewed using the checkboxes. You can elect to exclude substitutions that have a chord on each beat.
Types of Subs. to include This combo box will filter the substitutions to include only the best substitutions or all of them.
[Recompile] This button is only used if you have edited the chordsub.txt file to add your own substitutions. This recompiles the file and takes about 1 to 2 minutes.
[Do Substitution NOW] Press this button once you see a substitution that you like so that you can enter it onto the worksheet directly. Double-clicking on the substitution line will also accomplish the same. You can then move the current bar to the next part of the song that you need a substitution for and repeat the process.
You can UNDO the substitution by pressing the [Restore] button, or the [All] button to UNDO all substitutions.
Auto Chord Substitutions
You can quickly auto-generate substitutions for an entire song, or portion of a song using the auto-substitution dialog, which is accessed with the menu command Edit | Chords | Auto Generate Chord Substitutions.
For example, we can generate substitutions for the !Freddie.MGU song. Here is the original chord progression.
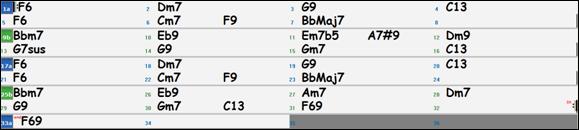
By using the auto-substitution dialog, we can generate substitutions for the whole song, and we get this result:
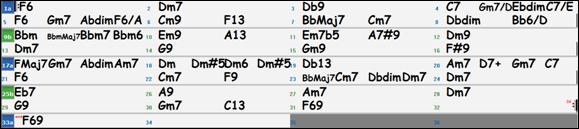
You can see that Band-in-a-Box chose the substitutions for about 70% of the chords in the song (that’s what we told it to do in the dialog). It began by replacing the F6 chord with an Fmaj7 Gm7 Abdim Am7 progression. Some of the substitutions chosen are even more advanced than that (replacing two bars of Bbmaj7 with Bb6 Ebmaj7 Dm7 Gm7 | Bbmaj7 Cm7 Dbdim Dm7 for example).
Here are the settings in the auto-substitution dialog that produced this result:
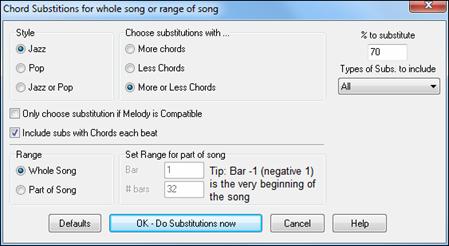
If you’d like Band-in-a-Box to only generate chords for a certain range of bars, you should highlight that range of bars in the Chord Sheet first, and then launch the dialog. The Range will then be set to “Part of Song” and the “Bar” and “# bars” settings will also be set. You can override these settings with manual settings, if necessary.
Chord Builder
You can right-click on any chord to instantly hear how it sounds or use the Chord Builder feature to audition different chords until you find the one that sounds best to you. In other words, you can enter chords “by ear” - without having to know the actual chord names or any music theory. This feature also illustrates the differences between various chord types.
|
Launch the Chord Builder by pressing the [Chord Builder] button, or right-clicking on the Chord Sheet and selecting the menu option Chord Builder, or by choosing the Window | Chord Builder menu option. |
The Chord Builder is designed so it fits entirely above the Chord Sheet. This means that it can be left open as you work entering chords into Band-in-a-Box. Remember that you can also play chords in from the MIDI keyboard by pressing Ctrl+Enter after you’ve played a chord.
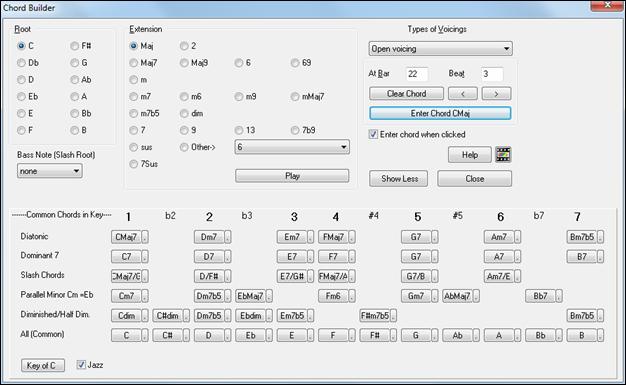
You can click on the root of the chord in the “Root” group, and the “Extension” (Maj7 etc.), and also an alternate “Slash-Note” root. For example, to make the chord F9/A, you would click on the “F” root, the “9” extension, and the Slash Root of /A. As you click on them, you will hear the bass note played on the Bass part, and the extension played on the Piano track.
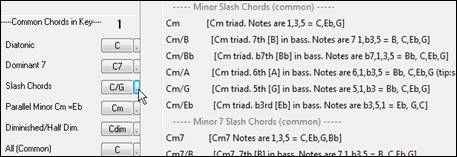
Chord Theory Section
This section displays and suggests chords that are most popular in the current key.

The top row is diatonic chords. Other rows add additional chords that are part of the key, such as dominant 7th approach, slash chords, parallel minor, diminished, and more. This allows you to quickly enter chords by clicking on the most common chords in the key. For example, if you stick to the top row (diatonic), the chord progression you enter will be a typical song progression. Choosing from other rows will add variation and color to the progression. This is a fun, interactive way to enter and explore chord progressions, and learn music chord theory at the same time.
You can enable the “Jazz” checkbox to show jazz chords (e.g. sevenths like Maj7) instead of pop chords (e.g. triads like C). The top row has the most common chords in the key of F, which are the diatonic chords.
F |
Gm |
Am |
Bb |
C |
Dm |
Em7b5 |
(in pop mode) |
FMaj7 |
Gm7 |
Am7 |
BbMaj7 |
C7 |
Dm7 |
Em7b5 |
(in jazz mode) |
So, you can just click on chords on this row to enter your chord progression using the most popular chords. Lower rows have additional chords in the key of F, like G7, A7, etc.
Diatonic: These are the diatonic chords, made up only of notes in the key. They are the most common chords used in the key, with the 1, 4, and 5 chords being the most common.
Dominant 7: These chords are considered to be in the key when they resolve up a 4th to a scale tone. For example, A7 resolves to D, which is a scale tone in the key of C.
Slash Chords: The diatonic chords are also commonly used with different chord tones as the bass note. They are called slash chords, like C/E.
Parallel Minor: For a major key like C, the chords from the Cm key are also used commonly.
Diminished/Half Dim.: The most common diminished chord used is the 1 diminished family [Cdim7, Ebdim7, F#dim7] in the key of C. Half-diminished chords (e.g. #4m7b5 [F#m7b5] and 7m7b5 [Bm7b5]) are used as 2-5-1 leading to minor diatonic chords.
All (Common): This row lists all commonly used chords with the root in the key.
Clicking on the small button on each row will list more suggestions.
If you are happy with the sound of the chord, you can press the [Enter Chord] button to enter the chord at the bar and beat specified. If you would like the chord to be inserted automatically when you click on the note/extension names, select the “Enter chord when clicked” option. This will advance the Bar/Beat position. You can change the Bar/Beat settings to move to a different bar. The [<] & [>] buttons move 1 beat on a right-click, and 2 beats on a left-click.
Rhythm Guitar Chord Tutor
Use the Guitar Tutor to analyze any song. This feature will show the chords that are playing on the virtual guitar fretboard, in your choice of a Jazz, Pop, or Folk perspective. The Guitar Tutor is a fun way to learn about new guitar chords while playing along with your favorite Band-in-a-Box tune.
The Rhythm Guitar Chord Tutor is most useful on styles that aren’t guitar styles, because the guitar styles already have a guitar part that you can learn from. Using the tutor, you can see (and optionally hear) guitar chords played on the guitar fretboard. This teaches you how to play the chords on guitar.
| |
To turn the Rhythm Guitar Chord Tutor on, launch the Guitar Window and press the [Tutor] button. |
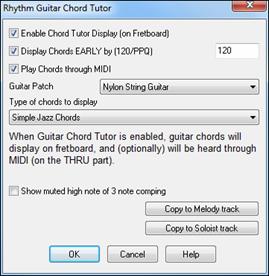
Enable Chord Tutor Display - This setting silently displays the chords on the guitar fretboard.
The Display Chords EARLY by (120/PPQ) is an “anticipate” mode that plays the next chord X beats in advance, allowing time for the user to prepare. If set to 120, the tutor chords will appear a full beat early.
Play Chords through MIDI - To hear the chords, select the “Play Chords through MIDI” checkbox.
Guitar Patch - You can select the patch to use directly from the Tutor dialog.
Type of chords to display - The tutor will display Jazz, Pop, and Folk voicings in easy, medium, and advanced forms. The advanced forms use inversions, and changing patterns of chords, while the easier ones just stick to the common “campfire” chords.
Half Note (sax) chords use the advanced Jazz Guitar “highest-4-strings-comping mode.” This usually plays on the 4 highest strings, and it plays several chords over a single chord. For example, for 2 bars of Cmaj7 it might play Cmaj7-Dm7-Ebdim-Em7 all played as half notes. There are also tutors for the alternate tunings like DADGAD, Open G, etc. They can be selected from this drop-down list.
Show muted high note of 3 note comping - One of the tutors uses 3 note Jazz voicings to simulate the famous Big Band chord guitar comping styles. If you use this, you will only see 3 notes in the chords of course. Since it sometimes helps to see the entire 4 chord voicing in this case, there is the option to show the muted note as well.
Copy to melody track / Copy to Soloist track - Pressing either one of these buttons will send the chord to the appropriate track.
The Guitar Tutor stays enabled until you change the Guitar track to another track (for example, to change it to the Bass track). You can easily re-enable it by clicking on the [Tutor] button again.
Chord “Breaks”
This feature is great for practicing tempo control.
Select the # of bars, and Band-in-a-Box will play for, say 4 bars (selectable), and then will rest all instruments for the next 4 bars. During the silence, you keep playing (comping, drums, melody, etc.), trying to stay in tempo. Drummers can mute the drum part. When the band comes back in after the 4 bars, you will get instant feedback on how well you have maintained the tempo, as indicated by whether the band comes back in time with you or not.
Once set, this feature works automatically with all songs until you turn it off.
![]() To access the Chord Breaks feature, press the [Chord Breaks] button from the Practice Window and then select “Insert Breaks.”
To access the Chord Breaks feature, press the [Chord Breaks] button from the Practice Window and then select “Insert Breaks.”
![]()
![]() It can also be launched from [Prefs] [Arrange].
It can also be launched from [Prefs] [Arrange].
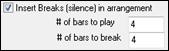 |
You then choose how many bars the program should play, and how many bars the program should not play. |
This setting remains in effect for all songs. Turn it off if you want to resume normal playing of songs.
Scale Wizard
The Scale Wizard allows you to easily generate scales, which appear as notation on the Soloist track. Options include Instrument Range, Patch Selection, Jazzy Mode (will use Lydian dominant scales for some 7th chords), and Diatonic Mode (keeps scales relative to the song key).
You can access this feature from the Soloists | Scale submenu.
![]()
The menu item Generate Scales opens the dialog, which allows you to set options for scales that will be generated. If Auto-Generate Scales when play pressed is checked, scales will be automatically generated when a song is played. You can view the scales in the notation and the on-screen guitar and piano.
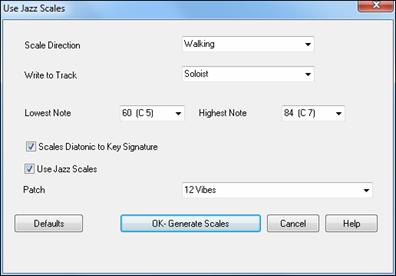
Scale Direction - When playing a new scale, either start on the root of the scale (going up) or start with the closest scale tone (moving up or down). The two modes are:
1. Ascending. The scales will always start on the root that is in the octave above the Lowest Note that is set and will play in ascending order.
2. Walking. The scales will start on the nearest scale tone to the previous tone that was played. The notes will ascend to the Highest Note setting, and then descend (by scale tones) down to the Lowest Note.
Write to Track - Choose Melody or Soloist track to write the scales to
Lowest Note is the lowest note to play for any scale. C5 (note 60) is middle C.
Highest Note is the highest note to play, used when the scale direction is up and down (Walking).
Scale Tones Diatonic to Key Signature - If diatonic, minor scales will be according to the key (VI minor is Aeolian etc.). Otherwise all minors will be Dorian.
Use Jazz Scales - If set, will use Lydian b7 chords. Chords like Bb7 in the key of C will have Lydian b7 scales (i.e. A#4 in the scale).
Patch - Send this MIDI patch (instrument) when playing the scale.
[Defaults] sets to default values.
[OK- Generate Scales] writes the scales to the notation of the selected track, Soloist or Melody.
MIDI File to Style Wizard
Making styles with the Style Wizard is a process involving:
- Loading a MIDI file into the Style Wizard.
- Listening to the MIDI file by muting channels to identify parts.
- Picking the channels to use for the BB Parts.
- Picking the snapshot bars for the “a” and “b” substyle.
- Pressing the [Generate NEW style…] button.
This section will discuss the various items in the Style Wizard dialog and the Style Wizard Additional Settings.
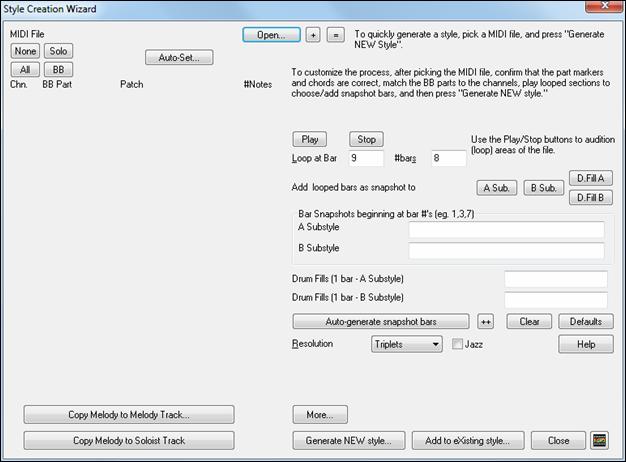
The Style Wizard is used to generate a Band-in-a-Box Style from a MIDI file. The Style Wizard does this by analyzing the file and creating patterns emulating the notes and rhythms for the style. First off, you need to get a MIDI file to use.
Using the MIDI File to Style Wizard
The Style Wizard converts any MIDI file to a Band-in-a-Box style. In this tutorial, we’re going to load in the violet.MID found in the C:\bb\Documentation\Tutorials folder and convert it to a style, which we will call Violet.STY.
| |
Start with a new song and press the [StyleMaker] button and select Style Wizard from the pulldown menu to launch the Style Wizard. Or you can go to menu File | StyleMaker | Style Wizard. |
The dialog is largely empty because we haven’t chosen a MIDI file yet.
![]() Press the [Open] button and load in the file C:\bb\Documentation\Tutorials\violet.MID. The Style Wizard then does the following automatically.
Press the [Open] button and load in the file C:\bb\Documentation\Tutorials\violet.MID. The Style Wizard then does the following automatically.
The chords for the MIDI file are interpreted and written on the Chord Sheet.
The “part markers” for the file are displayed on the Chord Sheet. For violet.MID, the Style Wizard has found the correct part markers – by looking for drum fills and other signs of a part change – and has assigned substyle “a” to all of them. We will change some of them to “b” later.
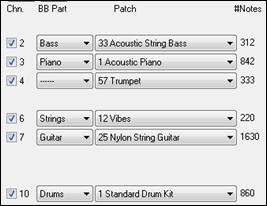
The channels used in the MIDI file are displayed in the dialog, with the patches used and # of notes played on each channel. (For violet.MID you can see that channels 2, 3, 4, 6, 7, and 10 are used.) |
|
The Style Wizard suggests which bars (“snapshots”) to include in the style. The suggested bars are bars with all of the “BB Part” instruments. |
|
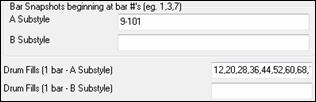
Usually, you’d want to customize these snapshot bars to control which bars get included in the “a” or “b” substyle. In the violet.MID style, the Style Wizard has offered to include Bars 9-101 (inclusive) and wants to put them all on the “a” substyle. Continuing on, we want to make a great sounding style, so it is important that we have the following two items correct.
|
The “BB Parts” have to be correct. We can audition the MIDI file by playing a loop and listening to the MIDI file and muting channels by clicking on the “Channel” checkboxes. From that, we can hear the individual parts and assign them correctly, as we would like them in the style. By playing the MIDI file inside the Style Wizard we can tell which bars to use for the “a” and “b” substyles. |

The Snapshot Bars should be correct for the “a” and “b” substyle. You need to tell the program what bars to use for the “a” substyle and for the “b” substyle. The program makes an attempt to guess at this, but since MIDI files can contain many different substyles (and a Band-in-a-Box style allows only 2), you would likely want control over these snapshots yourself.
Tip to help you choosing which bars to use:
To listen to the MIDI file, you can either exit the Style Wizard dialog and just play the song like any other Band-in-a-Box file or play a looped section inside the Style Wizard using the [Play], [Stop], and “Loop at Bar” settings.
![]()
OK, the Style Wizard has already made the correct settings for the “BB Parts” for us, so we don’t need to make any changes there. Let’s move to the Snapshots section and enter the bar numbers that correspond to the substyles that we’d like for the Jazz tune. After listening to the tune, we notice that there is a “2-feel” Jazz section, and a “4-in-the-bar” section. We want those as “a” and “b” substyles, so we enter the bar #s that correspond to these settings.
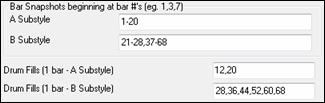
In the Snapshots area of the Style Wizard:
- Enter “1-20” for the bars for the “A” Substyle.
- Enter “21-28, 37-68” for the “B” Substyle.
- Enter “12, 20” for the “A” Drum Fills.
- Enter “28, 36, 44, 52, 60, and 68” for the “B” Drum Fills.
![]() Press [Generate NEW style…], choose a name for your style, and the style will be made.
Press [Generate NEW style…], choose a name for your style, and the style will be made.
Let’s call it Violet.STY. Now to hear your style! You could play the style with any song of course, by loading in a song and then loading in the Violet.STY It is easily available from the Favorite Styles dialog (Shift+F9).
For this tutorial, load in the song V_TEST.MGU that we made for you. That’s a Jazz Swing song using different chords than Violet, and it uses the Violet.STY (So you need to have made that style before you try to play the song or you will get a “Violet.STY not found” message.)
Save the existing song before loading in the new song. When Band-in-a-Box saves a song that has an entire MIDI file on the Melody or Soloist tracks it gives it a special MGX extension. So, you will be saving the file as Violet.MGX.
Alternatively, if you’d prefer to play the Violet.STY style without loading in another song, you can do it as follows. Since the Violet.MGX file currently has the entire MIDI file on the Melody track the first thing we need to do is Mute the Melody (Alt+8 or right-click on the Melody part at the top of the screen). The next thing is the Enable the Style, by choosing File | Load Style Special | Style is Enabled so that this item has a checkbox.
Auto Endings for Styles without Endings
If you’ve made a style, and haven’t included an ending, a 2-bar ending can be generated automatically, based on the style. This makes it easier to make complete styles using the Style Wizard. To hear an example, load in the song C:\bb\Documentation\Tutorials\Tutorial - BB2005\No Ending.MGU. This song uses NOENDING.STY, a style that doesn’t have an ending. An ending will be generated automatically for this style.
So, we’ve made our first style! In summary, making styles with the Style Wizard is a process involving:
- Loading a MIDI file into the Style Wizard.
- Listening to the MIDI file by muting channels to identify parts.
- Picking the channels to use for the BB Parts.
- Picking the snapshot bars for the “a” and “b” substyle.
- Pressing the [Generate NEW style…] button.
Advanced Settings and Preferences
![]() Click on the [More] button to open the Style Wizard Advanced Settings and Preferences.
Click on the [More] button to open the Style Wizard Advanced Settings and Preferences.
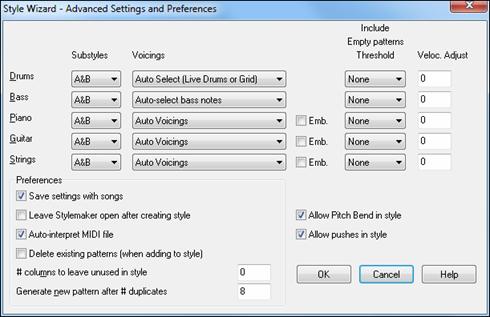
There are 2 sections to this dialog, Advanced Instrument Settings and Preferences.
Advanced Instrument Settings
The advanced instrument settings allow settings for the instruments (drums / bass / piano / guitar / strings) to be included in the style. The settings are:
 |
The Substyles determines whether the instrument is included in the “A,” “B,” or both “A&B” substyles. For example, if you want to make a style that only uses the strings on the “B” substyle, set the strings instrument part to “B” only. |
The Voicings settings determine, for the various instruments:
|
Drums (“voicings”): Whether the patterns will use live or grid style patterns. Default mode is “auto,” which normally uses live patterns, but you can force it to use live or grid style patterns. Live patterns have higher resolution and can use more instruments, so in general are the better choice. |
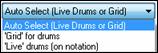
|
Bass (“voicings”) determine if the bass part will use All notes / Scale tones only / Root 3rd, 5th,7th / Root, 3rd, 5th / Root and 5th / or just the Root. The default is “Auto-select” which usually allows all 12 semitones. |
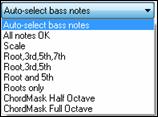
|
Piano, Guitar, and Strings Voicings determine how the Piano patterns will be voiced. The choices are “Auto,” “Include Full Voicings,” “Tritones only (3rd/7ths),” “Power Chords (Root/5th),” “Chord Mask Half Octave,” and “Chord Mask Full Octave.” The auto-setting usually uses the “Include full voicings.” If the part uses 2-note chords, you should over-ride this setting to “use tritones” so that the most important notes of the chord (the tritone) will get included. |
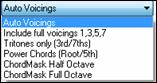
You can also use chord masks so that specific patterns over chords will get added to your style, and they will play exactly as in your MIDI file (just transposed). Set the voicings to use “Chord Mask Full Octave” or “Chord Mask Half Octave.”
![]() You wouldn’t make a Style Wizard style from scratch using chord masks, because there need to be generic patterns in the style. Therefore, you do it as a 2-stage process.
You wouldn’t make a Style Wizard style from scratch using chord masks, because there need to be generic patterns in the style. Therefore, you do it as a 2-stage process.
First, make the style using generic patterns (e.g. Voicing type “Auto”) and then change voicings to Chord Mask, and add those to the style. As with other Style Wizard features, it is important that the chords and part markers on the Chord Sheet be very accurate. If they aren’t, you should fix them before generating a style.
![]() The Emb. (Embellish) checkbox determines if the patterns for Piano, Guitar, and Strings will be embellished. If embellish is selected on a chord like D7 (in the key of C) 13ths, 9ths, and #11 notes might be added to embellish the chord. A Jazz piano style would likely use this.
The Emb. (Embellish) checkbox determines if the patterns for Piano, Guitar, and Strings will be embellished. If embellish is selected on a chord like D7 (in the key of C) 13ths, 9ths, and #11 notes might be added to embellish the chord. A Jazz piano style would likely use this.
|
The Include Empty Patterns Threshold setting defaults to None. Possible settings are None / 2 beat / 1 bar / 2 bars. If set to “None,” the instrument will always play in the style, and if set to “1 bar,” there will be “spaces of silence” up to 1 bar long (perhaps longer if chained together) in the style for that instrument. If an instrument is used sparsely in a style, set this setting to something higher than none. |
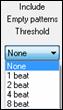
|
The Velocity Adjust will make an instrument louder or softer in the style. |
Save settings with songs
The song will be saved as an MGX file, since the Melody track type is Multichannel and contains the MIDI file. If you select this, the Style Wizard settings are all saved with the MGX file.
Leave StyleMaker open after creating style
If set, after generating the style, the StyleMaker is left open for you to examine/edit the style directly.
Auto-interpret MIDI file
When set, the Style Creation Wizard will set the channels, BB Parts, and snapshots for you. Normally this setting should be left on.
Delete existing patterns (when adding to the style)
If this option is set when you create style patterns to add to an existing style, the entire instrument will first be erased in the style for any instrument used in the new style. When you generate a style by adding to an existing style, the StyleMaker is then opened up, allowing you to pick a new name for the style (so you don’t overwrite the existing style).
# columns to leave unused in the style
If set to zero (the default), the Style Creation Wizard can create the biggest style possible – filling up the rows completely with patterns. But if you set this to a non-zero value it will limit the # of patterns that can be made. Since there are 30 rows in the StyleMaker, you can set this setting from 0 to 29.
Generate new pattern after # duplicates
The Style Creation Wizard won’t insert patterns unless they are unique compared to the ones already entered. But (with this setting at the default of 8), after 8 duplicates of the same pattern, a 2nd pattern will get entered that is a duplicate of another pattern. Setting this to zero would mean that every pattern would get entered (regardless of whether it was unique); setting it to a high number like 200 would mean that only truly unique patterns are entered. To maintain the correct balance in the style, since the maximum weight of a pattern in the StyleMaker is 8, this setting should be left at 8 in most situations. If your style is “filling up” all of the available columns, then set this to a higher number.
Allow Pitch Bend in style
If set, pitch bend present on the MIDI file will be included in the style. Make sure that the MIDI file pitch bend range = two semitones.
Allow pushes in style
If set, the style will allow pushes (playing instruments before the beat). This is done by setting the push values in the individual pattern’s options.
Unconditional 30-Day Money Back Guarantee on all PG Music products purchased from PG Music Inc.
PG Music Inc.
29 Cadillac Ave Victoria BC Canada V8Z 1T3
Sales: 800-268-6272, 250-475-2874,+ 800-4746-8742*
* Outside USA & Canada where International Freephone service is available.
Access Codes
Tech Support: Live Chat, support@pgmusic.com
 Online now
Need Help?
Customer Sales & Support
|
Phones (Pacific Time) 1-800-268-6272 1-250-475-2874 |
||
| Live Chat | ||
| OPEN | Online Ordering 24/7 |
|
| OPEN | Forums, email, web support |