
Search Manual
RealBand® 2022 for Windows® User’s Guide
Chapter 5: Using MIDI Features
Overview
RealBand is a full-featured MIDI sequencer for Windows with the added ability to create automatic accompaniments in its BB Tracks. If you want to know how to create MIDI tracks and BB Tracks please see the BB Tracks and MIDI tracks chapter. This chapter has instructions for using the many powerful MIDI features in RealBand.
Record and edit music for playback through your sound card or MIDI synthesizer as configured in the MIDI Driver Setup. MIDI music can be displayed in standard music notation on the screen, and also with the on-screen piano keyboard or guitar fretboard. RealBand MIDI sequences are saved in its native sequence file format with the file extension .SEQ. RealBand also includes full support for saving, playing, and editing Standard MIDI files (*.MID) and Karaoke files (*.KAR).
Using DXi and VSTi Synthesizers
DXi and VSTi software synthesizers allow RealBand to play high quality sounds directly through your computer’s sound system without external MIDI hardware. Connecting RealBand to the software synth as a plug-in has several advantages over connecting as a MIDI driver.
The plug-in allows RealBand to merge/sync in any existing audio file (vocals etc.) with the synth output. You can also directly render your performance to a .WAV file using the DXi or VSTi plug-in.
To use DXi/VSTi soft synths with RealBand, you can think of them as a type of “MIDI Output Driver.”
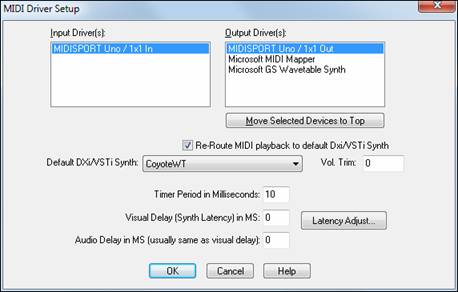
You can either visit the MIDI Driver Setup dialog (Options | Preferences | [MIDI] tab | [MIDI Devices] button) and select the “Re-Route MIDI Playback to Default DXi Synth” checkbox to send all MIDI playback to the default DXi synth, or you can assign DXi synths to individual tracks with the option to set all MIDI tracks to the same port.
![]()
![]()
Routing to Default DXi/VSTi Synth
The Default DXi/VSTi Synth: combo box lets you select which DXi or VSTi synth is used as the default DXi synth.
The Re-Route MIDI Playback to Default DXi/VSTi Synth setting will cause RealBand to re-route all MIDI playback to the Default DXi/VSTi synth. This is the easiest way to use a DXi or VSTi softsynth for playback. If this option is checked, then all MIDI playback output will be routed to the default DXi/VSTi synth regardless of the MIDI track’s port number.
Assigning DXi or VSTi Synths to Tracks
To assign a DXi/VSTi synth to a particular MIDI track, select the track in the Tracks window and then click on the Disclosure Triangle.
![]()
![]() The Disclosure Triangle will reveal more information about a track by making the track row height taller.
The Disclosure Triangle will reveal more information about a track by making the track row height taller.

The [Edit DXi] button launches the DirectX/VST Window.
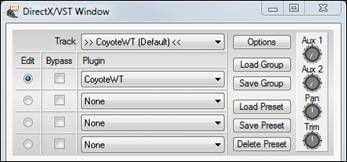
In the DirectX/VST Window you can select the type of DXi/VSTi softsynth to use and also see a control panel display of the softsynth that allows you to make settings directly for your DXi or VSTi synth.
The settings panel that opens is either for the default DXi synth (16th DXi synth slot which is MIDI port 32) or the current DXi port number if the track is set to a valid DXi port (17-32).
![]()
The DXi/VSTi softsynth will convert the MIDI information to audio, which RealBand will play back through your sound card to audio speakers.
Rendering Songs to Audio with DXi/VSTi
Rendering songs to audio in RealBand is much easier if the MIDI tracks are using a DXi (or VSTi) synth.
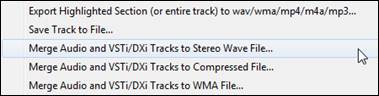
Rendering DXi MIDI tracks to audio is as simple as selecting the Render | Merge Audio and DXi Tracks to Stereo Wave File menu command. You will be prompted for a wave file name, and then RealBand will render to the .WAV file. It’s as simple as that.
Remember that audio tracks will also be rendered, so if you only want to render MIDI, then be sure to mute all audio tracks first.
Rendering Individual Tracks to Audio
Right-click in the Tracks window to access these audio rendering commands.
Auto Convert Individual MIDI Track to WAV File
Choose this command to convert any MIDI track to a .WAV file. RealBand will automatically render using a DXi or VSTi synth. WAV files can be exported to other sequencers or Windows Media Player.
Auto Convert Individual MIDI Track to Audio Track
It is easy to convert any MIDI track to an audio track. RealBand will automatically render using a DXi or VSTi synth and import the audio into the first available track in the Tracks window.
Loading and Playing Songs
Loading a Song
To load in a new song, choose File | Open. You will then see a list of files available for use with the program.
To see the custom Open dialog, go to Options | Preferences(Ctrl+F5) and select the checkbox for “Long File Names use custom open/save dialog.”
![]()
This lets you use a more advanced custom file dialog.
This dialog lets you choose a font, and it will remember the dialog’s window size and placement along with the currently selected font. It also has a tree button that lets you view the directory structure, and a button that lets you choose between details mode and list mode. RealBand will remember these settings the next time you load or save a file using the custom file dialog.
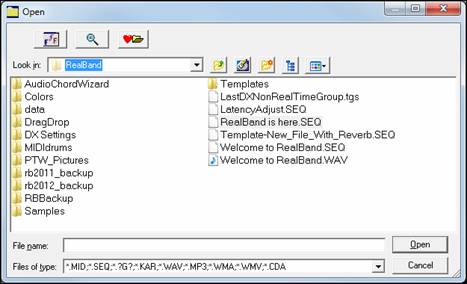
The font selection button lets you use any font on your system for the file dialog, in your choice of font size and style. |
|
|
The find button in the custom Open dialog lets you search for a file within the current folder, useful when a folder has many files. |
|
The favorite folders button in the custom Open dialog will let you quickly change the current folder by selecting from a list of “favorite” folders. |
RealBand will remember up to 25 folders from which you had previously loaded files. You can quickly select a folder and instantly go there without having to navigate through the Windows tree structure.
|
Let’s load in the demo song I Said It Before. The file name is i_said.seq. Open the song as you would any file, either with a double mouse click on the file name or by selecting the file name in the dialog and then clicking on the [Open] button. |
The song title and file name appear in the status bar at the top of the screen.
|
The song’s time signature and key signature are seen below the song title and directly above the on-screen piano keyboard. |
|
The song tempo is seen to the right of the time signature and key signature. Click in the tempo field to open the Tempo dialog and type in the tempo in beats-per-minute (bpm). |
Use the up/down scroll arrows to change the tempo without typing it in again, or click the [-] button four times in tempo and RealBand will set its tempo to the four beats (three for a waltz) that you just tapped.
If you click the [=] button four times it will set the tempo and start the song playing. You can also use the minus and equals keys on the computer keyboard to do this.
Use the square bracket [ ] keys to change the tempo by +/- 5 bpm.
Precise “Floating Point” Tempos
RealBand supports precise floating-point tempos, such as 120.514 BPM. This makes it easier to sync MIDI tracks to prerecorded audio tracks if the audio tracks weren’t recorded exactly at an integer tempo. This also is what lets RealBand play a song in sync to an existing audio track after the Audio Chord Wizard has worked its magic.
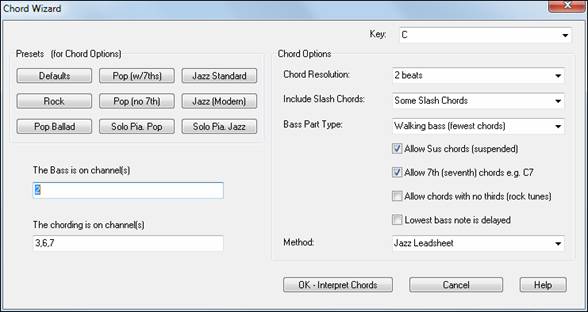
Chord Wizard
|
The Chord Wizard is located in the Chords window, which opens with the [C7] toolbar button. Right-click anywhere in the window to open the MIDI Chord Wizard menu. |
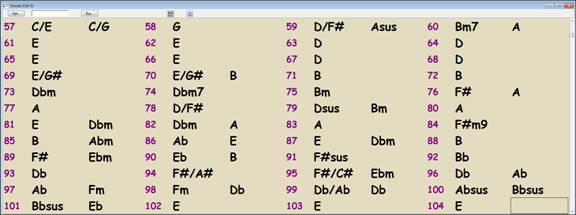
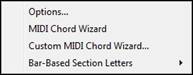
If you choose MIDI Chord Wizard, RealBand will attempt to automatically detect the chords in the song. You can use the Undo command if you want to undo this.
The Custom Chord Wizard command works the same as the MIDI Chord Wizard command except that it launches the Chord Wizard dialog, which lets you customize the settings for chord detection.
The Options menu item launches the Chords Window Options dialog.
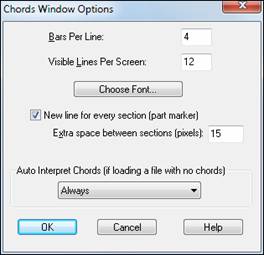
The “Bars Per Line” setting determines how many measures will be drawn per line in the Chords window.
The “Visible Lines Per Screen:” setting determines how many lines (rows) of chords are will be visible per screen. Each screen will always have 125 lines per screen in the Chords window, but the Visible Lines Per Screen setting controls how many lines will be visible without scrolling.
The [Choose Font…] button lets you select a font for the Chords window. The font’s overall size will be determined by the amount of Visible Lines Per Screen, as well as the height of the Chords window.
The “Auto-Interpret Chords” setting is useful in a situation where a file is loaded, but the file doesn’t already contain any chord symbols. If you set this to “Always,” then RealBand will always attempt to automatically interpret the chord symbols using the Chord Wizard. If set to “Ask First,” then RealBand will ask before attempting to automatically interpret chord symbols. If set to “Never,” then RealBand will just load the file without attempting to figure out the Chord Symbols.
Audio Chord Wizard
|
The Audio Chord Wizard is an extremely powerful feature that automatically finds chord symbols (C, Fm7 etc.) by analyzing the audio content of a song and displays them in a chord sheet window. |
The song can be in a digital file format (MP3, WAV, WMA, or CD audio file), one that you created in RealBand, or directly loaded from a CD.
In addition to the chords, the Audio Chord Wizard also automatically determines the bar lines and a Tempo map.
![]() The Audio Chord Wizard imports chord symbols it finds into the Chords window.
The Audio Chord Wizard imports chord symbols it finds into the Chords window.
Use this feature to instantly play along to your favorite songs, by reading and printing the chord symbols.
Playing a Song
![]()
Use the familiar control buttons to Record, Play, Rewind to the start, Fast Forward to the end, and Stop song playback. Playback can be stopped and started anywhere in the song.
The fast-forward and rewind buttons jump to either the end or the beginning of the song. The red circle indicates the Record button for recording MIDI tracks, the red circle with a waveform is for recording audio.
Auto Rewind
Auto Rewind is found in the Options menu. When enabled, RealBand will automatically rewind to the location that playback or recording was started. The choices are Recording Only, Playback Only, Both Recording and Playback, or Disabled.

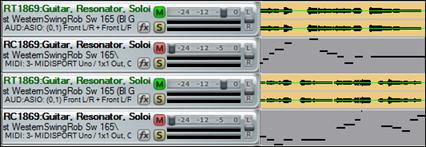
Soloing Tracks
|
You can solo any track or any combination of tracks by pressing the Solo button on the Tracks window toolbar. The track selection can be changed while the song is playing. Select multiple tracks by holding down the Shift key and clicking on the track numbers. |
Song Location
![]() Use the slider on the main toolbar to jump to a new song location.
Use the slider on the main toolbar to jump to a new song location.
![]()
This shows the current location in the song file. The Now: location is in bars, beats, and MIDI clock ticks according to the current resolution setting, which could range from 48 to 3840 system clock ticks per quarter note (ppq).
![]()
The From: and Thru: locations define the range of bars and beats that will be affected by the various Edit menu operations. The settings are made in the Block menu, or by selecting a range of bars in the Bars window, the Audio Edit Window window, or the track overview in theTracks window.
RealBand defaults to showing the Tracks window. Each row in the Tracks window represents a different track of the song.
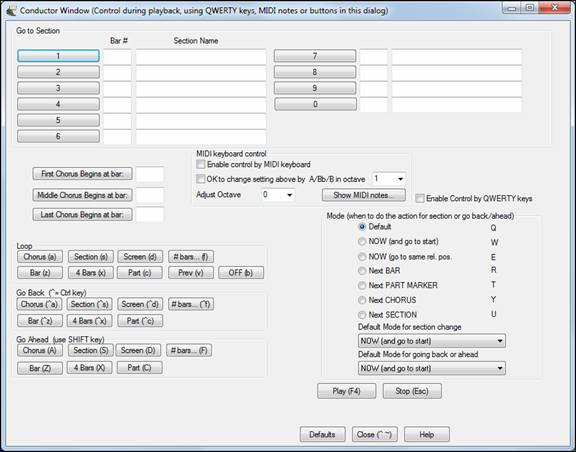
Conductor Window
“Conductor”- Live Looping/Playback Control
As the song is playing, there are options to control the flow of playback by one of three methods:
1. Conductor window
2. QWERTY hot keys
3. MIDI keyboard
|
The Conductor is launched with the Conductor button on the toolbar. |
![]() You must enable the QWERTY keys to be active for the Conductor during playback. This is done by selecting the “Enable Control by QWERTY keys” checkbox on the Conductor Window.
You must enable the QWERTY keys to be active for the Conductor during playback. This is done by selecting the “Enable Control by QWERTY keys” checkbox on the Conductor Window.
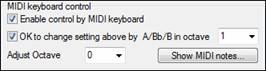
If you want to control the Conductor using the MIDI keyboard, you need to enable this by selecting the checkbox “Enable control by MIDI keyboard.” in the MIDI keyboard control box. When this setting is enabled, any MIDI input will be interpreted as a hot key for the Conductor, and you won’t hear MIDI thru.
![]()
If you’d like the ability to switch your MIDI keyboard between Conductor mode and regular playing mode, you can do this using the lowest “A-natural” MIDI note on your keyboard. This is A1 on an 88-note keyboard. Note A1 will turn the Conductor off, Bb1 turns it on, and B1 will toggle the Conductor on only when the Bb1 note is held down. If you don’t have an 88-note keyboard, you can set the octave setting to a number higher than 1, for example if you set it to “3,” then notes A3/Bb3/B3 will turn the Conductor Off/On/Toggled.
Using the Conductor QWERTY or MIDI keys, you can:
- Define and jump to up to 10 user defined sections in the song,
- Jump back 1 bar/4 bars/# of bars/screen/part/chorus/section,
- Jump ahead 1 bar/4 bars/# of bars/screen/part/chorus/section,
- Loop 1 bar/4 bars/# of bars/screen/part/chorus/section,<
- Pause/stop the song.
In addition, using the MIDI keyboard, you can also use the Conductor to:
A1 (note#21): Turn MIDI Conductor OFF
Bb1: Turn MIDI Conductor ON<
B1: Turn MIDI Conductor ON only as note is held down
The various functions of the Conductor are available with MIDI keys and QWERTY hot keys, as listed in the Wizards, Tools, and Plug-Ins chapter.
Customizing the Sections
Sections: This allows you to define up to 10 points in the song that are sections. By default, the following sections are defined for each song.
- Section 1: Start of song
- Section 2: Intro
- Section 3: First Chorus
- Section 4 :Middle Chorus (i.e. start of chorus #2)
- Section 5: Last Chorus
- Section 6: Ending
- Sections 7-10 are user definable. To do this, type in any bar # using the bar/chorus format (e.g. 21/2 would be bar 21, chorus 2).
If you prefer to enter custom values for the section numbers, you can do this if you check the “custom” checkbox, and then type in up to 10 bar numbers for each section.
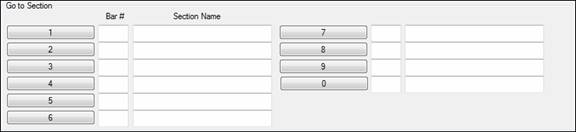
The section numbers are saved with the song. Once you have defined the sections, you can jump to a certain section of the song as the song is playing, simply by:
1. Pressing the 1-9 or 0 key on the QWERTY keyboard or,
2. Opening the Conductor window (~ hot key) and clicking on the section button or,
3. Pressing MIDI keys 77-86 (F6 to D7) corresponding to sections 1-10.
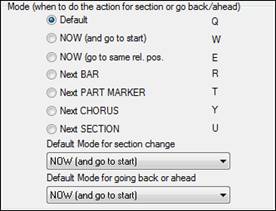
Mode (when to do the action)
By pressing a QWERTY hot key prior to an action, you can control when the action will take place. If no mode hot key is pressed prior to an action, the default mode will occur.
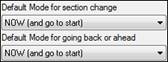
The default is set in the “Default Mode for section change” or “Default Mode for going back or ahead” combo box.
For example, by default, the section change will occur as soon as you press the key, and it will go to the equivalent place in the bar immediately before the beginning of the target section (so that the music stays in time, and the next section begins at the end of the bar). But you can change the default for the action to take place at the end of the current bar or current part marker etc.
Play Control Buttons
![]() This plays the song. Hot key = F4, MIDI note = F4.
This plays the song. Hot key = F4, MIDI note = F4.
![]() This stops playback. Hot key = Esc, MIDI note = F#4.
This stops playback. Hot key = Esc, MIDI note = F#4.
Example uses of the Conductor:
In this example, we don’t have custom sections set, so the default sections apply (middle chorus = section 4 etc.).
- Jump to the start of middle choruses during playback (press “4”).
- Loop the middle chorus (press S, which is Loop Section).
- Jump to the end of the song (press 6 ).
- Go back 1 chorus (Ctrl+A).
- Go ahead 1 chorus (Shift+A).
At the end of the current chorus, go back 1 section, press Y then Ctrl+S.
These actions can also be done with the MIDI keyboard. See the section on Conductor Functions with MIDI and QWERTY Hot Keys in the Wizards, Tools, and Plug-Ins chapter.
Tracks Window
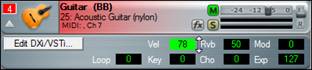
The Tracks window shows the track names, track type (MIDI or audio), instrument settings, and an overview section showing either MIDI or audio data.
![]() The Track Number field shows the track number. If the track is the current Track it will be highlighted in red.
The Track Number field shows the track number. If the track is the current Track it will be highlighted in red.

If the track is selected the number will be highlighted in yellow. If the track is not selected it will be gray. You can click on the track number field to make a track the current track (highlighted in red).
If you click on the track number field while holding the Shift key, this will select a range of tracks from the current track through the number you clicked on. For example, if track 2 is the Current Track, and you hold the Shift key and then click on the number field for Track 4, this will make tracks 2 through 4 selected. Track 2 will still be the Current Track and tracks 3 and 4 will be highlighted in yellow. You can select/deselect individual tracks by clicking on a Track’s number field while holding down the Ctrl key.
![]() The Disclosure Triangle will reveal more information about a track by making the track row height taller.
The Disclosure Triangle will reveal more information about a track by making the track row height taller.
|
If a track is a MIDI track, then you’ll see the Vel (velocity offset), Rvb (reverb), Mod (modulation), Loop, Key (key transpose), Cho (Chorus), and Exp (expression) settings. |
You can make changes to these settings by clicking on the edit fields with the left mouse button, and then moving the mouse up or down while holding the mouse button down. The [Edit DXi] button launches the DirectX Window dialog and will display the settings panel for either the Default DXi Synth (16th DXi synth slot which is MIDI port 32) or the current DXi port number if the track is set to a valid DXi port (17-32). Any track’s MIDI Output Port can be set to send to one of the 16 available DXi synth ports or to any other available MIDI port.
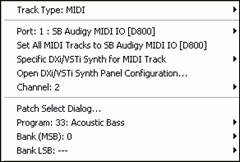 |
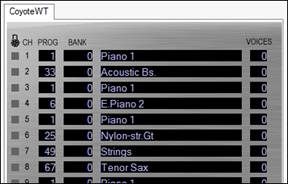
When you right-click your mouse on a MIDI icon you’ll see a pop-up menu that lets you set the MIDI Output Port, Program (Patch) setting, and Bank (MSB) and Bank LSB settings. Immediately below the Port: menu item is a menu command that lets you Set All Midi Tracks to the same port used by the track you are adjusting. There is also a menu item Patch Select Dialog that launches a patch selection dialog, which lets you select patches and variations as well as allowing you to change the track’s patch list. If the patch list is set to General MIDI, Roland GS, or Yamaha XG, the track will display an instrument icon corresponding to the patch. Otherwise, you’ll see the patch number displayed instead of an icon. |
The Track Name field shows the track’s name, which is edited by right-clicking or double-clicking on the track name field. Type the name and press Enter.
When using the General MIDI patch map the program will automatically display an icon for the instrument selected. |
|
The Mute button lets you mute or unmute a track. Green indicates the track is playing, red is mute. |
|
Click on the solo button(s) to solo one or more tracks. Bright yellow shows that the track is soloed. |
|
The [fx] button launches the dialog to choose VST/DX audio effects or MIDI synths for the track. If any effects or synths are assigned the [fx] button will be blue. |
|
The Volume and Pan sliders let you adjust a track’s volume and pan settings without opening the Mixer window. Right-clicking on the Volume or Pan controls will let you edit the setting by typing in a number. |
|
Below the Volume slider stereo VU meters give you a general idea of a track’s level during playback. |
|
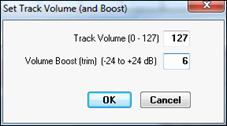
Frequently, when you are making a mix, adjusting a track's volume to the maximum still doesn’t make the track loud enough relative to the other tracks. This means that you have to either apply a gain effect or reduce the other track's volumes, which is time consuming. We’ve added a simpler method, which is to allow settings higher than 127. Simply right-click on the volume slider, and enter a “Volume Boost” (from -24 to 24 dB), and this will apply to any audio track, or any MIDI track that uses a DXi or VSTi synth! |
Track Overview Display
To the right of the track info panels you’ll see the overview display. This lets you view MIDI or audio data, and select sections for editing.

◄ Left and right ►cursor arrow keys will move the current time forward or backward by 1 beat.
![]() ►
► ![]()
The mouse scroll wheel in the Tracks window will zoom in/out if hovering over the overview section. It will still scroll horizontally if hovering to the left of the overview section.
![]()
![]()
Ctrl+Space Bar command will loop the highlighted region of a song (or whole song if nothing is currently highlighted).
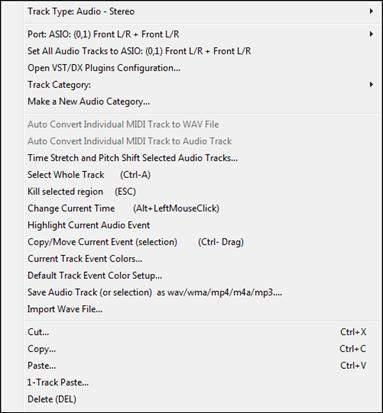
Right-click anywhere on the track to see more track options.
Right-click Menu for MIDI Tracks
|
If a track is a MIDI track, and you right-click on the track you’ll see a pop-up menu that lets you set the MIDI Output Port, Channel, Program (Patch) setting, and Bank (MSB) and Bank LSB settings. |
This menu will also open with a left click on the track type icon if “Left click on track-type icon in Tracks Window shows pop-up menu” has been selected (checked) in the Options | Preferences | General dialog.
There are 32 MIDI Output ports. You can think of each of port as route that the track takes to output sound, whether through an onboard sound card, software synthesizer, or an external MIDI keyboard or sound module.
The first 16 ports are for either onboard synthesizers or external MIDI I/O connections. Ports 17 through 32 are for DirectX (DXi) or Virtual Studio Technology (VSTi) instruments. Mouse over the Port menu item to see a list of all available ports.
At the bottom of the Port submenu, there are additional menu items to Load DXi/VSTi Synth into unused Slot and Load DXi/VSTi Synth into specific Slot. |
|
Load DXi/VSTi Synth into unused Slot loads in synth into the next available slot (port) and automatically assigns the track to that port. However, if the synth is already loaded into a port, it will assign the track to that port rather than loading another instance of the same plug-in. So this command is basically the same as “Specific Synth for MIDI track.”
Load DXi/VSTi Synth into specific Slot allows you to select the port to load the synth into, and it loads another instance of the synth.
Immediately below the Port menu item is a menu command that lets you Set ALL MIDI Tracks to>> the same port as used by the track you are adjusting.
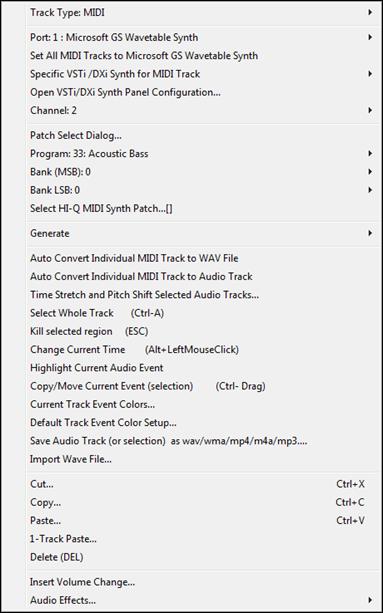
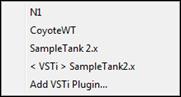
With Specific DXi/VSTi Synth for MIDI track you can assign each track to a specific DXi or VSTi synth. This allows you to use multiple synths in the same song. Point to Specific DXi/VSTi Synth for MIDI track then select the synth you want to use from the submenu.
Open DXi/VSTi Synth Panel Configuration opens the DirectX/VST Window. This allows you complete control over assigning DXi or VSTi synths to ports, processing the synth output with DX or VST audio effects, and working inside your synth’s control panel.
The help topic Tutorial: Using DXi and VSTi synths with RealBand provides detailed instructions for installing and selecting these high quality music synthesizers.
There is also a Patch Select Dialog menu item that launches a patch selection dialog (which lets you select patches and variations as well as allowing you to change the track’s patch list). As long a track’s Patch List is set to General MIDI, Roland GS, or Yamaha XG, then the track will display instrument icon corresponding to the patch. Otherwise, you’ll see the patch number displayed instead of an icon.
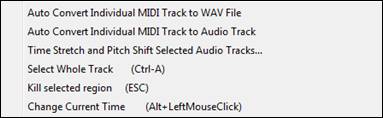
In the right-click Tracks window menu, MIDI tracks can quickly be rendered to audio with the commands Auto Convert Individual MIDI Track to WAV file and Auto Convert Individual MIDI Track to Audio Track as long as the track is assigned to a DXi or VSTi synth.
Time Stretch and Pitch Shift is an audio feature that lets you stretch (or reduce) the length of the highlighted section of audio tracks.
Select Whole Track command will select the entire track for editing.
Kill Selected Region will deselect a selected region of a MIDI (or audio) track.
Change Current Time (Alt+Left Mouse Click) – will change the current time without affecting the highlighting of tracks. This ensures you don’t accidentally de-select a region.
Highlight Current Audio Event makes it easier to select specific audio events, which then could be clicked and dragged (with Ctrl button held down) to a new location, etc.
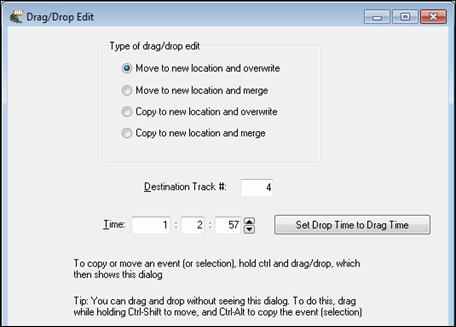
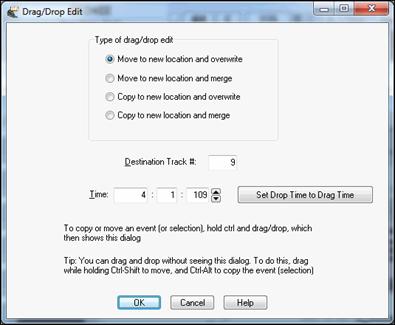
Copy/Move Current Event (selection) launches the Drag/Drop Edit dialog
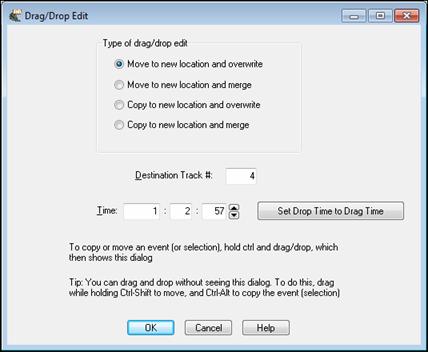
- If nothing is selected, and you Ctrl+click to drag and drop, it will assume that you want to drag the entire current audio event.
- Bypassing the dialog for quicker workflow. If you hold Ctrl+Shift then the drag will move the current event. If you hold Ctrl+Alt then the drag will copy the current event. When Dragging/Dropping within the overview section of the Tracks window, you can now drop to a blank track even if the track type wasn't originally set to the correct track type.
- Drag/Drop will automatically be set to the original time if within 20 ticks (at a PPQ of 120). So if you drag a region down to a new track, you just need to be “approximate” in the drop location, as the program will snap the time to the same time as the event on the source track. If you don’t want that behavior, just Ctrl+drag the selection, and the dialog appears with exact values. In this case, the dialog also has a handy “Set Drop Time to Drag Time” button.
- The Time field has been added to the Drag/Drop Edit dialog, so you can fine-tune the time for the drop when you drag a selection using Ctrl+drag.
- Destination Track # added to Drag/Drop Edit dialog when launched from the Tracks window.
- [Set Drop Time to Drag Time] button has been added to the Drag/Drop Edit dialog
- Copy/Move Current Event (selection) menu item added to the Tracks window right-click menu
- When dragging/dropping within the overview section of the Tracks Win, you can drop to blank track even if the track type wasn't originally set to the correct track type.
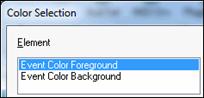
Current Track Event Colors/Default Track Event Color Setup
You can apply a custom color (foreground and background) to a track, or all tracks, using right-click menu items “Current Track Event Colors” and “Default Track Event Color Setup.”
The commands Save Audio Track (or selection) as wav/wma/mp4/mp3 and Import Wave File do not apply to MIDI tracks.
The Cut, Copy, Paste, and 1-Track Paste commands apply to the highlighted section of a track(s). The functions are as described in the Edit Menu topic.
Delete removes the selected section or events.
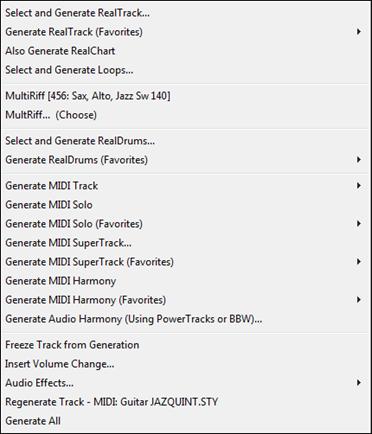
Select and Generate RealTrack opens the RB Assign RealTracks to Tracks dialog for Real instrument selection and options for the generation of the audio RealTrack. Track names for generated non-BB tracks are displayed in green. For example, if you had generated a track by right-clicking on it and selecting “Generate RealTrack” then the track name of that track will be displayed in green.
![]()
Generate RealTrack (Favorites) opens a list of recently used Real instruments for quick selection and generation.
Also Generate RealChart generates notation for RealTracks that include this feature. RealBand also supports multiple RealCharts for the same RealTracks soloist number. If you happen to have multiple tracks with the same RealTrack soloist number, you will see separate tracks for each RealChart.
Select and Generate Loops launches the Pick A Loop dialog where you can insert an audio loop into the track.
MultiRiff shows the current MultiRiff instrument, and is used to generate a new batch of riffs with the same RealTracks instrument.
|
RealBand can automatically generate RealCharts after you have chosen multiple riffs if Also Generate RealCharts is enabled in the track’s right-click menu. |
MultiRiff (Choose) opens the RealTracks Picker so you can choose an instrument for generating MultiRiffs.
Select and Generate RealDrums opens the RB RealDrums Picker for selection of a RealDrums style and options for the generation of the audio RealDrums. If the track type is MIDI it will automatically be set to Audio – Stereo. This feature cannot be applied to a non-empty MIDI track.
![]() Track names for generated non-BB tracks are displayed in green.
Track names for generated non-BB tracks are displayed in green.
Generate RealDrums (Favorites) opens a list of recently used RealDrums styles for quick selection and generation.
Generate MIDI Track opens a list box to select the part for a MIDI track to be generated on the current track. |
|

Generate MIDI Solo opens a Soloist selection list. Use the Filter String to make your selection easier. A solo will be generated for the selected track or for the highlighted section of a track.
Generate MIDI Solo (Favorites) opens a list of your most recent choices for quick selection.
Generate MIDI SuperTrack opens the list of available MIDI SuperTracks and generates your selection over the entire track or just a highlighted region.
Generate MIDI SuperTrack (Favorites) shows your most recent choices so you can quickly choose them again.
Generate MIDI Harmony opens a Harmony selection list with a Filter String for easier selection.
Generate MIDI Harmony (Favorites) opens a list of your most recent choices for quick selection.
Generate Audio Harmony (Using PowerTracks or BBW) lets you instantly create audio harmony parts from an existing audio track using the built-in TC-Helicon audio harmonies in Band-in-a-Box or PowerTracks Pro Audio.
Freeze Track from Generation prevents the track from being regenerated by functions like re-generate all tracks, or the [BB] button.
Insert Volume Change will insert a MIDI controller into the track at the current location. If a highlighted region exists, then the program will ask if you want to apply this change to the highlighted region (as opposed to a change at the location you clicked). If applying the change to a region, then program will insert a volume change at the beginning of the region, and a 2nd volume change at the end to restore the prior volume.
If necessary, the program will insert a controller at the very beginning of the song to preserve the original volume if you insert a volume change beyond the start of the track. This will normally be done the first time you insert a volume change into a track beyond the tracks’ beginning.
Audio Effects opens the selection list of built-in PG Music audio effects.
Regenerate Track will generate a new BB part for the current track or just for a selected region of a track.
Generate All generates parts for all BB tracks, unless they are frozen. If a section is highlighted the parts will just be generated for that From/Thru range.
Right-Click Menu for Audio Tracks
|
If a track is an Audio track and you right-click on the track, this pop-up menu opens. This menu will also open with a left click on the track type icon if “Left click on track-type icon in Tracks Window shows pop-up menu” has been selected (checked) in the Options | Preferences General dialog. |
The Track Type and audio Port settings can be assigned.
Open DX/VST Plugins Configuration opens the DirectX/VST Window where plug-ins can be applied and edited.
The Track Category item lets you select preset groups of audio effects for the particular category such as guitar, vocal, keyboard, or your own user assigned effects groups.
Make a New Audio Category opens a dialog where you can name a new category, select an image for its icon, and assign an audio effects group (*.TGS) preset.
Auto Convert Individual MIDI Track to WAV File
Invoke this command by right-clicking on the track in the Tracks window and easily convert any MIDI track to a .WAV file. RealBand will automatically render using a DXi or VSTi synth.
Auto Convert Individual MIDI Track to Audio Track
It is easy to convert any MIDI track to an audio track. RealBand will automatically render using a DXi or VSTi synth. This command is accessible by right-clicking on the track in the Tracks window.
Time Stretch and Pitch Shift is a dialog that lets you stretch (or reduce) the length of the highlighted section of audio tracks.
Select Whole Track command will select the entire track for editing.
Kill Selected Region will deselect a selected region of an audio (or MIDI) track.
Change Current Time will change the current time without affecting the highlighting of tracks. This ensures you don’t accidentally de-select a region.
Highlight Current Audio Event makes it easier to select specific audio events, which then could be clicked and dragged (with Ctrl button held down) to a new location, etc.
Copy/Move Current Event (selection) launches the Drag/Drop Edit dialog
- If nothing is selected, and you Ctrl+click to drag and drop, it will assume that you want to drag the entire current audio event.
- Bypassing the dialog for quicker workflow. If you hold Ctrl+Shift then the drag will move the current event. If you hold Ctrl+Alt then the drag will copy the current event. When Dragging/Dropping within the overview section of the Tracks window, you can now drop to a blank track even if the track type wasn't originally set to the correct track type.
- Drag/Drop will automatically be set to the original time if within 20 ticks (at a PPQ of 120). So if you drag a region down to a new track, you just need to be “approximate” in the drop location, as the program will snap the time to the same time as the event on the source track. If you don’t want that behavior, just Ctrl+drag the selection, and the dialog appears with exact values. In this case, the dialog also has a handy “Set Drop Time to Drag Time” button.
- The Time field has been added to the Drag/Drop Edit dialog, so you can fine-tune the time for the drop when you drag a selection using Ctrl+drag.
- Destination Track # added to Drag/Drop Edit dialog when launched from the Tracks window.
- [Set Drop Time to Drag Time] button has been added to the Drag/Drop Edit dialog
- Copy/Move Current Event (selection) menu item added to the Tracks window right-click menu
- When dragging/dropping within the overview section of the Tracks Win, you can drop to blank track even if the track type wasn't originally set to the correct track type.
Current Track Event Colors/Default Track Event Color Setup
You can apply a custom color (foreground and background) to a track, or all tracks, using right-click menu items “Current Track Event Colors” and “Default Track Event Color Setup.”
Save Audio Track (or selection) as wav/wma/mp4/m4a/mp3 lets you export a track or a section of a track to a separate audio file in one of the available formats. Some formats, such as MP3, require a proprietary codec that may not be present on your system.
Import Wave File allows you to select an audio file and insert it into either a highlighted section of a track or the whole track. This duplicates the File | Audio | Import Wave File command (Ctrl+F3) and allows you to import a wave file without to need to go to the Audio menu.
The Cut, Copy, Paste, and 1-Track Paste commands apply to the highlighted section of a track(s). The functions are as described in the Edit Menu topic.
Delete removes the selected section or events.
Select and Generate RealTrack opens the Assign RealTracks to Tracks dialog to select a RealTracks instrument and generate a RealTrack. Track names for generated non-BB tracks are displayed in green. For example, if you had generated a track by right-clicking on it and selecting “Generate RealTrack” then the track name of that track will be displayed in green.
![]()
Generate RealTrack (Favorites) shows a list of recently used RealTracks.
Also Generate RealChart generates notation for RealTracks that include this feature.
Select and Generate Loops launches the Pick A Loop dialog where you can insert an audio loop into the track.
MultiRiff shows the current MultiRiff instrument, and is used to generate a new batch of riffs with the same RealTracks instrument.
MultiRiff (Choose) opens the RealTracks Picker so you can choose an instrument for generating MultiRiffs.
Select and Generate RealDrums opens the RealDrums Picker to choose a RealDrums set and create a RealDrums track. Track names for generated non-BB tracks are displayed in green.
![]()
Generate RealDrums (Favorites) shows a list of recently used RealDrums.
Generate MIDI Track opens a list box to choose which Band-in-a-Box part to generate for the track – Bass, Drums, Piano, Guitar, or Strings. When a part is chosen from the list it will automatically be generated using the current Band-in-a-Box style in use. You can create tracks in different styles in the same song .The track name of the generated non-BB MIDI track will be colored green.
![]()
Generate MIDI Solo opens a Soloist selection list. Use the Filter String to make your selection easier. A solo will be generated for the selected track or for the highlighted section of a track.
Generate MIDI Solo (Favorites) opens a list of your most recent choices for quick selection.
Generate MIDI SuperTrack and Generate MIDI SuperTrack (Favorites) apply to MIDI tracks, not audio tracks.
Generate MIDI Harmony opens a Harmony selection list with a Filter String for easier selection.
Generate MIDI Harmony (Favorites) opens a list of your most recent choices for quick selection.
Generate Audio Harmony (Using PowerTracks or BBW) lets you instantly create audio harmony parts from an existing audio track using the built-in TC-Helicon audio harmonies in Band-in-a-Box or PowerTracks Pro Audio.
Freeze Track from Generation prevents the track from being regenerated by functions like re-generate all tracks, or the [BB] button.
Insert Volume Change will insert a MIDI controller into the track at the current location. If a highlighted region exists, then the program will ask if you want to apply this change to the highlighted region (as opposed to a change at the location you clicked). If applying the change to a region, then program will insert a volume change at the beginning of the region, and a 2nd volume change at the end to restore the prior volume.
If necessary, the program will insert a controller at the very beginning of the song to preserve the original volume if you insert a volume change beyond the start of the track. This will normally be done the first time you insert a volume change into a track beyond the tracks’ beginning.
Audio Effects opens a submenu that is the same as the Edit | Audio Effects window. This submenu also contains Fade In and Fade Out menu items, which launches a Flash Message w/ instructions, and then launches the GAIN dialog.
Regenerate Track will regenerate an existing track. If a track is a non-BB track, but it was generated individually from one of the generation options in Tracks Window popup menu, or from one of the generation options on the Generate Button popup menu, then the track name will be displayed in green. The track name being displayed in green or blue means that the track can be regenerated using this command. This feature is useful to regenerate, if you had changed the song’s tempo, or just to generate fresh material.
Generate All will regenerate all Blue and Green tracks automatically.
Select Area
Click and drag to highlight a section of the song for editing. You can select a region of the song during playback.

Shift+click (Shift key + left mouse button) support makes it easy to tweak the beginning or end of the highlighted area.
- If you Shift+click before the start of the From/Thru range, or after the end of the From/Thru range, the highlighted area will be extended.
- If you Shift+click within the From/Thru range, the range will be reduced, and the location you clicked on will become either From or Thru depending on which boundary was closer to where you Shift+clicked the mouse.
- If you keep the left mouse button held after the Shift+click, and you move the mouse you can adjust the boundary of the range while moving the mouse.
|
You can select a highlighted region by holding down the Ctrl key with the left mouse button pressed, and drag the region to a new location in the song. |
Click on [Play Selected Area] to hear the highlighted section being edited. Ctrl+Space Bar command will loop the highlighted region of a song (or whole song if nothing is currently highlighted).
![]()
The [-] and [+] buttons (upper far left corner of the Tracks window) let you zoom in or zoom out the overview section.
[Z-Whole] zooms out to show the complete waveform overview.
[Z-Sel] zooms in on the highlighted section of the waveform.
The [Snap] button causes the time indicator to snap to the nearest beat when changing the time location or when highlighting a region for editing.
The [L] button locks the From: and Thru: settings from being changed by the mouse. This prevents accidental changes to a selected area.
Drag and Drop Features
RealBand supports drag-and-drop editing in the Tracks and Audio Edit windows.
In the Tracks window you can easily move tracks up or down in relation to each other by drag ‘n’ drop using the mouse, e.g., drag track 1 below track 2 to change the order of the tracks.
You can move a highlighted region by holding down the Ctrl key with the left mouse button pressed, and drag the region to a new location in the song.
When you drop to a new track (or the same track), a dialog appears with options to move or copy.
This is called the Drag/Drop Edit dialog:
- If nothing is selected, and you Ctrl+click to drag and drop, it will assume that you want to drag the entire current audio event.
- Bypassing the dialog for quicker workflow. If you hold Ctrl+Shift then the drag will move the current event. If you hold Ctrl+Alt then the drag will copy the current event. When Dragging/Dropping within the overview section of the Tracks window, you can now drop to a blank track even if the track type wasn't originally set to the correct track type.
- Drag/Drop will automatically be set to the original time if within 20 ticks (at a PPQ of 120). So if you drag a region down to a new track, you just need to be “approximate” in the drop location, as the program will snap the time to the same time as the event on the source track. If you don’t want that behavior, just Ctrl+drag the selection, and the dialog appears with exact values. In this case, the dialog also has a handy “Set Drop Time to Drag Time” button.
- The Time field has been added to the Drag/Drop Edit dialog, so you can fine-tune the time for the drop when you drag a selection using Ctrl+drag.
- Destination Track # added to Drag/Drop Edit dialog when launched from the Tracks window.
- [Set Drop Time to Drag Time] button has been added to the Drag/Drop Edit dialog
- Copy/Move Current Event (selection) menu item added to the Tracks window right-click menu
- When dragging/dropping within the overview section of the Tracks Win, you can now drop to blank track even if the track type wasn't originally set to the correct track type.
Drag And Drop MIDI Or Audio Files Into The Tracks Window
You can drag a file, such as a .WAV file, from a folder directly onto the Tracks window. The file will be placed on the track you dropped it on, at the location onto which you dropped the file. The types of files that are supported are the audio files supported by RealBand, such as .MP3, .WAV, and WMV.
In addition to audio files, .MID files can be dropped onto the tracks window too. If the file is a multi-track .MID it will be imported onto free tracks beyond the highest occupied track.
If you hold the Ctrl key when dropping the file, then the file will be inserted at the time location, and any existing data moved beyond the end of the file that is being inserted, rather than overwriting any existing data.
Classic Tracks View

Click your mouse anywhere on a row to select that track. The number of the currently selected track (Tr) is highlighted in blue.
Ty = Type. |
The type field determines the track type: MIDI, Mono Audio, and Stereo Audio. You can’t change the track type if a track already has data in it. |
P = Play Status. |
The Play Status field shows the status of the track as Play (P), Muted (m). |
Name = Track Name. |
This is any name you want to give to the track. |
Ch = Forced MIDI channel. |
When not set to zero, all events in a track will be sent out over the selected channel. |
Key = Forced Key Transposition. |
This setting transposes the events in a track up or down by the number of semitones you specify. |
Vel = Forced Velocity transposition. |
This setting increases or decreases the velocity of the notes in a track by the amount you specify. |
Pt = Port. |
Determines the MIDI port, or audio port, through which the data in a track is sent out. |
Prg = Program change. |
When this setting is enabled a MIDI patch change will be sent at the start of the song. When you change this setting, a MIDI program change is sent. |
Bank = Bank change. |
This is the MSB (Most Significant Byte) portion of the bank change, controller number 0. |
LSB. |
This is the Least Significant Byte (controller number 32) portion of the bank change. Some synths use LSB instead of MSB, and some synths use a combination of the LSB and the MSB. |
Loop. |
When this setting is enabled, the track will automatically repeat for the number of times specified. |
Events. |
The number of events in a track. |
Selecting MIDI Patches
A double mouse click in the Prg (Program Change) field for any track will launch the Select Patch dialog.
This dialog lets you select a patch from the current patch list shown in the Patch List combo box. For example, if you select “General MIDI” then the patch list used for current track will be the General MIDI patch list. RealBand saves the most recently selected Patch List for each track in its native .SEQ files. This example shows Roland GS, which is an extension of the General MIDI list with variations (alternate choices) for many instruments.
To select a patch, simply click on the patch in the main list box then hit the [OK] button to exit the dialog. The “Variations” list box shows the variations, which are patches in other banks that have the same number as the selected patch.
If the “Always Show Bank 0 Names” checkbox is checked, the main list box will be filled with the patches of the default bank (those patches with both the bank MSB and LSB being 0), and the highlighted variation is the actual patch that is selected. If the checkbox is unchecked, then the patches in the list box will change to those of the bank number of the current variation.
Only patches that have names will be in the list box, e.g., if there are only 9 named patches in the current bank, the list box will only be filled with 9 patches. When you select a patch in the list box, the number of the patch will appear in the “Patch” edit control.
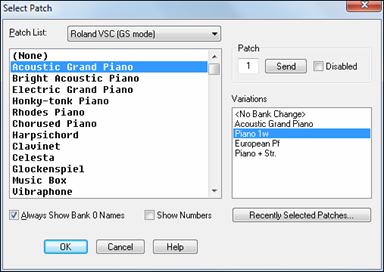
You can select any patch by number by typing the number in the “Patch” edit control. You can press the send button to send the patch change you just typed without having to exit the dialog. The disabled checkbox simply means no patch change is selected for the current track, and a value of “---” will show in the Prg column of the Classic Tracks View window.
The [Recently Selected Patches…] button brings up a dialog with a list of the 20 most recently selected patches, if any recently selected patches exist.
Unconditional 30-Day Money Back Guarantee on all PG Music products purchased from PG Music Inc.
PG Music Inc.
29 Cadillac Ave Victoria BC Canada V8Z 1T3
Sales: 800-268-6272, 250-475-2874,+ 800-4746-8742*
* Outside USA & Canada where International Freephone service is available.
Access Codes
Tech Support: Live Chat, support@pgmusic.com
 Online now
Need Help?
Customer Sales & Support
|
Phones (Pacific Time) 1-800-268-6272 1-250-475-2874 |
||
| Live Chat | ||
| OPEN | Online Ordering 24/7 |
|
| OPEN | Forums, email, web support |