
Search Manual
RealBand® 2022 for Windows® User’s Guide
Chapter 7: Digital Audio Features
Overview
Audio tracks are great for recording live performances; they work much like tracks on a tape recorder. They are also used for RealTracks and RealDrums since these parts are created from live audio recordings of studio musicians.
You can edit audio data by cutting and pasting in the Bars window or the Audio Edit window, you can import .WAV, .MP3, .WMA, .WMV, and .CDA files to be inserted into audio tracks, and you can also process audio tracks with the professional effects included with RealBand.
|
Any track can be designated as an audio track - mono or stereo. Click on the track icon to set the track type. |

Other Audio Formats
RealBand supports .WAV, .WMA, .WMV, .CDA, .MP3, .MP4, and .M4A audio file formats.
These files can be loaded directly with the File | Open menu option, or they can be imported to an exact location in a specific track with the File | Audio | Insert Wave File command (Ctrl+F3). |
|

Loading and Playing Audio Files
Let’s load an audio wave file and explore the audio features of RealBand. RealBand files have the .SEQ (sequence) file extension and open in the same way as a MIDI file.
|
Use the “Open a File” button or the menu command File | Open to go to the RealBand directory. In the “Samples” folder choose the file tutor2.seq. |
Tracks Window
Here’s how the Tracks window looks when the audio file is loaded.

|
Press the Play button. You should now be hearing the demo song playing through your computer’s sound system. What you’re hearing are four discrete tracks of digital audio. |
|
To mute any track, click on [M] button to the right of the track name. When the button is red the track is muted. |
![]()
![]() You can solo any track or combination of tracks by pressing the [S] buttons. Bright yellow = soloing.
You can solo any track or combination of tracks by pressing the [S] buttons. Bright yellow = soloing.
Mixer Window
|
To adjust track volume level and panning controls, open the Mixer window by selecting the Window | Mixer menu item or by clicking the Mixer button on the toolbar palette. |
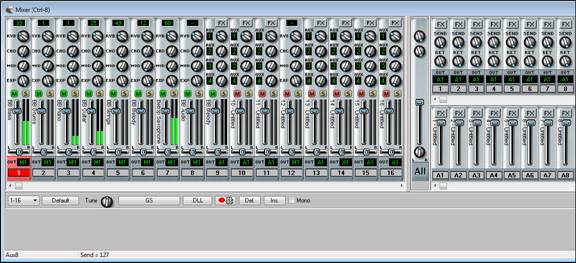
Here, you can change things such as track levels and panning to the left or right speaker as the song is playing.
|
Select a track view range from the combo list, or use the Mixer window left/right scroll bar directly above to scroll horizontally across the mixer layout.
|

|
The vertical splitter bar between the track strips and the bus strips can be moved right or left to make a custom mixer view. |
The [Del.] button in the mixer will automatically delete all mixer events (volume, reverb, pan, chorus) that are currently embedded within the song's selected tracks.
The [Ins.] button will automatically insert mixer events (volume, reverb, pan, chorus) into the song’s non-blank tracks.
The Ctrl+M and Ctrl+U hot keys are a convenient way to mute or unmute any track within the Bars or Mixer window.
|
Mixer moves can be recorded as the song is playing. There is a special “Record Mixer Moves” button in the mixer that will let you record ONLY mixer moves. This special button also lets you record mixer moves onto an audio track without the audio being silent during recording. |
Creating Audio Subgroups in the Mixer
Unassigned Outputs Work As Subgroups
![]() When this checkbox is enabled in the Audio Preferences dialog, any audio output ports that do not currently have a driver port assigned to them will function as subgroups. A subgroup is a bus or signal path that gives you the ability to control several tracks as a group.
When this checkbox is enabled in the Audio Preferences dialog, any audio output ports that do not currently have a driver port assigned to them will function as subgroups. A subgroup is a bus or signal path that gives you the ability to control several tracks as a group.
The Mixer chapter has full instructions for creating audio subgroups.
Video Window
You can load videos that you have already downloaded from YouTube or elsewhere into the RealBand Video Window. The audio is extracted from the video to the audio track, and you can slow down video and audio to help with learning and transcription, with Hi-Quality audio preserved at extreme tempo slowdowns.
To play a video, either use the [Open] toolbar button and select Open File from the menu or press the Views - [Video] button which launches the Video Window with its own toolbar which has an [Open] button.
Once you open a video, the Video Window will open.
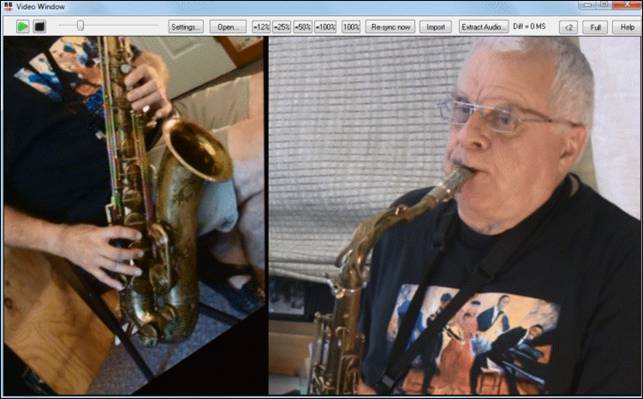
There is a [Full] screen button to make the video full screen, and the [Esc] key will go out of the full screen mode.
![]() Play, Stop or Move to a position in the video using the Transport toolbar.
Play, Stop or Move to a position in the video using the Transport toolbar.
![]() As the song plays, you can slow down the video, and the audio will slow down and stay in sync.
As the song plays, you can slow down the video, and the audio will slow down and stay in sync.
The quality of the audio at slower tempos is great - better than most video player programs. The video slowdown range is 50-100%. If you want slower than that, you can select values as low as 12%, which is an 8X slow down (1 second would take 8 seconds), and still has good quality. Note: When set to values lower than 50%, the Video Window is disabled, but the audio continues at the extreme slow tempo. This is a great tool for transcription. You can select a range in the Track window and loop a section of the video at a low tempo for example.
If the audio and video have become out of sync, press the [Re-sync now] button to re-sync them.
The [Settings] button will open the Video Settings dialog, which allows you to adjust the audio and video playback time.
Recording Audio Tracks
Audio tracks are great for recording live sounds such as a person singing or playing guitar, in a similar manner to tracks on a tape recorder. You can edit audio data by cutting and pasting in the Bars window or the Audio Edit window. You can import .WAV files to be inserted into audio tracks. You can also process audio tracks with effects in the Edit | Audio Effects menu.
Recording will occur over the current track selection, i.e., the track number that is highlighted in the Tracks window. The track type must be set to “Audio.”
The “Always Record Audio too, if current track is MIDI” setting in the Audio Options dialog (Options | Preferences | Audio) will cause RealBand to record audio even when the current track type is MIDI. RealBand will offer to keep the audio take on the nearest available blank track. This can be a “lifesaver” in those situations where you wanted to record audio, but you accidentally selected the current track as a MIDI track.
The “Backup Most Recent Audio Take” setting in the Audio Options dialog, when enabled, will always backup the most recent audio take. This can be helpful if you accidentally recorded audio onto the WRONG audio track, or you accidentally punched-in instead of recording a regular take. If this happens you can undo the keeping of the most recent take and then use the File | Audio | Insert Wave File command to insert the recorded audio onto a different track, by importing the RBBAKx.WAV file from the Temporary Audio Directory.
Setting Audio Levels
There are 2 pairs of VU meters, one pair for audio input, and one pair for audio output.

The clipping indicator indicates that clipping has occurred. Try to keep the levels low enough so they’re safely below 0 db, and so that the clipping indicator doesn’t light up.
To be on the safe side, it’s probably a good idea to adjust the levels so that the meters don’t get close to 0 db even if the clipping indicator hasn’t yet lit up.
The VU meters have an automatic peak-hold feature with gradual peak fallback, so it will be easy to see the transient peak levels if you’ve got your eye on the meters.
For the Output, you may have to adjust your mixer settings within RealBand to keep the levels within a reasonable range.
|
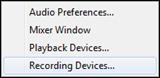
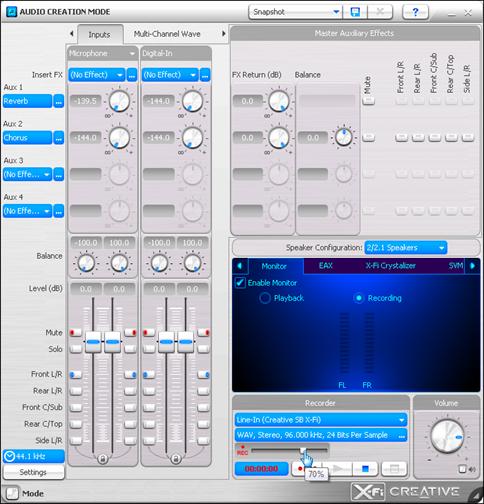
For the Input, you may have to press the speaker button to launch the Windows Recording Control properties and adjust the input level.
|
Note: The appearance of this window is different for different sound cards. The example shown is for a typical Sound Blaster Audigy card.
In the example shown of the Recording properties, “Microphone” is the selected audio input for a SoundBlaster device and the Volume fader is at 70% of the maximum level. Different devices will show different consoles.
If the Input meter were too high, either clipping or getting close to 0 db, then lowering the Microphone volume level would correct this.
|
Start recording by pressing the Record button. |
|
Stop recording by pressing the Stop button or the <SPACE> bar. |
|
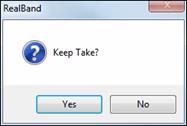
When recording is stopped a “Keep Take?” dialog appears that gives you the option to keep or reject the take. If you choose [Yes] the audio wave file will be saved and you will see an added event in the Events column for the track (Classic view). |
Auto Rewind
Auto Rewind is found in the Options menu. When enabled, RealBand will automatically rewind to the location that playback or recording was started. The choices are “Recording Only, Playback Only, Both Recording and Playback,” or “Disabled.”

Align Music to Click Track
This feature attempts to align a track of music that was recorded in free time to a click track. It tries to take a free time track and make adjustments to the times of the events so that the music becomes a standard track that can be synced to a metronome.
You can now easily record a click track along with any audio and/or MIDI, and then have RealBand automatically line up everything with tempo and time signature changes. This can have many useful applications. For example, if you recorded a strumming guitar in free time, RealBand can line it up to the grid so you can add loops, RealDrums, or RealTracks. Or, if you have just purchased a song from iTunes, you can have it line up to the grid in RealBand to make it easier for you to learn. Or, if you have recorded MIDI (not to a click track), and you can have that MIDI line up to the grid without affecting the actual performance.
Method 1: Recording of Bars
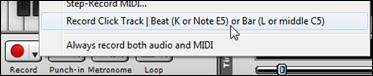
For example, you have just recorded your guitar, but since you sped up a little throughout the whole song, you want to make it line up correctly with the grid. Go down to the bottom of the screen and click on the arrow on the Record button. You will see a menu item Record Click Track and the additional information: Beat (K or Note E5) or Bar (L or middle C5). When you start recording, you can just type the letter L on your keyboard to indicate where the bar lines are. If you have an external MIDI keyboard, you can do this with the note C5. You can also enter specific beats by typing the letter K or playing the note E5 on your external MIDI keyboard. In this example, we will show you how to enter bars only.
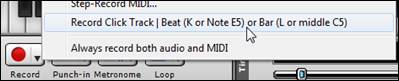
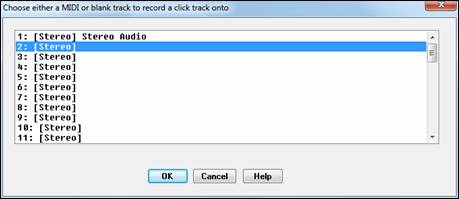
Select this menu item and then select a blank track to designate as the click track.
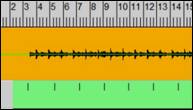
Then, type the letter L during the recording.
|
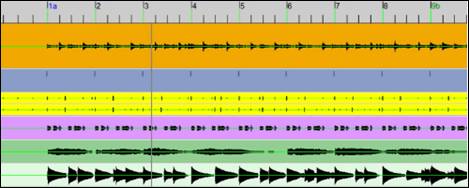
The Tracks window displays where you have placed the bar lines. |
|
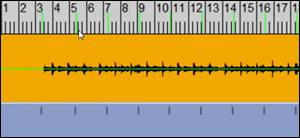
When you stop recording, you will also see the green lines on the grid, which indicate where the bar lines are. |
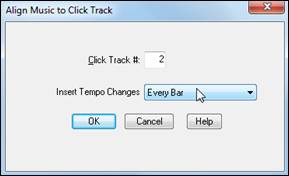
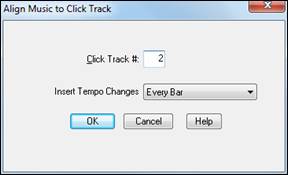
Right click on the Tracks window, and go to Click Track | Align (or Realign) music to click track.
|
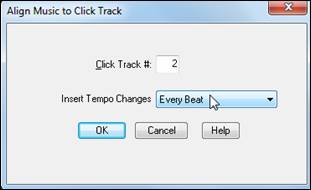
When the dialog opens, select “Every Bar” for “Insert Tempo Changes,” and click OK. |
Now you will see the actual bar lines above are in the correct places.
And when you play, you will see at the bottom of the screen that the bars and beats are displaying correctly.

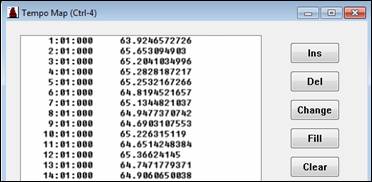
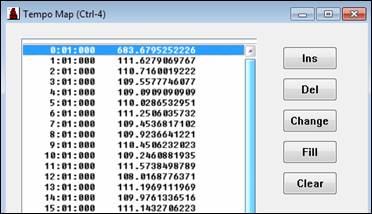
![]() If you open the Tempo Map, you can see exactly what RealBand has done.
If you open the Tempo Map, you can see exactly what RealBand has done.
|
It has put in tempo changes automatically at every bar so it will match up with the bar lines that you have typed in. You can see that it wavers between 64 and 65 beats per minute based on the bar lines you have entered. |
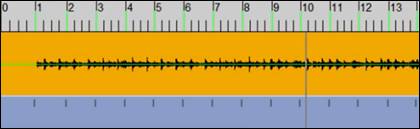
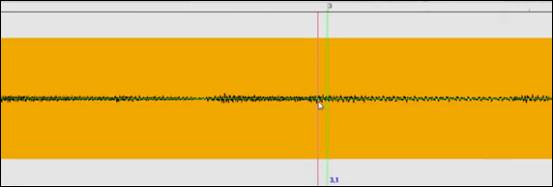
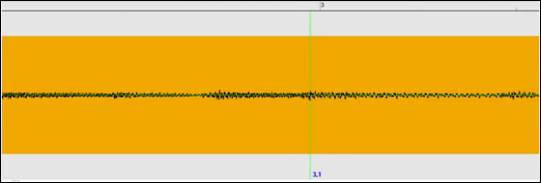
When you open the Audio Edit window for your guitar track, you can see the green lines. If you zoom in some of them, you can see they are not all perfectly line up with your guitar. You can easily move these around, and then re-align.
Right click where you want the bar line moved to, and go to Click Track | Move nearest click track event to location you clicked on.
Then, right click again and go to Click Track | Align (or Realign) music to click track.
You can do this process for any bar if necessary.
When all bar lines are lined up, it will be much easier to record additional tracks. Or you can even add RealDrums, Loops, or RealTracks.
Method 2: Recording of Bars and Beats
You can also easily deal with more complex songs. For example, if you have a 4/4 song that has a bar of 3/4 and want to learn from it, just drag it into RealBand.
Next, click on the arrow on the Record button, and select Record Click Track.
When the Align Music to Click Track dialog opens, select a blank track to designate as the click track.
And now do the same thing as before, but with one change; because the song has a 3/4 bar, you will also need to record beats by typing the letter K (or playing the note E5 if you are using an external MIDI keyboard).
This time, the Tracks window looks slightly different. Because you are entering beats too, you will see dashes in addition to lines. And for the bar of 3/4, you only see two dashes because has 3 beats instead of 4. You don’t need to enter beats for all bars; if you stop entering beats, RealBand will assume that the beats are following the main time signature (4/4) of the song. You only need to enter beats for bars that are different from the main time signature.

When you finish recording, right click and go to Click Track | Align (or Realign) music to click track.


![]() If you look at the Tempo Map, you can see how RealBand has aligned tempos.
If you look at the Tempo Map, you can see how RealBand has aligned tempos.
|
And if you look at the Meter Map, you can see that the meter switches to 3/4 at bar 8, then back to 4/4 at bar 9. |

Method 3: Manually Entering Bars
Instead of recording the bars or beats, you can just designate the first and lar bars as click track bars.
For example, you have a song that gradually speeds up from the start to the finish, and you want it to line up with all the bars. You could tap the letter L to enter bars, but if you know exactly how long the song is, you can just specify the first bar and a bar near the end and have it just fill in the rest.

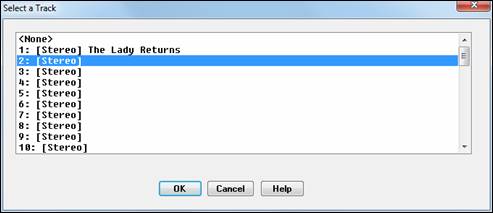
First of all, because you are not recording a click track, you need to select an empty track and designate it as the click track. Right click and go to Click Track | Choose Click Track.
Select the track 2.
Now, right click at the very beginning, where the musicians start, and go to Click Track | Insert new bar click track event to manually add a bar event there.

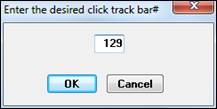
Go to the end of the song and locate the last bar before the ending. Right click, and go to Click Track | Make the current location the Nth bar.

|
For example, if you want to make that location the 129th click track bar, enter 129 and press OK. |
You will then see bar lines on the click track. When you look at the grid, it has a green line where you have entered manually. It also has yellow lines. These are inferred bar lines. Since you have entered bars 1 and 129, RealBand know where all the in-between bars should be.
In the Click Track menu, there are options to take the inferred bar lines and make them definite bar lines, which would change them to Green. But you cand just select Align (or Realign) music to click track.

Now you will see that by just entering the first and last bars, it’s pretty close to lining up. If it’s not perfectly lining up, you can specify another location in the middle, for example bar 65.
Right click where bar 65 should be should be located and go to Click Track | Move nearest click track event to location you clicked on.
You will then see the yellow line at bar 65 has changed to green, which means this bar has been changed from an inferred bar to a definite bar.

However, since all of the other bars remain as the inferred bars, you will need to do a quick realign by selecting Click Track | Align (or Realign) music to click track from the right click menu.
And this has made every part of the song much better.

Method 4: Aligning MIDI
You can also align MIDI that wasn’t recorded to a click track. For example, if you have a MIDI where the tempo is frequently slowed down and sped up for a dramatic effect, you can have it aligned to a click track without affecting the fluid nature of the performance.
First, right click on the arrow on the Record button to select the Record Click Track menu item, and start recording the click track.

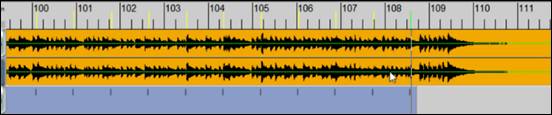
When you have entered bars and beats, you will see that where the tempo is quicker, the beats are closer together, and where the tempo is slower, the beats are stretched out.
Right click and go to Click Track | Align (or Realign) music to click track.
|
You can select “Every Beat” for the “Insert Tempo Changes” option to have the tempo changes reflect on each beat you have entered. |
When you press OK, you will see the bar lines are all lined up.
Audio Editing
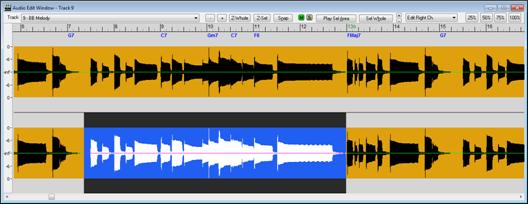
Any of the forty-eight tracks within RealBand can be designated as either mono audio or stereo audio. If you edit a stereo track in the Audio Edit window, you will see two channels (waveforms) in the window.
The Audio Edit window lets you edit only the left or right channels of a stereo track instead of always editing both channels. This lets you Cut/Paste just the left or right channel, or you can apply a non-real time effect (Edit | Audio Effects) to just the left or right channel.
Stereo tracks are normally panned to the center so the stereo signal is centered.
Scrub Mode
![]() Enable this button and drag a mouse over a section of waveforms to hear the audio of that section.
Enable this button and drag a mouse over a section of waveforms to hear the audio of that section.
Loop Record
|
If you record while in Loop mode (which is activated using the loop button) the music will loop when recording is started with the Record button. The music that is recording during each loop can be put onto individual tracks after recording is finished, or the entire take can be put onto a single |
track like an ordinary recorded take. A dialog will pop up giving you a choice of whether the recorded audio will go on separate tracks or on the same track. If you choose the latter, the take will be kept the same way an ordinary take is normally kept. If you choose to have the loops put on separate tracks, the program will put each loop on any available track that is greater than or equal to the Current Track. For example, if there are 10 audio loops recorded then program will put the takes onto 10 audio tracks. If you don’t want to overwrite existing tracks, then make sure the current track, and any tracks with a higher number than the current track, are blank before recording. For example, if the song already has 10 tracks used, then start recording on track 11 and the loops will be placed on track 11 and beyond. If the program runs out of tracks, it will attempt to put remaining loops onto the last track.
Editing Audio Tracks
You may find that you do much of your audio editing in the Tracks window overview, but the Bars window and the Audio Edit window are also very useful.
Bars Window
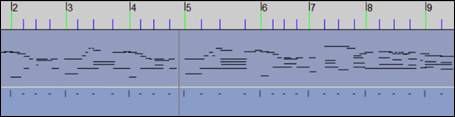
The Bars window provides an overview of the data (WAV and/or MIDI) in a song file. This view makes it easy to select a large region of a track for editing.
Bars view displaying a song with both digital audio and MIDI tracks.
You’ll see that as the song plays the Bars window scrolls along, showing graphical representations of the waveforms that are contained in the individual tracks. A small cursor at the top of the window indicates the current bar and the numbers indicate the bar numbers of the song.
If the Alt key is held when left-mouse clicking on the overview section of the Bars window the time will be changed without affecting the currently highlighted region. This lets you quickly adjust the current time without having to worry about accidentally changing the highlighted region.
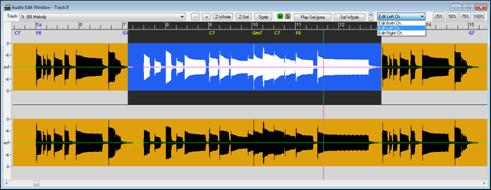
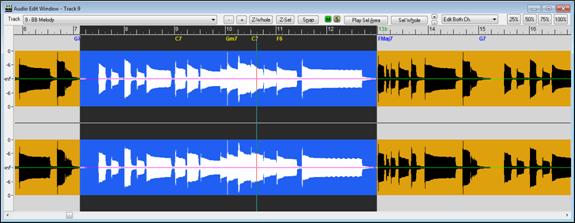
Audio Edit Window
|
You can open an Audio Edit window for any track that contains WAV data. To view the waveforms of the individual tracks click on the track that you want and then click on the Audio Edit toolbar button. |
You can also open the Audio Edit window with the menu command Window | New | Audio Edit Window (Ctrl+F2).
|
In the Audio Edit window, the Track Name Combo shows the track number in addition to the name for non-blank tracks. Use this list to change to a view of a different track. |
This window lets you view audio data as a graphical representation of the waveforms on the selected track. It scrolls as the song plays, with a thin red vertical stripe to mark the current song position.
The number-ruler at the top of the window denotes the bar numbers of the current song.
![]()
Small vertical lines are displayed at 8th and 16th note boundaries. This makes it easier to align audio to correct timing issues.
◄ Left and right ► cursor arrow keys will move the current time forward or backward by 1 beat.
![]() ►
► ![]()
The dB Scale on the left side of the Audio Edit window gives you a better idea of the level of an audio track.
|
By clicking on the [+] and [-] buttons you can “zoom” in or out on the waveform to facilitate very precise waveform editing. The large +/- buttons zoom horizontally, the smaller set zooms vertically. |
|
The [Z-Whole] button zooms out to show the entire waveform. |
|
The [Z-Sel] button zooms in on the highlighted section of the waveform. |
|
The [M] button mutes or plays the track. Red indicates the track is muted, green indicates playing. |
|
The [S] button solos the track. Bright yellow indicates the track is soloed. |
|
The [Snap] button will cause the highlighted region to snap to the nearest beat when selecting a region with the mouse. |
|
The [Play Selected Area] button will play the highlighted area to let you hear what was selected. |
|
The [Select Whole] button selects the whole audio track. |
|
Enable this button and drag a mouse over a section of waveforms to hear the audio of that section. |
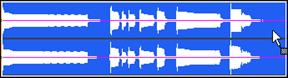
The current time within the song, if visible within the Audio Edit window, will be shown as a vertical line in red. This will be drawn in reverse video if the current time is within the selected region.
You can select a region to edit with the mouse by clicking on the waveform and dragging the mouse to the right. Shift+click (Shift key + left mouse button) support makes it easy to tweak the beginning or end of the highlighted area.
- If you Shift+click before the start of the From/Thru range, or after the end of the From/Thru range, the highlighted area will be extended.
- If you Shift+click within the From/Thru range, the range will be reduced, and the location you clicked on will become either From or Thru depending on which boundary was closer to where you Shift+clicked the mouse.
- If you keep the left mouse button held after the Shift+click, and you move the mouse you can adjust the boundary of the range while moving the mouse.
Alt+click is supported the same way as for the overview section of the Tracks window. In other words, Alt+click will ONLY move the time marker, which ensures you don't accidentally alter the current selected area.
After selecting a region, you can then execute Cut, or one of the audio effects in the Edit menu.
The Audio Edit window lets you edit only the left or right channels of a Stereo track instead of editing both channels. This lets you cut/paste or apply a non-real time effect (Edit | Audio Effects) to just the left or right channel.
RealBand supports drag-and-drop editing in the Audio Edit windows. Select the highlighted region by holding down the Ctrl key with the left mouse button pressed, and then drag the region to a new location in the song.
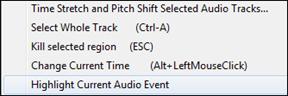
Right-Click Audio Edit Menu
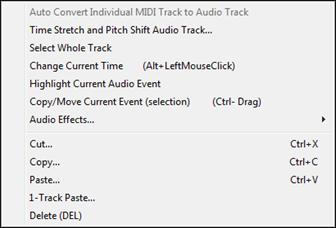
The right-click menu in the Audio Edit Window is similar to the right-click menu in the Tracks window.
The Time Stretch and Pitch Shift Audio Track feature allows you to permanently change the duration and pitch of individual audio tracks, or change the speed and pitch of the entire RealBand mix.
Select Whole Track command will select the entire track for editing.
Kill Selected Region will deselect a selected region of an audio (or MIDI) track.
Change Current Time will change the current time without affecting the highlighting of tracks. This ensures you don’t accidentally de-select a region.
Highlight Current Audio Event makes it easier to select specific audio events, which then could be clicked and dragged (with Ctrl button held down) to a new location, etc.
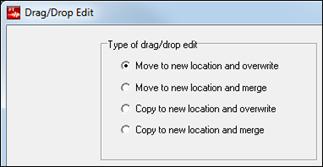
Copy/Move Current Event (selection) launches the Drag/Drop Edit dialog.

- If nothing is selected, and you Ctrl+click to drag and drop, it will assume that you want to drag the entire current audio event.
- Bypassing the dialog for quicker workflow. If you hold Ctrl+Shift then the drag will move the current event. If you hold Ctrl+Alt then the drag will copy the current event. When Dragging/Dropping within the overview section of the Tracks window, you can now drop to a blank track even if the track type wasn't originally set to the correct track type.
- Drag/Drop will automatically be set to the original time if within 20 ticks (at a PPQ of 120). So if you drag a region down to a new track, you just need to be “approximate” in the drop location, as the program will snap the time to the same time as the event on the source track. If you don’t want that behavior, just Ctrl+drag the selection, and the dialog appears with exact values. In this case, the dialog also has a handy “Set Drop Time to Drag Time” button.
- The Time field has been added to the Drag/Drop Edit dialog, so you can fine-tune the time for the drop when you drag a selection using Ctrl+drag.
- Destination Track # added to Drag/Drop Edit dialog when launched from the Tracks window.
- [Set Drop Time to Drag Time] button has been added to the Drag/Drop Edit dialog
- Copy/Move Current Event (selection) menu item added to the Tracks window right-click menu
- When dragging/dropping within the overview section of the Tracks Win, you can drop to blank track even if the track type wasn't originally set to the correct track type.
Audio Effects opens a submenu that is the same as the Edit | Audio Effects window. This submenu also contains Fade In and Fade Out menu items, which launches a Flash Message w/ instructions, and then launches the GAIN dialog.
The Cut, Copy, Paste, and 1-Track Paste commands apply to the highlighted section of a track(s). The functions are as described in the Edit Menu topic.
Delete removes the selected section or events.
Tracks Window Editing
Audio edits can also be performed directly in the Tracks window, although the Audio Edit window offers a larger view for precision editing.
Drag and drop audio editing in the Tracks window makes it easy to drag a clip from one track to another.
|
You can select a highlighted region by holding down the Ctrl key with the left mouse button pressed, and drag the region to a new location in the song. |
|
After releasing the mouse button, you have four options:
|
There is a right-click menu item in the Tracks window to highlight the current Audio Event. This makes it easier to select specific audio events, which then could be clicked and dragged (with Ctrl button held down) to a new location, etc.
![]()
Audio Edit Commands
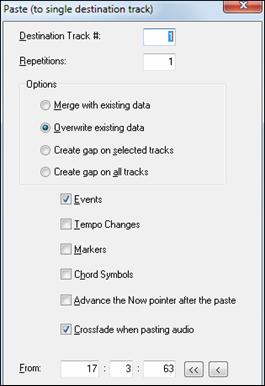
Audio editing uses the Edit menu commands. You can Cut, Copy, and Paste audio data just as if it were text.
Each action brings up its own dialog, which can also be launched with the standard Windows keystroke commands Ctrl+X for Cut, Ctrl+C for Copy, and Ctrl+V for Paste.
![]() The crossfade option when pasting audio smoothes out a paste, so that no audible “clicks” are heard at splice points of pastes.
The crossfade option when pasting audio smoothes out a paste, so that no audible “clicks” are heard at splice points of pastes.
![]() Click on the [Help] button in each edit dialog for detailed instructions on the settings and commands.
Click on the [Help] button in each edit dialog for detailed instructions on the settings and commands.
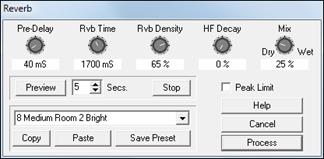
Audio Effects
|
This is a submenu that contains all of the permanent audio effects for RealBand. The audio effects in this submenu are actually external plug-ins that are transparently integrated with RealBand, but actually aren’t built-in to the program itself. You’ll be able to use them just as if they were built-in to RealBand. Unlike the effects that are added in the Mixer window on the FX track insert and the Aux busses, when the effects in the Audio Effects submenu are applied the content of the audio track is permanently altered. The effect can be removed with the Edit | Undo command. Note: Once the file has been saved the effect cannot be undone.
This command will undo the last edit command executed and restore the track to its previous state. The number of Undo Levels is adjustable from 1 to 100 in the General section of the Options | Preferences dialog. |
Each effect has its own dialog with custom settings and commands. Click on the [Help] button for a detailed explanation of the settings and a concise tutorial on how to apply the effect.
Time Stretch and Pitch Shift
This feature is available from the Tracks window by right-clicking with the mouse on any audio track.

It allows you to permanently change the duration and pitch of individual audio tracks, or change the speed and pitch of the entire RealBand mix.
If an audio track has been inadvertently recorded too flat or too sharp, you can easily modify the pitch without affecting the track's duration. If the duration of an audio track is incorrect RealBand can change the tempo of the audio track without affecting the pitch. Tempo can be adjusted from 1/4 speed to 4X speed. Pitch can be adjusted +/- one Octave, in one Cent increments (a Cent is 1/100 of a Semitone).
These features are also useful for learning your favorite up-tempo song. Load the file and play it back at half speed. If the song is in the key of F but you would rather learn it in Eb, transpose it down 2 semitones and continue playing at half-speed. As you master the song, you can gradually increase the tempo until you can play along at full speed.
The Time Stretch and Pitch Shift dialog lets you stretch (or reduce) the length of the highlighted section of audio tracks.
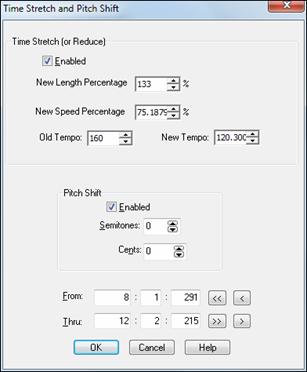
Time Stretch (or Reduce)
Enabled: if checked, then RealBand will change the length based on the following settings:
New Length Percentage: The new length as a percentage relative to the original length. For example, a new length percentage of 200% will result in the section being double the original length.
New Speed Percentage: Time stretching (or reduction) will also cause the section to be played faster or slower. If you are stretching a section of the song, it will play slower. If you are reducing a section it will play faster. This setting is the inverse of the New Length Percentage. For example, a New Speed Percentage of 50% (half speed) will result in a New Length Percentage of 200% (double length).
Old Tempo and New Tempo: If you specify old and new tempos, this is another way of adjusting the speed, but this method lets you think in terms of a change in tempo rather than a change in speed as a percentage.
Pitch Shift
Enabled: If checked, then RealBand will pitch shift based on the following settings:
Semitones: Amount of semitones to pitch shift up or down. There are 12 semitones per octave.
Cents: Amount of cents to pitch shift up or down. There are 100 cents per semitone.
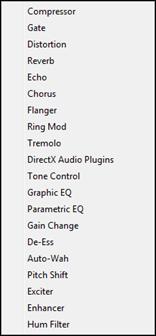
Real Time Effects Plug-Ins
RealBand supports DirectX and VST effects, which you can apply in real time to the audio tracks. A full range of PG Music effects is included with the program; you can also use any other third party DirectX or VST effects to add effects in real time without permanently altering the actual track data.
Installing DirectX Effects Plug-Ins
DirectX effects are installed by default in the Program Files folder on Windows computers. They will be present in the “Plugin” list in the DirectX/VST window. There is a “Scan” feature in the DirectX/VST Options that will search for newly installed DirectX plug-ins not on the list.
Installing a VST Effects Plug-In
Click on the [FX] button in the Mixer window or the [VST/DX Synth] button on the toolbar to open the DirectX/VST Window.
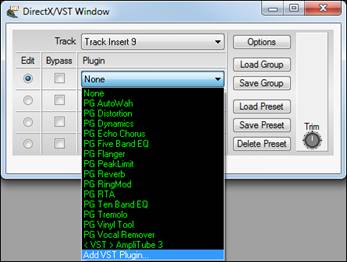
In the Plugin list, select the “Add VST Plugin...” item at the bottom of the list.
Select a VST plug-in .dll file in the following Select a VST plug-in dialog, and it is added to the plug-in list. After you add each VST, the plug-in is permanently added to the list. You only have to add each plug-in one time.
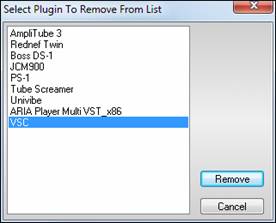
Remove VST/VSTi Plug-In
You can remove a VSTi or VST plug-in that you have installed. This only removes the VST/VSTi plug-in from RealBand' list of remembered VST plug-ins. The feature does not uninstall a plug-in or delete any plug-in files.
After you remove a plug-in from view in RealBand, that plug-in still remains usable to any other VST program where you prefer to have it available.
To remove a VSTi or VST plug-in from RealBand:
Click on the [Options] button in the DirectX/VST Window to launch the DX/VST Options dialog.
Select the [Remove VST Plugin (from list)…] button.
Select the plug-in to remove so it is highlighted in the list, then click the [Remove] button.
Uninstall a VST/VSTi Plug-In
If you want to permanently delete a VST/VSTi plug-in from your computer, first check if the plug-in has an uninstaller in the Windows menu “Start | Settings | Control Panel | Add or Remove Programs.” If an uninstaller is available, that is the best way to get a clean plug-in uninstall.
With plug-ins that do not have an uninstaller, it is safe to drag the plug-in's DLL and any other plug-in support files to the Windows Recycle folder.
DX/VST Options
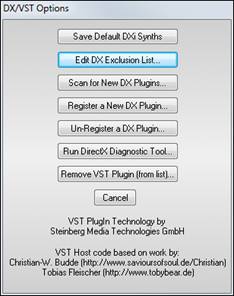
The [Options] button brings up the DX/VST Options dialog where you can manage your real time effects plug-ins.
[Save Default DXi Synths] saves your plug-in default settings.
The [Edit DX Exclusion List…] button lets you edit the list of plug-ins to include or exclude in the DirectX editor. This is useful if you have some plug-ins which were found and which aren’t compatible with RealBand. If you edit the exclusion list, you’ll see a dialog box with the left side displaying the included plug-ins and the right side displaying the excluded plug-ins:
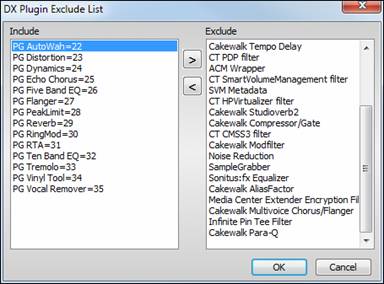
The [>] button moves a plug-in from the Include to the Exclude list.
The [<] button moves a plug-in from the Exclude to the Include list.
The [Scan for New Plug-Ins…] button will cause RealBand to scan for newly installed plug-ins.
The [Register a New Plug-In…] button can be used to register a plug-in with DirectX, so that audio applications such as RealBand can use the plug-in if you have a plug-in that doesn’t automatically register itself.
The [Unregister a Plug-In…] button removes a plug-in from DirectX so that audio applications will no longer be able to use this plug-in.
The [Run DirectX Diagnostic Tool…] button will run the Microsoft Direct X Diagnostic tool, which checks for problems with DirectX.
Select the [Remove VST Plugin (from list)…] button to remove a VST plug-in so that it is no longer included in the “Plugin” list in the DirectX/VST Window.
Effects Controls
|
The [FX] track insert button in the Mixer window assigns effects to the specific track alone. Up to four effects can be chained on the FX insert. Each of the four Aux control knobs can be assigned to one of the eight auxiliary effects busses. The position of the control knob determines the amount of the signal that is routed through the auxiliary bus and how much of the “dry” signal goes directly to the audio output bus. |
Auxiliary Effects Busses
Each of the eight Aux busses can have a chain of up to four real time effects. These can be any DirectX or VST effects that you have installed on your system, either the included PG Music effects or third party effects.
The effects on each bus or insert are chained (in sequence), which means that the processed signal from each plug-in is then further processed by the chain’s next plug-in. There are no hard-and-fast rules, but a typical effects chain might start with effects that condition the incoming signal (noise gate, EQ, dynamics), then add effects that alter the tonal qualities of the sound (chorus, distortion, modulation) and then time-based effects (reverb, delay).
To run effects in parallel, rather than chained, you can assign them to any of the eight auxiliary busses and route each track individually through any four effects.
![]()
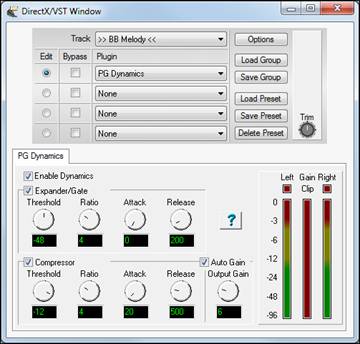
Choosing and Editing DirectX/VST Effects
The Track field of the DirectX/VST window lets you choose a track in which to select or edit effects. A “track” can be a Track Insert, an Aux bus, or an Output Insert.
The “Edit” radio buttons let you choose which of the four effects to edit in the group of effects available in each track. The “Bypass” checkboxes lets you bypass any of the four effects in a group.
In the example, the BB Melody is the currently selected Track and slot 1 (PG Dynamics) is selected for editing.
The [Load Group] and [Save Group] buttons let you load and save the effects settings for the currently selected track. The [Load Preset] and [Save Preset] buttons let you save and load presets for the current effect. The [Delete Preset] button lets you remove a preset from the list of already saved presets.
VST/VSTi Additional Panel Controls
VST is necessarily different from DirectX/DXi, and some extra controls are available for VST plug-ins. DirectX/DXi plug-ins save their presets to the Windows Registry and only one setting is “alive” at a time.
VST/VSTi plug-ins save their presets to disk files. VST/VSTi plug-ins contain a bank of presets in memory. You can switch between presets while editing, and each edited preset is remembered in the current bank.
VST Generic User Interface
VST/VSTi plug-ins are not required to have a fancy graphic control panel. There are many “faceless” VST plug-ins that have many adjustable parameters, but no fancy control panel. When you open such a plug-in, the control panel will look like this example. RealBand presents one “generic” slider for each adjustable parameter in the plug-in.
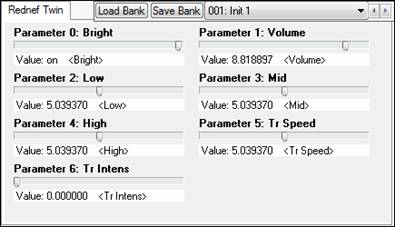
Parameter Name: Simply the name of each adjustable parameter.
Value Slider: Move the slider to adjust the parameter value.
Value Indication Text: Displays the value of the slider, as interpreted by the plug-in. In the above example, Parameter 0: Bright is interpreted as an ON/OFF switch, but Parameter 1: Volume is interpreted as a value from 0 to 10.
The number of real time effects that you can expect to activate at a time without stressing the system depends on the speed of your computer. Normally you would mostly be using the Aux busses, since the effects used in the Aux busses can be applied to multiple tracks efficiently. In other words, it isn’t very taxing on the CPU to apply an Aux effect to multiple tracks. For example, let’s say you were to select a reverb in the Aux 1 section of the mixer, and you adjust the Aux1 send knobs for 5 tracks so that they were all using Aux 1 for reverb. In this case, there would only be one instance of this reverb plug-in active in RealBand, regardless of the number of tracks (5) that were utilizing the Aux1 bus. What’s nice about this is that you can apply completely different amounts of the same effect to different tracks, so some tracks can be very “wet” with lots of reverb, while others can be relatively “dry” with very little reverb.
If you use Track Inserts on multiple-tracks, you will use up CPU processing power relatively quickly and your computer may have trouble handling this depending on the speed of your CPU. The reason for this is that the Track Inserts each involve the usage of a unique instance of each effect, since each Track Insert is a unique signal path for each track.
Reset Effects
|
The [Reset Realtime Effects] button is found in the Audio Preferences dialog. It removes all real time effects from your project so you can remix your project from scratch. |
Rendering MIDI Tracks to Audio
The Render menu on the main menu bar has commands to automatically render entire sequences to audio files, or to export selected tracks to WAV files.
Rendering MIDI to audio is virtually automatic when using the DXi/VSTi synthesizer support in RealBand. Just go to the Render menu and choose Merge Audio and DXi Tracks to Stereo Wave File, or to a WMA file, or to any compressed format (such as .MP3) that is supported by your computer.
All levels and effects settings will be rendered exactly as they are in the Tracks and/or Mixer windows.

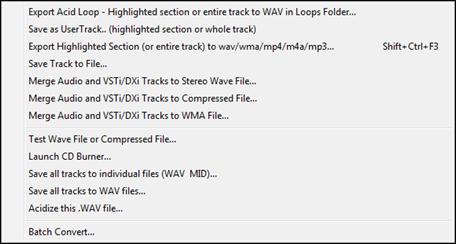
Export Acid Loop - Highlighted section or entire track to WAV in Loops Folder
This command will render the highlighted section of the current track or the whole track as an ACID Loop and save it to the bb\RealTracks\Loops folder.
Save as UserTrack (highlighted section or whole track)
This command will render the highlighted section of the current track or the whole track as a WAV file and save it to the bb\RealTracks\UserTracks folder.
Export Highlighted Section (or entire track) to wav/wma/mp4/m4a/mp3
This command will export the highlighted section of the current track to a wave file –as long as the track contains audio data. Drag a section of the track while holding down the left mouse button to select a highlighted section. Use Ctrl+A to select the whole track, or open the right-click menu and choose Select Whole Track.
Merge Audio and VSTi/DXi Tracks to Stereo Wave File
This is an export command that will merge all the audio tracks to a stereo wave file while simultaneously rendering and merging the MIDI tracks to audio if you have a DXi or VSTi software synth. When played in a wave file player the file will sound the same as if the audio tracks of the song were being played by RealBand. The volume, mute, pan, etc. settings of the track will affect the sound of the merged stereo wave file.
Merge Audio and VSTi/DXi Tracks to Compressed File
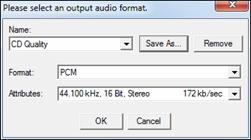
When you export audio to alternate file formats a standard Windows Audio Format dialog appears.
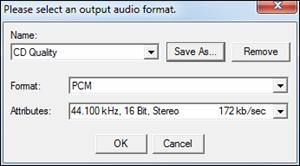
Use the Format popup menu to select the ACM codec you wish to use, and then select the exact specifications of the file from the choices available in the Attributes popup menu.
If you frequently use a particular combination you can click on [Save As] to name the setting in the Name combo box and save it for future use.
When you press OK, RealBand will export the song to the format you have selected using the ACM codec.
Merge Audio and VSTi/DXi Tracks to WMA File
This command works the same as the Render | Merge Audio and DXi Tracks to Stereo Wave File command except that this feature will compress the file using the Microsoft Streaming Media® Compression Technology™. When you execute this command the program first generates a temporary stereo PCM file (Raw Wave). A dialog will then pop-up that will let you save the resulting stereo PCM wave file to a .WMA file (Windows Media Audio).
![]()
Auto Convert Individual MIDI Track to WAV File
Invoke this command by right-clicking on the track in the Tracks window and easily convert any MIDI track to a .WAV file. RealBand will automatically render using a DXi or VSTi synth.
Auto Convert Individual MIDI Track to Audio Track
It is easy to convert any MIDI track to an audio track. RealBand will automatically render using a DXi or VSTi synth. This command is accessible by right-clicking on the track in the Tracks window.
Manual Rendering of MIDI to Audio
MIDI tracks can easily be rendered (recorded) to audio using your system’s sound card and its onboard MIDI synthesizer or by recording the audio output from an external MIDI device.
To render MIDI tracks to audio with the internal system sound device:
- Load the source MIDI file into RealBand.
- In the Tracks window select a blank track and set the track type to stereo audio.
- In Options | Preferences | MIDI Devices verify that the internal MIDI synthesizer is selected. This could be the Microsoft GS Wavetable SW Synthesizer, any model of Sound Blaster, or another onboard sound device.
- Click on the VU Meters button on the Tool Bar.
- In the VU Meters window click on the Windows mixer button to open the Volume Control (see note following). To see the Recording Control, select Options | Properties in the Volume Control window.
- In the Recording Control select the input source by checking the Select checkbox. Different systems and sound cards use different labels; you might be selecting “MIDI” as the input source, or “What You Hear,” or “Stereo Mix.” If you aren’t sure which source to choose, start by eliminating the obvious like CD Player, Microphone, or Line In.
- Play the MIDI file and monitor the levels on the Input VU meter. Levels can be adjusted in both the Recording Control and the Volume (or Playback) control. The levels can occasionally go into the yellow zone, and a transient peak in the red zone is OK. Consistent readings in the red or lighting up the clip indicator means your levels are set too high.
- Unless you want to record the metronome, check to be sure it is disabled in Options | Metronome.
- Click on the Record Audio button to record the song. The Input VU meters will become active during recording.
- When done, click the Stop button and choose to “Keep Take” when prompted. A stereo track will have been recorded.
You could then use the menu command Edit | Track | Save Track to File… to save the recorded audio track as a .WAV file.
To render MIDI to audio when you’re using an external synthesizer or sound module you connect its audio output to the Line In of your sound card and select Line In as your input source in the Windows Recording Control.
Rendering when you’re using an external synthesizer:
- Load the source MIDI file into RealBand.
- In the Tracks window select a blank track and set the track type to stereo audio.
- In Options | Preferences | MIDI Devices verify that the external MIDI driver is selected. It could be named MPU-401, MIDI Out Port or another name with the word “out” such as SB Live MIDI Out, or MIDI IO (input/output).
- Click on the VU Meters button on the Tool Bar.
- In the VU Meters window click on the Windows mixer button to open the Volume Control. To see the Recording Control select Options | Properties in the Volume Control window.
- In the Recording Control select “Line In” as the input source by checking the Select checkbox. Make sure that the audio output of your MIDI synthesizer or sound module is connected to your computer’s Line In jack.
- Play the MIDI file and monitor the levels on the Input VU meter. Levels can be adjusted in both the Recording Control and the Volume (or Playback) Control, the levels can occasionally go into the yellow zone, and a transient peak in the red zone is OK. Consistent readings in the red or lighting up the clip indicator means that your levels are set too high.
- Unless you want to record the metronome, check to be sure it is disabled in Options | Preferences | Metronome.
- Click on the Record Audio button to record the song. The Input VU meters will become active during recording.
- When done, click the Stop button and choose to “Keep Take” when prompted. A stereo track will have been recorded.
You could then use the menu command Edit | Track | Save Track to File… to save the recorded audio track as a .WAV file.
Saving Audio Files
RealBand files are saved in the .SEQ (sequence) file format, which can include both audio and MIDI tracks in the same file. So you could import a Band-in-a-Box MIDI file into RealBand and then record live parts along with the Band-in-a-Box accompaniment.
Auto-Backup of .SEQ Files
When you save a file, RealBand now saves a backup of the file in a c:\RealBand\RBBACKUP folder. This doesn’t add any time to the file-save command, and the number of backups is configurable. So the next time that you mistakenly overwrite a file when saving, go the backup folder to look for a saved previous copy.
Backup settings are found under the File tab in the Preferences dialog.

When the Create backup file when overwriting a .SEQ file setting is enabled, RealBand will always create a backup file (BKS file) when a .SEQ file is overwritten. For songs saved into the same hard drive where RealBand is installed, the backups are placed into an RBBACKUP subfolder of the RealBand folder. For songs that are saved to a different hard drive, the backups are placed in an RBBACKUP folder which is off of the root (e.g. D:\RBBACKUP) The max backups per song setting determines the maximum number of backups to be kept for each song. If this limit is reached, then RealBand will delete the oldest backup of the song you are overwriting and create a newer backup. The “Max backups per hard drive:” setting is the maximum total backups allowed per hard drive. If this limit is reached, then RealBand will delete the oldest backup file. There is also on option for moving the older backups into the Recycle Bin instead of deleting them when either of the two limits is reached.
Wave Files
Import Wave File
This command offers to import a wave file into the “current track” of your project. These audio file formats can be loaded from the Edit | Audio | Insert Wave File menu command.

- WAV: Windows wave files, native digital audio files for the Microsoft Windows platform.
- MP3: compressed audio files, popular on the Internet. Requires codec to be present on system.
- WMA: Windows Media Audio, a compressed audio format developed by Microsoft.
- WMV: Windows Media Video is a compressed video format developed by Microsoft. RealBand will load the audio from a WMV.
- CDA: CD Audio is the file extension used by Windows to make CD audio tracks available for loading into programs like RealBand. Just put an audio CD into your CD-ROM, and then open a .CDA file from that drive (usually drive D).
This command will also import MultiTrack .WAV files by offering a choice of merging them to mono or placing additional tracks of the wave file onto separate tracks. For example, if Track 1 is the current track and Track 2 is empty (and you import a Stereo Wave file), RealBand will place the left channel on track 1. The right channel will be imported to Track 2 on the next available track, which, in this case, is Track 2 since this track is empty.
A dialog will pop up which lets you select the time location to place the wave file(s). By default, this is the current time (Now:) of a song.
DirectX/VST Configuration

Open DirectX/VST Plugins Configuration
Open the DirectX/VST window to select and edit effects plug-ins.
Open DXi/VSTi Synth Panel Configuration
Opens the DirectX/VST window with the control panel for the current synth.
Audio Chord Wizard
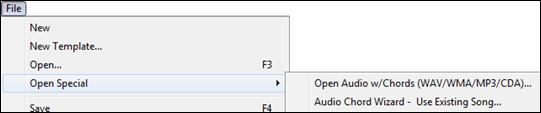
Audio Chord Wizard - Open Audio file (WAV/WMA/MP3/CDA)
Select an audio file to load into the Audio Chord Wizard.
Audio Chord Wizard - Use Existing Song
Load the currently loaded song into the Audio Chord Wizard.
Save Wave File
To make a .WAV file, and even burn a CD of the song, you can render the MIDI tracks to audio and export the whole song to a wave file.
RealBand offers a number of options to save or export audio files in different formats. These options are found in the Render menu.
Export Acid Loop - Highlighted section or entire track to WAV in Loops Folder…
This command will render the highlighted section of the current track or the whole track as an ACID Loop and save it to the bb\RealTracks\Loops folder.
Save as UserTrack… (highlighted section or whole track)
This command will render the highlighted section of the current track or the whole track as a WAV file and save it to the bb\RealTracks\UserTracks folder.
Export Highlighted Section (or entire track) to wav/wma/mp4/m4a/mp3
This command will export the highlighted section of the current track to a wave file –as long as the track contains audio data. Drag a section of the track while holding down the left mouse button to select a highlighted section. Use Ctrl+A to select the whole track, or open the right-click menu and choose Select Whole Track.
Merge Audio and VSTi/DXi Tracks to Stereo Wave File...
This is an export command that will merge all the audio tracks to a stereo wave file while simultaneously rendering and merging the MIDI tracks to audio if you have a DXi or VSTi software synth. When played in a wave file player the file will sound the same as if the audio tracks of the song were being played by RealBand. The volume, mute, pan, etc. settings of the track will affect the sound of the merged stereo wave file.
Merge Audio and VSTi/DXi Tracks to Compressed File...
When you export audio to alternate file formats a standard Windows Audio Format dialog appears.
Use the Format popup menu to select the ACM codec you wish to use, and then select the exact specifications of the file from the choices available in the Attributes popup menu.
If you frequently use a particular combination you can save a setting in the Name combo box.
When you press OK, RealBand will export the song to the format you have selected using the ACM codec.
Merge Audio and VSTi/DXi Tracks to WMA File
This command works the same as the Render | Merge Audio and DXi Tracks to Stereo Wave File command except that this feature will compress the file using the Microsoft Streaming Media® Compression Technology™. When you execute this command the program first generates a temporary stereo PCM file (Raw Wave). A dialog will then pop-up that will let you save the resulting stereo PCM wave file to a .WMA file (Windows Media Audio).
Test Wave File or Compressed File
This command launches your default media player so you can test your file for compatibility and playability with a standard Windows media player.
Launch CD Burner
This command launches the “Miniburn” CD Burner program. If the current song has audio data, this feature will first offer to merge audio tracks in the current song to a WAV file. If you say OK to this option, the CD Burner will automatically add the .WAV file to a list of files to be burned onto a CD (burn list).
If necessary, RealBand will convert your file to 16-bit, 44.1 kHz stereo before burning it to an audio CD.
Save all tracks to individual files (WAV MID)
This command will save all tracks to either WAV or MID files depending on the track type.
Save all tracks to WAV files
This command will save all tracks to WAV files. MIDI tracks will be rendered using DXi.
Acidize this .WAV file
This command will acidize the selected .WAV file. You can write the Acid information such as tempo, root note, and the tempo signature.
Batch Convert
The command will convert a group of files in a folder over to another file type (.SEQ, .MID, .MP3, .MP4, .M4A, .WAV, .MGU, .SGU).
|
This feature is also available from the Batch button. |
So let’s say you want to convert your PowerTracks Pro Audio songs to MP4 files. It’s as easy as entering the location and file type (or all files) for the files that you want to convert and then choosing the output file type and location. There is also the option to add a suffix to the file names to identify the rendered files.
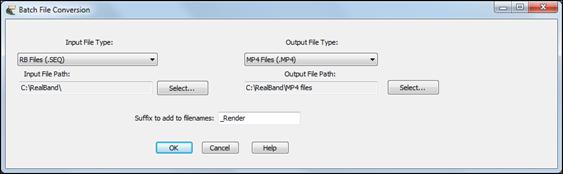
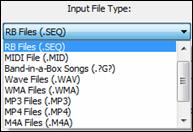
Input File Type:
The Input File Type combo lists the most common MIDI and audio file formats plus RealBand and Band-in-a-Box file types. There is also the option to select “All Supported File Types” to convert a folder with more than one type of file.
Input File Path:
![]()
This is the location where the files to be converted are found.
![]() Click on the [Select] button to browse for a folder.
Click on the [Select] button to browse for a folder.
Unconditional 30-Day Money Back Guarantee on all PG Music products purchased from PG Music Inc.
PG Music Inc.
29 Cadillac Ave Victoria BC Canada V8Z 1T3
Sales: 800-268-6272, 250-475-2874,+ 800-4746-8742*
* Outside USA & Canada where International Freephone service is available.
Access Codes
Tech Support: Live Chat, support@pgmusic.com
 Online now
Need Help?
Customer Sales & Support
|
Phones (Pacific Time) 1-800-268-6272 1-250-475-2874 |
||
| Live Chat | ||
| OPEN | Online Ordering 24/7 |
|
| OPEN | Forums, email, web support |