
Search Manual
Band-in-a-Box® 2021 for Mac® User's Guide
Chapter 4: The Main Screen
Main Screen Overview
The main screen gives direct access to the major features and program settings of Band-in-a-Box for ease and convenience during a session.
There are seven different areas on the main screen.
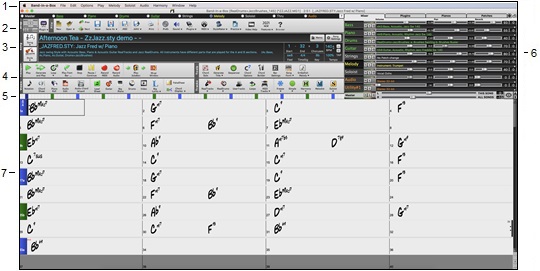
- The Status Bar shows program running status messages and path names of the currently loaded song. This area also includes the Menu Bar. Immediately below it are the Track Radio Buttons, where instruments are assigned and sounds are chosen. Right-click on the instrument names to open a menu of settings for that instrument.
- The Main Tool Bar area has buttons for direct access to important program features and menus. Hold the mouse cursor on any button to see a pop-up hint that describes its function.
- The Song Panel includes the song title and all the other settings for the song such as its Key Signature, Tempo, and Chorus settings. The [Song] and [Style] buttons offer various ways of selecting songs and styles, including the SongPicker and StylePicker dialogs.
- The Function Tool Bars are organized into groups of buttons for related features such as Transport, Tools, Views, and Tracks.
- The Progress Bar displays a timeline for the current song.
- The Mixer provides live control of parts with Volume, Pan, Reverb, and Tone settings. It also supports the assignment of plug-ins and patches to individual parts and has a piano keyboard display.
- The Chord Sheet Area occupies the lower part of the screen. Chord changes for the song are typed into the numbered bars (cells) in the sheet. Part markers (a, b, c, etc.) are entered here to switch between up to 24 Band-in-a-Box substyles.Repeats and endings are also shown.
To resize the window, just use the sizing control at the bottom-right corner of the window. Hold down the mouse button while you drag the sizing control.
This allows you to have Band-in-a-Box open as a small window on screen with other programs, and you still see a full Chord Sheet. The screen size is remembered between sessions.
Yellow Alert messages and green Action dialogs
You will see that many Band-in-a-Box messages appear as “yellow alerts” at the top right of screen. That way you don’t have to respond to the message, interrupting workflow. But, if the message box is green instead of yellow, the message is an “action” dialog and you can click on it to perform the action described, such as loading a substitute style. The green action messages have a close button, which is useful for closing them without performing the action.

Status Bar
The first thing to note is that the name of the song that is open is identified in the window title at the top of the screen along with the name of the style. This feature is handy when you want to know the status (and the title) of your song and the style in use at a glance. You’ll also see the length of the song in minutes and seconds, and this updates if you change the tempo and press the [Play] button.
![]()
The file name in the status bar will have an asterisk * added if the file has been changed.
Track Radio Buttons
![]()
This bar shows all of the available instrument parts in Band-in-a-Box, including:
- The Melody track, where you can record your own MIDI melody. Or just use it as a sequencer track to record any MIDI track.
- The Soloist track, for solos generated by the Band-in-a-Box Soloist. This track can also be used as a MIDI sequencer track if not needed for a solo.
- The Thru track for play-along on an outboard MIDI device or with the Band-in-a-Box Wizard feature.
- The Audio track for your recorded vocal or instrumental part, or an imported audio file.
The color of the instrument name indicates its type or state.
- White indicates that the part is empty and not in use.
- Yellow indicates a MIDI track.
- Blue indicates a MIDI SuperTrack.
- Green indicates a RealTrack. If the track name is underlined, it also has RealChart notation. If [V] is shown, the track has a video RealTracks.
- Orange is an Audio Performance Track.
- Red means that the track has been muted. When one of the tracks is being soloed, all other tracks will change color to red.
- For the Audio track, orange shows that an audio recording is present on the track.
If you have customized the track settings of a song (e.g. by overriding the settings in a style and putting a different RealTracks), it will be indicated by an equal sign in the track name by an (e.g. =Piano).
Automatic track naming with numbers. With previous versions, the tracks were always called the same names - Bass, Piano, Drums, Guitar, and Strings. Now, the track labels show the instrument names. And if there are multiple tracks with the same instrument, a number (1, 2, etc.) will follow. For example, if you load in the Slow Bluegrass Waltz style, you will see track buttons like these:

RealDrums can be added to any track, not just the Drums track, so you can have more than one drums track. To do this, right click on the track button and select Choose RealDrums from the menu. When there are multiple drums tracks, they will be automatically called Drums 1, Drums 2 etc.
![]()
In addition to the tracks shown on the track button bar, there are 16 editable Utility tracks, which can be used for audio and/or MIDI. You can generate RealTracks on the Utility tracks, where you can hear and edit the audio RealTracks, or view and edit the RealCharts MIDI. You can record audio or import an audio file to the Utility tracks to play, edit, or harmonize the audio. You can copy or move audio, MIDI, or both from other tracks to the Utility tracks. You can record MIDI or import a MIDI file to the Utility tracks for playback, notation display, or editing.
Master Button Menu
|
Right click on the Master button to open a menu of commands. |
Mute and Un-Mute All will mute or unmute all parts.
Export Song as Audio File will render the tracks together into one AIFF file.
Export Song as M4A File will render the tracks together into one m4a file.
Song has changed, needs regeneration will regenerate a new arrangement for all parts.
Render Song to Audio Track (and mute tracks) will consolidate all tracks into audio data and move it to the Audio track.
Un-Render Song from Audio Track (Enable tracks, erase audio track) will erase the Audio track and allow tracks to be generated by the current style again.
The Freeze and Un-freeze commands apply to all tracks.
If you like the current mix (of volumes, panning, reverb), and you want this applied as a default for all songs, you can choose Save Current Mix as Default. Load Default Mix restores the default mix you have saved, and Reset Mix sets the mix back to “factory defaults.”
Set Mix to Flat, Dry and Center sets the song to Flat (all volumes=90), Dry (no Reverb) and Center panning. This is useful when rendering individual tracks and transferring to a DAW.
The Set Song to Simple Arrangement checkbox makes the RealTracks play a simpler (less busy or embellished) arrangement.
This Song Volume Boost (range -36 to +36dB) opens a dialog where a dB value can be entered that will affect only the current song. For reference, 6dB is generally considered to double the volume; -6dB would be half the volume.
All Songs Volume Boost (range -36 to +36dB) opens a dialog where a dB value can be entered to adjust the overall volume of all songs. A setting of 6dB is twice as loud; -6dB is half as loud.
Render Video(s) allows you to make a video of RealTracks that are selected for your song, optionally with the chord sheet or the corresponding notation.
Track Buttons Menu
A right-click on any track button opens a menu of commands and settings that can be applied specifically to the individual track. The menu is organized into groups allowing easier selection of track types: audio (RealTracks, UserTracks, Loops) or MIDI (MIDI SuperTracks, classic MIDI tracks) and track settings/actions.
Select RealTracks
Choose RealTracks generates the part as a RealTrack using any available RealTracks instrument. Choose RealTracks generates the part as a RealTrack using any available RealTracks instrument. Choose Select Best “Soloist” RealTracks to add a best Soloist to any track. Select Best “All” RealTracks will show all RealTracks, sorted by best to worst for the current style, and Select Best “Chording” RealTracks shows the list for comping (i.e. Chording, non-Soloist) RealTracks. Find Best Sub will allow you to find a replacement that is similar to the currently selected RealTracks Choose RealTracks from Recently Chosen Favorites opens a list of recent RealTracks used. Choose No RealTracks for this track will remove the current selection from the track. Generate MultiRiffs will generate 7 variations of riffs from the same RealTracks for either a portion of the song or the whole song. Once the tracks are generated, the 7 files are saved as WAV files and can be accessed from the Drop Station. Add extra bar before and after the MultiRiff adds an extra bar before the riff begins to ensure that the riffs with “pickup” (early) notes will be heard. It does not add an extra bar at the end of the riff unless there are trailing notes. |
Select a UserTracks for this track lets you assign a track from the list in your UserTracks folder. UserTracks work like RealTracks but are created from the user’s own audio recordings.
You can play an audio loop (your own or 3rd party) on any track with the Select a Loop for this track command.
Choose RealDrums allows you to add RealDrums to any track, not just the Drums Track.
Select Guitar/Bass Amp Plugin will list all available TGS files for guitar/bass amp plugins. (Note: This menu item will be shown on an audio track.)
Select MIDI Instrument (Patch) is used to assign an instrument to a MIDI track from the Hi-Q patch list, the General MIDI patch list, the General MIDI 2 patch list, the higher bank patches on your particular synthesizer, or from a preselected list of favorite patches.
Use the Select Hi-Q MIDI Patch Plugin command to select a preset of a Hi-Q instrument and a VST/AU plugin (e.g. sforzando). (Note: This menu item will be shown on a MIDI track only.) |
Select MIDI SuperTrack for this track opens a list of available MIDI SuperTracks. They can be used in the same way as RealTracks.
Select Custom MIDI Style for this track lets you play your favorite MIDI track from any style on any track of your current style, including the Melody and Soloist tracks. The track you assign doesn’t have to be the same instrument, i.e., you could assign a Guitar to the Strings track.
Track Settings
xxx track is enabled. This command is the easy way to disable/enable a track, even during song playback. To disable a track, right-click on the track name (at top of the screen or on the mixer) and select enable/disable the track. When a track is disabled, the color is dark gray on the main screen and on the mixer. You can Mute or Solo the individual part. Solo mutes all but the soloed part. Un-Mute All is useful to restore all other parts after a part has been soloed. Freeze the track if you do not want the part regenerated on each play. Tracks can be unfrozen. Force Track to simple arrangement makes the RealTracks play a simpler (less busy or embellished) arrangement. Set track to avoid transpositions allows the RealTracks to avoid transposition. This will produce higher quality sound but less variation Set Track offset allows the track to moved ahead or behind by +/- 1000 ticks (at a resolution of 120 PPQ). Track Timebase allows you to select a timebase (normal/half/double/triple). Set Natural Arrangement allows re-interpretation of chords for the selected track of the current song. Duplicate RealTracks (to thicken sound) duplicates the currently selected RealTracks on the track. You can then set the stereo panning for each sub-track to achieve a fuller sound. Rename track title allows you to change the track label for the selected track. Change track description allows you to change the track description. Auto-Fix “Sour” Notes is a feature that auto-fixes out-of-tune notes in polyphonic audio, either for the generated RealTracks or any audio track. This means that if a chord is played with multiple notes at once, this feature can fix certain notes within that chord so that the note won’t clash with the chord progression or other tracks. Set Base Tempo allows you to set the tempo of the audio so that tempo stretches will be based on the correct master tempo. (This menu item is for the Audio track.) Conform to Playback Tempo allows the track to conform to the tempo of the song during playback. For example, if the base tempo of a Utility track is 120 and the tempo of the song is 140, then that track will be tempo stretched. (This menu item is for the Audio track.) |
Track Actions
Select (re)Generate RealTrack to (re)generate the RealTrack. Revert Track to Style Instrument will remove any custom instrument you have chosen for the track and revert to the instrument in the style. Erase Track removes either the MIDI or RealTracks data from the track. Select Track as AIFF File or Select track as M4A File will save a track (RealTracks or MIDI) as AIFF or M4A audio file to a folder you choose. Save Track as Performance File (AIFF/M4A) renders the track to your choice of an AIFF file or a M4A file. |
Render Video(s) allows you to make a video of RealTracks that are selected for your song, optionally with the chord sheet or the corresponding notation.
Toolbars
The toolbar buttons give quick access to program features. They are grouped according to function.
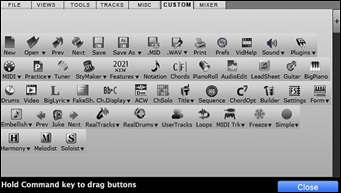
Toolbar Modes
There are three modes for the toolbar.
1. ![]() Smaller, configurable toolbar with tabbed interface.
Smaller, configurable toolbar with tabbed interface.
![]()
In this mode, the [CUSTOM] tab lets you select and add buttons in the order that you want.
|
First, click on the [+] button on the right to open a palette of buttons. |
|
Then, while holding down the Command key, drag buttons around to add, remove, or set the order. |
2. ![]() Taller toolbar, with fixed on-screen Mixer. This is useful for people with hi-res screens.
Taller toolbar, with fixed on-screen Mixer. This is useful for people with hi-res screens.
3. ![]() DAW mode. This makes a small screen, always on top. This is useful when you drag and drop tracks to your favorite DAW.
DAW mode. This makes a small screen, always on top. This is useful when you drag and drop tracks to your favorite DAW.
Drop
|
The Drop Station is used to drag and drop tracks from Band-in-a-Box to Digital Audio Workstations (DAWs) that don’t support direct drag and drop. Many DAWs will allow you to do this directly, but if your sequencer does not support the direct drop of a track that is not yet generated, then you can drag from a radio button (Master, Bass, Piano, etc.) to the Drop panel. |
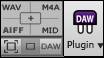
The four Drop quadrants show different file types. Your file will be rendered to the file type of the quadrant you drop it in and the button will change color to orange, indicating that the file is accepted and being prepared.
![]() When you drop the track to the [+] button, you are presented with a dialog, where you can choose a file format and other render options.
When you drop the track to the [+] button, you are presented with a dialog, where you can choose a file format and other render options.
|
When the button turns bright green, the track has been generated and is ready to drag from the Drop zone to your DAW. |
The Drop Station has a right-click menu, allowing you to copy the resulting file to a favorite folder, open the favorite folder, audition or email the dropped file, start/stop the DAW Plug-in mode, upload to Dropbox, and more.
|
The DAW Plugin button has two menu items. One starts or ends the plug-in mode, which lets you drag and drop MIDI or audio files from Band-in-a-Box to your DAW or Finder. The other opens a Plugin Settings dialog, which allows you to control drag ‘n’ drop operations. (See Chapter 12 for more details about the drag ‘n’ drop feature.) |
File
This section is for the file functions like Open, Save, etc.
|
The [New] button clears the Chord Sheet to start a new song. Band-in-a-Box reminds you to save your work before it erases the chords. |
|
The [Open] button shows a menu to open (load) songs into the program using various methods. |
|
This opens the previous song in the folder in alphabetical order. |
|
This opens the next song in the folder in alphabetical order. |
|
The [Save] button is used to save the current song to disk. |
|
This shows a menu to save a song using various methods. |
|
The [.MID] button allows you to save a song as a Standard MIDI File. |
|
Clicking this button shows a menu with selection for quick rendering the song to an audio file (aiff/wav/m4a/mp4) and opening Render to Audio File dialog, which allows you to choose options. |
|
Use the [Print] button to launch the Print Options dialog, which allows you to print Lead Sheet or Fake Sheet style notation. |
|
The [Prefs] button will bring up the Preferences dialog where you can set various settings and access program options. |
|
The [Sound] button shows you a menu to choose sound options such as MIDI port selection or help with AirPlay. |
|
The [Plugins] button shows you a menu ro set options for VST/AU plugins, to open a default VSwith options to open the default VST software synthesizer, and to open the Reverb Settings dialog for configuring audio reverb settings. |
|
The [MIDI] button shows you a menu with various options for MIDI use and allows you to enable the MIDI keyboard Wizard (playalong on lower 2 rows of QWERTY during playback). |
|
The [Practice] button shows you a menu for practicing with Band-in-a-Box. |
|
This button launches the StyleMaker, which allows you to edit or make styles (.STY files). |
|
Click this button for a link to video demonstrations and tutorials. |
|
This button shows you a menu to open the new features tutorial pages from PG Music website. |
|
This will open the Feature Browser, which lists many features in Band-in-a-Box. |
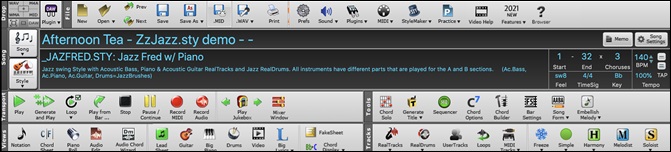
Song
This section is for information related to the current song, including the current style, tempo, key, form, etc.

|
The Song button lets you load a song. This is a split button. The top half of the button uses the default method to load a song. The bottom half shows a menu of different methods to load a song and allows you to set the default action for the top. |
|
The Style button is also a split button, with the top half being the default function, and the bottom half-listing different methods to load a style and allows you to set the default. |
The song title is displayed, and you can type in the name in this box.
![]()
Directly below the song title, the style display shows the style name and more information about the style.

- Style file name (Short)

- Style Name (Long)

- Style Memo

- List of instruments (and indication if they are MIDI or Real)

|
You can type any information about your song in the Memo window. |
|
This button opens a full menu of settings to use for a polished song arrangement, including a tag (coda), automatic endings, style variations and more. |
|
Chorus Begin button: Click on the Chorus Begin button and then click on a bar number or type a number in the dialog to select the first bar of the chorus. The Bar number that you select is displayed. |
|
Chorus End button: Click on this button and then click on a bar number or type in the dialog to select the last bar of the chorus. The Bar number that you select is displayed. |
|
The number of choruses possible for a tune is 40. Click on the chorus button and choose how many choruses you require. |
|
This is the feel (swing or even, and 8th of 16th) of the song. The feel is determined by the selected style. |
|
This is the time signature of the song. You can click on it to change the time signature. |
|
The key box is used to set the key or to change it and transpose the song. When you press it, you see 2 columns of keys. The first column will set the key AND transpose the song; the second will just set the key signature. The Visual Transpose setting is displayed in a small font next to the key. You can click on it to launch a menu for selecting the setting. |
|
The Tempo Control shows the current song tempo. Left-click on the up/down arrows to change the tempo by +/- 5 beats per minute. Right-click to change it by +/- 1 bpm. Tempos can also be typed in directly. |

|
This button allows you to quickly set the relative tempo. Click the button and choose a percentage or use the Custom Tempo % menu item to set any value between 1% and 800%. 1% would be 1/100 of the original tempo and 800% would be 8 times the original tempo. Hotkeys are available: control - (minus key) for half speed and control = for normal speed. |
|
Use the tap tempo buttons to count and set a tempo. Tap the [-] button in tempo four times to set the tempo. It will appear in the tempo box. Tap the [=] button to count-in the song and start playback at the tapped tempo. As you tap more than 4 times, the accuracy will improve (through averaging) and you can continue to tap until the target tempo has been reached. For example, in a 4/4/ style, once you tap 4 times a tempo will be set. But you can keep tapping and the tempo will change every beat, based on the average tempo that you have typed. |
Transport
These buttons are like the transport controls on a media player.
|
The [Play] button plays the song from the beginning without creating a new arrangement, unless regenerating is required. |
|
The [Generate and Play] button generates a new Band-in-a-Box arrangement and then plays the song. |
|
The [Loop] button plays the selected (highlighted) section of the Chord Sheet in a loop. The dropdown menu has settings for looping the entire song. |
|
The [Play from Bar] button is used to play a song starting anywhere in the song, including tags or endings. This feature is also available from the right-click menu in the Chord Sheet. |
|
The [Stop] button stops the song or the Jukebox from playing. |
|
The [Pause/Continue] button pauses the song during playback. Press again to continue from the paused location. |
|
The [Record MIDI] button is to record MIDI to your song. The control+R keys are the keyboard equivalent. |
|
The [Record Audio] button launches the Record Audio dialog for recording live audio recording. |
|
The [Play Jukebox] button is used to start or stop the Jukebox. The [ï] and [ð] arrow keys are used to move to either the previous or next song in the Jukebox. |
|
|
This will open the Mixer window. The hot key is control+M. |
|
Tools
This section is for miscellaneous Band-in-a-Box tools.
|
Press the [Chord Solo] button to launch the Generate Guitar Chord Solo dialog. |
|
This will automatically generate a song title for you. |
|
This button launches the Chord Options dialog box, which allows you to add chord pushes, rests, shots, and held chords for any given bar. |
|
This is the Chord Builder button. Chords may be heard and entered to the Chord Sheet by clicking in this dialog. |
|
F5 Bar Settings - Launches the Edit Settings for Current Bar dialog. This allows you to enter changes to the arrangement at any bar or chorus. The hot key is F5. |
|
Song Form - launches the Song Form Maker dialog and other tools to control the form of your song |
|
The grace note button enables the embellisher and opens the Melody Embellisher dialog for customizing the embellisher. |
Views
This section includes buttons to open Chord Sheet, Notation window, Guitar window, etc.
|
This button toggles between the Notation window, where you can enter chords and lyrics, edit notation, and view MIDI notation, and the Chord Sheet, where you enter chords for your song. |
|
This displays the Chord Sheet window. This is the default window in Band-in-a-Box, where you enter chords. |
|
This launches the Piano Roll window for editing the Melody or Soloist track in a piano roll format, including graphic controller editing. (Tip: Shift+clicking on tthe button will open the movable and resizable window.) |
|
This button launches the Audio Edit window, which displays a graphical waveform and allows editing the Audio track. (Tip: Shift+clicking on tthe button will open the movable and resizable window.) |
|
This opens the Audio Chord Wizard, which automatically figures out the chords from an autio file. |
|
The Lead Sheet notation is a multi-line notation display in a lead sheet style. The Lead Sheet can display more than one track at a time. |
|
The [Guitar] button launches the Guitar window that displays guitar notes as music is playing. |
|
The [Big Piano] button launches the Big Piano window, which will display the notes to any track (except drums) as the music is playing. |
|
The [Drums] button launches an animated Drum Kit window. Press it to launch this fully functional (and fun) GM-MIDI “virtual” drum kit. |
|
The [Video] button opens a menu with selections to open the Generate Video dialog. |
|
This button opens the Big Lyrics window for full screen “Karaoke-style” scrolling lyrics. |
|
This allows you to view the Chord Sheet in the Fake Sheet mode, which displays repeats, 1st/2nd endings, and codas. Use the menu to set repeats, endings, and codas. |
|
The [Chord Display] button has a menu that allows you to set the font and the color for Chord Sheet, chord type (normal, roman numerals, Nashville notation etc.), transpose options (alto sax etc.), and capo transposes (for guitar). |
Tracks
This section is for adding tracks to Band-in-a-Box (RealTracks, Loops, UserTracks etc.).
|
This button shows you a menu with selections for the RealTracks Picker, RealTracks Settings, and a command to “Select better RealTracks” for the song tempo. |
|
This button shows you a menu with options to select RealDrums and open the RealDrums Settings. |
|
UserTracks are like RealTracks but are made by you or third parties. This button opens a window, which lists available UserTracks you can add to any track. |
|
This button is for the Loops Picker, where you can choose an Audio Loop or Acid Loop (aiff/wav/m4a/mp3) to add to a track (e.g., nature sound, drum loop, etc.). You can add your own loops to the Loops folder in the RealTracks folder. |
|
This button shows you a menu of options to choose a MIDI SuperTrack or open the MIDI Track Picker dialog to add a MIDI track from a different style to the current song. |
|
This shows you a menu of options to freeze or unfreeze all tracks or just freeze individual tracks. Frozen tracks play without regenerating for faster playback. |
|
This button allows you to force any track or all tracks to play with simple arrangements. You can set this for the current song or all songs. |
|
Band-in-a-Box can automatically add MIDI harmonies to the Melody track or the Thru/Soloist track, giving you harmonies for your live playing on the Thru channel or QWERTY wizard. |
|
The [Melodist] button opens the Generate Chords and/or Melody dialog, where you can generate a new song with chord changes and melody as well as an improvised solo, and an original song title. |
|
This shows you a menu for either selecting a RealTracks soloist from a list of best soloists, or opening the Select Soloist dialog, where you can choose a custom soloist (MIDI or RealTracks) to play over any given chord changes. |
Progress Bar
![]()
This bar displays a time line for the current song. The current time is marked with a gray vertical line. You can click on the bar to move the current time to that point. Part markers are marked with colored (blue, green, etc.) vertical lines. The beginning of each chorus is marked with outlines. You can double click on the bar to start playback from that point.
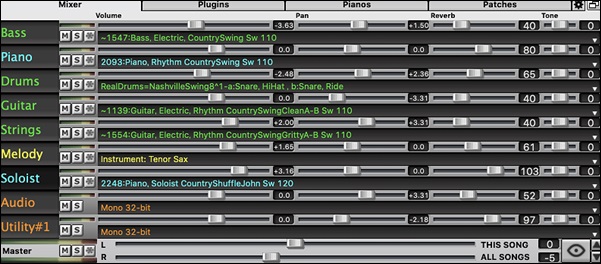
Mixer
Mixer window shows the current state of instruments and parts and allows easy changes or adjustments.
The window can be embedded in the main screen and is horizontally resizable to allow more room for the Chord Sheet, Notation, Piano Roll, or Audio Edit window.
In the normal screen mode, the window can be embedded at the top right of the screen or the bottom right. You can set this with the “Embedded Mixer Top Right” option in the Settings tab.
![]() The small button at the top right corner will switch to the floating mode, which allows you to resize or move the window to anywhere on the screen.
The small button at the top right corner will switch to the floating mode, which allows you to resize or move the window to anywhere on the screen.
![]() In the floating mode, you can change the window’s opacity. Left-click on these buttons to change the opacity by a significant amount, or right-click on them to change it by a small amount.
In the floating mode, you can change the window’s opacity. Left-click on these buttons to change the opacity by a significant amount, or right-click on them to change it by a small amount.
![]() You can select the tracks to display in the Mixer. Click on the “eye” button at the bottom right corner and check the tracks to display.
You can select the tracks to display in the Mixer. Click on the “eye” button at the bottom right corner and check the tracks to display.
![]() The Mixer can scroll visible track panels. Use the arrow buttons at the bottom right corner, or the mouse wheel if it is not used for controlling sliders and dials.
The Mixer can scroll visible track panels. Use the arrow buttons at the bottom right corner, or the mouse wheel if it is not used for controlling sliders and dials.
The Mixer automatically shows active tracks and hides unused tracks when playback starts. You can set this with the "Auto Show/Hide Tracks When Starting Playback" option in the Settings tab.
You can change the track panel height by moving the mouse wheel while holding down the command key.
When resizing the window, the track panel height will be restricted to the customized settings. For example, if the maximum panel height is set to a low value, then when you expand the window, there will be black portion below the track panels, but if it's set to a higher value, then when you expand the window, each track panel will be stretched to fill the window.
You can drag track labels from the Mixer and drop them to the Drop Station to render audio or MIDI files.
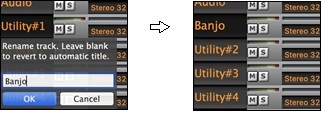
You can double-click on the track label to rename it.
Right-click on a track label for a menu of settings and actions for the selected track. The menu is organized into groups allowing easier selection of track types: audio (RealTracks, UserTracks, Loops) or MIDI (MIDI SuperTracks, classic MIDI tracks) and track settings/actions.
The window has five different screens for Mixer, Plugins, Piano, Patches, and Settings.
![]() The default screen is Mixer.
The default screen is Mixer.

In the Mixer screen, each individual track has settings for Volume, Pan, Reverb, and Tone that can be adjusted as the song is playing. Volume, Pan, and Reverb are controlled by horizontal sliders. Tone is controlled by typing in a number from -18 (full bass) to 18 (full treble), or by clicking on a number and dragging the mouse cursor vertically. You can also control the sliders and dials with the mouse wheel while the mouse cursor is over them.
You can set Volume and Panning to display as decibels instead of MIDI values. This makes sense when you are mostly dealing with RealTracks, RealDrums, and audio tracks. To display as decibels for all tracks, enable the “Display dB Instead of MIDI Volume” option in the Settings tab. To set for each track, right-click on a track and select Track Settings | Display dB Instead of MIDI volume.
Hold the control key down as you click on the track slider and drag the thumb of the slider. This will force all tracks to move to the same absolute location as the original track. Hold the shift key and it will move all tracks relative to the move of the original track.
Double clicking on the slider sets the value to a default value.
|
Each track has its own VU meter to show the sound level, and buttons to Mute, Solo and Freeze the track. The Mute and Solo states of each track will be saved in the songs and will be loaded the next time you open them.. |
There is also a Master section.
![]()
The Master Volume is a new type of volume setting for Band-in-a-Box, and is a true Master Volume, in that it applies a decibel (dB) boost to the master signal, independent of the tracks volumes. So, for example, if you want all Band-in-a-Box songs to be louder, you can simply set the “All Songs” Master volume slider (e.g. to +6 dB) and this boost will apply to audio output from all instruments (MIDI and audio) for all songs.
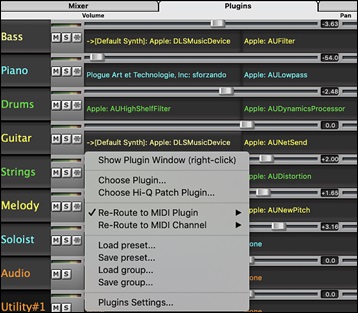
![]() The [Plugins] tab is for adding audio or MIDI plugins to each track.
The [Plugins] tab is for adding audio or MIDI plugins to each track.

Each track has 4 slots. For a MIDI track, the first slot can take a VST/AU synthesizer (e.g. Sforzando, etc.) and the other 3 can take audio effects For an audio track (RealTracks, Loops, or the Audio track), there is no synthesizer slot, so you can assign up to 4 audio effects.
When you click on a slot, this launches the Plugins dialog, which allows you to select a VST/AU synthesizer and/or VST/AU audio effects.
Click on a plugin name, and use the menu to choose a plugin, load or save a preset or a group of plugins, change plugins settings, and do more.
This dialog opens with the Plugins Settings menu item.
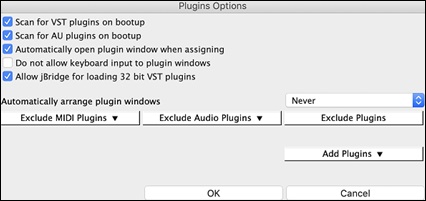
Scan for VST plugins on bootup: Enable this option if you want Band-in-a-Box to scan for new VST plugins every time it boots up. This only includes plugins that have not been found previously.
Scan for AU plugins on bootup: Enable this option if you want Band-in-a-Box to scan for new Audio Unit plugins every time it boots up.
Automatically open plugin window when assigning: If this is checked, a plugin’s window will open automatically when you assign to a track. This only applies if the Plugin dialog is open.
Do not allow keyboard input to plugin windows: Enabling this will prevent plugin windows from taking focus away from Band-in-a-Box, so keyboard input always goes directly to the main program. Disable this if you are using plugins that use keyboard input.
Allow jBridge for loading 32 bit VST plugins: If this is enabled, Band-in-a-Box will attempt to use jBridge to load 32 bit VST plugins. Disable this option for troubleshooting or speeding up the plugin scan.
Automatically arrange plugin windows: Plugin windows can be arranged automatically according to the assigned track, and the position in the plugin chain. It this option is disabled, then each plugin window will open at its previous position.
[Exclude MIDI Plugins] You can choose MIDI plugins to exclude. Excluded plugins will not show up in the lists and will never be loaded by Band-in-a-Box.
[Exclude Audio Plugins] This allows you to choose audio plugins to exclude. Excluded plugins will not show up in the lists and will never be loaded by Band-in-a-Box.
[Exclude Plugins] You can choose specific VST/AU plugin files that you do not want Band-in-a-Box to attempt to load when scanning for new plugins.
[Add Plugins] allows you to select VST plugins individually, add/remove VST scan folders, or scan for VST plugins in a specific folder.
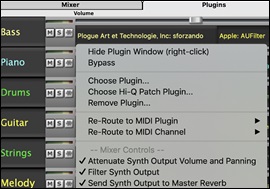
Multiple plugins GUI windows can be used simultaneously. These can be accessed from the Plugins section of the Mixer. Right-click on a plugin button to automatically show or hide the plugin’s GUI, or left-click and choose Show Plugin Window from the menu.
Each MIDI track can send its MIDI output to another track. By default, all accompaniment tracks route to the default synth, but you can choose a plugin on another track. This is accessed from the Plugin’s context menu on the Mixer.
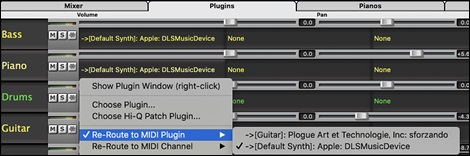
MIDI plugin’s audio output can be controlled in the Mixer with 3 new settings. This allows MIDI plugin’s sound to be controlled the same way as audio tracks (RealTracks, RealDrums, etc.). These settings are accessed from the Plugin’s context menu on the Mixer.
|
Attenuate Synth Output Volume and Panning: This will change the gain of the plugin’s audio output based on the Volume and Panning controls on the Mixer. When this is enabled, MIDI controllers for volume will not be sent to the plugin. This setting is useful for plugins that do not respond to MIDI controllers. |
![]() The [Pianos] screen shows the notes that are playing on each track on a piano keyboard.
The [Pianos] screen shows the notes that are playing on each track on a piano keyboard.

![]() The [Patches] screen shows full instrument names.
The [Patches] screen shows full instrument names.

![]() The Settings screen allows you to set options for the Mixer.
The Settings screen allows you to set options for the Mixer.
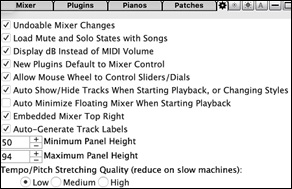
Undoable Mixer Changes: If this is enabled, changing Volume, Panning, Reverb, or Tone can be cancelled with the Edit | Undo menu item.
Load Mute and Solo States with Songs: If this is enabled, the Mute and Solo states of each track will be saved in the songs and will be loaded the next time you open the songs.
Display dB Instead of MIDI Volume: With this option, you can see Volume and Panning in decibels instead of MIDI values. This option can also be set manually for each track with the right-click menu on the track name.
New Plugins Default to Mixer Control: When adding a new MIDI plugin, "Attenuate Synth Output Volume and Panning," "Filter Synth Output," and Send Synth Output to Master Reverb" settings will be enabled. These allow the Mixer to control the plugin's volume/panning/reverb/tone.
Allow Mouse Wheel to Control Sliders/Dials: If this is enabled, you can control the sliders and dials with the mouse wheel while the mouse cursor is over them.
Auto Show/Hide Tracks When Starting Playback or Changing Styles: If this is checked, then when playback starts, active tracks will be shown but unused tracks will be hidden.
Auto Minimize Floating Mixer When Starting Playback: If this is enabled, starting playback will reposition the Mixer to the minimal size and position, and stopping playback will reposition back to the custom size and position.
Embedded Mixer Top Right: This option applies to the embedded Mixer in the normal screen mode. Enable this if you want the Mixer positioned at the top right of the screen rather than the bottom right.
Auto Generate Track Labels: If this option is enabled, the Mixer will display auto-generated labels (e.g., Banjo, Harmonica, etc.) instead of the default track labels (Bass, Piano, Melody, etc.)
Minimum Panel Height / Maximum Panel Height: With these options, the track panels will be restricted to a certain height when resizing the Mixer.
Tempo/Pitch Stretching Quality: This allows you to select quality of the tempo and pitch stretching. You can select "High" if you have a fast computer, but you should select "Low" if you have a slower computer and are hearing stuttering during playback.
Chord Sheet Area
Chords, rests, shots, holds, and part markers are entered in the Chord Sheet.
The Chord Sheet can be viewed in the full linear view showing all bars, or optionally in fake sheet view that shows 1st and 2nd endings and repeat signs. Another option shows bars past the end of the song in gray.
You can change the number of rows and columns displayed on the Chord Sheet with the zoom buttons at the bottom right.
![]()
![]() These will change the number of rows.
These will change the number of rows.
![]()
![]() These will change the number of columns.
These will change the number of columns.
![]() This will revert back to auto.
This will revert back to auto.
You can also use the mouse wheel to change the number of rows and columns.
-
Moving the mouse wheel while holding down the command key changes the number of rows.
-
Moving the mouse wheel while holding down the shift key changes the number of columns.
Time signature changes can be displayed on the Chord Sheet. This is enabled by a new option in the Display Options dialog.
Fake Sheet Mode
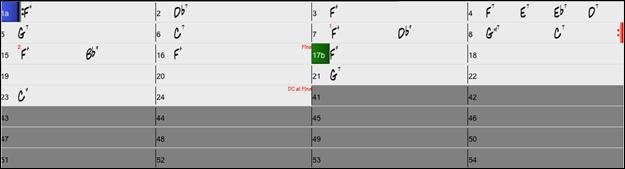
Open a demo song “Repeats Tutorial example 2 with 1st-2nd and DC al Fine” from the Band-in-a-Box/Tutorials/ Tutorial - Repeats and Endings folder.
|
To view the Chord Sheet in the Fake Sheet mode, click on the [Fake Sheet] button on the toolbar and enable the Display Chord Sheet in Fakesheet Mode menu option. |
|
When you disable the Fake Sheet mode by pressing the [Fake Sheet] button and deselecting the Display Chord Sheet in Fakesheet Mode menu item, the Chord Sheet will display in the full linear mode. |
In this mode, you see all the bars in the order that they will be played.
Chord Entry
The basic way of entering a song in Band-in-a-Box is by typing in the chords to the song using the computer keyboard. Chords are typed in using standard chord symbols (like C or Fm7 or Bb7 or Bb13#9/E).
Chords can be cut, pasted, and copied from one location to another.
Another way of entering chords is through MIDI chord recognition. Play any chord on your MIDI keyboard; and Band-in-a-Box will recognize it instantly and insert it onto the Chord Sheet. This allows you to enter an entire song without having to type in any of the chords!
To use this feature, select the Options | MIDI Patch Maps | Insert current MIDI chord menu command. control+return is the keystroke combination for this function.
The chord you choose will automatically be inserted into your song (Chord Sheet or notation view) at the current cursor location. Then, Band-in-a-Box is ready for the next chord. You can insert up to two chords per bar in this fashion.
For details about chord entry, see Entering Chords section in Chapter 6.
Chord Sheet Options
“Layers”
Layers are optional rows of information shown above each bar.

When there is no additional information within a row, that row will not show to maximize space on the Chord Sheet.

|
You can choose which layer to display by clicking on the [Chord Display] button on the toolbar and selecting Layers. |
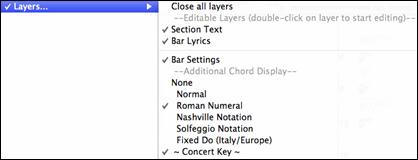
The “Section Text” layer is for editable text (up to 255 characters per bar) that is loaded and saved with the song.
![]()
The “Bar Lyrics” layer is for editable bar-based lyrics (up to 255 characters per bar) that are loaded and saved with the song. (See the “Adding Bar-Based Lyrics” section in another chapter for more details.)
![]()
The “Section Text” and the “Bar Lyrics” layers will attempt to intelligently separate your lyrics into different bars. For example, if you have a whole song of lyrics in a text file and the lyrics for every bar are on separate lines, you can simply highlight the entire block of text and paste it into Band-in-a-Box using command+V keys. Every line of text will occupy a separate bar. If the lyrics have not been distributed into the correct bars, you can move your text cursor to the beginning of a bar and press BACKSPACE to move the lyrics to the previous bar. This will shuffle the text in the following bars one bar backward as well. Hitting RETURN will move all the text after the text cursor to the next bar and shuffle the text in the following bars one bar forward. If you wish to see more than one line within a bar, you can hold down the COMMAND key while using the RETURN key, which forces a line break (second line) within the bar.
There is an option in the Display Options dialog to automatically open or close the Bar Lyrics and Section Text layers when you open a song that contains Bar Lyrics or Section Text.
The “Bar Settings” layer shows information about any changes that occur for that bar, as set in the Bar Settings dialog (e.g. tempo changes, key changes, etc.).
![]()
The “Additional Chord Display” layer shows the chords using the normal display or an alternative mode of showing root notes. There are four alternative modes: Roman Numeral, Nashville Notation, Solfeggio Notation, and Fixed Do (Italy/Europe).
![]()
The height of this layer can be set as a percentage of the main chord using the “Height % of Additional Chord Display layer” setting in the Display Options dialog. For example, you might want to see Nashville Notation as big as the main chord display below it.
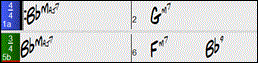
The “Concert Key” option allows you to display an additional chord display of the same chords transposed to a different key. So, for example, you can see two layers, one with concert chords and the other for Bb instruments.
All the layers can be customized with font and color in the Display Options dialog.
Right clicking in a layer has a menu with options to change height of the layer, close layer(s), copy/cut/paste, etc.
Display Options Dialog
You can set up the Chord Sheet with your own preferences.
|
Click on the [Prefs] toolbar button to open the Preferences dialog, and then click on the [Display Options] button to open the Display Options dialog. You can also right click on the Chord Sheet and select Display Options from the menu to open this dialog. |

The colors all elements on the Chord Sheet can be customized with the color palette in this dialog. For example, you can choose color for substyle A & B part markers. Previously, the color of the chords was always black, so you were limited to brighter colors for the background since darker backgrounds would make the chord text hard to see. Now, all the colors can be picked from the color palette, and any changes you make can be seen on the Chord Sheet in real time.
Use Gradients: This option gives the part markers with a gradient look. This also makes smoother seams between layers.
Draw part marker borders: If this option is enabled, borders around the part markers will be drawn.
Show bar numbers: This determines how often bar numbers appear. Choices are never, always, only at part markers, or only at new rows.
Show bar lines: Check this option if you want to see a bar line to left of bar numbers.
Show time signature changes: Enable this to show time signature changes on part markers.
Use substyle colors for bar #s, etc.: This option controls the color of the optional bar lines, bar numbers, and section letters. Previously, any bar without a part marker showed with the color of the current substyle. Now, this can be disabled, and everything will be displayed using a single color.
Highlight selected cell : If this option is selected, the currently selected cell will be highlighted instead of just out-lined. You can change the highlighting color by selecting “Cell highlighting” in the color picker. This feature is useful for JAWS Screen Reader users.
Enable display of Repeats/Endings allows repeats signs and 1st/2nd ending markers to be shown on the Chord Sheet.
Display bars higher than end of song in gray will “gray out” the bars on the Chord Sheet after the end of the song.
Show chords with push/rest characters: The pushes character is the caret symbol (^). So, a C chord with a push is displayed as ^C. The rest character is a period (.) so a C chord with a rest is displayed as C. (C period). If you prefer to not see these characters displayed, then set this to false. These characters won’t show up on the printout regardless of this setting.
Show chords with pushes/rests in color: If this is enabled, pushes will be displayed in GREEN and rests will be displayed in RED. This only applies to the Chord Sheet, not the notation.
Display ‘C9sus’ as ‘C11’: This option allows display of ‘9sus’ chords as ‘11’ (e.g., Bb11 instead of Bb9sus). This only affects how the chord is displayed, not how it is stored. And you can type either C11 or C9sus to enter the same chord.
Display ‘2’ as ‘sus2’ / Display ‘sus’ as ‘sus4’: These options will show suspended chords more explicitly. ‘sus’ implies ‘sus4,’ and ‘2’ implies ‘sus2,’ but you might want to see the full extension name.
Treat ‘dim’ chord as a diminished triad (Cdim5) instead of Cdim7: There are two types of diminished chords, diminished triads (Cdim5) and diminished 7ths (Cdim7). You can spell them out fully in Band-in-a-Box, or just enter them as Cdim. This setting controls if Cdim will represent Cdim5 or Cdim7. If set, Cdim will enter a C diminished triad (Cdim5), and Cdim7 will enter a diminished 7th chord. These work for chord entry and printout, and the Jazz symbols work for them.
For Roman Numerals of Chords in minor keys, use relative major: For minor keys, base roman numerals on the relative major. For example, in key of Am, Am is either the Im chord or the VIm chord.
Gray out chords beyond time signature: This setting grays out chords that will not play in the song. For example, if you switch a song of 4/4 time signature to a waltz style, the chords on beat 4 will be grayed out.
Transpose: This will visually transpose the Chord Sheet and Notation display by a number of semi-tones for concert or non-concert instruments, either by typing in a number or by choosing a preset.
Chord display: This setting allows you to choose a chord display for the main layer.
[Choose font] : Thisbutton allows you to choose a font, style, and size for the selected item in the combo box to the right.
Chord Sheet Font: You can choose the font to use for the Chord Sheet. If you choose a Custom font, you can choose the size as well. If you choose one of the preset fonts, the size is set automatically to fit into the height of the Chord Sheet row. If you click on the [Jazz Symbols] button, then “Jazz Chord Symbols” will be selected and you will see shorthand Jazz chord symbols on the Chord Sheet. The Default font button selects Comic Sans MS as the Chord Sheet font. To revert to the classic style that used a small System font and lots of rows, you can choose that as the type of font “Small font (system).” This allows you to choose a font for the chords on the main layer. If you click on the [Jazz Symbols] button, then “Jazz Chord Symbols” will be selected and you will see shorthand Jazz chord symbols on the Chord Sheet. The [Default font] button selects BigBand Chords. The [Custom] button allows you to choose the size as well.
Superscript chord extensions (main) / Superscript chord extensions (additional): The superscript feature shows the chord extensions using smaller raised text. This makes the root of the chord more distinguishable, and also helps maximize space on the Chord Sheet. “Superscript chord extensions (main)” is for extensions of the chords on the main layer, and “Superscript chord extensions (additional)” is for extension of the chords on the additional layer.
Chord font size %: This option allows you to choose any size for the chord font. The setting of 100% means that the chords will be as large as possible, while fitting into each chord cell.
Number of Columns: You can select the number of columns displayed on the Chord Sheet screen.
Number of Rows - The number of rows displayed on the Chord Sheet screen can be selected manually to best match your screen size and resolution. This only applies if “Auto-adjust # rows” is disabled.
Auto-adjust # rows: If this is set, when songs are loaded, then when you open a song, the number of rows will be automatically set depending on the number of bars in the song within the supplied range between “min rows” and “max rows.” The “minimum section” setting is the minimum number of bars that is required for a section to automatically start a new line when the “New line for every section” option is enabled.
New line for every section - When this is enabled, part markers will start a new line. This will show each section on a new line, so the form of the song is easier to see. You can also set the minimum number of bars that is required to start a new line with the “minimum section” setting. For example, if this is set to 8, then there won’t be a new line for the next part marker if that section has only four bars.
Extra line space between sections (pixels) is the amount of space to add on a new line when there is a part marker.
Extra space between rows (pixels): This allows you to set a border thickness between rows.
Extra space between columns (pixels): This allows you to set a border thickness between columns.
Height % of Additional Chord Display layer: This sets the percentage of additional chord display layer. For example, if you want to see Nashville Notation on the additional chord display layer as big as the main chord display below it, set this option to 100%.
Choose Skin: This allows you to see the small toolbar buttons in color.
[Load scheme] [Save scheme]: All of the settings and colors can be saved and loaded as a .csc file.
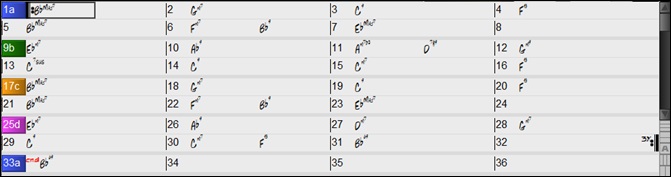
Part Markers
Style variations for your arrangement are entered in the Chord Sheet by clicking on a bar number to set a part marker. Each click toggles to the next available substyle part marker (a, b, etc.) or removes the part marker. Regular styles have two substyles, and Band-in-a-Box MultiStyles have four substyle variations – a, b, c, and d.
![]()
They typically occur every 8 bars or so but may be placed at the beginning of any bar.
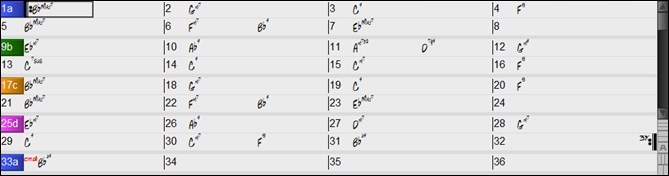
Adding Substyles in a Song
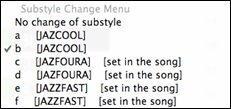
You can add more substyles to an individual song with a right-click on any bar number. This opens the Substyle Change Menu where you can define up to 24 substyles, from “a” to “x.”
Section Paragraphs
When you are reading a book, a new section begins on a new line, with space between. Band-in-a-Box does that for chords too. Whenever a new section occurs (a part marker), we start the new section on a new line and draw a grey line above to clearly mark the new section. A section can be as short as 2 bars. You will see each section on a new line so that the form of the song is easier to see. The feature is configurable and optional.
Chord Sheet Editing Features
The Chord Sheet has a contextual menu that opens with control+click or a right-click in the Chord Sheet area. This menu is a very convenient way to access the features for editing song arrangements.
|
Chords can be copied, pasted, cut, or erased and new chords can be entered from the Chord Builder. Chord Settings allow pushes, rests, and pedal bass to be applied. Bar Settings let you refine your arrangement with changes in tempo, meter, key signature, styles, RealDrums, volume levels, patches, and harmonies. Song Settings allow rests and pushes, and control tags, endings, and fadeouts. Display Options allow full customization of the Chord Sheet. Global system settings are accessed in the Preferences. You can also right-click on a bar in the Chord Sheet to set it as the beginning or end of the chorus or the end of the song from the settings in the context menu. For example, these settings are available with a right-click on bar 16. This menu can be used to start playback from the highlighted bar in any chorus of the song. Print Chords will print the Chord Sheet. |
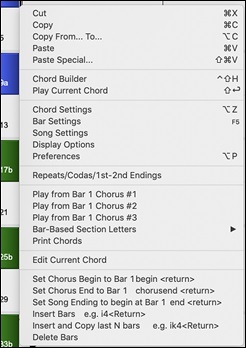
Bar-Based Section Letters lets you add a section letter, which will display just above the bar number on the Chord Sheet.
Insert Bars or Delete Bars lets you insert or delete a specific number of bars at the current bar.
Play Song from Chord Sheet
Songs can be played from any location in the Chord Sheet with a double-click on any bar. Playback will start at the bar where the mouse is clicked.
If a tag or an ending is defined, double-click on the ending bar (or a bar in the tag), and the song will play from the ending (or tag). This only applies to the Chord Sheet, since notation windows always play from the ending or tag already.
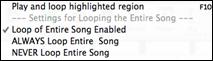
Play Selected Area as a Loop
To use this function, select a region on the Chord Sheet. To select a region, click a bar and drag the mouse. To select a large region, click a bar and shift+click on the end point.
![]()
|
Then, click on the [Loop] button, and select Play and loop highlighted region from the menu. Alternatively, you can press the F10 key. |
Unconditional 30-Day Money Back Guarantee on all PG Music products purchased from PG Music Inc.
PG Music Inc.
29 Cadillac Ave Victoria BC Canada V8Z 1T3
Sales: 800-268-6272, 250-475-2874,+ 800-4746-8742*
* Outside USA & Canada where International Freephone service is available.
Access Codes
Tech Support: Live Chat, support@pgmusic.com
 Online now
Need Help?
Customer Sales & Support
|
Phones (Pacific Time) 1-800-268-6272 1-250-475-2874 |
||
| Live Chat | ||
| OPEN | Online Ordering 24/7 |
|
| OPEN | Forums, email, web support |