
Search Manual
Band-in-a-Box® 2019 for Windows® User's Guide
Chapter 11: Working with Audio
About Band-in-a-Box Audio Files
|
You can open an audio file by clicking the [Open] toolbar button and selecting Open Audio (wav, wma, mp3, wmv, cda) from the pulldown menu. |
Audio files can also be opened from the File menu with the command Open Special | Open Audio (WAV, WMA, MP3, WMV, CDA). Open an MP3/WAV/WMA or audio CD track, and play back at 1/2, 1/4, or 1/8 speed. This is great for transcribing or analyzing audio.
If you load in an audio song (WAV file, MP3), when the song plays you can:
- Change the tempo of the audio to slow/speed up the song.
- Press Ctrl+[-] for half speed, Ctrl+[=] for full speed.
- Highlight an area in the Audio Edit window and press [Loop Selected Area]. This will loop the audio.
- Use the Audio | Set Audio Master (Base) Tempo menu item to ensure that tempo stretches are based on correct master tempo.
These features are useful as an aid for transcription.
If MySong.MGU is loaded, and a same named audio file (MySong.WMA, MySong.MP3, MySong.WAV, etc.) is present, Band-in-a-Box will open the audio file to the Audio track.
This allows third parties to make audio files with chords in them, by making a MySong.MGU and MySong.MP3 pair of files, which will load into Band-in-a-Box yet will have the audio compressed to take up little disk space. For example, make a teaching set of trombone files for Band-in-a-Box, with audio trombone track, and Band-in-a-Box file with chords, all fitting in a small file size.
Audio Track
The Audio track includes only your live recording or the imported audio file, whereas the rendered audio file includes everything in the file: MIDI parts plus the Audio track.
Import Audio File to Audio Track
Most types of audio files can be opened directly in Band-in-a-Box, but you may want to import an audio file into your Band-in-a-Box song. A Mono or Stereo audio file can be imported to the Audio track, optionally merging or replacing any existing Audio track. Most popular types of audio files are supported, including WAV, WMA, MP3, WMV, and CD audio.
Choose the menu item File | Import | Import Audio (WAV, WMA, MP3, WMV) or Audio | Import Audio (WAV, WMA, MP3, WMV…). You then choose an audio file to import. The Import Audio File dialog is then displayed, which allows selection of the point to insert the audio file, and whether to merge or overwrite existing audio in the range.
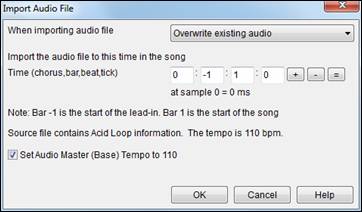
If the audio file contains Acid Loop or Apple® Loop information, the dialog shows an option to set the audio base tempo of the current song to the tempo of the audio file.
Using the Half-Speed Audio feature to help you transcribe a piece of music
| |
Once you open the audio file, open the Audio Edit Window window and you can see the audio data on the track. |
Choose “Half-speed tempo” (Ctrl+minus (-) hot key). Ctrl+equals (=) returns to normal tempo. (Use the Edit | Tempo menu for slower speeds like 1/4, 1/8.)
![]() Highlight the range that you want to hear, and then press [Loop Selected Area].
Highlight the range that you want to hear, and then press [Loop Selected Area].
You can then move around the window to play different sections as you transcribe the recording.
Audio Offset
The Audio Offset feature allows you to synchronize any point of the audio file with bar 1 of the Band-in-a-Box song – usually to sync the audio file with the rest of the song.
Let’s say you have a home recording of a live performance of one of your songs, saved as a WAV file (or MP3/WMA). File | Open Special | Open Audio will load the song into Band-in-a-Box.
| |
Now open the Audio Edit window, right-click where you would like to be considered bar 1 and select Mark this point as Bar 1 of the song from the menu. |
![]()
Then, as the song is playing, use the tap tempo feature (the minus key, pressed 4 times in tempo) to set the tempo of the piece.
Your audio file will then start playing at bar 1 of the Band-in-a-Box song in sync with the audio starting at the place you have marked as bar 1, and the bars will be in sync (approximately in sync, they will drift as the tempo of your live performance varies.) You can put tempo changes on certain bars to keep it perfectly in sync if you want to.
Recording Audio
Before you begin recording, you need to set the Recording Properties.
This tells your sound card (and Band-in-a-Box) what sources you would record from. You may be recording from a microphone or a line-in plug into your sound card. In that case, you need to have those items selected in the recording properties panel for your sound card.
Most sound cards are capable of recording from the following sources:
Microphone – plugged in to the sound card to record vocals or live instruments.
Line-In – from the Line-Out of a mixer or keyboard, or a guitar direct box.
CD-ROM player – to record the audio from an audio CD.
“What You Hear” or “Stereo Mix” is used if “rendering” the whole Band-in-a-Box song to Audio. This is an important point to understand when using audio in Band-in-a-Box: the soundcard should be capable of recording the outgoing MIDI that is being sent from your soundcard out to the speakers. When recording an audio track (vocals etc.), you’d almost never want to record the outgoing MIDI as well or it would get mixed in with the audio track. However, when rendering your whole composition to a single .WAV file to distribute on a CD or the Internet you always want to record the outgoing MIDI.
![]() When you press the [Set Recording Properties] button, you will see the Sound settings for your computer. This is where you select your recording source.
When you press the [Set Recording Properties] button, you will see the Sound settings for your computer. This is where you select your recording source.
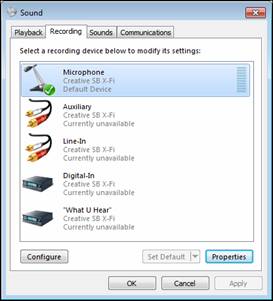 |
The panel displayed here is for a typical Windows® 7 computer with an add-on sound card. Different makes and models may not look exactly like the example, but the basic layout and operation is the same. From this panel, you select the items you want to record. Let’s take the example of recording live with a microphone. |
- We select the microphone as the recording device.
- In the [Properties], we can set the microphone level and other properties such as the sample rate and bit depth.
- Then, we test the level of the recording input for the microphone with the aid of the built-in VU meters in Band-in-a-Box.
Audio VU meters
These show the Record and Playback levels for audio, allowing adjustment of microphone and speaker levels.
| |
The VU Meters will open automatically when the Record Audio dialog opens. |
![]() The VU Meters will close or stay open when the dialog is exited depending on the “Leave VU Meters open” setting in the Record Audio dialog.
The VU Meters will close or stay open when the dialog is exited depending on the “Leave VU Meters open” setting in the Record Audio dialog.
The VU Meters show the average strength of the signal, with a dB scale, and a clip indicator. Clipping indicates that the signal has overloaded and will sound distorted (clipped).
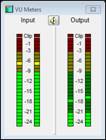 |
The green area represents normal levels, while red indicates an overload. |
Record Audio dialog
|
Press the [Record Audio] button to start recording audio. The Record Audio dialog will open. This dialog displays the mono/stereo status of the recording. |
|
If you want to change to/from stereo (to/from mono), press the [Audio Options] button in this dialog. The mono/stereo track status is also indicated on the Title bar at the top of the main screen. |

Set the start point for the recording.
You can record from the Start of the song, somewhere in the middle, or punch in by choosing a bar and chorus # to start recording.
Also Record MIDI? If you also want to record MIDI at the same time, choose either “Also Record MIDI to Melody” or “Also Record MIDI to Soloist” option.
Punch-In Recording Punch-in audio recording allows you to punch-in record or overdub a section of audio. You can select a section to punch-in by highlighting it in the Audio Edit window. You can also hear the existing audio part when you are overdubbing. This is automatic.
Overdub underlying Audio If you have previously recorded audio on the track, and want to overdub (to add a harmony for example), then you should select the Overdub underlying Audio. It is not essential to select it at this point, since you will get another chance at the end of the recording. Note that the Audio track will not play during record, so you’d have to sing the harmony without hearing the original audio part.
Press [Record]. Audio recording begins. If you have set the “Show VU Meter while recording” option, then the VU Meter will open and display during recording so you can monitor the VU meters.
Press [Stop] or press the [Esc] key. You will then see the “Keep Take?” dialog.

If you are happy with your recording, you should choose [OK -Keep Take] and the audio will be added to the Audio track.
You can listen to the results by pressing [Play].
If you are not happy with the results, you can choose Edit | Undo Keep Audio Take and you will be back to where you were prior to the recording. You can also choose the option to [Take Again], which reopens the Recording dialog.
Options
![]() If you’ve recorded only 1 chorus of the song, you can choose the option to copy that first chorus of audio to the whole song. This will fill up the whole song with the audio by repeating it as many times as necessary. Then you’d just need to record the ending of the song.
If you’ve recorded only 1 chorus of the song, you can choose the option to copy that first chorus of audio to the whole song. This will fill up the whole song with the audio by repeating it as many times as necessary. Then you’d just need to record the ending of the song.
![]() At the end of recording, you receive an option to overdub with the underlying audio. This means that both recordings will be merged together to form a new file, with both recordings preserved.
At the end of recording, you receive an option to overdub with the underlying audio. This means that both recordings will be merged together to form a new file, with both recordings preserved.
![]() There is also an option to “Retain audio past last recorded.” This allows you to “punch out” and preserve the rest of a previously recorded take.
There is also an option to “Retain audio past last recorded.” This allows you to “punch out” and preserve the rest of a previously recorded take.
Playing the Audio
You can play the Audio file that you’ve recorded by pressing [PLAY].
![]() The size of the audio file will be displayed at the top of the screen. In this example, there is a 5.6 MB .WAV file associated with the file, and that’s 1 minute and 4 seconds of audio.
The size of the audio file will be displayed at the top of the screen. In this example, there is a 5.6 MB .WAV file associated with the file, and that’s 1 minute and 4 seconds of audio.
Once the song is saved, the wave file will be called with the same name as the song. If you ever need to work with the .WAV file in another program, you can just directly edit the wave file. If you do this, make sure the .WAV stays a 44K mono .WAV file.
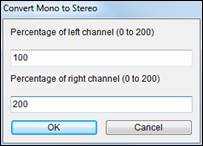
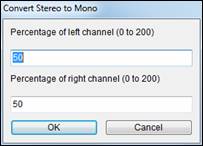
Converting Audio Channels
You can easily convert the Audio track from stereo to mono, or vice versa, with the Audio | Edit Audio | Convert Channels (mono/stereo) menu command. When you convert the channel, you can choose the percentage of each channel.
Generating Synthetic Vocal
Your Melody or Soloist track with lyrics can be rendered to a vocal audio track by sending it to the 3rd party vocal synthesizer Sinsy.
To access this feature, you should first enter melodies and lyrics to the Melody or Soloist track. If no Lyrics are present, you can still generate a vocal synth using the syllable of your choice (la la la etc.).
You can launch the Vocal Synth generation by one of the followings.
- Press the [Big Lyrics] button on the main screen toolbar and select either of the Vocal Synth menu items.
- Press the [Vocal Synth] button on the Notation window toolbar and select either of the Vocal Synth menu items.
- Go to menu Edit | Lyrics | Vocal Synth.
With the manual mode, Band-in-a-Box creates a Sound.XML file, which you need to upload to the Sinsy server. When the Sinsy has generated an audio file with a vocal synth, import it to Band-in-a-Box.
Normally, you would use the auto mode, which does this process automatically for you. When you choose an auto mode, the Generate Synthetic Vocal dialog will open.
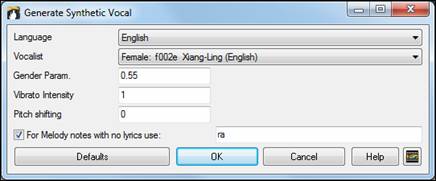
Language: The choice is English or Japanese. Select English unless your lyrics are entered in Japanese.
Vocalist: Choose one of the female or male vocalists. If the language is set to English, you can only select an English singer.
Gender Parameters: You can adjust the gender of the voice in a range from -0.8 to +0.8. Higher values are more masculine. The default is 0.55.
Vibrato Intensity: This controls the amount of vibrato in the voice. The range is from 0 to 2. The default is 1.
Pitch Shifting: This setting will shift pitch in semitones. The range is from -24 to +24. A setting of -12 would be down one octave. The default is 0.
For Melody notes with no lyrics use: If the track does not include lyrics, you can enter a syllable (.e.g. la) to use for notes with no lyrics. (Note: If you select a Japanese vocalist, you need to enter a Japanese syllable.)
When you press [OK], your song will be sent automatically to the Sinsy server and will be rendered to a vocal synth. This may take a few minutes. When the vocal synth has been generated, the Import Audio File dialog opens. Press [OK] to import it to the Audio track.
Editing the Audio
|
In the Audio Edit window, you can edit audio data using Copy, Cut, and Paste. Launch the Audio Edit window with the toolbar button, by the Audio | Audio Edit Window menu item, or by pressing the Ctrl+Shift+A keys. |
The window displays stereo WAV files as 2 separate tracks.
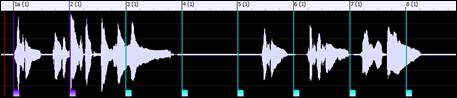
The numbered scale at the top of the window indicates bars and beats, with a full height vertical division for each bar and a short vertical line for each beat or quarter note. Bars with part markers also include the A or B part marker letter with the bar number (1a, 9b).
Note the decibel (dB) scale down the right side of the window.
To select a region of the Audio Edit window, you can Shift+click on the end point to easily select a large area.
- Click on the starting bar.
- Shift-click on the ending bar.
![]() This button zooms out horizontally to display a larger area of the audio. Zoom focus will be on audio cursor. You can also zoom with the mouse wheel, which focuses on the mouse cursor.
This button zooms out horizontally to display a larger area of the audio. Zoom focus will be on audio cursor. You can also zoom with the mouse wheel, which focuses on the mouse cursor.
![]() This button zooms in horizontally to display a smaller area of the audio. Zoom focus will be on audio cursor. You can also zoom with the mouse wheel, which focuses on the mouse cursor.
This button zooms in horizontally to display a smaller area of the audio. Zoom focus will be on audio cursor. You can also zoom with the mouse wheel, which focuses on the mouse cursor.
![]() This button zooms out as far as possible, showing the entire audio track.
This button zooms out as far as possible, showing the entire audio track.
![]() This button zooms down to the finest level possible, and at these levels you will see interpolation between the sample points. This is bandlimited interpolation which represents the waveform as it will be heard in reality once converted from digital to analog.
This button zooms down to the finest level possible, and at these levels you will see interpolation between the sample points. This is bandlimited interpolation which represents the waveform as it will be heard in reality once converted from digital to analog.
![]() These buttons change the height of the waveform display. [+] increases the height of the waveform display, [-] decreases the height of the display.
These buttons change the height of the waveform display. [+] increases the height of the waveform display, [-] decreases the height of the display.
![]() This setting allows you to select audio by snapping to a 16th note (or a triplet in Swing styles). A section of the wave file can be selected by clicking and dragging the mouse over an area of the wave file. To expand or reduce the selection, hold down the Shift key while clicking on the desired new boundary.
This setting allows you to select audio by snapping to a 16th note (or a triplet in Swing styles). A section of the wave file can be selected by clicking and dragging the mouse over an area of the wave file. To expand or reduce the selection, hold down the Shift key while clicking on the desired new boundary.
![]() This button plays the selected area, and then stops. The other instruments are all muted; you just hear the audio.
This button plays the selected area, and then stops. The other instruments are all muted; you just hear the audio.
![]() This button selects the whole track, useful for applying one of the built-in audio plug-ins.
This button selects the whole track, useful for applying one of the built-in audio plug-ins.
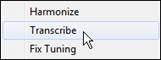
![]() This button lets you access various editing features. They will apply to the highlighted region of audio, but if no region is highlighted, then they will apply to the entire track.
This button lets you access various editing features. They will apply to the highlighted region of audio, but if no region is highlighted, then they will apply to the entire track.
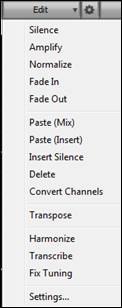 |
Silence - This will silence the audio. Amplify - This will increase or decrease the volume of the audio by a chosen number of decibels. A positive value will make the audio louder, or a negative value will make the audio quieter. Normalize - This will increase or decrease the volume of the audio in order to make the loudest point match the chosen decibel level. For example, if you choose -6 decibels and the loudest point in your audio is -8 decibels, then the audio will be increased by +2 decibels. Fade In - This will gradually change the volume of the audio. The audio will begin silent, and then gradually increase to full volume at the end. You can change the type of amplification curve in the Audio Edit Settings dialog. Fade Out - This will gradually change the volume of the audio. The audio will begin at full volume, and then gradually decrease to silence at the end. You can change the type of amplification curve in the Audio Edit Settings dialog. |
Paste (Mix) - This will mix the audio from the clipboard with the existing audio instead of overwriting it. You will be given the option to set the percentage of the existing audio to keep and the pasted audio to mix in.
Paste (Insert) - This will insert the audio from the clipboard to the current location, instead of overwriting the existing audio. The audio to the right of the insertion point will be shifted to make room for the new audio.
Delete - This will delete the selected region of audio.
Insert Silence - This will insert silence at the cursor. The duration of the silence inserted will be equal to the duration of the selected region.
Convert Channels - If the audio is stereo, this will convert it to mono. If it’s mono, this will convert it to stereo. You will be given the option to set the percentage of the left and right channels to include.
Transpose - This will transpose the audio by a specified number of cents.
Harmonize - This will add harmonies to the audio.
Transcribe - This will transcribe the audio to the Melody or Soloist track as MIDI data.
Fix Tuning - This will automatically correct the tuning according to the key of your song. For example, in the key of C, if a C# is detected then it will be transposed down to C or up to D depending on which one is closer.
Settings - This allows you to customize the appearance of the window.
![]() This button will open the Audio Edit Settings dialog, which allows you to customize the appearance of the window.
This button will open the Audio Edit Settings dialog, which allows you to customize the appearance of the window.
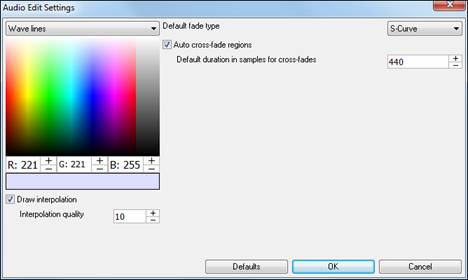
You can change the quality setting of interpolation or turn it off completely (quality vs. drawing speed). There is also an automatic feature to “auto cross-fade regions.” When a region of audio is being modified or replaced, the beginning and ending of the region will be cross-faded with the existing audio to make a smooth transition.
![]() This button allows you to change the Marker Mode. When you select the Audio Chord Wizard or UserTracks mode, the markers will be visible and editable.
This button allows you to change the Marker Mode. When you select the Audio Chord Wizard or UserTracks mode, the markers will be visible and editable.
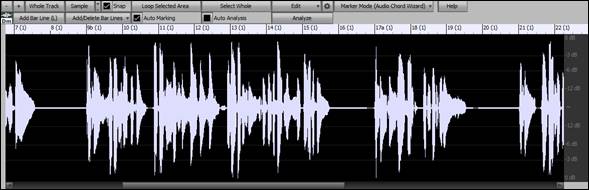
Each marker mode displays editable markers for various purposes. The Audio Chord Wizard mode shows bar line markers for making a tempo map, and the User Track mode shows bar/beat markers for defining rules in your UserTrack.
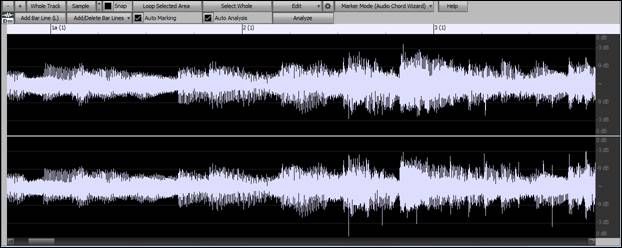
Audio Chord Wizard (Built-in)
The following buttons will appear if you select the Audio Chord Wizard marker mode.
![]()
In this mode, the first task is to locate bar lines in the audio so that the Audio Chord Wizard can detect chords accurately and the audio will play in sync with the Band-in-a-Box song.
![]() You can add bar lines with the [Add Bar Line] button or with the L key on your keyboard. A bar line will be placed at the audio edit cursor or at the playback cursor if the song is currently playing.
You can add bar lines with the [Add Bar Line] button or with the L key on your keyboard. A bar line will be placed at the audio edit cursor or at the playback cursor if the song is currently playing.
![]() The [Add/Delete Bar Lines] button menu has options to add bar lines based on your song structure or tempo. You can delete all of the existing bar lines or only the ones within the highlighted region.
The [Add/Delete Bar Lines] button menu has options to add bar lines based on your song structure or tempo. You can delete all of the existing bar lines or only the ones within the highlighted region.
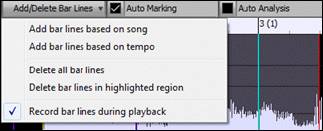
![]() If “Auto Marking” is enabled, then Band-in-a-Box will automatically add and arrange bar lines based on the bar lines you have added manually. The “auto” bar lines will show in light blue, and the “user” bar lines will show in purple. You can change these colors in the Audio Edit Settings dialog if you want.
If “Auto Marking” is enabled, then Band-in-a-Box will automatically add and arrange bar lines based on the bar lines you have added manually. The “auto” bar lines will show in light blue, and the “user” bar lines will show in purple. You can change these colors in the Audio Edit Settings dialog if you want.
![]() If “Auto Analysis” is enabled, then Band-in-a-Box will re-analyze the chords in the audio whenever you add or move a bar line, or when you edit the audio data. Keep this setting disabled if you prefer to set all bar lines first (i.e. establishing tempo), and then analyze the chords when you are done.
If “Auto Analysis” is enabled, then Band-in-a-Box will re-analyze the chords in the audio whenever you add or move a bar line, or when you edit the audio data. Keep this setting disabled if you prefer to set all bar lines first (i.e. establishing tempo), and then analyze the chords when you are done.
Bar lines can be moved with the mouse. Just click and drag the thumb control at the bottom. If you move an “auto” bar line, it will become a “user” bar line.
You can also right-click on the thumb control to get a context menu with options to switch a marker type (“user” or “auto”), delete the bar line, or set the time signature for the bar. The menu also shows you the tempo of the bar, based on the time signature of the bar and the position of the next bar line.
![]() Use the [Analyze] button to analyze the chords in the audio. The chords detected in the audio will be written into the Chord Sheet. You don’t need to do this if you have “Auto Analysis” enabled, but you might want to if you have erased or made changes to the chords in the Chord Sheet.
Use the [Analyze] button to analyze the chords in the audio. The chords detected in the audio will be written into the Chord Sheet. You don’t need to do this if you have “Auto Analysis” enabled, but you might want to if you have erased or made changes to the chords in the Chord Sheet.
When you add or move bar lines, Band-in-a-Box will automatically make a tempo map, so your song is in sync with the Audio track.
Any changes you make in the Audio Chord Wizard mode are undo-able. This was previously not possible with the standalone Audio Chord Wizard.
When you open the Chord Sheet, you will see the Audio Chord Wizard has entered the chords and the tempo map.

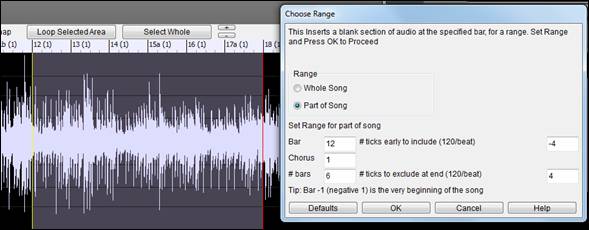
Automatic Range Selection for Audio Editing
When you perform various editing tasks from the Audio | Edit Audio menu, the Choose Range dialog will automatically use the region that is selected in the Audio Edit window.
Non-Destructive Audio Track Editing
The changes you make to the Audio track are non-destructive and only become permanent if you save the file.
If you have a song file called MySong.MGU, the Audio track is stored in a MySong.WAV file. If you are editing the audio, the edits are now made to a temporary WAV file called TEMPMAIN.WAV, and not to MySong.WAV. If you save the song, the changes get written to the MySong.WAV audio file, but if you don’t save, the original file is preserved.
Audio Harmonies (Built-in)
The audio harmonies include following features.
- Harmonizing the audio with up to 4 voices.
- Correcting out-of-tune notes.
- Transcribing the audio to notation.
Harmonize the Audio Track
First, open an audio file (WAV/WMA/MP3/M4A) or a Band-in-a-Box song file with audio. Then, go to the menu Audio or Harmony, and select Audio Harmonies, Pitch Tracking, Fix Tuning (Audio Edit).
This will open the Audio Edit window and the Audio Harmony dialog.
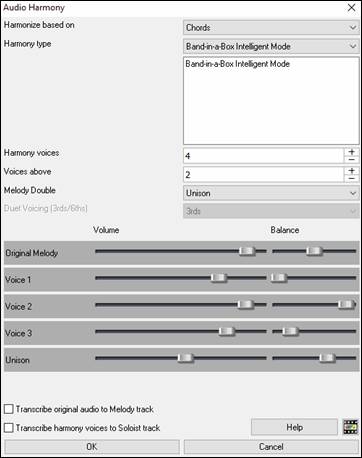
Choose one of the 4 harmonizing modes.

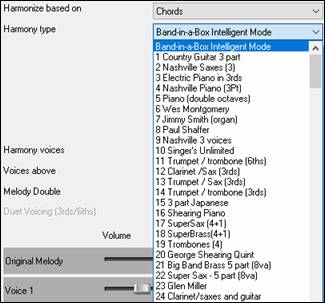 |
1) The “Chords” mode will harmonize the audio based on the chords in your song. Choose a type of harmony from the “Harmony type” option. Choose either the intelligent mode, which allows you to select the number of voices and other options, or one of the harmony presets. Then, set the volume and the stereo balance of each voice in the harmony. |
|
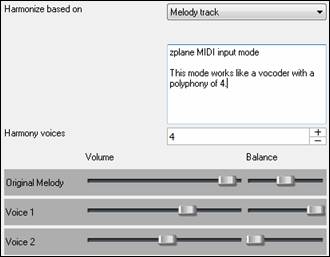
2) The “Melody track” mode will add voices to the audio, based on melodies in the Melody track. You can choose the number of voices (up to 4 voices), and the volume and the stereo balance of each voice. |
|
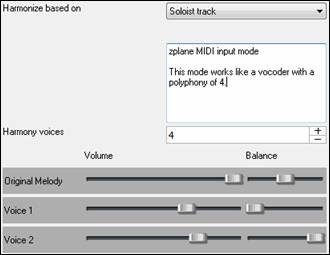
3) The “Soloist track” mode will add voices to the audio, based on melodies in the Soloist track. You can choose the number of voices (up to 4 voices), and the volume and the stereo balance of each voice. |
|
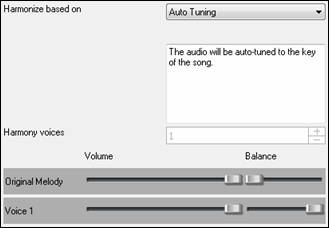
4) The “Fix Tuning” mode will analyze the Audio track and corrects out-of-tune notes in the selected region according to the key of your song. Normally, you do not want to keep out-of-tune notes after the fix tuning is done, but you can mix the original voice with the fixed one by moving the volume slider for “Original Melody” to the right. |
![]() You can use the “Transcribe original audio to Melody track” option to transcribe the original audio to MIDI on the Melody track.
You can use the “Transcribe original audio to Melody track” option to transcribe the original audio to MIDI on the Melody track.
![]() If “Transcribe harmony voices to Soloist track” is enabled, the harmony voices generated will be transcribed to MIDI on the Soloist track.
If “Transcribe harmony voices to Soloist track” is enabled, the harmony voices generated will be transcribed to MIDI on the Soloist track.
Fix Tuning for Audio Track
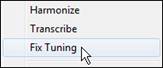
This feature analyzes the Audio track and corrects out-of-tune notes in the selected region according to the key of your song. For example, in the key of C, if a C# is detected, then it will be transposed down to C or up to D depending on which one is closer. To use this feature, press the [Edit] button in the Audio Edit window and select Fix Tuning from the menu.
![]()
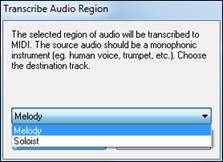
Auto-Transcribe of Audio Track to Notation (MIDI)
This will transcribe the selected region of audio to the Melody or Soloist track as MIDI data.
To access this feature, press the [Edit] button in the Audio Edit window and select Transcribe from the menu. You can then select the destination track.
 |
|
Audio Harmonies (TC-Helicon)
You can apply a harmony to the audio part – allowing you to automatically create up to 4-part vocal harmonies from your singing. And don’t worry if your singing is not in perfect tune, Band-in-a-Box can “fix” vocals to the correct pitch - automatically! Simply record your vocal part, choose a harmony, and Band-in-a-Box will generate the vocal harmony part for you using the world-leading TC-Helicon Vocal Technologies engine.
Once you have recorded a vocal part into Band-in-a-Box, you can use this feature in many ways, including:
- Record yourself singing into a Band-in-a-Box file. Create a vocal harmony for part or all of the song by selecting a Band-in-a-Box harmony and choosing the Generate Audio Harmony option. You can now hear yourself singing in perfect harmony!
- Did you hit a few “out-of-tune” notes when you recorded your singing to Band-in-a-Box? Fixing your “out-of-tune” singing is easy, by instructing the program to correct the pitches to the Melody track.
Audio Harmonies Tutorial
Let’s load in the song “Listen.MGU.”
First off, play the song “Listen” – it has an Audio track, so you will be hearing a male vocal track lasting about 16 bars (since WAV files are big, we only include a small 16 bar sample of the WAV file).
We’re going to apply some audio harmony to this “Listen” demo.
Since any edits we save to the audio WAV file are permanent, we want to make sure that we keep a copy of the original file around that is unaltered.
Save a copy of the song as “Listen 4-Part Harmony.”
|
Press the [Save As] button and choose Save Song As… from the dropdown menu. Save the song as “Listen 4-part harmony.” We will now be working with this file, so our original Listen file won’t be affected. |
|
Click on the [Harmony] toolbar button and choose Audio Harmonies & Pitch Tracking from the pulldown menu. Or go to menu Harmony | Audio Harmonies & Pitch Tracking. You will see the Generate Audio Harmonies dialog. |
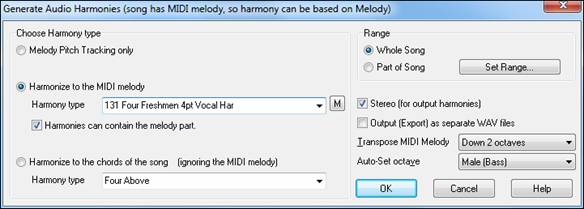
In this dialog, there are 3 types of harmony that we can choose from:
- Melody Pitch Tracking only (this would change the pitch of our singing to the correct pitches found on the MIDI Melody track).
- Harmonize to the MIDI Melody. This applies a 1-4 part audio harmony – turning your singing track into a harmony singing quartet.
- Harmonize to the chords of the song. If your song doesn’t have a MIDI melody, you can still create a vocal harmony, based only on the chords of the song.
![]() Let’s harmonize to the MIDI melody, so choose the radio button with that title.
Let’s harmonize to the MIDI melody, so choose the radio button with that title.
![]() Then select Harmony type “131 Four Freshmen 4-part Vocal Harmony.” This is a 4-part harmony that includes the melody, and one of the voices is above the melody.
Then select Harmony type “131 Four Freshmen 4-part Vocal Harmony.” This is a 4-part harmony that includes the melody, and one of the voices is above the melody.
![]() Since we want to harmonize the entire song, choose “Whole Song.”
Since we want to harmonize the entire song, choose “Whole Song.”
![]() The output can be mono or stereo. Since we’re making a 4-part harmony, and we want to hear the voices panned across our stereo speakers, we choose STEREO here.
The output can be mono or stereo. Since we’re making a 4-part harmony, and we want to hear the voices panned across our stereo speakers, we choose STEREO here.
![]() We want Band-in-a-Box to play our files directly, and since Band-in-a-Box plays only one WAV file at a time, we won’t be exporting the 4 voices as separate WAV files, and we don’t select the “Output (Export) as separate WAV file” option.
We want Band-in-a-Box to play our files directly, and since Band-in-a-Box plays only one WAV file at a time, we won’t be exporting the 4 voices as separate WAV files, and we don’t select the “Output (Export) as separate WAV file” option.
![]() Press OK, and this launches the TC Helicon Harmony dialog, which lets you control the sound of your harmonies.
Press OK, and this launches the TC Helicon Harmony dialog, which lets you control the sound of your harmonies.
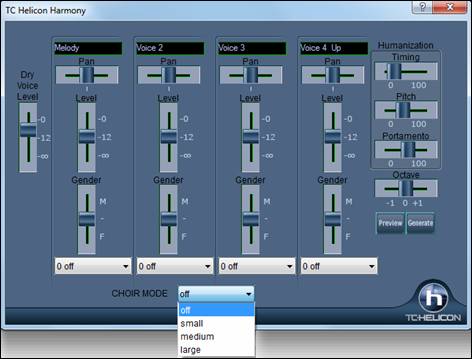
Let’s examine the various sliders on this dialog, as they apply to our “Listen 4-part Harmony” File.
The “Dry Voice Level” slider is the level of our original voice. We can make the harmony to include more of our original voice by raising this slider. Set it half way up (to 12dB).
The 4 columns labeled Melody, Voice 2, Voice 3, and Voice 4- 8va are the 4-part MIDI harmony that will be transformed to an audio harmony using our original voice. The “8va” tells you that Voice 4 will be above the melody.
Each of the voices have sliders for “Level” (loudness) and “Gender.” The “Gender” slider makes the voice sound like a male or female (raise the slider to make it more female). Higher pitches of harmony should have a female gender applied. Make the settings as in the picture above.
The Octave is an important setting that controls the overall octave of ALL the generated harmonies. If the harmony generated is too high, lower the octave setting here.
Try out the preview with the octave on 0, and then again on –1, you will hear all of the voices an octave lower on the –1 setting. Leave it at 0 for this demo.
There are 3 Humanization settings (timing, pitch, and portamento) that affect the sounds of the individual voices.
Timing controls how “tight” the group sounds, with a setting of zero being perfectly synced start/stop times. Let’s set it to about 20, to give some natural looseness to the group.
Pitch controls how steady the pitch will be. If set to zero the pitch will be exactly the MIDI pitch, if set higher, the pitch will vary up/down with the original WAV file.
Portamento controls how fast the pitch will change from one pitch to another. Settings above zero give smooth transition from one pitch to another.
Pitch Styles
When you generate audio harmonies to your recorded vocal tracks, you can select Pitch Styles to add vibrato and scooping effects to the vocal harmonies. There is a drop-down combo list at the bottom of each voice. You can choose a type of “pitch effect” (combination of vibrato and scooping) called a Pitch Style to be applied to each harmony voice.
In the example screenshot, we have chosen “Crooner,” “Lite Jazz,” “Lounge,” and “Head Voice” – somewhat similar vibrato types, but different for each harmony voice.
The Pitch Styles are especially useful for harmonies generated from MIDI tracks, because these lack any vibrato. Now by applying these pitch effects, you can get a natural sounding vibrato for these harmonies.
| |
Now let’s preview our harmonies! Press the [PREVIEW] button, and after a 5-10 second delay, you will hear a 10 second sample of the harmony. Once you hear it, you can tweak the settings, for example: |
- make the original voice louder by increasing the Dry Voice Level slider.
- to make the individual harmony voices louder, increase their sliders.
- to change the stereo separation, change the Pan sliders
- to make the group more “loose” sounding, increase the Timing slider
- to make the pitches and pitch-transitions more human, increase the Pitch and Portamento sliders
- change the whole Octave of all of the harmonies with the octave slider.
![]() If you’d like to get more help on-line about the settings, inside the dialog press the Help button and then click anywhere in the dialog.
If you’d like to get more help on-line about the settings, inside the dialog press the Help button and then click anywhere in the dialog.
This launches the Band-in-a-Box Help file with more information.
When you are happy with the settings, press the [GENERATE] button. This generates a harmony for the complete song (takes about 20 seconds for “Listen” depending on your CPU speed).
The dialog then exits, and your song is ready to play in Band-in-a-Box.
Band-in-a-Box gives you a confirmation message that the audio harmony has been created.
If you want to hear what the harmonies should sound like – we have included a completed version of “Listen 4 part harmony.MP3” and this is included in the C:\bb\Documentation\Tutorials\Tutorial - Audio Harmonies folder.
Melody Pitch Tracking
Now let’s use the Audio Harmonies for a different purpose, to “fix” pitches that may be out of tune, or to change some pitches to more interesting notes.
|
For this, reload the song Listen.MGU. Now resave it by [Save As] and give it the name “Listen Pitch Tracking.MGU.” Now, we’re going to change some notes of the MIDI melody. |
Open the notation, and change the pitch of the D note at the end of bar 2 to an E. Also change the “B” at bar 7 to a “G” below it.
At bar 10, change the “E” note to a C#.
![]() Now, choose Harmonies – Audio Harmonies, and select “Melody Pitch Tracking” and press OK to again launch the TC-Helicon Harmony Dialog. Now, we’re going to be changing the vocal track into a different vocal track that instead is matching the pitches of the MIDI melody (without any harmony).
Now, choose Harmonies – Audio Harmonies, and select “Melody Pitch Tracking” and press OK to again launch the TC-Helicon Harmony Dialog. Now, we’re going to be changing the vocal track into a different vocal track that instead is matching the pitches of the MIDI melody (without any harmony).
So, the dialog reflects this, by only showing one of the columns with a track name, and it is “Melody (BB).”
For this one, we should leave the original voice at ZERO (so we don’t hear any of it) and put some humanization settings as shown.
Now try the [PREVIEW] button. You will hear that the harmony is ONE OCTAVE TOO HIGH. This is because the MIDI melody is one octave higher than the vocal track (males sing in the bass clef!). No problem. Just adjust the Octave setting to –1 and try the preview again.
You will hear what sounds like the original voice, except you will notice that the pitch is fixed to perfectly in tune, and some of the notes are changed in pitches (the ones we changed above, for example the E note on end of bar 2). Now press [GENERATE] to hear this whole song.
If you want to hear what the pitch tracking final file should sound like – we have included a completed version of “Listen Pitch Tracking.MP3” in the C:\bb\Documentation\Tutorials\Tutorial - Audio Harmonies folder. (Play this file from Explorer by double-clicking on it.) Your tutorial example should sound very close to this.
Chordal Harmony
For the last example on “Listen,” we will do an example of the “Chordal Harmony.” This is a 4-part harmony based only on the chords, when we don’t have a MIDI melody available.
Load in Listen.MGU. Save the file as “Listen – Chordal Harmony.MGU.” Now erase the Melody (just to convince yourself that the Melody is not going to be used). Melody-Edit-Kill Entire Melody. Now choose Harmony-Audio Harmonies to open the dialog, and then choose Chordal Harmonies.
You will see that the only harmony type available will be the Chordal Harmony, because there is no Melody available.
![]()
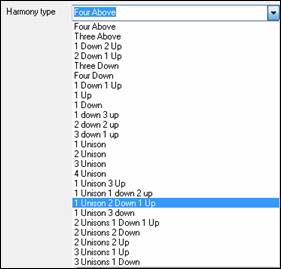
You can choose many different harmony variations, such as Four Above, or Three above etc. Let’s choose Four Above for 4 harmony voices above our original melody.
We want to include the original vocal track as well, so we will mix the “dry voice level” up into the mix. Make the settings as shown in this dialog, and press [PREVIEW], and then [GENERATE]. Playback this demo song, and also play the included “Listen Chordal Harmony.MP3” file – your file should sound similar.
Unison Harmonies
|
Unison harmonies are available for the Chordal harmony. For example, if you are recording a vocal track, and then choose Chordal Harmony (i.e. “Harmonize to the Chords of the Song”), you can then choose a new preset called “1 Unison, 2 Down, 1 Up.” This will give you 4 harmonies, and one of them will be a unison harmony doubling your voice. You can assign specific vibrato and other settings to the unison voice so that it sounds slightly different from your own, creating a “fattening” effect to your voice. |
Choir Effect
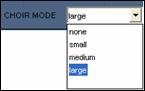
In the TC-Helicon dialog, you can select a choir effect, from none/small/medium/large. A “large” choir effect makes each voice sound like 4 people singing, so if you use a 4-voice harmony, you will hear the effect as if 16 people are singing.
Audio Harmonies Pitch Styles (automatic “Vibrato” and “Scooping”)
When you generate audio harmonies to your recorded vocal tracks, you can select Pitch Styles, which adds vibrato and scooping effects to the vocal harmonies. Choose from many vibrato/pitch presets, including “Ballad,” “Broadway,” “Pop Diva” and more!
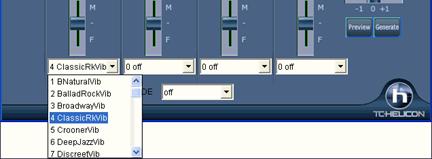
When you launch the TC-Helicon Audio Harmony dialog, you can see that there is a new dropdown combo list at the bottom of each voice. You can choose a type of “pitch effect” (combination of vibrato and scooping) called a Pitch Style to be applied to each harmony voice. In the example screenshot, we have chosen “Natural Vibrato,” “Ballad,” “Broadway,” and “Crooner” – different vibrato types for each harmony voice.
The Pitch Styles are especially useful for harmonies generated from MIDI tracks, because these lack any vibrato. Now by applying these pitch effects, you can get a natural sounding vibrato for these harmonies.
 >
>
Pitch Styles Preset Details (one per voice)
Each of the four voice banks has a Pitch Styles preset selection list. This control allows pitch scooping and vibrato effects to be added to the harmony voices. These effects can be used to increase the naturalness of vocals processed by melody pitch tracking, produce a more polished, professional sound in the harmonies, and even to create strange special effects. (Have you ever harmonized with a flock of sheep?)
The following table provides a list of the presets, as well as descriptions to help you decide when to use them.
Style Name |
Description |
1 B Natural Vibrato |
This is a very subtle vibrato along with pitch effect that causes the harmony voice to slightly scoop up into some notes, making it seem more distinct from the lead voice. |
2 Ballad Rock Vibrato |
A Rock vibrato typically used in slower pieces. |
3 Broadway Vibrato |
The classic vibrato of the New York Show-Tune sound. |
4 Classic Rock Vibrato |
Classic Rock - A rich and potent sound. |
5 Crooner Vibrato |
The classic sound of the Las Vegas entertainers. |
6 Deep Jazz Vibrato |
Reminiscent of the great Jazz singers of the 1950s. |
7 Discreet Vibrato |
A very light vibrato. |
8 Folk Vibrato |
A warm and pleasant vibrato. |
9 Funk Vibrato |
An energetic sound from the 70s. |
10 Head Voice Vibrato |
A very resonant vibrato, using pitch and amplitude modulation. |
11 Hi Energy Vibrato |
A fast vibrato. |
12 Lite Jazz Vibrato |
A lighter Jazz sound. |
13 Lounge Vibrato |
The bold and big sound of the lounge entertainer. |
14 Mellow Folk Vibrato |
A sweet, mellow sound. |
15 Mellow Pop Vibrato |
Light accents to a Pop vocal. |
16 Nervous Tremolo Vibrato |
A very fast, “nervous,” and choppy vibrato. |
17 Opera Tenor Vibrato |
The sound of a Classical Tenor singer. |
18 Tenor Delayed Vibrato |
A Classical tenor sound with a delayed onset. Better for slow songs. |
19 Pop Diva Vibrato |
The sound heard on many hit Pop recordings. |
20 Pop Diva XT Vibrato |
A thicker and fuller Pop Diva vibrato, with a faster onset time. |
21 R&B Vibrato |
Vibrato from another Pop music culture - Rhythm and Blues. |
22 Slow Ballad Vibrato |
A style typical of slow Pop ballads of the 1970s. Use this on slow songs only because the vibrato isn’t triggered on short notes. |
23 Slow Gospel Vibrato |
The big sound of the southern US Gospel singer. |
24 Smooth Pop Vibrato |
A smoother Pop vibrato. |
25 Soprano Vibrato |
The vibrato sound of a Classical soprano. |
26 Tremolo Vibrato |
No pitch modulation, just amplitude modulation. |
27 Warm Vibe Vibrato |
A warm and quick vibrato sound. |
28 Memphis Scoop Vibrato |
A style typical in ballads of a certain singer from Memphis. Long scoops into some notes, and a strong, slow vibrato. |
29 Changing Scoop Vibrato |
A style typical of a certain tambourine man. This one works best on slow songs if you just speak the lyrics without singing them! |
30 Country Scoop Vibrato |
A style that mimics that Country “flip” sound on note onsets. |
31 Jungle Vibrato |
Special Effect. The sound of the jungle-man. |
32 Landing Vibrato |
Special Effect. The sound of a close encounter with a spaceship landing. |
33 Motorbike Vibrato |
Special Effect. A motorcycle-like sound. |
34 Nervous Vibrato |
Special Effect. An agitated, uneasy sound. |
35 Sheep Vibrato |
Special Effect. The likeness of sheep bleating in the field. |
36 Siren Vibrato |
Special Effect. The sound of a North American emergency vehicle. |
37 Slicer Vibrato |
Special Effect. A choppy alternative to a standard vibrato. |
38 UFO Vibrato |
Special Effect. The sound of your science-fiction imagination. |
Applying Audio Plug-Ins
When you have recorded audio, you’d likely want to apply some type of effect to the audio. The usual one is reverb. Choose the audio plug-in that you want from the Audio | Plugin menu. For reverb, choose the Reverb option. You will then see a plug-in with its own settings, specific to the type of plug-in.
Inside the plug-in, you can preview the plug-in effect, and if you like it you can then proceed with processing the entire .WAV file. You can undo the effects of any plug-in by choosing Edit | Undo.
Direct-X or VST Plug-ins
You can apply your favorite DirectX or VST plug-in to the digital audio track. To process a WAV track with a DirectX or VST plug-in, choose Audio | Plugin | DirectX Audio plugins.
Real time DirectX or VST Audio Plug-ins
You can process the Audio track in real-time using DirectX or VST Audio plug-ins. This is useful to “non-destructively” apply EQ, Echo, Reverb, Dynamics, and other effects to the Audio track.
The advantage of real time processing is that you can set effects today, and if you decide you don’t like the effects tomorrow, the settings can be easily changed, since the real time effects did not permanently affect your audio file on the hard disk.
To use real time DirectX or VST audio plug-ins, open the Band-in-a-Box Audio Settings dialog with the [Preferences] [Audio] buttons.
Check “Use Realtime VST/DX Audio Plugins” to enable this feature.
![]() DX/VST audio plug-ins are not enabled by default, in case an older/slower computer might have trouble with DirectX. If your computer misbehaves with DX/VST audio plug-ins, simply make sure this option is unchecked.
DX/VST audio plug-ins are not enabled by default, in case an older/slower computer might have trouble with DirectX. If your computer misbehaves with DX/VST audio plug-ins, simply make sure this option is unchecked.
DirectX or VST audio plug-ins and DXi/VSTi synthesizer plug-ins can have playback latency (the delay between when a note is played, and when a note is heard).
Adjust “Audio Latency in mS” to fine-tune for your computer. If you have a fast computer and excellent sound card, the audio latency can be adjusted rather low. However, if you hear audio dropouts, you can set the latency as high as 2000 milliseconds.
Playback timing is equally good with long or short latency. But with longer-than-necessary latency, you have to wait awhile before hearing playback begin, and there is a noticeable delay if you adjust DX plug-in settings during playback.
![]() To edit DX plug-ins, click the [Edit Plugin Settings…] button.
To edit DX plug-ins, click the [Edit Plugin Settings…] button.
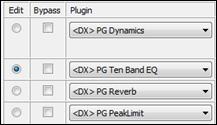 |
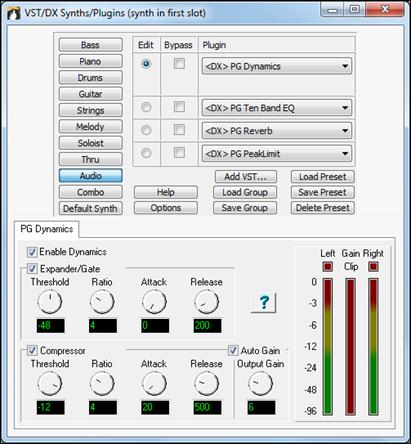
|
In the above picture, four DX plug-ins are applied to the Audio track. First, PG Dynamics to balance input levels, PG Ten Band EQ for tone polishing, PG Reverb to add ambiance, and PG Peak Limit to boost and level the amplitude.
The [Load Group] and [Save Group] buttons let you load and save the effects settings for the currently selected track.
The [Load Preset] and [Save Preset] buttons let you save and load presets for the current effect (such as PG Reverb).
The [Delete Preset] button lets you remove a preset from the list of already saved presets.
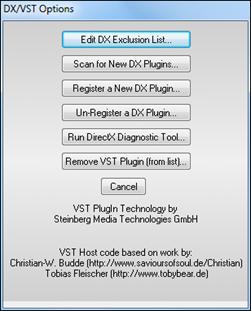
The [Options] button brings up DX/VST Options (useful utility functions you may occasionally need).
|
The [Edit DX Exclusion List] button lets you edit the list of plug-ins to include or exclude in the DirectX editor. This is useful if you have plug-ins installed, which are not compatible with Band-in-a-Box. If you edit the exclusion list, you will see a dialog with the left side displaying the included plug-ins and the right side displaying the excluded plug-ins. |
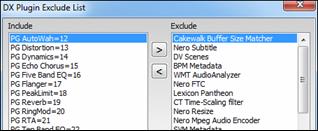 |
The [<] button lets you move a plug-in from the excluded list to the included list. The [>] button lets you move a plug-in from the included to the excluded list. |
The [Scan for New Plugins] button will re-scan for newly installed plug-ins. Use this option if you have installed a new plug-in since starting Band-in-a-Box.
The [Register a New Plugin] button can register a plug-in with Windows®, so that audio applications such as Band-in-a-Box or PowerTracks can use the plug-in. Most DX plug-in installers register themselves, but this option is useful if you have a plug-in that doesn’t automatically register itself.
The [Un-Register a Plugin] button removes a plug-in from Windows® so it will no longer be available. Many DX plug-ins have uninstallers that automatically unregister, but this option is useful to remove plug-ins that do not have uninstallers. This function does not delete a plug-in from your hard drive. It only removes it from the Windows® registry so that it can’t be used.
The [Run DirectX Diagnostic Tool] button runs the Microsoft Direct X Diagnostic Tool. This is a Microsoft program, which checks for problems with DirectX.
[Remove VST Plugin (from list)…] opens a separate list where you can remove VST or VSTi plug-ins.
VST/DX Plug-Ins for Individual Tracks
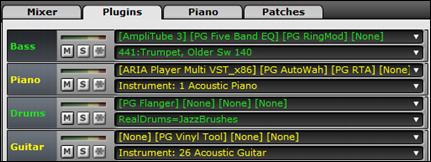
![]() VST and DX effects can also be applied to individual RealTracks. The control of effects plug-ins can be managed from the Mixer, on the [Plugins] tab.
VST and DX effects can also be applied to individual RealTracks. The control of effects plug-ins can be managed from the Mixer, on the [Plugins] tab.
Reading the Audio and MIDI Tracks into Other Programs
If you have a Band-in-a-Box song that has an audio track as well, and want to export that song to a sequencer like PowerTracks Pro Audio, follow these steps:
- For a song called MySong.MGU, the associated .WAV file (audio track) will be called MySong.wav.
- You should make a MIDI file (by pressing the .MID button). Save the .MID in the same folder as the song. Then your sequencer can read the entire file by doing the following inside your sequencer:
- Open the MIDI file.
- Import the .WAV file track into the sequence.
Unconditional 30-Day Money Back Guarantee on all PG Music products purchased from PG Music Inc.
PG Music Inc.
29 Cadillac Ave Victoria BC Canada V8Z 1T3
Sales: 800-268-6272, 250-475-2874,+ 800-4746-8742*
* Outside USA & Canada where International Freephone service is available.
Access Codes
Tech Support: Live Chat, support@pgmusic.com
 Online now
Need Help?
Customer Sales & Support
|
Phones (Pacific Time) 1-800-268-6272 1-250-475-2874 |
||
| Live Chat | ||
| OPEN | Online Ordering 24/7 |
|
| OPEN | Forums, email, web support |