
Search Manual
Band-in-a-Box® 2021 for Windows® User's Guide
Chapter 1: Welcome to Band-in-a-Box!
Congratulations on your purchase of Band-in-a-Box, the favorite of musicians, students, and songwriters everywhere. Get ready to have fun!
What is Band-in-a-Box?

Band-in-a-Box is an intelligent automatic accompaniment program for your multimedia computer. You can hear and play along to many song ideas and go from “nothing” to “something” in a very short period of time with Band-in-a-Box as your “on demand” backup band.
Band-in-a-Box is so easy to use!
Just type in the chords for any song using standard chord symbols (like C, Fm7, or C13b9), choose the style you’d like, and Band-in-a-Box does the rest, automatically generating a complete professional-quality arrangement of piano, bass, drums, guitar, and strings or horns in a wide variety of popular styles plus live audio tracks with RealDrums and RealTracks.
And that’s not all...
Band-in-a-Box is a powerful and creative music composition tool for exploring and developing musical ideas with near-instantaneous feedback. Over the years many features have been added to Band-in-a-Box – Notation and Lyrics, Piano Roll, 16-channel MIDI multi-tracks, harmonization, the StyleMaker and StylePicker, a live performance Conductor window, Medley Maker, and 24 –substyle Multistyles. The Soloist and the Melodist are popular “intelligent” features that generate professional solos or even create whole new songs from scratch. RealDrums add the human element of a live drummer while RealTracks add even more live session musicians, bringing the entire Band-in-a-Box arrangement to life. You can even record your own UserTracks and Band-in-a-Box will play them just like RealTracks! Or use the MIDI SuperTracks for MIDI tracks with a “real feel” that you can edit and arrange. The Audio Chord Wizard has the amazing ability to analyze, extract, and show the chords from audio recordings on-screen and then write them to the Band-in-a-Box Chord Sheet.
The inclusion of digital audio features makes Band-in-a-Box the perfect tool for creating, playing, and recording your music with MIDI, vocals, and acoustic instruments. Band-in-a-Box for Windows® can also record an acoustic instrument or voice to add to the composition, with processing through its own DirectX audio effects. Its built-in audio harmonies will turn your audio track into multiple harmony parts or adjust its pitch. Use the Mixer window to select parts, set levels, and create a polished final mix.
You can print out your finished creation with lyrics, chords, repeats and endings, DC markings, and codas, or save it as a graphics file for web publication or to e-mail to a friend. And when you are ready to let others hear your composition, you can burn it directly to an audio CD. Or save your composition as a Windows® Media File (or in any other compressed formats you have) for a file that’s “Internet ready.”
You will have even more fun making automatic medleys, playing your favorite song lists in the Band-in-a-Box Jukebox, and singing along to your Karaoke files with CDG graphics.
Let’s get started!
This is a comprehensive guide to the program, including information not included in the printed manual. We will begin with the easy installation and setup procedure.
Installing Band-in-a-Box for Windows®
Minimum System Requirements
Windows® 7 / 8 / 10 / 11(32 or 64-bit)
Minimum 1 GB RAM (2 GB+ recommended)
Minimum 1.0 GHz processor (2 GHz+ multicore recommended)
1 GB free Hard Disk space for a minimal install. More space is required for RealTracks, depending on which package you buy...
- RealTracks & RealDrums: ~100-400 MB per set
- Pro RealCombos: ~20 GB
- MegaPAK RealCombos: ~30 GB
- Full UltraPAK/UltraPAK+ when installed to internal hard drive: ~140 GB (another ~100 GB is required for the installation files when downloading the UltraPAK or UltraPAK+)
- Hard Drive versions of the UltraPAK, UltraPAK+, or Audiophile Edition do not require any hard disk space when run directly from the external hard drive they are shipped on.
1024x768 screen resolution (1360x768+ recommended)
USB port for the USB flash drive version of the MegaPAK or Pro.
USB port for the USB hard drive version of the UltraPAK, UltraPAK+, or Audiophile Edition.
A MIDI sound source is required. This could be a sound card, a MIDI keyboard, MIDI sound module, or software synthesizer.
Internet connection recommended for activation and updates.
Installing the Program
Use one of the following methods to install the program files into the Band-in-a-Box directory. By default, this directory is C:\bb, but you may choose another location. If you have a previous version of Band-in-a-Box installed on your computer, you should install the files to your existing Band-in-a-Box directory.
Installing from the Downloaded Installer Files
If you ordered the e-delivery, download all installer files from the link provided. Double-click on each file to run the installation program.
Installing from the USB Flash Drive
Connect the USB flash drive to the USB port. The Windows® AutoPlay should open the drive and show you the contents. If the drive does not automatically open, find the drive in the Windows® Explorer and double-click on the flash drive icon to open it. Double-click on a setup file to run the installation program.
Installing from the USB Hard Drive
Larger versions of Band-in-a-Box ship on portable USB hard drives. You can run Band-in-a-Box and RealBand directly from the hard drive by using the program shortcuts. Before you use the programs, you should double-click on Setup.exe. This will set up any files that need to be installed/registered on your computer.
MIDI Setup
Band-in-a-Box uses the multimedia drivers for your MIDI interface and/or sound card that are supported by the Windows® operating system. To get sound playback you need to have a MIDI (and audio - for songs with digital audio, RealDrums, and RealTracks) driver installed.
To start using the program you will need to make sure that your MIDI interface, audio driver, and Windows® sound source are installed and configured.
Run the program by double-clicking the program icon.
|
To check your MIDI driver setup, press the [MIDI] toolbar icon and select the menu item MIDI/Audio Drivers Setup. This will open the MIDI/Audio Drivers Setup dialog. You can also go to Options | MIDI/Audio Driver Setup to open this dialog. |
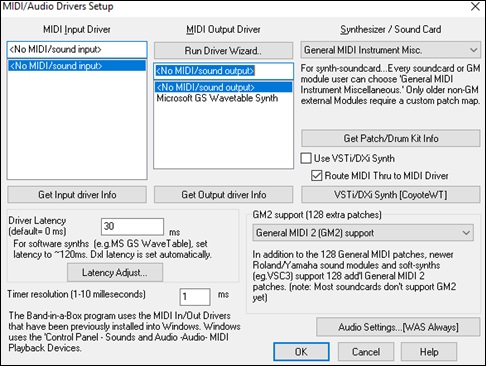
Select a MIDI Output Driver to use for MIDI sound playback and optionally a MIDI Input Driver if you are using an external MIDI controller keyboard or guitar. If the setup is panned to mono, the program offers to change it to stereo.
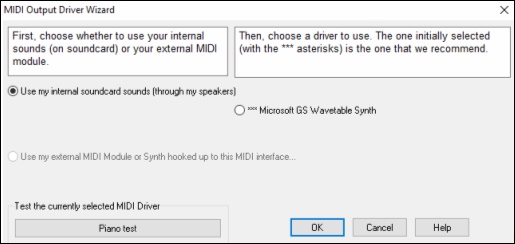
Perhaps the easiest way to configure Band-in-a-Box is to press the [Run Driver Wizard] button in the MIDI/Audio Drivers Setup dialog.
The MIDI Output Driver Wizard dialog will take you step-by-step through the process of auditioning and selecting an appropriate driver. This assumes that the appropriate Windows® sound drivers are installed and correctly configured.
Output to Software Synthesizers (DXi and VSTi)
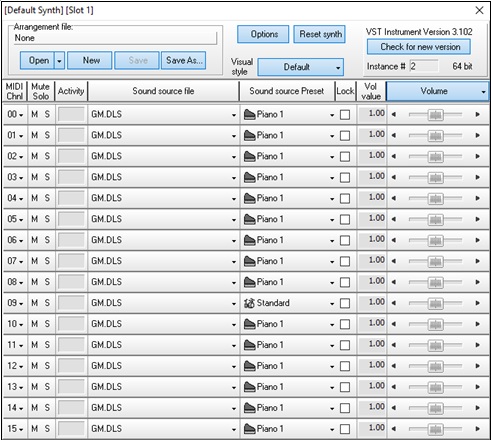
Software synthesizers allow Band-in-a-Box to play high quality sounds directly through your computer sound card, without requiring any external MIDI hardware. Most new software synthesizers are released as “plug-ins,” so they will work in a standard way with many programs. Connecting Band-in-a-Box to the software synth as a plug-in provides several advantages over the previous method of connecting as a MIDI driver. The plug-in allows Band-in-a-Box to merge/sync in any existing audio file (vocals etc.) with the synth output. You can also directly render your performance to a .WAV file using the plug-in. Sampler-based synths allow you to assemble a huge, customized library of instrument samples to use with Band-in-a-Box.
Check the Use VST/DXi Synth checkbox to enable DXi playback. While using DXi or VSTi, all playback information is routed to the DXi/VSTi, including the option to route the Thru track from your MIDI keyboard to the DXi/VSTi synth.
![]()
![]() The current VSTi or DXi synth name is displayed in the [VSTi/DXi Synth] button. You can change the synth by pressing this button and selecting a synth from the list.
The current VSTi or DXi synth name is displayed in the [VSTi/DXi Synth] button. You can change the synth by pressing this button and selecting a synth from the list.
Support for 64-bit VST Plugins using jBridge
You can use your 64-bit VST plugins and VSTi instruments with Band-in-a-Box, using jBridge. Since Band-in-a-Box has built-in support for jBridge, you just use your plugins as you normally would, by selecting 32- or 64-bit plugins within Band-in-a-Box. (Note: jBridge is a third-party product.)
To use 64-bit plugins with Band-in-a-Box, you:
- Get and install jBridge,
- Select and use your 64- or 32-bit plugins within Band-in-a-Box, without any further setup or configuration!
VSTSynthFont64
The 64-bit version of Band-in-a-Box allows you to use the VSTSynthFont64 as the General MIDI (GM) synth.
![]() To use it, press the [VSTi/DXi Synth] button in the MIDI/Audio Drivers Setup dialog.
To use it, press the [VSTi/DXi Synth] button in the MIDI/Audio Drivers Setup dialog.
Then, in the VST/DX Synths/Plugin window choose the "VSTSynthFont64" from the list of available plugins.
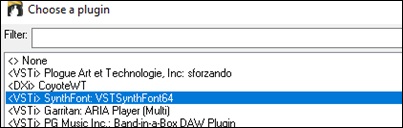
Note: If VSTSynthFont64 is not listed, close the dialog and go to the Mixer. Then click on a plugin in the Plugins tab and select Plugins Settings from the menu. When the Plugins Options dialog opens, press the [Add Plugins] button, select + Scan for VSTPlugins in a Specific Directory from the menu, and select C:\bb\Data\Libx64.
![]() When the VSTSynthFont64ynth is selected, its name will show in the [VSTi/DXi Synth] button in the MIDI/Audio Drivers Setup dialog.
When the VSTSynthFont64ynth is selected, its name will show in the [VSTi/DXi Synth] button in the MIDI/Audio Drivers Setup dialog.
Driver Latency
Software synthesizers have some inherent latency, which is the delay between the time a note is played and it is processed by the computer. Older soft synths had noticeable latency, whereas a VSTi/DXi synth using ASIO drivers has very little. This setting is used to synchronize the visual display (notation, chords, virtual piano etc.) with the sound you hear.
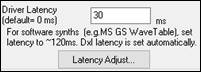
Band-in-a-Box automatically sets the latency for VSTi/DXi and some other soft synths
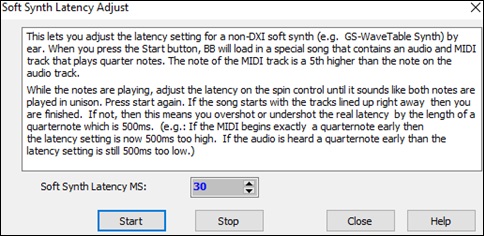
The [Latency Adjust…] button opens the Soft Synth Latency Adjust dialog where you can manually adjust the latency.
Alternate Patch Maps
You can choose the patch map (instrument list) that matches your synthesizer keyboard or sound module. Original equipment sound cards or integrated sound chips are General MIDI (GM) compatible.
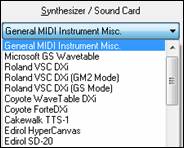
We have made preset drum/patch files for many synthesizers and sound cards. If your synth is not listed, you should use the General MIDI Instrument Misc. patch kit (default).
You can probably omit this step unless you are using an old synth that is not General MIDI compatible. If your non-GM synthesizer or sound card is not listed, you can easily make your own patch map with the [Patch Map] button in Options | Preferences.
General MIDI 2 (GM2) Support
General MIDI 2 patches are supported for 128 additional instruments. The type of GM2 support is set in this dialog.

The GM2 support choices are:
- General MIDI 2 support: If you’re using a newer Sound Canvas (i.e. newer than 1999, or newer than the Roland SC88), then choose this GM2 support.
- Roland GS (older Modules): “Older” Sound Canvases (SC55/SC88) support GS, but not GM2. The good news is that they have the same patches available, just at different locations. So, if you choose this option, Band-in-a-Box will find the patches at the “GS” locations instead of the “GM2” locations. If you have a newer GS module like the SC8820, it supports both GM2 and GS - you should likely choose GM2.
- No GM2 support: Some sound cards don’t have GM2 support but they do support the original 128 General MIDI sounds. Band-in-a-Box will use the closest instrument in these cases.
Audio Setup
The [Audio Settings] button in the MIDI/Audio Drivers Setup displays the current audio driver and status (WAS/MME/ASIO).
![]()
Band-in-a-Box performs the audio setup automatically using the installed system audio components. To restore or modify this setup, click on the [Prefs] button and then click on the [Audio] tab to launch the Audio Settings dialog.
![]()
![]()
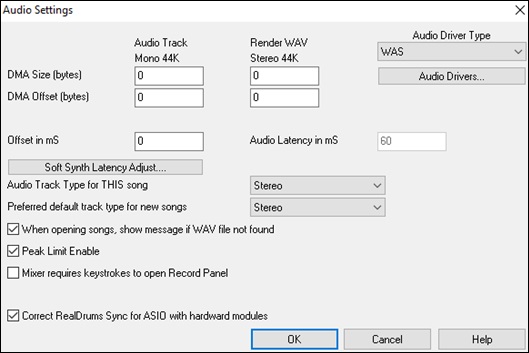
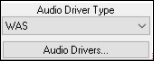
Audio Driver Type: You will see the following options for Audio Driver Type: MME, ASIO, or WAS. MME is the default audio driver type that is used in Windows®. MME is good, but there is latency (delay) associated with MME drivers. ASIO is a faster audio driver developed by Steinberg. It has much lower latency than ordinary MME drivers, but usually can be used by one program at a time. WAS (Windows® Audio Session) has ultra-low latency (< 25 ms on a typical Windows® PC), so audio operations like playing or sending out information via MIDI happen with no noticeable delay.
The DMA Size and DMA Offset settings are set automatically by the auto-testing of the sound card. The default value for all of these settings is 0 (zero). You can override these settings if required, but it is usually not necessary.
The Offset in mS is not a setting that gets set automatically. It defaults to zero. This allows you to adjust the timing that the sound card plays audio in relation to MIDI. Normally you’d leave this at zero, but if you need to fine tune the synchronization of audio to MIDI you could try changing this setting.
Audio Latency in mS: DirectX audio plug-ins and DXi synthesizer plug-ins can have playback latency (the delay between when a note is played, and when it is heard). Adjust “Audio Latency in mS” to fine-tune for your computer. If you have a fast computer and excellent sound card, the audio latency can be adjusted rather low. However, if you hear audio dropouts, you can set the latency as high as 2000 milliseconds.
Audio Track Type for THIS song: You can choose between mono and stereo for the audio track. Tracks can be edited in either format and converted from stereo to mono or vice versa. You can change a project from mono to stereo at any time. For example, if you have already recorded a mono track, changing the setting will convert the track to stereo for you.
Preferred default track type for new songs: This setting (mono/stereo) sets the default recording type for new songs that you record. For example, if you have a stereo microphone, you should likely record in stereo.
When opening songs, show message if WAV file not found: A Band-in-a-Box song called “My Song.MGU” will have the associated wave file called “My Song.wav.” If Band-in-a-Box loads this song file and it can’t find its associated file, it will put up a message to that effect. If the warning message is distracting, and for some reason you don’t have the wave files that were recorded with the songs then you can disable that message with this option box (disable).
Peak Limit Enable: Enable this to restrict excessive levels from being recorded (Filter).
Mixer requires keystrokes to open Record Panel : If you are running Windows® 95, check this box to allow access to the Record Panel from Band-in-a-Box. Do not check if using Windows® 98 or greater.
Correct RealDrums Sync for ASIO with hardware modules: Some systems have a sync problem when using RealDrums with hardware modules (zero latency). If this is set, the sync problem is fixed as the song starts to play (bar 1).
Windows® Audio Session (WAS)
Band-in-a-Box supports Windows® Audio Session (WAS) driver, an alternative to ASIO (a driver with low latency, but usually can be used by one program at a time) or MME (an older driver with worse latency). The WAS driver has ultra-low latency (< 25 ms on a typical Windows® PC), so audio operations like playing or sending out information via MIDI happen with no noticeable delay.
When you boot up Band-in-a-Box, it will be already set to use the WAS driver. If you want to change the settings, open the Windows Audio Devices dialog.
|
The dialog will open if you press the [Audio Drivers] button in the Audio Settings dialog when the “WAS” is selected for the audio driver type. |
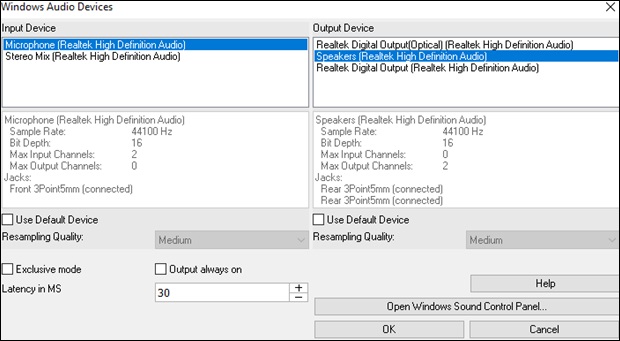
Input Device : This is the audio input device that will be used for recording a voice or an instrument. If you have multiple devices installed in your system, you can choose a device from the list.
Output Device : This is the audio output device that will be used for playing sound. If you have multiple devices installed in your system, you can choose a device from the list.
Use Default Device : If this option is enabled, the playback or recording device selected as the default device in your Windows® Sound Control Panel will be used.
Resampling Quality : You can choose a quality level for resampling. “Low” will improve performance if necessary, but “High” will sound best.
Exclusive mode : Use the exclusive mode if you want Band-in-a-Box to take full control over the audio device(s). In this mode, other applications might not be able to use the audio devices, so we recommend you do not use this mode.
Output always on : If this is enabled, sound will always be sent to the device. If this is disabled, sound will be sent to the device only when the song is playing. Enable this option if you want MIDI plugins to work when the song is not playing.
Latency in MS : This is the delay between when sound is sent from Band-in-a-Box and when you actually hear it by the audio device. Increase this setting if you are hearing sound glitches during playback.
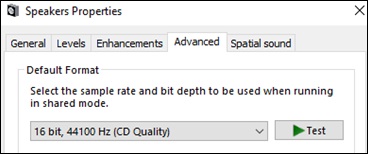
[Open Windows Sound Control Panel] : This button will open the Windows® Sound Control Panel. You can change your device settings by clicking on [Properties] > [Advanced]. For the “Default Format,” a setting of 44100 Hz is best for Band-in-a-Box.
ASIO Audio/Software Synth Drivers
ASIO drivers allows for much lower latency than ordinary MME drivers do.
This ASIO Audio Drivers dialog lets you choose an ASIO driver.
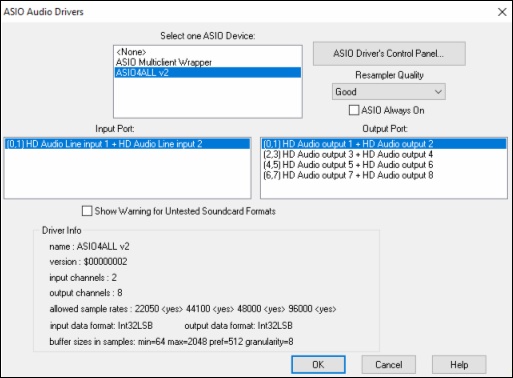
The Select one ASIO Driver list box lets you select an ASIO driver to use. You can only select one ASIO driver at a time.
Once you have selected an ASIO driver, you will see the Input Port and Output Port list boxes filled with your driver’s input and output ports. By default, the first of each will be selected. You are allowed to select different ports (but only one input and one output port at a time can be selected). The ports you selected will be available for output within Band-in-a-Box. If you do not hear input or output, then you may need to try different ports than the defaults. You may need to read your sound card’s instructions to determine the correct ports to use.
The [ASIO Driver’s Control Panel] button launches the Control Panel for your driver. This usually lets you adjust the latency by letting you choose different buffer sizes in milliseconds. Some drivers might let you choose the buffer size in samples, which is less convenient than milliseconds. The smaller the buffer size, the lower the latency, and the faster the response. Smaller buffers require more CPU power and if you hear dropouts or artifacts, you may need to increase the buffer size. See the Understanding Latency section that follows.
Since many ASIO drivers do not support multiple sample rates, Band-in-a-Box has a built-in resampler which lets you play and record songs that have a different sampling rate than the rate(s) directly supported by your ASIO driver. For example, if the driver does not support 44.1K sampling rate, but supports 48K, then Band-in-a-Box will use the resampler to convert to 48K when playing back, and to convert FROM 48K when recording. The Resampler Quality combo lets you choose Fast, Good, Better, or Best. Fast is the quickest but is the lowest of the four levels of quality. Best is the slowest (uses more CPU time), but the most transparent and accurate quality.
The [ASIO Driver’s Control Panel] button launches a settings dialog specifically provided by your driver manufacturer. This usually lets you adjust the latency, and usually you will have a choice between buffer sizes in milliseconds. See the following section on Understanding Latency.
Show Warning for Untested Soundcard Formats is an optional setting that shows a warning if your ASIO driver format has not been tested in Band-in-a-Box. It does not necessarily mean your driver will not work.
The Driver Info field shows various characteristics of your driver.
The Name is the driver’s name.
The Version is the version number of your driver.
Input Channels is the total number of mono input channels that your sound card has.
Output Channels is the total number of mono output channels that your sound card has.
The Allowed Sample Rates field shows the sample rates are allowed by your sound card’s ASIO driver. Band-in-a-Box has a built-in resampler which lets you play and record files that aren’t directly supported by your ASIO driver.
The Buffer Sizes In Samples shows the range of allowed buffer sizes. The “Pref” is the preferred size, and this is the size that Band-in-a-Box uses. Your driver may alter the preferred size if you’ve launched the ASIO Driver Control Panel and have selected a new buffer size from within the driver’s Control Panel. If your driver changes the preferred size, then Band-in-a-Box will be aware of the new preferred size.
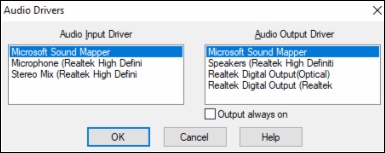
MME Audio Drivers
.MME is the default audio driver type that is used in Windows®. MME is good, but there is latency (delay) associated with MME drivers.
Choose MME as the “Audio Driver Type” and click on the [Audio Drivers] button to select which audio driver to use. This launches the Audio Drivers dialog.
|
The “Output always on” option allows you to use VST or Canyon GM DXi at all times, so MIDI can be routed and heard using these Plugins when the program is stopped. |
Understanding Latency
Latency is based on the buffer sizes. The smaller the buffer sizes the lower the latency. Lower latency allows you to hear mixer volume changes very quickly, as well as hear MIDI thru echoed out via a DXi soft synth practically in real time. The latency, in MS is determined by the buffer size in samples, as well as the driver’s sampling rate.
Converting Samples to MS
For example, suppose the driver’s sample rate is 48K. A 48K sampling rate means that it is playing at 48,000 samples per second. If the buffer size were 48000 samples, then the latency would be 1 second, or 1000ms (which is very large and slow, and usually not allowed in ASIO). If the buffer size were 4800 samples, which is 1/10 second, then the latency would be 100ms. If the buffer size were 2400 samples, which is 1/20 second, the latency would be 50 ms. If the buffer size were 240 samples, which is 1/200 second, the latency would be a mere 5ms which is incredibly low and very fast.
Normally, you can change your driver’s latency by pressing the Launch ASIO Driver’s Control Panel button. Normally, the driver specifies the buffer sizes in milliseconds which is equal to the latency.
Low latency is faster and more responsive but uses more CPU power.
Depending on the speed of your computer, you may find that the playback has dropouts, clicks/pops, or other artifacts if you set the buffer sizes too small. This is because smaller buffers use more CPU power and if your computer can’t handle the low latency you will hear artifacts. If this happens, you would need to use larger buffer sizes. You may need to experiment to find what works well. You may be able to use smaller buffers with songs that don’t have a lot of tracks and effects but may find that you need to use larger buffers with songs that have more tracks and use more effects. This is because more tracks and more effects use more CPU power, which leaves less CPU power available for the audio routines to keep up with lower latencies.
Sample Rate Detection Warning
Windows 7 has a peculiar issue where if you choose Windows® Start button - Control Panel - “Sound,” right-click on your output device, choose “Properties” and then “Advanced,” you can see the default format. It should be 44100 Hz. Unfortunately, some apps change this setting without your knowledge. When it is set like this, all of your audio gets “resampled” and this can create obvious audible artifacts and make some things sound “bad.”
Band-in-a-Box detects this setting when you exit the MIDI/Audio Drivers Setup dialog, and will give you a notification about it, and that’s a clue for you to visit this dialog and set it back to 44100 Hz.
Unconditional 30-Day Money Back Guarantee on all PG Music products purchased from PG Music Inc.
PG Music Inc.
29 Cadillac Ave Victoria BC Canada V8Z 1T3
Sales: 800-268-6272, 250-475-2874,+ 800-4746-8742*
* Outside USA & Canada where International Freephone service is available.
Access Codes
Tech Support: Live Chat, support@pgmusic.com
 Online now
Need Help?
Customer Sales & Support
|
Phones (Pacific Time) 1-800-268-6272 1-250-475-2874 |
||
| Live Chat | ||
| OPEN | Online Ordering 24/7 |
|
| OPEN | Forums, email, web support |