
Search Manual
Band-in-a-Box® 2021 for Windows® User's Guide
Chapter 13: Tools, Utilities, and Apps
Download Manager
The Download Manager automatically downloads and installs all of the Band-in-a-Box content (mainly RealTracks files) in background. It is located in the C:\bb\Data\DownloadManager folder and can be launched from inside the program by selecting the Help | Utilities | Run Download/Install Manager now menu command.
You will first see a message that asks you where you want to store the downloaded installer files. Choose the location and press OK. If you get a User Account Control prompt, answer Yes to allow DownloadManager.EXE to make changes to your computer.
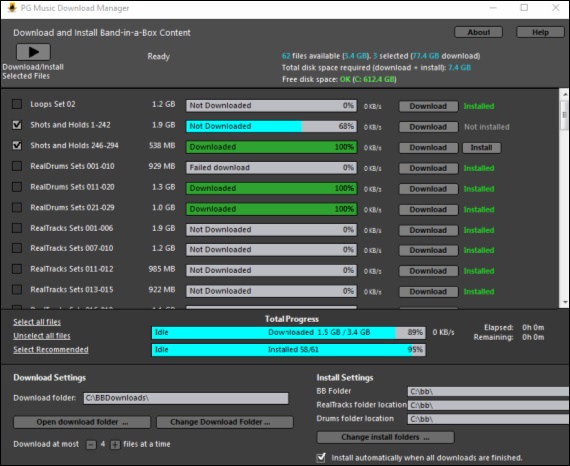
You will then see the PG Music Download Manager window. It will show you a list of files available for download based on the package that you own (e.g. Pro, MegaPAK, PlusPAK). It determines what files need to be downloaded to complete your installation and selects those files for download.
Download Settings
Before you start the download, check your download folder location where the installers will be downloaded to. If you want to change the location, click on the [Change Download Folders] button.
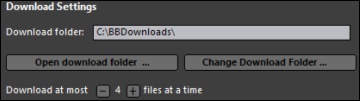
The “Download at most X files at a time” setting allows you to choose the number of files to download simultaneously. Default is 4. Increasing this number will usually reduce the total download time if you have a reliable internet connection but will degrade internet performance for other programs.
Install Settings
You should also check the folder locations. If you are installing an upgrade, the locations should match your existing installation.
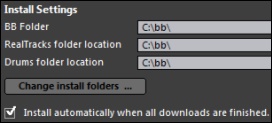
There are three install locations, since you are allowed to have the larger RealTracks and Drums audio content in a different location than the rest of the Band-in-a-Box files. The default Band-in-a-Box folder is C:\bb. Typically, RealTracks and Drums folder locations are also C:\bb. If you want to change these locations, click on the [Change install folders] button.
If “Install automatically when all downloads are finished” is checked, the files will be automatically installed when they are downloaded.
Download/Install
 |
You can start the download by pressing the [Download/Install Selected Files] button. The Download Manager will then begin downloading all the selected files in sequence, and also installing them if you have the “Install automatically” option checked. |
Once the download starts, you will see the status in the progress bar and the estimated elapsed/remaining time in the install status indicator.
![]()
Downloads can be paused at any time and continued later. To pause individual download, click on the small pause button to the right, and to pause all downloads, click on the large pause button at top-left of the window.
![]() If you close the program while it’s doing work, it will minimize to your system tray and continue running in the background.
If you close the program while it’s doing work, it will minimize to your system tray and continue running in the background.
![]()
When all selected files have been downloaded and installed, you can check the status of each file download. They should all say “Downloaded 100%” in the progress bar, and “Installed” in the install status indicator to the right. However, some might show a “Failed Download” or “Failed Install” if there was a problem with them. You can retry the files by using the small individual download buttons, or by selecting all problem files and pressing the big [Download/Install Selected Files] button again.
Find File
So many files, so little time? This feature is a “Swiss Army Knife” that allows you to find a Band-in-a-Box song (or any file that Band-in-a-Box can open), including filtering by words found in the file name or any text in the file. Go to File | Open Special | Find File to open this dialog.
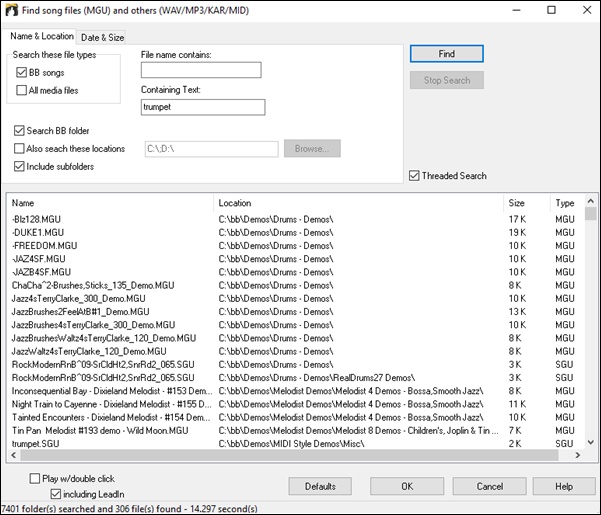
You can define your search by the name and location of the file, or by the date and size.
Name & Location
This includes filtering by words found in the file name or any text in the file. For example, you can
- get a listing of all Band-in-a-Box songs on your PC with the word “Blues” in the title.
- get a listing of all Band-in-a-Box songs in the BB folder with the word “Reggae” in them.
Date & Size
Use this window to search in a particular range of dates or times. This can be useful if you have multiple versions of a file from different dates and sessions.
The listing stays between sessions, so you can then take your time to explore all the songs that Band-in-a-Box offers that match your find term.
DAW Plug-In Mode
Band-in-a-Box has a “plug-in” mode for your favorite sequencer (RealBand, Sonar, Reaper, Pro Tools, FL-Studio, Nuendo and more). With the plug-in mode, Band-in-a-Box is open as a small always-on-top window, and acts as a plug-in for your favorite DAW/sequencer, so that you can drag-and-drop MIDI and audio (WAV) tracks from Band-in-a-Box to your favorite sequencer. Work in your favorite sequencer, type a progression in Band-in-a-Box, and then simply drag the track from Band-in-a-Box to your sequencer’s track at the desired track and bar location.
The DAW Plug-in mode is a mode within the regular Band-in-a-Box program. This mode allows you to transfer tracks, or parts of tracks, to other DAW Sequencers easily, by simply dragging the track icons from Band-in-a-Box (BB) to the tracks window of your DAW.
For the Drag and Drop to work, you need to have your MIDI driver set to use a DXi or VSTi synth (like Coyote WaveTable DXi).
![]() You can enter and exit the plug-in mode easily by pressing the small [DAW] button on the main toolbar.
You can enter and exit the plug-in mode easily by pressing the small [DAW] button on the main toolbar.
When you select the DAW mode…
- The window size of Band-in-a-Box changes to a small size (you can resize it to the size/position that you want, and it will remember that).
- Band-in-a-Box becomes an always-on-top window, if the option is set in the Plugin settings dialog.
Drag and Drop Tracks
|
This is the Drop Station where you drag a track radio button at the top of the screen or a track label from the Mixer and drop it to get an audio or MIDI version of the track. It shows six different file types: audio files (WAV/WMA/M4A/MWAL/MP3) or MIDI file (MID). |
The Drop Station makes it faster and easier to make different file types. It also allows you to make MIDI versions of the RealTracks (RealCharts), by simply dragging a RealTrack to the “MIDI” area of the Drop Station.
![]() If you want the entire performance dragged to the DAW, drag the Master button to the Drop Station. By default, a single file is dropped with the entire arrangement. But if you want all tracks transferred as separate files, uncheck the “Drag Master as separate tracks” option in the Plug-in Setting dialog.
If you want the entire performance dragged to the DAW, drag the Master button to the Drop Station. By default, a single file is dropped with the entire arrangement. But if you want all tracks transferred as separate files, uncheck the “Drag Master as separate tracks” option in the Plug-in Setting dialog.
![]() If you want a single track transferred, drag that track name. For example, drag the Bass icon to transfer the bass track. If the track is a RealTrack with RealCharts, you can drop it to the “MIDI” area.
If you want a single track transferred, drag that track name. For example, drag the Bass icon to transfer the bass track. If the track is a RealTrack with RealCharts, you can drop it to the “MIDI” area.
![]() If you want to transfer only a portion of the performance, you can do this by selecting the region in Band-in-a-Box, and then dragging the track button to the Drop Station. (Don’t drag the selected region.)
If you want to transfer only a portion of the performance, you can do this by selecting the region in Band-in-a-Box, and then dragging the track button to the Drop Station. (Don’t drag the selected region.)
|
When you drop the track onto the Drop Station, you will see an orange color, indicating that the track is accepted and the file is being prepared. |
|
When the file is ready, the Drop Station turns green. You can now drag it to your favorite DAW (Sonar, Pro Tools etc.) or Windows® Explorer. |
|
When you drop the track to the [+], you are presented with a dialog, where you can choose a file format and other render options. |
|
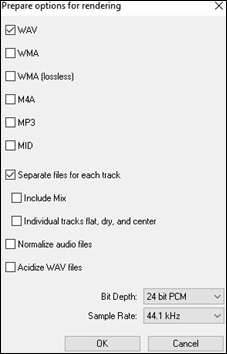
You can choose a format (WAV, WMA, WMA lossless, M4A, MP3, or MID) of the file. When you have dragged the Master radio button, you can select the Separate files for each track option. Check the Include Mix option to render a mix of all tracks to a separate file.. If the Individual tracks flat, dry, and center option is enabled, each track will render ignoring its Mixer settings (Volume, Pan, Reverb, and Tone), and the default settings will be used instead. The default settings are Volume=0 db, Pan = 0, Reverb= 0, Tone = 0). If this option is disabled and there is no lead-in in the Melody track, the lead-in will be skipped in the rendered file. If Normalize audio files is selected, the file will be normalized. Normalizing boosts the volume to a maximum level without distortion. Most professional music tracks are normalized. If you want to add ACID information (tempo, key, and time signature) to the WAV file, check the Acidize WAV files option. The dialog also has settings for Bit Depth (16, 24, 32 bit) and Sample Rate (44.1, 48, 96 kHz). |
Plug-In Settings
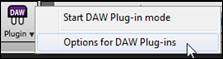
To get to the DAW Plugin settings dialog, press the [Plugin] button and choose the menu item Options for DAW Plug-in.
Alternatively, go to the Preferences dialog and click on the [DAW Plugin] tab. |
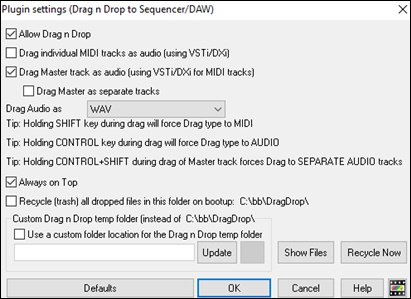
You will then see the plug-in options.
Allow Drag n Drop (default=true)
If this is disabled, the Drag Drop feature will not work. There shouldn’t be a reason to disable this.
Drag Individual MIDI tracks as audio (using VST/DXi) (default=false)
This option applies when you drag a track directly to a DAW. When it's enabled, the chosen MIDI tracks get converted to audio, using your currently selected VST/DXi (e.g. Coyote WT or Forte).
Drag Master track as audio (using VST/DXi for MIDI tracks) (default=true)
This option applies when you drag a Master track directly to a DAW. When enabled, each track will get converted to audio using your currently selected VST/DXi (e.g. Coyote WT or Forte). If not selected, the MIDI tracks in the arrangement get transferred as MIDI, in a single file.
Drag Master as separate tracks (default=false)
If this is enabled, when dragging the Master radio button, the drop will result in multiple files, one for each track.
Drag Audio as
You can select a type of audio files to create..
Always on Top
If this option is enabled, the Plug-in window will be always-on-top. Note that if you change this in the dialog, it won’t take effect until you exit the dialog.
Recycle (trash) all dropped files in this folder on bootup (default=false)
If you enable this option, the DragDrop folder (C:\bb\DragDrop) will get erased on bootup. Many DAWs require the files to remain permanently, so do not enable this option unless you are sure that your DAW does not require the files to remain.
You can use a Custom Drag n Drop Folder for the temp files if you prefer, inside your DAW’s folder for example. Then the dragged files will also be in Explorer in a folder near your DAW’s audio project.
CoyoteWT
The Coyote Wavetable DXi synth is included with Band-in-a-Box. This works with Band-in-a-Box and other DXi compatible host programs to produce realistic instrument sounds and is compatible with all the latest Windows® operating systems, including the 64-bit version of Windows® 7, 8, or 10.
The CoyoteWT can be installed automatically when you install Band-in-a-Box, or you can install it at a later date by running the file SetupCoyoteWT.exe from theC:\bb\Data\Installers folder.
Selecting the CoyoteWT
|
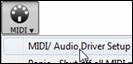
To use the Coyote Wavetable as your driver, press the [MIDI] toolbar button and select MIDI/Audio Driver Setup from the dropdown menu. This will open the MIDI/Audio Drivers Setup dialog. |
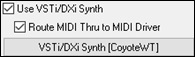
|
Enable the Use VST/DXi Synth option and press the [VSTi/DXi Synth] button. |
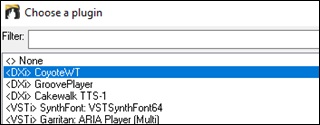
Then select the <DXi> CoyoteWT from the list.
Coyote WT Overview
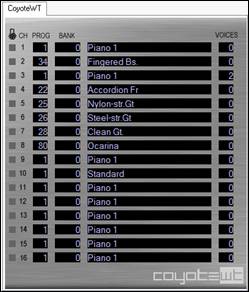
|
The main display panel lists the sixteen available MIDI channels down the left side with the program, bank number, and name of each instrument patch assignment. During playback the number of voices (notes) being used by each instrument is displayed. |
What does CoyoteWT do?
CoyoteWT (WaveTable) works in conjunction with Band-in-a-Box or other DXi-compatible host programs, to produce realistic audio output. It plays “samples” of actual instruments in response to commands from the DXi host. For instance, when Band-in-a-Box says to play a loud middle C using an acoustic steel-string guitar, CoyoteWT looks up that note of that instrument in its sample-bank database and then outputs that note to the sound card, at the requested volume, for the requested duration.
System Requirements
Generating a realistic emulation of dozens of instruments at a time requires a fairly powerful computer. The following requirements should be considered as absolute minimums:
- Pentium III CPU at 500 MHz.
- 128 MB RAM.
- 20 GB disk, 7200 rpm.
- a 16-bit sound card.
- Windows® 2000, XP, Vista, 7, 8, 8.1, or 10.
For best performance, the following specifications are recommended:
- Pentium-4 or Athlon XP CPU at 1.7 GHz.
- 256 MB RAM.
- 40 GB disk, 7200 rpm, 30 MB/s read rate.
- a 20-bit or 24-bit sound card.
- Windows® 2000, XP, Vista, 7, 8, 8.1, or 10.
Coyote Settings
Program settings for the CoyoteWT are made in its context menu.
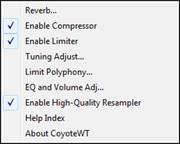 |
The context menu can be accessed by right-clicking on the CoyoteWT property page (that is, its main display). |
Reverb: Clicking on this menu item brings up a dialog in which you can control the reverb parameters. The available controls are:
- Room Size: select one of:
- Club (the smallest simulated room)
- Stage
- Hall (the largest simulated room)
- Damping: Setting the slider to the leftmost position simulates a room with hard, reflective walls. Setting the slider to the rightmost position simulates a room with absorbent walls. The effects of this control are fairly subtle.
Click on OK to apply the changes.
Enable Compressor:
Clicking on this menu item turns the compressor on or off. When it is on you will see a check mark beside the menu item.
When the compressor is enabled, the overall dynamic range will be slightly compressed (mostly by boosting the quieter signals), and the sound will have a little more “presence.”
Enable Limiter:
Clicking on this menu item turns the limiter on or off. When it is on you will see a check mark beside the menu item.
When the limiter is enabled, the overall volume level is increased, and in order to keep momentary peaks from clipping or distorting, CoyoteWT briefly reduces the volume just before the peak occurs and then increases it again after the peak is over. The volume changes are performed smoothly and are usually inaudible. The increased volume is desirable because it increases the overall signal-to-noise ratio.
Tuning Adjust:
Clicking on this menu item brings up a dialog in which you can enter an adjustment to be applied to all samples in the sample-set. The adjustment is specified in terms of cents, where one cent is 1/100 of a semitone.
Limit Polyphony:
Clicking on this menu item brings up a dialog in which you can specify the maximum polyphony (number of simultaneous notes that can be played). If your CPU is not powerful enough to handle 100 notes at once (some are not) you may be able to reduce audio clicks by choosing a number lower than 100. This is usually preferable to the artifacts produced when you run out of CPU power.
EQ:
Clicking on this brings up a dialog in which you can specify the amount of boost or cut to be applied to the low or high frequencies. You can use this to compensate for the frequency response of your speakers, your sample file, or just to accommodate your preference.
The bass (low frequencies) and treble (high frequencies) can each be boosted or cut by up to 12 dB. Positive numbers produce a boost; negative numbers produce a cut.
You can also specify an overall volume adjustment. The allowable range is limited to plus or minus 3 dB.
Enable High-Quality Resampler:
CoyoteWT modifies the pitch of a note by resampling. Normally you should leave the default, high-quality, enabled. However, if you are using a slow PC (say, 500 MHz or less) you may get better results by disabling high-quality mode.
Audio Chord Wizard (Stand-alone)
This amazing wizard automatically figures out the chords from an audio file (MP3/MP4/WAV/WMA) and displays them in Band-in-a-Box. Just load an audio file and you will instantly see the chords.
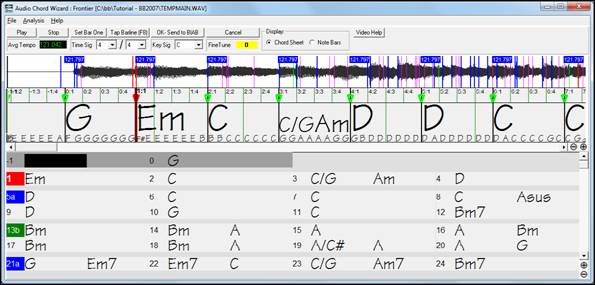
Chord Sheet Overview
There’s a Chord Sheet window in the Audio Chord Wizard that shows the chords for the whole song on a single screen. This allows you to click on a bar on the Chord Sheet to jump to that area of the song.
You can mark sections of the song using part markers, and the sections will begin on a new line with a line space between so they are clearly seen. So, you can then also learn the form of the song, as you can see the various sections (intro/verse/chorus/break) at a glance, or quickly jump to the any section simply by double-clicking on that part of the Chord Sheet.
For this discussion, open C:\bb\Documentation\Tutorials\Tutorial - BB2007\Frontier.MP3. You will now see the song, and the Chord Sheet window in the Audio Chord Wizard is visible.
Play the song.
![]() When a new bar starts, hit the Enter key (or F8). This is called “tapping in a bar line.”
When a new bar starts, hit the Enter key (or F8). This is called “tapping in a bar line.”
The first time you do that, the program will consider that point to be “bar 1.” Tap in a few more bar lines.
Click on the Chord Sheet, and the music will jump to that location.
Now, let’s define some sections in the song.
If a bar begins a new section, click on the bar # on the Chord Sheet, or press the P key to put in a part marker. Pressing P again will change the part marker, and then turn it off.
Now the song is divided into sections, with space between each section, and each section starting on a new line.
If we want to renumber the bars, right-click on the waveform timeline at the place that you would like to be bar 1, and choose “Set Bar One.”
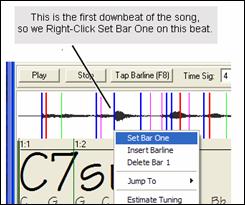
To change the # of bars per row, or rows per screen, right-click on the Chord Sheet.
|
The +/- buttons at the bottom right of the window also change the row height. |
|
Chords may be edited in the Audio Chord Wizard with a right mouse click on the chord. When Edit Chord is selected, a highlight cell opens at the chord location. Type in the name of the new chord using standard Band-in-a-Box chord entry characters and press the Enter key to make the edit. |
![]() The edited chord name is blue in color.
The edited chord name is blue in color.
Individual edits can be removed with the Remove Chord Edit command, or all edits in the song can be removed with the Remove All Chord Edits command. Part markers, chord symbols, key signature, and tuning setting are saved in Band-in-a-Box and are passed back and forth to the Chord Wizard.
The Audio Chord Wizard is a great way to learn the chords of songs. You can add section markers and divide the song logically into sections, so it is also a great way to learn the “form” of the song, an essential part of learning popular songs.
As well as the chords of the song, the Audio Chord Wizard also figures out,
- the tempo of the file,
- bar lines throughout the song,
- fine tuning detection (e.g. 5 cents sharp from A440),
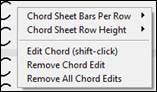
Audio Chord Wizard Window
Primary Program Controls
![]() Toggle Play/Pause (Space bar or Play/Pause key).
Toggle Play/Pause (Space bar or Play/Pause key).
![]() Stop play, rewind to start with Esc key.
Stop play, rewind to start with Esc key.
![]() Set the bar 1 location. F6 key also sets the bar 1. Audio Chord Wizard works best if you set the bar 1 location before any other actions. During playback, press this button at the beginning of bar 1.
Set the bar 1 location. F6 key also sets the bar 1. Audio Chord Wizard works best if you set the bar 1 location before any other actions. During playback, press this button at the beginning of bar 1.
![]() Moves nearest bar line to current play position. F8 or Enter key also sets bar lines.
Moves nearest bar line to current play position. F8 or Enter key also sets bar lines.
![]() Song time signature, 2/4 to 12/8 supported.
Song time signature, 2/4 to 12/8 supported.
![]() Average tempo, right-click for options.
Average tempo, right-click for options.
![]() Song key signature.
Song key signature.
![]() Use to correct pitch of song if necessary.
Use to correct pitch of song if necessary.
![]() Exit and send chords to Band-in-a-Box.
Exit and send chords to Band-in-a-Box.
![]() Exit without sending chords to Band-in-a-Box.
Exit without sending chords to Band-in-a-Box.
Chord Detection
Chord Detection accuracy depends on the accuracy of the bar lines. If bar lines are not well-aligned then the Chord Detection can be expected to be rather poor. It is quick and easy to align the bar lines on most songs, once you get the hang of it.
The first task is to locate the beginning of Bar One. Since an audio file could have an arbitrary amount of silence at the beginning of the song, and many songs begin with a pickup partial bar, ACW cannot easily guess the first bar without a hint from you.
The shortcut keys and mouse playback controls make it easy to find Bar One. Tap the space bar to begin play, watch the Location Cursor, and listen for the downbeat. If the Location Cursor passes the downbeat and you were not completely certain of the location, you can tap the W key to rewind to the song beginning and replay the first part of the song, to audition the downbeat as many times as necessary to make sure of its location.
You can also single-click in the Chords panel to jump the playback position. If the rhythm is unusually complicated near the downbeat, you could repeatedly click just a little before the suspected Bar One location, to zero-in on the exact downbeat.
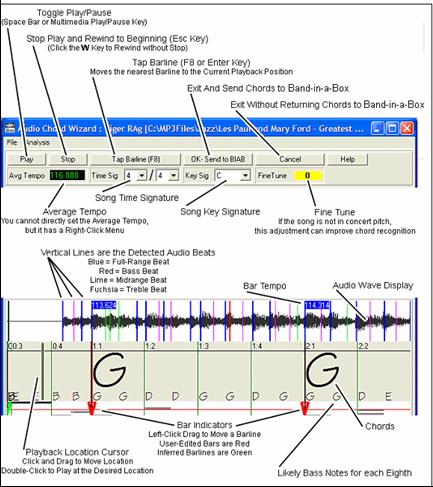
In the following example song, we have discovered the downbeat of Bar One, so we Right-click on that location to Set Bar One.
 |
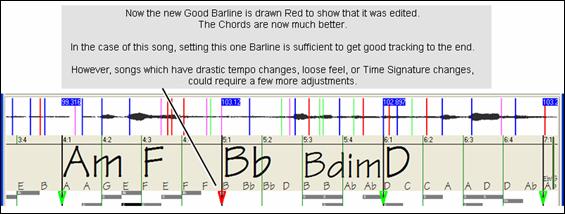
Now the Bar One bar line is red (shown below). The red Triangle bar indicator indicates that we have edited that bar line. The Red Triangles are called Good Bar Lines (GBL’s). The green Triangle bar indicators are bar lines which ACW has automatically inferred from its automatic tempo detection PLUS your edited Good Bar Lines. We call the green automatic bar lines Inferred Bar Lines (IBL’s). On this example song, the initial automatic tempo detection did a pretty good job. Simply setting Bar One has caused the first four bars to be properly aligned to the music. On some songs, Set Bar One is the only action necessary to get good bar alignment for the ENTIRE tune. |

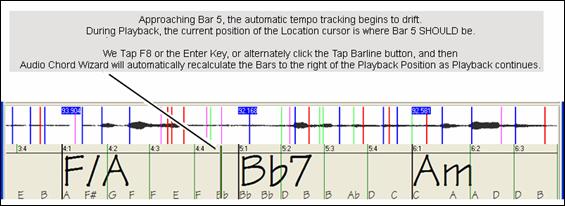
As playback continues in this example (below), we notice that ACW has made its first error approaching Bar 5. Audio Chord Wizard has estimated the tempo of Bar 4 too slow.
But that is easy to fix. If you prefer real-time control, just tap F8 or the Enter key where the downbeat should actually be.
If you prefer stopped-time editing, you can either mouse-drag Bar 5 to its desired position or drag the Playback Location Cursor to the desired position and then tap F8 or the Enter key.
When satisfied with the Bar lines and Chords, click the [OK] button to return the Chords and Tempo Map to Band-in-a-Box.
Keyboard Shortcuts
Keyboard shortcuts make it easier to navigate the song and tap in bar lines without having to work the mouse with start/stop/scroll actions.
Play/Pause - SPACE BAR, or Multimedia keyboard PLAY/PAUSE key or (certain keyboards) PLAY key
Stop - ESC key, or PAUSE key, or Multimedia keyboard STOP key
Tap Barline - F8, or ENTER key
Jump To Song Start - W key, or HOME key
Jump To Song End - END key
Jump Forward One Bar - RIGHT ARROW key
Jump Back One Bar - LEFT ARROW key
Jump Forward Four Bars - PAGE DOWN key, or DOWN ARROW key, or Multimedia keyboard NEXT TRACK key
Jump Back Four Bars - PAGE UP key, or UP ARROW key, or Multimedia keyboard PREVIOUS TRACK key
Special Cases
Time Signature:
If a song is not in the default 4/4 time signature, set the Time Signature very early before you do anything else.
Bad Initial Tempo Estimates
Double/Half Tempo:
Sometimes Audio Chord Wizard will guess double or half of the tempo you might prefer.
Slightly Wrong:
Sometimes syncopated songs can have musical anticipations which make ACW guess a tempo slightly too fast or slightly too slow.
Completely, Horribly Wrong:
Some songs have rhythms difficult for a computer to understand. Sometimes a song’s rhythmic beats are spaced in such a way that a song with a perfect Tempo of 120, might mathematically BETTER fit the audio beats at some simple (but wrong) related ratio such as 80, 100, 160, or 180 BPM.
If the initial Tempo Estimate is pretty good, the Tap Bar line function will be the easiest way to fix such errors, requiring only a few keyboard taps during playback.
But if the initial tempo estimate happens to be horribly wrong, it helps to make the initial tempo “in the ballpark” BEFORE you tap a few F8’s to make it completely right.
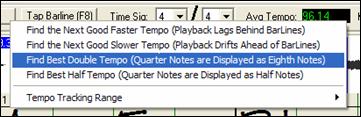
Right-click the Avg Tempo control for some easy automatic fixes.
Note: If you want to use the Avg Tempo Menu functions, use the menu very soon after you have opened a song, before you have done much bar editing. If you invoke the Avg Tempo Menu functions after you have laboriously edited a lot of bar lines, the automatic nature of these functions can ruin your previous editing.
In some cases, there is a good reason to initially set the tempo artificially slow by using the “Find Best Half Tempo” function.
For example, if the initial tempo estimate is considerably faster than the tempo that you want to tap in, the Tap Bar line function can mistakenly think that you want a very fast tempo, which fills the remainder of the song with unwanted fast-tempo bars. In that case, if you initially set the tempo very slow, ACW will be unlikely to misinterpret your Tap Bar Lines.
Set Key Signature
Once the chords look reasonable, for instance if your song looks like it is probably in the key of F, set the Key Signature control to F for better chord spelling. This only affects the cosmetic display of notes and chords (flats and sharps). The Key Signature control does not currently affect the basic accuracy of Chord Detection.
Adjust Fine-Tuning
If a song is significantly mis-tuned from concert pitch, the notes are “in the cracks,” which makes Chord Detection less accurate.
If your Chords look reasonable, there is no need to bother with Tuning. Most songs are recorded pretty close to Concert Pitch.
But if you see numerous Chord errors, it may help to adjust the Fine Tuning control.
If you are playing along with a song on your keyboard, you might decide to make an ear-estimate of how far out-of-tune is the song:
For instance, you could adjust the fine-tuning control on your keyboard until your keyboard matches the song’s pitch (according to your ear). Then you could look at your keyboard’s tuning readout and adjust ACW’s Fine Tune Control to match. Either click-drag ACW’s Fine Tune control (like a slider control), or right-click the Fine Tune control then type in a number.
The Fine Tune Control currently does not change the pitch of playback (though that would be an excellent future feature). Currently ACW’s Fine Tune control only improves Chord Detection on mis-tuned songs.
The Fine Tune control is calibrated in cents, 1/100th of a semitone. Therefore, if a song is perfectly in the key of C, but if you set Fine Tune to +100 Cents, ACW would display chords in the key of B. Similarly, if you set Fine Tune to -100 Cents, it would display that song’s chords in the key of C#.
That simple use of the Fine Tune control is just a backwards way to transpose the Chords. But if you set Fine-Tune somewhere in the middle, ACW looks for notes that are somewhere “in the cracks” between the piano keys. For instance, if your song SHOULD be in the key of C, but it was unfortunately recorded 50 Cents sharp.
There could be many reasons that a song was recorded off Concert Pitch. Maybe the recording studio had a broken tape recorder, or the singer couldn’t quite hit the highest note. Perhaps the vinyl record cutter was off-speed, or some Record Executive decided that the song was 10 seconds too long for airplay and instructed the Mastering Engineer to speed it up a little bit. In such cases ACW can get confused, mis-identifying some pitches too high and other pitches too low, detecting nonsense Chords.
So, if your favorite song was unfortunately recorded 50 Cents sharp, you can set the Fine-Tune control to +50 Cents so that ACW will properly display in the “original” key.
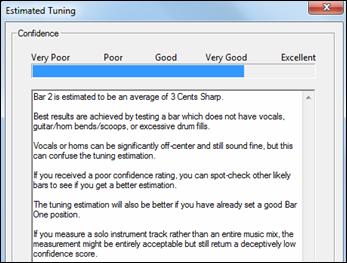
Auto Estimate Tuning
ACW can automatically estimate the tuning, which helps in some cases. Since the estimation is math-intensive, ACW only analyzes one bar of music at a time.
Right-click somewhere inside a bar and pick the Estimate Tuning function.
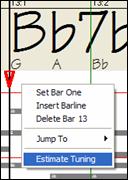 |
After the process is finished, up pops the results dialog. As advised in the dialog, results can be improved by carefully picking the bar. Bars with relatively long notes are easier to analyze, compared to bars containing flashy fast melodies. It can be useful to spot-check a few bars. If several spot-checks give similar answers (within a few cents), you have good confidence that the results are actually meaningful, not being randomly affected by out-of-tune melodies or loud drums. |
However, if the first estimate reads +43 and the next measurement reads -12, then it probably means that your song is not a good candidate for automatic Tuning Estimation.
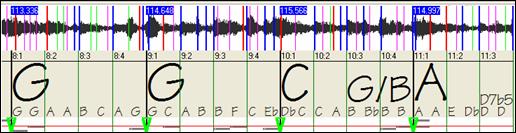
Odd Length Bars and Drastic Tempo Changes
If a 4/4 song contains occasional bars of 3/4, 5/4, or whatever, or if there are sections where the music has an extreme ritard or accelerando, sometimes you can just Tap Bar Lines to adjust it.
But it is sometimes more convenient to manually add or delete bar lines. The following example song has an overall Time Signature of 4/4, but Bar 9 should have a time signature of 2/4. If you simply Tap Bar Line on 9:3 to shorten the bar, then ACW will mistakenly decide that you wish to make all the following bar lines double-tempo 4/4.
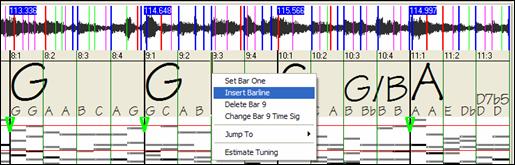
Solution
First, Right-Click on the beat 9:3, and Insert a bar line.
Now a new bar line is added, and three new GBL bar lines are flagged red.
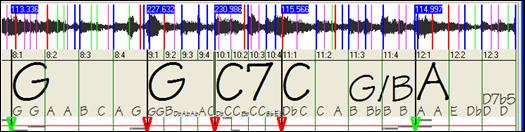
Right-Click on the new shortened Bar 9 and set the Time Signature to 2/4.


Change Bar 10 to its desired duration. Hover the mouse over the red triangle marker at Bar 11, and the mouse cursor becomes a drag cursor. Click and drag the bar line to the location marked 11:3

Now we have edited bar 9 to have its proper 2/4 Time Signature and preserved the song tempo on both sides of the 2/4 bar.
Notes Display
The Notes Display looks like a MIDI Piano Roll, but it is not exactly the same as a MIDI Piano Roll. Audio Chord wizard detects the strongest frequencies found in each eighth-note time slot and displays them in the Notes Display.
Sometimes the displayed frequencies REALLY ARE instrument notes played in the audio file. But they could be spurious information, such as the accidental loudest frequency of a drum beat. A midrange frequency note-bar might be showing the sum of harmonics from several instruments, each instrument’s harmonics contributing to the strength of that frequency.
The Notes Display information is real and useful but try not to assume that every displayed note-bar is a real note in the audio.
Audio Chord Wizard Utilities Dialog

The Audio Chord Wizard Utilities dialog can be launched at any time from the menu item (File | Open Special | Audio Chord Wizard Utilities, or Audio | Audio Chord Wizard Utilities).
It is also launched automatically after returning from the Audio Chord Wizard
![]()
Automatic detection of key signature based on the chords only. This is useful for a song from the Audio Chord Wizard, where you forgot to set the key signature or for any song without the key signature set.
If you agree with the analysis, you can accept the chord signature recommended for the song, by pressing the [Set the song key signature to--->] button.
Make a Tempo Map
After an audio song (MP3/WAV/WMA) has been loaded into the AudioChordWizard, there will be bar lines assigned automatically by ACW, and perhaps modified by you. If you would like Band-in-a-Box song file to follow these bar lines, so that the BB file will play in sync with the audio file, press the [Make a tempo map in BB] button.
![]()
You will then see red boxes on the BB Chord Sheet, indicating tempo changes and the presence of a tempo map.
Press the [Erase tempo map] to remove the tempo map, and the “red boxes” will disappear around the bar lines. (Note: You can always get the tempo map back, by pressing “Make a tempo map” at any time.)
The [Erase the Audio WAV file in BB] button erases erases the Audio track from Band-in-a-Box. If you have loaded in an MP3 file, the audio track isn’t the MP3 file, it is the WAV file copy that Band-in-a-Box has made of it. So, you wouldn’t be erasing your MP3 file! Note that you also have to SAVE the BB file to have the erasure be complete.
If you check the Enable style, you will hear the audio file as well as the Band-in-a-Box style. Otherwise, you can mute the Band-in-a-Box style by disabling it here.
You can revisit the Audio Chord Wizard by pressing the [Open Audio Chord Wizard] button (this can also be done from the Audio menu). Revisiting the AudioChordWizard is useful to refine the bar lines.
Tip: How to preserve chords if you revisit the Audio Chord Wizard
![]()
If you do revisit the Audio Chord Wizard and want to preserve the chords that you may have edited, first select all of the chords, choose Edit-Copy, and then, after the AudioChordWizard, choose Edit-Paste. Otherwise, the AudioChordWizard might re-interpret your chords!
Guitar/Bass Tuner
The Tuner is optimized for guitar and bass, though it may be useful with other instruments. Connect an electric guitar or bass to your computer’s sound card Line-In, or tune an acoustic instrument using a microphone connected to the sound card Mic input. Play a pitch and the tuner will auto-range to determine the nearest note and display the intonation of your instrument.
|
Press the on-screen [Tuner] button or select the Window | Guitar Tuner menu item to launch the Tuner Window. |
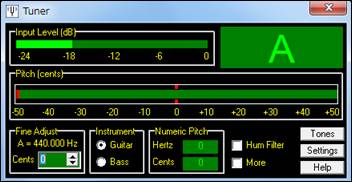
The Tuner must be able to receive audio from your instrument via the line-in or microphone input of your sound card. Please make sure that either the Microphone In or Line-In is enabled in the Recording Properties of the Windows® Mixer (or the appropriate Mixer application for your sound card).
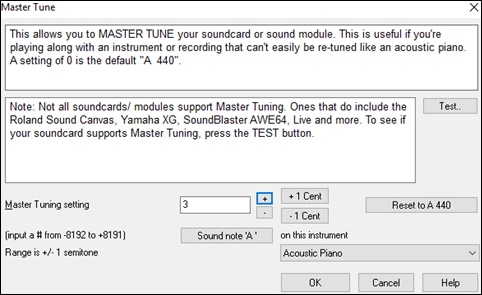
Master Tuning
This function allows you to tune your sound card or module to another instrument, as well as adding a testing function to see if your sound card supports Master Tuning. This is useful if you’re playing along with an instrument or recording that can’t easily be re-tuned like an acoustic piano. A setting of 0 is the default A = 440.
Select the Options | GM Settings, etc. | Master Tuning menu item to launch the Master Tune dialog.
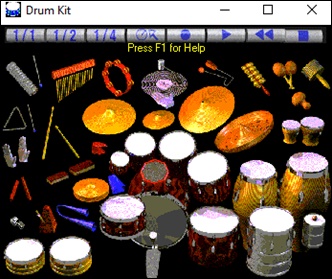
Dynamic 3D Drum Kit Window
This sizeable drum window is an animated 3D display of a complete MIDI drum kit with all 61drum sounds displayed on their respective instruments. Watch the drums being played or play-along/record by using QWERTY keys or a mouse.
To launch the Drums Window, click on the [Drums] button in the View Panel. |
- Watch the drums being played on the Drums window in real time.
- Play along with the drums in real time by mouse clicking on the drum instruments or using the QWERTY keys. The computer keyboard, the piano key number, and sound names can all (optionally) be made visible on the hint line by moving your mouse cursor over a given instrument.
- Record a drum part into Band-in-a-Box.
Drum Display
All the General MIDI percussion instruments are shown. Some percussion instruments are triggered by multiple MIDI notes. When a sound is controlled by more than one MIDI note, a percussion instrument will show different behavior in response to the different notes. For instance, the Hi-Hat responds differently to Close Hat, Pedal Hat, and Open Hat MIDI notes.
The Drum Kit window can be resized to tile or fit with other windows of interest, or the drums can be moved off-screen. The window looks best if your computer display is in High Color (16 bit) or True Color (32 bit) video mode.
The onscreen instruments may be played by mouse clicking or by pressing the appropriate computer keys. There is an option to display all the QWERTY names on the drums at the same time, so that you can see what keys to hit without having to mouse over the instrument. When playing by mouse click or computer keys, the Shift key can be used to switch the velocity between two user-specified levels (i.e. loud=100 and soft=50).
The drums that you play show up in green; the computer played drums are red.
The multi-note instruments send different MIDI notes to your sound source, depending on where you “click” on the instrument. For instance, the Kick Drum can send three different notes: Ac. Bass Drum (MIDI note 35), Bass Drum 1 (MIDI note 36), and Square Kick (MIDI Note 32).
Control Buttons
- Record: Puts Band-in-a-Box in Record mode so drums can be recorded.
- Play: Starts song playback.
- Rewind: Stop and return to song start.
- Stop: Stops song playback.
- Size Buttons 1/1 - 1/2 - 1/4: Clicking on these buttons changes the size of the drums window to full size, half size, or quarter-size. (You can also resize the drums window to any size by dragging a window border.)
- Settings: Adjusts program behavior. See settings window section below.
- Help: To launch the drum Help File, press F1.
Computer “QWERTY” Keys
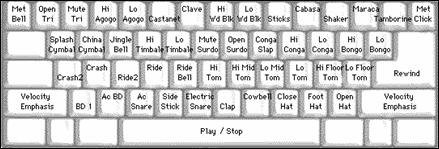
Numeric keypad
|
Press computer keys to play drums. |
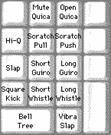
Multi - Note Instruments
Kick Drum - Ac. Bass Drum, Bass Drum 1, Square Kick
Snare - Acoustic Snare, Side Stick
Hi-Hat - Closed, Pedal, Open
Floor Tom - Low, High
Electronic Pad - Multi-zoned for Hi-Q, Slap, Electric Snare
High Conga - Mute, Open
Surdo - Mute, Open
Cuica - Mute, Open
Metronome - Bell, Click
Whistle - Long, Short
Triangle - Mute, Open
Guiro - Long, Short
Scratch - Push, Pull
Settings Dialog
Press the Settings button (to the left of Rewind button), to adjust the various Drum Kit Settings.
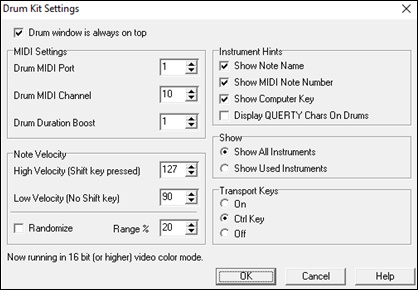
Drum window is always on top - Use this checkbox to keep the Drums window on top of other program windows.
Note Velocity - When playing drums with a mouse or computer keys, the shift key toggles between two levels of note velocity. The two velocity levels can be set any way desired. For instance, if you want the shift key to send quieter notes you can set the shift velocity lower than the non-shift velocity.
Randomize - Use this checkbox to enable the program to send random velocity levels when playing the drums. This is handy when using non- velocity sensitive devices. “Range” controls the amount of velocity randomization. Usually a small range works best, around 10% to 30%. For example, if velocity is set to 127, and the random range is set to 20%, notes would randomly vary between a maximum velocity of 127 and a minimum velocity of 102.
Instrument Hints - Customize the appearance of the Hint line.
- Show Note Name
- Show MIDI Note Number
- Show Computer Key
Show
- Show All Instruments” shows all instruments in the drum window.
- Show Used Instruments” displays the basic trap kit but does not display any extra instruments unless they are used in a song.
The drum window is cleared each time Play or Stop is pressed.
MIDI Monitor
MIDI Monitor displays a listing of data received from computer MIDI Input and/or Band-in-a-Box output, useful for educational or diagnostic purposes.
The MIDI Monitor opens with the [MIDI] button on the main screen toolbar, or with the menu command Window | MIDI Monitor. |
The MIDI Monitor has options for 1-based patch numbering and patch name display. Quick View Filter presets (such as “Notes Only,” “Controllers Only,” “Program Changes Only,” “Programs including Bank Changes”).
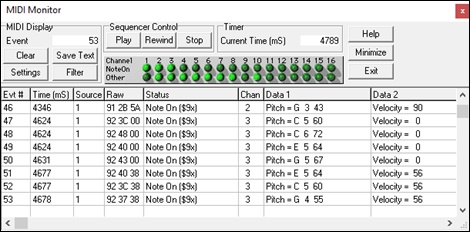
MIDI Monitor - Main Window
Event: The current event number since the display was last cleared.
Clear: Clears MIDI Display, Event counter, and Channel Activity panel.
Save Text: Save a tab-delimited text file of the data in the MIDI display. The file can be opened with a word processor or spreadsheet program, for printing or further study. Various Save Text options can be adjusted in the Settings window.
Settings: Open the Settings dialog, to adjust display behavior. The display can be modified to suit the task at hand.
Filter: Open the Filter dialog, where receive settings can be adjusted.
Sequencer Control: The [Play], [Rewind], and [Stop] buttons control song playback without the need to return to the main Band-in-a-Box screen.
Timer: A millisecond timer is useful for viewing timing relationships between messages. To use Band-in-a-Box to measure in milliseconds, set Band-in-a-Box PPQN to 480, and Band-in-a-Box tempo to 125 BPM. With this special resolution and tempo, tick values in the Event List window will correspond to milliseconds.
Current Time - The millisecond count since the timer was last started. Click anywhere in the Timer area to clear the Current time, setting it to zero.
Channel Activity Panel: This panel has an array of “LEDs” to show which channels are active.
MIDI Display Area: The MIDI Display area at the bottom of the main window, displays the data generated by Band-in-a-Box and/or data received at the computer MIDI input. Each row is a single MIDI event.
Evt #: Event number, starting from when the display was last cleared.
Time (mS): The time in milliseconds of the event, from when the timer was last cleared.
Source: Int means the event was generated by Band-in-a-Box, and Ext means the event was generated by an external MIDI Device attached to the computer MIDI In port.
Raw: The raw bytes representing each MIDI message. Most MIDI Message types contain three bytes, but some messages contain one or two bytes. SysEx messages can contain an arbitrary number of bytes. This field is blank in the case of SysEx messages. With SysEx messages, up to 16 “Raw” bytes are displayed in the Data fields. Long SysEx messages are displayed on multiple lines, 16 bytes per line.
Status: Text name of the Event type.
Chan: MIDI channel of the Event. This field is blank for System messages (values from $F0 to $FF). System messages do not have an associated channel.
Data 1: Text name for the meaning of the first data byte of the MIDI message. For some messages such as Pitch Bend or Song Position Pointer, the value of both bytes 1 and 2 are displayed in Data 1.
Data 2: Text name for the second data byte of a MIDI Message.
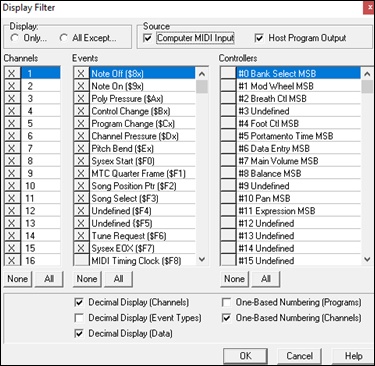
Display Filter
![]() The Display Filter dialog allows you to select what MIDI events will be recognized by the MIDI Monitor program.
The Display Filter dialog allows you to select what MIDI events will be recognized by the MIDI Monitor program.
Fretlight® support
![]()
The Fretlight® is a cool electric hardware guitar that has LED lights on the frets.
If you have a Fretlight, you can mirror the output of the Band-in-a-Box on-screen guitar to the Fretlight fretboard. You can just look at the Fretlight as you play along to any of the great guitar RealTracks or guitar Artist Performances as you hear the playing, and see the fret positions on your Fretlight guitar.
For the wired Fretlight Support to be enabled, you need to set “Fretlight Guitar Support” in the Guitar window.
![]()
![]()
![]()
Plug in the Fretlight, and Band-in-a-Box will find it. Then, any output that happens on the Band-in-a-Box Guitar Window will automatically get mirrored to the Fretlight so that you see the guitar played on your Fretlight. Now you can, using your Fretlight:
- See the Artist Performance Tracks played by Nashville Legend Brent Mason show up on your Fretlight guitar as you hear the tracks.
- Set the Guitar Tutor in Band-in-a-Box to play strumming chord shapes, which works for any song in Band-in-a-Box (choose your chord types jazz/pop/folk etc.)
- See RealTracks played on your Fretlight guitar, as you hear them played by the Masters in audio.
TranzPort® Support - Wireless Remote Control
|
The Frontier Design TranzPort® is a wireless remote control hardware unit (Electronic Musician Editors’ Choice 2006) that allows you to control Band-in-a-Box through walls from 30 feet away! |

The backlit LCD provides a two-line readout, and buttons and a wheel allow control of many Band-in-a-Box features. Select songs and play/stop/pause/loop. Select/mute/solo tracks and volume/tempo changes are all supported. And best of all, when the song is playing, the chords of the song are displayed in time on the backlit LCD screen.
You can, for example, put the TranzPort unit on your piano at home (or your music stand on a gig) and load/play/control and view chords for songs, all while far away from your computer – all wirelessly up to 30 feet – even through walls! Selectable transpose lets the TranzPort show chords in a non-concert key (e.g. Eb Alto) while the computer shows concert -great for jam sessions! Or display the scrolling lyrics of the song on the TranzPort for a wireless Karaoke session! The TranzPort also works “right-out-of-the-box” with other popular music software, including Sonar™, Logic®, and many others.
Using TranzPort with Band-in-a-Box
First, you need to purchase a TranzPort unit, and install it.
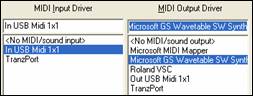
Now, make sure that the TranzPort is installed and working. You can determine that it is installed and working by running Band-in-a-Box and looking at the list of MIDI Drivers (Options | Audio/MIDI Driver Setup). If “TranzPort” appears on the list of MIDI-IN and MIDI-OUT drivers, then the TranzPort is installed correctly.
To start using the TranzPort
- While Band-in-a-Box is running, “wake up” the TranzPort by pressing a key on the TranzPort (STOP key for example).
- The TranzPort display will show
“Title of BB song” <tempo> <Current Track> <track volume> <patch #/name>
For example, the screen might say
- “My Tune”
- 120 Mel v 122 p1 Acoustic Piano
- Track < and Track> buttons change the current track Bass/Drums/Piano/Guitar/Strings/Melody/Soloist/Thru
Controlling Patches/Tempo/Volume
- The WHEEL changes the tempo.
- Shift-WHEEL changes the volume of the ALL TRACKS.
- [Prev] [WHEEL] changes the volume of the current track.
- [ADD] [WHEEL] changes the patch of the current track using Favorite Patches.
- [NEXT] [WHEEL] changes the patch of the current track, cycling through all patches.
- MUTE AND SOLO mutes or solos the current track.
- [SHIFT] MUTE, will mute/un-mute ALL tracks.
Loading Songs
- [IN] button opens the “Favorite Songs” dialog. The LCD screen of the TranzPort displays the current song, and the WHEEL cycles through the various songs. When you’ve found the song that you want, press PLAY to load and play the song (or “Solo” to function like the OK button in the Favorite Songs dialog, note if “Play song when chosen” is set or not in that dialog). Press UNDO to cancel the dialog.
- [OUT] button functions in a similar manner, except it uses the Song List dialog.
- [Shift]- [IN] loads the previous song in alphabetical order, by filename, in the same folder.
- [Shift]- [OUT loads the next song in alphabetical order, by filename, in the same folder.
Playing Songs
- PLAY button plays the song.
- [RED button beside play] pauses the song.
- STOP button stops the song.
- [<<] and [>>] buttons jump to the previous or next section of the song. You can define custom sections of the song (using the Conductor in Band-in-a-Box), but if you haven’t, the sections default to lead-in, intro, first chorus, middle chorus, last chorus, ending.
- LOOP button will loop the current section
- SHIFT LOOP button loops 4 bars
- UNDO is panic button (turn MIDI notes off)
Playback Display
During playback, you will see the chords (and/or lyrics) to the song, scrolling along in time to the music. For example, you might see this…
*5| D | D7 |
7| G | Gm
The * marks the current bar (bar 5), which is a D chord. The screen always scrolls to show you 2 bars ahead of the current time.
TranzPort Dialog
![]()
![]() There is a TranzPort Settings dialog inside Band-in-a-Box with additional settings.
There is a TranzPort Settings dialog inside Band-in-a-Box with additional settings.
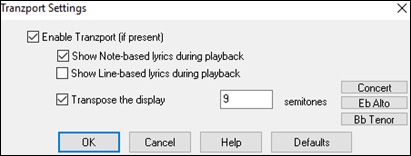
Enable TranzPort support for Band-in-a-Box in the Tranzport Settings dialog.
If you want lyrics to display on the TranzPort during playback, set these options.
Players of non-concert pitched instruments can use “Transpose the display.” For example, an Alto sax player would press the “Eb Alto” button, and then the TranzPort display would show chords transposed to his key.
BB Remote
Remote control for desktop Band-in-a-Box for Windows®
BB Remote is an app for your iPhone. It is used as a remote control to control your existing desktop version of Band-in-a-Box 2011.5 or higher. The sounds will come out of the desktop program, not the iPhone. You must have the desktop version of Band-in-a-Box 2011.5 to use the program at all.
If you use Band-in-a-Box for Windows®>, you may want to be somewhere else other than sitting at your PC as you play songs. For example, you might want to sit at the piano, or at your music stand, or be sitting on the couch with your guitar in hand.
The BB Remote app installs to your iPhone (via the iPhone app store), and then connects to the desktop version of Band-in-a-Box 2011.5.
The BB Remote app has different screens, accessible by “swiping” the screen to the left/right.
BB Remote Main Screen- Chords View
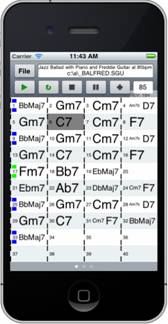 |
The Chords view lets you see the chords of the song, and the current bar of the song highlights during playback. For example, you could be seated at your piano, far from the desktop PC, and be loading in and playing songs, with the sound coming from your desktop PC, but you see the chords and current bar on the iPhone. |
BB Remote Conductor Window
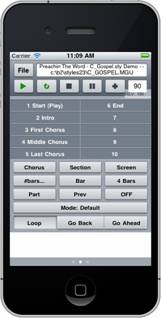 |
This allows fine control of playback, including jumping to sections, choruses, # bars etc. and looping. |
Mixer Window – BB Remote
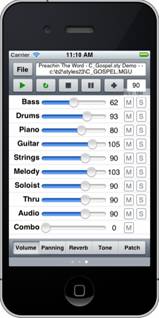 |
The Mixer window of BB Remote for iPhone allows you to mute/solo or adjust volumes, panning, reverb, tone, or patches of the desktop program in real time. |
Patch Selection – BB Remote
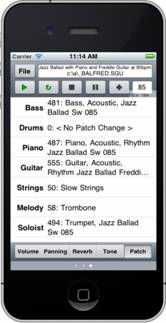 |
The patch selection window of BB Remote for iPhone allows you to view or select patches. If you press play again, the changed patches will sound in the song. |
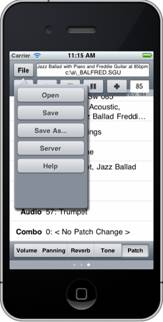
File Menu – BB Remote
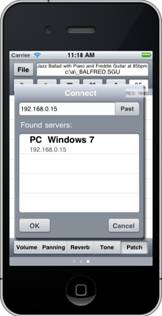
Server Connect Window – BB Remote
Band-in-a-Box for iPhone
Band-in-a-Box for iPhone (BB iPhone) is an app for iOS devices including iPhone®, iPad®, and iPod Touch®. The BB iPhone version is meant to function as a client to the regular Band-in-a-Box desktop version. If you don’t own a copy of the BB Desktop software, the usefulness of the BB iPhone version will be quite limited.
Band-in-a-Box for iPhone is available from the Apple® App Store, http://www.apple.com/iphone/apps-for-iphone/.
If you have a copy of Band-in-a-Box 2011 or higher, then with the Band-in-a-Box iPhone version you can:
- Quickly transfer your existing library of songs from BB Desktop to BB iPhone, including chord lead sheets and audio (M4A). See the chord lead sheets and play the songs anytime on your iPhone, without re-connecting to BB Desktop.
- Enter songs from scratch on your BB iPhone by typing in chord symbols to the song.
- Generate audio on your BB iPhone for the songs by pressing play. The songs play on the iPhone and are stored on the iPhone as M4A files. This connects across your home network or the internet to your desktop version of Band-in-a-Box
- Send songs from BB iPhone to BB Desktop.
Here are some typical uses for your BB iPhone version. This assumes that you have the BB Desktop version:
- Jim has entered lots of songs over the years into his BB Desktop version. He now wants to practice his guitar playing on these tunes using only his BB iPhone. As a one-time procedure, at home (over his home network WiFi) he first transfers his entire song library to BB iPhone, including lead sheets and audio. This takes about 10 seconds per song. Now he has his BB song library on his BB iPhone and doesn’t need to connect to his BB Desktop again (unless he wants more songs, or to generate different chords for the songs). He plays the songs on his iPhone, either using the iPhone speakers, headphones, or plugging the iPhone line out into his stereo system. He will only ever need to connect to BB Desktop again if he wants to get more songs, or regenerate them in different styles etc.
- Joan is playing a solo vocal gig, using BB iPhone as her backup band. She connects the iPhone audio out to the PA system. A customer requests one of her compositions, a song that she knows, but doesn’t have a backing band arrangement for. On her break, she types in the chords to the song, presses PLAY, and the audio file generates and is ready to play on her BB iPhone (by connecting to BB Desktop over the Internet). After the gig, she sends the song to her BB Desktop, so that is available there too as part of her song library.
BB2Go Dialog
The iPhone version of Band-in-a-Box will see the BB2Go folder (C:\bb\BB2Go). Any Band-in-a-Box songs that you put in this folder are visible to the BB iPhone. You can send files back and forth from BB iPhone to Band-in-a-Box for Windows®, and the files go to the BB2Go folder.
You can add audio to the Band-in-a-Box files in the BB2Go folder from the Band-in-a-Box Windows menu with the BB2Go command and select the files that you want to have MP4/M4A audio added. You can also generate the audio from the iPhone version.
More documentation for the BB iPhone version is available at https://www.pgmusic.com/help100/.
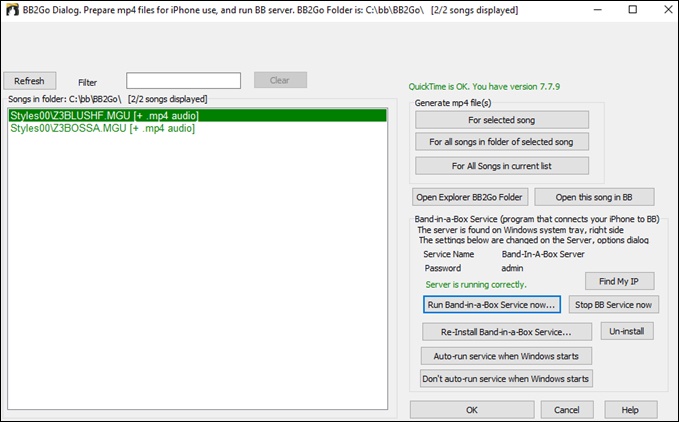
Use the [Refresh] button to refresh the list when additional files have been added externally.
You can use the Filter to search the songs for a particular word.
The [Clear] button removes the search term.
Generate mp4 file(s): There are three options for generating mp4 files for the iPhone. [For selected song] generates an mp4 file for the selected song, you can then send the Band-in-a-Box song and the mp4 to iPhone BB using the Band-in-a-Box service. [For all songs in folder of selected song] generates mp4 files for all songs in the same folder as the selected song. When generated, the files will be green in the list, indicating that mp4 audio is present. [For All Song in current list] generates mp4 files for all songs in the BB2Go folder (C:\bb\BB2Go). It takes about 1 minute per song, then you can send the songs and the mp4 audio to the iPhone.
The [Open Explorer BB2Go Folder] button opens the C:\bb\BB2Go folder in Windows® Explorer. You can add files to the folder in Explorer and then press [Refresh] to see them in this dialog.
The [Open this song in BB] button opens the currently highlighted song in Band-in-a-Box.
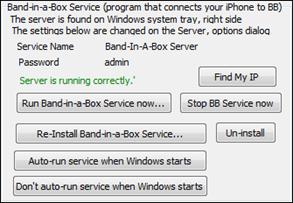
Band-in-a-Box Service: Band-in-a-Box Service is the program that connects your iPhone over the Internet to Band-in-a-Box. It is located in the C:\bb\BBHelper folder.
![]() When the server is running you will see this button in the Windows® system tray. Right-click on the button to open the menu of server commands and click Show to access the Options and set the password and server name.
When the server is running you will see this button in the Windows® system tray. Right-click on the button to open the menu of server commands and click Show to access the Options and set the password and server name.
Use the buttons to run, auto-run, and install the service.
Program Tutorial
Instructions for using Band-in-a-Box iPhone version
Run the BB iPhone program by clicking on the icon. You will then see the Band-in-a-Box screen. This consists of:
- Top Toolbar area (File Mixer Settings Play/Stop Chord Keyboard).
- Title display line.
- Chords area.
If you want to edit information in a song, press the Chord Keyboard icon. This will open the Chord Keyboard, and also a “Song Parameters” section at the top to choose style, tempo and song form.
Let’s open and play an existing song.
Press FILE and then OPEN. You will then see a list of the demo songs that are included with BB iPhone. You should see “Blues Shuffle Demo” and “Jazz Swing Demo.” You will notice that these file names are in green. The green indicates that audio (M4A) is available for these songs, and they are “ready-to-play” and don’t have to be re-generated.
Choose “Jazz Swing Demo.” This song was previously generated using BB iPhone, and the arrangement was made entirely from the chord progression. The arrangement sounds realistic because it is using the high quality RealTracks present in Band-in-a-Box.
Press the Green PLAY button. (Note: If the play button is Red, it indicates that the song will need to be generated, by connecting to BB Desktop).
Press STOP at any time.
Let’s enter our own song from scratch.
We will enter a simple blues progression, which is 12 bars long, in the key of C.
Press File and then NEW.
Open the Chord Keyboard, so that the song is editable.
Choose a style for the song. Press the Style button (at the left of the screen, below the title), then choose the genre Blues, and select the style _BLSHUFF (Blues Shuffle) which is the 3rd one on the list.
Leave the tempo at the default of 140 (or change it by clicking on it).
Leave the key signature at C (or change it by clicking on it).
The song formula will say something like [1] [16] [3]. That means the song form begins at bar 1, and ends at bar 16, and repeats 3 times. Since this is a 12-bar blues (not 16 bars), we click on the “16” and change it to 12. We can leave the number of repeats of the form at 3 (or change it by clicking on it).
Type in the chords. Click on bar 1 on the chord sheet. Then use the chord keyboard to type in a chord. To move to a new bar, click on the bar so that the highlight bar moves to that bar. Once you are in the bar, type the chord on the chord keyboard.
Type “C” in bar 1.
Type “F” in bar 5.
Type “C” in bar 7.
Type “G7” in bar 9 - do this by typing “G” and then “7.”
Type “F7” in bar 10.
Type “C” in bar 11.
Enter a title for your song. Call it “My Blues” and then save it by choosing File-Save.
That’s it! You’ve entered your first song.
Close the Chords Keyboard window.
Now to hear your song, you are going to need to be connected to your Band-in-a-Box Desktop version.
Connecting to the BB Desktop Version
Since the song has not been generated yet, the PLAY button will be RED, indicating that the song audio needs to be generated. Press the red Play button, and this will launch the Server Connection dialog. Here you will either enter the IP that is displayed from your home network (if BB Desktop is on the same home network as your iPhone), or your IP address of your BB Desktop version (or router). Details of router setup are available on the File-Help menu.
Once you have entered the Server IP, then press OK, and then enter the password (the default password is admin, so if you haven’t changed it, that will work).
You will then see “Loading styles” … this only happens when it is a new connection, and BB desktop is telling BB iPhone what styles are available.
After that, you will see “Generating song” and then “Downloading file.” After a wait of 15-30 seconds, your song will start playing. Press STOP to stop the song. At this point, the song “My Blues” now has audio saved with it and will be ready to play next time without connecting to the BB Desktop version.
Let’s get an existing song from the BB Desktop version.
Press File and then Server, then “Get Song(s).” You will then see a list of the songs that are available on the BB Desktop program (i.e., the songs present in the BB2Go folder inside the BB folder).
Choose a song, and then press DOWNLOAD. This will download the song. Press PLAY to generate it and hear it.
That concludes the tutorial.
Unconditional 30-Day Money Back Guarantee on all PG Music products purchased from PG Music Inc.
PG Music Inc.
29 Cadillac Ave Victoria BC Canada V8Z 1T3
Sales: 800-268-6272, 250-475-2874,+ 800-4746-8742*
* Outside USA & Canada where International Freephone service is available.
Access Codes
Tech Support: Live Chat, support@pgmusic.com
 Online now
Need Help?
Customer Sales & Support
|
Phones (Pacific Time) 1-800-268-6272 1-250-475-2874 |
||
| Live Chat | ||
| OPEN | Online Ordering 24/7 |
|
| OPEN | Forums, email, web support |