
Search Manual
Band-in-a-Box® 2026 for Windows® User's Guide
Chapter 11: Working with Audio
About Band-in-a-Box Audio Files
You can open an audio file by clicking on the [Open+] button on the top toolbar and selecting Open Audio (wav, wma, mp3, wmv, cda) from the drop-down menu.
![]() Audio files can also be opened by selecting the menu item File | Open Special | Open Audio (WAV, WMA, MP3, WMV, CDA). Once opened, MP3, WAV, WMA, or audio CD tracks can be played back at 1/2, 1/4, or 1/8 speed, which is ideal for transcribing or analyzing audio.
Audio files can also be opened by selecting the menu item File | Open Special | Open Audio (WAV, WMA, MP3, WMV, CDA). Once opened, MP3, WAV, WMA, or audio CD tracks can be played back at 1/2, 1/4, or 1/8 speed, which is ideal for transcribing or analyzing audio.
When you load an audio file, you can do the following during playback:
- Change the audio tempo to slow down or speed up without changing pitch.
- Press Ctrl+[-] for half speed, Ctrl+[=] for full speed.
- Loop a section by highlighting an area in the Audio Edit window and clicking [Loop Selected].
- Use the menu item Audio | Set Audio Master (Base) Tempo to ensure that all tempo stretching is based on the correct master tempo.
If MySong.MGU is loaded and an audio file with the same name (e.g., MySong.WMA, MySong.MP3, MySong.WAV, etc.) exists in the same folder, Band-in-a-Box will automatically load the audio file into the Audio track. This allows third parties to create compact teaching or demo packages by making a pair of MySong.MGU and MySong.MP3. The MGU file provides the chords and structure, while the compressed audio file provides the prerecorded audio, keeping the overall file size small.For example, you could create a trombone teaching set for Band-in-a-Box that includes a song file with the chords and a matching audio trombone track, all packaged in a compact, easy-to-share file size.
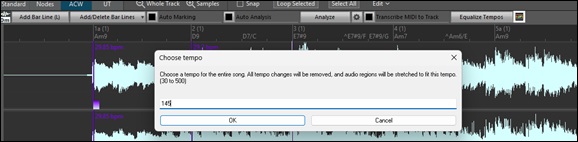
Equalize Tempos
If you have an audio file that wasn’t recorded at a fixed tempo, you can adjust it so that all sections play at the same tempo. This process is called “tempo equalization.
![]() Click on the [ACW] button on the side toolbar to launch the Audio Chord Wizard.
Click on the [ACW] button on the side toolbar to launch the Audio Chord Wizard.
Then, set bar lines for the whole audio, and press the [Equalize Tempos] button.
[Tip: Press the video button on the Audio Edit window toolbar to see how you can set bar lines.]
Converting Audio Channels
Easily convert the Audio track from stereo to mono, or vice versa, with the menu item Audio | Edit Audio | Convert Channels (mono/stereo). When you convert the channel, you can choose the percentage of each channel.

Audio Offset
The Audio Offset feature allows you to synchronize any point of the audio file with bar 1 of the Band-in-a-Box song – usually to sync the audio file with the rest of the song.
For example, if you have a home recording of a live performance saved as a WAV, MP3, or WMA file, select the menu item File | Open Special | Open Audio to load it into Band-in-a-Box.
![]() Then open the Audio Edit window, click on the [Nodes] (Volume Automation mode) or the [UT] (UserTrack mode) button . Right-click on the point in the waveform that should correspond to bar 1 and choose Mark this point as Bar 1 of the song from the context menu.
Then open the Audio Edit window, click on the [Nodes] (Volume Automation mode) or the [UT] (UserTrack mode) button . Right-click on the point in the waveform that should correspond to bar 1 and choose Mark this point as Bar 1 of the song from the context menu.
After this, the audio will start playing at bar 1 of the Band-in-a-Box song, in sync with the point you marked in the audio. The bars will be approximately synchronized, though they may drift if your live performance tempo varies. If needed, you can add tempo changes at specific bars to keep everything perfectly in sync.
Importing Audio File
Most types of audio files can be opened directly in Band-in-a-Box, but you may want to import an audio file into your Band-in-a-Box song. A Mono or Stereo audio file can be imported to any track, optionally merging or replacing the existing Audio track. Most popular types of audio files are supported, including WAV, WMA, MP3, WMV, and CD audio.
To import an audio file, open the Import Audio File dialog by using one of the following methods.
 Click on the [Import] button on the top toolbar and select Import Audio (WAV, WMA, MP3, WMV) from drop-down menu.
 - Choose the menu item File | Import | Import Audio (WAV, WMA, MP3, WMV).
- Choose the menu item Audio | Import Audio (WAV, WMA, MP3, WMV).
- Drag an audio file from Windows Explorer and drop it anywhere onto the Band-in-a-Box screen.
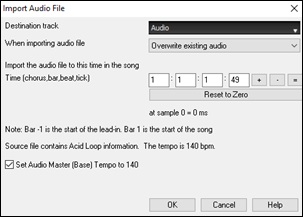
In the dialog, select the destination track, the point to insert the audio file, and the option to merge or overwrite existing audio in the destination track.
If the audio file contains Acid Loop or Apple® Loop information, the dialog shows an option to set the audio base tempo of the current song to the tempo of the audio file.AI Stems - Audio Stem Splitter and Transcriber to MIDI
This amazing tool separates an audio file containing multiple instruments into individual tracks - bass, drums, guitars/piano, vocals, and residual sounds. These tracks are then added separately to your song, allowing you to generate Band-in-a-Box tracks to play along with. Using advanced AI and machine learning techniques, this process, also known as “audio source separation,” offers greater flexibility and creative control in music production. For example, you can import vocals from your favorite singer and rearrange the backing tracks in Band-in-a-Box to create a unique, personalized mix.
To use these features, open the Stems - AI Audio Stem Splitter and Transcriber to MIDI dialog using one of the following methods.
- Click on the [AI] button on the top toolbar and select AI Stems from the drop-down menu.
- Use the hotkey S T E M S Enter.
- Select the menu item File | Import | Import Audio File to Separate Tracks using Stem Splitter.
- Select the menu item Audio | Import Audio File to Separate Tracks using Stem Splitter.
- Select the menu item File | Open Special | Open Audio File to Separate Tracks using Stem Splitter.
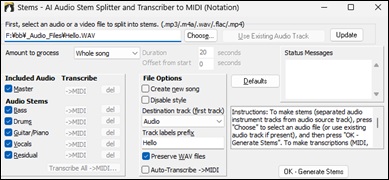
First, select a file by typing its directory or clicking on the [Choose] button. The file can be an audio file (MP3, M4A, FLAC, WAV, WMA, etc.) or a video file (MP4). To split the audio already on the Audio track, click on the [Use Existing Audio Track] button.
Use the Amount to Process setting to choose whether to process the entire song or just a portion. Since creating stems can take some time (typically 10-30 seconds for a full song), selecting a smaller section is useful for previewing the results.
In the Included Audio area, select which stems to add to your song. Typically, you'll want to include all the individual tracks as well as the master track, but you can customize this selection to include only specific tracks if desired.
Master is the original audio file. |
The File Options area allows you to select additional options.
With the Create new song checkbox, you can choose to add the stems to either a new song or the current song. |
When you are ready, press [OK - Generate Stems]. For a full 3-minute song, the process may take 10-45 seconds to complete. The routines use multiple CPU cores, so it will be faster on fast machines with higher performance and more cores. If the auto-transcription is enabled, this button will change to [OK - Generate Stems & Transcription], and pressing it will separate the file into individual tracks and automatically transcribe each one to MIDI.
Once the stems are generated, they will be added to your song and will appear in the Mixer. You'll see a Master track, which is the original audio file, unchanged. Normally, you want to mute this track because you will be hearing the same thing on individual tracks. It is set to mute (red) by default.
Now you can play these tracks as a group, remix them, or mute/solo any individual track. The possibilities for creative fun are endless!
To play these tracks in sync with the Band-in-a-Box style tracks, set the song to the same tempo as the source file. This ensures proper timing and seamless integration. If the source file contains tempo variations open the Audio Chord Wizard, mark the bar lines, and let it determine the chords of the song. Once the song is synced and the chords are entered, you can select RealTracks, MIDI SuperTracks, Loops, etc. or change a style to play along with any or all of your tracks.
When you save a song, the stem tracks will be saved as audio files using the song file name followed by the track name. For example, if you save the song as Sunshine.mgu, the stem tracks will be saved as Sunshine-bass.wav, Sunshine-drums.wav, and so on.
AI Notes - Audio Transcriber and Stem Splitter
The amazing “AI-Notes” feature transcribes polyphonic audio to MIDI, allowing it to be viewed in notation or played as MIDI. It can transcribe an entire audio file (all pitched instruments and all drums), or it can isolate and transcribe individual instruments (drums, bass, guitars/piano, and vocals). It uses an advanced AI neural network to produce highly accurate results that sound exceptionally musical when played. For example, load your favorite pop song and generate transcriptions for its instruments (bass, drums, guitars/pianos, vocals), which you can play on their own or along with the audio of the song. This is an excellent way to learn songs, as you can visually follow the parts as they play on the piano keyboard or guitar fretboard. You can also use this feature together with the “AI-Stems” feature to split the original audio into separate tracks.
To use it, click on the [AI] button and select AI-Notes from the drop-down menu, or use the hotkeys N O T E S Enter or S S 1 6 Enter to open the Notes - AI Audio Transcriber and Stem Splitter dialog. Then, select a track containing audio that you want to process, choose the instrument(s) to split and/or transcribe, specify the destination track(s) for the MIDI output, and press OK.
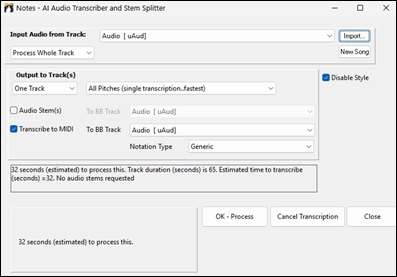
Input Audio from Track: Transcription or stem split processes use the existing audio in the track selected here.
[Import]: This lets you select an audio file to import to the selected track.
[New Song]: This clears the current song, allowing you to open a new audio file to a new song using the [Import] button.
Process Whole Track / Process Partial Track: Choose whether to process the entire song or only a portion. Because transcription can take time (up to two minutes for a three-minute song), selecting a smaller section speeds up processing.
Offset from start: Specify the location where the transcription begins.
Duration: Set the length of audio to process from the start location
Disable Style: Check this if you don’t want the style to play along with the audio.
One Track / Master + 4 Tracks: Choose to output transcriptions and/or stems for a single instrument or multiple instruments.
Audio Stem(s): Select this to generate stems. You should also select a destination track for the generated stems.
Transcribe to MIDI: Select this to transcribe audio in the selected track to MIDI. You should also choose a destination track for that MIDI output.
Notation Type: Select a type to assign the correct channel, patch, and notation display for the output track.
Stem Splitter Player
The Stem Splitter Player allows you to play stems without triggering the Band-in-a-Box style tracks. It also includes Audio-to-MIDI transcription, enabling you to convert stem tracks into MIDI notation for viewing, remixing, or learning purposes. Explore your stems and MIDI transcriptions for flexible music production and creative experimentation!
To launch it, select the menu item File | Open Special | Open Stem Splitter Player.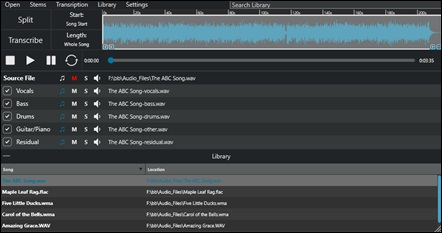
The menu bar contains following menus:
Open to browse and select an audio file (.wav/.mp3/.flac/.ogg/.wma /.m4a/.mp4) to load. Stems for options to split songs into stems. Transcription for options to transcribe songs to MIDI notation. A powerful transcription engine converts pitched instruments or drums into MIDI format, offering endless possibilities for remixing, learning, and music production. Library to manage your song library.You can also drag and drop one or multiple songs directly onto the Library panel to instantly add them to your collection. Settings to configure application preferences and behavior. Enable the Auto-Split After Open setting to automatically begin splitting a file into stems immediately after opening it. If Auto-Transcribe After Split is enabled, all stems are automatically transcribed after the splitting process is completed. The Output option includes stem format selection (.wav, .mp3, .ogg, etc.), residual stem transcription, and subfolder creation. The Reset Mixer option quickly returns all mixer tracks to their default state. |
The toolbar provides quick access to essential functions for managing and processing audio. Use [Split] to separate the current song into individual stems (vocals, bass, drums, guitar/piano, and residual) based on enabled tracks. [Transcribe] transcribes audio to MIDI notation, processing the source file if no stems exist or all enabled stems if available. [Start Time] lets you specify the exact point in the file to begin processing, and [Length] sets the duration to process from the start position; both values automatically update when selecting a region on the waveform.
The interactive waveform display shows your source audio file with precise time references. The timeline provides a visual representation of your audio and links directly to the Start and Length parameters. You can navigate a large file effortlessly with zoom and scroll buttons. You can select a region of your file by clicking and dragging. This updates the Start and Length values automatically, making it easy to process only the selected region.
Just below the toolbar buttons is the transport control area, which includes standard playback controls such as Play, Stop, Pause, Replay, and a progress bar for navigating through the audio. This area allows you to control playback and monitor your position in real time.
The track table displays the source audio file directory along with transcription, mute, solo, and volume controls for the source file and all five stems. It provides quick access to playback control, stem selection, and individual track settings. Each track includes a transcription button (eighth note icon) that, when clicked, generates a transcription for that track (stem or master). When the button turns blue, indicating that a transcription exists, you can drag it to export the MIDI file directly to your desired location.
The Library panel provides a centralized view of all songs in your library. To add songs to your library, use the Library menu or drag and drop files directly onto the panel.
Load an audio file by using the File menu or by dragging and dropping a file onto the track table, adjust the settings (start position, length, and stem selection), and click on the [Split] button to separate the file into stems. Then click on the [Transcribe] button to convert all stems into MIDI. Whenever all stems are transcribed, the program also generates a multi-stem combined transcription, which merges all individual stem transcriptions into a single master transcription. If you enable the “Auto-Split after Open” and “Auto-Transcribe after Split” in the Settings menu, simply loading a file automatically performs the full split and transcription process for a more seamless workflow.
Recording Audio
You can record vocal or instrument performance to your song.
![]() To get started, press the [Record] button on the top toolbar.
To get started, press the [Record] button on the top toolbar.
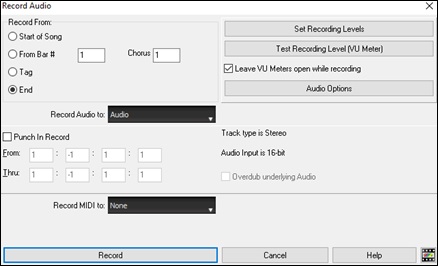
Set the recording properties.
Tell your sound card (and Band-in-a-Box) what sources you would record from. You may be recording from a microphone or a line-in plug into your sound card. In that case, you need to have those items selected in the recording properties panel for your sound card.
Most sound cards are capable of recording from the following sources:
Microphone – plugged in to the sound card to record vocals or live instruments.
Line-In – from the Line-Out of a mixer or keyboard, or a guitar direct box.
CD-ROM player – to record the audio from an audio CD.
“What You Hear” or “Stereo Mix” is used if “rendering” the whole Band-in-a-Box song to Audio. This is an important point to understand when using audio in Band-in-a-Box: the soundcard should be capable of recording the outgoing MIDI that is being sent from your soundcard out to the speakers. When recording an audio track (vocals etc.), you’d almost never want to record the outgoing MIDI as well or it would get mixed in with the audio track. However, when rendering your whole composition to a single .WAV file to distribute on a CD or the Internet you always want to record the outgoing MIDI.
[Technical Note: This is only true if you are using the sound card for your output MIDI driver. If you have an external MIDI device like the Roland Sound Canvas you’d need to route the Line Out from your Sound Canvas back in to the Line-In of your sound card in order to record (render) the MIDI. ]
When you press the [Set Recording Levels] button, you will see the Sound settings for your computer. This is where you select your recording source.
Set the start point for the recording.
You can record from the start of the song, somewhere in the middle, or punch in by choosing a bar and chorus # to start recording.
Select the destination track.
Audio can be recorded to any track.
Select the destination track for recording MIDI.
If you also want to record MIDI at the same time, choose the destination track with the “Record MIDI to” option.
Select the punch-in recording option.
Punch-in audio recording allows you to punch-in record or overdub a section of audio. You can select a section to punch-in by highlighting it in the Audio Edit window. You can also hear the existing audio part when you are overdubbing. This is automatic.
Select the overdub underlying audio option.
If you have previously recorded audio on the track, and want to overdub (to add a harmony for example), then you should select the “Overdub underlying Audio.” It is not essential to select it at this point, since you will get another chance at the end of the recording. Note that the Audio track will not play during record, so you’d have to sing the harmony without hearing the original audio part.
Set the track type (stereo/mono) for recording
The dialog displays the mono/stereo status of the recording, but if you want to change it, press [Audio Options] button.
Test the recording level with VU Meters.
The VU Meters will close or stay open when the dialog is exited depending on the “Leave VU Meters open” setting in the Record Audio dialog. The VU Meters show the average strength of the signal, with a dB scale, and a clip indicator. Clipping indicates that the signal has overloaded and will sound distorted (clipped).
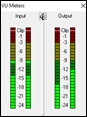 |
The green area represents normal levels, while red indicates an overload. |
Press the [Record] button. Audio recording begins. If you have set the “Show VU Meter while recording” option, then the VU Meter will open and display during recording so you can monitor the VU meters.
Press the [Stop] toolbar button or the [Esc] key.
You will then see the “Audio recorded - Keep Take?” dialog.
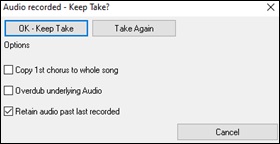
Copy 1st chorus to whole song: If you’ve recorded only 1 chorus of the song, you can choose the option to copy that first chorus of audio to the whole song. This will fill up the whole song with the audio by repeating it as many times as necessary. Then you’d just need to record the ending of the song.
Overdub underlying audio: At the end of recording, you receive an option to overdub with the underlying audio. This means that both recordings will be merged together to form a new file, with both recordings preserved.
Retain audio past last recorded: This allows you to “punch out” and preserve the rest of a previously recorded take.
If you are happy with your recording, you should choose [OK -Keep Take] and the audio will be added to the destination track. You can listen to the results by pressing [Play].
If you are not happy with the results, choose the menu item Edit | Undo Keep Audio Take and you will be back to where you were prior to the recording. You can also choose the option to [Take Again], which reopens the Recording dialog.
Your recording will be saved as a .WAV file when you save the song, using the same name as the song. For example, if you record audio to the Audio track and save the song as MySong.MGU, the recorded audio will be saved as MySong.WAV. If you record audio to the Utility #1 track and save the song as MySong.MGU, the recorded audio will be saved as MySong #1.WAV.
Audio Input Monitoring
This is like "Audio Thru" and it routes incoming audio to Audio Out.
To use this feature, you need to arm the track that you are recording to. Right-click on the track label in the Mixer and select Arm Track for Audio Input Monitoring from the context menu, or right-click on the VU meters and select Arm Trac.

The VU meters right-click menu has options to select an audio input. For example, if your audio interface has two inputs (right/left) and you want to record from a microphone plugged into the right input, select the Mono Right to Stereo menu item.
![]() When the track is armed, blue borders are drawn around the VU meters. You can now monitor audio input along with the effects that you select on that track. For example, to add a tremolo effect to your recording, right-click on the first slot in the Mixer, select Choose Plugin from the context menu, and select a tremolo effect. Now, when you sing or play an instrument though the microphone, you will see it on the VU meters and you will hear it along with the tremolo effect.
When the track is armed, blue borders are drawn around the VU meters. You can now monitor audio input along with the effects that you select on that track. For example, to add a tremolo effect to your recording, right-click on the first slot in the Mixer, select Choose Plugin from the context menu, and select a tremolo effect. Now, when you sing or play an instrument though the microphone, you will see it on the VU meters and you will hear it along with the tremolo effect.
![]()
Generating Synthetic Vocal
Your Melody or Soloist track with lyrics can be rendered to a vocal audio track by sending it to the 3rd party vocal synthesizer Sinsy.
[Note: An internet connection is required to use this feature.]
To use this feature, you should first enter melodies and lyrics to the Melody or Soloist track. If no Lyrics are present, you can still generate a vocal synth using the syllable of your choice (la la la etc.).
![]() The Vocal Synth generation can be accessed from the [Lyrics] button on the top toolbar, the [Vocal Synth] button in the Big Lyrics window, or the menu item Edit | Lyrics | Vocal Synth.
The Vocal Synth generation can be accessed from the [Lyrics] button on the top toolbar, the [Vocal Synth] button in the Big Lyrics window, or the menu item Edit | Lyrics | Vocal Synth.
This feature has two modes – manual mode and automatic mode. In manual mode, Band-in-a-Box creates a Sound.XML file, which you upload to the Sinsy server. After Sinsy generates the synthetic vocal audio file, you import it back into Band-in-a-Box. Automatic mode is normally used because it handles the entire process for you. When automatic mode is selected, the Generate Synthetic Vocal dialog opens.
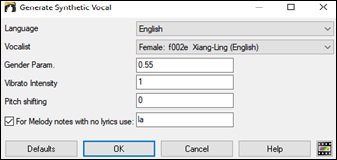
Language: The choice is English or Japanese. Select English unless your lyrics are entered in Japanese.
Vocalist: Choose one of the female or male vocalists. If the language is set to English, you can only select an English singer.
Gender Parameters: You can adjust the gender of the voice in a range from -0.8 to +0.8. Higher values are more masculine. The default is 0.55.
Vibrato Intensity: This controls the amount of vibrato in the voice. The range is from 0 to 2. The default is 1.
Pitch Shifting: This setting will shift pitch in semitones. The range is from -24 to +24. A setting of -12 would be down one octave. The default is 0.
For Melody notes with no lyrics use: If the track does not include lyrics, you can enter a syllable (e.g. la) to use for notes with no lyrics. (Note: If you select a Japanese vocalist, you need to enter a Japanese syllable.)
When you press [OK], your song will be automatically sent to the Sinsy server and will be rendered to a vocal synth. This may take a few minutes. Once the vocal synth has been generated, you can hear it by pressing the [Play] toolbar button.
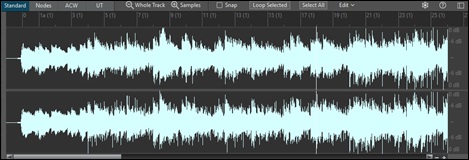
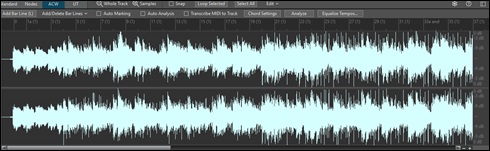
Editing Audio - Audio Edit Window
The Audio Edit window shows a digital waveform and allows you to select, preview, or edit audio data on any track.
![]() It is opened with the [Audio Edit] button on the side toolbar, the menu item Audio | Audio Edit Window, or the hotkey Ctrl+Shift+A.
It is opened with the [Audio Edit] button on the side toolbar, the menu item Audio | Audio Edit Window, or the hotkey Ctrl+Shift+A.
[Note: When you edit audio data, it will be saved in a WAV file, not in an MGU/SGU file. For example, if you edit the Audio track in a song called MySong.MGU, the Audio track will be saved in MySong.WAV. For the tracks other than the Audio track, the track names will be added to the WAV files, e.g., MySong Melody.WAV, MySong Bass.WAV, MySong #1.WAV (for the Utility#1 track), etc.]
The window displays stereo WAV files as two separate tracks.
The ruler below the toolbar indicates bars and beats, with a full height vertical division for each bar and a short vertical line for each beat or quarter note. Bars with part markers also include the A or B part marker letter with the bar number (1a, 9b). The decibel (dB) scale is shown at the right of the window.
Use the [-] and [+] buttons at the bottom-right corner to zoom in or out horizontally. You can also zoom using the mouse wheel.
A region of the audio can be selected by clicking and dragging the mouse. To select a large region, you can click on the starting point and Shift+click on the end point. To expand or reduce the selection, hold down the Shift key while clicking on the desired new boundary. The selection can be played using the [Loop Selected] button.
There are some handy features for stretching or shrinking regions of audio. To use these features, select a region of audio, then click and drag while holding down the Ctrl key. Clicking within the region and dragging to somewhere else within the region will stretch both halves of the region (one will become longer, and the other will become shorter). Clicking outside the region and dragging to somewhere in the region will shorten the region. Clicking within the region and dragging to somewhere outside the region will lengthen the region. These features can be useful for quantizing beats or correcting mistakes in a recording.
The window has four modes – Standard mode, Volume Automation mode, Audio Chord Wizard mode, and UserTracks mode. Volume Automation mode allows fine volume control of any track for fades, crescendos, mutes, etc. Audio Chord Wizard mode allows you to create and edit bar line markers for chord interpretation. UserTracks mode is used to create and edit bar line markers for your UserTracks files.
Toolbar
The [Whole Track] button zooms out as far as possible to show the entire audio track.
The [Samples] button zooms in to the finest level possible. At this level, you will see interpolation between the sample points. This uses band-limited interpolation, which represents how the waveform will sound when converted from digital to analog.
The Snap setting allows you to select audio by snapping to a 16th note (or a triplet in Swing styles). A section of the waveform can be selected by clicking and dragging the mouse over a region. To expand or reduce the selection, hold down the Shift key while clicking on the new boundary.
The [Loop Selected] button plays the selected region.
The [Select All] button selects the whole track, which is useful for applying built-in audio plugins.
The [Edit] button opens a menu for various editing commands. These commands apply to the selected region, or to the entire track if nothing is selected.
Following hotkeys are available.
- Home moves the cursor to the beginning of a track.
- End moves the cursor to the end of a track.
- Shift+Home moves the left cursor of the selected region to the beginning of a track. If no region is selected, this will select a region from the cursor to the beginning of a track.
- Shift+End moves the right cursor to the end of a track. If no region is selected, this will select a region from the cursor to the end of a track.
- Ctrl+A selects the whole track.
- Ctrl+C copies the selected region of audio to the clipboard.
- Ctrl+X cuts the selected region of audio.
- Ctrl+V pastes the copied audio to the current location and overwrites the existing audio.
- Ctrl+Shift+V pastes the copied audio and merges it with the existing audio instead of overwriting it.
- Delete erases the selected region of audio.
- Shift+Delete deletes the selected region of audio.
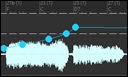
Volume Automation
Node-based volume automation allows fine volume control of any track for fades, crescendos, mutes, etc.
We’ve created over 170 original songs sung by a variety of very talented singers in a variety of genres. They can be played in Band-in-a-Box and are great for experimenting with different styles. The songs are saved in the Artist Performance Set 11 to Artist Performance Set 18 subfolders in C:\bb\Songs and Lessons\Artist Performance Sets.
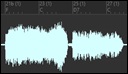
Load a song called “Emmaline 100 country male C _goldrsh.MGU” from the folder C:\bb\Songs and Lessons\Artist Performance Sets\Artist Performance Set 12 - Songs with Vocals volume 2. This song has great leading and background vocals, but when you play the song, you may notice that the background vocal is too loud.
Open the Audio Edit window and see the background vocal track. In bars 21–27, you may notice that the first half is slightly louder than the second half. While you could adjust the volume in the Mixer window, that would change the level for the entire section. A better approach is to use Volume Automation for more precise control.
Switch to Volume Automation mode. You’ll see a blue line on the track. Click anywhere on the line to add a node, which acts as an anchor. Add more nodes as needed and move them up or down—the blue line will be drawn between the nodes. The position of the blue line at any point determines the volume change in decibels for that moment. When you play the song, the background vocal will be balanced between the two sections. You could have the vocal start off quieter and have it gradually become louder.
Analyzing Chords in Audio - Audio Chord Wizard
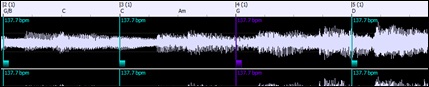
ou can import chords from an audio file using the Audio Chord Wizard. It analyzes audio files (WAV, WMA, MP3, WMV, or CDA) and imports the results into Band-in-a-Box. It detects tempo, bar lines, and chord changes, making it easy to turn your favorite audio files into playable Band-in-a-Box songs.
![]() After loading an audio file to your song, launch the Audio Chord Wizard with the [ACW] button on the side toolbar, the hotkey S S 1 4 Enter, or menu items Audio | Audio Chord Wizardor File | Open Audio with Chords (WAV, WMA, MP3, WMV, CDA).
After loading an audio file to your song, launch the Audio Chord Wizard with the [ACW] button on the side toolbar, the hotkey S S 1 4 Enter, or menu items Audio | Audio Chord Wizardor File | Open Audio with Chords (WAV, WMA, MP3, WMV, CDA).
[Note: The Audio Chord Wizard uses a special multi-view layout, with the Chord Sheet on top and the Audio Edit window on the bottom.]
The first task is to locate bar lines in the audio so that the Audio Chord Wizard can detect chords accurately and the audio will play in sync with the Band-in-a-Box song.
You can define bar lines using the [Add Bar Line] button on the toolbar or by pressing the L key. A bar line will be placed at the audio edit cursor, or at the playback cursor if the song is currently playing.
When you start entering bar lines, the program automatically sets the tempo of the song to the tempo of the first bar of the audio.
Once the tempo of the first bar is set, the program automatically moves the location of the first bar of audio over so that the visual space of the count-in bars is visible.
After you've added the bar lines, IF you adjust the first or second bar and the tempo of the first bar changes accordingly, the program automatically changes the tempo of the song to match.
The [Add/Delete Bar Lines]button provides options to add bar lines based on your song structure or tempo. You can also delete all existing bar lines or only those within a highlighted region.
If the Auto Marking option is enabled, the wizard will automatically add and arrange bar lines based on the ones you’ve added manually. By default, auto-generated bar lines appear in light blue, while user-defined bar lines appear in purple.(Tip: You can customize these colors in the Display and Chord Sheet Settings dialog, accessible by clicking the gear icon on the Chord Sheet toolbar.)
If the Auto Analysis option is enabled, the wizard re-analyzes the chords in the audio whenever you add or move a bar line, or when you edit the audio data. Keep this setting disabled if you prefer to set all bar lines first (i.e. establishing tempo), and then analyze the chords when you are done.
Bar lines can be moved with the mouse. Just click and drag the thumb control at the bottom. If you move an “auto” bar line, it will become a “user” bar line.
You can also right-click on the thumb control to get a context menu with options to switch a marker type (“user” or “auto”), delete the bar line, or set the time signature for the bar. The menu also shows you the tempo of the bar, based on the time signature of the bar and the position of the next bar line.
Use the [Analyze] button to detect chords in the audio and write them into the Chord Sheet. You don’t need to do this if the “Auto Analysis” option is enabled, but it can be useful if you’ve erased or modified chords in the Chord Sheet.
When you add or move bar lines, the wizard automatically generates a tempo map so your song stays in sync with the audio.
Any changes made in Audio Chord Wizard mode can be undone.
On the Chord Sheet, you will see that the Audio Chord Wizard has entered the chords and the tempo map.

If you enable the Transcribe MIDI to Track option, the wizard will send the transcribed MIDI notes to the track for further analysis (in the Piano Roll or Notation window). Note that this provides a “snapshot” view of the pitches every 8th note and is not intended for full polyphonic transcription
The [Equalize Tempos] removes tempo changes by stretching regions of audio so that the tempos are all equal.
The [Chord Settings] button allows you to customize the chord analysis settings.
Song Key: Choose the key in which to look for chords. For example, if the song key is set to G major, the wizard will search for chords in the key of G major. These G major chords are further specified by the Chord Preset.
Chord Preset: Choose which set of chords to look for, from the chosen key.
Pre-tune audio: Auto-tune the track to a reference of A440 before performing the chord analysis. This is useful for songs that were recorded slightly out of tune.
Minimum chord duration 1 bar: This forces the wizard to choose only 1 chord per bar (i.e. no half-bar chords).
Harmonizing Audio
The audio harmonies include following features.
- Harmonizing the audio with up to 4 voices.
- Correcting out-of-tune notes.
- Transcribing the audio to notation.
First, open an audio file (WAV/WMA/MP3/M4A) or a Band-in-a-Box song file with audio. Then, go to the menu Audio or Harmony, and select Audio Harmonies, Pitch Tracking, Fix Tuning (Audio Edit). This will open the Audio Edit window and the Audio Harmony dialog.
[Tip: If the Audio Edit window is already open, press the [Edit] button on its toolbar and select Harmonize from the drop-down menu.]
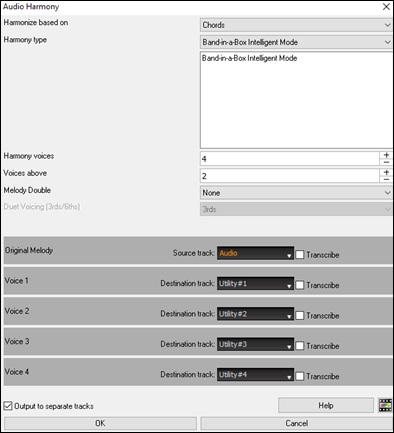
Choose one of the three harmonizing modes.
- The “Chords” mode will harmonize the audio based on the chords in your song. Choose a type of harmony from the “Harmony type” option. Choose either the intelligent mode, which allows you to select the number of voices and other options, or one of the harmony presets. When you select the intelligent mode, you can also use the “Melody Double” option to make one of the harmony voices double the original melody. For the 2-part harmony, you can make the harmony voice 3rds or 6ths above/below the original melody depending on the “Voice above” setting or a combination of 3rds and 6ths with the “Duet Voicing” setting.
- The “MIDI” mode will add voices to the audio, based on MIDI notes in the source track. You can choose the number of voices (up to 4 voices).
- The “Fix Tuning” mode will analyze the source track and corrects out-of-tune notes in the selected region according to the key of your song.
Source track is the track that the selected harmonizing mode will apply to.
If Output to separate tracks is unchecked, harmony voices will be written into the source track and merged with the existing audio in that track. You can also set the volume and stereo balance for each harmony voice. If you check this option, harmony voices will be written into other tracks that you select with the Destination track option. After harmony voices are generated, you can use the Mixer to control volume, panning, reverb, and tone, or add effects for each voice.
You can enable the Transcribe option for the source track and/or harmony voices. Note that the audio in the source track should be monophonic (e.g. vocal, saxophone).
Applying Audio Plugins
When you have recorded audio, you’d likely want to apply some type of effect to the audio. The usual one is reverb. Choose the audio plugin that you want from the Audio | Plugin menu. For reverb, choose the Reverb option. You will then see a plugin with its own settings, specific to the type of plugin.
Inside the plugin, you can preview the plugin effect, and if you like it, you can then proceed with processing the entire WAV file. You can undo the effects of any plugin with the menu item Edit | Undo.
VST/DX Plugins for Individual Tracks
VST and DX audio effects can be applied to individual tracks. The control of effects plugins can be managed in the Mixer..
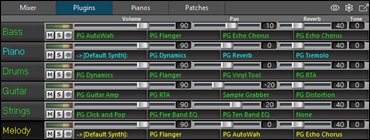
MIDI tracks have four slots. The first slot can take a synthesizer (e.g. Sforzando, Coyote GM, Garritan Aria, and HyperCanvas) and the other three can take audio effects (e.g. reverb, compression etc.).
Audio tracks (RealTracks, the Audio track, or Utility tracks) have 4 slots. There is no synthesizer slot, so they have 4 for audio.
Click on a plugin name, and use the menu to choose a plugin, load or save a preset or a group of plugins, change plugins settings, and do more.
Reading the Audio and MIDI Tracks into Other Programs
If you have a Band-in-a-Box song that has an audio track as well, and want to export that song to a sequencer like PowerTracks Pro Audio, follow these steps:
- For a song called MySong.MGU, the associated .WAV file (audio track) will be called MySong.wav.
- Save the song as a MIDI file in the same folder as the song.
- In your sequencer, open the MIDI file.
- Import the .WAV file into the sequencer.
[Tip: PowerTracks Pro Audio recognizes that this is a Band-in-a-Box file with a wave file associated with it, and will offer to read them both in. In earlier versions of PowerTracks Pro and other sequencers you need to follow the steps above.]
Unconditional 30-Day Money Back Guarantee on all PG Music products purchased from PG Music Inc.
PG Music Inc.
29 Cadillac Ave Victoria BC Canada V8Z 1T3
Sales: 800-268-6272, 250-475-2874,+ 800-4746-8742*
* Outside USA & Canada where International Freephone service is available.
Access Codes
Tech Support: Live Chat, support@pgmusic.com
 Online now
Need Help?
Customer Sales & Support
|
Phones (Pacific Time) 1-800-268-6272 1-250-475-2874 |
||
| Live Chat | ||
| OPEN | Online Ordering 24/7 |
|
| OPEN | Forums, email, web support |