
Search Manual
RealBand® 2023 for Windows® User’s Guide
Chapter 12: Wizards, Tools, and Plug-Ins
Plug-in Mode and Drag ‘n’ Drop
|
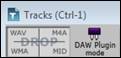
To enter plug-in mode in RealBand, click on the DAW Plugin Mode button of the Track window and select Start DAW Plugin Mode from the menu. |
![]()
In plug-in mode, RealBand is open as a small always-on-top window, and acts as a plug-in for your favorite DAW/sequencer, so that you can drag-and-drop MIDI and audio (WAV or WMA) tracks from RealBand to another sequencer (or to Explorer). You can work in another sequencer, type a chord progression in RealBand, and then simply drag the track from RealBand to your sequencer's track at the desired track and bar location.
Dragging and dropping from RealBand to an outside location, such as the desktop or another audio program, involves:
- entering the Tracks window.
- holding down the left mouse button on the Track Number of the source track.
- dragging the mouse (still holding down the button) to the new location of the track, either the desktop or a track in another sequencing program.
![]()
To drag and drop part of a track, first highlight the section that you want and then hold down the left mouse button on the track number and drag the mouse to the desired drop site.
You can select a region of the song during playback in the Tracks window and some other windows like the Audio Edit window and Chords window.
Drop Station
If drag ‘n’ drop to another sequencer/DAW isn't working, you may need to use the Drop Station.
|
There are 4 quadrants, and they are labeled according to the types of files that will be made by the drop: Audio Files (wav, wma, m4a) or MIDI file (mid). The Drop Station makes it faster and easier to make different file types. It also allows you to make MIDI versions of the RealTracks (RealCharts), by simply dragging a RealTrack to the “MIDI” quadrant of the Drop Station. |
|
When you drop the track onto the Drop Station, you will see an orange color, indicating that the track is accepted and the file is being prepared. |
|
The color of the [Drop] button will change to green when the file is ready. When the file is ready, the Drop Station turns green. You can now drag it to the DAW. |
Audio Tracks
If the track is an audio track, it will be dropped as a either a .WAV file (uncompressed) or a .WMA file. To choose the audio file type, click on the DAW Plugin Mode toolbar button and select Options for DAW Plugin Mode from the dropdown menu to open the Plugin settings dialog.
In the Plugin settings click on the “Drag Audio as” combo box to choose the audio file type.
![]()
MIDI Tracks
If the track is a MIDI track, it will either be dropped as a MIDI file or an audio file depending on the "Drag Individual MIDI tracks as audio (Using VST/DXi)" setting in the Plugin settings dialog.
Also, if Shift is held when dragging/dropping MIDI outside RealBand, then a MIDI track will be dropped as a MIDI file regardless of that particular setting. If Ctrl is held, it will be dropped as an audio file regardless of the setting.
Options for DAW Plug-in Mode
The second menu item on the DAW Plugin Mode button is Options for DAW Plugin Mode. This opens the Plugin settings dialog.
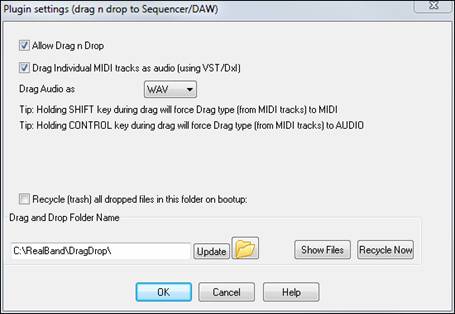
“Allow Drag n Drop” must be checked to use this feature. There shouldn’t be a reason to disable this.
If “Drag Individual MIDI tracks as audio (using VST/DXi)” is checked, MIDI tracks will be rendered to audio WAV files before they are dropped.
If “Recycle (trash) all dropped files in this folder on bootup:” is set, the DragDrop subfolder in the RealBand folder will be erased (recycled) on boot up. Before enabling this setting, make sure that your DAW does not require a permanent copy of the file in this folder.
|
RealBand lets you change the DragDrop temp folder by clicking on the folder button and browsing for a new location. |
Drag and drop is allowed outside of RealBand even if the plug-in mode is not specifically enabled. The options in this dialog still apply to drag-and-drop outside of RealBand when not in plug-in mode.
Audio Chord Wizard
Overview
The Audio Chord Wizard is an extremely powerful feature that automatically finds chord symbols (C, Fm7 etc.) by analyzing the audio content of a song (MP3/WAV/WMA or CD-audio file). The song can be in a digital file format (MP3/WMA/WAV), one that you created in RealBand, or directly loaded from a CD.
In addition to the chords, the Audio Chord Wizard also automatically determines the bar lines and a Tempo map.
Use this feature to instantly play along to your favorite songs, by reading and printing the chord symbols.
The File | Open Special | Open Audio w/Chords (WAV/WMA/MP3/CDA)... menu command will open an existing audio file into RealBand, and then immediately launch the Audio Chord Wizard.
Audio Chord Wizard Lead Sheet
There’s an Audio Chord Wizard Lead Sheet window that shows the chords for the whole song on a single screen. This allows you to click on a bar on the lead sheet to jump to that area of the song.
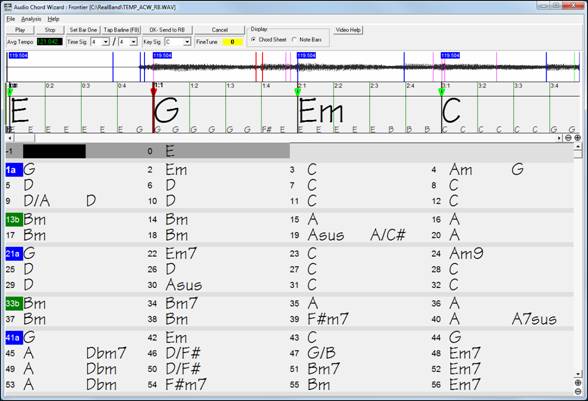
And you can mark sections of the song using part markers - the sections begin on a new line with a line space between, so are clearly seen.

This makes it easier to learn the form of the song, as you can see the various intro/verse/chorus/break sections at a glance and quickly jump to any section, e.g., the break, simply by double clicking on that part of the lead sheet.
Part markers, chord symbols, key signature, and tuning settings are saved in PowerTracks, and are passed back and forth to the Chord Wizard.
Editing Chords
Chords may be edited in the Audio Chord Wizard. The easiest way to edit a chord is to Shift+click on the chord in the lead sheet.
This opens a highlight cell at the chord location. Type in the name of the new chord using standard chord entry characters and press the Enter key to make the edit.
![]()
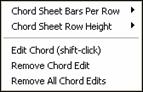
Another method for chord edits is to right mouse click on the chord to open this menu with chord options.
|
Selecting Edit Chord will open the chord edit cell, where you can type in the new chord name. Individual edits can be removed with the Remove Chord Edit command, or all edits in the song can be removed with the Remove All Chord Edits command. |
![]() Edited chords are shown in blue in the lead sheet.
Edited chords are shown in blue in the lead sheet.
Two chords per bar can be detected.
Audio Chord Wizard Tutorial
|
The Audio Chord Wizard button on the toolbar launches the Audio Chord Wizard. This button will pop up a dialog that gives you two choices: “Open Audio File” or “Use Existing Song.” |
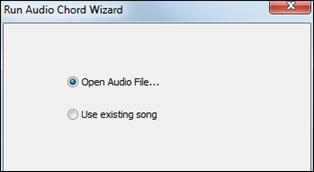
If you choose the “Use existing song” option, then RealBand will launch ACW using whatever song is currently loaded into the program. You will also be asked a question about whether or not to preserve the existing bar lines.
If you choose to preserve existing bar lines, then ACW will only attempt to automatically detect chord symbols rather than bar lines and tempo information. The Audio Chord Wizard opens the audio file and makes initial calculations, finding audio beats and estimating a tempo map. And then Audio Chord Wizard displays your audio file.
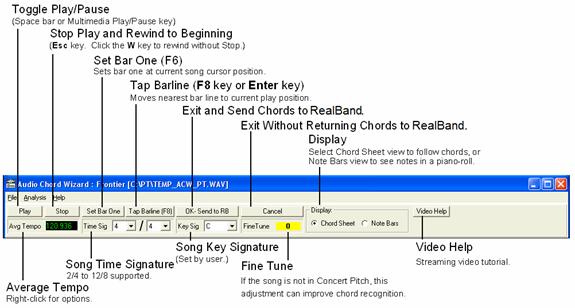
Primary Program Controls
![]() Toggle Play/Pause (Space bar or Play/Pause key).
Toggle Play/Pause (Space bar or Play/Pause key).
![]() Stop play, rewind to start with Esc key.
Stop play, rewind to start with Esc key.
![]() Set the Bar One location (F6 key). Do this first, before any other actions.
Set the Bar One location (F6 key). Do this first, before any other actions.
![]() Moves nearest bar line to current play position. F8 key or Enter key also set bar lines.
Moves nearest bar line to current play position. F8 key or Enter key also set bar lines.
![]() Exit and send chords to RealBand.
Exit and send chords to RealBand.
![]() Exit without sending chords to PowerTracks.
Exit without sending chords to PowerTracks.
|
Select either the Chord Sheet view to follow along with the chords of the song, or the Note Bars view to see the notes interpreted by the Audio Chord Wizard in a piano-roll type of display. |
![]() View the Audio Chord Wizard tutorial at the PG Music web site.
View the Audio Chord Wizard tutorial at the PG Music web site.
![]() Average tempo, right-click for options.
Average tempo, right-click for options.
![]() Song time signature, 2/4 to 12/8 supported.
Song time signature, 2/4 to 12/8 supported.
![]() Song key signature (set by user).
Song key signature (set by user).
![]() Use to correct pitch of song if necessary. This can improve chord recognition.
Use to correct pitch of song if necessary. This can improve chord recognition.
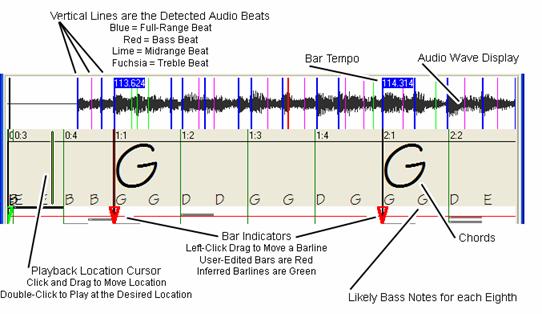
Chord Detection accuracy depends on the accuracy of the bar lines. If bar lines are not well-aligned then the Chord Detection can be expected to be rather poor. It is quick and easy to align the bar lines on most songs, once you get the hang of it.
The Audio Chord Wizard automatically attempts to find a valid Bar One location.
The shortcut keys and mouse playback controls make it easy to find Bar One. Tap the space bar to begin play, watch the Location Cursor, and listen for the downbeat. If the Location Cursor passes the downbeat and you were not completely certain of the location, you can tap the W key to rewind to the song beginning and replay the first part of the song, to audition the downbeat as many times as necessary to make sure of its location.
You can also single-click in the Chords panel to jump the playback position. If the rhythm is unusually complicated near the downbeat, you could repeatedly click just a little before the suspected Bar One location, to zero-in on the exact downbeat.
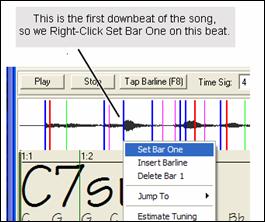
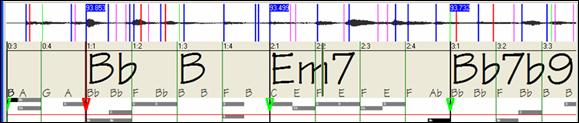
In the following example song, we have discovered the downbeat of Bar One, so we Right-click on that location to Set Bar One.
|
Now the Bar One bar line is red (shown below). The red Triangle bar indicator indicates that we have edited that bar line. The Red Triangles are called Good Bar Lines (GBLs). The green Triangle bar indicators are bar lines which ACW has automatically inferred from its automatic tempo detection PLUS your edited Good Bar Lines. |
We call the green automatic bar lines Inferred Bar Lines (IBL's).
On this example song, the initial automatic tempo detection did a pretty good job. Simply setting Bar One has caused the first four bars to be properly aligned to the music. On some songs, Set Bar One is the only action necessary to get good bar alignment for the ENTIRE tune.
As playback continues in this example (below), we notice that ACW has made its first error approaching Bar 5. Audio Chord Wizard has estimated the tempo of Bar 4 too slow. But that is easy to fix. If you prefer real-time control, just tap F8 or the Enter key where the downbeat should actually be.
If you prefer stopped-time editing, you can either mouse-drag Bar 5 to its desired position, or drag the Playback Location Cursor to the desired position and then tap F8 or the Enter key.

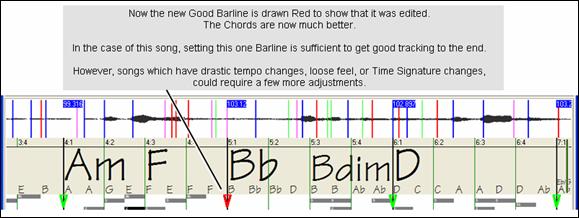
When satisfied with the Bar lines and Chords, click the [OK] button to return the Chords and Tempo Map to Band-In-a-Box or RealBand.
Keyboard Shortcuts
Keyboard shortcuts make it easier to navigate the song and tap in bar lines without having to work the mouse with start/stop/scroll actions.
Play/Pause- SPACE BAR, or Multimedia keyboard PLAY/PAUSE key or (certain keyboards) PLAY key.
Stop- ESC key, or PAUSE key, or Multimedia keyboard STOP key
Tap Bar line- F8, or ENTER key
Jump To Song Start- W key, or HOME key
Jump To Song End- END key
Jump Forward One Bar- RIGHT ARROW key
Jump Back One Bar- LEFT ARROW key
Jump Forward Four Bars- PAGE DOWN key, or DOWN ARROW key, or Multimedia keyboard NEXT TRACK key
Jump Back Four Bars- PAGE UP key, or UP ARROW key, or Multimedia keyboard PREVIOUS TRACK key
Special Cases
Time Signature:
If a song is not in the default 4/4 time signature, set the Time Signature very early before you do anything else.
Bad Initial Tempo Estimates:
Double/Half Tempo:
Sometimes Audio Chord Wizard will guess double or half of the tempo you might prefer.
Slightly Wrong:
Sometimes syncopated songs can have musical anticipations which make ACW guess a tempo slightly too fast or slightly too slow.
Completely, Horribly Wrong:
Some songs have rhythms difficult for a computer to understand. Sometimes a song's rhythmic beats are spaced in such a way that a song with a perfect Tempo of 120, might mathematically BETTER fit the audio beats at some simple (but wrong) related ratio such as 80, 100, 160, or 180 BPM.
If the initial Tempo Estimate is pretty good, the Tap Bar line function will be the easiest way to fix such errors, requiring only a few keyboard taps during playback.
But if the initial tempo estimate happens to be horribly wrong, it helps to make the initial tempo “in the ballpark” BEFORE you tap a few F8's to make it completely right.
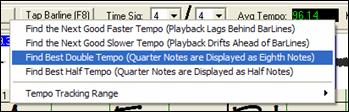
Right-click the Avg Tempo control for some easy automatic fixes.
If the initial tempo estimate is considerably faster than the tempo which you want to tap-in, the Tap Bar line function can mistakenly think that you want a very fast tempo, which fills the remainder of the song with unwanted fast-tempo bars. In that case, if you initially set the tempo very slow, ACW will be unlikely to misinterpret your Tap Bar Lines.
Set Key Signature
Once the chords look reasonable-- For instance if your song looks like it is probably in the key of F-- Set the Key Signature control to F for better chord spelling. This only affects the cosmetic display of notes and chords (flats and sharps). The Key Signature control does not currently affect the basic accuracy of Chord Detection.
Adjust Fine-Tuning
If a song is significantly mistuned from concert pitch, the notes are “in the cracks,” which makes Chord Detection less accurate.
If your Chords look reasonable, there is no need to bother with Tuning. Most songs are recorded pretty close to Concert Pitch.
But if you see numerous Chord errors, it may help to adjust the Fine Tuning control.
If you are playing along with a song on your keyboard, you might decide to make an ear-estimate of how far out-of-tune is the song:
For instance, you could adjust the fine-tuning control on your keyboard until your keyboard matches the song's pitch (according to your ear). Then you could look at your keyboard's tuning readout, and adjust ACW's Fine Tune Control to match. Either click-drag ACW's Fine Tune control (like a slider control), or right-click the Fine Tune control then type in a number.
The Fine Tune Control currently does not change the pitch of playback. Currently, the ACW's Fine Tune control only improves Chord Detection on mistuned songs.
The Fine Tune control is calibrated in cents, 1/100th of a semitone. Therefore, if a song is perfectly in the key of C, but if you set Fine Tune to +100 Cents, ACW would display chords in the key of B. Similarly, if you set Fine Tune to -100 Cents, it would display that song's chords in the key of C#.
That simple use of the Fine Tune control is just a backwards way to transpose the Chords. But if you set Fine-Tune somewhere in the middle, ACW looks for notes that are somewhere “in the cracks” between the piano keys. For instance, if your song SHOULD be in the key of C, but it was unfortunately recorded 50 Cents sharp--
There could be many reasons that a song was recorded off Concert Pitch. Maybe the recording studio had a broken tape recorder, or the singer couldn't quite hit the highest note. Maybe the vinyl record cutter was off-speed, or some Record Executive decided that the song was 10 seconds too long for airplay, and instructed the Mastering Engineer to speed it up a little bit. In such cases ACW can get confused, misidentifying some pitches too high and other pitches too low, detecting nonsense Chords.
So if your favorite song was unfortunately recorded 50 Cents sharp, you can set the Fine-Tune control to +50 Cents so that ACW will properly display in the 'original' key.
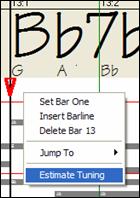
Auto Estimate Tuning
|
ACW can automatically estimate the tuning, which helps in some cases. Since the Estimation is math-intensive, ACW only analyzes one bar of music at a time. Right-click somewhere inside a bar and pick the Estimate Tuning function. After the process is finished, up pops the results dialog. As advised in the dialog, results can be improved by carefully picking the bar. Bars with relatively long notes are easier to analyze, compared to bars containing flashy fast melodies. |
|
It can be useful to spot-check a few bars. If several spot-checks give similar answers (within a few cents), you have good confidence that the results are actually meaningful, not being randomly affected by out-of-tune melodies or loud drums. However, if the first estimate reads +43 and the next measurement reads -12, then it probably means that your song is not a good candidate for automatic Tuning Estimation. |
Odd-Length Bars and Drastic Tempo Changes:
If a 4/4 song contains occasional bars of 3/4, 5/4, or whatever, or if there are sections where the music has an extreme ritard or accelerando, sometimes you can just Tap Bar Lines to adjust it.
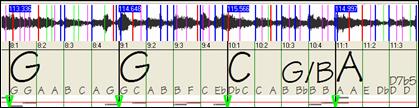
But it is sometimes more convenient to manually add or delete bar lines. The following example song has an overall Time Signature of 4/4, but Bar 9 should have a time signature of 2/4. If you simply Tap Bar Line on 9:3 to shorten the bar, then ACW will mistakenly decide that you wish to make all the following bar lines double-tempo 4/4.
Solution
First, Right-Click on the beat 9:3, and Insert a bar line.
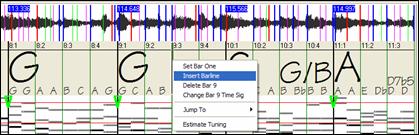
Now a new bar line is added, and three new GBL bar lines are flagged red.

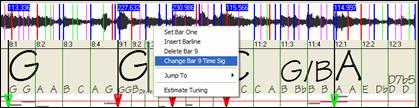
Right-Click on the new shortened Bar 9 and set the Time Signature to 2/4.
Change Bar 10 to its desired duration. Hover the mouse over the red triangle marker at Bar 11, and the mouse cursor becomes a drag cursor. Click and drag the bar line to the location marked 11:3
Now we have edited bar 9 to have its proper 2/4 Time Signature and preserved the song tempo on both sides of the 2/4 bar.
Precise “Floating Point” Tempos
RealBand supports precise floating-point tempos, such as 120.514 BPM. This makes it easier to sync MIDI tracks to prerecorded audio tracks if the audio tracks weren’t recorded exactly at an integer tempo. This also is what lets RealBand play a song in sync to an existing audio track after the Audio Chord Wizard has worked its magic.
Notes Display
The Notes Display looks like a MIDI Piano Roll, but it is not exactly the same as a MIDI Piano Roll. Audio Chord wizard detects the strongest frequencies found in each eighth-note time slot, and displays them in the Notes Display.
Sometimes the displayed frequencies REALLY ARE instrument notes played in the audio file. But they could be spurious information, such as the accidental loudest frequency of a drum beat. A midrange frequency note-bar might be showing the sum of harmonics from several instruments, each instrument's harmonics contributing to the strength of that frequency.
The Notes Display information is real and useful, but try not to assume that every displayed note-bar is a real note in the audio.
Horizontal Scroll Bar
![]()
Scroll forward/back in the wave file.
Plus/Minus Zoom Buttons
![]()
Zoom the display to show more or less detail.
Conductor Window
“Conductor”- Live Looping/Playback Control
As the song is playing, there are options to control the flow of playback by one of three methods:
1. Conductor window
2. QWERTY hot keys
3. MIDI keyboard
![]() The Conductor is launched with the Conductor button on the toolbar.
The Conductor is launched with the Conductor button on the toolbar.
![]()
You must enable the QWERTY keys to be active for the Conductor during playback. This is done by selecting the “Enable Control by QWERTY keys” checkbox on the Conductor Window.
If you want to control the Conductor using the MIDI keyboard, you need to enable this by selecting the checkbox “Enable control by MIDI keyboard.” in the MIDI keyboard control box. When this setting is enabled, any MIDI input will be interpreted as a hot key for the Conductor, and you won’t hear MIDI thru.
![]()
If you’d like the ability to switch your MIDI keyboard between Conductor mode and regular playing mode, you can do this using the lowest “A-natural” MIDI note on your keyboard. This is A1 on an 88-note keyboard. Note A1 will turn the Conductor off, Bb1 turns it on, and B1 will toggle the Conductor on only when the Bb1 note is held down. If you don’t have an 88-note keyboard, you can set the octave setting to a number higher than 1, for example if you set it to “3,” then notes A3/Bb3/B3 will turn the Conductor Off/On/Toggled.
Using the Conductor QWERTY or MIDI keys, you can:
- Define and jump to up to 10 user defined sections in the song,
- Jump back 1 bar/4 bars/# of bars/screen/part/chorus/section,
- Jump ahead 1 bar/4 bars/# of bars/screen/part/chorus/section,
- Loop 1 bar/4 bars/# of bars/screen/part/chorus/section,
- Pause/stop the song.
In addition, using the MIDI keyboard, you can also use the Conductor to:
A1(note#21) - Turn MIDI Conductor OFF
Bb1 - Turn MIDI Conductor ON
B1 - Turn MIDI Conductor ON only as note is held down
The various functions of the Conductor are also available with MIDI keys and QWERTY hot keys.
Customizing the Sections
Sections: This allows you to define up to 10 points in the song that are sections. By default, the following sections are defined for each song.
- Section 1: Start of song
- Section 2: Intro
- Section 3: First Chorus
- Section 4 :Middle Chorus (i.e. start of chorus #2)
- Section 5: Last Chorus
- Section 6: Ending
- Sections 7-10 are user definable. To do this, type in any bar # using the bar/chorus format (e.g. 21/2 would be bar 21, chorus 2).
If you prefer to enter custom values for the section numbers, you can do this if you check the “custom” checkbox, and then type in up to 10 bar numbers for each section.
The section numbers are saved with the song. Once you have defined the sections, you can jump to a certain section of the song as the song is playing, simply by:
1. Pressing the 1-9 or 0 key on the QWERTY keyboard or,
2. Opening the Conductor window (~ hot key) and clicking on the section button or,
3. Pressing MIDI keys 77-86 (F6 to D7) corresponding to sections 1-10.
Mode (when to do the action)
By pressing a QWERTY hot key prior to an action, you can control when the action will take place. If no mode hot key is pressed prior to an action, the default mode will occur.
The default is set in the “Default Mode for section change” or “Default Mode for going back or ahead” combo box.
For example, by default, the section change will occur as soon as you press the key, and it will go to the equivalent place in the bar immediately before the beginning of the target section (so that the music stays in time, and the next section begins at the end of the bar). But you can change the default for the action to take place at the end of the current bar or current part marker etc.
Play Control Buttons
![]() This plays the song. Hot key = F4, MIDI note = F4.
This plays the song. Hot key = F4, MIDI note = F4.
![]() This stops playback. Hot key = Esc, MIDI note = F#4.
This stops playback. Hot key = Esc, MIDI note = F#4.
Example uses of the Conductor:
In this example, we don’t have custom sections set, so the default sections apply (middle chorus = section 4 etc.).
- Jump to the start of middle choruses during playback (press “4”).
- Loop the middle chorus (press S, which is Loop Section).
- Jump to the end of the song (press 6 ).
>
- Go back 1 chorus (Ctrl+A).
- Go ahead 1 chorus (Shift+A).
At the end of the current chorus, go back 1 section, press Y then Ctrl+S.
These actions can also be done with the MIDI keyboard.
Example using the MIDI keyboard:
Assume Charlie is a piano player who uses his MIDI keyboard with RealBand, and would like to play his keyboard, but also use it to control RealBand.
![]()
He sets the conductor to allow his MIDI keyboard lowest notes A/Bb/B to turn the Conductor mode OFF/ON/Toggled-when held.
When he turns it off (low A note), he can play his keyboard normally.
If he wants to pause the song, he holds down the low B3 note as he presses the MIDI key for pause, which is G4. The song will pause, and the conductor mode turns off as he lets go of the B3 key, and he can resume his piano playing. If Charlie didn’t plan on using the MIDI keyboard for piano playing, he could leave it in conductor mode by turning it on with the A3 key.
Conductor Functions with MIDI and QWERTY Hot Keys
MIDI Note |
Function |
QWERTY Key |
F4 |
Play |
F4 |
F#4 |
Stop |
Escape |
A4 |
MIDI panic |
F12 |
Bb4 |
Previous Jukebox song |
Ctrl+Shift+F8 |
B4 |
Next Jukebox song |
Shift+F8 |
Db5 |
Open Notation window |
Ctrl+W |
D5 |
Lead Sheet window |
Alt+W |
F6 to D7 |
Jump to sections 1-10 of the song |
1-9 and 0 |
Eb7 |
Loop current chorus |
A |
E7 |
Loop current section |
S |
F7 |
Loop current bar |
Z |
F#7 |
Loop current 4 bars |
X |
G7 |
Loop current part |
C |
Ab7 |
Looping ON, previous setting |
V |
A7 |
Looping OFF |
B |
Bb7 |
Go Back 1 Chorus |
Ctrl+A |
B7 |
Go Back 1 Section |
Ctrl+S |
C8 |
Go Back 1 Screen |
Ctrl+D |
Db8 |
Go Back 1 Bar |
Ctrl+Z |
D8 |
Go Back 4 Bars |
Ctrl+X |
Eb8 |
Go Back 1 Part marker |
Ctrl+C |
E8 |
Go Ahead 1 Chorus |
Shift+A |
F8 |
Go Ahead 1 Section |
Shift+S |
F#8 |
Go Ahead 1 Screen |
Shift+D |
G8 |
Go Ahead 1 Bar |
Shift+Z |
Ab8 |
Go Ahead 4 Bars |
Shift+X |
A8 |
Go Ahead 1 Part marker |
Shift+C |
In addition, using the MIDI keyboard, you can also use the Conductor to:
A1 |
(note#21)Turn MIDI Conductor OFF |
Bb1 |
Turn MIDI Conductor ON |
B1 |
Turn MIDI Conductor ON only as note is held down |
TranzPort® Support - Wireless Remote Control
TranzPort Support - Wireless Remote Control support for RealBand!
The Frontier Design TranzPort® is a wireless remote control hardware unit (Electronic Musician Editors’ Choice 2006) that now allows you to control RealBand from 30 feet away!
The backlit LCD provides a two line readout. Buttons and a wheel allow control of many RealBand features. Select songs and control Play, Stop, Pause, and Loop. Select, Mute, and Solo tracks as well as Volume and Tempo changes are all supported.
You can, for example, put the TranzPort unit on your piano at home (or your music stand on a gig) and load/play/control songs, all while far away from your computer – all wirelessly up to 30 feet – even through walls! The TranzPort also works “right-out-of-the-box” with Band-in-a-Box.
Using TranzPort with RealBand
To use the MIDI TranzPort with RealBand, first make sure the Frontier USB wireless receiver is plugged into a USB port of your computer.
![]() The “Enable TranzPort (if present)” checkbox must be selected under the MIDI tab in Preferences. If this checkbox is unchecked, then RealBand will not attempt to look for and initialize the TranzPort. By default, this checkbox is enabled, which means that, by default, RealBand will always try to find and initialize the TranzPort.
The “Enable TranzPort (if present)” checkbox must be selected under the MIDI tab in Preferences. If this checkbox is unchecked, then RealBand will not attempt to look for and initialize the TranzPort. By default, this checkbox is enabled, which means that, by default, RealBand will always try to find and initialize the TranzPort.
You should see a TranzPort icon on the Windows task bar. RealBand should then automatically connect to TranzPort when you start-up RealBand.
To verify that the TranzPort is installed, you can visit the MIDI drivers dialog and see if TranzPort shows up as a MIDI In and MIDI Out driver. Do NOT select the TranzPort in the MIDI drivers dialog.
To start using the TranzPort
While RealBand is running, “wake up” the TranzPort by pressing a key on the TranzPort (e.g. the STOP key). The TranzPort display will show
- “Title of RB song” on top row of LCD
- <tempo> <Current Track Number> <track volume> <patch # (if track is MIDI)>
For example, the screen might say
“My Tune”
120 Tr=1 v=122 p=1
TranzPort Key Commands
- Track arrow keys - increase or decrease the current track in RealBand.
- Rec - begins recording.
- Solo - same as pressing solo button in RealBand.
- Undo - same as Edit - Undo in RealBand.
- IN - when a popup OK/Cancel or Yes/NO dialog is on the screen, IN will function as either an OK or Yes answer.
- OUT - when a popup OK/Cancel or Yes/NO dialog is on the screen, OUT will function as either a Cancel or No answer.
- Shift-IN - Load Previous Song.
- Shift-Out - Load Next Song.
- Punch - enables or disables punch-in mode in RealBand.
- Loop - enables or disables loop mode in RealBand.
- Wheel - change the tempo of a MIDI-only song.
- Shift+Wheel - Increase or Decrease volume of Current Track by 5.
- Prev+Wheel - Increase or Decrease volume of Current Track by 1.
- Next+Wheel - Increase or Decrease MIDI Patch number for current track.
- Shift+Prev - jump to previous marker in RealBand.
- Shift+ Next - jump to previous marker in RealBand.
- Add - add a new marker at current song location.
- Rewind button – rewind.
- Fast fwd button - fast forward.
- Stop button – stop.
- Play button – play.
- Record button – record.
Pitch to MIDI Converter
Access the Pitch to MIDI Converter by selecting (highlighting) an audio track and choosing the Edit | MIDI | Pitch to MIDI Convert (current audio track) menu item.
The converter cannot recognize chords or mixes of music instruments. It gives the best results with single-note melody lines, played very cleanly, and with very little background noise or hum.
For best results, use very plain playing technique and pure tone. Idiosyncratic playing technique or wide variation in instrument tone can confuse the converter. When playing guitar or other stringed instruments try to avoid ringing strings. A quietly ringing open string can also confuse the converter as it tries to determine the pitch of your intended note. For vocals, try humming or singing all notes with a pure vowel sound such as “Oooh” or “Aaaah.”
As with other pitch-to-MIDI computer algorithms, this plug-in is not absolutely perfect. However, with careful playing (or singing) and the right settings you can get good conversion results on most of the notes. You can also expect to get a few “off the wall” notes, which must be edited, in the Notation or Event Edit screens.
Settings
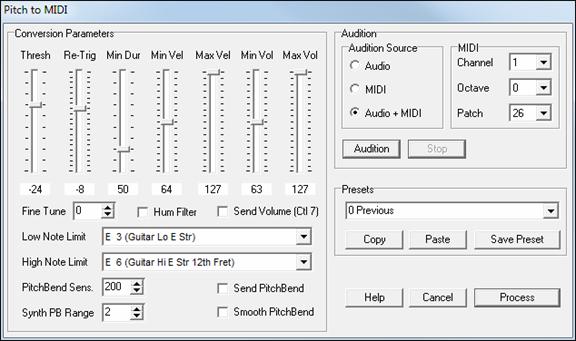
Thresh - The Note On level threshold, in dB. Audio below the Note On threshold will not trigger notes. If Thresh is set too low, the converter will try to convert noise and unintended notes to MIDI. If Thresh is set too high, the converter might miss some of the intentional notes in the audio.
For best results use a fairly loud track. It is not necessary to have the audio recorded so loud that it distorts.
Re-Trig - Set the sensitivity for re-triggering identical note pitches. For instance, this control is useful to properly detect guitar double-picking techniques. If the slider is too high, it will re-trigger too many notes, and if the slider is too low it will miss some re-triggers. Some instruments might work better with minimal or no re-triggering (slider all the way down). Soft attack instruments such as flute or sax might need the Re-Trig set fairly high in order to get good performance on legato repeat notes.
Min Dur - Minimum note duration (in milliseconds). This setting helps to ignore very short glitch notes, short tracking errors within notes, and fixes tracking wobble on note decay. As notes decay and become very quiet the note is not very loud compared to the noise in the track which means the converter will have more difficulty measuring the pitch. If you get too many glitches increase the Min Dur setting. If you miss too many notes decrease Min Dur.
Fine Tune - Compensate for an out-of-tune recording. If too many MIDI notes are playing a half step too high adjust the Fine Tune setting upwards. If too many MIDI notes are playing a half step too low adjust it downwards.
Low Note Limit, High Note Limit - Set the expected note range of the source audio.
Min Vel, Max Vel - The Midi velocity range that corresponds to the audio note amplitude. An input Note that reaches up to 0 dB will send the Max Vel, and a note that is barely above Thresh will send the Min Vel. For an organ-type on-or-off response, set Max Vel and Min Vel to the same value. This will cause all MIDI notes to have the same velocity.
Hum Filter Checkbox - Pre-process the audio thru a hum filter –in case the audio has too much hum (hum can confuse the pitch detection).
Send Volume Checkbox - Insert Volume messages in the MIDI track.
This could be most useful with voice, violin, horns, or even guitar
A good way to use this setting would be to set a narrow velocity range– Perhaps Min Vel and Max Vel could be set to 127, or perhaps Max Vel = 127 and Min Vel = 100. Then enable the Send Volume checkbox.
Each note’s MIDI volume is controlled by the instantaneous audio level rather than controlling the level by MIDI velocity. You could use a long-decay synth patch, and each note will track the volume envelope of the underlying audio. With “just the right settings” it will track gradual changes in dynamics on sustained instruments such as horn or voice.
Min Vol, Max Vol - Adjust the volume message range (controller 7) that is transmitted according to the instantaneous audio level of the source file.
Audition Button - Convert and then play the file.
Stop Button - End the audition playback.
Audition Source - Audition the source wav, the converted MIDI, or both at the same time. The timing is fairly tight between audio and MIDI, but when auditioning Audio and MIDI simultaneously, there may be slight variations depending on the MIDI latency and audio latency of your sound card. The playback timing will be much better once the MIDI track has been exported back into RealBand.
Note: The audio audition uses the Windows default audio device, and the MIDI audition uses the Windows default MIDI device.
MIDI Channel - The audition MIDI channel.
MIDI Octave - The audition octave. This only affects the octave of audition playback. It does not affect the pitch of file output. Once the conversion has been exported back into RealBand you can adjust the octave of the track here, if necessary.
MIDI Patch - The MIDI patch is used for Audition playback. This setting does not affect the patch assigned in RealBand.
Cancel - Exit the Pitch to MIDI converter.
Process - Do the conversion and return to the host program (RealBand).
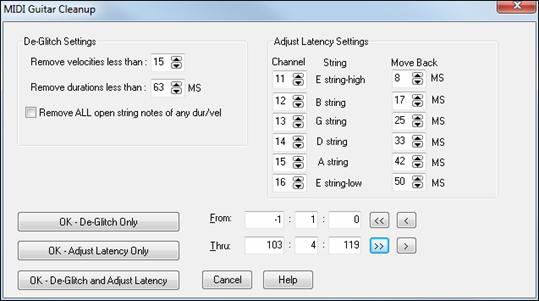
MIDI Guitar Cleanup
|
The MIDI guitar tool bar button launches the MIDI Guitar Cleanup dialog where you can clean up MIDI tracks recorded on a MIDI guitar. |
The De-Glitch routine will automatically remove glitch notes based on the Velocity and Duration settings in milliseconds (ms). The Adjust Latency routine will automatically move the location of notes earlier to compensate for MIDI guitar latency. You can specify the adjustments for each string in milliseconds if the default settings don’t match your guitar's response times.
- OK – DeGlitch Only – This will process the track using the DeGlitch routines only.
- OK – Adjust Latency Only – This will process the track using the latency adjustment routines only.
- OK – DeGlitch and Adjust Latency – This will process the track using both sets of routines.
Convert to WMA (Windows® Media AudioTM)
Us this plug-in feature to convert a .WAV file to Windows Media Audio format (*.WMA). There are options to save the file to a specific filename and destination folder, to select a resolution (quality) for the file, and spaces to fill in the appropriate Title, Author, Copyright, and song Description credits. This information will be embedded into the resulting WMA file and will be viewable when the file is played in an appropriate media player.
To access this feature, select Render | Merge Audio and DXi Tracks to WMA file.
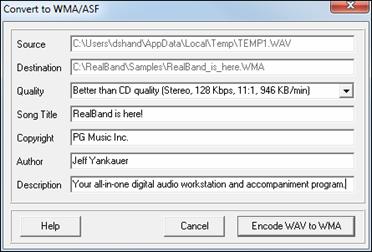
In the example, we chose 160Kbps, since we want the file to sound as clear as possible. You can set this quality/resolution parameter from a low of 6Kbps up to this 160Kbps rate. You might want to choose a setting of around 32Kbps (modem speed) if you want to make a file that can “stream” on your web site.
Source – This field displays the source WAV file. It is for informational purposes only. This field cannot be edited.
Destination – This field displays the Destination filename and path. This can be edited if desired.
Quality – Set the bit rate of the compressed file. Higher bit rates have higher quality audio, while lower bit rates make smaller files which take up less space on a hard drive (and are easier to stream over the Internet) at the expense of sound quality.
Song Title – The Song Title which is encoded into the WMA file, and which is displayed by a WMA player.
Copyright – Copyright information encoded into the WMA file.
Author – Author information encoded into the WMA file.
Description – Additional information encoded into the WMA file.
As mentioned, the information you enter into the Song Title, Copyright, Author, and Description fields will be viewable when the file is played in a supported media player.
MiniBurn
The Render | Launch CD Burner… plug-in feature renders the current project file to a stereo .WAV file and then launches the CD Burner application.
You can add songs to the CD-R at a later date if you don’t select (disable) the “Finalize” option. Any CD you create won’t be playable in an audio CD player until the disc is finalized. Make sure that the disc is finalized when you burn the CD for the last time.
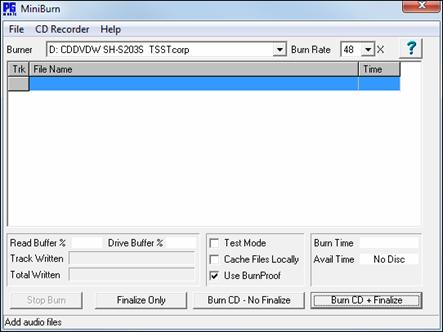
The Burn List
Burn list files are displayed in MiniBurn’s central file list region.
Trk - Track Number
File Name - Path and name of Wave files
Time - Play time of each track, formatted in minutes:seconds:frames.
Burn Time indicates the sum of all the burn list track times.
Avail Time indicates the time available on the blank CDR, if a writeable CDR or CDRW has been inserted in the CD Burner. If no disc has been inserted, or if an unwriteable disc has been inserted, Available Time reads “No Disc.”
Add Files to the Burn List
- Use the menu item File | Add Track…
- Right-click on the Burn List and select Add Track from the pop-up menu.
- Drag wave files into the MiniBurn window from an open Windows folder.
Remove Files from the Burn List
- Left-click to select a track, then use File | Remove Selected Track.
- Left-click to select a track, then right-click on the Burn List and pick Remove Track from the pop-up menu.
Clear All Files from the Burn List
- Use the menu item File | Clear All Tracks From Burn List.
- Right-click on the burn list and select Clear All Tracks from the pop-up menu.
Change the Order of Tracks in the Burn List
- Left-click on the Trk column of the file you wish to move, and drag the file to a new location in the list.
Description of Filenames
miniburn.exe - Main program executable. This program can be run as a plug-in from within RealBand, or it can be run stand-alone. Double-click this file (located in the main RealBand folder) to run Miniburn in stand-alone mode.
done.wav - This wave file (if present) will play when the burning operation is complete. You can use any standard wave file – just save it as done.wav and the program will play that file when done.
burn.txt - The program automatically looks for and loads files specified in the burn.txt file at the beginning of a burn session. A burn.txt file is made when the program is launched, adding the “current song” to the burn list automatically.
acdwrite.ocx - An active X control that is registered and installed into the Windows OS. This file is required for the burner software to operate.
DirectX (Windows® Audio Plug-In Format)
Use this feature to apply DirectX (DX) or VST audio plug-ins to a track.
|
Access the feature by clicking on the [VSTi] button in the toolbar and selecting a track from the list, or in the Tracks window by clicking on the disclosure arrow for an audio track and then pressing the [Edit VST/DX…] button. |


You can also select a track and then go to Edit | Audio Effects | DirectX Audio Plug-ins.
The DirectX feature requires that you have Microsoft DirectX installed in your OS. Note also that this functionality will be of no use to you until you have at least one DirectX Audio plug-in installed into your system.
You can download the latest version of Microsoft DirectX from www.microsoft.com.
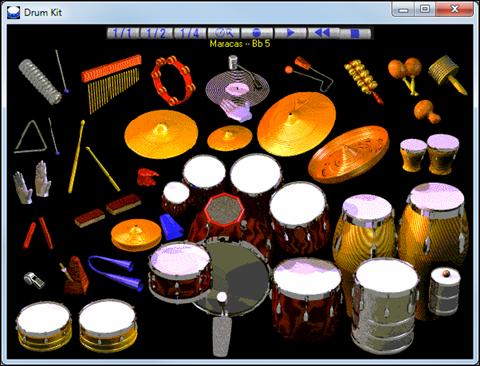
Dynamic 3D Drum Kit Window
This re-sizable drum window is an animated 3D display of a complete MIDI drum kit with all 61drum sounds displayed on their respective instruments.
|
To launch the Drum Kit window, click the Drums button in the toolbar. You can do several things with the Drum Kit window: |
- Watch the drum part being played on the drum kit in real time.
- Play along with the drums in real time by mouse clicking on the drum instruments, or using the QWERTY keys. The computer keyboard, the piano key number, and sound names can all (optionally) be made visible on the hint line by moving your mouse cursor over a given instrument.
- Record a drum part into RealBand.
Drum Display
All the General MIDI percussion instruments are shown. Some percussion instruments are triggered by multiple MIDI notes. When a sound is controlled by more than one MIDI note, a percussion instrument will show different behavior in response to the different notes. For instance, the Hi-Hat responds differently to Close Hat, Pedal Hat, and Open Hat MIDI notes.
The on-screen instruments may be played by mouse clicking or by pressing the appropriate computer keys. When playing by mouse click or computer keys, the Shift key can be used to switch the velocity between two user-specified levels (i.e. loud=100 and soft=50). The multi-note instruments send different MIDI notes to your sound source, depending on where you “click” on the instrument. For instance, the Kick Drum can send three different notes: Ac. Bass Drum (MIDI note 35), Bass Drum 1 (MIDI note 36), and Square Kick (MIDI Note 32).
Control Buttons:
- Record: Places RealBand in Record mode so drum instruments can be recorded.
- Play: Starts song playback (Space key).
- Rewind: Stop and return to song start (Return key).
- Stop: Stops song playback (Space key).
- Size Buttons 1/1 - 1/2 - 1/4: Clicking on these buttons changes the size of the Drum Kit window to full size, half size, or quarter-size. (You can also resize the window to any size by dragging a window border.)
- Settings: Adjusts program behavior. See the Settings Dialog topic.
- Help: To launch the drum Help file, press F1.
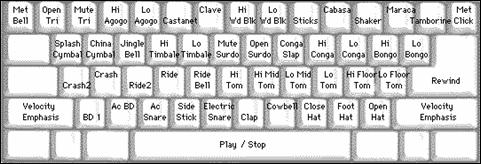
Computer Keys
|
Press computer keys to play drums. Drums are grouped on the computer keyboard by category. The kick, snare, and hi-hat sounds are on the lowest keyboard row. The lower-middle row contains toms and cymbals. The upper-middle row contains Latin drums, and the top row contains Latin hand percussion. The Numpad keys contain the rest of the Latin hand percussion plus the electronic tones. |
Multi - Note Instruments
Kick Drum - Ac. Bass Drum, Bass Drum 1, Square Kick
Snare - Acoustic Snare, Side Stick
Hi-Hat - Closed, Pedal, Open
Floor Tom - Low, High
Electronic Pad - Multi-zoned for Hi-Q, Slap, Electric Snare
High Conga - Mute, Open
Surdo - Mute, Open
Cuica - Mute, Open
Metronome - Bell, Click
Whistle - Long, Short
Triangle - Mute, Open
Guiro - Long, Short
Scratch - Push, Pull
Settings Dialog
![]() Press the Settings button (to the left of the Rewind button), to adjust the various Drums Settings.
Press the Settings button (to the left of the Rewind button), to adjust the various Drums Settings.
The “Drum window is always on top” checkbox keeps the Drum Kit window on top of other program windows.
MIDI Settings
- “Drum MIDI Port” defaults to Port 1, but can be changed to use any of the ports available, i.e., the MIDI Output drivers enabled in the MIDI Driver Setup.
- “Drum MIDI Channel” defaults to channel 10, which is the channel used by General MIDI instruments. If your drum machine or MIDI device uses a different channel for drums you can set it here.
- “Drum Duration Boost” adds duration to drum notes with a range of 1-10.
Note Velocity
When playing drums with a mouse or computer keys, the Shift key toggles between two levels of note velocity. The default velocity is 90, with a default shift key velocity of 127. The two velocity levels can be set any way desired. For instance, if you want the Shift key to send quieter notes you can program the shift velocity lower than the non-shift velocity.
- The “Randomize” checkbox enables the program to send random velocity levels when playing the drums. This is handy when using non velocity-sensitive devices such as a mouse or computer keyboard.
- “Range” controls the amount of velocity randomization. Usually a small range works best, around 10% to 30%. For example, if velocity is set to 127, and the random range is set to 20%, notes would randomly vary between a maximum velocity of 127 and a minimum velocity of 102.
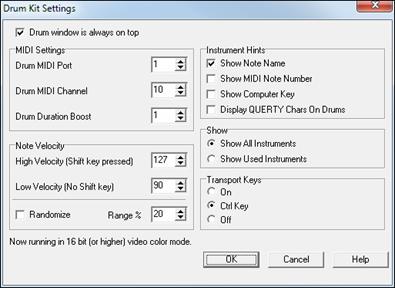
Instrument Hints
Customize the appearance of the Hint line.
- Show Note Name
- Show MIDI Note Number
- Show Computer Key
Show
- “Show All Instruments” shows all instruments in the drum window.
- “Show Used Instruments” displays the basic trap kit, but does not display any extra instruments unless they are used in a song.
The drum window is cleared each time Play or Stop is pressed.
Transport Keys
- “On” - Control playback with the computer keyboard. Space key will toggle Play/Stop. Return key will halt and return to the song beginning. Ctrl+Tab will enter Record mode.
- “Ctrl Key” - Sometimes it is distracting to play the drums with the computer keys, because if you accidentally play the spacebar or Enter key, it halts playback. With this option enabled, playback is controlled by Ctrl+space and Ctrl+Enter, so it is more difficult to accidentally stop playback.
- “Off” - Playback is not controlled by the computer keyboard.
Guitar Tuner
|
The Guitar Tuner is launched with the “tuning fork” button, which is found on the toolbar. |
The Guitar Tuner is optimized for guitar and bass, although it is also useful with other acoustic instruments, including voice.
To use the tuner, connect an electric guitar or bass to your computer’s sound card input, or tune an acoustic instrument using a microphone connected to the sound card microphone input. Then, play a pitch, and the tuner will “auto-range” to determine the nearest note and display the intonation of your instrument.
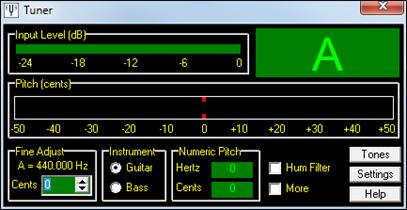
Main Window
Input Level: Displays the instrument Input Level in dB. For best results, the level should peak at least halfway up. Quiet signals may be too noisy to properly recognize the pitch. Some inexpensive sound cards do not handle clipping gracefully. If your card seems to misbehave on very loud signals you should try to avoid hitting the very top of the level meter. On most sound cards, however, “going over the top” will not significantly affect the tuner’s performance.
Input Note: The name of the most recent note detected by the tuner is shown in the upper right corner.
Pitch (cents): Displays the intonation of the note in cents (hundredths of a semitone). The note is in-tune (with the current detected note) when the indicator is hovering near zero.
When the tuner has “locked on” to a recognizable pitch the indicator turns green and tracks the current pitch. If a note is not loud enough, too noisy, or too unsteady for the tuner to measure, the indicator will turn red and freeze at the last known good value.
It can sometimes take the tuner a moment to “lock on” to a pitch. You may need to play a note a couple of times in succession before the tuner is well locked on to the note. This is most noticeable on very high or very low notes.
The display has quarter-cent resolution. Noise, hum, or bad strings can cause the pitch indicator to wobble. Guitar “G” strings seem particularly prone to odd harmonics which wobble the pitch indicator.
Don’t be alarmed if the indicator is wobbling quite a bit. Center the average indicator motion around zero. The resolution of the display magnifies pitch deviations that the ear may not notice. A deviation of a few cents is not very obvious to the ear even though it is a large distance on the pitch display.
Fine Adjust: Modify the tuner’s calibration. For instance, if Fine Adjust is set to 10 cents an instrument must be tuned 10 cents higher than usual to measure in tune.
If you have access to a Strobotuner or other expensive tuner you could calibrate this Guitar Tuner program to agree with the other tuner you use. The accuracy of this Guitar Tuner program should be within a few cents of standard on most computers. However, the tuner program relies upon the audio clock stability of the sound card, so there may be slight variations on different sound cards.
If you have a piano, organ, or other instrument you wish to use as reference you can likewise adjust the Tuner to agree with your fixed-pitch instrument.
Instrument: Optimize the tuner for guitar or bass. Bass cannot be tuned at its best if the Guitar button is selected, and guitar cannot be tuned at its best if the Bass button is selected.
In addition, the Fretboard display changes according to the selected instrument. The Guitar setting displays a standard-tuned six string guitar. The Bass setting displays a standard-tuned six string bass. If tuning a four string bass, you would look for the middle four strings in the display. If tuning a five string bass, ignore the “C” string.
Numeric Pitch (Hz): Display the frequency of the incoming signal. As with the Cents pitch display, if the pitch becomes unreadable, this control will freeze and remember the last good reading.
Hum Filter: The tuner works best if you give it a signal with little hum or noise. Hum can make the pitch measurement “jittery.” If you can’t keep your guitar from humming, then the hum filter may help.
The tuner program has no way to know what string you are playing, so non-open guitar notes may show up on the wrong string in the display – though it will properly indicate the correct note pitch.
Tones: This button opens the Generate Tones dialog to create wave tones for audible tuning reference.
Generate Tones
Generate tone references for tuning by ear. This may be preferable if you do not have enough gain on a mic input, or have an acoustic guitar or a guitar with dead strings. With dead strings or some acoustic guitars, the ear can reconcile the out-of-tune harmonics in the string better than the Tuner program.
These tones are basically very accurate, but remember that the final accuracy depends upon the accuracy of the sample clock in your sound card. The cards we have tested seem to be within a couple of cents of standard tuning, but larger errors are possible with some sound cards.
Wave Shape - Sine wave is a very pure wave which only contains the listed fundamental frequency. Complex is a filtered ramp wave, which contains the fundamental tone plus a healthy dose of even and odd harmonics.
The complex wave may be easier to tune against, since guitars and other instruments usually have a broad mix of harmonics. Complex wave may also be less tiring to the ear.
In the low bass range, the sine wave can be difficult to hear unless you have a very good set of monitor speakers.
“Cents” - Fine-adjust the pitch in cents (hundredths of a semitone).
“Level” - The output level measured in dB. Zero dB is as loud as it gets, and negative numbers reduce the level.
“Frequency” - A read-only indication of the frequency of the tone. As you adjust Note, Octave, and Cents, Frequency is calculated from the current settings.
|
Chromatic Pitch - Select this radio button to select any desired note and octave. “Note” - Pick the desired note. “Octave” - Pick the desired octave. “Restrict Range” - The reference tone can become painful and possibly dangerous to speakers in the very high range, if the playback system is set too loud. Similarly, very low reference tones could damage woofers. If the “Restrict Range” checkbox is enabled, the pitch range is limited to the mid and bass range where the tone is not as hazardous to ears or loudspeakers. |
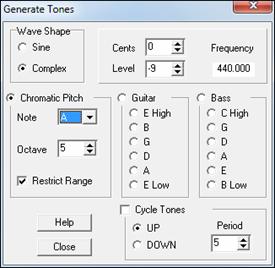
Guitar - Select this radio button to tune using standard guitar pitches.
Once a note has been selected in the Guitar group, you can switch between the different string pitches with the cursor up and cursor down computer keys.
Bass - Select this radio button to tune using standard Bass pitches. These are the notes for six string bass. Use the middle four pitches for four string bass, and use the bottom five pitches for five string bass.
Once a note has been selected in the Bass group, you can switch between the different string pitches with the cursor up and cursor down computer keys.
Cycle Tones - This checkbox automatically plays the Guitar or Bass pitches in sequence, to make it easier to tune guitar without touching the computer keyboard or mouse.
With “Cycle Tones” enabled, if the “Guitar” radio button is selected, the tuner will automatically play the guitar pitches in sequence. If the “Bass” radio button is selected, the tuner will play the bass pitches in sequence.
The “UP” and “DOWN” buttons cycle the pitches either up or down.
“Period” is the sustain time of each pitch, in seconds. With the default period of five, each pitch will hold for five seconds before cycling to the next pitch.
Settings
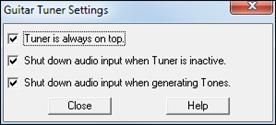
Tuner is always on top - The Tuner main window remains above all other windows on the screen. Sometimes this option does not appear to “stick” after it is set. If the Tuner is set to “always on top” but doesn't stay on top, close the Tuner and re-open it to get the desired behavior.
Shut down audio input when Tuner is inactive - When the Tuner window is not the active window, it will close the sound input channel. This can help the Tuner work smoother on slow computers, or free up the sound input driver for other programs which are running.
Shut down audio input when generating Tones - When the Generate Tones window is active, it will close the sound input channel. This can help the Tuner work smoother on slow computers. If the Audio Input continues to be processed while the computer is generating tones, it makes more work for the program. This extra work might stall slow computers.
MIDI Monitor
|
The MIDI Monitor opens with the MIDI button, which is found in the View Panel. |
The MIDI Monitor displays a listing of data received from computer MIDI Input and/or the RealBand MIDI output. This plug-in program has been found to be very useful for educational and diagnostic purposes.
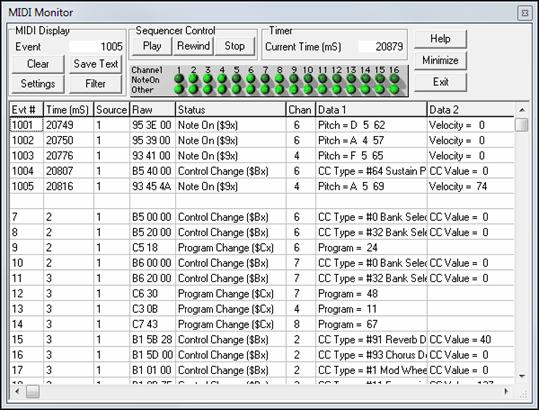
The MIDI Monitor provides details on all aspects of the MIDI data being transmitted and received.
MIDI Display Controls
Event: The current event number since the display was last cleared.
Clear: Clear the MIDI Display, Event counter, and Channel Activity panel.
Save Text: This feature will allow you to save a text file of the data in the MIDI display. The file can be opened with a word processor or spreadsheet program, for printing or further study. Various Save Text options can be adjusted in the Settings window.
Settings: Press to open the Settings dialog, which allows you to adjust various display behaviors. The display can be modified to suit the task at hand.
Filter: This opens the Filter dialog, where receive settings can be adjusted.
Sequencer Control: Standard transport controls: Play, Rewind, and Stop.
Timer: A millisecond timer useful for viewing timing relationships between MIDI messages. If the computer is under a “light load,” this timer is fairly accurate. However, if the computer is under a “heavy load” the values can be expected to be less than perfectly accurate.
You can record MIDI data in RealBand and examine the timing in the RealBand Event List window.
To use RealBand to measure correctly in milliseconds, set then RealBand’ PPQ resolution to 480 and RealBand’ tempo to 125 BPM. With this special resolution and tempo, tick values in the Event List window will correspond to milliseconds.
Current Time: This is the millisecond count since the timer was last started. Click anywhere in the Timer area to clear the Current time, setting it to zero.
The timer automatically starts when MIDI data is received. The period that the timer will run after MIDI activity ceases can be adjusted in the Settings dialog.
Channel Activity Panel: The Channel Activity panel has an array of “LEDs” (light emitting diodes) to indicate which channels are active. For example, if note information is received on a channel, the Note On LED will latch on. If controller, pitch bend, or other channel events are received, the Other LED will latch on. Click anywhere on the Channel Activity Panel to clear all the indicators.
MIDI Display Area
The MIDI Display area, located at the bottom of the main window, displays the data generated by RealBand and/or data received at the computer MIDI input. Each row is a single MIDI event.
Evt #: Event number, starting from when the display was last cleared.
Time (mS): The time in milliseconds, from when the timer was last cleared.
Source: When set to “Int,” the event was generated by RealBand, and when it is reading “Ext,” the event was generated by an external MIDI Device attached to the computer’s “MIDI In” port.
Note: To display data received from computer MIDI Input the MIDI THRU option must be enabled in RealBand.
Raw: This indicates the raw bytes representing each MIDI message. Most MIDI message types contain three bytes, but some contain only one or two bytes. SysEx messages can contain an arbitrary number of bytes.
Note: This field is normally blank in the case of SysEx messages. With SysEx messages, up to 16 “raw” bytes are displayed in the Data fields. Long SysEx messages are displayed on multiple lines, at 16 bytes per line.
Status: Show the text name of the Event type.
Chan: This displays the MIDI channel of an Event. This field is blank for System messages (values from $F0 to $FF). System messages do not have an associated channel.
Data 1: Text name for the meaning of the first data byte of the MIDI message.
Data 2: Text name for the meaning of the second data byte of a MIDI Message.
Notes:
(1) For some messages such as Pitch Bend or Song Position Pointer, the value of both data bytes 1 and 2 are calculated and displayed in Data 1.
(2) Some MIDI messages, such as Program Change or Channel Pressure, only have a single Data byte, and the Data 2 field will be blank. Also, some MIDI Messages have no data bytes, in which case both Data fields will be blank.
Settings Window
MIDI display options are adjusted in the MIDI Monitor Settings dialog.
|
“MIDI Monitor is Always On Top” - Check this item to keep the MIDI Monitor window on top of other programs or windows. When Display is Full:
|
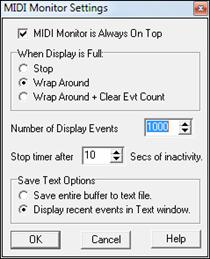
“Number of Displayed Events” - This box allows you to set the length of the capture buffer. The length can be set as high as 32,000.
Stop Timer after “nnnn” Milliseconds of inactivity. It does no harm to let the timer free-run, but if you find this irritating, you can set the timer to automatically stop after a period of no MIDI activity.
Save Text Options
These options help set the behavior when the [Save Text] button is pressed.
“Save entire buffer to text file” - To capture a listing of a large number of events, enable this option. This directly saves the entire buffer to a disk text file.
“Display recent events in Text window” - A text listing of the most recent events will be created in a text window. In this window unwanted events can be selected and deleted. You can also edit events or add comments. The selected text in this window can be saved to a text file or copied to the Windows clipboard, where it can be pasted into a word processor or spreadsheet program.
Display Filters
The Display Filter dialog allows you to select which events are to be recognized by the MIDI Monitor program.
Note: Virtually any combination of display events can be selected in the filter. It is therefore possible to select combinations that do not display any MIDI events at all. The MIDI Monitor will warn you about the more obvious “nil” combinations, but if you find that you are not receiving what you expected, review these filter settings.
Display
“Only” displays only the selected items chosen in the filter lists.
“All Except…” displays all data except the selected items in the filter lists.
Sources
“Computer MIDI Input,” when enabled, displays data arriving on the computer’s MIDI Input (when MIDI Thru is enabled in RealBand). To view data exactly as it is received, set RealBand’s “Thru Method” to Global. Also, check the RealBand Record Filter to ensure that the desired events are enabled.
“Host Program Output” displays data generated by RealBand.
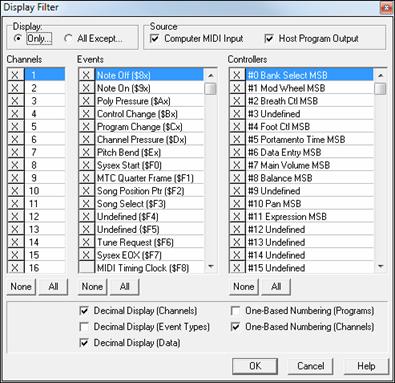
Channels: Select which channels are received.
Events: Select which Event types are received.
Controllers: Select which Controller types are received.
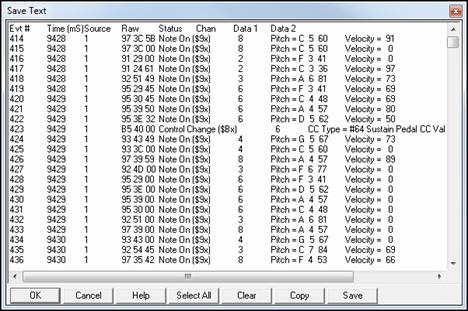
Save Text Window
When the [Save Text] button is pressed in the MIDI Monitor program’s main window, and the “Display recent events in Text window” option has been enabled in the Settings dialog, the Save Text window will open, containing the most recent MIDI events.
Select All: Selects all the text in the window.
Clear: Clears the selected text.
Copy: Copies the selected text to the Windows clipboard.
Save: Saves all window text to a .TXT file.
You can also use the common Ctrl+X (cut), Ctrl+C (copy), Ctrl+V (paste), and Delete keys to edit the text.
Unconditional 30-Day Money Back Guarantee on all PG Music products purchased from PG Music Inc.
PG Music Inc.
29 Cadillac Ave Victoria BC Canada V8Z 1T3
Sales: 800-268-6272, 250-475-2874,+ 800-4746-8742*
* Outside USA & Canada where International Freephone service is available.
Access Codes
Tech Support: Live Chat, support@pgmusic.com
 Online now
Need Help?
Customer Sales & Support
|
Phones (Pacific Time) 1-800-268-6272 1-250-475-2874 |
||
| Live Chat | ||
| OPEN | Online Ordering 24/7 |
|
| OPEN | Forums, email, web support |