
Search Manual
RealBand® 2023 for Windows® User’s Guide
Chapter 13: Reference
This chapter describes the pull-down menu commands in RealBand. The information discussed in this chapter is divided into separate sections based on each menu.
File Menu
The File Menu contains commands that are related to loading and saving files.
New
This command clears the current song from memory so that you can start a new song. If you’ve changed the current song since you last saved it, you will be prompted as to whether or not you wish to resave the file (with changes) before clearing the file from memory.
New Template
This command will let you create a new song using a template. A template is a file that is used as a starting point when creating a new song. A Choose Template dialog box will pop up that shows a list of all available templates. Select one, and then start working on your song.
Open
A dialog box will pop up which has two list boxes, one displaying all files with recognized extensions in the current directory, and another displaying the different directories/folders.
You can selectively restrict the type of file you’re looking for. RealBand supports virtually all common MIDI and audio formats in addition to its own .SEQ files and Band-in-a-Box ?G? files.
![]()
To load a file move the highlight bar over the desired choice and either press Enter or click on the [Open] button.
The Open dialog recalls the folder from the last time the dialog was used. This setting can be enabled or disabled in the File tab of the Options | Preferences dialog.
A file can also be loaded by typing its name directly in the “File name:” field instead of using the list box. You can also use the mouse to select a file by double-clicking on the file with the left-mouse button.
Open MusicXML Files
RealBand supports MusicXML so you can easily import MusicXML files from your notation programs such as Finale, Sibelius, and Guitar Pro to RealBand.
If you select a MusicXML file in the Open dialog, the Load XML File dialog will open. In this dialog, select a track that you want to load. To select multiple tracks, hold down the CTRL key and click a track. If you want to change the destination track, right click on a track and select Destination Track. Then, select elements that you want to load from the XML file. Finally, press [OK], and the XML file will be loaded to RealBand.
Custom File Dialog
We’ve made a custom Open dialog for you with more features than the standard dialog. To see the custom Open dialog, go to Options | Preferences (Ctrl+F5) and under the File tab select the checkbox for “Long File Names use custom open/save dialog.”
Open Special
Open Audio w/Chords (WAV/WMA/MP3/CDA)This menu command will let you select an existing audio file and launch the Audio Chord Wizard. Audio Chord Wizard - Using Existing SongThis menu command will open an existing audio file into RealBand, and then immediately launch the Audio Chord Wizard. Open Previous FileThis feature will open the previous file found in the current file directory or folder. The order is based on the alphabetic order of the files. This command is most useful when you’ve been using the Open Next File command and you need to “go back” to a previously loaded file. Open Next FileThis feature will open the next file found in the current file directory or folder. The order is based on the alphabetic order of the files. This command is useful when working with a group of files (e.g., a set list) and you need to edit a number of them. This feature saves you the trouble of having to keep using the File | Open command and repeatedly type in the file names. Open From ClipboardIf data is in the Windows Clipboard in the form of a Standard MIDI File the Open From Clipboard feature will use the data to load the entire “file” from the Clipboard into RealBand. This is similar to loading a file from disk except that the file is loaded from the Clipboard instead. This command provides a quick way of transferring an entire file from another program (e.g., Band-in-a-Box) into RealBand. Open Backup FileWhen the “Create backup file when overwriting a SEQ file” setting is enabled in the File preferences, RealBand will always create a backup file (BKS file) when a .SEQ file is overwritten. Use this command to open a backup file with a previous version of a .SEQ file. MultiTracks Wave File PlayerThis command will play special MultiTracks wave files (up to 48 tracks). This file format is similar to regular wave files, but instead of being simple stereo or mono standard wave files these files can be quite large and contain up to 48 discrete mono tracks. The dedicated MultiTrack Wave dialog is simply a quick means of playing these special wave files. This player can also play and preview any regular mono or stereo wave files. To use, note the following:
|
Save
This command will offer to save your work along with a name of your choosing. If a song has no name (untitled), a dialog box will pop up when you choose this option so that you can choose a file name and format (e.g., .MID, .SEQ, or .DP). See the Save As command for more information on choosing a file name and format.
Save As
The Save As command is similar in function to the Save command except that it also prompts you every time to choose the name of a file before saving it.
The Save As dialog recalls the folder from the last time it was used. This setting can be enabled or disabled in the File tab of the Options | Preferences dialog.
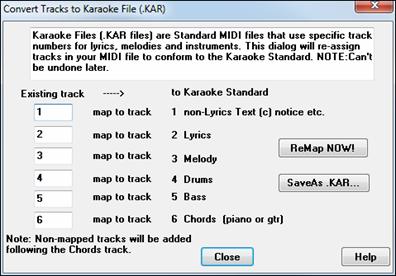
RealBand can save files either in .MID, Type 0 .MID (one track), Karaoke .KAR or .SEQ format. A dialog box that looks similar to the File Open dialog allows you to choose the name of the file, directory, drive, and file type. If you choose to save a file with a file name that already exists the program will prompt you to confirm that you want to overwrite the pre-existing file.
You can also save MIDI data as .DP files. A .DP file is simply a .MID file renamed with the .DP extension. The .DP files are used for storing drum patterns in order to differentiate them from a song (.MID) file.
The Save As command also supports saving to MP3, .MP4, .M4A, and .WMA files. MIDI tracks are automatically rendered to audio and saved in the file. Note that your system must have the codec installed for the type of file you want to save (e.g. MP3).
Save as MusicXML
To save the song as a MusicXML file, choose “XML Files (*.XML)” as a file type in the Save As dialog. This will open the Save XML File dialog. First, select a track that you want to save. To select multiple tracks, hold down the CTRL key and click the track. The “Track-specific settings” area lets you choose which clef to include for each track. For example, you can save the bass clef for the Bass track, both tracks for the Piano track, and the treble clef for the Melody track. There is also an option to include a tablature. You can also select elements that you want to save in the XML file. Finally, press OK, and the XML file will be saved.
Save as ABC Music File
You can save a track of notation in a popular ASCII text format to import into other programs, or you can paste this format into a user forum as a way of sending the track (usually the melody and chord symbols) to other users without having to attach a file. To save the file, press the [Save As] toolbar button. Then, when the Save As dialog opens, select “ABC Files” as a file type, and specify the location and the name of the file.
This will open the Save to .abc file settings dialog.
In the “Select a track to save” area, click on the track that you want to save in the file.
Enable “Include Chords” to save chords in the file.
When “Include Notes” is checked, notes on the selected track will be saved.
When “Simplified Chord Names” is enabled, complicated chords will be written as simplified names. For example, D7#5#9 will be written as D7.
The [Copy to clipboard] button will copy the file to the clipboard. You can then paste it into other programs. The [Save as File] button will let you type a name and select the destination in your hard drive.
Save As Special
Import
This lets you easily add a MIDI/ WAV/ SEQ/ or MGU file to an existing project (SEQ). This is handy when combining media types to a new or existing project.
Scrap
Change Directory (Path)
This command lets you change the current (working) directory for loading/saving files. A dialog box will pop up prompting you to select a new directory.
Window Setup
This item is a special sub-menu for loading and saving .RWS (Window Setup) files. See the proceeding three sections (Load Window Setup, Save Window Setup, and Normalize Window Setup) for details on .RWS files.
This feature will send notation to your printer to be printed. This is the same as the print button in the Notation window. A Notation window must be the currently active (highlighted) window in order to print. You can launch a Notation window by clicking on the notation button or by pressing ALT+F2.
Exit
This command exits/quits the program. If you’ve changed your work since you last saved it the program will first prompt you as to whether or not you wish to save your project before proceeding with the exit feature.
Edit Menu
The Edit menu contains commands relating to editing (changing) a song. This menu has standard editing features such as cutting, pasting, quantizing, etc. The editing commands normally affect the marked (highlighted) area of all selected tracks.
Undo
Undo can be applied to most operations in RealBand –including audio effects processing, notation edits, and event-level MIDI edits.
This feature will undo the last edit command executed from the lower portion of the Edit menu (excluding commands in the chords submenu). It will restore the tracks that were affected by the last edit command to their previous state. If you are working in the Comments window, this will also undo the last text edit command. RealBand supports up to 100 levels of Undo, the number is set in Options | Preferences | General.
If you execute a command for which there may not be enough memory to be able to issue the Undo command RealBand will warn you beforehand. If you receive such a warning it might be a good idea to save your work to disk before proceeding.
Cut
This command works in a few different ways – depending upon which window is active. If you are working in the Comments window, this command will cut the selected text to the clipboard. Otherwise, it deletes MIDI events and wave data from the marked area and moves them to the scrap buffer. As with copied events, cut events can later be pasted to any location, or saved to a file with the Save Scrap command.
|
Events Checkbox: When this checkbox is enabled the Cut command will operate on MIDI events or WAV data in the marked area of all selected tracks. Tempo Changes Checkbox: When this checkbox is enabled the Cut command will operate on tempo changes in the tempo map. If the first tempo map entry is within the marked area it will be copied instead of cut, and all other entries will be cut. You can the paste the tempo changes to a different location in a song using the Paste command. Markers Checkbox: Enable this if you want to cut Markers in the marked area between From: and Thru: locations. Chord Symbols Checkbox: Enable to cut chord symbols in the marked area. Part Markers Checkbox: Enable to cut “a” and “b” part markers in the marked area. Options: When events are Cut a gap is created (by default) in the selected track(s) of a song. You can choose to keep or close this gap. |
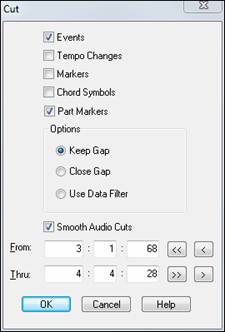
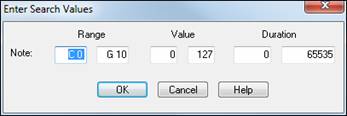
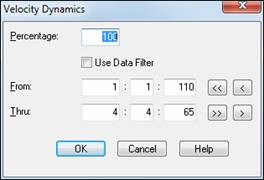
Use Data Filter: The Data Filter is a filter that, when in use, determines which events will be affected by the current edit command. RealBand will only allow the events that match the chosen characteristics to “pass through” the filter so that the current edit command can act upon them. The filter has a separate row for all six types of MIDI events. Within each row are settings that determine whether a type of event will pass through the filter, and the ranges and values of the events that RealBand will allowed to pass through. There is also a row within the filter that lets you specify which MIDI channels will pass through the filter.
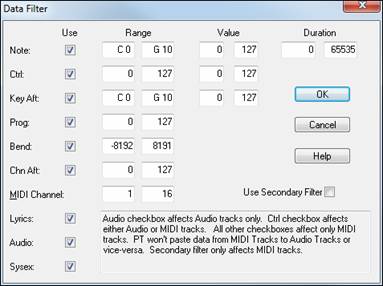
The Use column determines whether or not an event type will pass through the filter. If the Use column is checked, the event type will be used, but if it isn't checked the event won't pass through the filter. For example, if the use column in the Note row is not checked then note events will not pass through the filter.
The Range column determines what range of events will pass through the filter. For example, if the minimum for the note range is C1 and the maximum is C2 only notes that fall within the range of C1 through C2 will pass through the filter. The current edit command will not affect any notes lower than C1 or higher than C2.
The Value column works in the same way as the range column, but will act upon note velocities, controller values, or aftertouch values. Only events with values that fall within the specified values will pass through the filter. For example, if the minimum note value is 50 and the maximum is 100, then only notes with a velocity of 50 up to a velocity of 100 will be passed through the filter.
Duration allows you to specify that only notes with durations in a specified range will be affected by your edit.
A Secondary Filter is a second Data Filter that you can use in addition to the regular filter. If you check the “Use Secondary Filter” option at the bottom of the filter, then a second filter will pop up after you're done editing the regular filter. Events that pass through either the regular or Secondary Filter will be affected by the current edit command.
The purpose of the Secondary Filter is to let you choose two separate sets of ranges. For example, you could specify a note range of C1 to C2 in the regular filter, and a note range of C7 to C8 in the secondary filter. Notes that fall within either range will be affected by the current edit command but notes that don't fall within either of these two separate ranges won't be affected at all.
Smooth Audio Cuts Checkbox: This feature performs a very quick “fade-in” if there is audio data immediately beyond the cut section. This will prevent any clicks or pops from occurring when the section beyond the cut is played back.
Copy
This command works in different ways –depending upon which window is active. If you are working in the Comments window, this command will copy the selected text to the clipboard. Otherwise, this command copies the marked area of selected tracks, as specified by the From: and Thru: settings, and places the copied events in a scrap buffer. You can then use the Paste command to paste the contents of the scrap buffer anywhere within the song, or you may use the Save Scrap feature to save the contents of the buffer to a file. You can use the Data Filter to determine which events to copy.
|
Events Checkbox: When this checkbox is enabled the Copy command will operate on MIDI events in the marked area of all selected tracks. Tempo Changes Checkbox: When this checkbox is enabled the Copy command will operate on tempo changes in the tempo map. You can the paste the tempo changes to a different location in the song using the paste command. This command also automatically copies MIDI events into the Windows clipboard so that you may paste the events into another Windows application that supports pasting Standard MIDI Data to/from the clipboard. |
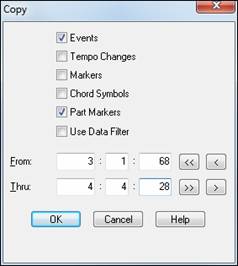
Markers and Chord Symbols will be copied if these boxes are checked.
Another option when working with MIDI tracks is to use the Data Filter to determine which events to copy. If you use the Data Filter the program will copy some events and will leave others untouched, depending on whether or not they “pass through” the filter. See the detailed description under the Cut topic.
Paste
The Paste command works differently depending upon which window is active. If you are working in the Comments window the paste command will paste text from the Windows clipboard into the Comments section. Otherwise, this command pastes the contents of the scrap buffer to the current location in the song, as specified in the From: settings.
Paste automatically works the same way as 1-Track Paste if the scrap buffer only has data from 1 track.
|
Destination Track # If you copy or cut from a single track, the Paste dialog will let you choose the destination track, with the current track being the default value. Use the 1-Track Paste menu item if you wanted to paste multiple tracks onto a single track. The Repetitions option will cause the paste to repeat for as many times as you specify. The Options field gives you 4 choices:
Events Checkbox: When this checkbox is enabled this command will offer the ability to paste any Events that are currently in the scrap buffer. |
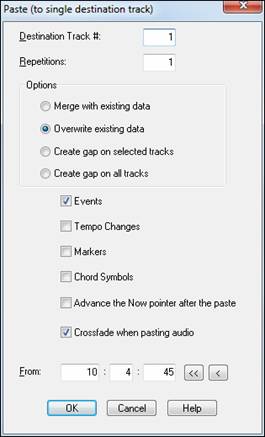
Tempo Changes Checkbox: When this checkbox is enabled the Paste command will paste any tempo changes that were copied or Cut into the tempo scrap buffer. The Markers and Chord Symbols checkboxes have the same function.
Advance the Now pointer after the paste advances the current time to the end of the pasted area. This is a useful feature for when you plan to create a new track or song section from multiple Pastes.
Crossfade when pasting audio smoothes out a paste, so that no audible “clicks” are heard at splice points of pastes.
1-Track Paste
This feature performs a similar function as the Paste command except that it pastes all the data onto one single track. Therefore, you should select only one track as the destination track or this command can’t be performed.
This command will only paste MIDI data to a MIDI track and WAV data to an audio track. For example, if you 1-Track Paste to an audio track, and there is also MIDI data in the scrap buffer, the MIDI data will be ignored.
If more than one audio track is in the scrap buffer RealBand will merge those tracks together automatically during the 1-Track Paste procedure; but this will take a notably longer time to carry out.
Insert Blank Bars Command
The new Edit | Insert Blank Bars into song command makes it easy to insert blank bars into the song, with an option to intelligently adjust MIDI notes that are close to the boundary of the section you are inserting (useful if inserting bars in the middle of a song). This will insert blank bars at any location of the song, and push the music forward in time to create the blank bars.
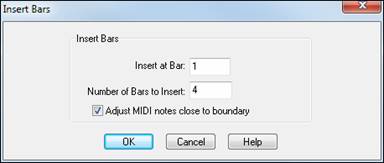
In the Insert at field, enter the bar at which you would like RealBand to place the blank bars.
In the Number of Bars to Insert field, enter the amount of blank bars you would like RealBand to insert.
If the Adjust MIDI Notes Close to Boundary checkbox is checked, RealBand will attempt to ensure that MIDI notes that are slightly earlier than the point of the insert (and really is part of the section of music that will be moved forward in time but was played slightly early) will be moved to the end of the inserted section rather than staying just before the inserted section.
Delete Bars and Preserve Settings
Edit | Delete Bars from song makes it easier to delete bars from a song with an option to preserve the most recent Patch/Wheel/Controller settings and an option to intelligently adjust MIDI notes that are close to the boundary of the section being deleted. This command will delete bars of music from the song (and will move the music beyond the deleted section backward in time so there is no gap left over).
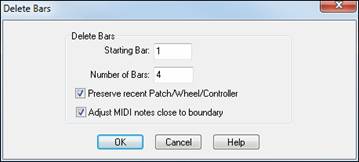
In the Starting Bar field, enter the bar number of the beginning of the section you would like RealBand to remove.
In the Number of Bars field, enter the number of bars to remove.
If the Adjust MIDI Notes close to boundary checkbox is checked, RealBand will attempt to ensure that MIDI notes that are slightly earlier than the very end of the deleted section (and really are part of the section of music beyond the deleted section) will be moved backward in time rather than deleted. RealBand will also attempt to delete MIDI notes that are slightly earlier than the start bar and really considered to be part of the first bar being deleted.
Track
DuplicateThis makes an exact copy of a track. You must select only one track as this feature is intended to duplicate one track at a time. You will be prompted to select a destination track. The destination track must be empty. EraseThis command permanently erases all selected tracks and resets their track setup values to “0.” You will be prompted as to whether or not you wish to erase all selected tracks. This command can’t be undone later. Erase Data OnlyThis feature works the same as the preceding Erase command except that it will not erase the parameter settings in the Tracks window such as the Track Name, Channel, Velocity, etc. Erase All LyricsThis delete all lyrics from the track. Adjust Volume/Trim of All TracksThis will increase or decrease the audio trim db for all tracks at the same time or set them all to the same specific value. MergeThis feature will offer to merge two tracks (of the same type- e.g., MIDI) together and place all the MIDI or WAV data found in both tracks onto a 3rd track. “Merge Track #”and “with Track #” fields:These settings contain the numbers of the two source tracks that are to be merged. “To Track #” field: This setting specifies the number of the destination track in which the merged data from the source tracks will be placed. Any blank track number (from 1 to 48) is valid. Note: This command can’t be undone, but you can simply delete the destination track if you change your mind. The original source tracks are unaffected by this command.
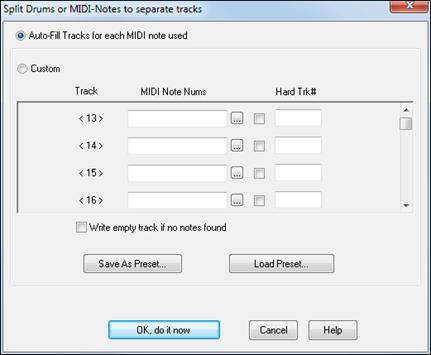
Convert Guitar TracksThis command will convert a single channel guitar track that contains position information in it into a multi-channel guitar track (i.e. MIDI Channels 11-16). The position information tells the Guitar window which position on the fretboard to display the notes. It consists of Controller Number 84 MIDI Events that have been inserted into the track in the Guitar window by pressing the insert position button. If you have created a single channel guitar track using your keyboard and you used the Guitar Window to insert position information then this command will help you convert the track into a multi-channel “MIDI Guitar” track. Six MIDI channels are used in this conversion, one for each guitar string. The range of the channels is based on the “Base Channel” setting in the Guitar window’s Options dialog. If the base channel is set to 11 (default), the channels will range from 11 to 16 –with Channel 11 corresponding to the highest string and Channel 16 corresponding to the lowest. Split Piano Track into LH/RHThis command will attempt to split a piano track so that the notes that were played by the left hand are moved to Channel 8 and the notes played by the right hand moved to Channel 9. This command may not work perfectly in all situations, but it often produces quite acceptable results. The auto-splitting performed by this command can be thought of as one of the many possible ways a track may have been played. When a track is split by this command you can check the “Use Ch 8/9 for Left/Right hand” checkbox in the Notation Window Options dialog to attempt to display the notes in the Notation window on Channel 8 in the bass clef and the notes on Channel 9 in the treble clef. Copy Lyrics to ClipboardThis feature can copy any existing lyrics of the current track to the standard Windows clipboard as text so that you can share them with another program. Selecting this command will automatically launch a Big Lyrics window for the current track –and then copies the lyrics to the clipboard. You can close the Big Lyrics window at any time after the lyrics have been copied to the clipboard. If a Big Lyrics window is already open for a given track the program will use the existing window rather than launch a new one. Align Music to Click TrackThis feature attempts to align a track of music that was recorded in free time to a click track. It tries to take a free time track and make adjustments to the times of the events so that the music becomes a standard track that can be synced to a metronome. You can now easily record a click track along with any audio and/or MIDI, and then have RealBand automatically line up everything with tempo and time signature changes. This can have many useful applications. For example, if you recorded a strumming guitar in free time, RealBand can line it up to the grid so you can add loops, RealDrums, or RealTracks. Or, if you have just purchased a song from iTunes, you can have it line up to the grid in RealBand to make it easier for you to learn. Or, if you have recorded MIDI (not to a click track), and you can have that MIDI line up to the grid without affecting the actual performance. Consolidate Audio RegionUse the Consolidate Audio Region feature when you are working with WAV (digital audio) files to recreate a track or region as one contiguous file. While not always necessary, this is especially useful in situations where you have performed many edits (e.g., Cut/Copy/Paste) and the resulting track has been broken up into many smaller wave “chunks” that may cause audio glitches and/or timing errors as your computer has to work harder to open and close the many small files. The “consolidate” feature effectively serves to “stitch together” these smaller files into one big file. The non-real time audio effects work better with consolidated tracks, if these effects are returning error messages the problem is often corrected by applying this feature. This command will offer the option to include silence when consolidating from the start of the song and tracks(s) don't start at the very beginning. Insert Blank TrackThis command inserts a blank track at the position of the Current Track selected in the Tracks window and bumps all existing tracks down in the Tracks view by one row. For example, say you want to insert a blank track at Track 2. By using this command, the existing track at track 2 will become track 3 and the track that was previously track 3 will become track 4. To undo this procedure, you could use the Remove command to remove the track previously inserted. Remove TrackThis command removes (deletes) the Current Track and moves higher numbered tracks up by 1 row in the Tracks window. If you want to delete track number 3 with this command, Track 4 will become track 3 and track 5 will become track 4, etc. This command can’t be undone later, but you could move the remaining tracks back to their original locations by using the Insert Blank Track feature. Swap TracksThis command lets you easily swap two tracks. This will switch their positions (track number) on the Tracks window. To swap track 2 with track 4, enter 2 in the Swap Track # field and enter 4 in the With Track # field, and the two tracks will trade places. Save Track to FileThis command lets you save the current track as a file. If the track is an audio track this will export it to a .WAV file. If the track is a MIDI track you can save it either to a .SEQ, .MID, or Type 0 .MID file. Generate Intelligent Audio Harmony (with passing tones) , MIDI Vocoder, Fix TuningThe intelligent audio harmony feature uses elastique.
To use, right-click on the Tracks window and select Generate | Generate Intelligent Audio Harmony (with passing tones)), MIDI Vocoder, Fix Tuning. If you want to generate harmonies for a region, highlight the region before selecting this command. This will open theGenerate Intelligent Audio Harmony (with passing tones) dialog. Select the number of “Harmony Voices” that you want to generate. Merge 2 Mono Audio Tracks to StereoThis command lets you combine any two mono audio tracks into a single stereo track. When the dialog box pops up, you need to type in the track numbers of tracks containing mono audio in the Source Track for Left Ch and Source Track For Right Ch fields. In the Destination Track field, type in the track number of a blank track. Press the OK button and RealBand will merge the mono audio tracks to stereo. Note: The original tracks will remain untouched. At some point, you could choose to erase the original tracks using the Track | Erase command.
Split a Stereo Track Into 2 Mono TracksThis command lets you split a single stereo audio track into two mono audio tracks. This is useful in special situations, such as if you wanted to use completely different effects on each of the two channels. In the Stereo Source field, type in the track number of a stereo audio track. In the Destination Track For Left Ch and Destination Track For Right Ch fields, type in two blank track numbers. Press the OK button, and RealBand will split the stereo track into two mono audio tracks. Note: The original track will remain untouched. At some point, you could choose to erase the original track using the Track - Erase command.
Make all BB tracks regular tracksThis allows BB tracks to be moved or renamed like regular tracks. It also means the tracks won’t be regenerated, so it is useful safety feature to save a RealBand arrangement that you don’t want to change. Make first 8 tracks BB tracksThe first eight tracks will be assigned the default BB settings. If there are existing tracks present they will be moved down. |
MIDI

Audio
Insert Wave FileThis command offers to import a wave file into the “current track” of your project.
Note: This feature may not work unless running Windows XP or higher. CDA files may not open in Windows Vista.
This command will also import MultiTrack .WAV files by offering a choice of merging them to mono or placing additional tracks of the wave file onto separate tracks. For example, if Track 1 is the current track and Track 2 is empty (and you import a Stereo Wave file), RealBand will place the left channel on track 1. The right channel will be imported to Track 2 on the next available track, which, in this case, is Track 2 since this track is empty. A dialog will pop up which lets you select the time location to place the wave file(s). By default this is the current time (Now:) of a song. Open DirectX/VST Plugins ConfigurationOpen the DirectX/VST window to select and edit effects plug-ins. Open DXi/VSTi Synth Panel ConfigurationOpens the DirectX/VST window with the control panel for the current synth. |
Audio Effects
This submenu contains all of the installed audio (DSP) effects that can be used with Wave Digital Audio Tracks (or “rendered” MIDI tracks). The audio effects in this submenu are actually external “plug-ins” that are transparently integrated with RealBand. You’ll be able to use them just as if they are built-in to the program since they work in a manner similar to the standard editing commands. To access any DirectX or VST plug-ins you have installed in your system, choose the “DirectX Audio Plugins” option and select the effect you want to use from the drop-down list located in the DirectX plug-in dialog. In the Edit | Audio Effects menu, there is an item to reverse a highlighted section of audio to create backwards effects in your song. This can be used for backwards soloing effects or for transitions to a new section of a song. For example, if you reverse a held chord or a sustained cymbal, it can be used as a “crescendo” effect to transition from one section to another section of a song.
A detailed description of the each effect is described in Appendix A on this manual.
Chords
This menu item contains a special sub-menu that allows you to delete or copy chord symbols that are shown in the Chords or Notation window. The commands in this sub-menu do not affect the MIDI playback of a song, but the song will be changed if BB tracks are regenerated.
|
Copy ChordsThis feature lets you copy or move chord symbols that are shown in the Chords or Notation window to a different location in one easy operation. This command does not affect the MIDI playback of a song, but it does affect the generation of BB tracks. The Copy From Bar and Copy Thru Barsettings provide you with the ability to select a range of bars (measures) in which the chord symbols are copied. The Paste From Bar setting offers a space to choose the bar number in which to paste the copied chord symbols. If the Move Instead of Copy checkbox is enabled the chord symbols are moved instead of copied. The Repetitionssetting causes the program to paste the chord symbols by the amount shown in this setting. The repetitions setting is ignored if the “Move Instead of Copy” checkbox is checked. Note: This command can’t be undone later. A warning message box will give you one last chance to cancel the command before it is carried out.
Delete ChordsThis command deletes any chord symbols that are shown in the Chords or Notation window. This command does not affect the MIDI Events of a song but it does affect the generation of BB tracks. The Delete From Bar and Delete Thru Barsettings allow you to select a range of bars (measures) in which the chord symbols are deleted. This command can’t be undone later. A warning message box will provide you with the opportunity to cancel the command before it is performed. You can delete chord symbols individually for a specific beat of a song by pressing Ctrl+Delete or the comma (,) key while in the Notation window (only if the Ch checkbox in the Notation window is checked). Chords WindowThis command opens the Chord window. |
Song Settings
This menu command opens the Song Settings dialog with options that apply only to the current song.
Tempo
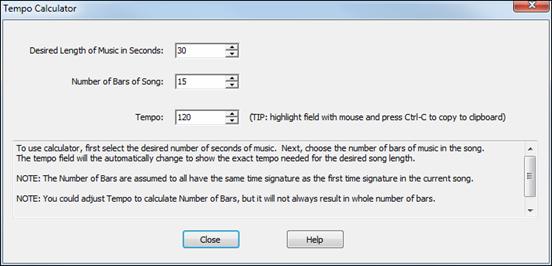
Set Current TempoThis command allows you change the current tempo of the song. You may choose a tempo value of 8 to 2000. RealBand will automatically change the current tempo entry in the Tempo Map to the tempo that you select. See also Tap-in tempos as described in the Reference section. Tempo MapThe Tempo Map is a list of all the tempo changes that occur during the course of the song. Tempo CalculatorThe length of a song depends on tempo and number of bars. With this calculator, you can enter 2 of the 3 variables (length of song in seconds, tempo, number of bars) and the program calculates the third variable for you. So, for example, if you need a piece of music lasting 60.00 seconds, and it is 45 bars, you can use the calculator to find the tempo that will achieve that.
|
Meter
Set Time Signature (Meter)This command lets you change the current meter. The Meter Map event for the current time will correspondingly be automatically changed. The numerator can be from 1 to 99. You can change the denominator via the drop down combo box. Meter MapThe Meter Map contains a list of all the meter changes that occur during the course of a song. The [Ins], [Del], and [Change] buttons may be used to insert, delete, and change the entries in the Meter Map. You may also insert meter entries by pressing the Insert key on your computer while in the Meter Map dialog. Pressing the Enter key or double mouse clicking over the desired entry will allow you to change the meter instantly. The Delete key is used to delete entries from the map. Note that if there is only one entry in a map you won’t be able to delete it since a minimum of one entry is required in each project. |
Key Signature
This feature allows you to choose the key signature for a song. This setting will affect whether accidentals are displayed as sharps or flats. The key signature is selected from the dropdown combo box. The Key Signature dialog also has options for transposing the song’s MIDI tracks, audio tracks, or both to the new key. “No Transpose” changes the key signature for notation but does not affect the tracks.
Time Stretch and/or Transpose Entire Song
This lets you transpose/stretch/reduce all tracks and then conveniently save to a new file.
Generate Menu
The Generate Menu contains commands that are related to generating tracks.
Render Menu
Export Acid Loop - Highlighted section or entire track to WAV in Loops Folder
This command will render the highlighted section of the current track or the whole track as an ACID Loop and save it to the bb\RealTracks\Loops folder.
Save as UserTrack (highlighted section or whole track)
This command will render the highlighted section of the current track or the whole track as a WAV file and save it to the bb\RealTracks\UserTracks folder.
Export Highlighted Section (or entire track) to wav/wma/mp4/m4a/mp3
This command will export the highlighted section of the current track to a wave file –as long as the track contains audio data. Drag a section of the track while holding down the left mouse button to select a highlighted section. Use Ctrl+A to select the whole track, or open the right-click menu and choose Select Whole Track.
Save Track to File
This command lets you save the Current Track as a file. If the track is an audio track this will export it to a .WAV file. If the track is a MIDI track you can save it either to a .SEQ, .MID, or Type 0 .MID file.
Merge Audio and VSTi/DXi Tracks to Stereo Wave File
This is an export command that will merge all the audio tracks to a stereo wave file while simultaneously rendering and merging the MIDI tracks to audio if you have a DXi or VSTi software synth. When played in a wave file player the file will sound the same as if the audio tracks of the song were being played by RealBand. The volume, mute, pan, etc. settings of the track will affect the sound of the merged stereo wave file.
Merge Audio and VSTi/DXi Tracks to Compressed File
When you export audio to alternate file formats a standard Windows Audio Format dialog appears.
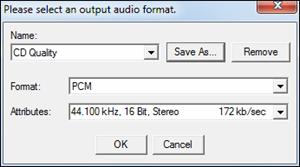
Use the Format popup menu to select the ACM codec you wish to use, and then select the exact specifications of the file from the choices available in the Attributes popup menu.
If you frequently use a particular combination you can save a setting in the Name combo box.
When you press OK, RealBand will export the song to the format you have selected using the ACM codec.
Merge Audio and VSTi/DXi Tracks to WMA File
This command works the same as the Render | Merge Audio and DXi Tracks to Stereo Wave File command except that this feature will compress the file using the Microsoft Streaming Media® Compression Technology™. When you execute this command the program first generates a temporary stereo PCM file (Raw Wave). A dialog will then pop-up that will let you save the resulting stereo PCM wave file to a .WMA file (Windows Media Audio).
Test Wave File or Compressed File
This command launches your default media player so you can test your file for compatibility and playability with a standard Windows media player.
Launch CD Burner
This command launches the MiniBurn CD Burner program. If the current song has audio data this feature will first offer to merge audio tracks in the current song to a WAV file. If you say OK to this option the CD Burner will automatically add the .WAV file to a list of files to be burned onto a CD (burn list).
If necessary, RealBand will convert your file to 16-bit, 44.1 kHz stereo before burning it to an audio CD.
Save all tracks to individual files (WAV MID)
This command will save all tracks to either WAV or MID files depending on the track type.
Save all tracks to WAV files
This command will save all tracks to WAV files. MIDI tracks will be rendered using DXi.
Batch Convert
The Batch Convert command will convert a group of files in a folder over to another file type (.SEQ, .MID, .MP3, .MP4, .M4A, .WAV, .MGU, .SGU). For example, you might want to convert your RealBand songs to MP4 files.
You just enter the location and file type (or all files) for the files that you want to convert and then choose the output file type and location. There is also the option to add a suffix to the file names to identify the rendered files.
Action Menu
This menu contains commands dealing with recording or playback.
Play
You can start playback by using this command or pressing or by pressing the <SPACE BAR> or by pressing the Play button.
Play From Start
This command will play back the song from the beginning.
Play at Speed
This command brings up a submenu that gives you a choice of playing the song at 25% speed (one quarter the regular speed), 50% regular speed, 75% regular speed, and 100%, which is regular speed. Percentage tempo buttons are also available in the Audio Edit window.Once engaged from either location the tempo playback speed remains in effect until changed in one of the two locations.
Stop
This command stops a sequence from playing or recording. You can also stop playback by pressing the <SPACE BAR> or the Stop button.
Record
You can start recording either by using the Record menu item or by pressing the [Record] button.
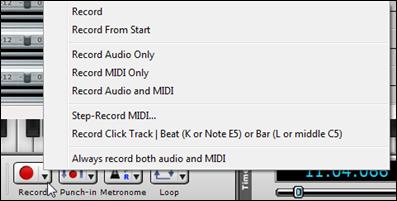
- Use Record Audio Only to prevent MIDI from also being recorded. This will avoid extra popup questions after recording.
- Use Record MIDI Only to prevent audio from also being recorded. This will also avoid extra popup questions.
- Use Record Audio and MIDI to record both regardless of the current track type.
- Use Record Click Track menu item for recording a click track to align events to the locations you clicked. This automatically will ensure that the current track gets set to MIDI, or switch to a new track if the current track is audio. This will also designate the track as the Click Track after recording, and set the name to “Click Track” as well.
- If Always Record both Audio and MIDI menu command is enabled, then when the Record button is pressed, both types of recording will occur by default. If this is not checked, then either MIDI or audio will be recorded, depending upon the track type.
Recording will occur over the track that is selected as the current track when you activate Record. The program will attempt to record either MIDI or audio data –depending on whether the current track is set to audio or MIDI in the Tracks window.
Any Volume, Pan, Chorus, and Reverb mixer adjustments made while recording will be recorded in real-time and saved as MIDI controller messages –just like incoming MIDI data. Adjustments made in the All column of the mixer will not be recorded. When recording mixer moves it is common to record the data on separate tracks from the musical data so that it can be more easily edited or deleted.
Recording can be stopped by pressing the <SPACE BAR > or by pressing the Stop button.
When you have successfully recorded any MIDI or audio events you will be asked whether or not you wish to keep the take.
|
If the Punch In mode is activated the recording will automatically erase previously recorded data in the Punch In range field without the need for you to erase the old data. |
When recording WAV audio tracks the recording always overwrites any existing data even if you’re not punching in. In other words, audio recording works like a tape recorder. If you want to ADD to a track without overwriting the old/existing track simply select and use a new/blank track before recording additional material.
Recording onto a MIDI track won’t overwrite any existing data unless Punch In mode is enabled.
Each column in the mixer represents a track, and if the track is a MIDI track then any adjustments made in that column will result in a MIDI controller message (mixer move) being generated based on the forced MIDI channel of that particular track. If there is no forced channel for the track the channel of the first MIDI event will be used. If there are no events or a forced channel the actual track number will be used.
See the Window Menu section later in this chapter for further information on the Mixer window.
If a selected track is a MIDI track and you also make mixer adjustments during recording, then you will be prompted as to whether or not you wish to keep the recorded moves at the end of the take.
Record From Start
This command will automatically start recording from the beginning of a song.
Step Record
The Step Record feature allows you to record MIDI data one step at a time as opposed to a regular, real-time recording. Each time you play something on your keyboard the sequencer will record the event with a time value representing the current location in the song (i.e. the Now: time field). This kind of recording method is very useful if you know your way around a piano keyboard, but perhaps don’t know it quite well enough to play in real time. This way, you can quickly enter the notes you want via your MIDI keyboard without having to play it in time, as there will be an unrecorded “rest time” – of any length you want – between notes played.
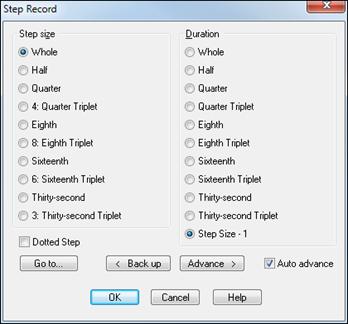
Choosing a Step Size: To choose a step size simply mouse-click over the desired step. In the example dialog box shown above, for example, a Whole note step has been selected.
Durations: Durations are chosen exactly the same way as step sizes; the “step Size minus 1” option will automatically make the durations 1 tick less (PPQ) than the selected Step Size. This is a convenient way to make durations automatically match whatever step size you choose.
Auto Advance: When the “Auto Advance” setting is checked the time will automatically advance to the next step after you play each note or a chord. You will see the Now: and Time: fields on the tool bar change accordingly as the time is advanced.
Dotted Step: When Dotted Step is enabled the step size will be 1and 1/2 times the regular step size. (Example: a dotted eighth note is equal to 3 sixteenth notes.)
Go to: Use the [Go to…] key to conveniently move to a new location.
Backup and Advance: The[< Back Up]and[Advance >] buttons allow you to move through your project forwards and backwards by one step at a time.
When you are finished with step record press the [OK] button. The take will be automatically saved. Pressing the [Cancel] button will cancel the step record without keeping the take.
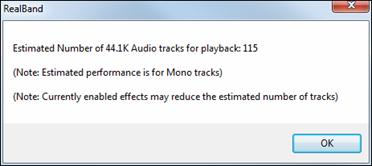
Test Audio Performance
This command will test the performance of your computer and hard-drive for recording digital audio tracks. This feature will provide an estimate of the maximum number of 44.1 kHz tracks that the program can successfully play back. Keep in mind that this is just a rough estimate; the actual amount of tracks you can play back may be higher or lower than this estimate.
Go to Time
This command gets you directly to any time in a song. You can also use the F6 function key to activate this command. If the Display Mode (in the SMPTE section of the Options Menu) is set to “Normal” then the time is expressed in Measures:Beats:Ticks. If the Display Mode is set to “SMPTE” then the time is expressed in Hours:Minutes:Seconds:Frames.
Go To Marker
This command allows you to go to a specific marker without having the Markers window opened.
Jukebox

The Jukebox feature lets you automatically play a list of songs. When selected, a dialog box will pop up that offers you choices as to which songs will be played in a Jukebox session, etc.
The “Play List String”fieldcontains a list of songs to be played. “Wild Cards” are allowed, as shown in the illustration above.
For example, if the “Play List String” is *.* then all .MID and .SEQ files in a specified directory will be played.
For example, suppose the Play List String is
“C:\WINDOWS\CANYON.MID;C:\RealBand\*.SEQ;D:\MIDIFILE\*.MID.”
In this example, the program will first play CANYON.MID followed by all the .SEQ files in the C:\RealBand directory. This would be followed by all the .MID files in the D:\MIDIFILE directory. The Play List String can be up to 1024 characters long.
The [Delete] button removes the currently highlighted song from the play list.
[Move Up] and [Move Down] reposition the currently highlighted song in the list.
Use [Delete All] to remove all songs from the play list.
When the “Random” checkbox is checked the Jukebox feature will play all the files in a random order. Otherwise, songs will be played in the order in which they are physically encountered. There are many 3rd party disk utilities which can be used to re-sort files in a given directory based on selectable sort options such as file size, alphabetical, file date, etc.
The “Delay” field lets you insert a user-definable delay, in milliseconds (thousandths of a second), that the Jukebox will pause between playback of songs.
[Re-start jukebox from currently highlighted song] restarts the Jukebox with the currently highlighted song.
The [Open] button allows you the option of loading a .JUK file. A .JUK file simply contains a pre-made Play List String. If you save a .JUK file with the [Save] button the current Play List String can be saved to a .JUK file. If you later load the .JUK file with the [Open] button the Play List String stored in the file will appear in the Jukebox dialog.
Click on [Save] to save the current play list as a .JUK file.
The [Add to Play List] button lets you add a file to the play list from a File | Open dialog without having to type the file name into the Play List String field.
[Add Folder to Play List] automatically adds all the songs in a folder to the play list.
The “Stop Between Songs” checkbox will cause the program’s playback to stop between songs. You can later re-start the Jukebox by pressing the Start button.
The [Start] button will start the Jukebox. If you’ve typed any invalid file names in the Play List String field the program will inform you of the error so you can correct it. When the Jukebox is playing the window title on the main screen will have the words “(Jukebox)” shown (to the right of the file name) to indicate that the program is in Jukebox Mode.
The [Stop] button will stop the Jukebox. You can restart the Jukebox from the current song by pressing start.
|
There are hot keys for the [Start] (t) and [Stop] (o) buttons within the Jukebox. The hot keys (t) and (o) will work as long as the jukebox is visible and the currently active window. |
The [<] and [>] buttons enable you to jump to the previous or next songs in the play list.
[Make highlighted song Next Song] lets you move to a new song in the play list. The currently highlighted song will be the next to play.
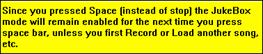
The [Close] button will exit the Jukebox. Even if the Jukebox is playing you can still exit the Jukebox. You can always return to the Jukebox later. When playing in JukeBox mode, and you have exited the Jukebox window itself, and space bar is pressed, RealBand will remain in JukeBox mode so you can press space again to resume Jukebox play. A Flash message will display when the space bar is pressed.
Changing the Play List
If you are playing a list of individual songs in a non-random order you can change the play list after you’ve already started.
To do this, follow these steps:
- First, enable the Stop Between Songs checkbox.
- Next, start editing the song list either during the playback of the current song, or you could wait until it stops and then do so.
- When editing the song list you must delete the songs that already have been played, otherwise they will be heard again since the program will be restarting the song list from the first song in the list. Your new song list should start from the song that you want to be played next.
- Then make any other changes to the song list such as substituting one file for another, etc. Use the Add to Play List button to add a song. This action will add the song at the end. To change the position of a file you can use Ctrl+X (cut) and Ctrl+V (Paste) keys.
- The Jukebox will stop after the current song is played since the Stop Between Songs checkbox is enabled (Step 1).
- Press the [Start] button and the Jukebox will proceed to inform you that the song list has changed and will ask if you want to use the new song list. Choose “yes” and the Jukebox will restart with the new song list.
Note: If you edit the song list ensure that you don’t exit the Jukebox until the new song list is playing. Otherwise, the new song list will be ignored. If you make any errors while editing the song list you will be prompted to fix them before proceeding.
Block Menu
The Block menu contains commands that deal with marking an area (or block) of the song. The areas marked here work in conjunction with the editing options found in the Edit menu.
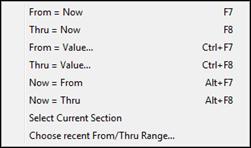
From = Now
This command sets the beginning of the marked area to the current time.
Thru = Now
This command sets the end of the marked area to the current time.
From = Value
This command lets you directly specify the From Time value. A dialog box will appear in which you can enter the new time.
Thru = Value
This command lets you directly specify the Thru Time value. A dialog box will appear in which you can enter the new time.
Now = From
This command sets the current time to the beginning of the marked area.
Now = Thru
This command sets the current time to the end of the marked area.
Select Current Section
This command will highlight the current section for editing purposes. The current section starts with the previous marker and ends at the next marker.
If there is a marker in the song at time 1:01:000 named “Intro” and another marker at 4:01:000 called “Verse 1,” and the current time of the song is 2:01:000 when you execute this command, then the section from 1:01:000 up to but not including 4:01:000 will be highlighted for editing purposes.
Choose recent From/Thru Range
This command lets you select from a list of recently highlighted From/Thru regions and RealBand will make your chosen range into the currently highlighted From/Thru range. This is especially useful if you've accidentally unselected the current From/Thru range, or if you wish to re-select a range you selected earlier in the session.
When you launch this command, a dialog box will pop up with a list of recently selected From/Thru ranges. RealBand will automatically pick the most recent of any previously selected ranges. You can click on any range in the list, or use the arrow keys on the keyboard to navigate the list box. When you have made your choice, press the [OK] button.
Options Menu
The Options menu contains access to various settings that affect basic program operation. Some of these options can be stored within a song if it is saved as a .SEQ file. Similarly, several of these options can also be saved into a .MID file.
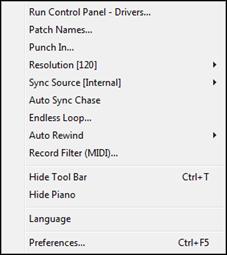
Run Control Panel - Drivers
This feature auto-runs the Windows Sound dialog. This command performs the same function as manually going in to the Control Panel settings and double clicking on the Sounds icon.
Patch Names
You can easily associate a list of names to patch numbers. The Options | Patch Names setting can be regarded as a global default setting. This means that unless you’ve specifically selected another patch list when changing the patch of a track in the Track, Classic Tracks View Window, or Mixer window the patch list you select here will be shown in the Patch Selection dialog.
For example, if the Patch Names list is set to “General MIDI” you will encounter the General MIDI patch list by default when you choose to select a patch. As another example, if you select the “General MIDI 2” patch name list when you select a patch for Track 2 the program will “remember” this selection the next time you decide to select a patch for Track 2.
The Patch Name list information is saved in RealBand’s .SEQ files.
The Numeric setting allows you to select patches as numbers rather than from a named patch list. When the Numeric setting is used numbers will always be used for all tracks when selecting a patch.
The Numeric Range setting dialog also offers the ability to choose whether the numbers should range from 0-127 or 1-128 in order to accommodate both numbering conventions used with different synths. This setting has no effect when a named patch list is used. If you’re using a named patch list the number range is based on whether the first name in the list was assigned a value of 0 or 1 in the PATCHES.INI file.
PATCHES.INI is a text file that resides in the RealBand folder. It defines a named list of synth-specific patches. You could add a new named patch list (specific to your synth) by entering the names into the PATCHES.INI file. This file also has instructions for creating a new patch map
Punch-In
When the Punch In feature is enabled recording takes place between the From and Thru settings and will overwrite existing events in the specified section. When Punch In is disabled recording may occur at any time within the song and the data will be merged with any existing MIDI events.
|
Press the Punch button to enable or disable punch-in mode.
|
|
When Punch In is enabled, recording will take place during the period between From: and Thru: and will overwrite any existing events during that time. The From: and Thru: settings for punch-in recording can be set in the Punch In dialog, or they can be the settings from the main toolbar. Note: The From and Thru settings for Punch In are not the same as the From and Thru settings used for editing-menu purposes.
When punching in it is usual to get a “running start” by starting to play or sing before the actual punch-in point. The Punch In dialog’s pre-roll feature automatically starts playback by a specified number of bars and beats before the start of the punch-in point. In the example shown, the pre-roll could be leading in to a punch-in that starts with a pickup note on beat 4 of the bar. |
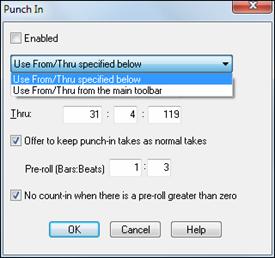
You wouldn’t normally have a count-in playing when a pre-roll is set.
When Punch-In is disabled, recording may occur at any time within the song and data will be merged with any existing events if the track is a MIDI track, or the data will overwrite existing data if the track is an Audio track.
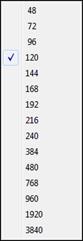
Resolution
|
This option allows you to set (or change) the timing resolution for a given project in Pulses Per Quarter note (PPQ). Simply pick a fixed resolution from the supplied menu-list and the program will automatically convert a song to the new resolution. RealBand supports resolutions as high as 3840 PPQ, which allows for more precise audio editing, since at higher resolutions each tick spans a finer section of audio. Note: For really long songs, or for songs that have really long note durations, it may be wise to not use the highest PPQ settings. Higher note resolution reduces the maximum allowed song length, as well as reducing the maximum allowed note duration length. At 3840 PPQ, the maximum song length of a 4/4 song is around 35 minutes long at a tempo of 120, less at faster tempos. |
Sync Source
|
This option determines which “clock source” will handle all the timing of the MIDI music. |
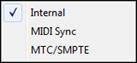
Internal: When the sync source is set to “internal” the program will handle all timing. The following two settings are also used when syncing to external devices:
MIDI Sync: When the sync source is set to MIDI the program will use song position pointer (SPP) and MIDI clocks as the clock source.
MTC/SMPTE: When the Sync Source is set to MTC/SMPTE the program will use MIDI Time code (MTC) as the clock source and display the time in SMPTE format.
If a song has WAV audio data the playback speed of the audio will not be varied (freewheeled) during playback –even when clock-syncing to an external device, as described above. If the external sync-device being used varies you may find that the audio may eventually drift “out-of-sync” over time.
You may also have to decrease the Output Buffer Seconds setting in the Options | Preferences | Audio Settings dialog if your computer is having trouble syncing correctly after playback has started.
If syncing to MIDI the program may not have enough time to start syncing correctly if the MIDI device (drum machine, sound module, etc.) isn’t providing enough delay time between the sending of the Song Position Pointer information and the start of MIDI playback. In this situation your drum machine may have a “SPP locate delay” or similar adjustment that can be made to give RealBand enough time to correctly sync to the external MIDI clock-source.
The sync options are saved automatically to the RB.INI file and will remain in effect until you re-visit this dialog and change it.
Auto Sync Chase
This feature is useful when syncing the program to an external device (e.g., drum machine, tape deck, etc.) during playback. When Auto Sync Chase is enabled this allows for “hands-free” sync chasing to the external device.
For example, if the program is playing back while synched to a tape deck and you stop the deck, the program will also stop and await a MIDI Sync or MTC start command – all without you having to find your mouse and manually click on the STOP and PLAY buttons. When you start the tape deck again the program will attempt to automatically re-sync. When this option is selected a check mark will appear next to the appropriate menu item.
This option is saved automatically to the RB.INI file and will remain in effect the next time you use the program.
Endless Loop
When this option is enabled playback will automatically loop through a section of a song. Use the Loop button to open the dialog from toolbar, or click the Loop button while holding the Ctrl key to toggle endless looping on and off.
The From Bar and Thru Bar fields determine the location of the loop. If the Thru setting is in a range beyond the end of the song the loop end point will be automatically adjusted to reflect the end of the song. Looping only occurs during playback.
This setting is not saved to RB.INI or to .SEQ files.
The Endless Loop command also has the following four choices:
- Chosen Range Below lets you enter start end measures in the From Bar and Thru Bar fields.
- The Entire Song setting loops the entire song.
- The Current Song Section will loop the song based on any existing Markers. When you press “Play” the song will loop until the next marker (or end of song) is reached, and will then loop to the most recent marker at the time Play was pressed. For example, let’s say there is a marker at 4:01:000 and 8:01:000. If the current time is 5:01:000 and you press Play, the song will continue playing until just before 8:01:000 is reached. Then the song will continue playing the loop starting at 4:01:000.
- The Highlighted Area setting will loop the song based on the highlighted area. This is the same highlighted area (From/Thru) that you use for editing.
Auto Rewind
When enabled, RealBand will automatically rewind to the location that playback or recording was started. The choices are Recording Only, Playback Only, Both Recording and Playback, or Disabled.
Record Filter
This feature brings up a dialog in which it is possible to choose what kinds of MIDI events are recorded, as well as exactly which MIDI Channels will be recorded. For example, if you uncheck the “Key Aft” checkbox any key aftertouch events that were transmitted won’t actually get recorded. Similarly, if you uncheck the “Channel 9” checkbox any events encountered on MIDI channel 9 won’t be recorded.
Icon Set
This allows you to select the classic or modern icon set.
Hide Tool Bar / Show Tool Bar
This option offers to hide the toolbar from the main screen. If you need more space on the screen to work with then this setting can help to free up some screen space. This menu option changes to Show Tool Bar when the hidden mode is in effect.
Hide Piano / Show Piano
This option offers to hide the piano keyboard from the main screen. When the piano is hidden with this feature there will be more space available for the placement of the additional windows below the tool bar. This menu option changes to Show Piano when the hidden mode is in effect.
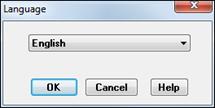
Language
Select another language for RealBand from the dropdown combo box in the Language dialog. The new language will take effect the next time the program is launched.
Preferences
The Options | Preferences menu item will launch a tabbed Preferences dialog box, which has multiple sections or tabs. This replaces the preferences submenu in previous versions of RealBand.
![]()
Preferences - General
![]() General settings that affect overall RealBand operation.
General settings that affect overall RealBand operation.
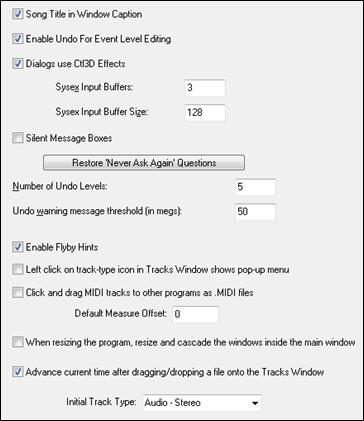
Song Title in Window Caption: This checkbox, when enabled, displays the song title in the main window’s caption. If you prefer to have only a song’s file name displayed, you can uncheck this option.
Enable Undo For Event Level Editing: This feature, when checked, will allow you to undo the last event level edit in the Event list or Notation window, such as inserting, deleting, changing, or moving a note.
Dialogs Use Ctl3D effects: This checkbox ensures a modern appearance for the program.
The SysEx Input Buffers setting offers the ability to change the amount of SysEx input buffers allocated before receiving a SysEx dump. This setting can range between 2 and 512.
The SysEx Input Buffer Size settings let you change the size of each input buffer allocated by RealBand before receiving a SysEx dump. The default size is 128. You can decrease this to as low as 64K to as high as 1024K.
The Silent Message Boxes checkbox, when enabled, will prevent RealBand from making a “beeping sound” in situations where a message box is displayed.
Restore “Never Ask Again” Questions will restore pop-up message boxes in which “Never Ask This Again” was chosen.
The Number of Undo Levels determines the number of recently executed edit commands can be undone. By default, this is set to 5 levels of undo; you could increase this to as high as 100.
You can also adjust the Undo Warning Message Threshold (in same dialog). For example, if you set the threshold to 100 megabytes, RealBand will issue a warning message and ask if it’s okay to clear some undo buffers if the undo buffers contain temporary audio files that can be erased to free up disk space.
Enable Flyby Hints checkbox lets you enable or disable the hints that pop-up when you move the mouse over certain controls, such as those on the toolbar.
Left click on track-type icon in Tracks Window shows pop-up menu: When this is checked, a left-click on a track type icon will show the pop-up menu of settings for that track.
Click and drag MIDI tracks to other programs as .MIDI files: When this is checked, then when you drag MIDI tracks to other programs, they will be dropped as MIDI files. If this is unchecked, then MIDI tracks will be rendered to audio files before the drop.
Default Measure Offset: This allows you to decrease the bar numbers for all songs. For example, if this is set to -2, then all the bar numbers will be shown as two less than their actual numbers (i.e. Bar 3 would be 1, and Bar 4 would be 2).
When resizing the program resize and cascade the windows inside the main window: This allows you to choose whether the windows display proportionally as cascade or they display as there were when you resize the program window.
Advance current time after dragging/dropping a file onto the Tracks Window: If this is checked, then when you drag a file from outside of RealBand and drop that onto the Tracks Window, the current time will advance, but if this is unchecked, the current time will remain unchanged after the drop.
Initial Track Type: This sets the initial track type for new songs. When a new song is started, all tracks will initially be set to the type selected (MIDI, Audio-Mono, Audio-Stereo) until changed to another type.
Preferences - Audio
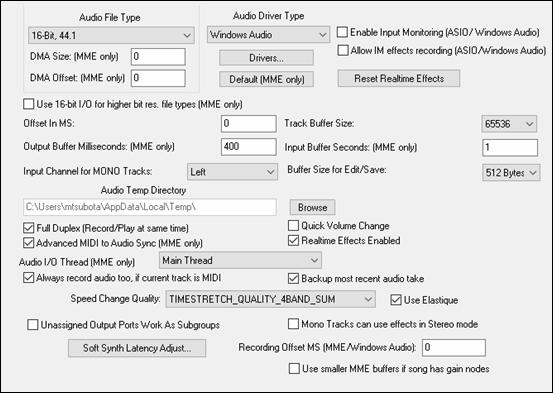
![]() Various settings that affect audio recording/playback.
Various settings that affect audio recording/playback.
|
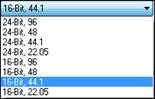
The Audio File Type combo box gives you a choice of sampling rates from 22.05K to 96K at bit depths of either 16-bits or 24-bits. 16-Bit, 44.1 is the file type to use for files that you want to burn to audio CDs. |
Sample Rate Change
This setting can be changed even if the song already has audio tracks. If you change the sample rate with a project that already has audio saved at a different sample rate the program will offer to automatically convert the song.
When you’ve pressed the OK button to exit the Audio Preferences dialog you will be asked whether or not to go ahead with the conversion (if applicable). Press the Yes button to convert your project to the new sampling rate.
The DMA Size and DMA Offset (MME only) settings are memory buffer sizes and offsets used by the sound card’s driver. These settings are detected by RealBand, and don’t normally need to be changed.
Audio Driver Type
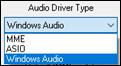
RealBand supports Windows Audio Session audio driver, an alternative to ASIO (a driver with low latency, but usually can be used by one program at a time) or MME (an older driver with worse latency). The Windows Audio Session driver has ultra-low latency (< 25 ms on a typical Windows PC), so audio operations like playing or sending out information via MIDI happen with no noticeable delay. Note that this supports 1 stereo input plus 1 stereo output at a time. For multiple inputs/outputs, you should continue to use either MME or ASIO.
|
When you boot up RealBand, it will be already set to use this driver without any action from you. If you want to confirm the selection, open the Preferences - Audio dialog (Options | Preferences | [Audio]) and see the “Audio Driver Type” option. |
The [Drivers…] button will opens the MME Audio Driver dialog if the Driver Type is set to MME, Windows Audio Drivers dialog if the Driver Type is set to Windows Audio, or the ASIO Audio Drivers dialog if the Driver Type is ASIO.
When RealBand detects ASIO drivers it will prompt you to ask if you want to use them.
There is a warning if the ASIO4All driver is “not connected” Sometimes the ASIO4All driver will not be connected to an audio driver and output will be silent. This is usually due to a soft synth already using the audio driver. If RealBand detects that ASIO4ALL isn’t connected, it will warn you about this, so you are aware of why the audio is silent.
If using MME, by default, the Microsoft Sound Mapper is selected for both input and output. If you have multiple sound cards, or a multiple I/O card, you can select more than one input or output. This will affect the computer performance when recording or playing audio tracks. The more ports that are selected, the more demand is placed on your computer. This may require a very fast computer.
Each Input and Output port is a stereo pair, with a left and right channel. If you select 4 input ports and 4 output ports then you would be actually getting 8 input and 8 output channels, since each audio port has both a left and right channel.
The Default (MME only) button will restore some of the MME settings in this dialog to default settings. Since some of these settings must be detected, RealBand will analyze the sound card again.
Enable Input Monitoring [ASIO/Windows Audio]
When this checkbox is enabled in the Audio dialog (and ASIO or Windows Audio is selected in the Driver Type combo) then RealBand will take the ASIO input signal from input port number 1 and send it to output 1 so that you will hear the input through the speakers.
You can apply real time effects to the monitored input by selecting “Input” in the top combo box of the DirectX/VST Real Time Effects dialog. You can then select up to four DirectX or VST effects.
WARNING! - Do not enable this feature if the input port number 1 is set to record the output (e.g. “What you hear” or “Mix”) because enabling input monitoring in this case will cause massive feedback that could hurt your ears!
When Allow IM effects recording [ASIO/Windows Audio] is enabled, and Input Monitoring is enabled, and effects plug-ins are enabled for input monitoring, the effected signal will be recorded instead of the dry signal.
The [Reset Realtime Effects] button will remove any real time effects from your project so you can begin remixing your project from scratch.
If the Use 16-bit I/O for higher bit res. file types (MME only) setting is enabled, then RealBand will convert the audio to 16-bit before sending to the sound card.
The Offset In MS setting can be used to make an adjustment to the timing for the purpose of keeping the MIDI and audio in sync. You can make an adjustment to this setting if the sound card’s audio timing is early or late in comparison to the MIDI. For example, if the sound card’s audio is being heard later than the MIDI, you can try increasing this setting, which will delay the MIDI timing to match the audio timing. The default for this setting is 0.
The Track Buffer Size settings determine the amount of memory used by RealBand as a buffer when reading audio data from disk for each audio track.
Output Buffer Milliseconds (MME only) setting lets you adjust the output buffer duration. The default setting is 4000 milliseconds (4 seconds), which is a very conservative setting. The higher the setting, the less likely it is that playback will glitch. The lower the setting, the quicker the song will start playback, and the quicker the program will respond when you change volume, pan, mute, or effects settings for an audio track.
You can reduce this setting if you want faster response to mixer moves (such as volume, pan, etc.) without needing to enable the Quick Volume Changes setting. 1000 milliseconds (1 second) is usually a good overall setting for fast enough response, while still leaving enough buffers to avoid audible dropouts or clicks, assuming your computer has a reasonably fast CPU.
The Input Buffer Seconds (MME only) setting determines the number of seconds of audio data that are in the input buffer during recording. The greater the setting, the less likely a dropout will occur during recording in situations when the system is very active.
The Input Channel for MONO Tracks setting determines which audio input channel (Left, Right, Stereo) is used by RealBand to record audio onto a MONO track. When set to Left or Right, the audio in a track is stored as mono so only one channel is used when recording.
Keep in mind that this setting ONLY is relevant when recording onto MONO audio tracks.
When set to “L+R (2 Tracks)” the left channel will be recorded on the Current Track and the right channel will be recorded on the next highest track number. If the next highest track is a non-blank MIDI track, then a new track will automatically be inserted at that position to make room to record audio. You can undo the keeping of an L+R take.
Example:
Say the current track is track number 1. When you record using L+R, the Left channel will get recorded on track number 1 and the Right channel will get recorded on track number 2. If Track 2 is blank or already has audio, then the audio for the Right channel will get recorded directly onto the existing track number 2. If track number 2 already has MIDI data then a new track will automatically be inserted at track number 2, and the existing track with the MIDI data will become track number 3.
If RealBand inserted a new track when recording using L+R, Undo won't remove the inserted track, but you could use the Remove Track command if you decided to remove the newly inserted track.
If the Record Channel is set to Left or Right, only Input Port number 1 (the first input port in the list that was selected by you in the Audio Drivers dialog) will be recorded, even if multiple ports are selected.
The Buffer Size for Edit/Save setting in the Audio dialog lets you adjust the buffer size used by RealBand when editing and saving a song. It lets you adjust the buffer size that RealBand uses during operations such as cutting and pasting or when saving a file. Depending on your hard drive, using larger buffer sizes may result in a speed improvement.
The Audio Temp Directory is the directory used by RealBand to store temporary audio data when recording or editing a song. This setting can’t be changed if the song already has audio data.
The Full Duplex setting, when checked, will allow RealBand to record and play back audio at the same time. This setting will only work if your sound card its driver supports full duplex (simultaneous record/playback).
The Quick Volume Change checkbox, when checked, will cause RealBand to quickly stop and restart playback in response to any volume or panning changes to an audio track, or muting/unmuting of audio tracks. There may be a slight delay or glitch before the change occurs. If this checkbox is unchecked, then there will be a delay equal to the Output Buffer Seconds setting before you hear the change.
The Advanced MIDI to Audio Sync (MME only) checkbox, when checked, will enable a mode in which RealBand polls the sound card for position information at a higher rate for more accurate timing.
Realtime Effects Enabled allows processing of audio tracks through real time DirectX or VST effects from PG Music Inc. or others. These are non-destructive effects that do not permanently alter the individual tracks.
Audio I/O Thread (MME only) gives you three different choices regarding the execution thread for audio playback and recording. The three choices are: “Main Thread,” “Discrete Thread - Normal Priority,” and “Discrete Thread - High Priority.” When set to use the Main Thread, the audio I/O uses the program's main execution thread rather than multi-tasking. When set to Discrete Thread it uses a separate execution thread for the audio playback, which makes it less likely that there will be an audio dropout in certain situations, such as when small I/O buffer size settings were selected by the user.
Very Important: If you change this setting, and later experience any unusual problems with the audio playback/recording, please change this back to the “Main Thread” setting. The Main Thread setting is the safest of the three.
Always Record Audio too, if current track is MIDI – this setting will cause RealBand to record audio even when the current track is MIDI. RealBand will offer to keep the audio take on the nearest available blank track. This can be a “lifesaver” in those situations where you wanted to record audio, but you accidentally selected the current track as a MIDI track.
Backup Most Recent Audio Take – this setting, when enabled, will cause RealBand to always backup the most recent audio take as <Temporary Audio Directory>\RBBAKx.WAV, with x being the audio input port number. This can be helpful in those rare-yet-frustrating situations, such as when you accidentally recorded audio onto the WRONG audio track, or you accidentally punched in instead of recording a regular take. If this happens you can undo the keeping of the most recent take and then use the Wave Files - Import Wave File command to insert the recorded audio onto a different track, by importing the RBBAKx.WAV file which will be located in the Temporary Audio Directory.
Speed Change Quality: This setting determines the time stretch method used to alter the speed of the song when you play the song at a different speed, such as 50% speed. There are 8 different choices here. The “best” choice depends on the source material. You may need to experiment to determine the best choice for the music you are working with. Here are the choices:
- 1BAND_SUM - The fastest method but with the lowest quality. May sound best on simple tracks.
- 2BAND_SUM - Fast with better quality than 1BAND_SUM. May sound best on simple tracks.
- 4BAND_SUM - Fast with better quality than 2BAND_SUM. Good for simple tracks or mixes.
- 8BAND_SUM - This is the best-sounding fast method, likely to sound good on either simple tracks or mixes.
- 2BAND_AUTOCORR - Noticeably slower than the above methods. It may sound much better than 8BAND_SUM on simple tracks, but it probably will not sound better than 8BAND_SUM on mixes.
- 3BAND_AUTOCORR - Even slower, may sound much better on simple tracks, but it may not sound better than 8BAND_SUM on mixes.
- 4BAND_AUTOCORR - Same speed as 8BANDSUM_HYBRID, but may sound better than 8BANDSUM_HYBRID on simple tracks.
- 8BANDSUM_HYBRID - Same speed as 4BAND_AUTOCORR. If processing speed is not an issue, 8BANDSUM_HYBRID is likely to be the best choice for full mixes. It uses AUTOCORR on low audio bands, and SUM on the high audio bands.
When the Use Elastique option is enabled, RealBand will use Elastique for realtime pitch transposition and stretching whenever possible.
When the Unassigned Output Ports Work As Subgroups checkbox is enabled in the Audio dialog, any audio output ports that do not currently have a driver port assigned to them will function as subgroups. A subgroup is a bus or signal path that gives you the ability to control several tracks as a group.
The Mono Tracks can use effects in Stereo mode setting in the Audio Options dialog allows mono audio tracks to use the real time effects track inserts in stereo mode for better sounding mixes. When the checkbox is enabled, and a mono track is using an effects insert (added via FX button on mixer) such as a stereo reverb, the output from the stereo reverb will be heard in stereo rather than mono.
Pressing the [Soft Synth Latency Adjust] lets you adjust for fine tuning latency settings for MIDI (non-DXi, and non-VSTi) soft synths. This works by playing a song called LatencyAdjust.SEQ (which comes with RealBand) which contains a MIDI note and audio note. Pressing the Start button starts the playback; you can then tweak the Soft Synth Latency MS setting until you hear the MIDI and audio tracks are in sync.
Note: if the notes sound in sync but you later play a song and the MIDI and audio still sound like they are out of sync, then likely you overshot the correct MS setting by 500ms. If this happens, we recommend starting the adjustment again at a value of zero and increasing it until you hear the MIDI and audio notes in sync.
The Recording Offset MS [MME/Windows Audio] setting can be used to correct a timing issue under Windows Vista that can cause recorded tracks to be delayed in time. If that happens, you can increase to a setting greater than zero. Usually the delay is around 50 to 60 milliseconds (ms).
Use smaller MME buffers if song has gain nodes - Small buffers help eliminate potential clicking when doing fade ins/outs with gain nodes. This does not affect the total buffer size in ms.
Preferences - File
![]() Preferences that deal with saving or loading files.
Preferences that deal with saving or loading files.
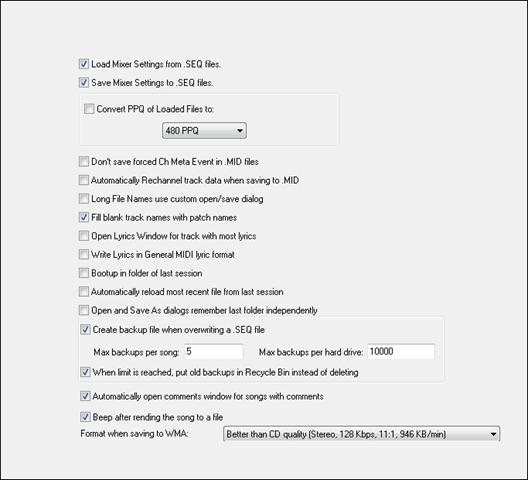
The Load Mixer Settings from .SEQ Files checkbox, when checked, enables the feature in which RealBand automatically loads and transmits any mixer settings that are stored in .SEQ files.
The Save Mixer Settings to .SEQ Files checkbox, when checked, will cause RealBand to save all the current mixer settings of non-blank tracks to .SEQ files. If the “Load Mixer Settings from .SEQ Files” setting is enabled the settings will be loaded and sent whenever a .SEQ file is loaded.
The Convert PPQ of Loaded Files to PPQ checkbox, when checked, will automatically convert files to the selected PPQ resolution. For example, if the selected PPQ resolution is 480 PPQ (Pulses Per Quarter note), and this checkbox is checked, RealBand will automatically convert any files you load to 480 PPQ. RealBand supports PPQ as high as 3840, which allows for more precise audio editing, since at higher resolutions each tick spans a finer section of audio.
The Don’t Save Forced Ch Meta Event in .MID files checkbox, when checked, will prevent RealBand from saving the forced MIDI channels (the Ch field in the Classic Tracks View window) into the .MID files. This META event is only recognized by other PG Music programs.
If you choose to not have this setting saved then the forced channels won’t be recalled the next time the file is loaded. You could use the MIDI | Edit | Rechannel All Tracks command to convert the actual MIDI data in the tracks to the forced channel so that a forced channel setting isn’t needed.
Automatically Rechannel track data when saving to .MID
When saving to a MIDI file, RealBand will automatically ask you if you want to rechannel the track data to the forced MIDI channels in the tracks view, if the tracks contain MIDI channels different from the forced channel.
The Long file names use custom open/save dialog checkbox lets you use a more advanced, custom file dialog. This dialog allows you to choose a Font. This dialog will remember the dialog’s window size and placement, and the currently selected font. It also has a tree button that lets you view the directory structure, and a button that lets you choose between details mode and list mode.
These settings will all be remembered by RealBand the next time you load or save a file using the custom file dialog.
![]() The Find button in the Custom File Selection dialog lets you search for a file within the current folder. This is useful when a folder has many files and you wish to avoid scrolling through a long file list.
The Find button in the Custom File Selection dialog lets you search for a file within the current folder. This is useful when a folder has many files and you wish to avoid scrolling through a long file list.
![]() The Favorite Folders button in the Custom File Selection dialog will let you select from a list of “favorite” folders.
The Favorite Folders button in the Custom File Selection dialog will let you select from a list of “favorite” folders.
When using the Custom File Selection dialog, RealBand will remember up to 25 folders from which you had previously loaded files. When you press the Favorite folders button, you can quickly select a folder without having to navigate through the Windows folder tree structure.
The Fill blank track names with patch names checkbox will cause RealBand to fill a blank track name with the patch name for the track when loading a file, assuming the track has MIDI data, and the Prg field (in the Classic Tracks View) isn’t blank. For .MID files this is ALWAYS a General MIDI patch name. For .SEQ files this is based on the patch list of each track.
The Open Lyrics Window for track with most lyrics setting, when enabled, lets RealBand automatically open a Big Lyrics window for the track that has the most lyrics.
Write Lyrics in General MIDI lyric format saves Standard MIDI File lyrics.
Boot up in folder of last session is a checkbox that can be enabled or disabled. When you enable this setting, RealBand will boot up in the folder of the most recently loaded file from the previous session of RealBand.
Automatically reload most recent file from last session. If this is enabled, then when you run RealBand it will load the most recently loaded file from the last session.
When Open and Save As dialogs remember last folder independently is enabled, the File Open and File Save As dialogs individually recall the folder from the last time either dialog was used.
Backup Settings
When the Create backup file when overwriting SEQ files settings is enabled, RealBand will always create a backup file (BKS file) when a .SEQ file is overwritten. For songs saved into the same hard drive that RealBand is installed, the backups are placed into RBBACKUP subfolder of the RealBand folder. For songs that are saved to a different hard drive, the backups are placed in a RBBACKUP folder which is off of the root (e.g. D:\RBBACKUP).
The Max backups per song setting determines the maximum number of backups to be kept for each song. If this limit is reached, then RealBand will delete the oldest backup of the song you are overwriting and create a newer backup.
The Max backups per hard drive setting is the maximum total backups allowed per hard drive. If this limit is reached, then RealBand will delete the oldest backup file.
There is also on option for moving the older backups into the Recycle Bin instead of deleting them when either of the two limits are reached.
Automatically open comments window for songs with comments opens the Comments when the song loads if this box is checked.
When Beep after rendering the song to a file is selected it tells you that audio rendering of a MIDI file is done and the audio file is ready.
Format when saving to WMA: has a drop down combo box where you can select the quality of the WMA files you render with RealBand.
Preferences - Big Lyrics Window
![]() The various settings for the Big Lyrics window.
The various settings for the Big Lyrics window.
|
The Text, Background, and Highlight Colors can all be changed if you prefer different colors than the defaults. The Default, Yellow on Red, Black on Gray, and Black on Teal buttons let you chose between 4 preset color schemes without having select individual colors for each setting. The Choose Font button provides you with ability to select a different font for use with the Big Lyrics window. The Use Default Font button “resets” the font used in the Big Lyrics window back to its default setting. The Display Chord Symbols checkbox, when enabled, allows chord symbols present in a song. Lyrics scroll before bottom line scrolls the lyrics before the bottom line instead of scrolling after the first line. |
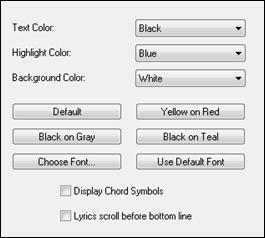
Preferences - Notation
![]() This lets you access settings for the Notation window and Lead Sheet window. The options are described in detail in the Notation and Printing chapter.
This lets you access settings for the Notation window and Lead Sheet window. The options are described in detail in the Notation and Printing chapter.
|
The [Notation Options…] button lets you access the settings for the Notation window. The [Notation Print Options…] button letsyou access the Notation Print settings and is accessible only if the current track contains notes. The [Lead Sheet Options…] button lets you access the settings for the Lead Sheet window. |
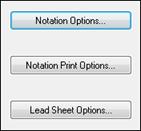
Preferences - MIDI
![]() This lets you access settings related to the MIDI setup.
This lets you access settings related to the MIDI setup.
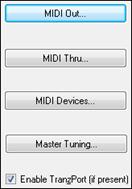
Preferences - MIDI Out
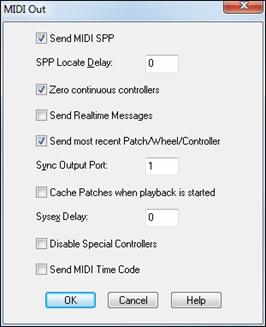
Use the MIDI Out dialog to choose the messages that will be sent to your MIDI sound source.
Send MIDI SPP: Determines whether MIDI Song Position Pointer data is sent.
SPP Locate Delay: Adjusts the delay time (in milliseconds) before playback is started after sending Song Position Pointer (SPP) information. This gives external MIDI devices the time required to find the proper location when syncing to the program.
Zero continuous controllers: Sets continuous controllers such as Pitch Bend to zero, which is the off position.
Send Real-time Messages: When this option is enabled the program will send “MIDI clocks” information – as well as Start, Stop, and Continue messages.
Send Most Recent Patch/Wheel/Controller: When this option is enabled the program will search back through the tracks for the most recent patch, wheel (pitch bend), and controller events. These events will be sent to your MIDI sound source before starting playback. This ensures that you hear the proper sounds when playing from a new location within a song.
Cache Patches when playback is started: If you are using an output driver that requires patch caching RealBand will update the patch cache when a .MID or .SEQ file is loaded.
SysEx Delay: When multiple packets of system exclusive data are sent, many synthesizers require a slight delay between packets. A SysEx packet is a message that begins with (Hex) F0 and ends with F7. If your synth requires a delay between packets when receiving SysEx (which is quite common), then this setting lets you specify a delay setting of between 1 and 100 milliseconds. The default setting is 0, which equals no delay. If you are encountering problems (e.g., overflows, lockups, etc.) with sending SysEx data to your MIDI sound source you should try a setting of 10-100 milliseconds to correct the problem.
Disable Special Controllers: This prevents RealBand from sending any of the special controller messages that are used for the Guitar and Notation windows. The Guitar window uses controller 84 for inserting “position” markers. The Notation window uses controller 85, 86, and 88 for advanced notation features such as “micropegs” and Bars Per Line markers.
Send MIDI Time Code: When this feature is enabled the MIDI Time Code will be sent through the MIDI OUT port during playback. This is useful if you need to sync an external device to RealBand that only supports synching to MTC (rather than synching to MIDI clocks/SPP).
Preferences - MIDI Thru
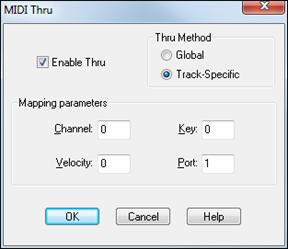
This command provides you with the ability to enable or disable the MIDI Thru setting. This also allows you to choose how the MIDI data is echoed. There are two types of MIDI Thru: Track-Specific and Global.
Enable Thru: If this option is checked the MIDI Thru feature will be enabled.
Thru Method: As noted, there are two types of Thru methods:
- Track-Specific: When Track-Specific MIDI Thru is enabled the incoming MIDI data will be “echoed” using the forced Channel, Velocity, Key, and Port settings of the track. If these settings are set to 0 the MIDI data will be echoed but otherwise unchanged.
For example, if a given track has a forced MIDI channel of 2, all incoming MIDI events will be echoed out via MIDI on Channel 2.
- Global: When Global MIDI Thru is enabled the incoming MIDI data will be “echoed” using the forced Channel, Velocity, Key, and Port settings that you specify in the Mapping parameters settings. If these settings are set to 0 the MIDI data will be echoed out but otherwise unchanged.
Preferences - MIDI Devices
This command allows you to select the MIDI input and output drivers to use with the program. When selected, a dialog box will pop up which contains two list boxes, one for the Input Driver(s) and one for the Output Driver(s) (specific to your system). You can select more than one input or output driver. RealBand supports multiple MIDI ports.
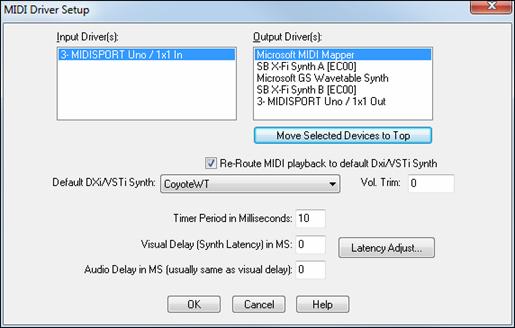
The [Move Selected Devices to Top] button lets you adjust the order of the MIDI Output ports. This means you can choose which MIDI Output devices appear as Port 1, Port 2, etc. within RealBand, rather than the default order for the ports determined by the operating system.
If the ports are in a different order than required, you can select (highlight) one or more ports, and press the [Move Selected Devices to Top] button. This will move the highlighted ports to the top of the list. You can highlight one or more ports and then move them to the top to shuffle the order until it’s the order you want.
When you launch the MIDI Driver Setup dialog, all the highlighted ports will always be shown at the top. They will be in the same order they were before, relative to each other. For example, let’s say you have four ports on your system, and, by default they show up sequentially:
Original Driver Order |
After Re-ordering |
Next Launch of Dialog |
Let’s say that you highlight the 4th port (Driver D) and move it to the top, and then you highlight the last port in the list (which is now Driver C, since Driver D was moved to the top). You now have 2 ports selected, Driver D at the top and Driver C at the bottom. Driver D and Driver C will be ports 1 and 2 within RealBand.
The next time you launch the MIDI Driver Setup dialog, you’ll see Driver D and Driver C at the top, followed by the other two un-highlighted ports. The important point here is that the chosen order of the highlighted ports Driver D followed by Driver C was preserved.
The Re-Route MIDI Playback to Default DXi/VSTi Synth setting will cause RealBand to re-route all MIDI playback to the Default DXi/VSTi synth. This is the easiest way to use a DXi (Direct X Instrument) or VSTi soft-synth for playback. If this option is checked, then ALL MIDI tracks’ playback output will be routed to the default DXi synth regardless of the track’s port number.
The Default DXi/VSTi combo lets you select which DXi/VSTi synth is used as the default softsynth.
The Timer Period in Milliseconds setting determines how fast the timer interrupt rate will be for MIDI synchronization, the smaller the setting the faster the interrupt rate. The range can be between 1 and 20.
The Visual Delay (Synth Latency) in MS is useful if you’re using a software-based synth such as the Coyote WT. This setting will delay the visual display within RealBand, such as displayed times and highlighting of notes during playback. When using a software-based synth, you may have to set this to a few hundred milliseconds depending on your computer’s speed. You may have to tweak this a few times until the visual display during playback matches the sounding of notes on a software-based synth.
The Audio Delay in MS setting will delay the start of audio playback and audio recording, which is useful if you want to attempt to keep audio playback/recording in sync with MIDI if you are using a software-based synth for MIDI playback. Normally, you will set this to match the Visual Delay (Synth Latency). This is why this setting is in the MIDI Devices dialog. If you are using a software based MIDI synth, setting both the Visual Latency and Audio Delay will let you play/record audio in sync with the MIDI.
[Latency Adjust] opens a routine for manually adjusting softsynth latency.
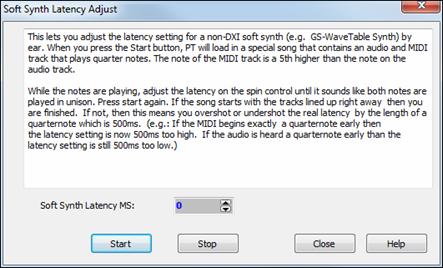
[Master Tuning…] allows you to master tune your sound card or sound module, useful if you're playing along with an instrument or recording that can't easily be re-tuned, like an acoustic piano. A setting of 0 is the default A = 440. This setting is saved between RealBand sessions.
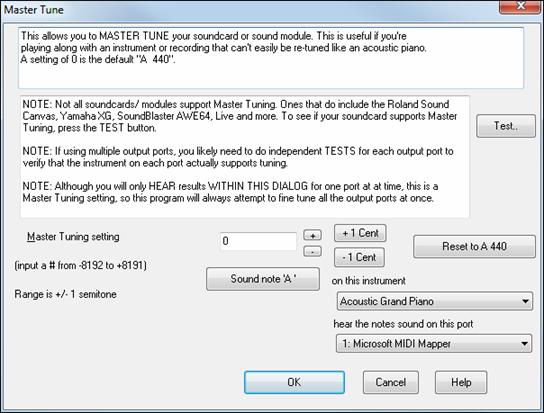
Enable TranzPort (if present) allows remote control from a TranzPort wireless DAW controller.
Preferences - Song Generation
![]() These are global settings that apply to all RealBand songs.
These are global settings that apply to all RealBand songs.

Auto generate song when MGU file opened automatically generates and arrangement when a Band-in-a-Box file is opened in RealBand. Disable this feature if you don’t want the parts in the imported Band-in-a-Box file to be regenerated and overwritten.
![]() Click on this button to open the Select Folders dialog to choose or change the path for RealBand to find its RealTracks and Real Drums.
Click on this button to open the Select Folders dialog to choose or change the path for RealBand to find its RealTracks and Real Drums.
|
|
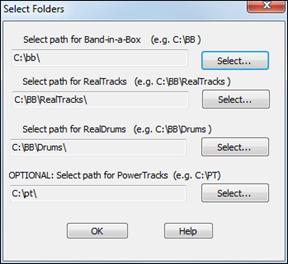
The other settings enable the listed functions when checked and disable them when unchecked.
Preferences - SMPTE
![]() Settings for the time code used by the Society of Motion Picture and Television Engineers.
Settings for the time code used by the Society of Motion Picture and Television Engineers.
|
The [SMPTE Settings] button gives access to the SMPTE dialog, which offers the ability to choose the time display format as well as whether MIDI events will be translated and displayed as SMPTE times. |
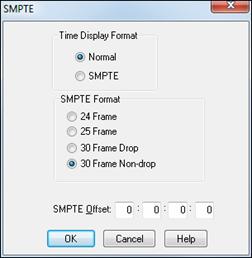
Time Display Format: If the time display mode is set to Normal the time will be displayed in Measures:Beats:Ticks. When it is set to SMPTE the time will be displayed as Hours:Minutes:Seconds:Frames.
SMPTE Format: You may choose one of four SMPTE formats: 30 FPS (Non-Drop), 30 FPS (Drop-frame), 25 FPS, or 24 FPS (frames per second).
SMPTE Offset: This determines the SMPTE time that the program associates with the beginning of a song. For example, if you use an offset of 00:00:02:00 then the start of the song will be 00:00:02:00. This gives the program two seconds to “sync up” to a tape when starting a tape from the beginning.
Preferences - Metronome
![]() Access to the Metronome dialog.
Access to the Metronome dialog.
The metronome can be active during recording, playback, or both.
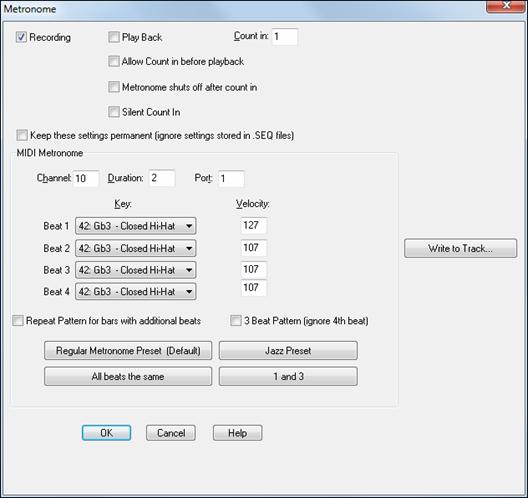
Recording - If this checkbox option is enabled the metronome will be on/heard during recording.
Playback - If this option is enabled the metronome will be on during playback.
RealBand will send a specific note out via MIDI on each beat. The note, velocity, duration, and port options will determine the pitch and characteristics of the note that is sent out via MIDI on each beat of the song.
Count In - This option lets you choose how many measures/bars will be counted down before recording begins. The countdown may range from 1 to 4 measures.
Allow Count in before playback - Enables count-in before playback. This is useful for practicing or playing live.
Metronome shuts off after count in - Shuts the metronome off after the count-in so it is silent during playback.
Silent Count In - Ensures that the count-in will be silent (visual count-in only). This is useful if you are playing live and you don't want an audible count-in.
Keep these settings permanent (ignore settings stored in .SEQ files) will cause RealBand to remember the current metronome settings and ignore any settings stored in .SEQ files.
MIDI Metronome - RealBand will send a specific note out via MIDI on each beat. The Channel, Key, Duration, Velocity and Port options will determine the characteristics of the note that is sent out via MIDI on each beat of the song.
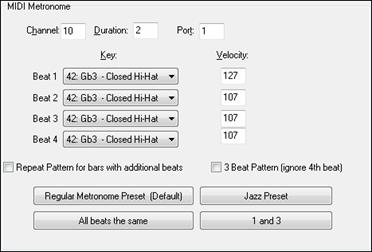
You can choose a different sound for each beat by using the Beat combo box to select a key from the list of drum notes for the standard GM drum kit. Use the Velocity setting to vary the volume of the notes in a rhythmic pattern.
There are preset buttons for typical count-in patterns for different genres. For example, the Jazz preset is silent on beats 1 and 3, with closed hi-hat on beats 2 and 4.
The [Write to Track] button writes the metronome to a chosen MIDI track, or to just a specified region of the track.
|
The Counting Down dialog visibly shows the numbers (e.g. 1, 2, 3, 4) during the countdown. |
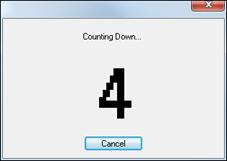
Preferences - Piano
![]() Access to the Piano Settings dialog with settings applicable to the virtual piano display mode. There are two display modes for the piano:
Access to the Piano Settings dialog with settings applicable to the virtual piano display mode. There are two display modes for the piano:
|
When the display mode is set to Current Track , the piano will display notes as they are being played from the current (highlighted) track. When the display mode is set to All notes except for drum channel, the piano will display the notes of all tracks except for notes that are on the drum channel. The default drum channel is normally set to channel 10 in this dialog but it can be changed to any MIDI channel between 1 and 16. If you select a drum channel of 0 all notes that are being played will display, including the drums. When the strong>Big Sizeable Piano setting is enabled, RealBand will show a bigger piano below the toolbar, instead of the smaller piano. You can vertically resize the Big Piano by placing the mouse on the bottom edge of the piano and then clicking and dragging the mouse up or down. For the Big Sizeable Piano, there is also a setting that gives you a choice of Show Track Number (drawn as a tiny number within the notes), Show MIDI Channel, or Show No Text. |
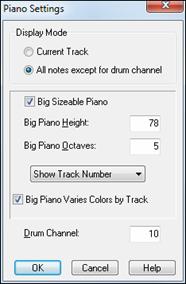
If Big Piano Varies Colors By Track is enabled, then the colors of the notes drawn on the big piano will vary depending on the track number. For tracks 1 through 10, RealBand uses 10 different colors, then repeats these colors for higher track numbers.

These settings are automatically saved to RB.INI and RB.CFG so that they will remain in effect the next time you use RealBand.
Reset to default settings
This will reboot the program with factory settings.
Window Menu
The Window menu contains commands that aid in creating, selecting, and arranging windows.
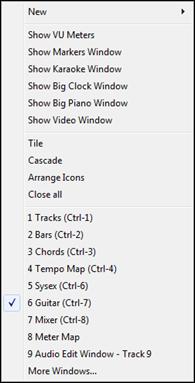
In RealBand, you can open more than one instance of some types of windows. The New command offers the creation of such “multiple instance” windows. The Event List, Notation, Big Lyrics window, Audio Edit window, and Lead Sheet window are all windows that fall into this category.
New
When you choose the New command the sub-menu (shown above) will appear –offering the Event List, Notation, Audio Edit, Big Lyrics, and Lead Sheet windows available to be opened.
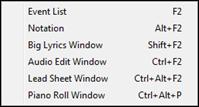
Event List
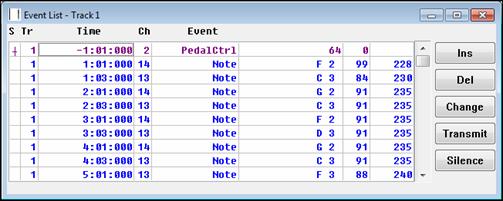
The Event List window allows you to insert, delete, and change all MIDI events. A list of events is displayed vertically in the window (shown above) and each line in the list represents an individual event. Each event is shown with its track number, time, MIDI channel number, the kind of the event, and the parameters applicable to the event.
Event List window supports shift-click to extend the start (From) or end (Thru) of the selected area. In this example, we shift-clicked on the last row in the list to extend the end point from 2:04:000 to 3:04:093.
|
|
|
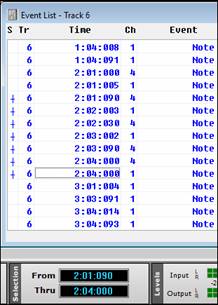
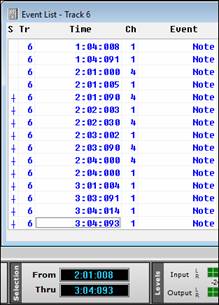
When an Event List is created it is displayed based on the tracks that are currently selected/highlighted. For example, if only one track, e.g., Track 1, is selected and you use the New command to create an Event List window, it will only display events that occur within Track 1.
You can also open an Event List while multiple tracks are selected. In this case the Event List will display all events encountered in the tracks that are selected. For example, if Tracks 1 through 3 were selected/highlighted when you created an Event List window, the Event List will display all the events occurring in those 3 tracks –regardless of what tracks you select later.
Events are inserted by pressing the [Ins] key or button. After pressing this insert key a menu will pop up to allow you to choose what type of event to insert. After picking the event type, an entry box will pop up which will ask you to choose the MIDI Channel, Time, and any other parameters applicable to the event.
Events can be deleted by pressing the [Del] key/button.
Existing events may be edited by pressing the Enter key. An entry box will pop up and you may make changes to the event in this box.
You can play events one at a time by pressing the Transmit button. If the event you’re playing isn’t a note the cursor will be advanced to the next event. If the event is a note it will be sustained until any other key is pressed.
You can stop a sustained note from sounding by pressing the Silence button. The sustained note will also stop in other situations, such as when you switch to a different window, or if you choose a different event list command.
Types of Events
Note events consist of three parameters:
- Note string: shows the name of the note and its octave.
- Velocity: the speed that the key was pressed.
- Duration:the length of the note.
Controller Change events consist of 2 parameters:
- Controller number: a number ranging from 0 to 127.
- Controller value: a number ranging from 0 to 127
Program Change events consist of 1 parameter:
- Program number: a number ranging from 0 to 127 or 1 to 128. The range depends on which patch list is currently selected, or which numeric range is selected if you are using the Numeric patch list. See also the Patch Names command in the Options menu for more information about patch lists.
Pitch Bend (wheel) events consist of 1 parameter:
Bend level:a number ranging from -8192 to 8192, with 0 representing the wheel in the center position.
Channel Aftertouch events consist of 1 parameter:
Aftertouch level: a number ranging from 0 to 127.
Key Aftertouch events consist of 2 parameters:
Note string: the note, which the aftertouch will affect.
Aftertouch level: a number ranging from 0 to 127.
Lyric events can be entered and edited in the Event List. Lyrics that are entered in track in the Notation window will appear in the Event List for that track.
Notation Window
The Notation window displays the notes of a MIDI track on a staff and lets you print music on your printer. The Notation window can also display chord symbols and lyrics.
The Standard Notation mode displays the notes as regular music. Editable Notation mode will display standard notation but allow you to edit the notation. You will see standard notation with vertical gray lines that represent possible note locations. Staff Roll mode displays the notes as note heads (no stems) with optional duration and velocity lines. Also, the Staff roll mode will contain gray vertical lines across the staff.
Big Lyrics Window
The Big Lyrics window will display any existing lyrics in a track. The program will highlight the lyrics as they play, which is very useful for singing along with the music.
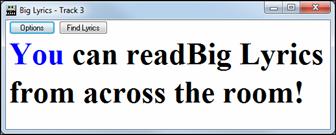
Various settings for this window can be changed in the Lyric Window Options dialog, which is launched with the [Options] button in the Big Lyrics window. These options can also be found in the Options | Preferences menu’s tabbed dialogs.
|
This lets you adjust various settings for the Big Lyrics window. The “Text Color,” “Background Color,” and the “Highlight Color” all can be changed if you don’t like the colors that the window is using. The [Default], [Yellow on Red], [Black on Gray], and [Black on Teal] buttons let you choose those 4 color schemes without having to play around with the individual colors. The [Choose Font…] button lets you select a different font for the Big Lyrics window. The [Use Default Font] button resets the Big Lyrics window to use the default font. The “Display Chord Symbols” checkbox will let you enable or disable chord symbol display. The chord symbols will be displayed in brackets, e.g. [Am7] between the lyrics. “Lyrics scroll before bottom line”scrolls the lyrics before the bottom line instead of scrolling after the first line. |
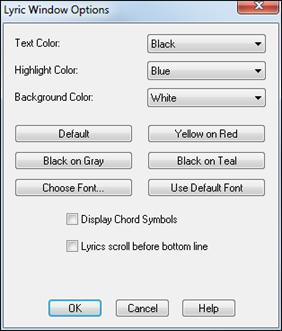
Clicking on a lyric or chord symbol in the Big Lyrics window will start the song from the location of the lyric or chord that you clicked on.
The [Find Lyrics] button automatically sets the Big Lyrics window to the track with the most lyrics.
Audio Edit Window
|
The Audio Edit window opens with the Audio Edit toolbar button, from the Window | New submenu, or with the keystrokes Ctrl+F2. |

This window displays wave audio data as a large, editable waveform. The dB scale on the left side of the Audio Edit window gives you a better idea of the level of an audio track.
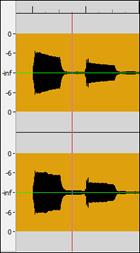
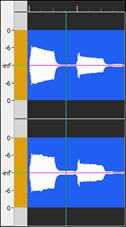
The thin red vertical line that is visible within the Audio Edit window indicates the current time location in the song. It is seen in reverse video (i.e. negative) if the current time is contained within the highlighted range of a track.
Zoom In/Out
|
By clicking on the [+] and [-] buttons you can “zoom” in or out on the waveform to facilitate very precise waveform editing. The large +/- buttons zoom horizontally, the smaller set zooms vertically. |
|
The [Snap] button will cause the highlighted region to snap to the nearest beat when selecting a region with the mouse. |
|
These are Mute and Solo buttons. They have the same function as the Mute and Solo buttons in the Tracks window and the Mixer window. Their operation is identical. |
|
The [Play Selected Area] button will play the highlighted area to let you hear what was selected. |
|
The [Select Whole] button selects the whole audio track. |
|
This button zooms out to show an overview of the whole waveform for the track. |
|
This button zooms in on the highlighted section of the waveform. |
|
For stereo tracks, there is the option to apply edits to both channels or to either the left or right channel only. |
|
Percentage tempo buttons give you a choice of playing the song at 25% speed (one quarter the regular speed), 50% regular speed, 75% regular speed, and 100%, which is regular speed. |
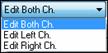
This feature is also available with the Action | Play at Speed menu command.
Selecting a Region to Edit
You can select a region to edit with the mouse by clicking and dragging over the section you are interested in. Shift+click (Shift key + left mouse button) support makes it easy to tweak the beginning or end of the highlighted area.
- If you Shift+click before the start of the From/Thru range, or after the end of the From/Thru range, the highlighted area will be extended.
- If you Shift+click within the From/Thru range, the range will be reduced, and the location you clicked on will become either From or Thru depending on which boundary was closer to where you Shift+clicked the mouse.
- If you keep the left mouse button held after the Shift+click, and you move the mouse you can adjust the boundary of the range while moving the mouse.
After selecting a region you can then use the Edit | Cut,Copy,andPastefeatures; or choose from one or more of the plug-in Audio Effects found in the Editmenu.
Drag and Drop Editing
|
You can select a highlighted region by holding down the Ctrl key with the left mouse button pressed, and drag the region to a new location in the song. |

After releasing the mouse button, you have four options:
- Move to new location and overwrite.
- Move to new location and merge.
- Copy to new location and overwrite.
- Copy to new location and merge.
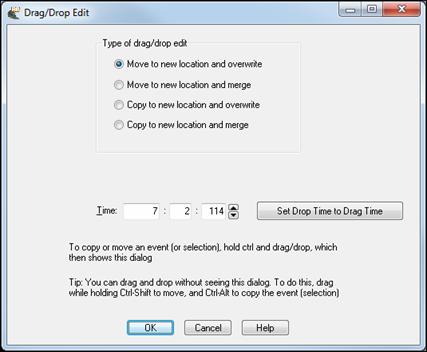
Lead Sheet Window
This window is similar to the Notation window, except that it can display a track in the form of a lead sheet, with multiple staves per page.
The Lead Sheet window is resizable. It will adjust the height and width of staves automatically when resized.
Up to 7 tracks at a time can be displayed per window. In order to display multiple tracks, you should first select the tracks in the Tracks window or Bars window and then open up a new Lead Sheet window. Another way to select tracks is in the Lead Sheet Options dialog.
RealBand can also print notation with multiple tracks when you press the [Print] button at the top of a Lead Sheet window that is currently displaying multiple tracks.
Piano Roll Window
The Piano Roll window enables precise graphic editing of note timing and duration. You can also graphically edit Note Velocity, Controllers, Program Changes, Channel Aftertouch, or Pitch Bend. There are 2 panes in the window – one for notes and the other for controllers, velocity, and other data.
All notes and controllers are displayed as black/gray bars on a grid. You can change note duration and pitch by selecting and dragging with your mouse.
Show VU Meters
This command will display the VU meters. There are 2 pairs of VU meters, one pair for audio input, and one pair for audio output. If you re-size the VU meters window vertically the height of the meters will expand or shrink to match the new window height. The clipping indicator at the top of the meters indicates that clipping has occurred. You should try to keep the levels low enough so they’re safely below 0 db and the clipping indicator doesn’t light up. To be on the safe side, it’s probably a good idea to adjust the levels so that the meters don’t get too close to 0 db even if the clipping indicator hasn’t yet lit up. For the Output, you may have to adjust your mixer settings within RealBand to keep the levels within a reasonable range. For the Input, you may have to press the speaker button to launch the Windows Record Control dialog, and you could then lower the input level.
Show Markers Window
This command will display the Markers window. This window lets you insert markers in the song for keeping track of various sections of your music.
Show Karaoke Window
Use this command to display karaoke files.
Show Big Clock Window
This window displays the current time location in a large text. It will show Measures:Beats:Ticks, or Hours:Minutes:Seconds:Hundredths, or Samples. Clicking on the window will toggle the display mode.
Show Big Piano Window
This command opens the resizable piano keyboard.
Tile
The Tile command will arrange the various project windows so that an equal portion of each window is visible on the screen.
Cascade
The Cascade command arranges the various program windows on screen on top of each other with the tops of each window visible.
Arrange Icons
The Arrange Icons command positions the icons so that they are neatly arranged.
![]()
Close All
The Close All command minimizes all open windows so that they are shown as icons.
Tracks Window
The Tracks window shows the tracks with their names, track type (MIDI or audio), various settings, as well as an overview section showing either MIDI or audio data.
![]() The Track Number field shows the track number. If the track is the current Track it will be highlighted in red.
The Track Number field shows the track number. If the track is the current Track it will be highlighted in red.
If the track is selected the number will be highlighted in yellow. If the track is not selected it will be gray. You can click on the track number field to make a track the Current Track.
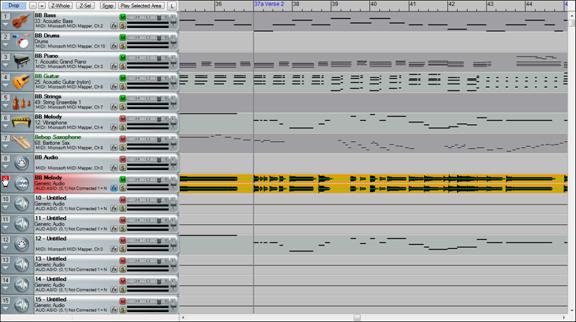
If you click on the track number field while holding the Shift key, this will select a range of tracks from the current track through the number you clicked on. For example, if track 3 is the Current Track, and you hold the Shift key and then click on the number field for Track 6, this will make tracks 3 through 6 selected. Track 3 will still be the Current Track and tracks 4, 5, and 6 will be highlighted in yellow.
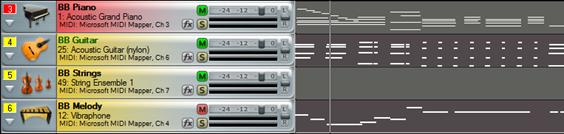
You can select/deselect individual tracks by clicking on a Track’s number field while holding down the Ctrl key.
|
The Disclosure Triangle will reveal more information about a track by making the track row height taller. |
|
If a track is a MIDI track, then you’ll see the Vel (velocity offset), Rvb (reverb), Mod (modulation), Loop, Key (key transpose), Cho (Chorus), and Exp (expression) settings. |
![]()
You can make changes to these settings by clicking on the edit fields with the left mouse button, and then moving the mouse up or down while holding the mouse button down. The [Edit DXi] button launches the DirectX Window dialog and will display the settings panel for either the Default DXi Synth (16th DXi synth slot which is MIDI port 32) or the current DXi port number if the track is set to a valid DXi port (17-32). Any track’s MIDI Output Port can be set to send to one of the 16 available DXi synth ports or to any other available MIDI port.
When you right-click your mouse on a MIDI icon you’ll see a pop-up menu that lets you set the MIDI Output Port, Program (Patch) setting, and Bank (MSB) and Bank LSB settings.
Immediately below the Port: menu item is a menu command that lets you Set All Midi Tracks to the same port used by the track you are adjusting.
There is also a menu item Patch Select Dialog that launches a patch selection dialog, which lets
you select patches and variations as well as allowing you to change the track’s patch list. If the patch list is set to General MIDI, Roland GS, or Yamaha XG, the track will display an instrument icon corresponding to the patch. Otherwise, you’ll see the patch number displayed instead of an icon.
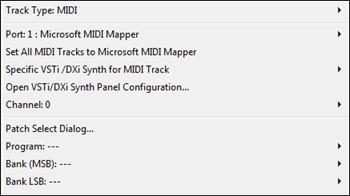
|
If a track is an audio track, when you click on the disclosure triangle you’ll see the four Aux effects level settings. You can make changes to these settings with the mouse. |
![]()
The [Edit DX] button will launch the DirectX Window dialog for the slot corresponding to the tracks effects insert.
If you right-click an audio track icon, the pop-up menu will have a Track Category item that lets you associate icons (small pictures) with the track’s audio content.
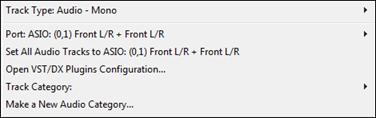
So if an audio track is a guitar part, choose Guitar as the track category to display a guitar icon. You can use factory icons or your own custom user icons.
User pictures are located in RB_Pictures\Audio_Pictures\User_Pictures in the RealBand folder. You can add your own user icon pictures to this folder and you can also associate your own effects groups with your custom audio categories. To make a new user icon and, optionally, an effects group (*.tgs) to go with it, click on Make a New Audio Category in the pop-up menu.
Most audio categories have associated effects groups (*.tgs). When you choose a track category, the Load Audio Category Effects dialog opens giving the names of the effects and options for loading, activating, and customizing them.
![]() The [Apply Cat FX] button loads the Category Effects for the chosen track category. If you previously chose not to load the effects or to bypass them, you could use this button to apply the category effects to the track at a later time.
The [Apply Cat FX] button loads the Category Effects for the chosen track category. If you previously chose not to load the effects or to bypass them, you could use this button to apply the category effects to the track at a later time.
The Track Name field shows the track’s name, which is edited by right-clicking or double-clicking on the track name field. Type the name and press Enter.
![]()
![]() The Mute button lets you mute or unmute a track. Green indicates the track is playing, red is mute.
The Mute button lets you mute or unmute a track. Green indicates the track is playing, red is mute.
![]()
![]() Click on the solo button(s) to solo one or more tracks. Bright yellow shows that the track is soloed.
Click on the solo button(s) to solo one or more tracks. Bright yellow shows that the track is soloed.
![]()
![]() The [fx] button launches the dialog to choose VST/DX audio effects or MIDI synths for the track. If any effects or synths are assigned the [fx] button will be blue.
The [fx] button launches the dialog to choose VST/DX audio effects or MIDI synths for the track. If any effects or synths are assigned the [fx] button will be blue.
|
The Volume and Pan sliders let you adjust a track’s volume and pan settings without opening the Mixer window. Right-clicking on the Volume or Pan controls will let you edit the setting by typing in a number. |
|
Below the Volume slider stereo VU meters give you a general idea of a track’s level during playback. |
Track Overview Display
To the right of the track info panels you’ll see the overview display. This lets you view MIDI or audio data, and select sections for editing.

◄ Left and right ►cursor arrow keys will move the current time forward or backward by 1 beat.
![]() ►
► ![]()
The mouse scroll wheel in the Tracks window will zoom in/out if hovering over the overview section. It will still scroll horizontally if hovering to the left of the overview section.
![]()
![]()
Right-click anywhere on the track to see more track options.
Click and drag to highlight a section of the song for editing. You can select a region of the song during playback.

|
You can select a highlighted region by holding down the Ctrl key with the left mouse button pressed, and drag the region to a new location in the song. |
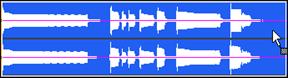
Click on [Play Selected Area] to hear the highlighted section being edited.
If drag ‘n’ drop to another sequencer/DAW isn't working, you may need to use the Drop Station.
|
There are 4 quadrants, and they are labeled according to the types of files that will be made by the drop: Audio Files (wav, wma, m4a) or MIDI file (mid). The Drop Station makes it faster and easier to make different file types. It also allows you to make MIDI versions of the RealTracks (RealCharts), by simply dragging a RealTrack to the “MIDI” quadrant of the Drop Station. |
||
|
When you drop the track onto the Drop Station, you will see an orange color, indicating that the track is accepted and the file is being prepared. |
|
|
|
The color of the [Drop] button will change to green when the file is ready. When the file is ready, the Drop Station turns green. You can now drag it to the DAW. |
|
|
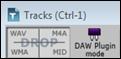
![]()
The [-] and [+] buttons let you zoom in or zoom out the overview section.
[+Whole] zooms out to show the complete waveform overview.
[+Selection] zooms in on the highlighted section of the waveform.
The [Snap to beat] button causes the time indicator to snap to the nearest beat when changing the time location or when highlighting a region for editing.
With a right-click on any track in the Tracks window overview this pop-up menu opens. Individual MIDI tracks can be auto-converted to wave files or audio tracks using a DXi or VSTi synth.
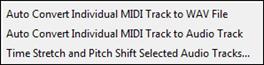
Time Stretch and Pitch Shift Selected Audio Tracks allows you to permanently change the duration and pitch of individual audio tracks or change the speed and pitch of the entire RealBand mix.
Bars Window
The Bars window offers an overview of multiple tracks of wave and MIDI data.
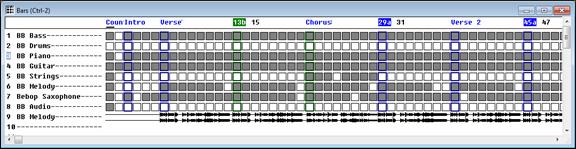
This window shows the bars (or measures) of the song. Bars that have MIDI data will be shaded, while bars without any data are not shaded.
At the top of the window you will see either the bar numbers, markers, or both, depending on the chosen settings in the Markers window Marker Options dialog.
To the left of the window you will see the track names. If the whole track name doesn’t fit in this section, you will see it ending with “...” to indicate the name is actually longer than shown.
Bars that have MIDI data will be shaded. Bars that contain WAV data will be displayed as waveform overviews. Bars without any data appear as “empty squares.”
Left click with the mouse to set the current time location. To ensure that a previously highlighted region is not accidentally changed while setting the current time, hold down the Alt key when clicking the left mouse button.
You can use the mouse to select a region to be highlighted by clicking on a measure and dragging the mouse over the measures you are interested in. This action highlights an area that can be affected by the commands in the Edit menu.
The horizontal scroll bar located at the bottom of the Bars window allows you to scroll around through your entire project.
Chords Window
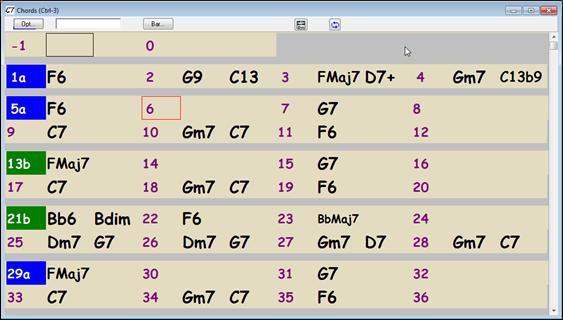
The Chords window displays the chord symbols of a song. You’ll see the bars of the song displayed in rows. If a bar contains chord symbols they will be displayed to the right of the bar number. An optional setting inserts a line between each section of the song, as determined by the “a” and “b” part markers. There is another setting for the thickness of the line.
When the song isn’t playing you can enter chord symbols by typing them. You enter chords in a similar manner to the Notation window, except that the Chords window is always ready for chord entry if the song is currently not playing.
Each measure is divided into Beat Groups. A Beat Group consists of two beats. If a song is in 4/4, then each measure will contain two beat groups. The current beat group will have a rectangle drawn around it. You can type two chords into the current beat group. For example if you type this: “c7,g7” (without the quotes) you’ll see the text you’re typing in the white rectangular panel on the toolbar. If you then hit [Enter] you’ll see the C7 and G7 chords appear within the current beat group, and the input rectangle will automatically advance to the next beat group. When you’re in the middle of typing chord symbols, you can use the [Backspace] key to correct a mistake.
The ¬Left Arrow and Right Arrow® keys let you move the input rectangle to a different beat group without entering chords. You can also click the mouse on a different beat group to move the input rectangle to a new location.
If you’ve attempted to enter chords within a beat group, and you’ve pressed enter and chords don’t appear within that beat group, this means that you have made a typing error and the text was not recognized. You should then use the left arrow key to go back, and try again. It may be that the chord spelling is different than the spelling that RealBand recognizes for that chord. Look in the list of chords for the spelling recognized by the program.
You can highlight a range of cells for editing by clicking inside of a bar and then dragging the mouse to the inside of another bar. For example, if you click in the middle of bar 1, and then drag the mouse to the middle of bar 8, you will have highlighted bars 1 through 8. Shift+click will extend the highlighted area. This will select all the tracks of the song for editing.
You can cut and paste sections of the song by using the Edit | Cut (or Edit | Copy if copying instead of cutting) and the Edit | Paste command.
The [Opt...] button launches the Chords Window Options dialog.
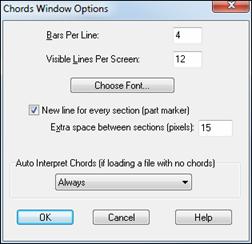
The Bars Per Line setting determines how many measures will be drawn per line in the Chords window.
The Visible Lines Per Screen setting determines how many lines (rows) of chords are will be visible per screen. Each screen will always have 125 lines per screen in the Chords window, but the Visible Lines Per Screen setting controls how many lines will be visible without scrolling.
The [Choose Font…] button lets you select a font for the Chords window. The font’s overall size will be determined by the amount of Visible Lines Per Screen, as well as the height of the Chords window.
New line for every section (part marker) inserts a line between each section of the song based on the “a” and “b” part markers. When this feature is used each section starts on a new line, similar to paragraphs in a book, making the chords easier to follow.
Extra space between sections (pixels) sets the width of the line between sections between 0 and 100 pixels.
The Auto-Interpret Chords setting is useful in a situation where a file is loaded, but the file doesn’t already contain any chord symbols. If you set this to “Always,” then RealBand will always attempt to automatically interpret the chord symbols using the Chord Wizard. If set to “Ask First,” then RealBand will ask before attempting to automatically interpret chord symbols. If set to “Never,” then RealBand will just load the file without attempting to figure out the Chord Symbols.
|
BB Tracks can be generated using more than one style, with volume changes, and with repeats. In the Chords window, click on the bar where you want to make changes. The [Bar] button launches the Settings for Bar dialog, where you can specify the changes that you want to have happen at the highlighted bar. |
|
This button launches the Audio Chord Wizard, where you can automatically figure out the chords from audio files (WAV, MP3, WMA, SEQ) and write them to the Chords window. |
|
If you the [Loop] button on the toolbar is blue, RealBand will play the highlighted section in an endless loop. If no section is highlighted then the entire song will be looped. |
Part Markers
|
If you click directly on a bar number, the number will change into a Part Marker. There are two kinds of part markers: an “a” part marker (blue), and a “b” part marker (green). Clicking once on the bar number that currently has no part marker will set the bar to “a” part marker. Clicking again will set it to “b” part marker, and clicking again would set the bar back to having no part marker. With the “New line for every section (part marker)” setting enabled, a line will be inserted between each section that has been marked with an “a” or “b” part marker. |
You can toggle the part marker type for a measure during playback. In addition, you can also toggle a part marker for the current measure by pressing the M key on your keyboard when the Chords window is currently active.
Chord Wizard
|
Right-click in the Chords window to open this menu with Chord Wizard options. If you select MIDI Chord Wizard the program will automatically detect the chords in the song. If you’ve highlighted a range of bars, RealBand will only attempt to detect the chords for the highlighted range. |

If no bars are highlighted, RealBand will attempt to detect the chords for the entire song. You can use the Undo command if you want to undo this.
The Custom MIDI Chord Wizard will launch the Chord Wizard dialog, which lets you customize the settings for chord detection.
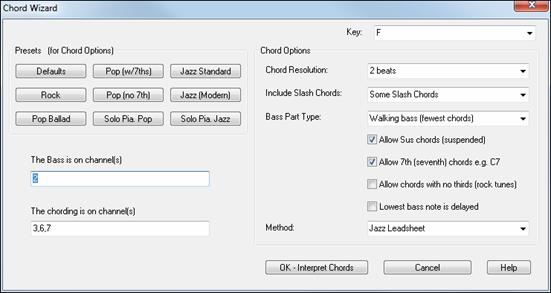
Chord List
Chords listed here are based on C, but any valid chord letter (A-G) can be used.
(Major chords)
C, CMAJ, C6, CMAJ7, CMAJ9, CMAJ13, C69, CMAJ7#5,
C5b, Caug, C+, CMAJ9#11, CMAJ13#11
(Minor chords)
Cm, Cm6, Cm7, Cm9, Cm11, Cm13, Cmaug, Cm #5, CmMAJ7
(Half Diminished)
Cm7b5
(Diminished)
Cdim
(Dominant 7th chords)
C7, 7+, C9+, C13+, C13, C7b13, C7#11, C13#11, C7#11b13, C9,
C9b13, C9#11, C13 #11, C9#11b13, C7b9, C13b9, C7b9b13, C7b9#11,
C13b9#11, C7b9#11b13, C7#9, C13#9, C7#9b13, C9#11, C13#9#11, C7#9#11b13, C7b5, C13b5, C7b5b13, C9b5, C9b5b13, C7b5b9, C13b5b9, C7b5b9b13, C7b5#9, C13b5#9, C7b5#9b13, C7#5, C13#5, C7#5#11, C13#5#11, C9#5, C9#5#11, C7#5b9, C13#5b9, C7#5b9#11, C13#5b9#11, C7#5#9, C13#5#9#11, C7#5#9#11, C13#5#9#11
(Sustained 4 chords)
Csus, C7sus, C9sus, C13sus, C7susb13, C7sus#11, C13sus #11, C7sus#11b13,C9susb13, C9sus#11, C13sus #11, C9sus#11b13, C7susb9, C13susb9, C7susb9b13, C7susb9#11, C13susb9#11, C7susb9#11b13, C7sus#9, C13sus#9, C7sus#9b13, C9sus#11, C13sus#9#11, C7sus#9#11b13, C7susb5, C13susb5, C7susb5b13, C9susb5, C9susb5b13, C7susb5b9, C13susb5b9, C7susb5b9b13, C7susb5#9, C13susb5#9, C7susb5#9b13, C7sus#5, C13sus#5, C7sus#5#11, C13sus#5#11, C9sus#5, C9sus#5#11, C7sus#5b9, C13sus#5b9, C7sus#5b9#11, C13sus#5b9#11, C7sus#5#9, C13sus#5#9#11, C7sus#5#9#11, C13sus#5#9#11.
Notes on entering chords:
- It is not necessary to type upper or lower case; the program will sort this out for you.
- Any chord may be entered with an alternate root (slash chord), e.g., C7/E = C7 with E bass.
- Separate chords with commas to enter 2 chords at a time, e.g., Dm7, G7.
Tempo Map
The Tempo Map is a list of all the tempo changes that occur during the course of the song.
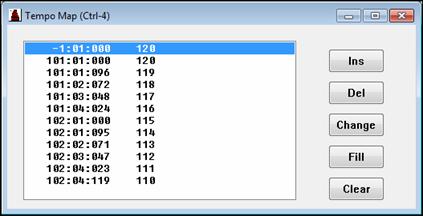
Tempo Map using Fill feature for a ritard.
The [Ins], [Del], and [Change] buttons shown above may be used to insert, delete, and change entries in the tempo map.
You may also insert tempo changes by pressing the computer’s Insert key. You can change the tempo of the currently selected entry by pressing Enter key or by double mouse clicking over the desired entry. The Delete key can be used to delete entries from the map.
If there is only one entry in the map you can’t delete it since at least one entry in the map is required in each project.
|
The Tempo Map window also has a [Fill] button that enables you to insert a series of ascending or descending tempo changes, highly useful for ritards and accelerandos. |
The “From:” and “Thru:” fields displayed in the Fill Tempo Changes dialog allow you to specify the beginning and ending locations where you want the tempo changes to occur. The “Start Value” and “End Value” fields let you choose where, in terms of tempo, the fill will begin and end.
For example, if the start value is 100 and the end value is 90, a series of tempo changes starting at 100 and decreasing down to 90 will be inserted through the bars beginning with the “From:” location and ending at the “Thru:” setting.
SysEx Window
The SysEx window is actually a built-in system exclusive (SysEx) librarian.
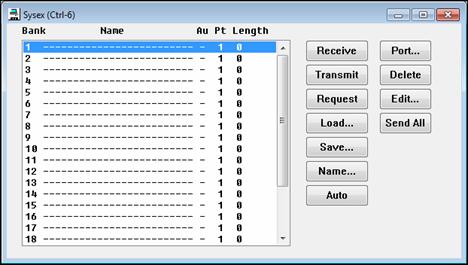
This allows you to transmit or receive any SysEx data. You can also load and save MIDIEX compatible SysEx files. The SysEx librarian can hold up to 24 banks of system exclusive data. Since the librarian stores all data on disk as opposed to memory, the size of the SysEx data is limited only by the amount of free disk space available.
SysEx MIDI Events - you can insert System Exclusive data directly into a MIDI track as MIDI events in the Event List window. You can record SysEx data in real time and when you keep a take, the SysEx data will be added to a MIDI track as SysEx events. You could also load SysEx data into a SysEx MIDI event by receiving SysEx data from your synth, or by loading the SysEx data from a file. SysEx MIDI events can also be edited.
Receive: This command enables the ability to receive a data dump from your synthesizer to the currently selected bank. When you select this feature a message box will pop up to indicate that the sequencer is ready to receive the SysEx dump.
After you initiate this command you can press the appropriate buttons to dump the data from your synth. All the data received will be stored in the current bank in the program. A dialog box will show the progress of the SysEx dump, as shown below:
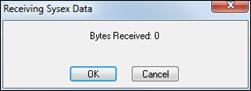
When your synth is finished dumping the data press the [OK] button to exit this window.
Transmit: Sends the SysEx data in a given bank out via MIDI. A dialog box will inform you that a send is in progress.
If you wish to cancel a transmission after it has started press the Cancel button and the transmission will be stopped.
Request: This option allows you to initiate a SysEx dump request by sending the request to your synthesizer via MIDI. Simply choose an instrument from the available names and press the Enter key. You may be prompted for the channel or patch numbers if the instrument requires them. After sending the request on the MIDI Out port the program will then proceed to receive any data that is sent from your synth automatically –as if the Receive command had been issued.
Load: This command will load a MIDIEX compatible SysEx file into the currently selected bank.
Save: This command will save the currently selected bank on disk in MIDIEX compatible format.
Name: Provides you with the option to choose the name for a current bank of SysEx data.
Auto: When this feature is enabled the bank will automatically be transmitted via MIDI when loaded from a .SEQ file. The letter “A” will appear to the right of the bank name if the bank is set to be Auto-Transmitted.
Port: This setting determines the output port through which the SysEx data will be sent out via MIDI. If the selected port is greater than the number of ports available, the data will be sent out the highest available port. For example, if the port setting for a bank is set to 2 and there is only one MIDI output port installed, the SysEx data in the bank will be sent out through MIDI Port 1.
Delete: This simply deletes the SysEx data from a currently selected bank.
Edit: For those who wish to manually edit the bytes of a selected bank, you can also type in this SysEx data as long as the bank currently has no data in it. A dialog box will pop up in which you can manually edit the bytes. The bytes are edited as hexadecimal numbers separated by spaces. The SysEx data will look something like this: F0 41 10 42 12 40 11 02 10 1D F7. Each SysEx message should start with F0 and end with F7.
The following is a list of the editing commands available for you to use when editing SysEx data:
Home |
Go to beginning of line. |
If you save a song to a .SEQ file the SysEx data will be saved within the file. However, there are a few differences in the way SysEx data is saved to MIDI files, since they must be saved as SysEx meta events. For example, if you save a file as a .MID the SysEx information will be saved, but the banks won’t retain their individual names when the .MID file is loaded back into RealBand.
If a bank has multiple SysEx messages in it (such as a bulk dump), each individual SysEx message is saved separately into a MIDI file. If more than the maximum number (24) of SysEx meta events are read from a MIDI file into RealBand the additional banks will be added to bank number 24.
If you save a file called $OPTIONS.SEQ, RealBand will automatically send any SysEx banks with “Autosend” (“A”) enabled in that file. This is useful if you want to have default SysEx data sent to your synth or sound source each time the program is started.
Dump Request Macros
A Dump Request Macro (DRM) allows you to initiate a data dump of your synth from the program instead of having topress buttons on your synth. A DRM file contains the name of a synth (names appear in a pick window when you select the Initiate Dump Request command), and the appropriate packet of bytes can be sent to your synth, which will instruct it to auto-send a data dump.
When you use the Initiate Dump Request command, RealBand reads the dump request macros from a binary file called RB.INS. The binary file RB.INS is converted from a text file called RB.DRM, which contains the macro information in ASCII format.
If you have a synth that isn’t listed in the RB.DRM file it is possible for you to manually add your own macro for your synth. These macros are derived from the System Exclusive Implementation information in your synthesizer manual.
Guitar Window
The virtual guitar fretboard displays the notes of any track or group of MIDI channels.
The virtual Guitar window displays notes (as green squares for fretted notes, and blue squares for bends) that are played in a selected track or by the MIDI Thru channel on the virtual guitar fretboard.
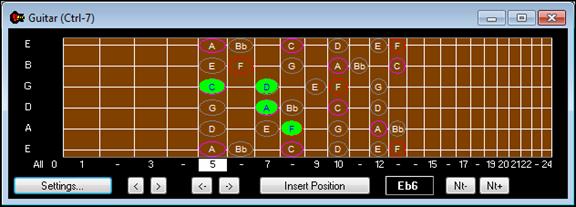
Pitch bends are displayed in real time as blue lines extending in the direction of the bend. If the direction is up, then line extends higher on the neck than the original note. If the direction is down (such as if a pull-off were executed), then the bend extends lower on the neck.
The pitch bends, shown as horizontal blue lines, will move horizontally along the string in real time illustrating the extent of the pitch bend.
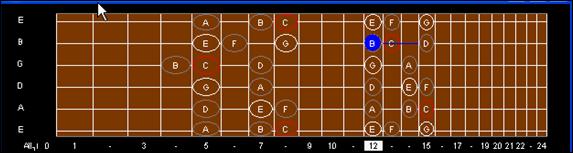
Example of a MIDI pitch bend from a B to a C#
This virtual instrument works in the same fashion as the piano keyboard display. However, given that there are six separate strings on the guitar fretboard – and that many notes and chords can be played several different ways on the guitar, there are a few additional settings unique to this instrument.
Just below the fretboard you will find position markers. The current position setting of the guitar is highlighted in reverse video. The positions range from 0 (open) to 24 (24th fret). There is an additional position called “All,” where the MIDI notes will be displayed in all possible ways on the guitar. When the position is set to any other range (e.g., from 0 to 24), the notes will be displayed in that position, unless they are outside the range of a given position, in which case they will not be shown. You can change the position simply by clicking on any position marker (e.g., 1, 3,5,7,9, etc.).
The [Insert Position] button causes the currently selected position to be embedded into the track at the “Now:” location. When you play back a track with embedded position information the guitar position will correspondingly change when the position event is encountered. A position event is stored in the track as a MIDI Controller parameter (number 84) with a value ranging from 0-24 (indicating positions 0-24). A controller #84 value of 127 indicates the “All” position.
The ability to insert position information into a track is especially useful for properly displaying a track that was recorded by a MIDI guitar controller with all six strings set to transmit over one channel. By manually inserting this position information you can coax the guitar fretboard into displaying the notes in the position they were originally played, instead of having them display in all possible positions.
Try recording guitar music on a MIDI piano-keyboard, then insert the appropriate position information into the track, and watch the virtual guitar display the notes as if they had been played on a guitar.
Of course, the best way to record guitar music is with an actual MIDI Guitar Controller set to transmit over 6 separate MIDI channels (e.g., 11-16).
The Note Indicator is a white square located to the right of the [Insert Position] button. When you pass the mouse cursor over the guitar fretboard the name of the note that the cursor comes into contact with is shown in this white box. This can be used for getting to know the note locations found on the guitar.
The [<]backup and advance [>] buttons allow you to advance forward or go backward by one note at a time. The program will step-play the note that you have advanced or backed-up to. You can stop the note from sounding by advancing or backing-up to another note, or by pressing the [Stop]button. This feature is available so that you can hear and see a sequence of notes one-step-at-a-time. The keyboard shortcuts to backup and advance are the Shift+Left Arrow and Shift+Right Arrow keys.
The [¬] backup group and advance [®] group buttonswork in a similar fashion as the previously mentioned backup and advance buttons, except that these button allow you to see and hear a group or cluster of notes. Notes that are within a certain distance from each other (automatically determined by the program) are considered to be such a group/cluster of notes.
Keyboard shortcuts for the backup and advance group feature are the Ctrl+Left Arrow and Ctrl+Right Arrow keys. Additional hot keys available for this feature are the [0] and [.] numeric-pad keys, which can be used even when editing or viewing notation in the Notation window.
The [Settings] button offers a dialog that can change the following settings applicable to the Guitar window:
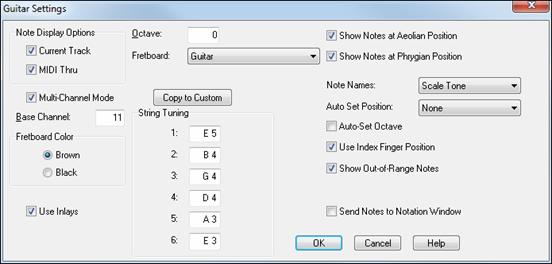
The Note Display Options checkboxes determines whether the Guitar window will display notes on the current/highlighted track (i.e. recorded MIDI data), or the notes echoed out via the MIDI Thru port (i.e. live MIDI-Controller data).
The purpose of multi-channel mode is so that when you play back a track that was recorded by a MIDI guitar controller in mono mode the notes will correctly display the notes in the virtual guitar. If a given note’s MIDI Channel falls outside the channel range (e.g., Channel 9), the program will attempt to use the position information instead to display the note correctly.
The Base Channel determines the guitar channel range when inmulti-channel mode. For example, with a Base Channel of 1 the channel range will be “1-6.” The highest possible base channel is 11 (the default), making the range “11-16.”
The Fretboard Color radio buttons let you choose between Brown and Black for the color of the guitar fretboard.
The Octave determines the range of notes that are displayed on the guitar fretboard. When set to 0, the fretboard will display notes normally. When set to “-1” for example, the guitar window can be used to correctly display bass lines instead.
|
The Guitar window can display fretboards for guitar, bass, ukulele, mandolin, and banjo. Select the instrument fretboard from the Fretboard combo box. Alternate tuning presets, such as Drop D, DADGAD, Open G, etc. are supported for the Guitar window and Notation Tablature. The Custom Tuning setting for the Guitar window lets you specify the number of strings (4 through 6) and the tuning of each string. Note: This custom setting does not support Banjo. |
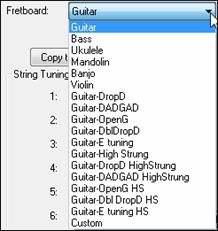
![]() Use this button to copy the current string settings as a starting point for a custom tuning.
Use this button to copy the current string settings as a starting point for a custom tuning.
When you press OK, RealBand will save your custom settings, and then they will be recalled if you later switch to another fretboard and then return to the custom fretboard.
The String Tuning settingdetermines the range of notes that are displayed on each of the six strings. The default is Standard E Tuning. You can change the note value corresponding to the open note for each of the six strings. The guitar fretboard will appropriately display the notes as if they are played on a real guitar set to an alternate tuning.
The Send Notes To Notation Window setting, when enabled, offers the ability to insert a note directly into a Standard Notation window by mouse clicking on the appropriate note position on the virtual fretboard. Notes will be inserted at the current time/location of the opened Notation window.
The Show Notes at Aeolian Position setting, when enabled, will show guides on the guitar fretboard based on the current key of the song. For example, in the Key of C the Aeolian Position can be thought of as an A-Minor scale at the 5th Position (Aeolian Mode), with the root of the minor scale being on the 6th string of the guitar. Roots of the relative major scale are shown with orange circles.
The Show Notes at Phrygian Position setting, when enabled, will show guides on the guitar fretboard based on the current key of the song. For example, in the Key of C the Phrygian Position can be thought of as an A-Minor scale at the 12th position, with the root of the minor scale being on the 6th string of the guitar. We’ve named this the Phrygian Position since, in the Key of C, if you start playing a scale beginning at the E note on the 6th string at the 12th position it is actually a Phrygian Mode scale. You can also think of it as just another minor scale beginning on a 5th string. The roots of the corresponding major scale are shown with an orange circle.
The Note Names combo lets you choose between several options that affect the display within the circular guides on the fretboard. The default option is “Scale Tones,” which will display all the tones of the Aeolian or Phrygian scale. Other options are “None” (no notes shown), “Root Only,” (just the major scale root notes shown), and “Chord Tones” (just the major triad tones).
The Auto Set Position combo, if you chose to make use of this setting, will cause the program to automatically set the guitar fretboard’s current position to either the Aeolian or Phrygian position of the current key. By default it is set to “None” which means that the fretboard’s current position stays unchanged.
The Auto Set Octave setting, when enabled, will cause RealBand to automatically set the guitar octave by analyzing the MIDI data in the current track of the song.
The Use Index Finger Position setting when enabled causes the guitar display to use the “index finger” to play notes that are one fret outside of the normal position, instead of the little finger.
The Show Out-of-Range Notes setting, when enabled, will allow any note to be displayed on the guitar, regardless if it is the range of the guitar or not.
Mixer Window
The Mixer window provides real time control of effects and track volumes. You can launch it by typing Ctrl+8.
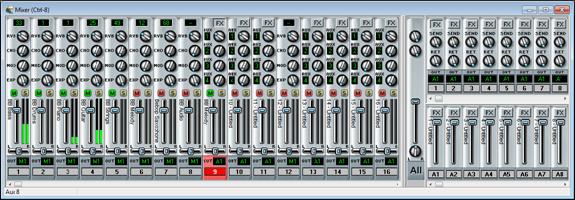
Note that there are sliders for all 48 tracks, 8 auxiliary effects (Aux) busses, and a total of 16 audio output ports or audio subgroups.
The Mixer window has stereo VU meters for each track, smoothly responsive sliders and knobs, individual track mute buttons, and a scrollable track strip.
MIDI Track Strip
This is the Mixer strip for a MIDI track.
|
Audio Track Strip
This is the Mixer strip for an Audio track.
|
|
Aux Busses
RealBand has 8 auxiliary busses, with the ability to use up to 4 at a time per track. Having more Aux busses means that you can add more real time audio effects to your song efficiently.
|
Note: This panel is scrollable, so if you don’t have room on the screen for all eight Aux bus strips you can use the ◄ ► scroll arrows to get to the one you want. In this example, Aux busses 1 through 4 are assigned to the audio output port, A1, and busses 5 through 8 are assigned to an audio subgroup, G2. |

You could have up to 16 Aux effects per track since each track can use up to 4 auxiliary busses with up to 4 effects plug-ins per bus. This is in addition to the 4 effects that can be chained on each track’s FX insert.
|
|
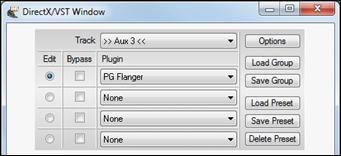
Audio Subgroups
Unassigned Outputs Work As Subgroups
![]() When this checkbox is enabled in the Audio dialog, any audio output ports that do not currently have a driver port assigned to them will function as subgroups. A subgroup is a bus or signal path that gives you the ability to control several tracks as a group.
When this checkbox is enabled in the Audio dialog, any audio output ports that do not currently have a driver port assigned to them will function as subgroups. A subgroup is a bus or signal path that gives you the ability to control several tracks as a group.
|
Suppose you only have one audio Output Driver port installed in RealBand and you’ve enabled the “Unassigned Outputs Work As Subgroups” checkbox. Audio Output Ports 2 through 16 will now function as subgroups. If you were to then set the output ports of tracks 2, 3, and 4 to G2 (i.e., port 2, which is now called Subgroup 2), and you were to adjust the volume of Subgroup 2 in the mixer the same way you do for output ports, this will affect the volume of all 3 tracks as a whole. |
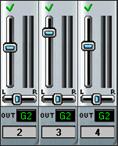
Output Port FX Inserts
|
Audio subgroups can be assigned to audio output ports that do not currently have a driver port assigned to them. These audio subgroups are used to apply real time effects to a specific group of tracks, with a chain of up to four effects on each subgroup. The final audio output also has an FX insert bus that allows up to four effects to be applied to the final mix. |
Markers Window
This window lets you insert markers in the song for keeping track of various sections of your music.
|
When markers are inserted in a song you can use the [Prev] and [Next] buttons in the Markers area on the toolbar to jump from marker to marker. |
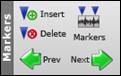
These markers will also appear (by default) at the top of the Bars window. You could use the markers to mark sections such as the verses and choruses of the song. The Ins and Del buttons allow you to insert or delete markers. You can change the current marker by editing it directly in this window.
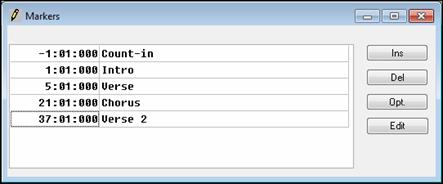
The [Opt.] button will open a dialog with checkboxes for enabling or disabling the display of Markers and Bar Numbers at the top of the Bars window.
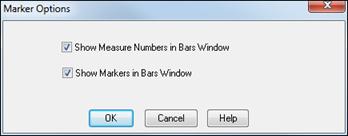
By default, both Markers and Bar Numbers are displayed. Since they are shown on the same line you can prevent either of these from being shown in the Bars window by unchecking the appropriate checkbox. If you uncheck the Show Measure Numbers in Bars Window checkbox the bar numbers will not be shown in the Bars window. If you uncheck the Show Markers in Bars Window checkbox the markers will not be shown in the Bars window. These options are provided in case you prefer just one or the other being shown in the Bars window.
Markers can be as close together in time or as far apart as you wish. Markers that are too close together will run into each other when displayed in the Bars window. In most situations such as marking verses and choruses of a song this isn’t a problem, but it is something to keep in mind when working with markers.
Classic Tracks View Window
This is the original tracks window from PowerTracks Pro. Settings made in the Classic Tracks View will also affect the Trackw Window and the Mixer.
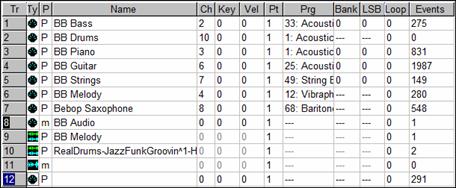
Selected Indicator: The first column in the track view indicates whether or not a track is selected/highlighted. If a track is selected its number will be highlighted in the same color as the window caption (top part of a window), and an “input rectangle” will appear over the “current” edit field.
Ty (Type) The type field determines the track type. There are three types: MIDI, mono audio, and stereo audio, each with its own icon.
![]() MIDI
MIDI
![]() Audio
Audio
![]() Stereo Audio
Stereo Audio
You can’t change the track type if a track already has data in it.
P (Play status) The play status field shows the current status of a track. A track can be in one of two states: play (P), or muted (m).
Tracks with a “play” status will be heard. Mutedtracks will not be heard, but the data will still be processed, so that you can quickly switch the track back into Pstatus at any time during playback or recording.
Editing Fields within the Tracks Window: The following fields may be edited by moving the cursor over the particular field you wish to edit and then pressing ENTER, or by double-clicking the mouse while over the field. Numeric fields may be increased or decreased by pressing the +/- keys.
Track Name: The name of a track.
Events: The number of events in a track.
Note:The following settings affect MIDI tracks only and don’t affect .WAV audio tracks:
Ch: Forced MIDI Channel. When not set to 0 all events in a track will be sent out over the selected channel.
Key: Forced Key Transposition. This setting transposes the events in a track up or down by whatever amount you specify. For example, “-12” will transpose down by 1 octave.
Vel: Forced Velocity transposition. This setting increases or decreases the velocity of the notes in a track by whatever amount you specify.
Port: MIDI Port. This setting determines which MIDI port the data in a track is sent out. If the port selected is greater than the number of available output ports the events in the track will be sent out the highest available port. For example, if only one port is available and you select port number 2, the events will be sent out of port number 1.
Prg: Program Change. When this setting is enabled a MIDI patch change will be sent at the start of a song. When you change this setting a program change will be sent out via MIDI. This is convenient for “auditioning” sounds during playback.
Bnk: Bank Select. This will send a bank select message, followed by the track’s current program change setting. Some synthesizers have more than 128 patches. The additional patches can be accessed by sending a bank select message, which will cause the synth to switch to a different bank of patches. See also the Options | Preferences | MIDI | MIDI Out command.
Loop: Loop MIDI Track. When this setting is enabled, a track will automatically repeat for the number of times specified. The track will loop back to the start of the measure that contains the first event in the track. If this setting is set to zero, the track will not be looped.
Resizing the track columns
p>You can resize the columns of the Classic Tracks View window as follows:
Move the mouse cursor to the top gray row and point it to the edge of the column you wish to resize. The mouse cursor will change shape. |
|
Click on the left mouse button and drag the mouse to the right to expand the column, or to the left to reduce the column width.
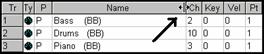
Help Menu
The Help Menu provides easy access to the on-line help file system (RB.CHM).
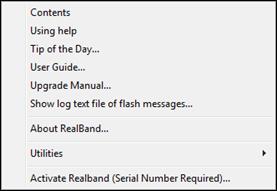
Contents
This tab will access the help file and display an index of the topics available in the RealBand help file system.
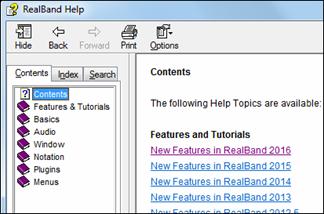
Click on the Index tab to type in the name of a feature or topic you wish to find. Then choose a topic in the list and click on [Display].
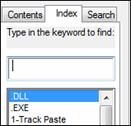
Click on the Search tab to search for a specific word.
Tip of the Day
This item accesses a dialog box that will provide you with numerous tips applicable to this program. By default, a tip is displayed when you first run the program. You can disable the tip feature by unchecking the “Show Tips at Start-Up” checkbox offered in the Tip of the Day dialog. Select the [Next Tip]Button to cycle through all the tips available.
User Guide
This launches your .pdf file reader and opens a full RealBand manual in .pdf format.
Upgrade Manual
This launches the New Features Guide for your version. It is a quick reference to newly added features.
Show log text file of flash messages
This will run the Notepad and show you a list of flash messages.
About RealBand…
This displays a dialog box containing the Version and Copyright information applicable to the RealBand program.
Utilities
Activate Band-in-a-Box (Serial Number Required) allows you to activate Band-in-a-Box if you haven’t done so yet. Band-in-a-Box needs to be activated within 30 days after you first run Band-in-a-Box.
Special Options for Activation/De-Activation will show options to change the activation status (e.g. removing activation and moving it to another PC).
Write BandInABoxRequest file creates a file that you can email to support@pgmusic.com if you have a problem activating the program.
Unconditional 30-Day Money Back Guarantee on all PG Music products purchased from PG Music Inc.
PG Music Inc.
29 Cadillac Ave Victoria BC Canada V8Z 1T3
Sales: 800-268-6272, 250-475-2874,+ 800-4746-8742*
* Outside USA & Canada where International Freephone service is available.
Access Codes
Tech Support: Live Chat, support@pgmusic.com
 Online now
Need Help?
Customer Sales & Support
|
Phones (Pacific Time) 1-800-268-6272 1-250-475-2874 |
||
| Live Chat | ||
| OPEN | Online Ordering 24/7 |
|
| OPEN | Forums, email, web support |