
Search Manual
RealBand® 2023 for Windows® User’s Guide
Chapter 9: Notation and Printing
Notation Window
Overview
|
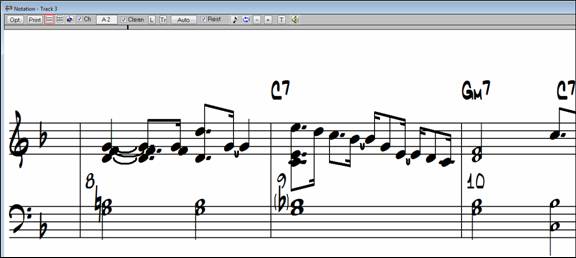
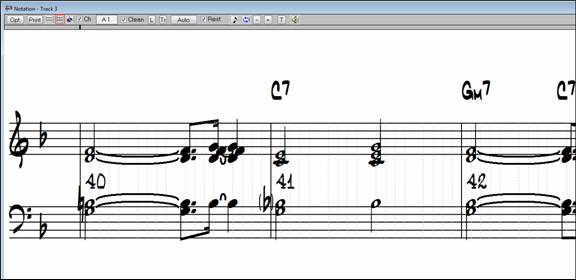
The Notation window displays the notes of a MIDI track on a staff and lets you print music on your printer. Open the Notation window with the “eighth-note” button, with the Window | New | Notation menu option, or with the keystrokes Alt+F2. |
Notation Window Tool Bar
![]()
![]() Opens the Notation Window Options dialog where user settings and preferences are made.
Opens the Notation Window Options dialog where user settings and preferences are made.
![]() Launches the Print Options dialog to print music.
Launches the Print Options dialog to print music.
![]() Opens the Standard notation mode window.
Opens the Standard notation mode window.
![]() Opens the Editable notation mode window.
Opens the Editable notation mode window.
![]() Opens the Staff Roll notation mode window.
Opens the Staff Roll notation mode window.
![]() Enables Chord Entry mode to type chords in the notation.
Enables Chord Entry mode to type chords in the notation.
![]() Name of the current note or the note that will be entered.
Name of the current note or the note that will be entered.
![]() The Clean checkbox put the standard notation into Clean Mode. Clean Mode will clean up the notation in certain situations where there are notes played very close together and are within a certain interval of each other. The clean option makes the notation more readable when there are a lot of grace notes (notes leading up or down to the next note) or glitch notes, which are notes that are short in duration and have a low velocity.
The Clean checkbox put the standard notation into Clean Mode. Clean Mode will clean up the notation in certain situations where there are notes played very close together and are within a certain interval of each other. The clean option makes the notation more readable when there are a lot of grace notes (notes leading up or down to the next note) or glitch notes, which are notes that are short in duration and have a low velocity.
![]() Opens Lyric Edit mode. In the Notation window, lyrics can be entered into a track that already contains the notes of a melody. When you switch into Lyric Edit mode, a gray edit box will appear near the top of the Notation window. The closest note or chord to the current time location will be highlighted.
Opens Lyric Edit mode. In the Notation window, lyrics can be entered into a track that already contains the notes of a melody. When you switch into Lyric Edit mode, a gray edit box will appear near the top of the Notation window. The closest note or chord to the current time location will be highlighted.
![]() The Track button lets you choose which track to view.
The Track button lets you choose which track to view.
![]() The Duration Button lets you select the duration of the note. The default duration is Auto. If Auto is the currently selected duration, the duration will be automatically set by the program so the note’s duration lasts up to the next note in the measure or to the end of the measure, which ever is closer.
The Duration Button lets you select the duration of the note. The default duration is Auto. If Auto is the currently selected duration, the duration will be automatically set by the program so the note’s duration lasts up to the next note in the measure or to the end of the measure, which ever is closer.
![]() The Rest checkbox lets you insert a hard rest onto the notation window to force a rest to be shown at a particular location. For example, if there is a half note at the beginning of a measure, you can cause it to be displayed as quarter note by inserting a hard-rest on the 2nd beat of the measure. Hard rests are shown in blue. The Rest checkbox only remains checked until you insert a rest.
The Rest checkbox lets you insert a hard rest onto the notation window to force a rest to be shown at a particular location. For example, if there is a half note at the beginning of a measure, you can cause it to be displayed as quarter note by inserting a hard-rest on the 2nd beat of the measure. Hard rests are shown in blue. The Rest checkbox only remains checked until you insert a rest.
![]() Switch between a Notation window and a Lead Sheet window.
Switch between a Notation window and a Lead Sheet window.
![]() The Loop Screen button will play the music of the current notation screen in a loop.
The Loop Screen button will play the music of the current notation screen in a loop.
![]() The Zoom Out button reduces the size of the Notation Window’s font.
The Zoom Out button reduces the size of the Notation Window’s font.
![]() The Zoom In button increases the size of the Notation Window’s font.
The Zoom In button increases the size of the Notation Window’s font.
![]() The Section Text button lets you place a text event at any location on the staff window. When you press this button, you’ll see a dialog box with a list of any existing text events.
The Section Text button lets you place a text event at any location on the staff window. When you press this button, you’ll see a dialog box with a list of any existing text events.
![]() The Scrub Mode button plays the notes in the song as you drag the mouse horizontally over the notation. This can be helpful for learning difficult parts, or for examining recorded tracks for glitches or wrong notes. Click the scrub mode button and the mouse cursor will change to speaker icon.
The Scrub Mode button plays the notes in the song as you drag the mouse horizontally over the notation. This can be helpful for learning difficult parts, or for examining recorded tracks for glitches or wrong notes. Click the scrub mode button and the mouse cursor will change to speaker icon.
![]() This will generate a vocal track using an online third party vocal synthesizer called Sinsy for a MIDI melody track with lyrics.
This will generate a vocal track using an online third party vocal synthesizer called Sinsy for a MIDI melody track with lyrics.
![]() This allows you to quickly change the number of bars per line.
This allows you to quickly change the number of bars per line.
![]() This allows you to display notation with larger font size and note names within note heads. Press the button again to return to the normal size.
This allows you to display notation with larger font size and note names within note heads. Press the button again to return to the normal size.
There are three Notation window modes, each with its own toolbar button.
1. ![]() Standard Notation mode
Standard Notation mode
2. ![]() Editable Notation mode
Editable Notation mode
3. ![]() Staff Roll Notation mode
Staff Roll Notation mode
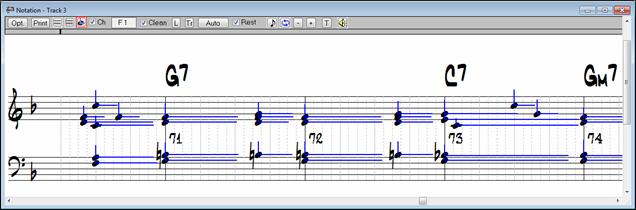
By default, the Notation window is in Standard Notation mode, which displays the notes as regular music with chord symbols and lyrics.
Editable Notation mode also displays standard notation but allows you to edit the notation. You will see standard notation with vertical gray lines that represent possible note locations, either eighth note triplets or sixteenth notes.
The Staff roll mode displays the notes as note heads (no stems) with optional duration and velocity lines. The Staff roll mode also contains gray vertical lines across the staff.
Standard Notation Mode
Standard Notation mode is a convenient way of displaying a track as regular music on a staff with chord symbols and lyrics.
|
The Notation window will draw brackets around an accidental (#) in a situation where the same note in the previous bar was an accidental outside the current key. |
This is a courtesy which helps to remind you that the note is now played as expected within the current key.
Entering Chord Symbols
Chords symbols can be entered in the notation for each beat of a song. A beat is equal to the numerator of the current time signature. For example, if the song is 2/4, you could enter up to 2 chord symbols per bar. If a song is 6/8, you could enter up to 6 chords per bar (although you likely won’t want to enter that many).
Chords are typed in from the computer keyboard using standard chord symbols like C or Fm7 or Bb7 or Bb13#9/E. Chord entry is enabled when the “Ch” checkbox is checked in the Notation window.
To start typing in chords in a Notation window:
- Rewind to the beginning of the song.
- Enable chord entry by clicking on the “Ch” checkbox.
- You may move around by cursor arrow Keys, Enter key, or mouse pointer click on the time indicator at the top of the Notation window. The time line moves 2 beats at a time in response to the left and right cursor keys.
When you have the time indicator at or close to the beat where you want to enter a chord, you then type the name of the chord. Note that the chord entry works the same as Band-in-a-Box in that the chord you type will go to the first beat in a 2 beat “cell.” For example, if the time is 1:02:00 and you type the letter c the C chord will be placed on beat 1. You can enter a chord on beat 2:00:00 with a comma as discussed below.
For example type c6 to get the C6 chord. Note that you should never have to use the Shift key, as RealBand will sort this out for you.
- Use b for a flat, e.g., Bb7.
- Use # or 3 for a sharp, e.g., F#7. You can actually type F37 to get F#7; RealBand will sort out the case, saving you the effort of using Shift+3 to type the # symbol.
- Use / for slash chords with alternate roots such as C7/E, C7 with E bass.
- Use a comma to enter two chords in a row. For example, we would type Ab9, G9 to enter two chords on consecutive beats.
- You can use Ctrl+Delete or the comma key to delete a chord.
The chords are shown in the Notation window above the treble clef:
| C6 AM7 | DM7 Ab9 G9 | C6/E | A7#9 |
In the above example, the | symbol shows roughly where the bar lines would be if these chords were entered in a Notation window. The sequence of keystrokes to enter all the chords in the above line would be:
w c6> am7> dm7> ab9,g9> c6/e> > a739 Enter
W indicates rewind, the > indicates cursor key to the right, and Enter indicates pressing the Enter key.
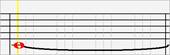
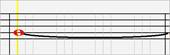
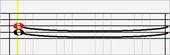
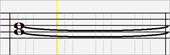
Time Signature Display
Time signature changes that occur during the song (1/4 through 4/4) will be displayed in the Notation window, Lead Sheet window, or printout.

Time signature change at bar 10 in Standard notation display.
Entering Lyrics
|
The [L] button in the Notation window puts the notation into a mode in which you can enter lyrics. Lyrics are stored as individual track events, which can be accessed in the Event List window like any other events. |
In the Notation window, lyrics can be entered into a track that already contains the notes of a melody. In Lyric Edit mode, a gray edit box will appear near the top of the Notation window. The closest note or chord to the current time location will be highlighted.
Lyrics are entered by typing a word in the edit box and then pressing Enter. When Enter or Tab is pressed, the Notation window will advance to the next note or chord of the melody. You can then continue typing lyrics and pressing Enter to advance forward into the melody. Ctrl+ ¬ (left cursor arrow) lets you back up to the previous note or chord, and Ctrl+ ® (right cursor arrow) lets you advance to the next chord without saving the contents of the edit control.
Unlike the .KAR format RealBand lyrics should not be preceded by spaces. Syllables are indicated with dashes, and paragraphs and lines are indicated with backslashes and forward slashes at the end of a line or paragraph.
Multi-Syllable Words: If a word has two or more syllables, you should follow the syllable with a dash. For example, the word “crazy” would be entered as two separate lyric events, cra- and zy.
Ending a line when lyrics are displayed in Big Lyrics window:
![]()
![]()
The Line and Para buttons appear when Lyrics mode is selected in the Notation window. These two convenient buttons let you enter line breaks (/) or paragraph breaks (\) when entering lyrics.
To end a line and start a new line, enter a break (line or para) at the end of the last lyric in a line. For example, if a word ends with a backslash, e.g., “town\,” then the next lyric after “town” will be displayed on a new line in the Big Lyrics window.
If you plan on saving as a .KAR file, you can use a “Para” backslash to indicate the end of a paragraph, and a “Line” forward slash to indicate the end of a line. In RealBand and in some Karaoke players, both the \ and / characters are treated the same way.
Generating Vocal Synth
To access this feature, you should first pick a song that has lyrics and a MIDI Melody. If no Lyrics are present, you can still generate a vocal synth using the syllable of your choice (la la la etc.).
Once you've loaded in a song, you can launch the Vocal Synth generation, either by:
- Press the [Vocal Synth] button in the Big Lyrics window and choose either auto or manual.
- Press the [Vocal Synth] button in the Notation window and choose either auto or manual.
- Or go to the Notation window, right-click on the track with lyrics and select either Vocal Synth (Auto" or Manually Generate Vocal Synth Track.
Once you choose the option, you see the dialog.
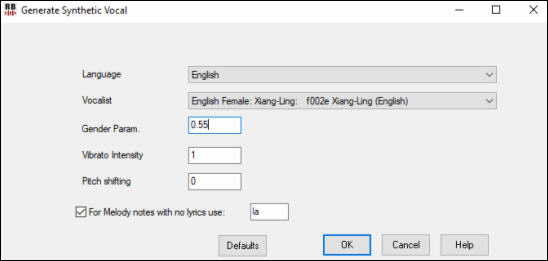
Normally you would use the AUTO mode, which means that you just press a single button, and wait (about 30 seconds) for the file to be generated.
Language - The choices here are English or Japanese. If you are using non-English words, phonetic spelling is advisable.
Vocalist - Choose singing voice (one English voice, or two Japanese voices).
Gender Parameters - This ranges from -0.8 to +0.8, and defaults to 0.55. Higher numbers are more masculine.
Vibrato Intensity - This controls the amount of vibrato in the voice. Range 0 to 2. Default is 1.
Pitch shifting - If set the pitch will be shifted in semitones. -12 would be down one octave. (Range -24 to +24)
For Melody notes with no lyrics use - If there are no lyrics, but there is a melody, the vocal synth can use the syllable you enter to sing the song. e.g. if you put 'la', then the song will be sung 'la la la la.'
The synthesized vocal will be returned as an audio file and loaded in to a blank track.
Editable Notation Mode
Editable Notation mode is the same as Standard Notation mode, but notes can be inserted by clicking on the staff with the left mouse button, moved by dragging with the left mouse button, or edited by clicking on a note head with the right mouse button.
Broken vertical gray lines across the staff show the position for each note subdivision in either eighth note triplets or sixteenth notes.
Editable Notation window in 16th note (even) resolution.
Moving Notes
Notes can be moved via drag and drop. To move a note, move the mouse cursor over an existing note and then click and hold the left mouse button. The mouse cursor will change to a different shape.
While keeping the mouse button pressed, move the mouse cursor over to the location you wish to drop the note and then let go of the mouse button. The note will be moved to the place you dropped it. Certain areas of the screen are not valid locations to drop a note. The mouse cursor will change to a circle with line through it to indicate an invalid location. If you try to drop a note in an invalid location, nothing will happen.
When you click on a note with the left mouse button, and drag the mouse without releasing the left mouse button, you will hear the note being played as you move it up and down the screen. The note’s pitch will be increased or decreased chromatically as you move it up/down the screen.
Entering Notes
Notes can be inserted simply by clicking on the staff in an appropriate location. You will see the name and octave of the current note location in a box at the top of the window. This helps if you are inserting a note above or below the grand staff. You can also insert notes via the Piano or Guitar window as discussed later in this section.
When inserting a note, holding down the mouse button and then pressing the Shift key (click+Shift) will make the note 1 half-step sharper than the position that you click on. Holding down the Ctrl key and then clicking (Ctrl+click) will make the note 1 half-step flatter, and holding down the Alt key will make the note a natural. Hold the key down until after you release the mouse button.
You can also insert notes by clicking on the Piano or the Guitar window. If you click on the Piano or Guitar window, notes will be inserted into any open Notation window at the current location in the Notation window. For example, if you click on middle C of the Piano keyboard, a middle C will be inserted into the Notation window.
There is a 1-peg hot key in the Notation window to move current time forward or backward by 1 peg (normally a 16th note). Alt+left arrow moves the current time backward by 1 peg. Alt+right arrow moves it forward by 1 peg. This makes it easier if you are using the on-screen piano for entering notes into the Notation window.
Notes can be deleted by holding down the Delete key and then clicking over the note you wish to delete.
Entering Notes Entirely with Keystrokes
There’s a keystroke entry mode - the “N” mode, which lets you enter a melody entirely using keystrokes. The keystrokes are N to enter a note, up/down cursor to change its pitch, left/right cursor to move the time line, M to enter an additional note a third above the existing note, and R to enter a rest.
|
Hit the N key to enter a note at the current time line. |
|
While the note is highlighted, use the up/down cursor keys to change its pitch. |
|
If you want to add a note a third above the existing note on the current time line, hit the M key. |
|
Use the right/left cursor keys to move the time line. |
|
Hit the R key to enter a rest at the current time line. |
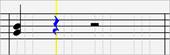
Editing Notes
Notes can be edited by clicking on the note with the right mouse button to launch a menu of editing commands. Select Edit Note to open the NOTE dialog.
|
This dialog allows editing of:
Forced Accidental If a note is being displayed as a sharp, but you want it to appear as a flat (or vice versa), you can force that here. Note Type - You can choose for the note to be Normal, Invisible (note will sound but will not appear in regular notation), or Guitar Bend (a B will appear above the note). Note that the guitar bend is for notation only and does not affect the sound of the note. The [Delete] button removes the note. |
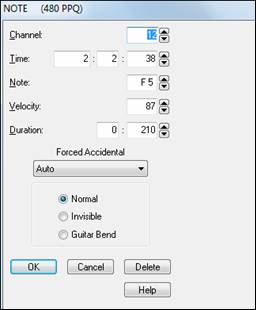
Micro-Resolutions
You can change the resolution for any individual beat of a song to a different resolution by clicking with the right mouse button above that beat on the Notation window’s time line. You can also right-click on the window and select Change Beat Resolution from the menu.
|
For example, if you click on the time line above the 2nd beat in a measure, a dialog box will pop up which will let you set the resolution of the current beat for both clefs. If you select a resolution of 8, then 32nd notes can be displayed. You can even select a resolution as high as 32, which would allow 128th notes to be shown. When you choose a micro-resolution RealBand will insert a special controller event into the track as a means of storing the resolution. If you set the resolution to the same setting as the Options dialog’s resolution setting, then micro-resolutions won’t be used, and the special controller for the current beat and clef will be deleted. |
Highlighting a section of the Notation window
When the Notation window is in Editable Notation Mode, you can highlight a section of the Notation window, so that you can cut or copy the section.
To highlight a section of the Notation window:
- Click and hold the left mouse button at the upper right corner of the rectangular section you want to highlight. Make sure you don’t click on any existing notes, and make sure you don’t release the left mouse button until you are finished highlighting.
- Move the mouse down and to the right to form a rectangle. You will see a rectangular section of the Notation window become highlighted in reverse.
- When you’ve finished highlighting release the left mouse button.
During the process of highlighting a section, you can highlight a section beyond the current notation screen by moving the mouse cursor beyond the right edge of the Notation window. When you do this, the Notation window will advance to the next screen. The Notation window will continue advancing until you move the mouse cursor back inside of the Notation window. You should move the mouse cursor back inside the notation window when it has reached the screen that contains the last measure of the section you wish to highlight. Then you can move the mouse cursor to the left or right within the Notation window to adjust to make any final adjustments to the highlighted section.
The highlighted area will include any notes on the first and last pegs (vertical beat division lines) of the highlighted section. The minimum highlighted section contains two pegs.
Shift+click to adjust the highlighted section of notation
Shift+click (Shift key + left mouse button) support makes it easy to tweak the beginning or end of the highlighted area.
- If you Shift+click before the start of the From/Thru range, or after the end of the From/Thru range, the highlighted area will be extended.
- If you Shift+click within the From/Thru range, the range will be reduced, and the location you clicked on will become either From or Thru depending on which boundary was closer to where you Shift+clicked the mouse.
- If you keep the left mouse button held after the Shift+click, and you move the mouse you can adjust the boundary of the range while moving the mouse.
Shift+click works in terms of adjusting the top and bottom of the highlighted area, and this affects the range of notes selected.
Once you have highlighted a section of the Notation Window, you can use the Edit | Cut or Edit | Copy commands to cut/copy a section of notation. The From/Thru values in the Cut or Copy dialog will automatically be set to reflect the highlighted area. You can then cut or copy as you would normally.
When you cut or copy after having selected a section of the Notation window and you press [OK], RealBand will ask you if you wish to apply a Data Filter based on the highlighted range of notes. If you answer “Yes” a Data Filter will pop up which will be set to include notes based on the vertical highlighted range in the Notation window.
Right-click Pop-Up Menu
This menu of notation commands pops up when you right-click on the Editable Notation window.
 /p>
/p>
Edit Note opens the Note dialog and lets you edit the current note.
Delete Note deletes the current note.
Forced Accidental lets you quickly add an accidental to the current note.
Duplicate previous groups of notes quickly duplicates the previous chord (a group of notes on the same location) without having to reenter it.
Delete Highlighted Red Notes deletes all notes that are currently highlighted in red.
Change Beat Resolution allows you to change the beat resolution of the current beat.
Insert Section Text opens the Section Text Event dialog where either regular or boxed section text is entered along with its time and vertical position in the window.
Section Letters – A submenu will let you select a section letter from A – Z, or Remove, which removes the nearest section letter to where you right-clicked.
Bar-Based Section Letters – The Section Letter gets inserted at the top of the bar line, so that it doesn’t overwrite chords or notes.
Notation Symbols – The notation symbols are entered from the Notation Event dialog, which is accessed from the right-click menu in the Editable Notation window.
Cleanup Orphaned Notation Controller Events – This will automatically remove stray notation controller events, such as any that no longer have notes associated with them.
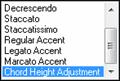
Chord Height Adjustment– Lets you make an adjustment to the vertical position of the chord symbol at the current beat.
Advance by 1 Peg – Advance the time by 1 peg.
Backup by 1 Peg – Backup the time by 1 peg.
Modes - Clicking on another notation mode will change to that screen while staying at the same location in the song.
Vocal Synth (Auto) - Your Melody or Soloist track with lyrics can be rendered to a vocal audio track by sending it to the 3rd party vocal synthesizer Sinsy.
“1-Peg” Notation Hot Key
There is a 1-peg hot key in the Notation window to move current time forward or backward by 1 peg (normally a 16th note). Alt+left arrow moves the current time backward by 1 peg. Alt+right arrow moves it forward by 1 peg. This makes it easier if you are using the on-screen piano for entering notes into the Notation window.
Pop-Up Note Properties Display
When in Editable Notation mode, if the Show pop-up hint for note properties setting is enabled in the Other Notation Options, a pop-up hint will appear if you move the mouse cursor over a note and stop.
![]()
![]()
|
The hint window shows the note's properties - note name, MIDI channel, velocity, start time, and duration. This lets you quickly see a note's properties without having to bring up the edit dialog by right-clicking on the note. |

Notation Symbols for Expression and Articulation
The Notation window supports many new symbols including section letters [A, B, etc.], slurs, legato, accents, staccatos, crescendos and more!
This dialog lets you insert (or remove) notation symbols such as,
Slurs |
|
Regular |
|
Crescendo |
|
Legato |
|
Decrescendo |
|
Staccatissimo |
|
Staccato |
|
Marcato |
|
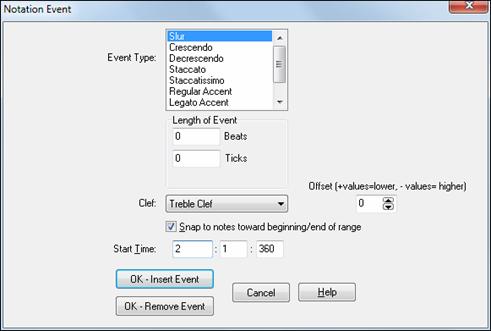
Choose the event type (slur, decrescendo, etc.) in the Notation Event list box.
The Length of Event field determines the length of a slur, crescendo, or decrescendo. The length is specified in beats and ticks. If an event is a “single-peg” event, such as a staccato or accent, then this field will cause multiple events to be inserted if the range is greater than zero (and the range spans multiple pegs). If you had highlighted an area of the Notation window prior to right-clicking on it (to launch the pop-up menu and choose the notation symbols menu item) then this field is set based on the length of the highlighted area.
The Clef field, if present, indicates the clef in which the event will be inserted (or removed from). Most events affect only one clef at a time, and therefore you must choose the clef and this field will be preset based on where you had initially right-clicked with the mouse on the Notation window (you did this to get the pop-up menu that launches this dialog). For example, if you had right-clicked on the treble clef, then this will be set to treble.
The Offset field, if present, lets you make adjustments to the vertical position of an event.
The Start Time field is the start time of the event (in measures:beats:ticks).
OK – Insert Event – exits this dialog and then inserts the event into the notation track.
OK – Remove Event – exits this dialog and then REMOVES the event (if it exists in the specified time range) from the notation track.
Chord Height Adjustment
The Notation Event dialog also lets you make an adjustment to the chord symbol height for a beat, by choosing theChord Height Adjustment event type.
|
This setting allows for adjustment of the vertical position of individual chord symbols. This is useful when chord symbols overlap other aspects of the notation. |
Staff Roll Notation Mode
Staff Roll mode is similar to a piano roll, except the notes are shown on a grand staff. Its purpose is to allow for easy graphical editing of notes, with the Staff Roll you will be able to graphically edit sequences much easier than if you were using a regular piano roll or an ordinary notation window.
Notes are shown as black dots (note heads) on the staff. Note stems are NOT shown.
If the Show Note Durations option is enabled, the durations of the notes are shown as horizontal lines. The horizontal duration lines are drawn a little higher or lower if the note is a sharp or a flat, which helps you be aware of rare situations where notes a half step apart overlap each other. Notes are shown with sharp, flat, or natural symbols depending on the key signature of the song. Notes are shown exactly where they occur. They are not quantized.
You can adjust the velocity and duration of a note by clicking on a note head with the right mouse button and then, while holding the button down, dragging the mouse cursor either vertically or horizontally. The velocity or duration will be changed based on the location where you release the right mouse button.
You can step forward or backward in the song by one chord by pressing the keypad period (.) and keypad zero (0) keys. The notes will be highlighted in red and sustained.
Notation Window Options
![]() The Options button launches the Notation Window Options dialog.
The Options button launches the Notation Window Options dialog.
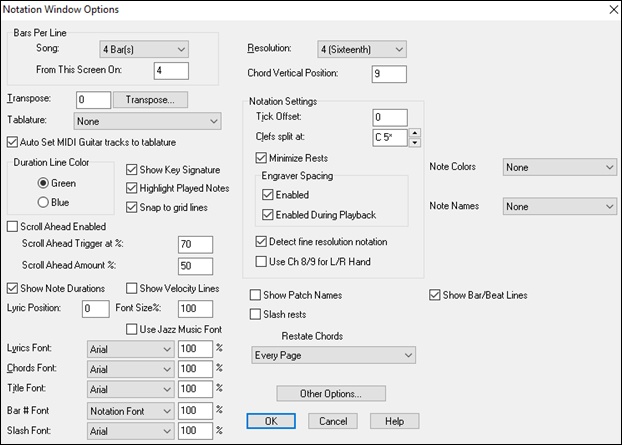
The Bars Per Line - Song setting determines the horizontal resolution of the screen. For example, with 2 Bars Per Line, the width of the screen is equal to 2 Bars in length. You can increase this setting to 16 Bars Per Line, although the screen may look unusual at this extreme since the size of the note heads remains the same regardless of this setting.
You can also use this setting to make the resolution equal to between 1 and 4 beats rather than complete bars. This is mainly for editing purposes. If you use beats with this setting, the program will ignore any “Bars Per Line -| From This Screen On” markers in order to display the partial bars.
The Bars Per Line - From This Screen On setting lets you change the horizontal resolution from this screen on. This will cause the program to insert a special Bars Per Line marker (Controller Event) into the sequence. This is useful if you have some sections of the song that you would like to be displayed with a different number of Bars Per Line than the overall Song setting. The Notation window will then display the number of bars you selected from the current screen on.
The Resolution setting determines how many vertical grid lines will be drawn for each beat. For example, with a resolution of 1, just one line will be drawn per beat. With a resolution of 4, 4 lines will be drawn, with 1 line being the beat line drawn in a solid color and the other lines being dashed lines representing sixteenth notes in 4/4. If you're displaying Jazz Swing or Shuffle music that has a triplet feel to the eighth notes, make sure to set the resolution to =3 (triplets). This will display the 8th notes and other aspects of Jazz Swing music correctly. You can also set micro-resolutions by clicking on the time line above any beat with the right mouse button.
The Chord Vertical Position setting adjusts the vertical position in which the chord symbols are displayed, which is useful when chord symbols overlap other notation. This setting can range from 1 to 10, with 1 being nearest to the staff.
The Transpose setting lets you adjust the Notation window to display notes either higher or lower than their actual pitches. For example, if you're working with guitar music, you could set this to +12 and the guitar music will be displayed an octave higher, which is the way guitar music is normally notated.
The Show Beat/Bar Lines checkbox, when unchecked, will cause the staff window to be drawn without beat or bar lines (Staff Roll mode only, not in Standard Notation mode).
The Tablature box gives a choice of tablature for guitar and additional fretted instruments - bass, ukulele, mandolin, and banjo. The fretboard tablature will show where the bass clef is normally located. Tablature is only shown in Standard Notation and Editable Notation mode. A track displayed with tablature must be a valid multi-channel guitar track, or the tablature won't be displayed properly.
Duration Line Color selects the color of the horizontal lines that represent note duration and the vertical lines for note velocity in the Staff Roll notation mode.
The Key Signature is shown if the Show Key Signature option is enabled.
If the Highlight Played Notes checkbox is checked, notes will be highlighted in red as the notes are played when a song is playing.
If the Snap to grid lines checkbox is checked, the inserted note will be lined up with the closest grid line (quantized). The duration of inserted notes is determined by the “Inserted Note Defaults” settings in the Other Notation Options.
The Notation window can be set to scroll ahead of the music without interfering with your view of the current notation. Use the Scroll Ahead Enabled checkbox to toggle this feature on and off.
The Scroll Ahead Trigger at % setting adjusts the location where the screen will scroll. A setting of 70 would cause the notation to scroll when the 70% of the current screen has played.
The Scroll Ahead Amount % determines how much the screen will scroll, based on the Bars Per Line setting. For example, a setting of 50% with the Bars Per Line setting at 4 Bars would scroll the notation ahead by two bars.
If the Show Note Durations checkbox is checked, then in Staff Roll Mode the durations of notes will be shown as either green or blue horizontal lines depending on whether the Duration Line Color is set to green or blue.
The Show Velocity Lines setting causes the Staff roll mode to display vertical lines in the same color as the duration lines. These lines represent the velocity of the notes, the higher the velocity the longer the line. The velocity lines are roughly the height of a staff when a note has a velocity of 127.
The Lyric Position lets you adjust the vertical position of the lyrics. When set to zero, the lyrics are drawn between the staves. The range is -64 to 64.
The Font Size setting adjusts the size of the Notation window’s font. The default size is 100%. You can increase or decrease the font size by changing this setting. You can also use the Zoom In [+] and Zoom Out [-] buttons at the top of the Notation window.
The Use Jazz Music Font setting enables the Jazz Music font for notation instead of the standard font. The Jazz font will give your lead sheets the appearance of a Jazz lead sheet rather than having a “Classical” appearance.
The Lyrics Font, Chords Font, and Title Font let you choose a different font for lyrics, chord symbols, and a song title. The percentage fields are used by RealBand to determine the size of the font (rather than the size in the font selection dialog).
The Bar # Font setting lets you choose either the Notation Font, or a different font of your choice. The percentage setting lets you adjust the percentage relative to the default size.
The following group of settings is for Standard Notation mode only, and don't have any effect in Staff roll mode:
The Tick Offset lets you display the music ahead or behind the beat. If you have a tendency to play the music ahead of the beat, you can specify a setting from 1 to 120 to have the music displayed forward in time. A setting from -1 to -120 will cause the music to be displayed ahead of the beat (but not before the beginning of the song). 120 ticks equal one quarter note for this setting regardless of the current PPQ setting. Generally you won't need to use this setting since the notes are rounded when being displayed in standard notation.
The Clefs Split At setting determines the split point for placing notes on the Bass or Treble clef. The default setting is C5, displayed as C5* to indicate it is middle C. For example, you can use a higher split point, such as C6 if you want some notes up to a G above middle C to be displayed on the bass clef with ledger lines instead of on the treble clef. If the split point is above middle C, and a note in the music is high enough that any of the ledger lines above the bass clef would overwrite the treble clef, the note will be placed on the treble clef.
The Minimize Rests checkbox, when checked, will cause RealBand to display the music with minimal rests. Use this setting if notes are displayed as shorter than you intended. For example, if eighth notes are displayed as sixteenth notes because you recorded them staccato.
The Engraver Spacing setting, when enabled, will improve the appearance of the standard notation in situations where the Notation window is crowded. However, you may notice a significant decrease in the speed of screen re-draws. You may want to only enable this setting before printing if you find that the screen redraws too slowly on your computer. When in Editable Notation, the spacing will not be drawn using engraver spacing. There are two Engraver Spacing settings, “Enabled” and “Enabled During Playback.” If the “Enabled” checkbox is checked, then engraver spacing is enabled, but won’t be displayed during playback unless the “Enabled During Playback” checkbox is checked. If the “Enabled” checkbox is unchecked then engraver spacing will be totally deactivated.
The Detect fine resolution notation setting will allow the Notation window, in Standard Notation Mode (non-editable mode) to detect micro-resolutions automatically. It will detect notes a short as 32nd notes in most situations. When this setting is enabled, the program will count the number of distinct chords (or individual notes) per beat and if there are more chords played in the beat than the current Resolution, the program will display the beat at a high enough resolution to show all of them separately rather than lumped together. For example, if the Resolution is set to 3 and 4 chords were played on a beat the program will display 4 chords as 16th note chords for that beat even though the song’s resolution is 3.
The Use Ch 8/9 for Left/Right Hand checkbox will cause the standard notation to display, within reason, notes on channel 8 on the bass clef and the notes on channel 9 on the treble clef. Notes on channels other than 8 or 9 will be displayed on the clef that they normally would be shown.
When Show Patch Names is checked, the patch name for the track is displayed on the notation, lead sheet, and printout.
If Slash Rests is enabled, slash marks / / / / will show for empty bars.
If Restate Chords is set to “Don’t Restate,” then the program works as in previous versions, and if the chord stays the same, it will never be stated again in the arrangement until it does change. If set to “Every Bar,” “Every Line” or “Every Page,” then the Notation, Lead Sheet and Printout will restate the chord every bar, line or page. The setting of “Every Page” is the default, which means that the first bar of the Lead Sheet Window will always have a chord as will the top of each Notation Window screen.
Other Notation Options
There are some additional settings that can be accessed by pressing the [Other Options] button.
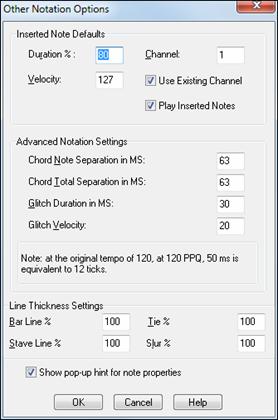
The Duration % setting causes the durations to be set to a percentage of the currently selected duration. For example, if the current duration is Whole, and you set the percentage to 50, the duration will be 50% of a Whole note.
The Channel and Velocity settings determine the MIDI Channel and velocity of inserted notes.
When the Use Existing Channel setting is enabled, and you insert a note in the Notation window, RealBand will intelligently determine the channel number of inserted notes instead of using the “Channel” setting in the Other Notation Options dialog. When this setting is disabled, the Channel field is used for inserted notes.
If this setting is enabled, and you then insert a note in the Notation window, RealBand will first try to use the forced MIDI channel in the Tracks window to determine the channel of the note you're inserting. If there is a forced MIDI channel setting for the track in the Tracks view, then RealBand will set the channel of the note you are currently attempting to insert so that its channel is the same as the forced MIDI channel.
If this setting is enabled, but there is no forced MIDI channel, i.e., the Ch field in the Tracks window is set to zero, RealBand will search the track for the nearest MIDI event in the track that is located before the time of the note you are currently attempting to insert. If a MIDI event was found in the track, then RealBand will set the channel of the note you're currently attempting to insert so that its' MIDI channel matches the MIDI channel of the event which was found.
If this setting is enabled, but there is no forced channel, and a MIDI event isn't found in the track, then RealBand will use the “Channel” field of the “Inserted Note Defaults” section in the Other Notation Options dialog.
If the Play Inserted Notes checkbox is checked, notes that you insert will sound briefly as they are inserted so you know that the note is correct.
These are advanced settings for standard notation mode:
- Chord Note Separation in MS is the maximum time span in milliseconds allowed for adjacent notes within a chord when “Detect fine resolution notation” is enabled. The default setting is 63 milliseconds, around 15 ticks at a tempo of 120 bpm and a resolution of 120 PPQ. In this case notes further than 15 ticks away will be detected as separate chords. Increasing this setting will increase the amount of time allowed between notes within each chord.
- Chord Total Separation in MS in the maximum time span in milliseconds allowed for the entire chords when “Detect fine resolution notation is enabled.” The default setting is 63, about 15 ticks. In this case, any note beyond 15 ticks from the earliest chord will be detected as a new chord.
- Glitch Duration in MS is a setting used by the clean routine to determine which notes are glitches and which notes are valid. Increasing this setting increases the likelihood that notes will be detected as glitches when clean mode is checked and the notation is in non-editable Notation mode.
- Glitch Velocity is a setting used by the clean routine to determine which notes are glitches and which notes are valid. Increasing this setting increases the likelihood that notes will be detected as glitches and not shown when clean mode is checked and the notation is in non-editable Notation mode.
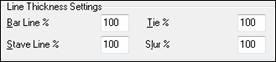
The Line Thickness Settings (Bar Line %, Stave Line%, Tie %, and Slur %) affect the thickness of the lines drawn by RealBand. The settings are a percentage, with 100% being the regular thickness.
Notation Controllers
The Notation window’s advanced features use controllers. For example, when you insert a hard rest or change the resolution of a beat to a “micro resolution” a controller event is inserted into the track. The Notation window controllers are:
Controller |
Value |
Purpose |
85 |
1 - 32 |
Bass clef micro resolutions. |
85 |
34 |
Invisible Note (Affects note immediately before it in the track.) |
85 |
37 |
Bass clef hard rest. |
86 |
1 - 32 |
Treble clef micro resolutions. |
86 |
37 |
Treble clef hard rest. |
88 |
33 - 48 |
Bars Per Line From This Screen On (33 corresponds to 1 BPL while 48 corresponds to 16 BPL). |
89 |
0 |
Slur |
|
1 |
Crescendo |
|
2 |
Decrescendo |
|
3 |
Staccato |
|
4 |
Staccatissimo |
|
5 |
Regular Accent |
|
6 |
Legato |
|
7 |
Strong Accent (Marcato) |
|
8 |
Chord Height Adjustment |
|
9 |
Boxed Section Letter (A through Z) |
90 |
|
Used to store notation data for events such as slurs, crescendo, etc. |
You can prevent RealBand from sending these controllers by checking the “Disable Special Controllers” in the MIDI Out dialog (Options | Preferences | MIDI | MIDI Out).
Lead Sheet Window
This window is similar to the Notation window, except that it can display a track in the form of a lead sheet, with multiple staves per page.
|
Open the Lead Sheet window with the tool bar button, or the Window | New | Lead Sheet Window menu option, or with the keystrokes Ctrl+Alt+F2. The Lead Sheet window is resizable and automatically adjusts the height and width of staves when resized. |
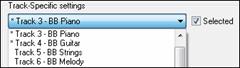
The Lead Sheet window can display notation for up to seven tracks at the same time. In order to display multiple tracks, you should first select the tracks in the Tracks window or Bars window and then open up a new Lead Sheet window.
Another way to select multiple tracks is in the Lead Sheet Options dialog.
|
RealBand can also print notation with multiple tracks when you press the Print button at the top of a Lead Sheet window that is currently displaying multiple tracks. |
If you attempt to display multiple tracks and the lead sheet appears overcrowded, you should reduce the Font Size setting in the Lead Sheet Options dialog. This will solve the problem of staves bumping into each other.
![]() You can switch between the Lead Sheet window and a regular Notation window by pressing the eighth-note button at the top of the Lead Sheet window.
You can switch between the Lead Sheet window and a regular Notation window by pressing the eighth-note button at the top of the Lead Sheet window.
![]() The Loop Screen button will play the music of the current lead sheet screen in a loop.
The Loop Screen button will play the music of the current lead sheet screen in a loop.
![]() This will open the Lead Sheet Memo window. This window is ideal for song lyrics that you want entered as a text entry appended to the end, multiple verses of lyrics, or any other text.
This will open the Lead Sheet Memo window. This window is ideal for song lyrics that you want entered as a text entry appended to the end, multiple verses of lyrics, or any other text.
![]() Press this button to set the number of bars per line to a different value.
Press this button to set the number of bars per line to a different value.
![]() This display notation with larger font size and note names within note heads. Press the button again to return to the normal size.
This display notation with larger font size and note names within note heads. Press the button again to return to the normal size.
![]() Although the Lead Sheet window has its own Options dialog, many of the settings in the Notation window’s Options dialog also affect the Lead Sheet window.
Although the Lead Sheet window has its own Options dialog, many of the settings in the Notation window’s Options dialog also affect the Lead Sheet window.
Lead Sheet Options
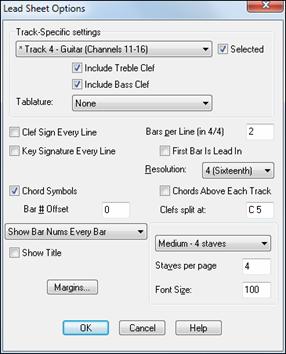
The Track-Specific settings section lets you adjust settings for individual tracks. The “Selected” checkbox determines if a track is displayed in the current Lead Sheet window; use this to display multiple tracks of notation. The combo box with the track numbers will show an asterisk (*) for tracks that are selected.
The Include Bass Clef and Include Treble Clef” settings determine which of the clefs will be displayed for each track.
The Show Tablature checkbox lets you enable or disable the display guitar tablature for each track.
The Clef Sign Every Line and Key Signature Every Line checkboxes let you decide if the lead sheet should show the clef sign and key signature on every line. These two settings are the same settings as found in the Print Options dialog of the Notation window.
The Bars Per Line setting determines how many measures are drawn on each line of the lead sheet in 4/4. If the Bars Per Line is set to 4, you will get 8 measures per line if the time signature is 2/4. Note: This setting is the same setting as found in the Print Options dialog of the Notation window.
The First Bar is Lead In; setting causes the program to display an extra bar of music on the first line of the first page displayed. Use this setting in combination with the “Bar # Offset” setting if the song has a lead in. This setting is the same setting as found in the Print Options dialog of the Notation window.
The Resolution setting determines the resolution of each beat. Normally you’ll keep this set to either 4 (sixteenth notes) or 3 (triplets). In the Notation window you can select micro resolutions for each individual beat.
When the Chord Symbols checkbox is checked, the program will show the chord symbols of the song, if there are any. This setting is the same setting as found in the Print Options dialog of the Notation window.
When Chords Above Each Track is checked the chord symbols (if present) will be seen above each track. This is helpful for following the chord changes on tracks farther down the screen, but it makes the overall appearance of the window “busier.” If left unchecked chords will only show above the top track.
The Bar # Offset setting is an advanced setting that you can use to decrease all the measure numbers of the lead sheet. It decreases the numbers that are displayed at each measure. For example, if you specify a Bar # Offset of -2, all the measures numbers will be shown as 2 less than their actual numbers. So, measure 3 would be shown with a number of 1, and the number for measure number 4 would be shown as 2. Any number that is reduced to 0 or less isn't shown, so in this case measures 1 and 2 would have no number, useful if the song has a 2-bar lead in. This setting is the same setting as found in the Print Options dialog of the Notation window.
The Clefs Split At setting determines the split point for placing notes on the Bass or Treble clef. The default setting is C5 that is middle C. For example, you can use a higher split point, such as C6 if you want some notes up to a G above middle C to be displayed on the bass clef with ledger lines instead of on the treble clef. If the split point is above middle C, and a note in the music is high enough that any of the ledger lines above the bass clef would overwrite the treble clef, the note will be placed on the treble clef. This is identical to the Clefs Split At setting in the Notation Options dialog.
The Show Bar Nums setting lets you choose how often bar numbers are displayed. This setting is the same setting as found in the Print Options dialog of the Notation window.
The Show Title checkbox lets you see the song title on the top of the first page of the song.
The Margins button lets you adjust the margins of the Lead Sheet window.
You can select the Staves per page and Font Size. The bigger the font, the fewer staves you'll be able to fit on each page. If you select a higher number of staves than will fit with the current font size, the Lead Sheet window will only display the maximum number of staves that will actually fit on the page. Use the combo box to select from several presets.
Double Bar Lines
Double bar lines supported in the Lead Sheet and for staff printout.
RealBand will automatically display double bar lines when a new part marker is reached.
RealBand will display a double-fat bar line at the beginning of the 1st part marker, except when the First Bar Is Lead-in Checkbox is enabled, in which case the double-fat bar line will be displayed at the beginning of bar 2. RealBand will also display a double-fat bar line at the end of the printout. Double-bar lines of normal thickness will be displayed at part-marker section changes in the middle of a printout.
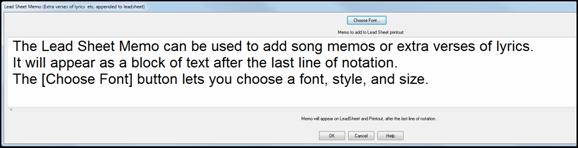
Lead Sheet Memo - Copy/Paste Song Lyrics to Lead Sheet
Easily copy and paste lyrics from other applications, to be appended to your lead sheet for display and printout, with selectable font.
|
Pressing the Memo button on the Lead Sheet window will launch the Lead Sheet Memo window. |
In this dialog you can type in a memo, such as extra lyrics, etc. The memo will show up after the last line of notation in Lead Sheet or notation printout. The [Choose Font] button lets you choose which font is used to display the memo.
Printing
|
The [Print] button lets you print out music. When you press the print button, the Print Options dialog will pop up. |
Print Options Dialog
This dialog lets you change various settings that affect the printout. These settings will remain in effect until you exit the program. Almost all of these settings are saved to RealBand .SEQ files.
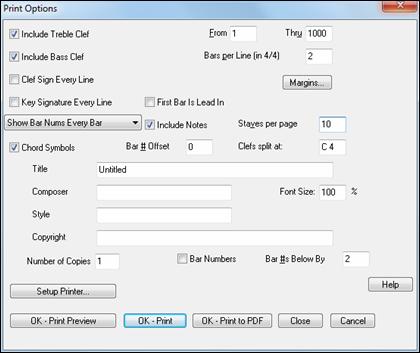
The Include Bass Clef and Include Treble Clef checkboxes let you decide whether the printout should contain the Bass Clef, Treble Clef, or both. Note that both the bass and treble clefs are always printed in Staff roll mode regardless of these settings.
The From and Thru settings determine the range of measures that are printed. By default, “From” is set to 1 and “Thru” is set to 1000. This will cause the entire song to be printed (unless the song really goes beyond 1000 measures). The program won't print beyond the end of the song. If there are sustained notes that go beyond the measure in the “Thru” setting, the program may print extra measures. For example, if the “Thru” setting is set to measure 5, and there is a note that is sustained until measure 6, the program will print measure 6.
The Bars Per Line setting determines how many measures are drawn on each line of the print out in 4/4. If the “Bars Per Line” is set to 4, you will get 8 measures per line if the time signature is 2/4.
The Clef Sign Every Line and Key Signature Every Line checkboxes let you decide if the printout should print the clef sign and key signature on every line.
The First Bar is Lead In setting causes the program to print an extra bar of music on the first line of the first page printed. Use this setting in combination with the “Bar # Offset” setting if the song has a lead in.
The Margins setting lets you change the left and right margins of the printout in inches. When the margins are set to 0, the program will print as wide as your printer will support. Therefore, there may still be margins if your printer can't print on the edges of the paper.
The Show Bar Nums combo lets you choose where you want bar numbers to be printed.
When the Include Notes checkbox is checked, the program will print the notes of the track. The only reason for un-checking this would be to print blank paper, with just the key signature. (You would also have to make sure the Bars Per Line is set to 1, and un-check the Bar Numbers and Chord Symbols checkboxes.)
The Staves Per Page setting lets you determine how many staves will be printed per page. Normally, you'll want to leave this at 10, but you can decrease this setting if the song has a lot of very high or very low notes so that there is room between staves for them. If you increase this setting beyond 10, there may not be enough room for all the staves on the paper depending on the size of the paper in your printer. If the printout has a song title, the first page printed out will be limited to 8 staves so that there's room for the title.
When the Chord Symbols checkbox is checked, the program will print the chord symbols of the song, if there are any.
The Bar # Offset setting is an advanced setting that you can use to decrease all the measure numbers of the printout. It decreases the numbers that are printed at each measure. For example, if you specify a Bar # Offset of -2, all the measures numbers will be printed as 2 less than their actual numbers. This setting is useful if the song has a lead in, because, for example, a setting of -1 would cause the first measure to be printed with no number and the rest of the measures will be printed with their numbers starting with 1.
The Clefs Split At setting determines the split point for placing notes on the Bass or Treble clef. The default setting is C5, which is middle C. For example, you can use a higher split point, such as C6 if you want some notes up to a G above middle C to be displayed on the bass clef with ledger lines instead of on the treble clef.
The Title, Composer, Style, and Copyright settings let you insert text onto the first page of the printout. The “Title” field is for a song title. The “Composer” field is for the author's name, and will appear to the right of the title. The “Style” field is for the style of the music such as Slow Blues, and will appear to the left of the title. The “Copyright” field is for a copyright notice and will appear at the bottom of the first page of the printout.
The Font Size setting lets you adjust the size of the font used for the printout. A value of 100 % is normal size. You can make the font smaller or larger by increasing or decreasing this setting.
The Number of Copies setting allows you to easily print out multiple copies of notation. You can print any number of copies from 1 to 1000.
Select the Bar Numbers checkbox to print only the range of bars defined by the Print Options’ “From” and “Thru” boxes.
You can adjust the position of the bar numbers with the Bar #s Below By option.
The [Setup Printer] button lets you configure your printer. The changes to the printer configuration will be in effect for printing music until you exit the program.
The [OK – Print Preview] button launches the Print Preview.
The [Print-to-PDF] button lets you print the notation directly to a .PDF file.
Unlike most other dialogs, the Print Options has a [Close] button in addition to [OK] and [Cancel]. The [Close] button works the same as [Cancel], except that any changes you've made to the settings will be saved.
Print Preview
When you press the [Print] button to print from the Notation window, you can print to a Print Preview window. This lets you view what the printout will look like without having to waste paper. To access the Print Preview window, you print as you normally would, except you press the [OK- Print Preview] button. When you’ve pressed the [OK – Print Preview] button, the Print Preview will be shown. At the top of the Print Preview window, you will see a toolbar with various buttons.
![]()
The [Prior] and [Next] buttons will go to the prior page or next page of the printout.
The [First] and [Last] buttons will jump to the first or last pages of the printout.
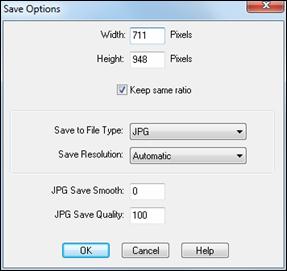
The [Opt] button will access the Preview Options, such as the bitmap dimensions and the type of file used if you wish to save a page to a graphics file.
The [Screen Width] button will make the size of the pages in the preview equal to the width of the screen.
The [Full Page] button will make the size of the pages just big enough to see the entire image in proportion without having to do any scrolling.
The [Print…] button returns to the Print Options dialog.
The [Print Page] button prints the currently displayed page directly to the default printer, unless you select a different printer in the Print Options dialog.
The [Save…] button lets you save the current page to a graphics file. You’ll see a dialog with some of the same settings as the Options dialog.
The [Save Range…] button saves a range of pages. The pages will be named SONGNAMEXXX.BMP with SONGNAME being the name of the song, and XXX being the page number.
The [Close] button closes the Print Preview.
![]() Use the [Save] button to save your song as a graphics file. Graphics files can be inserted into documents, uploaded to the Internet, or sent as email attachments.
Use the [Save] button to save your song as a graphics file. Graphics files can be inserted into documents, uploaded to the Internet, or sent as email attachments.
You can choose to print to BMP, JPG, TIF, and other graphic formats as grayscale or color files with either low or high resolution. The JPG Save Smooth and JPG Save Quality settings affect the quality of JPG files. |
|
Unconditional 30-Day Money Back Guarantee on all PG Music products purchased from PG Music Inc.
PG Music Inc.
29 Cadillac Ave Victoria BC Canada V8Z 1T3
Sales: 800-268-6272, 250-475-2874,+ 800-4746-8742*
* Outside USA & Canada where International Freephone service is available.
Access Codes
Tech Support: Live Chat, support@pgmusic.com
 Online now
Need Help?
Customer Sales & Support
|
Phones (Pacific Time) 1-800-268-6272 1-250-475-2874 |
||
| Live Chat | ||
| OPEN | Online Ordering 24/7 |
|
| OPEN | Forums, email, web support |