
Search Manual
Band-in-a-Box® 2020 for Mac® User's Guide
Chapter 14: MIDI Setup
Mac OS X CoreMIDI
Band-in-a-Box uses CoreMIDI as a MIDI driver. CoreMIDI is the Mac OS X standard MIDI driver method. CoreMIDI facilitates communication with external MIDI devices, and it also enables inter-application “piping” of MIDI data between MIDI applications.
CoreMIDI requires some setup but is not terribly complicated.
CoreMIDI with a MIDI Interface and External Synthesizers
If you have not done so already, follow the manufacturer’s instructions to install your MIDI interface. Installation details may vary, depending on the manufacturer and the model of your MIDI Interface.
Hint: It is helpful to occasionally check your manufacturer’s web site and download/install MIDI Interface driver updates which might become available.
Apple® “Audio MIDI Setup” Application
Audio MIDI Setup is usually found in your Applications/Utilities folder. It can be helpful to locate Audio MIDI Setup in the Finder, then drag its icon to the Dock, so it will be easy to launch the program (from the Dock) when necessary.
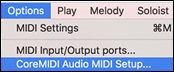
Audio MIDI Setup can also be launched from Band-in-a-Box.
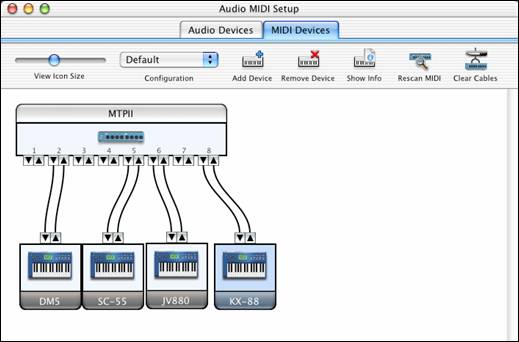
Specific details of your Audio MIDI Setup screen will differ from this example, depending on your MIDI interface and your connected external MIDI devices. This is a relatively complicated example, with an eight port MIDI interface and four different synthesizers.
If your MIDI Interface has been properly installed, the picture of your MIDI Interface will automatically appear in the Audio MIDI Setup window, showing input/output “pins” for each MIDI input and output socket on your MIDI Interface.
You need to inform Audio MIDI Setup about your external devices (keyboards, synthesizers, drum machines, mixers, etc.). Click the [Add Device] button for each of your external devices, and then double-click each new device to set Manufacturer, Model, number of Send/Receive MIDI channels, and other relevant information.
After your external devices have been created and configured, the last step is to “wire them up” to the picture of your MIDI interface. For instance, in the above illustration, the KX-88 keyboard controller is connected to MIDI input/output pair #8 on the MTPII MIDI Interface. Click on an input/output “pin” on the picture of your MIDI Interface and drag to an output/input “pin” of the picture of an external device.
After supplying this information, CoreMIDI will know what devices are “on the other side” of your MIDI interface(s).
Band-in-a-Box MIDI Port Selection for External Devices
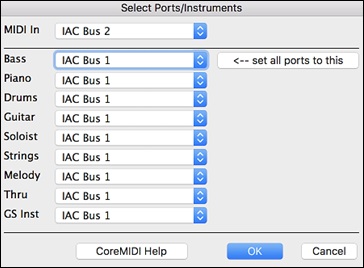
This example shows Band-in-a-Box configured to receive/record from a MIDI keyboard on MIDI Interface Port 8. Band-in-a-Box transmits tracks on an assortment of synthesizers, connected to various MIDI Interface ports. This scheme would be useful on a large MIDI setup, if your best Drum sounds are on a Port 5 synthesizer, best Piano is on a Port 2 synthesizer, etc.
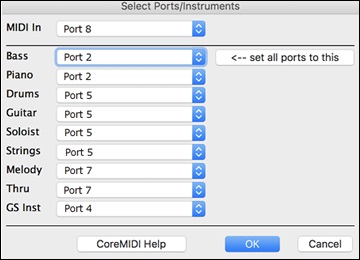
Your setup does not have to be so complex. If you want all tracks to be played on a single synthesizer (the most common situation), set the desired destination in the Bass popup menu, and then click the [← set all ports to this] button, to quickly set the destination for all tracks. You can get excellent results with all instruments assigned to a General MIDI compatible device, such as an Apple® DLS synth module.
Apple® DLS Synth and a Controller Keyboard
If you have a small MIDI controller keyboard, but you do not have any external MIDI Synthesizers, Band-in-a-Box can easily support this.
Select the port that your controller is connected to as your MIDI Input, and then select QT Music Instruments for your output ports. Band-in-a-Box will receive/record from a keyboard connected to the MIDI interface, but playback and keyboard MIDI Thru will go to the built-in Mac® synth.

Inter-Application Communication with IAC or Virtual Ports
Virtual Ports can be used to “pipe” Band-in-a-Box MIDI playback into most CoreMIDI-compatible sequencers and other MIDI software. This means that when you play a song in Band-in-a-Box, the MIDI information will be sent to another application, rather than directly to a MIDI interface or Apple® DLS softsynth. One reason to do this would be to use a third-party application as an Audio Unit or VST plug-in host.
With Band-in-a-Box, you can use either the BIAB Virtual Ports or the IAC (Inter-Application Communication) bus. These are just two different ways of accomplishing the same thing.
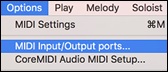
There is a detailed video tutorial on using Band-in-a-Box with various standalone soft synths (“Using Band-in-a-Box® with stand-alone synths”) at https://www.pgmusic.com/videos.bbmac.htm . To use the IAC bus, you first need to enable the IAC driver in the Audio MIDI Setup window (MIDI Devices). Double-click on IAC Driver, make sure “Device is online” is checked, and add at least one port.
In Band-in-a-Box, go to the CoreMIDI Choose Ports dialog, and select IAC on all output ports.
Next, launch your third-party MIDI application, and select IAC as the input port. This is often done in the program’s Preferences | MIDI window.
On Non-GS Synthesizers, Avoid GS Commands
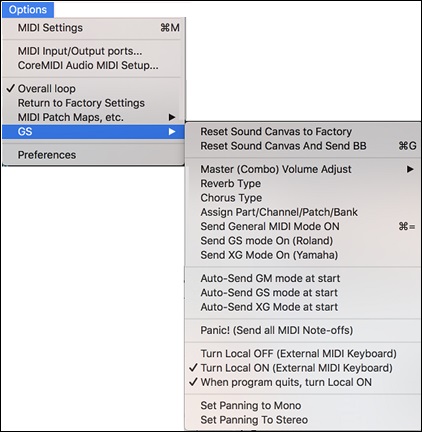
GS is a Roland-authored set of SysEx commands. GS is recognized by many (but not all) Roland synthesizers. GS is also recognized by some non-Roland synthesizers.
In a perfect world, the worst that would happen to a non-GS synthesizer is that the synthesizer would simply ignore GS messages (and therefore GS parameters like Master Volume or Reverb would not work).
However, there are many synthesizers available, especially amateur-written soft synths. It is possible that you may find occasional devices that can get confused and malfunction, if presented with GS messages.
In order to make sure you get the control response you expect, and avoid possible malfunctions on some synthesizers. Unless you know that your synthesizer understands GS messages, make sure to specify MIDI control messages.
MIDI Settings
The MIDI Settings dialog box allows you to setup settings for each track. You can also set the Harmony channels by pressing the [Harmony] button inside this dialog box.
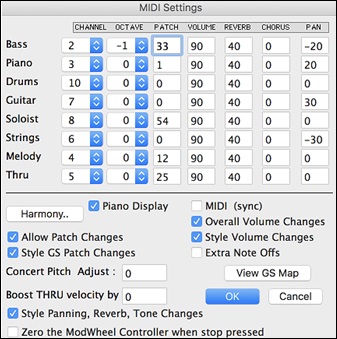
The settings are:
- CHANNEL: Range 0 to 16. (If set to 0, part will be Off).
Some synths (e.g. MT32), give higher priority to lower channel #’s, so if you are “running out of notes” you should assign important parts (e.g. Melody) a lower channel than other parts (e.g. Guitar). - OCTAVE: This adjusts the octave of the part. Range is -2 to +2, usually set to 0. (Bass is usually set to -1 for General MIDI instruments.)
- PATCH: Range 0 to 127. These are General MIDI patch numbers. You do not type in the patch numbers of your synthesizer. (The patch map handles mapping of the General MIDI patch numbers to your non-GM synthesizer’s patch numbers.)
- VOLUME: Range 0 to 127. Typical volume setting is = 90.
- REVERB: Range 0 to 127. Typical setting = 40.
- CHORUS: Range of 0 to 127. Typical setting = 0.
- PAN: Panning refers to the left/right stereo placement. Range is –63 (hard left) to +64 (hard right). A setting of 0 is centered.
Press the [Harmony] button to launch the Harmony Channels dialog.
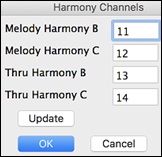
Band-in-a-Box already uses 7 channels (Bass, Drums, Piano, Guitar, Strings, Melody and Thru channels). Adding these 4 harmony channels produces potentially 11 channels of information. If you have a modern module that receives on all channels, then you can use these defaults.
- Melody Harmony Channel A: Always uses the Melody channel.
- Melody Harmony Channel B: Default =11
- Melody Harmony Channel C: Default =12
- Thru Harmony Channel A: Always uses the Thru channel.
- Thru Harmony Channel B: Default =13
- Thru Harmony Channel C: Default =14
Older modules capable of playing only 8 parts at once (like an MT32 or a Korg M1) won’t be able to take advantage of the harmony using different instruments. In this case, you should set the harmony channels as follows:
- Melody Harmony Channel A: Uses the Melody Channel. No need to set.
- Melody Harmony Channel B: Need to set equal to Melody Channel.
- Melody Harmony Channel C: Need to set equal to Melody Channel.
- Thru Harmony Channel A: Uses the Thru Channel. No need to set.
- Thru Harmony Channel B: Need to set equal to Thru Channel.
- Thru Harmony Channel C: Need to set equal to Thru Channel.
If you do this, then you don’t need to do any other modifications to your Band-in-a-Box setup, because it is not using any new channels.
Piano Display
Uncheck this box if you don’t want to see notes played on the piano keyboard in the Mixer Window.
Allow Patch Changes
Do not check this box if you want to disable All Patch changes. If you haven’t made a patch map, you should disable this.
Style GS Patch Changes
Styles frequently come with patch changes. If you want to disable these, uncheck this box.
Concert Pitch Adjust
This is useful for non-concert instruments such as Saxophone or Trumpet. The output is transposed so that you see the music in one key, and it plays in another. Trumpet players and other Bb instruments should set Concert Pitch Adjust to -2 (i.e. minus 2). Alto Sax and other Eb instruments should set Concert Pitch Adjust to +3.
Here is an example of an Alto player using Band-in-a-Box by setting the concert pitch adjust to +3.
If the song is in the concert key of C transpose the song to A using the key signature box on the main screen. The song will display in the key of A, but with the Concert Pitch Adjust set to +3 it will play 3 semitones higher, in the key of C. So, the Alto player can read the music in the transposed key while hearing it in the concert key. The song can also be printed out in the key of A.
Boost THRU velocity by
If the sound of your keyboard is too quiet when playing along with Band-in-a-Box, and increasing the THRU Volume doesn’t help enough, use this option to boost the THRU velocity and make your THRU playing louder. (For example, non-velocity sensitive keyboards are usually set to output a quiet velocity of 64).
Style Panning, Reverb, Tone Changes
When this option is enabled, styles are allowed to set panning, reverb, and tone, if they are set that way in the style.
Zero the ModWheel Controller when stop pressed
If you use Garritan synths, do not enable this option, because Garritan uses Modulation Wheel for Volume. If you have a MIDI keyboard, and use Modulation Wheel, you might set this.
MIDI (sync)
To synchronize Band-in-a-Box with an external sequencer, check this box.
Overall Volume Change
To prevent any changes of volume inside Band-in-a-Box, uncheck this box.
Style Volume Changes
Styles occasionally come with volume changes. To prevent these, uncheck this box.
Extra Note Offs
Leave this box unchecked unless you are having trouble with stuck notes when you press [Stop]. If you check this box, Band-in-a-Box will send a sweep of all notes off.
The [View GS Map] button opens a list of General MIDI patch numbers for quick reference.
Unconditional 30-Day Money Back Guarantee on all PG Music products purchased from PG Music Inc.
PG Music Inc.
29 Cadillac Ave Victoria BC Canada V8Z 1T3
Sales: 800-268-6272, 250-475-2874,+ 800-4746-8742*
* Outside USA & Canada where International Freephone service is available.
Access Codes
Tech Support: Live Chat, support@pgmusic.com
 Online now
Need Help?
Customer Sales & Support
|
Phones (Pacific Time) 1-800-268-6272 1-250-475-2874 |
||
| Live Chat | ||
| OPEN | Online Ordering 24/7 |
|
| OPEN | Forums, email, web support |