
Search Manual
Band-in-a-Box® 2020 for Mac® User's Guide
Chapter 5: Playing Songs
Loading a Song
Band-in-a-Box songs with the .SGU file extension are backup arrangements with no melodies. Songs with a MIDI melody track have the file extension .MGU.
You can load a song from the [Open] or [Song] button on the toolbar.
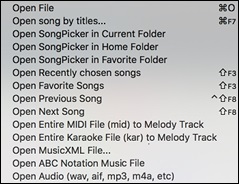
The [Open] button opens a menu of commands for opening files by various methods. |
|
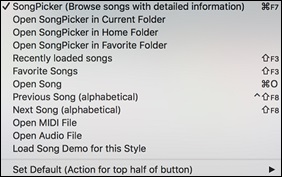
The [Song] button is a split button. Clicking on the top half opens a song selection dialog using the default method assigned to the button. Clicking on the bottom half of the button opens a menu of the options for opening songs. |
|
The default method for the top half of the button is assigned from this menu. For example, if there is a check mark beside “SongPicker,” clicking on the top half of the button will launch the Song Picker dialog. If “Recently Loaded Songs” is checked, clicking the button will go directly to the Recently Played Songs list, and so on. |
Drag & Drop Files to Band-in-a-Box
You can drop many file types onto the Band-in-a-Box screen and they will be loaded into the program, either as a new file or added to an existing song. File types include Band-in-a-Box songs (.SGU/.MGU), MIDI (.MID), audio (.WAV/.AIFF/.M4A/.MP3), MusicXML (.mxl/.xml/.musicxml), and ABC Notation (.abc). . Simply drag the file and drop it anywhere on the Band-in-a-Box screen, including various windows.
Open Song by Titles (SongPicker)
The SongPicker shows information for up to 60,000 songs. It has many filter features for finding songs. You can also search songs that have similar chord progressions or melody fragments.
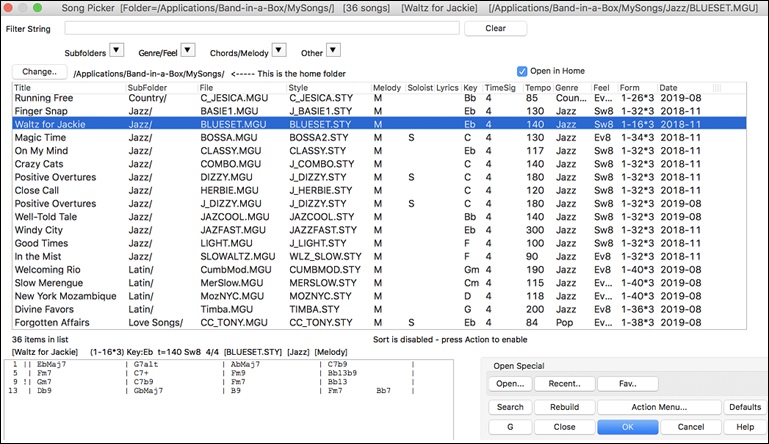
The SongPicker will show songs in Band-in-a-Box/MySongs, which is your “home” folder. This is an empty folder but is used for you to put any songs.
![]()
![]() You need to press the [Rebuild] button to build the song list for this folder.
You need to press the [Rebuild] button to build the song list for this folder.
If the song list build is taking more than 3 seconds, you will see the progress at the top of the window.
![]()
![]() If the “Open in Home” option is enabled, the SongPicker will always open in the home folder instead of the current folder when you press the default [Song] button to open the SongPicker.
If the “Open in Home” option is enabled, the SongPicker will always open in the home folder instead of the current folder when you press the default [Song] button to open the SongPicker.
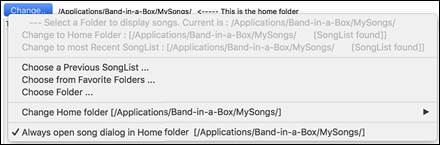
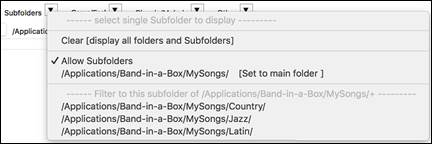
If you want to see the song list in other folders, press the [Change] button. You will see some menu options to choose folders. There is also an option to always open the home folder.
You can change the width of any column in the song list by dragging the boundary. This customization will be remembered between sessions.

Title - This is the title of the song.
SubFolder - If the folder has subfolders, they will show here.
File - This is the file name of the song.
Style - This is the style the song uses.
Melody - A letter “M” indicates that the song has the Melody track. A blank column means that the Melody track is empty.
Soloist - A letter “S” tells you that the Soloist track is present. If the column is blank, the Soloist track is empty.
Lyrics - If the song has note-based lyrics, a letter “L” will show in this column.
Key - This is the key of the song.
TimeSig - The number shown is the numerator of the time signature, so “4” means the song is in 4/4 time and “3” means it is in 3/4 time.
Tempo - The tempo of the song displays.
Genre - This tells you the genre of the song.
Feel - The feel (even/swing, 8th/16th) will show in this column.
Form - This shows you the song form. For example, if 1-32*3 is shown, the chorus starts at the bar 1 and ends at the bar 32, and there are 3 choruses in the song.
Date - The file was last modified in this year/month.
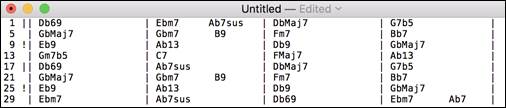
In the area below the song list, you can see the chord progression of the currently highlighted song.

You can copy and paste it into a text file.
The song list can be filtered in many ways.

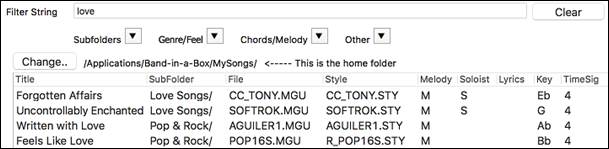
Type in any text, and the filtered list will show songs that contains the text in any field.
The “Subfolders” button allows you to filter the list by a certain subfolder of the current folder.
You can use “Genre/Feel” button to filter the list by genre, feel (even/swing, 8th/16th), or time signature.

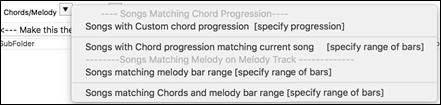
The “Chords/Melody” button allows you to filter the list by a chord progression and/or a melody fragment.
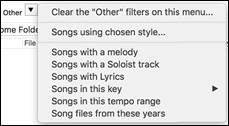
The “Other” button is to filter the list by a certain style, songs with melody/soloist/lyrics, certain keys, tempo range, or file dates from certain years.
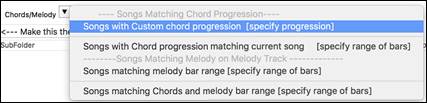
The Songs with Custom Chord Progression item in the “Chords/Melody” filter menu helps you find songs that contain a chord progression that you specify.
When the Custom Chord Progression Match dialog opens, type in a chord progression using a vertical line for a bar line. (e.g. Dm7 | G7 | C |)
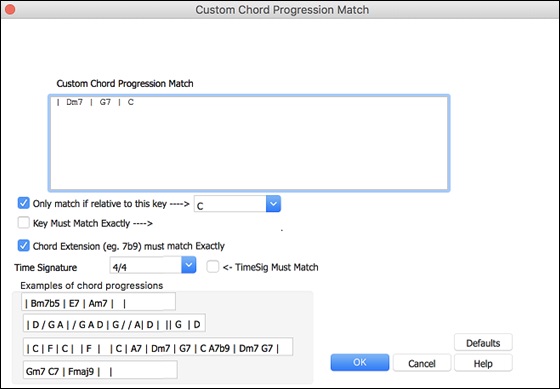
If you want to find the progression that is relative to the key of C (i.e. Dm7 is IIm7), then you should enable the “Only match if relative to this key” checkbox and set the key to C.
This function will always find the progressions in every key; for example, it will find | Am7 | D7 | G.
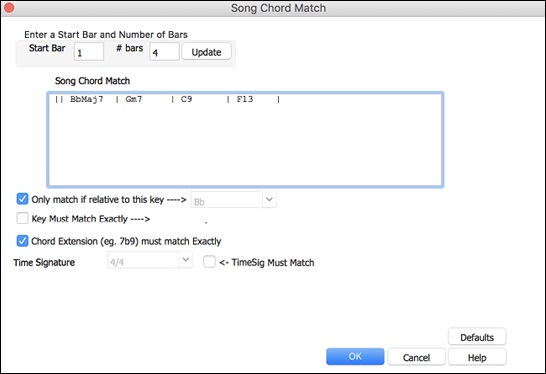
The Songs with Chord progression matching current song item in the “Chords/Melody” filter menu will help you find songs that has a similar chord progression in the selected range of the current song.
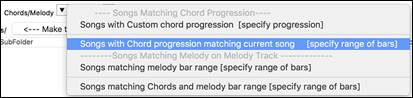
In the Song Chord Match dialog, specify the range by entering the start bar number and the number of bars. When you press the [Update] button, the chord progression in that range will display.
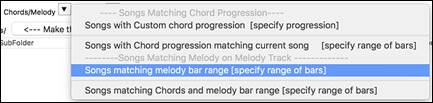
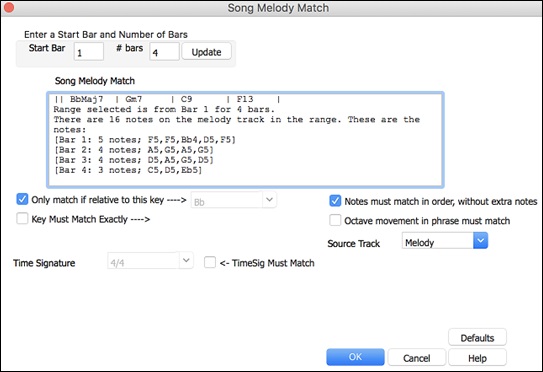
With the Songs matching melody bar range item in the “Chords/Melody” filter menu, you can find songs with a similar melody fragment in the selected range of the current song.
When the Song Melody Match dialog opens, select the source track (Melody or Soloist), and specify the range.
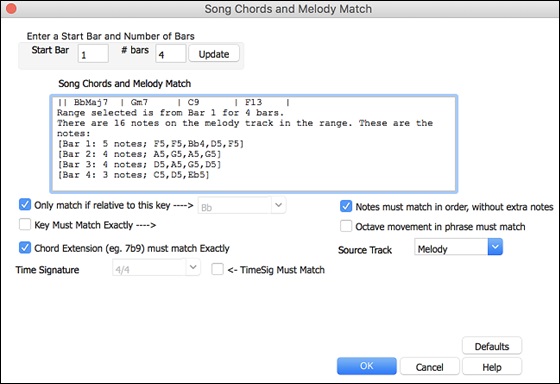
If you want to find songs with a similar chord progression and a melody fragment in the selected range of the current song, select the Songs matching Chords and melody bar range menu item.
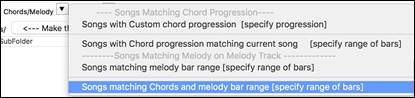
In the Song Chords and Melody Match dialog, select the source track (Melody or Soloist) and specify the range.
There are more buttons in the SongPicker for opening and finding songs.
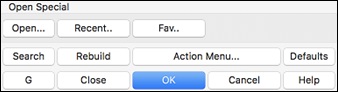
The [Open] button allows you to open files of any available format from any folder.
Press the [Recent] button if you want to open recently played songs.
The [Fav] button is for opening your favorite songs.
The [Search] button allows you to find a song that contains a certain text in any field. You can continue the same search with the [G] button.
Press the [Rebuild] button to rebuild the song list for the current folder. The song list build very fast; approximately 150 songs will be processed per second.
The [Action Menu] button allows you to select additional options.
You can reset the dialog with the [Defaults] button.
Open Recently Selected Songs / Open Favorite Songs
|
Press the [Open] or [Song] button and choose Favorite Songs or Recently Loaded Songs to launch the Favorites / Recently Played dialog. This allows you to quickly load songs and styles that have been used in your last sessions with Band-in-a-Box. |
You may find this to be the best way to load songs into Band-in-a-Box, since the lists give you instant access to the songs you are most likely to be playing, regardless of where the song is located on your hard drive. (File | Open Special | Open Favorite Songs... or shift+F3 also opens this window.)
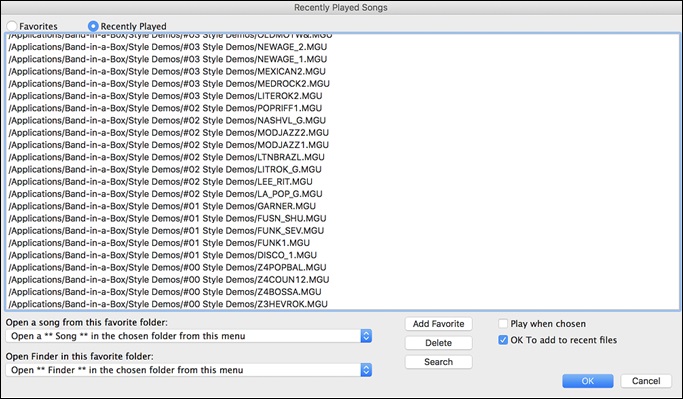
 The “Favorites” and “Recently Played” radio buttons toggle between a list of your recently played songs (or styles), and a list you create of your Favorite you select as favorite songs or styles. You can add an unlimited number of favorites.
The favorites list will start off as an empty one, but you can add songs/styles as your favorites, by clicking on the [Add Favorite] button.
If “Play When Chosen” is checked, the program will load and play a song when you either double-click on its name in the list or select the name and the click [OK].
Check “OK To add recent files” to allow your recently loaded songs to be added to this list.
The [Search] button lets you search your songs by typing in part of a file name.
Open Song
This command opens the Open Song dialog. The hot key is F3.
Open Next Song
This command opens the next song in alphabetical order in the currently active folder.
Open Previous Song
This command opens the previous song in alphabetical order in the current folder.
Open Entire MIDI File (mid) to Melody Track
This command opens a MIDI file to the Melody track.
Open Entire Karaoke File (kar) to Melody Track
This command opens a Karaoke file to the Melody track.
Open MusicXML File
Band-in-a-Box supports MusicXML so you can easily import MusicXML files, including notes, chords, lyrics, guitar tab, bends, hammer-ons, pull-offs, and slides, from your notation programs such as Finale, Sibelius, and Guitar Pro to Band-in-a-Box.
When you select this menu command and select a MusicXML file (.musicxml/.XML/.MXL) , the Load XML File dialog will open.
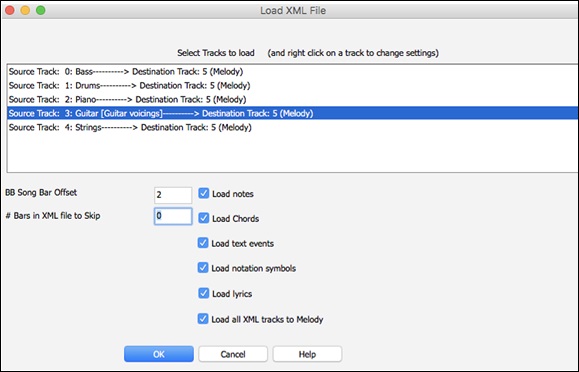
First, select a track that you want to load. To select multiple tracks, hold down the command key and click a track.
If you want to change the destination track, right click on a track and select Destination Track.

|
Next, select elements that you want to load from the XML file. If you do not want all the tracks to be merged into the Melody track, disable the “Load all XML tracks to Melody” option.
|
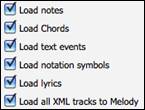
Press [OK], and the XML file will be loaded to Band-in-a-Box.
Open ABC Notation File
ABC notation is the simple text-based notation system used by musicians worldwide to store chords, melody, and lyrics of songs. You can find out more information about the songs and ABC notation at abcnotation.com.
Changing the Style
The hundreds of musical styles available for Band-in-a-Box include lots of variations for any style you choose.
|
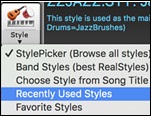
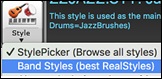
The [Style] button is a split button. Clicking on the top half opens a style selection dialog using the default method assigned to the button. Clicking on the bottom half of the button opens a menu of the options for selecting styles. The default method for the top half of the button is assigned from this menu. |

|
For example, if there is a check mark beside “StylePicker,” clicking on the top half of the button will launch the StylePicker dialog. If “Recently Used Styles” is checked, clicking the button will go directly to the Recently Played Styles list, and so on. |

The StylePicker
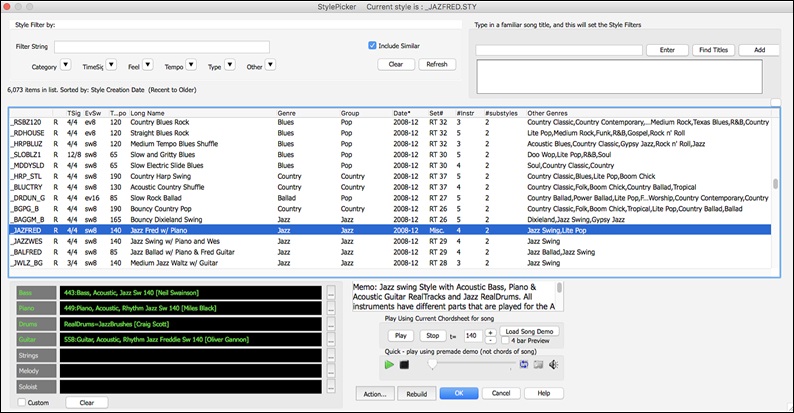
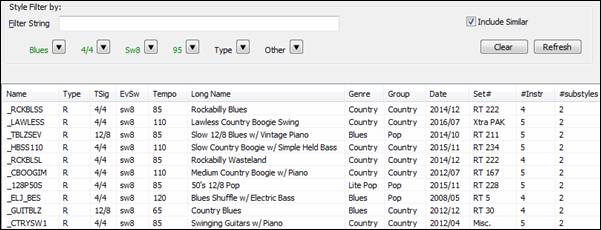
The StylePicker window lists all styles with full information. It has a great filter feature for finding a perfect style for your song by selecting elements such as time signature, feel, or tempo, or by simply typing in a familiar song title.
You can browse styles by sorting columns or hear an “instant” preview of the style by double clicking on the list. If style has both MIDI and RealDrums available, you can hear both, and choose which one you want. This makes it much faster to find the style that fits your song.
Quick Filter
Type a text and/or press the arrow button to select a category, time signature, feel, etc., and you will immediately see the filtered list. If “Include Similar” is unchecked, then the filtered list will show the exact match only, but if this option is checked, then the list will show the exact match and the similar styles.

Style suggestion
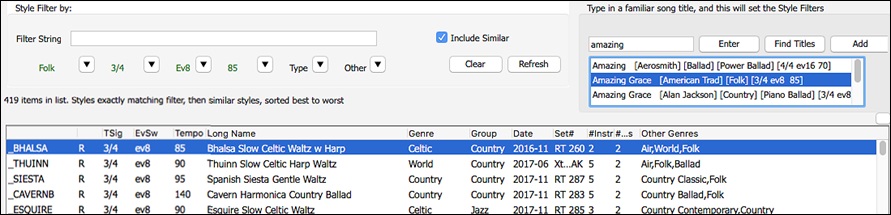
Just type in a familiar song title, artist name, or genre of music, and StylePicker will list styles whose genre, feel, tempo, and time signature are similar to that song.

Type in a text, click on a song to select it, and press [Enter]. Then, the list will be filtered to show styles that match the elements of the song. You can see what filters are in place when you look at the “Style Filter by:” area. If you enable the “Include Similar” option, the filtered list will include similar styles, but if you want to see only the exact match, then uncheck this option.
Song Titles Browser
The Song Titles Browser window allows you to browse and filter the huge list of over 14,000 popular song titles. You can, for example, filter the list by a certain artist, and then sort it by tempo, key, feel, time signature, and more.
|
You can open this window with the [Find Titles] button. |

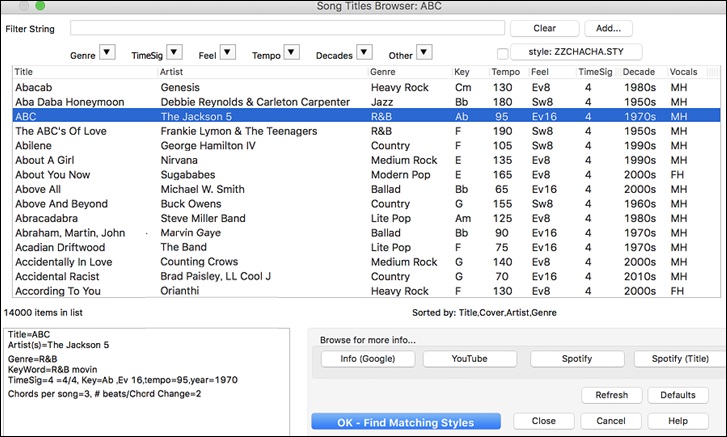
Once you have found a song, press the [OK - Find Matching Styles] button. This will take you to the StylePicker window with styles that best match the tempo, feel, and genre of the selected song title.
Instant Preview of Styles
You can audition a style without changing your existing arrangement, by using the preview control.

It has Play and Stop buttons, a progress bar, a Loop button, and a file button.
|
If the selected MIDI style has two demos (one with MIDI drums and another with RealDrums), then you can hear both. This button toggles between them. |
|
This will play a premade demo. You can also double click on a style in the list to preview. |
The style demos are found in 2 possible places:
- On your hard drive, in the Band-in-a-Box/RealTracks/Data/Style Demos Audio folder. (Some of the demos are included on disk, but to save space not all of them are included.)
- On the Internet, at www.pgmusic.com. (All of the demos are there.)
When you demo a style, the program will play the version on disk if available; otherwise will play from the Internet. This all takes place very quickly, and inside the control, so no external browser is launched.
|
You can download a file that is being played from the internet by clicking this button. If the file is being played on your hard drive, this button will show the file in a folder. |
![]() This button allows you to control the volume of demos.
This button allows you to control the volume of demos.
Play Your Song with the Styles
You can also audition a style by actually playing it over the current chord progression of your song.
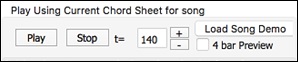
Pressing the [Play] button will generate arrangement for your song with the currently highlighted style. You can speed up the generation if you enable the “4 bar Preview” option, which will play only for the first 4 bars.
RealStyles and Styles with RealTracks
RealStyles are Band-in-a-Box styles that use RealTracks only. The style names for RealStyles are prefaced by an underscore, _.
![]()
Styles with RealTracks are a blend of MIDI tracks and RealTracks. Style names for Styles with RealTracks are prefaced by an equals sign, =.
![]()
Styles with RealDrums use RealDrums for the Drums track and MIDI tracks for other tracks. Style names for Styles with RealDrums are prefaced by a hyphen -.
![]()
Changing a Style at any bar
|
The style of your song can be changed at any bar by pressing this button or the F5 key. When the Edit Settings for Current Bar dialog opens, click on the [STY…] button to launch the StylePicker and choose a style that you want to apply from the current bar. |
Selecting a Style from Recently Played or Favorite
To select a style from the recently used styles or favorite styles, click on the [Style] button and choose Recently Used Styles or Favorite Styles. The menu command File | Load Style Special | Open Favorite Styles... or hot keys shift+F9 also open the dialog.
You can either choose from recently played styles or go to your saved list of Favorites. You can add to or edit the Favorites list.

Click the “Play When Chosen” checkbox to have Band-in-a-Box play your song immediately upon selecting a style.
Band Styles
|
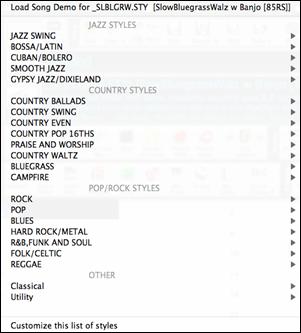
When you click the [Style] button and select Band Styles (Best RealStyles), you will see a directory of style types, with submenus sorted into the listed categories. |
|
For example, in the Jazz section you will see styles for Jazz Swing, Bossa/Latin, Cuban/Bolero, Smooth Jazz, and Gypsy Jazz/Dixieland. Each heading opens a list of selected RealStyles, sorted by tempo and type. |
Playing, Pausing, and Stopping Songs
Playing Songs
|
This button replays the song without regenerating the tracks, unless regeneration is required. The current arrangement is preserved. (Freeze the song or save to a MIDI file to permanently save the arrangement.). The hotkey is |
|
This button creates a new arrangement and plays the song. If you do not want your tracks regenerated, then use [Play]. Pressing the |
|
Click this button for a menu of looping selections. You can play the highlighted section of the Chord Sheet or notation in an endless loop. Click and drag the mouse to highlight a section of bars to loop. If the checkbox is selected, the entire song will loop. |
|
This button will play the song starting at the selected chorus and bar number. Use it to jump to any bar in the song. The hotkey is control+F. |
|
This button stops song playback. Pressing the ESC key also stops playback. |
|
This button is to pause the song during playback. Press again to continue from the paused location. The hot key is control+H. |
Options for Simpler Arrangements
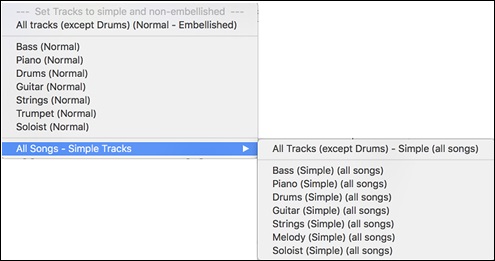
The [Simple] button on the toolbar allows you to set individual tracks or all tracks to unembellished arrangements. The simple arrangement option can be set on a song-by-song basis or for all songs.
If you set the Drums track to be simple, then the Drum track will avoid fills or post fills (cymbal crashes). You can also set a Drums track to be simple in a style. UserTracks will also follow this setting for Drums and play a simpler arrangement without fills if you set the Drums track to Simple.
|
|
Lead-in Counts
|
Band-in-a-Box will play a lead-in count at the start of each song if you want it to. This is set in the Preferences dialog, where there a several options for how the lead-in is played. |
|
Allow Lead In Bars People who use Band-in-a-Box for soloing practice will likely turn the lead-in off to allow endless looping uninterrupted by the lead-in count. Play Lead In even if Intro present |

Lead-in Type
You can specify to have Band-in-a-Box play 2 bars of a drum pattern instead of the count-in. You may prefer hearing the drum beat to a simple count-in, since it provides more information about the upcoming groove. To set this, set Lead-in Type to one of “b” substyle fills/ “a” substyle fills/ or fill-pattern or pattern-pattern combinations.
Audible Lead In / Volume
If you want the lead-in bars to be present but you do not want to hear the lead-in, then uncheck the “Audio Lead In.” You can also set the volume of the lead-in.
Instrument / Pattern
Use these options for the audible drum count-in. You can select any drum instrument for the count-in. You can choose different count-in rhythms (e.g. Tap on 2 and 4 instead of 1-2-3-4).
Smart Lead-ins
Smart lead-ins can also be set here; they avoid playing the count-in drum sound during a Melody pickup.
Lead-in Drum count if drums muted
This is great for drummers who play along with Band-in-a-Box and mute the drum track. Previously, when the drum track was muted or disabled in a song, the count-in drum click wouldn’t play. Use this option to play the drum count-in in all circumstances.
Part Settings for Playback
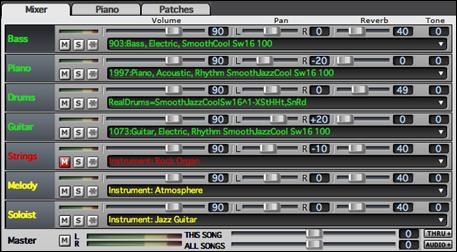
The individual instrument parts are controlled with the on-screen mixer. It is always present in the upper right corner of the main screen.
![]() Each track in the Mixer shows the name of the instrument assigned to it.
Each track in the Mixer shows the name of the instrument assigned to it.
![]() Yellow text indicates a MIDI instrument.
Yellow text indicates a MIDI instrument.
![]() Green text indicates RealTracks or RealDrums.
Green text indicates RealTracks or RealDrums.
 |
Right-click or double-click on a part name for a menu of settings and actions for the selected part. The menu is organized into groups allowing easier selection of track types: audio (RealTracks, UserTracks, Loops) or MIDI (MIDI SuperTracks, classic MIDI tracks) and track settings/actions. |
Changing Volume, Panning, Reverb, Tone
Each track in the Mixer has its own set of controls including volume, pan, reverb, and tone. Use them to make your own mix for the arrangement.
Volume Slider and value: ![]()
Pan Slider and value: ![]()
Reverb Slider and value: ![]()
Tone Settings: -18 (bass) to +18 (treble): ![]()
Hold the [control] key down as you click on the track slider and drag the thumb of the slider. This will force all tracks to move to the same absolute location as the original track. Hold the [shift] key and it will move all tracks relative to the move of the original track.
There is also a Master section with a Mute button, VU Meters, and Master Volume controls.
![]()
The Master Volume is a new type of volume setting for Band-in-a-Box, and is a true Master Volume, in that it applies a decibel (dB) boost to the master signal, independent of the tracks volumes. So, for example, if you want all Band-in-a-Box songs to be louder, you can simply set the “All Songs” Master volume slider (e.g. +6 dB) and this boost will apply to audio output from all tracks (MIDI and audio) for all songs.
Muting, Soloing, and Freezing Tracks
Each track has its own buttons to [M]ute, [S]olo, and [*] Freeze the track.
Mute Tracks
![]() Click on the Mute button to silence the selected track. The button will turn red to show it is active.
Click on the Mute button to silence the selected track. The button will turn red to show it is active.
![]() To mute/unmute all parts as the song is playing, simply press option+ 2 or right-click on the “Master” radio button at the top of the screen and select Mute in the menu.
To mute/unmute all parts as the song is playing, simply press option+ 2 or right-click on the “Master” radio button at the top of the screen and select Mute in the menu.
Solo a Track
![]() While listening to Band-in-a-Box, you can solo (isolate) a certain part by clicking on the Solo button.
While listening to Band-in-a-Box, you can solo (isolate) a certain part by clicking on the Solo button.
You can change the solo and the mute status of other tracks by right-clicking on a blue mute button.
|
→ |
|
For example, if the Guitar track is in the solo status, when you right-click on the blue mute button on the Drums track, the Drums track will be un-muted AND the Guitar track will be un-soloed. |

Freeze a Track
![]() Any track can be frozen (MIDI or RealTracks). When frozen, it won’t be changed or re-generated. This saves time when replaying previous songs, and lets you freeze an arrangement that you like. The [*] buttons on the Mixer freeze the individual tracks.
Any track can be frozen (MIDI or RealTracks). When frozen, it won’t be changed or re-generated. This saves time when replaying previous songs, and lets you freeze an arrangement that you like. The [*] buttons on the Mixer freeze the individual tracks.
|
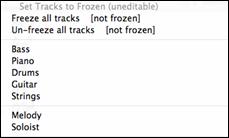
Use the snowflake button on the toolbar for additional options, which include freezing the whole song. If you freeze the whole song, you don’t have to wait at all for the song to regenerate. Next time you play, it is ready to go. |
Reasons to Freeze a RealTracks track (audio):
- Frozen tracks will play back instantly, not requiring time to generate.
- They play back the same way each time, so if you like a solo, you can “freeze it.”
- If you send a song to a friend as “frozen,” they will hear the same performance.
- For the Soloist track, if you generate a solo, it can now be saved (by freezing the track).
Reasons to Freeze a MIDI track:
- You can edit the MIDI data, to customize the performance to match a certain song, and this will be saved. Use the Notation or Piano Roll window to edit the track.
More reasons to freeze any track:
- Frozen tracks play back instantly, without requiring time to regenerate.
- They play back the same way each time.
- You can change the chord progression of the song and have one part playing a different chord progression than the rest of the band. For example, type a “blowing” chord progression, generate a solo, freeze the solo track, then type a normal chord progression and generate the rest of the instruments (bass, guitar etc.) that will play the normal changes.
- Have different instruments play different styles. For example, the Bass could be generated using Reggae, then Frozen, and then the rest of the instruments generated using a Techno style.
Forcing Generation of a Song that is Frozen
Band-in-a-Box won’t touch tracks that are frozen. But if you want to change that, without having to Un-Freeze the tracks, you can do this easily.
Hold down the SHIFT key as you press the [Generate and Play] button (the fly-by hint will remind you of that) or go to menu Play | Play Special | Generate (even if tracks are frozen).
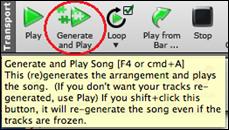
When you do this, the song will regenerate, the tracks will get rewritten, and the song will stay frozen. So, if you’re freezing songs to get the instant playback with RealTracks but get tired of the “same-old” frozen arrangement, just press SHIFT-PLAY, generate a new arrangement, and press SAVE. Then the new “fresh-frozen” arrangement will play instantly, even with many RealTracks.
Slide Tracks
This dialog opens with the command Edit | Slide Tracks. It allows you to move any of the bass, drums, piano, guitar, strings, melody or the soloist track ahead or behind by a certain amount.

Setting these numbers will slide the entire track ahead or behind by the # of ticks (120 ticks per beat). You could, for example, slide the bass track so it plays a little ahead of the rest of the band. This has the effect of making the bass player “drive the band” and is useful in Jazz styles to make the music sound more exciting.
Allow Any Slides If you want the slides to occur, then check this box.
Humanize Slides If this box is checked, the slides will be randomized to slide the track a different amount for each note. The amount varies from 0 ticks to the slide setting for the instrument. A track that always plays notes early by a certain amount tends to sound out of time, whereas randomizing the slide makes the track sounds more human.
|
If the song is currently playing, you can press the [Update] button to hear any changes you have made. |
|
This returns all fields to factory default settings. The default settings are as shown in the illustration. |
|
This enters a value of zero for all fields. |


Looping
|
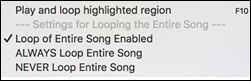
The [Loop] toolbar button opens a menu for looping options - loop a highlighted region or the whole song. If the checkbox is enabled, the song will play again from the beginning each time it reaches the end. |
Looping the Notation Screen
To loop a screen of notation, click the [Notation] button to open the Notation window. Then click the [LoopScn] button. When there is a red border around this button, the song will loop for the 4 bars shown on the notation screen. |
Changing MIDI Instruments
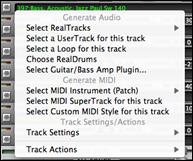
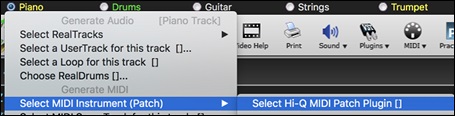
To select a MIDI Instrument for any MIDI track, right click on the track radio button at the top of the screen and go to Select MIDI Instrument (Patch) and choose one of the menu commands.

Select Hi-Q Patch Plugin
Use this menu command if you want to select a preset of a Hi-Q MIDI instrument and a VST plugin
Select no MIDI Patch
This will remove the current selection of the MIDI Instrument.
Select General MIDI Patch
This will allow you to select an instrument from the list of GM patches.
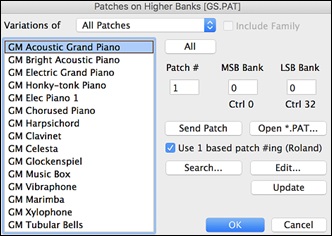
Select Higher Bank Patch (from .Pat file)
This will allow you to select a higher bank instrument on your particular synthesizer.
Hi-Q MIDI Instruments for sforzando
Hi-Q (High Quality) MIDI instrument plugin makes the MIDI tracks (both regular and MIDI SuperTracks) sound much better. We have included Plogue’s sforzando that has been customized for Band-in-a-Box and is used to play Hi-Q MIDI instrument.
Most of the interaction between Band-in-a-Box and the sforzando will be behind-the-scenes, so you don’t need to do anything. Just “pick a style and press play” as usual. This is because the styles that need to use the synth are coded to do so in the style, using the Hi-Q sound.
![]()

If you want to add a specific Hi-Q sound, right click on the track button and go to Select MIDI Instrument (Patch) | Select Hi-Q MIDI Patch Plugin.
This will open a dialog with available Hi-Q sounds.
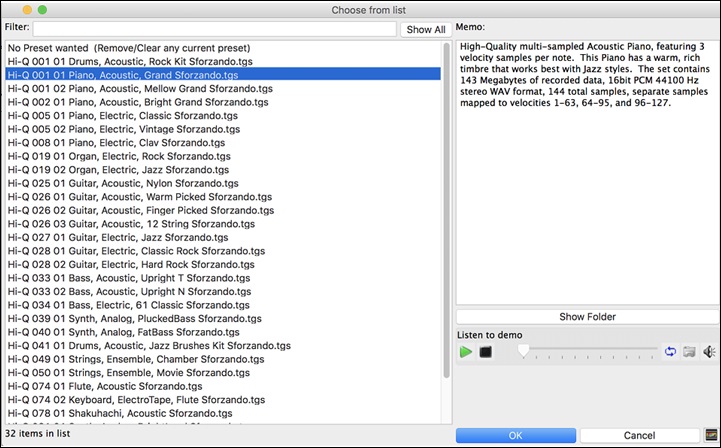
You can audition the Hi-Q sound by double clicking on the list or using the media player control.
![]()
When you make a selection and press [OK], sforzando will be loaded with the selected Hi-Q sound.

You can also use a custom sound such as an .SFZ sound that you have acquired. To do this, click on [None] in the Mixer’s [Plugin] tab.
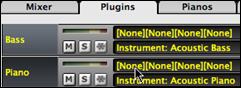 |
Note that you need to pick a MIDI track for this, not a “green” audio track.
|
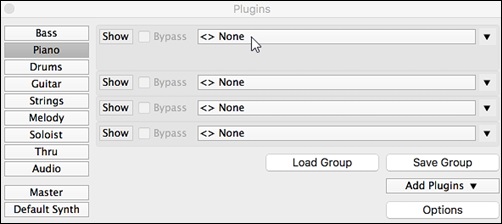
When the Plugins dialog opens, click on the first slot.
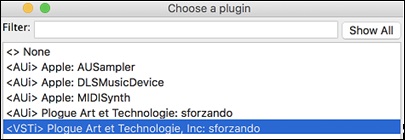
This will open a dialog with available plugins. Select “<VSTi> Progue Art Technologie, Inc: sforzando” from the list.
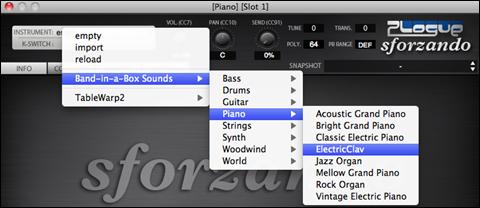
Then, select a Hi-Q sound that you want to use for the selected MIDI track.
Adding Real Instruments – RealTracks and RealDrums
These “real” parts add a human element that brings new life to any Band-in-a-Box arrangement. Use them to replace MIDI tracks with live audio recordings. That’s right, any Band-in-a-Box part can be played in audio by a “real” drummer or instrumentalist using tracks recorded by top session players and recording artists.
If you have made a lot of songs using older MIDI styles, and would prefer that they play with RealTracks, you can do this easily by selecting the menu option File | Load Style Special | Auto-replace MIDI styles with RealTracks. Then, if you have the needed RealTracks installed, your MIDI style will be intelligently replaced with a RealTracks style. There is also a manual option to do this on an as-needed basis, or to disable the feature for a certain song, or reverse it if you prefer the MIDI style.
These features are fully described in their own chapter but using them is easy as 1-2-3.
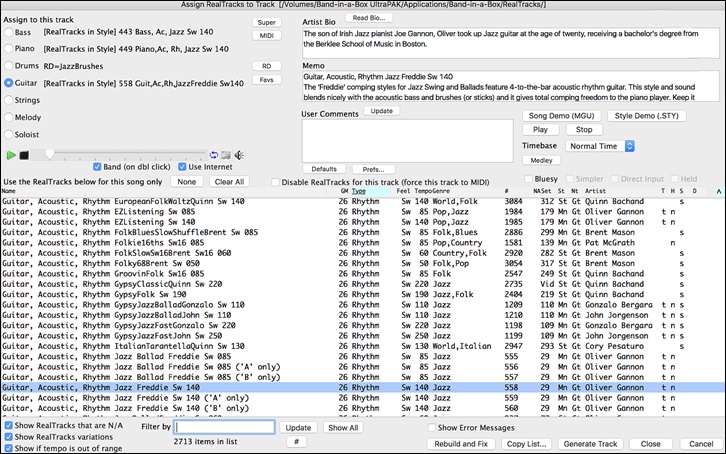
Using RealTracks in Songs - Assign RealTracks to Track Dialog
The Assign RealTracks to Track dialog assigns a RealTracks instrument to any of the Band-in-a-Box instrumental tracks. It also shows any RealTracks that are assigned to Band-in-a-Box tracks.
This dialog is launched by:
- clicking on the [RealTracks] toolbar button and selecting RealTracks Picker Dialog.
- right-clicking or double clicking on an instrument name at the top of the main screen and selecting Choose RealTracks in the menu.
- or pressing the [Assign to Track…] button in the RealTracks Picker dialog.
The dialog allows you to assign a specific RealTracks instruments to a track in a song. It also displays any RealTracks that are currently assigned to each track.
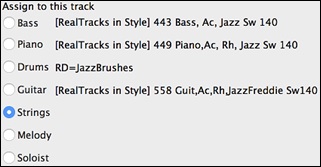 |
First, select the track that you want to assign. Then, select the RealTracks from the list below it. |
Using RealDrums in Songs
Most styles, even earlier MIDI styles, have RealDrums already assigned to them. They are automatically generated with the song arrangement. It’s easy to change to a different set, and there are lots to choose from.
To use RealDrums in Songs,
- click on the [RealDrums] toolbar button and select RealDrums Picker Dialog,
- right-click or double click on the Drums track button the top of the main screen and choose RealDrums in the menu,
- or right-click or double click on the Drums track in the Mixer and choose RealDrums in the menu.
When the RealDrums Picker opens, choose a RealDrums style from the list and press [OK].
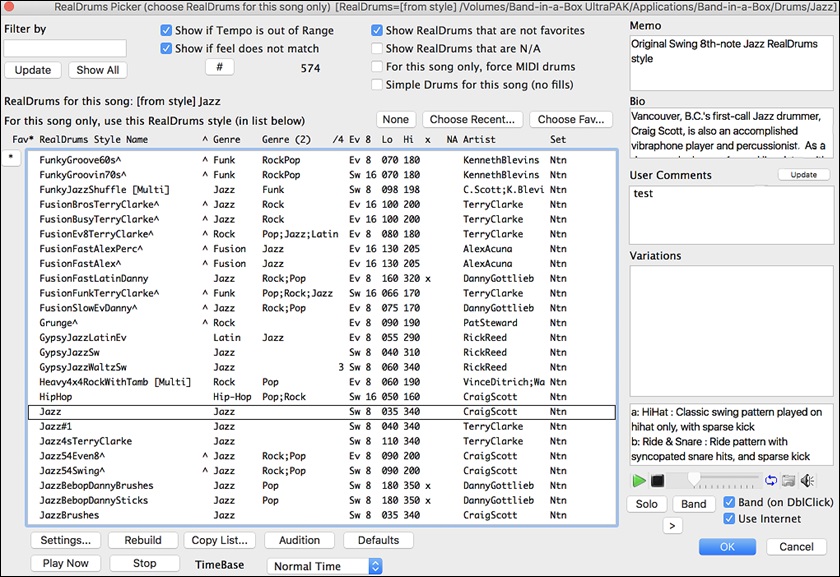
(Details about this dialog are described in the “Selecting RealDrums – RealDrums Picker” section in Chapter 7.)
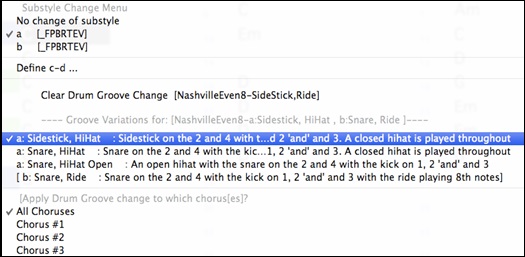
RealDrums Variations - EZ selection of “DrumGrooves”
These are different variations, or grooves, within RealDrums styles. RealDrums with a caret (^) at the end of the name have several “DrumGrooves” available.
There is an easy way to select the different grooves within the song. Simply right-click on a bar number, and you see a menu of the DrumGrooves within the style. So, for example, you could easily switch from the “side stick/hihat” groove to “snare/hihat” to “snare/Ride.”
Adding MIDI SuperTracks
MIDI SuperTracks are MIDI tracks that can be added to a track or a style and play like other MIDI tracks in a style. They are called “SuperTracks” because they are generated using a different engine than typical MIDI style tracks. Typical MIDI style tracks are generated from C7 patterns in the style and repeat these patterns over any chord. MIDI SuperTracks use actual MIDI playing from musicians (similar to RealTracks in that regard), so are not based on patterns.
Using MIDI SuperTracks
To use MIDI SuperTracks, either:
- Choose a style or song that has MIDI SuperTracks, and press [Play]. (Look in the MIDI SuperTracks Demos folder for these songs.)
or
- Add a MIDI SuperTrack to a certain track.
For example, let’s add a MIDI SuperTrack to the Piano track.
|
Right-click on the Piano track label at the top of the screen and choose Select MIDI SuperTrack for this track. |
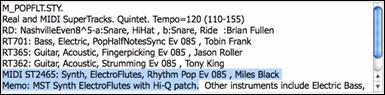
You will see a list of available MIDI SuperTracks.
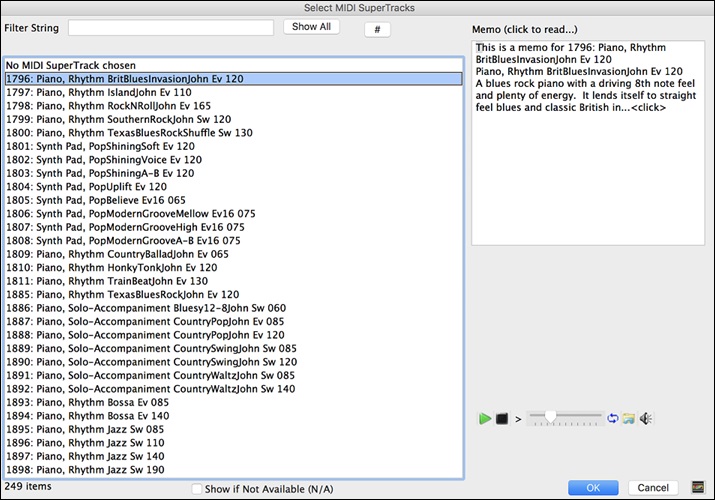
You can type a text or press the filter button [#] to narrow down your search.
There are memos describing the individual MIDI SuperTracks, and you can click on the memo for a big window.
You can audition MIDI SuperTracks by double clicking on the list or using the transport control in the dialog.
Choose a MIDI SuperTrack from the list and click [OK].
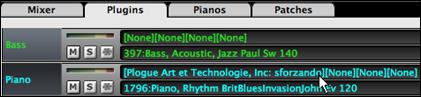
![]() You will then see that the Piano label has turned blue to indicate that it is a MIDI SuperTrack.
You will then see that the Piano label has turned blue to indicate that it is a MIDI SuperTrack.
In the Mixer’s Plugins panel, you will see that a VST plugin and a Hi-Q MIDI instrument have been selected to the Piano track.
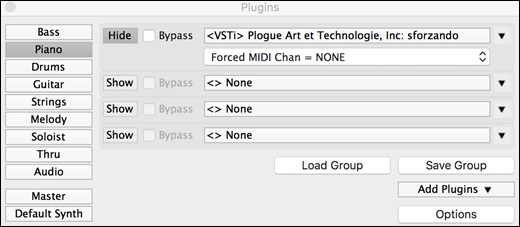
If you want to customize the sound, click on the VST name in the Mixer. This will open the Plugins dialog as well as the VST plugin panel where you can change a Hi-Q instrument or apply effects to the MIDI track.

|
When you press [Generate and Play] you will hear a much more sophisticated MIDI arrangement than a typical MIDI style, since it is not based on C7 chord patterns; instead, it is based on hours of actual MIDI playing from a top studio musician. |
Once generated, MIDI SuperTracks behave like a regular MIDI track, and can be saved as MIDI files etc.
Playing Along with Songs
Play along with your MIDI Controller Keyboard
If you have an external MIDI keyboard controller connected to your computer system, you can use the MIDI THRU features to play along with the program.
|
The Thru part is the part that you play along on your MIDI keyboard or with the Wizard feature. |
Harmonize the play along
|
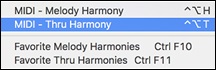
Your play along can be harmonized by clicking the [Harmony] toolbar button and selecting MIDI - Thru Harmony or by pressing control+option+T key.
|
Choose a harmony in the Select Thru Harmony dialog. Whatever you play along on your MIDI keyboard while the song is playing will be auto-harmonized in real time.
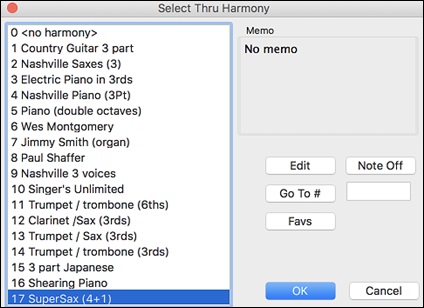
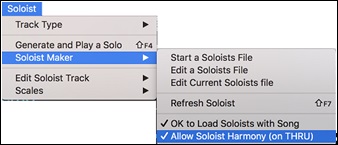
The Thru Harmony is also applied to Soloist parts when the option to Allow Soloist Harmony (on Thru) is selected in the Soloist | Soloist Maker menu.
For example, you could add a SuperSax harmony to a saxophone soloist to create the effect of a full saxophone section.
![]() This button opens the Harmony Maker, where you can customize Harmonists.
This button opens the Harmony Maker, where you can customize Harmonists.
![]() This button is to turn off any notes that are stuck on. (There shouldn’t be any.)
This button is to turn off any notes that are stuck on. (There shouldn’t be any.)
![]() Enter the number of the harmony you want to go to and press [Go To #].
Enter the number of the harmony you want to go to and press [Go To #].
![]() This button brings up your favorite 50 Harmony styles (based on recent usage) and allows you to choose one to use on the Thru or Soloist track.
This button brings up your favorite 50 Harmony styles (based on recent usage) and allows you to choose one to use on the Thru or Soloist track.
Thru Transpose Settings
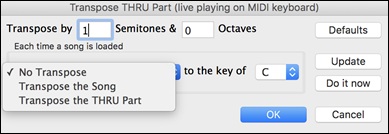
Transpose the Thru part, which is the live playing on the MIDI keyboard, so you can play any song in any key.
This feature is found in the Preferences dialog; it opens with the menu command Options | MIDI Patch Maps, etc.| Thru Transpose Settings.
When playing along on your MIDI keyboard, you can set Band-in-a-Box to “Transpose by” semitones and/or octaves.
You can define a favorite key and “Each time a song is loaded” Band-in-a-Box will optionally transpose any and all loaded songs to that key. This is a great feature for practicing in a certain key.
You can also automatically transpose the Thru part so that you can always play along in your favorite key regardless of the actual key of the song.
|
The default is “No Transpose,” so the [Default] button sets all fields to 0. If you are playing along while changing these settings, the [Update] button will apply the changes you have made so you can hear the difference. |
[Do it now] sends your transpose settings for either the song or the Thru part, as selected.
The Play Along Wizard
The Play Along Wizard is an intelligent play along feature that uses your QWERTY keyboard to play along with Band-in-a-Box. This also allows you to record to the melody or soloist track without an external MIDI keyboard and can even be used to trigger the Soloist Wizard. Also, play along using the Wizard can use the harmony feature, so you can play along live from your QWERTY keyboard in 4-part Saxophone harmony for example.
Turning the Wizard On/Off
Click on the [MIDI] toolbar button and check MIDI QWERTY Keyboard Wizard. You can also select the Wizard Playalong option from the Song menu, or press option+W.
![]()
![]()
Playing the Wizard
The Wizard keys are only active during playback. The active keys are the lower 2 rows of the keyboard.
![]()
Changing Instruments / Settings for The Wizard
The Wizard is a play along instrument, so is treated just like the THRU instrument. Changing Instruments, Volume, Reverb, etc. for the Wizard is therefore the same as for the THRU instrument. (i.e., Click on the THRU button, then select instrument etc.) You can record the Wizard and it will use THRU harmonies if selected.
Play Regular Notes
There is now an option to play regular “non-smart” notes, for those of you up to the task of poking out actual melodies on your QWERTY keys.
In the Song menu, toggle Wizard Uses ‘Smart’ Notes off (unchecked) to have the Wizard provide you access to a chromatic scale, and toggle “on” to have Band-in-a-Box provide you with notes based on the chord/key of the song.
Soloist Wizard
Additionally, you will find another great Wizard feature in the Soloist menu; the Solo Wizard. Toggling this option “on” enables the Soloist Wizard. As you play notes on the MIDI or QWERTY keyboard, the program will play “correct” notes in the style of the current Soloist! This means that you can play a perfect solo every time, simply by pressing any key on your MIDI keyboard or QWERTY keys.
Beyond impressing your friends with your newfound improvisational prowess, this feature has practical implications as well. For example, you can concentrate on practicing your solo phrasing and playing “in time” without concerning yourself with which notes to play. (Band-in-a-Box will supply the correct notes: see the next section for details.)
MIDI Normalize
If performing live or at a jam session, it helps to have the volume of all of the songs be similar.
This is done with the Normalize MIDI velocities to… feature in the Preferences dialog.
![]()
![]()
![]()
With the “Normalize MIDI velocities” feature, you can level the volumes to a setting you enter. For example, you can set all volumes to be 70 and the program will make each song play within those levels.
![]()
Normalization for the Melody and Soloist tracks is optional, if you want their MIDI velocities left “as-is” you can uncheck the Also normalize Melody, Soloist box.
Output Chords to External Device
Some external music hardware devices require chords played in root position to drive them in real time.
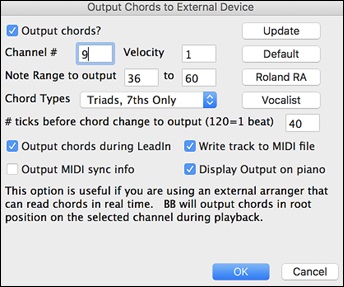
An example of this is the Digitech Vocalist. It will let you sing into a microphone and harmonize your voice according to the chords that are input to the device. Band-in-a-Box has the capability of outputting a separate channel with the chords in root position to support such external devices automatically. There are also settings such as complexity of chords, output channel, velocity, and note range. Band-in-a-Box will also drive “Real Time Arrangers” like the Roland RA series. The best way to accomplish this is to access the Options | MIDI Patch Maps, etc. | Output Chords to External Device menu item.
|
Click on the [Vocalist] button if you have such a device connected to your MIDI system. Band-in-a-Box will then send it the appropriate chord information automatically as your song is playing (e.g., root position triads) and the Vocalist will harmonize your voice according to the root position chords that Band-in-a-Box is sending to it. For any other devices, you will need to know a little more information as to what your external device needs to “see” for it to function correctly, such as channel, velocity, chord type, etc. Then type the appropriate values in the spaces provided in the Output Chords to External Device dialog. |
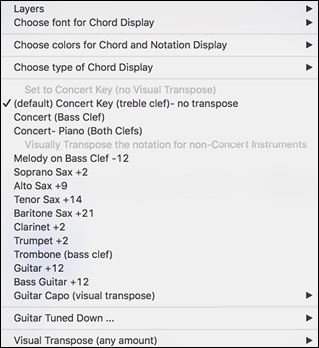
Non-Concert Visual Transpose
This feature displays the chords and notation for non-concert key instruments like trumpet and saxophone in the non-concert key (Bb, Eb) while the music plays in the concert key.
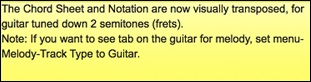
Note: This does not transpose the music. To do that, use the song key box to the right of the Style area. |
|
|
|
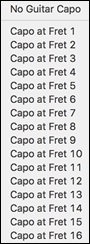
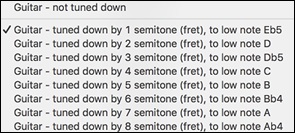
Pressing the [Chord Display] button opens a list of concert and non-concert instruments. There are also settings for guitar capo, tuning the guitar down, and visual transpose of any number of semitones. |
Guitar Settings
|
You can also tune the guitar down from 1 semitone to 8 semitones. If you tune down by 1 semitone a song entered in E will display in E but play in Eb.
|
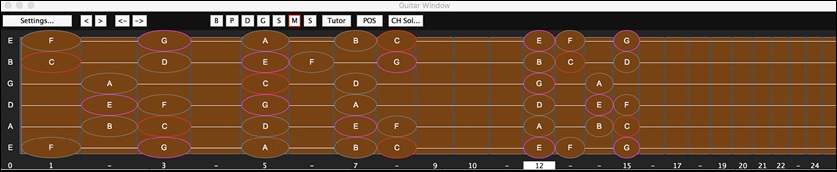
Guitar Window
This is a window for guitar and bass players! The onscreen fretboard displays any Band-in-a-Box track on guitar or bass. Guitar players can “read-along” to a Melody/Solo simply by looking at the guitar fretboard.
|
To launch the Guitar Window, press the guitar button, or control+shift+G or choose the menu item Windows | Guitar Window. Once launched, you will see the various areas of the Guitar window. |
The window can be resized by dragging the bottom right corner.
The top title bar states the key of the song, the current track is displayed, and the fret position.
The fretboard is displayed with the highest notes of the guitar at the top, and the open position of the guitar on the left.
There are names for the open strings displayed on the left (E B G D A E). If the Bass track is selected the display changes to the four bass strings (G, D, A, E).
There are fret positions marked at the bottom of the fretboard. You can mouse click on these positions to change the current fret position. In the diagram above, the current position is position 5.
There are Note Names displayed. They are displayed for two positions on the guitar fretboard. One of the positions is the scale beginning with the third of the scale on the lowest string. In the key of F, this is the 5th position beginning on an A note (the third of the scale). Because it begins on the third of the scale, this position is referred to as the Phrygian Position (since an A Phrygian scale is the same as an F scale). Similarly, the other popular scale is the scale beginning on the 6th of the scale, in the key of F, this is up at the 10th position, and is called the Aeolian Position.
There are note names displayed in color, with ellipses around the notes that are in the scale. The root note of the scale is highlighted in red, the third and fifth of the scale are in purple, and the rest of the scale tones are circled in gray.
A capo will be drawn if you set a capo value with the [Chord Display] toolbar button menu.
Clicking on the black area to the left of the zero fret notes in the Guitar window will delete the notes on just the channel of that string on the current notation time line rather than all notes at that time line.
Clicking on a note will delete the note from the Notation window if the note is currently highlighted. If no notes are highlighted in red, then clicking on a note will first delete any notes on the current notation timeline and channel before inserting a new note.
It supports the left-handed (in addition to the right-handed) guitar and student view. The student view is the view a student (or YouTube video watcher) would have of the (right-handed) guitar facing him with the head at the right and low notes at the top. There’s also a left-handed student view, so all 4 possible views are supported. To change the view, open the Guitar Settings dialog with the [Settings] button
Automatic Settings for Guitar Display
Band-in-a-Box does many things automatically on the guitar window, to ensure that the notes are displayed intelligently on a guitar fretboard. These include:
- Automatically setting the 2 positions that will display the note names based on the key.
- Auto-Scanning the track to be played and adjusting the display octave on the guitar fretboard to ensure that the best octave is picked to minimize the number of notes that will be outside of the current position displayed on the fretboard.
- After Auto-scanning the track, the best position for displaying the music on the guitar is determined. This is always one of the 2 positions (Aeolian or Phrygian) as discussed above, though you may over-ride this by clicking on any fret position.
- Color coding note displays. In addition to the note names being outlined in the colors (as discussed above), when the note is played, it is highlighted in green if it is a scale note, and yellow if it is an out-of-scale note.
![]() This button opens the Guitar Settings dialog, which allows you to set the guitar options.
This button opens the Guitar Settings dialog, which allows you to set the guitar options.
![]() This is the name of the current note that the mouse is over. If you click on the guitar at that position, the note will sound. If the Notation Window is open (in Editable Notation or Staff Roll mode), that note will be inserted on the notation at the current position on the timeline – you can disable that option to insert notes.
This is the name of the current note that the mouse is over. If you click on the guitar at that position, the note will sound. If the Notation Window is open (in Editable Notation or Staff Roll mode), that note will be inserted on the notation at the current position on the timeline – you can disable that option to insert notes.
![]() When you open the Guitar window, the first thing you’ll want to do is choose the track that you want to display.
When you open the Guitar window, the first thing you’ll want to do is choose the track that you want to display.
![]() Guitar Tutor will show the chords that are playing on the virtual guitar fretboard, in your choice of a Jazz, Pop, or Folk perspective.
Guitar Tutor will show the chords that are playing on the virtual guitar fretboard, in your choice of a Jazz, Pop, or Folk perspective.
![]() The position button toggles between the 2 popular positions displayed with note names.
The position button toggles between the 2 popular positions displayed with note names.
![]() This generates a guitar chord solo based on the existing Melody track using correct guitar fret positions.
This generates a guitar chord solo based on the existing Melody track using correct guitar fret positions.
Guitar Settings Dialog
![]() The Guitar Settings dialog opens with the [Settings…] button in the Guitar window.
The Guitar Settings dialog opens with the [Settings…] button in the Guitar window.
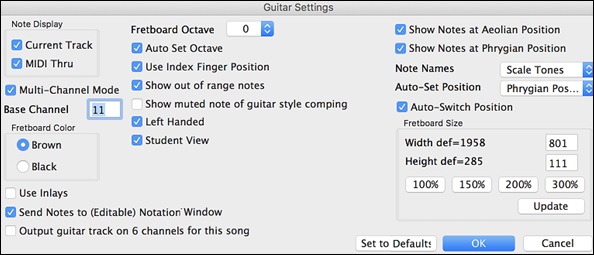
Use these settings to control the appearance and output of the Guitar window.
Note Display
If “MIDI Thru” is selected (Default=On), the Guitar will display the music played on a MIDI keyboard. If “Current Track” is selected (Default=On), the current track will be displayed.
Multi-Channel Mode / Base Channel
The guitar will display information on channels 11 to 16 on strings 1 to 6 if “Multi-Channel Mode” is set to on (default). Channel 11 is referred to as the base channel (Default=11). You can edit notes on the notation to set the channels of the notes. Guitar controllers will also record information in this manner, so you can record on a MIDI guitar and see the display on the guitar fretboard. The base channel is normally 11, but you can set it to any channel (e.g. if set for channel 5, this would mean that channels 5 to 10 would be the guitar channels).
Fretboard Color
The fretboard color can be brown or black. (Default=brown)
Use Inlays
If you elect to not display note names, you can select “Use Inlays” and a Guitar inlay will be displayed along the neck. The inlays will only display if note names are not being displayed.
Send Notes to (Editable) Notation Window
If set, when you click on the Guitar notes (and the Notation window is open in editable notation mode or note roll mode), the note will be inserted at the current time line on the Notation window.
Output guitar track on 5 channels for this song
If you would like to have Melody and Soloist parts written specifically for guitar, set this to “Yes.” Then the notes that are played on the six different strings will be assigned to six separate MIDI channels.
Fretboard Octave / Auto Set Octave
You can set the fretboard octave. For example, if the music is very low, and you need to boost the octave to display it on the guitar, set the guitar octave to 1 or 2. If “Auto Set Octave” is enabled, the guitar octave will get set automatically.
Use Index Finger position
If you enable this option, the scale will use the “index finger” to play notes that are one fret outside of the normal position, instead of the little finger.
Show out-of-range notes
If this is enabled, any note will be displayed on the guitar, regardless if it is the range of the guitar or not.
Show muted note of guitar style comping
If this is enabled, the applicable high note that is muted or left out with three note jazz voicings will be displayed.
Left-Handed
With this option, the Guitar window displays for the left-handed users.
Student View
This is a view a student (or YouTube video watcher) would have of the (right-handed) guitar facing him, with the head at the right and low notes at the top. (With the combination with Left-Handed and Student View options, the Guitar window has 4 possible views - Right-Handed, Left-Handed, Right-Handed & Student View, Left-Handed & Student View.)
Show Notes at Aeolian Position / Show Notes at Phrygian Position
The note names will get displayed in up to two positions, depending on the settings for Show Notes at Aeolian Position and Show Notes at Phrygian Position (Default=True).
Note Name
You can choose which notes will be displayed on the fretboard from None, Root Only, Chord Tone and Scale Tones.
Auto-Set Position
The position can be auto-set to None, Aeolian or Phrygian.
Auto-Switch position
This setting allows the program to automatically switch the display of the guitar when a new track is loaded in. This auto-chooses the best position to display the track.
Fretboard Size
The Guitar can be resized using the Width and Height setting or the preset buttons that set the size. You can also resize the Guitar by dragging the bottom right corner of the window. The [Update] button will apply any change you have made to the fretboard size.
[Set to Defaults]
This button sets the Guitar window to factory defaults.
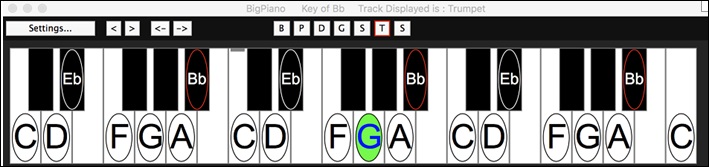
Big Piano Window
This resizable window displays notes on a piano keyboard.
|
Open the Big Piano Window by pressing the [Big Piano] button or with the Windows | Big Piano Windows menu item. |
The window can be resized by dragging the bottom right corner.
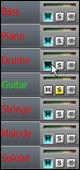
Use the [B][P][D][G][S][M][S] buttons to switch tracks to display. (Note: These buttons show the initials of the “automatic” track labels (e.g. [H] for Harmonica) when you check the “Auto-Generate Track Labels” option in the Preferences dialog.
The range of the piano is set automatically (based on the actual notes in the track) to show the largest possible piano.
The key of the song is displayed at the top of the window.
Clicking on the key plays a note (using the Thru part).
The notes of the scale are circled, with the note names included.
The root of the scale is colored in red. As the song plays, scale tones are colored in green; other notes are colored in yellow.
[<][>][<-][->] buttons step-advance one note or chord at a time within the current track.
Clicking on the black area to the left of the piano will delete highlighted red notes from the Notation window. If no notes are highlighted in red, then clicking to the left of the piano will delete any note on the current notation timeline.
Clicking on a note will delete the note from the Notation window if the note is currently highlighted in red.
The piano display can be customized by pressing the [Settings…] button.
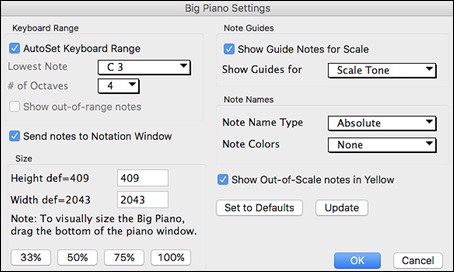
If AutoSet Keyboard Range is unchecked, you can choose the Lowest Note and # of Octaves.
Show out-of-range notes ensures that all notes will be displayed.
If Send Notes to Notation Window enabled, clicking a key on the Big Piano will insert a note to the Notation Window. (Note: The Notation Window must be opened and set to Editable Notation mode.)
The size of the keyboard can be changed by typing values in Height and Width or pressing the preset buttons.
Note Guides are numbers or letters displayed on the keyboard. The guide can be scale tones, chord tones, or roots only.
You can select a Note Name Type. If “Relative to Key” is selected, numbers will show. For example, if the key were Eb, the Eb would be 1; F would be 2, etc.
The Note Colors apply when the song is playing. The colors can be relative to the key, relative to chords, absolute or none.
Show Out-of-Scale notes in Yellow applies only if the “Note Colors” option is set to none.
The JukeBox
The Jukebox will load and play an entire folder of songs. Songs play continuously, one after the other. The Jukebox will continue to play while you move to other programs, so you can use the Jukebox to provide background music for your Mac®!
To play the Jukebox, click on the toolbar button, press |
Make your choices of options as described below, and then click on the [Play Juke Box] button to start the Jukebox playing.
Press the arrows buttons or the ![]() +[ or
+[ or ![]() +] keys to select the “Previous Juke Song” or the “Next Juke Song” respectively, or choose these options from the Song menu.
+] keys to select the “Previous Juke Song” or the “Next Juke Song” respectively, or choose these options from the Song menu.
Jukebox Options
|
Include Songs without Melodies: If checked, the program plays songs with and without melodies - that is songs within the Songs folder. If not checked, the Jukebox will include only songs with the MG? extension. Audible lead-in: While listening to the Jukebox, you might not want to hear the count-in click. If not checked, you won’t hear the count-in click. Vary Melody Instrument: Hearing a song after a song is played with the same melody instrument would get a little monotonous. If you check this option, the program will randomly change the melody instrument between your favorites. Hide Song Name: This feature is used to play the “Guess the Song” game. When checked, the titles are hidden until you click the title. When someone guesses the Song Title, you can click in the Title box to verify if he/she is correct. You’ll probably want to restrict the Jukebox to only songs with melodies unless you can guess songs without melodies! Random Play/Alphabetical: If set to “Random,” the songs will be played in random order (without repeating songs). If set to “Alphabetical,” the songs will be played in alphabetical order from the Songs folder. |
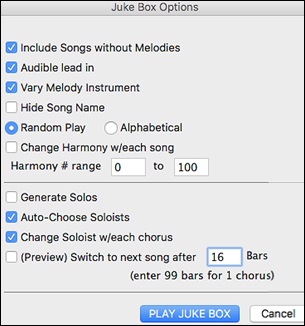
Change Harmony w/each song: If selected, a harmony will be automatically selected for each song that plays in the Jukebox. Use the “Harmony # range” settings to choose from a particular section of the Harmony list.
Generate Solos: Set this option to on to permit the Soloist to play a solo over all the songs selected for Jukebox playback.
We have created a special Jukebox directory of songs that showcase the many Soloists available. Take a moment to hear this showcase by following these steps:
- Change to this directory by loading/opening a song from the Soloist Demos folder, but instead of playing the song, you have loaded press the [Juke] button.
- Ensure that the “Generate Solos” checkbox is set selected (checked). If you enable “Auto-Choose Soloists,” the program will select an appropriate Soloist for each Jukebox song. “Change Soloist w/each chorus” instructs the program to choose different Soloists for each chorus of a song. For example, if Band-in-a-Box encounters a three chorus Jazz tune during jukebox playback, the program might choose a Saxophone solo for the first chorus, a Trumpet for the next, and a Guitar or Piano for the last chorus.
- When you select [Play Juke Box], the Select Soloist dialog will pop up with a suggestion to use a Soloist for the first song in the jukebox list. This is normal. Press [OK] to accept the Soloist suggestion. (The Jukebox will not bother you with the Select Soloist dialog again; it will simply choose an appropriate Soloist for any given song in the Jukebox song list.)
(Preview) Switch to next song after __ Bars:
Use this setting to preview the songs in a Jukebox list. Band-in-a-Box will play each song in the folder for the number of bars you enter into the box. Use a setting of 99 bars to play one chorus of each song.
Unconditional 30-Day Money Back Guarantee on all PG Music products purchased from PG Music Inc.
PG Music Inc.
29 Cadillac Ave Victoria BC Canada V8Z 1T3
Sales: 800-268-6272, 250-475-2874,+ 800-4746-8742*
* Outside USA & Canada where International Freephone service is available.
Access Codes
Tech Support: Live Chat, support@pgmusic.com
 Online now
Need Help?
Customer Sales & Support
|
Phones (Pacific Time) 1-800-268-6272 1-250-475-2874 |
||
| Live Chat | ||
| OPEN | Online Ordering 24/7 |
|
| OPEN | Forums, email, web support |