
Search Manual
Band-in-a-Box® 2026 for Mac® User's Guide
Chapter 6: Making Songs
Making your Own Songs
It’s fun to play music with Band-in-a-Box, but it’s even more fun to make songs of your own. This section gives you step-by-step instructions from start to finish.
Clear the Chord Sheet
![]() Click on the [New] button if you need to blank the Chord Sheet. You can also select the menu item File | New.
Click on the [New] button if you need to blank the Chord Sheet. You can also select the menu item File | New.
Name the song
Enter the song title by typing in the title area on the top toolbar.
![]()
Choose a Key
The key signature of the song is displayed in the Song area on the top toolbar.
You can use the special operators “TK” and “TR” to set or transpose a key signature.
- Typing T K C Enter key sets the key of the song to C. Typing T K B B Enter sets it to Bb. Note that this sets the key signature but does not transpose the song.
- The “TR” operator sets the key signature and transposes the song. Typing T R F Enter would transpose the song to the key of F, typing T R A B Enter would transpose the song to Ab.
![]() Another way to set a key signature is to click on the [Key] button on the top toolbar and choose the key from the lists of all major and minor keys. If you select from the “Transpose and Set Key Signature” column, the song will be transposed to the new key signature you choose. If you select from the “Just Set Key Signature (no transpose)” column, the key signature will be changed but the song will not be transposed.
Another way to set a key signature is to click on the [Key] button on the top toolbar and choose the key from the lists of all major and minor keys. If you select from the “Transpose and Set Key Signature” column, the song will be transposed to the new key signature you choose. If you select from the “Just Set Key Signature (no transpose)” column, the key signature will be changed but the song will not be transposed.
You can have multiple keys in a song by changing the key signature in the Edit Settings for Current Bar dialog (F5 function key).
Set the Tempo
![]() The tempo is displayed next to the time signature. You can quickly set a specific tempo by typing the T key followed by the tempo and pressing the Enter key. For example, type T 1 4 0 and return to set the tempo of the song to 140.
The tempo is displayed next to the time signature. You can quickly set a specific tempo by typing the T key followed by the tempo and pressing the Enter key. For example, type T 1 4 0 and return to set the tempo of the song to 140.
When creating a new song (File | New), the tempo defaults to the best tempo for the current style. You can adjust the tempo using the arrow buttons.
- Left-click to change by 5 beats per minute at a time.
-
Right-click to change by 1 beat per minute at a time.
You can also press the [ key to decrease the tempo by 5, and ] key to increase the tempo by 5.
You can quickly set a specific tempo by typing the T key followed by the tempo and pressing the return key. For example, type T 1 4 0 and press return to set the tempo of the song to 140.
To quickly set a specific tempo, type the T key, type the desired tempo, and press return. For example, type T 1 4 0 and press return to set the tempo to 140.
Setting the Relative Tempo
![]() The Percentage button allows you to quickly set the relative tempo. Click on the button and choose a percentage or use the Custom Tempo % menu item to set any value between 1% and 800%. 1% would be 1/100 of the original tempo and 800% would be 8 times the original tempo. Hotkeys are available: control - (minus key) for half speed and control = for normal speed.
The Percentage button allows you to quickly set the relative tempo. Click on the button and choose a percentage or use the Custom Tempo % menu item to set any value between 1% and 800%. 1% would be 1/100 of the original tempo and 800% would be 8 times the original tempo. Hotkeys are available: control - (minus key) for half speed and control = for normal speed.
Tap the Tempo
![]() Not sure of the tempo for your song? Tap it in real time using the minus [-] or equals [=] key on your computer keyboard. Four taps on the minus key sets the tempo, while four taps on the equals key sets the tempo and starts the song playing. As you tap more than 4 times, the accuracy will improve (through averaging) and you can continue to tap until the target tempo has been reached. For example, in a 4/4/ style, once you tap 4 times a tempo will be set. But you can keep tapping and the tempo will change every beat, based on the average tempo that you have typed. You can also click on the on-screen [-] and [=] buttons to the right of the tempo box.
Not sure of the tempo for your song? Tap it in real time using the minus [-] or equals [=] key on your computer keyboard. Four taps on the minus key sets the tempo, while four taps on the equals key sets the tempo and starts the song playing. As you tap more than 4 times, the accuracy will improve (through averaging) and you can continue to tap until the target tempo has been reached. For example, in a 4/4/ style, once you tap 4 times a tempo will be set. But you can keep tapping and the tempo will change every beat, based on the average tempo that you have typed. You can also click on the on-screen [-] and [=] buttons to the right of the tempo box.
You can change the tempo at any bar in the song with the Edit Settings for Current Bar dialog. Press F5 or the keystroke combination option+B or go to Bar Settings in the Edit menu to open the dialog. The tempo change you enter takes effect at the beginning of the bar and remains until a new tempo change at another bar is inserted.
Frame the song
Framing a song designates the first and last bars of each chorus and the number of choruses Band-in-a-Box will play before playing the standard 2-bar ending.
![]() For this song, bar one is the first bar of the chorus and bar 32 is the last bar of the chorus. The chorus will play three times, jumping to the two-bar ending the third time through. You can click these buttons to change the setting.
For this song, bar one is the first bar of the chorus and bar 32 is the last bar of the chorus. The chorus will play three times, jumping to the two-bar ending the third time through. You can click these buttons to change the setting.
You can also type special words to set the beginning and end of the chorus, and the end of the song.
B E G I N return sets the beginning of the chorus to the current bar
C H O R U S E N D return sets the end of the chorus to the current bar
E N D return sets the end of the song to the current bar
Another way is to right-click a bar in the Chord Sheet to set it as the beginning or end of the chorus or the end of the song from the settings in the context menu.
![]()
Chord Entry
Entering Chords from MIDI Keyboard
You can enter chords from an external MIDI. Play the chord on the keyboard, then press command+return to insert the chord into the Chord Sheet on the first beat of the current chord cell, i.e., beat 1 or beat 3 of the bar. Use shift+command+return to insert the chord on the next beat, i.e., beat 2 or beat 4 of the bar.
Another method allows you to choose alternate chords. Select the Window | MIDI Chord Detection | MIDI Chord Detection menu item to open the dialog.
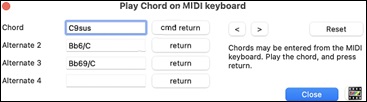
When you play chords, Band-in-a-Box shows you the chord name and suggests alternates that you can choose from. Typing command+return enters the first selection and advances the highlight cell by ½ bar. To place an alternate chord in the Chord Sheet, click on the [return] button beside the chord you want.
Enter Chords from Audio File (Audio Chord Wizard)
You can import chords from an audio file using the Audio Chord Wizard. It analyzes an audio file (MP4, M4A, AIFF, etc.) and imports it to Band-in-a-Box. It detects the tempo, bar lines, and chord changes, making it easy to turn your favorite audio files into Band-in-a-Box songs. .
Enter Chords from MIDI file (MIDI Chord Wizard)
This allows you to read in the chords from any MIDI file and write them onto the Band-in-a-Box Chord Sheet. First, blank the song by choosing File | New. Then, choose File | Import | Import Chords, Tracks and Lyrics from MIDI File (or press control+option+I). You will then see the MIDI Chord Wizard dialog. Press the [Open (Change)] button and select the MIDI file to import. Choose a preset, and the Chord Wizard will interpret the chords in that style. Press the [OK - Interpret Chords] button to see the chords written into the Chord Sheet.
Enter Chords with Computer Keyboard
The most common way to enter the chords in Band-in-a-Box is by typing them on the computer keyboard. You can enter up to four chords per beat.
The location of the highlighted cell determines where chords will be entered. Use either the mouse or the cursor arrow keys on the computer keyboard to move the highlighted cell around the Chord Sheet.
Click on any bar to select a cell, and then type in the chords for that bar.
The highlighted cell covers two beats, or half a bar in 4/4 time. Two chord names can be typed into the highlighted cell (separated by a comma e.g., C, C#dim) so up to four chords per bar may be entered.
To enter a chord, type its name using standard chord symbols (like C, or Fm7, or Bb7, or Bb13#9/E) and press the return key. The chord name(s) you have typed will be entered in the Chord Sheet at the current location of the highlighted cell. Each time the return key is pressed the highlighted cell advances 2 beats, or ½ a measure.
[Note: To view a list of Band-in-a-Box chord names, please refer to the Reference chapter of this manual.]
To start typing in chords:
- Go to the top (bar 1) of the Chord Sheet by clicking on measure 1.
- Blank the Chord Sheet by clicking the [New] button, or with the keystrokes command+N.
- The highlight cell will be at the start of bar 1, reposition it if desired.
- When you have the highlight cell positioned where you want to enter a chord, type the name of the chord you would like. For example, type c6 to get the C6 chord.
You should never have to use the shift key, as Band-in-a-Box will sort this out for you. Here are some other tips for easy chord entry:
- Use b for a flat, e.g. Bb7. It is not necessary to type upper or lower case; the program will sort this out for you.
- Use # or 3 for a sharp, e.g. F#7. (# is the uppercase symbol of 3, so you can type F37 to get F#7. Band-in-a-Box will sort out the case, saving you the effort of using <SHIFT>3 to type the # symbol).
- Use / for slash chords with alternate Roots such as C7/E (C7 with E bass).
- Use a comma (,) to enter 2 chords in a cell. In the example below, we would type Ab9,G9 to get the 2 chords in the cell (on beat 3 and 4 of bar 2).
![]()
The sequence of keystrokes to enter all these chords above would be c6>am7>dm7>ab9,g9>c6/e>>a739.
[Tip: The fastest way to type in chords is to use your left hand to type in the chords. Your right hand stays on the cursor keys (or mouse) to advance the highlight cell to the next bar/beat after you've typed in the chords. ]
[Note: The "Display 'C9sus' as 'C11'" setting in the Display and Chord Sheet Settings dialog (Options | Preferences | [Display]) allows display of '9sus' chords as '11' (e.g., Bb11 instead of Bb9sus). This only affects how the chord is displayed, not how it is stored, and you can type either C11 or C9sus to enter the same chord.]
[Note: The "Display '2' as 'sus2'" and "Display 'sus' as 'sus4'" settings in the Display and Chord Sheet Settings dialog show suspended chords more explicitly: 'sus' implies 'sus4,' and '2' implies 'sus2,' but you might want to see the full extension name. ]
Shortcut Chords
To speed up chord entry, use the following shortcut keys.
- J = Maj7
- H=m7b5 (H stands for Half diminished.)
- D=dim
- S=Sus
For example, type CJ to enter CMaj7.
MicroChords (Multiple Chords per Beat)
The MicroChords feature allows you to enter up to 4 chords per beat. Previously, Band-in-a-Box was limited to one chord per beat, but now you can have chords on 8th notes, triplets, or 16ths notes. This is especially useful on slow songs. You can select which tracks will play the MicroChords, allowing some tracks to play fast moving chord progressions and others to play the main chords.
[Note: The soloist and background RealTracks do not follow MicroChords by design because playing would be too chopping if they did.]
MicroChords are stacked vertically on the Chord Sheet. If there is also a main chord at the same beat, it will display in gray.
![]()
You can enter MicroChords on the Chord Sheet with parentheses and commas. Start with an open parenthesis, type chords separated by commas, and end with a close parenthesis.
For example, typing (C,F) enters two chords for 8th notes, (C,F,G) enters three chords for triplets, and (C,F,G,Am) enters four chords for 16th notes. If you do not type a chord between commas, it will enter a blank chord. For example, typing (C,F,G,,) would enter the first and the second chords for 16th notes and the third chord for an 8th note.
![]()
You can have both MicroChords and a main chord at the same beat. For example, type D7(A,Fm) to enter D7 as a main chord and A and Fm as MicroChords.
![]()
You can erase all chords (main and/or MicroChords) from the highlighted cell with the Delete key.
![]()
Pressing the () and return keys will erase just the MicroChords and advance the cell.
![]()
You can change the current main chord and keep the current MicroChords at the beat by typing another main chord. For example, if you type Gm and press the return key, the main chord will be replaced with Gm and the MicroChords will remain.
![]()
If you want to change the main chord and erase the MicroChords, type a chord followed by parentheses. For example, type Gm() to replace the current main chord with Gm and erase the MicroChords.
![]()
You can also use a dialog to enter MicroChords. Press F6 or M return keys to open the Set MicroChords dialog. This dialog has more features including the option to exclude some tracks from playing the MicroChords.
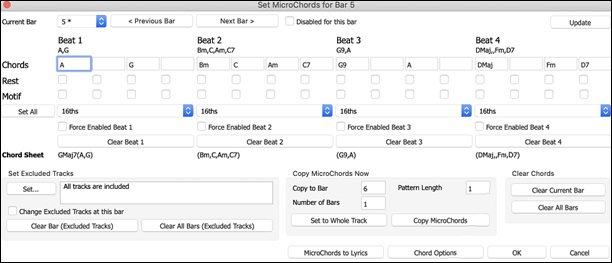
Current Bar: The bar number will display with * if there are some MicroChord data in the bar, and “t” if there is a new “Excluded Tracks: setting.
Disabled for this bar: If this option is checked, none of the MicroChord settings will be played for this bar.
[Update] will update the settings in the dialog. Press this if chords have changed.
Chords: Enter MicroChords on this row. Each beat is divided into four for an even style and three for a swing style.
Rest: A rest will cause the previous chord duration to stop playing, turning the previous chord into a “shot.”
Motif: The Motifs feature allows selected tracks to play specific rhythms without changing the chords. For example, you might want the guitar and bass to play a specific 16th rhythm in a funk song, while the piano and sax stick with the normal feel. Enter a checkmark if you want to create a specific rhythmic pattern. You do not need to enter chords as the motif will use whatever current chord is in the song. Suppose you have loaded a funk style and you want a horn section to play a specific rhythm (16th-rest-rest-16th) in Beat 1 and 3 and just to rest in Beat 2 and 4. So, you check the “Motif” checkbox in the first and fourth slots, and the “Rest” checkbox in the second and third slots for Beat 1, and then you check the “Rest” checkbox for all slots in Beat 2. You repeat this patten for Beat 3 and 4. Enable the “Change Excluded Tracks at this bar” option and press the [Set] button to exclude tracks other than a horn section. If you want to use this rhythm pattern in other bars, use the “Copy Chords” area. Now, when you play the song, you will hear horns to play hits interspersed with the cool lines that are part of the style itself.
[Set All] applies the divisions of the first beat to all other beats.
Triplets/16ths/Auto: This sets the number of divisions per beat. “Triplet” divides the beat into 3, and 16th divides the beat into 4. If “Auto” is selected, the division is automatically selected by the style loaded.
Force Enabled: This is useful if you do not enter any MicroChords in the current beat but still want a beat of silence instead of the main chord.
[Clear Beat #] clears the data for the corresponding beat.
Set Excluded Tracks: This area allows you to select tracks to be excluded from playing the MicroChords. Enabling the Change Excluded Tracks at this bar option allows you to select tracks that should be excluded from playing the MicroChords. Press the [Set] button to select tracks that should be excluded. The excluded tracks will play main chords, instead. The [Clear Bar (Excluded Tracks)] button clears any excluded-track setting for the current bar, and the [Clear All Bars (Excluded Tracks)] clears any track-excluded settings for all bars in the song.
Copy MicroChords Now: This area allows you to copy MicroChords and settings to other bars. Enter the destination bar in Copy to Bar and the total number of bars to be copied in Number of Bars. Set the Pattern Length option to 1 if you want the current bar to be copied. If you want a longer section to be copied, enter the number of bars to copied. For example, enter 2 to copy the current and the next bars. The [Set to Whole Track] button sets the destination to the whole song. The [Copy MicroChords] button copies the MicroChords and settings in the current bar (or more bars if the Pattern Length is more than 1) and paste them to the selected bar.
[Clear Current Bar] clears all settings from the current bar, and [Clear All Bars] clears all settings from all bars in the song.
[MicroChords to Lyrics] displays the MicroChords, including the Motifs (x) and Rests (r), as Bar Lyrics, which are viewable on the Chord Sheet when the Bar Lyrics layer is selected with the [Chord Display] toolbar button menu.
[Chord Options] opens the Chord Options dialog.
Chord Options
![]() Chord options include rests, shots, holds, pushes, and pedal bass. The Chord Options dialog opens with the C7 toolbar button, the option+Z keys, or the right-click contextual menu on the Chord Sheet.
Chord options include rests, shots, holds, pushes, and pedal bass. The Chord Options dialog opens with the C7 toolbar button, the option+Z keys, or the right-click contextual menu on the Chord Sheet.
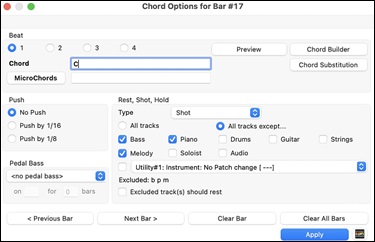
Beat: You can choose the beat location for the chord you are entering.
Chord: If a chord has been entered for this beat, it will appear here. If no chord has been entered, you can type it here.
MicroChords: You can enter up to 4 chords on a beat by typing chords separated by a comma. For example, you could type C,F for 8th notes, C,F,D or C,,D for triplets, or C,F,G,Am or C,F,,Am for 16th notes. The [MicroChords] button opens the Set MicroChords dialog, which allows you to exclude some tracks from playing the MicroChords and select other options.
Push: “Pushes” (sometimes called anticipations) are chords that are played before the beat. For example, in Jazz Swing the piano player often pushes a chord change by playing the chord an eighth note before the beat. Depending on the feel for the style in use, chords can be entered on either 16th or 8th note resolution. You can specify a chord to occur a 16th note before the beat for example, and all instruments will play this, including drums.
Pedal Bass: You can add a pedal bass here. Choose the pattern from the drop-down menu, enter the note you want the bass to pedal on in the “on” field, and specify the duration in the “bars” field.
Rest, Shot, Hold: When a shot or hold is assigned to a chord, the tracks that are excluded from the shot or hold play normally. There is an additional option for those excluded tracks to stay silent. To set this, select a shot or a hold and enable the Excluded track(s) should rest option. This option gives you the ability to rest some tracks while others play the shot or hold.
Normally, you don’t need to press the [Apply] button because the chord you enter will immediately update on the Chord Sheet.
Support for other chord display types
You can enter or display chords in Roman Numeral notation, Nashville notation, Solfeggio notation, or Fixed Do notation.
For example, the chord Gm7 in the key of F would be displayed as IIm7 in Roman Numeral notation, 2m7 in Nashville notation, Rem7 in Solfeggio notation, and Solm7 in Fix Do notation. (Note: In Italy and other parts of Europe, chords are always referred to by the Solfeggio name (Do7 for C7) regardless of the key signature.)
These systems are very useful for learning or analyzing tunes, since they are independent of the key signature. You can take an existing song, and print it out in Roman numeral notation, so you can study the chord progression. You can also type a chord in these systems, like "4" which will enter the "4" chord in the current key.
Click on the [Chord Display] button on the Chord Sheet toolbar, then select a type from Choose type of Chord Display.

[Tip: Print out a song in Nashville Notation or Roman Numeral notation. Then learn the song this way (i.e. 1maj7 4maj7 3m7b5 67b9). You'll then discover that it is much easier to play the song in any key.]
You can display the non-standard chord above the standard chord on the Chord Sheet.
![]()
To do this, click on the [Layers] button on the Chord Sheet toolbar and select a chord type from the Additional Chord Display.
[Tip: The font and the height of the additional chord display can be selected in the Display and Chord Sheet Settings dialog.]
Previewing Chords
You can hear chords as you type them. After entering a chord name on the Chord Sheet or Notation window, press shift+return. This enters the chord and plays it using the MIDI patches on the Piano and Bass tracks. You can also hear a chord that’s already been entered: move the highlight to the bar with the chord and press shift+return to play the chord on the first beat of that bar.
You can also preview chords from the Chord Options dialog. Press option+Z to open the dialog, and then press the [Preview] button to hear the current chord.T
Chord Builder
The Chord Builder offers two features: Progression Builder and Chord Picker, both of which allow you to enter chords by ear without needing to know their names or any music theory.
![]() You can launch the Chord Builder using the [Chord Builder] button on the top toolbar, the menu item Edit | Chord Builder, or the hotkeycontrol+shift+H.
You can launch the Chord Builder using the [Chord Builder] button on the top toolbar, the menu item Edit | Chord Builder, or the hotkeycontrol+shift+H.
The Progression Builder displays and suggests the best next chords in the current key, in pop or jazz, allowing you to interactively create your own progression.
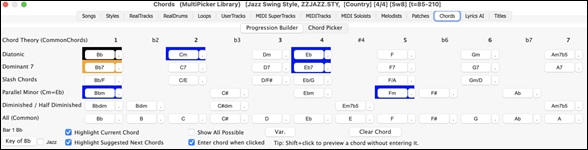
The current chord is highlighted in black and the suggested good chords to come after it are highlighted in colors. These occur if the Highlight Current Chord and Highlight Suggest Next Chords options are enabled. The blue color indicates common chords and the orange color indicates less common but more interesting chords. Normally, you will see just one or two interesting chords but you can cycle through the interesting chords by pressing the [Var.] button. If the Show All Possible option is enabled, you will see all the interesting chords.
The top Diatonic row shows diatonic chords made up only of notes in the key. They are the most common chords used in the key, with the 1, 4, and 5 chords being the most common. Other rows add additional chords that are part of the key. The chords on the Dominant 7 row are considered to be in the key when they resolve up a 4th to a scale tone. For example, A7 resolves to D, which is a scale tone in the key of C. The diatonic chords are also commonly used with different chord tones as the bass note. They are called slash chords, like C/E, are listed on the Slash Chords row. For a major key like C, the chords from the Cm key are also commonly used and are shown on the Parallel Minor row. The most common Diminished chord used is the 1 diminished family [Cdim7, Ebdim7, F#dim7] in the key of C. Half-Diminished chords (e.g., #4m7b5 [F#m7b5] and 7m7b5 [Bm7b5]) are used as 2-5-1 leading to minor diatonic chords. The All (Common) row lists all commonly used chords with the root in the key. Clicking on the small button on each row will list more suggestions.
shift+clicking on one of the suggested chords lets you preview. Clicking on it enters it to the current cell on the Chord Sheet and then the Builder will suggest the best chords for the next. You can repeat this process until you get a great chord progression for your song.
The [Clear Chord] button erases the chord already entered on the current cell.
The Chord Picker lets you pick a root and extension to build a chord.
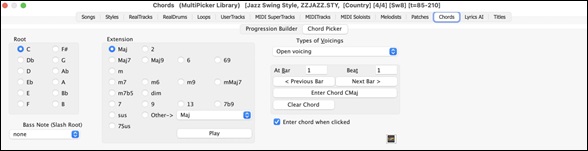
Click on the root of the chord in the “Root” group, the “Extension” (Maj7 etc.), and an alternate “Slash-Note” root. For example, to make the chord F9/A, you would click on the “F” root, the “9” extension, and the Slash Root of /A. As you click on them, you will hear the bass note played by the MIDI instrument on the Bass track, and the extension played by the MIDI instrument on the Piano track. You can change these MIDI patches using Select MIDI Instrument (Patch) in the right-click menu on the Mixer or the track radio buttons at the top of the screen.
You can shift+click on a root or an extension to preview. If you are happy with the sound of the chord, you can press the [Enter Chord] button to enter the chord at the bar and beat specified. If you want the chord to be inserted automatically when you click on the note/extension names, select the Enter chord when clicked option. This will advance the Bar/Beat position. You can change the Bar/Beat settings to move to a different bar. The [<] and [ >] buttons move 1 beat on a right-click, and 2 beats on a left-click.
Delete Chords
The chords at the current location of the highlight cell are cleared by the delete key, the standard “Cut” command, or by typing a comma and pressing return.
Deletion of chords over a range of bars can be done by selecting the range and pressing the delete key on your computer keyboard. No confirmation dialog is required.
Enter Breaks (Rests, Shots, and Held Chords) and Pushes
Breaks
Breaks are points in a song when one or more of the instruments rests, plays a shot, or holds a chord.
- Rests specify any, some, or all instruments to rest at any bar. For example, you could rest all instruments except the bass for the first 4 bars, and then add the piano for 4 bars, and then add the entire band for the rest of the song. You may optionally disable the rests in the middle or final choruses (e.g., where you would likely have a solo, and rests may not be appropriate).
- Shots specify certain instruments play a “shot,” where the chord is played and then a rest follows. For example, the song “Rock Around the Clock” has a shot on beat 1 followed by a rest for 2 bars. The duration of “shots” is 60 ticks per beat.
- Held chords specify that certain instruments hold a chord sustained for a certain number of bars. For example, you can have the bass and piano hold a chord sustained while the drums continue to play a pattern.
A chord can be specified as a by adding a period after the chord.
C. indicates a C chord that is a REST.
C..indicates a C chord that is a SHOT.
C...indicates a C chord that is a HELD.
You can specify that some tracks not be affected by the break. The coded names for the tracks are B for Bass, D for Drums, P for Piano, G for Guitar, S for Strings, M for Melody, L for Soloist, A for Audio, and U1 to U16 for Utility 1 to Utility 16. To exempt tracks, add their letters following the break. For example, C.bd will put a rest on all instruments except the bass and drums. To indicate a held chord for all instruments except the piano, type C...p
Breaks can also be set in the Chord Options dialog (option+Z).
Shots, Holds and Pushes in RealTracks
Simply type in the chords as you normally would, adding periods (…) for shots and holds, and the RealTracks will play them. Note that for this, you need the LibraryM/Holds folder in your RealTracks folder.
Not all RealTracks styles have shots, holds, and pushes available, so check the “H” column in the RealTracks Picker to see if the style has them.
- If the column is blank, they are available and installed.
- If the column shows the letter “n,” the Holds files are available but not installed. Check the support pages of the PG Music web site, www.pgmusic.com, for RealTracks updates.
- If the column shows a dash “–” no holds are available for the style.
Assuming that you have the Holds files for the RealTracks that you are generating, then you just use Band-in-a-Box as you would normally, and type chords with shots (e.g. C..), holds (C…) or pushes (^C or ^^C for 8th or 16th note push), or combinations of push and hold (^C…).
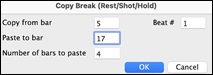
Copy Break (Rest/Shot/Hold)
The Copy Break dialog is opened with the Edit | Copy Special | Copy Bresk (Rest/Shot/Hold) menu command.
With this feature, you can copy the attributes (rests/shots/holds) of a chord over a range of other chords. The settings allow you to specify the bar and beat to copy from, the number of bars to copy, and the location to copy to.
Copy Breaks by Shortcuts
Shortcuts are available for entering breaks (rests/shots/holds) over a range of bar.
Type h4 on a chord, and this will copy the break on the first beat of the cell for 4 bars.
Type ,h4 on a chord, and this will copy the break on the second beat of the cell for 4 bars.
Type h on a chord, and this will copy the break until the next part marker.
Type a chord with a break followed by a number (N), and this will do this for the next N bars.
e.g. C7...4 will enter held chords for 4 bars Gm7...bd5 will enter held chords (bd=except bass and drums) for 5 bars.
Pushes
Pushes in Styles
“Pushes” (also called anticipations) are chords that are played before the beat. For example, in Jazz Swing, the piano player often “pushes” a chord change by playing the chord an eighth note before the beat. Styles can push any instrument so that the instrument plays before the chord begins. This is very common in Jazz and other Pop music and gives the music a more natural sound.
You need not be concerned with pushes that are in the styles as they happen automatically. You need only to be aware that the styles can push the instruments. This makes styles sound much better, and more syncopated.
Pushes in Songs.
Chords can be pushed by an 8th or 16th note. For example, you can specify a chord to occur a 16th note before the beat and all instruments, including drums, will play this.
You can also specify that a chord change should happen before the beat. To do this, you can use either keystrokes, or the chord options dialog box. To use keystrokes:
Type the caret symbol (^) before the chord. (The caret symbol is located above the 6 on the keyboard).
Type a single caret to get a chord an eighth note before the beat.
e.g. ^C7
Type a double caret to get a chord a sixteenth note before the beat.
e.g. ^^C7
In Jazz styles (and other triplet feels), the chord will be pushed by a triplet, regardless if there is a single or double caret (^^).
Erase Chords
To erase a chord, move the highlighted cell to that chord and press the delete key.
Erase Chords and/or Melody
To erase chords with additional control for erasing the melody and/or soloist choose Edit | Erase From.. To.. or press option+K to launch the Erase Chords and/or Melody dialog box.
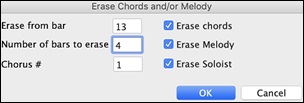
You can erase several bars of chords and/or melody and/or soloist. If you are erasing the melody and/or soloist, you need to specify which chorus you are erasing.
Insert/Delete Bars
Inserting or deleting measures in the Chord Sheet saves a lot of copying or re-typing of chords when changes are made to an arrangement. The commands to insert or delete bars from the Chord Sheet are:
To insert bars choose Edit | Insert Bar(s) or command+I and you can insert a given # of bars. You can also use hotkeys to insert N bars at the current location. For example, I N returm would insert 4 bars at the current location, and I N 8 return would insert 8 bars
To delete bars choose Edit | Delete Bar(s) or command+D and you can delete a given # of bars.
Copying and Pasting a Section of Chords
Since many songs repeat the same sequence of chords throughout, a faster method to enter a song into Band-in-a-Box is to COPY and PASTE the repeating chords.
Copying a section of chords is done in a manner similar to copying text in a word processor. Highlight a section of chords by dragging the mouse over them while holding the left mouse button. The area will be blackened/highlighted.

[Tip: You can select a region of bars just by using the keyboard. Hold down the shift key and use the cursor keys (left/right/down/up).]
Press command+C or select the Edit | Copy menu item. The highlighted area will be copied to the clipboard. It can then be pasted back into the Chord Sheet at any location and reused as many times as you like.
Move the highlight cell to the bar that you want to paste the chords into, using the arrow keys or the mouse.

Paste the copied section with command+V or select the Edit | Paste menu item. The chords will then appear at the new location. These features are also available from the control+click (or right-click) context menu.
[Tip: Remember that the copied section remains in the clipboard and can be used repeatedly. Example: If you are inputting a song with verse, verse, bridge, verse, you can just copy the first verse to the Clipboard, and then paste in the other verses. The clipboard remains even if you load in a new song, so you can copy and paste between songs.]
Copy Chords and/or Melody
Copy and paste the chords, melody, and solo for a range of bars in the Copy Chords and/or Melody dialog.
Select Edit | Copy Special | Copy From.. To, or press option+C to open this dialog.
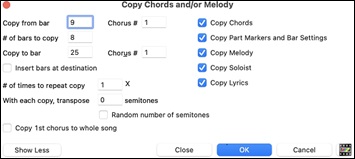
The settings allow you to specify the location to copy from, the number of bars to copy, the location to copy to, and the option to copy any or all the chords, melody, and/or soloist.
Insert Bars at destination: If you enable this, prior to the copy, bars will be inserted at the destination.
# of times to repeat copy: If you set this to more than one, multiple copies will be made, optionally with transpositions on each copy. These are all applied to the first chorus only.
With each copy, transpose __ semitones: If more than one copy is selected, this will transpose the song with each copy. This is most useful when wanting to learn a short phrase (“riff”) in different keys or modulating a section of a song.
Random number of semitones: This will transpose the copy a random transposition and would be useful for advanced students who are trying to master a riff or phrase in all keys.
Copy 1st chorus to whole song: If you enable this, this will apply any of the copying commands in this dialog to all choruses of the song, not just chorus #1.
The [Close] button does not copy chords and/or melody but preserves the current settings in the dialog.
“K” Quick Copy Method
By simply typing K at a bar followed by the return key, you can instantly copy the last 8 bars to the current position. By adding additional keys in the K command, you can customize this shortcut (e.g. typing K 12, 3 would copy from bar 3 for 12 bars to current position.) The current position is advanced to the bar beyond the copy. This speeds up song entry!
For example, if you’re entering a song that has a repeating section of chords for 8 bars, type in the first 8 bars of chords, and then move to bar 9 and then type: k, retturn.
The last 8 bars will be copied to bar 9-16, and the cursor will be moved to bar 17, so you’re ready to continue with the tune. If you get to bar 25 and would like the chords from 1-8 to be copied to 25-32, type k,1 and this will copy 8 bars from bar 1 to bar 25.
The chords always get copied. The Melody, Soloist, and Lyrics also get copied if these items are set in the Copy Chords and/or Melody dialog.
Copy/Paste Chords as Simple Text
Copy from a Band-in-a-Box song
Chords can be copied as a simple text format and be pasted into another song in Band-in-a-Box or a text file in a program like TextEdit.
Select the chords on the Chord Sheet, and press the standard command+C keys to copy them. You can then press command+V in another song or a text file to paste them.

Note: If chords are not selected on the Chord Sheet, command+C copies the whole song including all chords and additional information (title, key, tempo, form, memo, etc.) to the clipboard. You can paste this into a text file with the command+V keys, but if you want to paste it into another song, you need to press command+shift+V or go to menu Edit | Paste Special - from Clipboard text to Song(s).
By default, part markers as well as rests, shots, holds, and pushes are included in text, but you can change this with the options in the Song(s) to Text (clipboard or .txt file) dialog. This dialog also allows you to select the items that will be included when you copy the whole song. Using this dialog, you can also copy all songs in a specific folder to the clipboard or save them as text file(s). The dialog can be accessed with the Edit | Copy Special | Copy Song(s) to Text on clipboard or file(s) menu item.
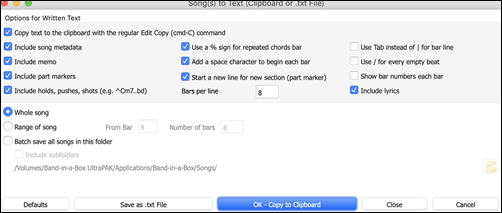
Copy text to the clipboard with the regular Edit Copy (cmd-C) command: This has to be enabled in order to copy chords with the standard command+C keys.
Include Song MetaData: This option applies when you copy the whole song. If this is checked, the song metadata (title, key, tempo, form, style, etc.) will be included.
Include Memo: This option also applies when you copy the whole song.
Part Markers: By default, part markers are copied, but you choose not to copy them.
Holds, Pushes, Shots: By default, rests, shots, holds, and pushes entered in chords are copied, but if you don't want them, uncheck this option.
Use % for repeated chords bar: If this is enabled, a % sign will be used for a blank bar.
Space character to begin each bar: If this is enabled, a space will be added at the beginning of each bar.
New Line for new section (part marker): If this is enabled, every section (part marker) will start a new line.
Bars per line: You can set the number of bars of chords to write per line.
Use Tab instead of | for bar line: With this option, text can be pasted into a spreadsheet with columns for each bar.
Use / for every empty beat: This will write a slash for an empty beat. For example, you will see | C / / / | instead of | C |.
Show bar numbers each bar: If this is enabled, a bar number will be included.
Include lyrics: This allows you to include the lyrics as a [Lyrics] section.
Whole Song: If you select this mode, you can press [OK - Copy to Clipboard] to copy the whole song (chords and additional information selected) or [Save as .txt file] to save it as a text file.
Range of Song: If you select this mode, you can press [OK - Copy to Clipboard] to copy the chords in the selected range or [Save as .txt file] to save them as a text file.
Batch save all songs in this folder: With this mode, you can copy or save all songs in a specific folder. Press the folder icon to select the folder, and choose the option to include subfolders of that folder. Also select the destination with the Batch Save As option. You can copy all songs to the clipboard, save them as individual text files in the same folder, save them as individual text files in another folder, or save them as a single text file. Then, press [OK -Batch Save TXT] to copy or save the songs.
The [Defaults] button resets all options to default settings.
The [Close] button closes the dialog, saving the settings but not copying anything.
Copy from a text file
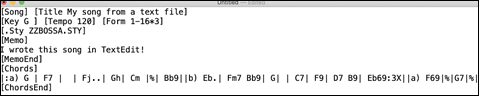
You can copy chords in a text file and paste them into a Band-in-a-Box song. Type chords in a text file using a vertical line for a bar line. If you want a blank bar, leave a space or type a % sign between vertical lines. For example, you can type | D | G7 | | F | or | D | G7 | % | F |. ou can use shortcuts and non-standard chord display (e.g., | 1j | 2h | 53 |). To add breaks (rests/shots/holds), type period(s) after the chord. To add pushes, enter caret(s) before the chord. If you want a part marker, type a or b and a parenthesis after a vertical line. You can type as many bars as you like on each line.
![]()
You can even enter a whole song in a text file. The easiest way is to use the text file that you pasted the whole song into. Some of the information pasted into that text file cannot be pasted back into Band-in-a-Box because they are not applicable for a new song. For example, “Song Summary” is no applicable because this is automatically generated in the song and cannot be edited by a user. However, it will not cause problems if you leave them in the text file. You can include a title, a key, a tempo, a form, a style file name, and a memo.
When you are ready, press command+A to select all and command+C to copy. Then, in Band-in-a-Box, press command+shift+V or go to menu Edit | Paste Special - from Clipboard text to Song(s). This will open the Paste text to Song(s) dialog.

Song(s) Found in Paste: If you created multiple songs in the text file, you can select the song to paste.
Items to include in the paste: Check the items you want to include in the paste.
Paste as New Song: This mode pastes all the chords in the selected song into a new song.
Paste into current Song: This mode pastes into the selected bar in the current song. You can select either the Whole song option to paste all chords in the song or the Range option to paste the chords in the selected range of the song.
Save as SGU song(s): This mode saves the selected song or all songs on the clipboard as new song(s). To save the selected song as a new song, select the Selected song option. Then, press OK, select a folder, and type a file name. To save all songs as new songs, select the All songs in clipboard option, press OK, and select a folder.
Shrink/Expand
Edit | Song Form | Shrink cuts chord durations by 50%.
Edit | Song Form | Expand doubles the durations of chords.
Auto-Generate Chords for Intro
![]() To generate an intro, click on the [Song Form] button on the toolbar and select Generate Intro from the drop-down menu. You can also use the menu item Edit | Song Form | Generate Chords for Intro. The Generate Chords for Intro dialog will then open.
To generate an intro, click on the [Song Form] button on the toolbar and select Generate Intro from the drop-down menu. You can also use the menu item Edit | Song Form | Generate Chords for Intro. The Generate Chords for Intro dialog will then open.
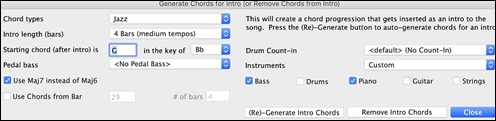
With a single press of a button, you can auto-generate a 2-, 4-, or 8-bar intro for any song. The chords will be different each time, and you can keep trying as often as you like until you get the progression that you want. The intro generated will be an intelligent chord progression (i.e., appropriate for an intro) in the chosen style of music (Jazz/Pop). It can have optional pedal bass and will “lead” correctly to the first chord of the song. There is also an option to have the intro be played by the whole band, a specific track, or any combination of tracks.
The duration of the intro can be set to 2, 4, or 8 bars. You can also get a pedal bass figure inserted throughout the intro. Press the [Remove Intro] button to delete any intro present in your song.
'Jazz Up' the Chords
The menu item Edit | Chords | ‘Jazz Up’ Chords will “Jazz Up” the chords by changing chords like C and Cmaj to 7th and 6th chords. Song embellishment will be turned on for the song. Select the type of 7ths from the list box, and then click on the [OK – Jazz Up] button.
'Jazz Down' the Chords
The Edit | Chords | 'Jazz Down' Chords menu command will "Jazz Down" the chords by changing chords with 7ths (e.g., C7) to triads (e.g., C) and 9ths and 13ths to 7th chords. Song embellishment is turned off. Press [OK - Jazz Down] to proceed.
Chord Substitution
Reharmonizing a song with the Chord Substitution Wizard is a fun and educational way to perform or practice a familiar song in a brand-new way. This feature is very easy to use; simply highlight an area of chords and select “Chord Substitution.” The possible chord substitutions are instantly displayed for you.
For example, if you had chords such as “Dm7 G7 Cmaj7,” a list of substitutions including the tritone substitution “Dm7 Db7b5 Cmaj7” would be offered to you for use in your song. There are also helpful comments associated with each substitution, showing you why a given substitution might work in each case (e.g., is the melody compatible with the substitution, etc.). Alternatively, you can enable the “Auto-Substitution feature and the substitutions will be selected according to the general preset preferences.
There are two ways to get chord substitutions, you can let Band-in-a-Box show you a list of possible substitutions to pick from yourself (Edit | Chords | Chord Substitution Dialog), or you can let Band-in-a-Box pick them automatically (Edit | Chords | Chord Substitution (Auto-Generate)).
Manual Chord Substitutions
The appearance of this dialog depends on what chords are present at the highlighted bar. This bar number is shown in the dialog and may be changed. In the example above, the chord is an F7 chord, so the substitutions shown are for an F7 chord. The substitutions shown may work for up to 4 bars, depending on the substitution. In the examples above, the substitutions work for 2 bars.
You can control what types of substitutions to see by using the Jazz/Pop checkbox. Some substitutions include more chords than the original, some simplify the progression, and these can be viewed using the checkboxes. You can elect to exclude substitutions that have a chord on each beat.
The Types of substitution scombo box will filter the substitutions to include only the best substitutions or all of them.
The [Recompile] button is only used if you have edited the chordsub.txt file to add your own substitutions.
Once you see a substitution that you like, you can enter it onto the worksheet by pressing the [OK - Do Substitutions] button or double-clicking on the substitution line. You can then move the current bar to the next part of the song that you need a substitution for and repeat the process.
You can undo the substitution by pressing the [Restore] or [Restore All] button.
Auto-Chord Substitution
You can quickly auto-generate substitutions for an entire song or portion of a song using the auto-substitution dialog. For example, we can generate substitutions for the !Freddie.MGU song. Here is the original chord progression.
By using the auto-substitution dialog, we can generate substitutions for the whole song, and we get this result:
You can see that Band-in-a-Box chose the substitutions for about 70% of the chords in the song (that’s what we told it to do in the dialog). Some of the substitutions chosen are more advanced than that (replacing an F7 with a B13 for example)
Here are the settings in the auto-substitution dialog that produced this result:
If you’d like Band-in-a-Box to only generate for a certain range of bars, you should first highlight that range of bars in the Chord Sheet, then launch the dialog. The Range will then be set to Part of the song and the bar # and # of bars settings will also be set. You can override these settings with manual settings, if necessary.
Generate Chords for a Melody (The Reharmonist)
Use the “Reharmonist” feature to generate chords for a melody or create an improved chord progression. It produces a chord sequence in the chosen genre, based solely on the melody, ignoring any existing chords in the song.
The Reharmonist feature provides two separate windows: one allows you to reharmonize the entire song with a new chord progression, and the other shows a list of possible reharmonizations for a selected section of the song.
Reharmonization (Auto-Generate)
To generate an entirely new chord progression for a complete song or a portion of a song, go to menu Edit | Chords | Chord Reharmonization (Auto-Generate). You will then see the Select Re-Harmonist dialog.

The first thing you should do is set the “Genre” for the reharmonization. For example, if you want “Jazz Swing” genre, choose that in the genre drop down. You will then get typical Jazz chords.
Verify that the key is correct. Band-in-a-Box analyzes the melody and gives its best guess as to the best key for the song. If it is different from the current key, Band-in-a-Box will suggest the new key, and you can press the button to set the key to the new key.
Set the region of the song that you want reharmonized. Usually this will be the “Whole Song.”
Reharmonization (Choose)
Use the feature interactively with the “Bar Reharmonist” to display a list of possible chord progressions for a portion of the melody and audition them to choose the best one. This lets you hear new chord progressions for existing melodies or entirely new progressions for tunes without chords. To use it, choose the menu item Edit | Chords | Chord Reharmonization (Choose your own). The dialog shows the current bar in the song and presents a list of suggested chord progressions based on the melody and genre you select.
The progressions are sorted in alphabetical order, or from “best to worst” depending on this setting.
Choose a chord progression, and press [OK - Reharmonize] and the program will insert that progression.
hRearrange Cords - Song Form Maker
The Song Form Maker lets you define sections of a song (A, B, C etc.), and rearrange the song by selecting the desired form (e.g., AABABAACA). You can reopen the dialog at any time to change the form.
![]() To open it, click on the [Song Form] button on the top toolbar and select Song Form Dialog from the drop-down menu, or go to the main menu Edit | Song Form | Song Form Dialog.
To open it, click on the [Song Form] button on the top toolbar and select Song Form Dialog from the drop-down menu, or go to the main menu Edit | Song Form | Song Form Dialog.
Define the sections (e.g., A = bars 1 for 8 bars, B=start at bar 17, for 8 bars C=start at bar 25, for 4 bars), type the form that you want (AABACABA), and press [OK - Generate Form].
The form and sections are saved with the song.
You can revisit this dialog to re-order the sections. Or change a chord in the “A” section of the Chord Sheet, and then use the Song Form Maker to propagate the changes through all the “A” sections.
Use the [Undo] button to reverse your changes.
Uses for the Song Form Maker
- Enter a song by simply entering each section once, and then visit the Song Form Maker, typing the form that you want and generating it. Change the form without having to type in new chords, just redo the Form String (AABACABA, etc.).
- Change chords in each section by simply changing the chord in the main section, and then regenerate the form.
- Enter a melody once and copy it throughout the form by regenerating the form.
Part Markers and Substyles
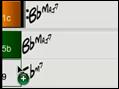
Part Markers (a, b, c, d, etc.) are placed on the Chord Sheet to indicate a new part of the song. They are used to change substyles or insert drum fills. They typically occur every 8 bars or so but may be placed at the beginning of any bar.
There is always a part marker at bar 1 so that Band-in-a-Box knows which substyle to begin with. The song continues to play in one substyle until it encounters a new part marker. The substyle will change automatically on second choruses when the “Vary style in middle choruses” setting is selected in the Song Settings dialog.
You can customize the display of the part markers in the Display and Chord Sheet Settings dialog. For example, you can pick a color for each part marker, draw part marker borders, show each part marker on the new line, etc.
MultiStyles
Band-in-a-Box MultiStyles are styles that can have up to 24 substyles; original Band-in-a-Box styles had two substyles, “a” and “b.” Band-in-a-Box MultiStyles typically have four substyles, but may have up to twenty-four, selected by using part markers “a” through “x.”
- Substyle “a” is usually used for the verse of a song.
- Substyle “b” is usually used for the “b-section” or the chorus, and for soloing in the middle choruses.
- Substyle “c” is usually used for the intro or for an opening verse or pre-verse.
- Substyle “d” is usually used for a break or interlude.
Placing Part Markers
Move the highlight cell to the bar where you want to place the part marker. Then press the P key on the computer keyboard. Repeatedly pressing P scrolls through all available part markers.
Position the mouse cursor directly over the bar line (or an existing part marker). Then, click the left mouse button. Repeat this procedure to scroll through the available options.
To remove a part marker, keep pressing P or clicking the mouse until you reach the end of the available part markers and there is no marker on the bar number.
Copying Part Markers
You can drag a part marker to copy it to other bars.
|
|
|
|
|
Placing Drum Fills
A one bar drum fill will play in the bar preceding (leading into) a part marker, just as a live drummer will play a fill to accent the transition between sections of a song. If you want a drum fill to play in bar 7 of a song, insert a part marker at bar 8. You can either retain the current substyle or change the substyle (“a” or “b”) when you place the part marker.
You can get no drum fill on the bar before a part marker, or you can get a drum fill at any bar without needing a part marker. This is controlled in theEdit Settings for Current Bar dialog (F5). When the “Allow Drum Fill” option is checked, you’ll get a drum fill at the current bar. If you are at a bar before a part marker and you don’t want a drum fill, then disable this option.
Section Paragraphs
When you are reading a book, a new section begins on a new line, with space between. Band-in-a-Box does that for chords too. Whenever a new section occurs (a part marker), we start the new section on a new line and draw a grey line above to clearly mark the new section. You will see each section on a new line so that the form of the song is easier to see.
For example, if you have a song with a 7-bar section, followed by 8-bar sections, earlier versions of Band-in-a-Box wouldn’t start the other sections on a new line. The result was that it was hard to delineate the sections, as if an entire story was told within one paragraph.

With the Section Paragraphs feature, you will see each section on a new line so that the form of the lead sheet is easier to see. Sections can be as short as 2 bars.

The feature is configurable and optional with the “New line for every section” setting in the Display Options dialog. You can also set the minimum number of bars that is required to start a new line with the “minimum section” setting. For example, if this is set to 8, then there won’t be a new line for the next part marker if that section has only 4 bars.
Generating Tracks
Band-in-a-Box generates backing arrangements based on the chords you type in, playing them in a particular style.
Selecting Styles
There are many styles available for use with the Band-in-a-Box program. Styles refer to styles of music like Jazz Swing, Latin, Blues, Pop, Rock, or Country. You can pick a style either before or after you have entered the chords to a song. Once a style is loaded, the song will be played back using your chosen style. All style files have the .STY extension.
The StylePicker
The StylePicker lists all the styles that are present in the Band-in-a-Box folder. The StylePicker window has a great filter feature for finding a perfect style for your song by selecting elements such as time signature, feel, or tempo or by simply typing in a familiar song title.
![]() The StylePicker can be accessed with the [Style] button on the toolbar or the hotkeys control+F9, S return or S 1 return.
The StylePicker can be accessed with the [Style] button on the toolbar or the hotkeys control+F9, S return or S 1 return.
[Note: The StylePicker opens in the MultiPicker Library window if Use MultiPicker instead of dialogs is enabled in the Edit menu or the track label's context menu. If this setting is disabled, the StylePicker opens as a standalone dialog.]
Rebuild StylePicker and Confirm RealTracks and RealDrums Folder Locations
If the style list needs to be rebuilt when you open this window, a dialog will open to confirm and set the correct locations of your RealTracks and RealDrums folders. In the dialog, you can see the current locations (e.g.,Applications/Band-in-a-Box/RealTracks and Applications/Band-in-a-Box/Drums) and the number of RealTracks and RealDrums present in these locations. This allows you to confirm that you are using the correct locations as you see the expected numbers of RealTracks and RealDrums found in the folders.
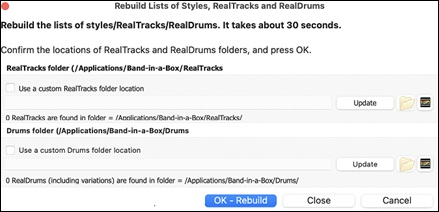
[Note: The dialog is also accessible with the [Set RT/RD Folders] button in the Track Settings and Actions dialog (F7).]
A progress bar appears at the top of the StylePicker window during style rebuild. Once the list is rebuilt, you can browse styles by sorting columns or hear an “instant” preview of the style by double-clicking on the list.
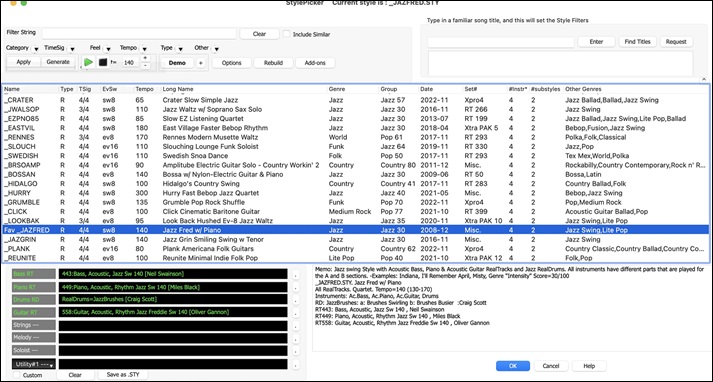
Style List
The styles list can be easily sorted by clicking on a column name. Clicking again will reverse the order. You can also resize the column width by dragging a column border.
(Note: To toggle the sort between the forward and reverse order, you need to enable “Sort columns in forward and reverse order” in the StylePicker Options dialog.)
Each column provides following information for the style.
Name : This column shows the file name of the style.
Type : This column tells you whether the style has RealTracks only (“R”), MIDI only (“M”), or a combination of RealTracks & MIDI (“RM”)
TSig : This column shows a time signature (4/4, 3/4, etc.) of the style.
EvSw : The “ev” or “sw” indicates whether the style plays in an even feel or a swing feel.
Tempo : The tempo shown here is the tempo set in the style.
Long Name : This column shows the full name of the style.
Genre : This column shows the genre of the style.
Grou p: The styles are grouped into three groups: Pop, Jazz, and Country. The styles are grouped into three groups: Pop, Jazz, and Country. This column also shows a "genre score," which describes a style by a simple number from 1 to 100. This works as follows: quiet, classical, acoustic, jazz, or folk would have low genre scores (1 to 30); loud, aggressive, or heavy rock would have high genre scores (80-100); and light-medium pop would have mid-range genre scores. You can filter the style list by the genre score with the "Other" filter button either by choosing a pre-defined range or setting your own custom range. For example, if you're looking for a quiet "living room" type style, use the filter to only show styles with a genre score less than 40. This might show jazz, classical, folk or other quiet-acoustic styles.
Date : This column shows the date when the style was made.
Set # : In this column, you can see which set includes the style.
# Instr : This column shows the number of instruments that are present in the style.
# Substyles : A style can contain as many as 24 substyles.
Other Genres : This column suggests additional genres of the style.
Filter
![]()
You can easily find a style using the text filter. For example, if you want to find punk styles, simply type “punk” and the list will be filtered to show punk styles. If there is a RealTracks musician that you want to check out, just type in his name, and the list will show styles with that musician in them.
You can also use the arrow button to select a category, time signature, feel, etc., and you will immediately see the filtered list.
Category - This lets you filter styles by a genre or category.
TimeSig - This allows you to filter styles by the time signature.
Feel - This sorts the list by feel (even 8th, swing 8th, even 16th or swing 16th).
Tempo - This sorts the list by the tempo.
Type - With this button, you can choose to display Real and/or MIDI styles. The default is to display Real styles first and MIDI styles at the bottom, but you can change the default selection with the last menu item.
Other - This is a miscellaneous filter. For example, the list can be filtered to show only your favorite styles, styles of a specific RealTracks set, or styles with soloists, or styles in a specific Xtra Styles set
If Include Similar is unchecked, then the filtered list will show the exact match only, but if this option is checked, then the list will show the exact match and the similar styles. The [Clear] button will clear any filter, so all styles will display.
Style Suggestion
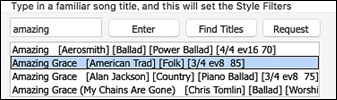
In the Type in a familiar song title field, type in a familiar song title, artist name, or genre of music, and the StylePicker will filter the list by the genre, feel, tempo, and time signature of that song title.
You can also press the [Find Titles] button to open the Song Titles Browser, which allows you to browse and filter the huge list of over 21,000 popular song titles. You can, for example, filter by a certain artist, and then sort all the songs by tempo, key, feel, time signature, and more.
Instant Preview of Styles - Audio Demos
![]() The [Demo] button plays a pre-made audio demo of the selected style.
The audio demos are found on your hard drive or on the Internet (www.pgmusic.com).
The program will play the hard drive version if available; otherwise, it will play
The [Demo] button plays a pre-made audio demo of the selected style.
The audio demos are found on your hard drive or on the Internet (www.pgmusic.com).
The program will play the hard drive version if available; otherwise, it will play
from the Internet.
The [+] button shows a menu with options to allow use of the Internet to play audio demos, adjust the volume of the audio demos, loop playback of audio demos, load demo songs for the selected style, open the folder of audio demos if the file is being played on your hard drive, etc
Instant Preview of Styles - Play Your Song
You can also audition a style by actually playing it over the current chord progression of your song.
![]() The green arrow button plays your song with the currently highlighted style. The black square button stops playback of the song or the audio demo.
The green arrow button plays your song with the currently highlighted style. The black square button stops playback of the song or the audio demo.
You can also double-click on a style or press the spacebar to play the song if the Double-Click (or Spacebar) plays Chord Sheet (not pre-made demo) option in the [+] button is unchecked.
The number of bars for song preview is settable. Press the [Options] button, select Set Dialog Option from the menu, and select a number for the “# of preview” option.
The ideal tempo for the style is shown here but you can change it to any tempo by typing in the number or clicking on the [+] and [-] buttons. You can even change it during playback.
[Apply] [Generate]
![]() You can press the [Apply] button to load the selected style to the song. Pressing the [Generate] button loads the style to the song and plays the song with the style.
You can press the [Apply] button to load the selected style to the song. Pressing the [Generate] button loads the style to the song and plays the song with the style.
Rebuild of Styles List
![]()
Press the [Rebuild] button and select [Fast] Rebuild of PG Music styles only after you install new styles from PG Music. It takes about 30 seconds to rebuild the list. The [Slow] Rebuild of PG Music and 3rd party styles menu item will find not only PG Music styles but also new or changed user or third-party styles. It takes longer to rebuild the list.
Customization
The new mixer-like control shows what tracks and instruments are used in the currently selected style in the list and color-codes them according to the track types (MIDI, MIDI SuperTracks, or RealTracks).
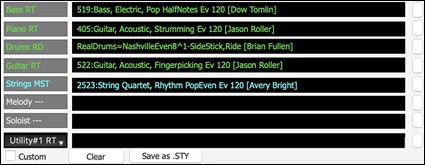
For each track, there is a menu button, which allows you to change the instrument, disable/enable the track, or perform other track actions. Previously, you had to close to the StylePicker window to do these.
When the track is customized, an asterisk will be added to the name.
When the Custom option is checked, the tracks of the currently selected style will be overridden with the choices you have made.
The [Clear] button will clear any customized settings.
Press the [Save as .STY] button to save the style that you have customized. For example, you might add/remove a RealTracks and save that as a new style. When you save the style, it will be added to the StylePicker list.
Memo
This area shows additional information about the style. You can see instruments, artists, a brief description, and song examples currently selected style. If the style has Loops or UserTracks, you will see the names of the Loops or UserTracks.

Options
Clicking on the [Options] button shows you a menu with various useful functions. These include loading song demos, setting the selected or loaded style as a remembered style so that you can easily revert to it, assigning the selected style as a favorite, opening the StylePicker Options dialog, etc. These functions are also accessible if you right-click on the style list.
Load highlighted style: This loads the selected style to the current song.
Play current chords with highlighted style: This plays the current song with the selected style.
Load demo song for highlighted style:: This opens a demo song of the selected style.
Play pre-made audio demo for highlighted stylee: You can hear a pre-made audio demo of the selected style.
Revert to remembered style: This quickly reverts to the remembered style after loading other styles.
Set remembered style to highlighted style: This sets the selected style as a remembered style. You can easily revert to this style after loading other styles.
Set remembered style to currently loaded style: This sets the currently loaded style as a remembered style.
Set StylePicker options: This menu item opens the StylePicker Options dialog with additional options for the StylePicker.
Reset StylePicker to defaults: This menu item resets the dialog to default settings.
Mark as prototype, and sort by similar styles to: This menu item will sort and filer the list by best to worst match of the prototype’s tempo, feel, genre, time signature, and more. Once you do this, the sort status indicator will tell you that the sort is by prototype. For example, if you choose _BUBLPOP as the prototype style, the list will be sorted with styles most similar to _BUBLPOP. These are the styles with a similar genre, feel, tempo, and time signature. Here is an example of the results of setting _BUBLPOP as the prototype.
Select/Create User Category:
Unlimited User Categories can be created by users or third parties, to list their styles in the StylePicker.
To select an existing User Category, choose Select/Create User Category. When the dialog opens, select a category and press the [OK] button.
To make your own User Category, right-click on the list, choose Select/Create User Category, and when the Choose User Category to display in StylePicker dialog opens, press the [Create New Category] button. Then, type a name for your category and click on the [Save] button.
You can also enter a memo for your category.
(Technical notes: User Categories are stored as .txt files, which just contain the list of style names. The User Categories must reside in Band-in-a-Box/Data/StylePicker/User Categories folder. You can re-arrange this folder by creating subfolders and moving the categories around to organize them. You can also directly edit the .txt file in this folder. If you have made any changes to this folder, remember to press the [Refresh] button.)
User Categories are analogous to playlists in a song player. You can create/edit them and choose to display only the styles from the category or all styles with the category styles highlighted with a * asterisk.)
Set highlighted style as favorite: This will set the selected style as a favorite.
Add custom memo for: You can add your own memo to the highlighted style.
Save current list as a User Category: This menu item allows you to create a new User Category and add all the styles currently displaying in the list to the new category. To display only the styles from the current User Category, click on the [Category] button above the list and select Show this User Category. If you want to see only the styles from another User Category, select Choose and Show User Category and choose a User Category from the list. You will then see styles from the selected User Category.
Copy current list to clipboard: This menu item saves the current list with all information to a tab-delimited .txt file and opens it in Notepad. In Notepad copy all and paste it into a spreadsheet such as an Excel file. You can then apply a hierarchical sorting of the list.
Selecting the Set StylePicker options from the [Options] button drop-down menu opens a dialog with additional options for the StylePicker.
|
Preferred listing of styles: This controls the default type of listing of styles (Real and/or MIDI). |
Remix Full Vocal Songs
Band-in-a-Box has over 150 original songs (Pop, R&B, and Modern Country) with high-quality, great sounding vocals, harmonies and Band-in-a-Box arrangements. They are included in new Artist Performance sets 11 and 16. Use these to remix new arrangements, starting from these high-quality, great sounding tracks!
To hear the audio demos, press the [Other] filter button in the StylePicker, and select Styles that have .m4a full song demos, with vocals from the drop-down menu. Or, press the [Category] filter button, select Choose and Show User Category from the drop-down menu, and select “PGMusic\Style Demos with Vocals\All Style Demos with Vocals” from the list. This will list styles that have full vocal audio songs. You can then click on a style in the list to listen to a demo.
Song Titles Browser
This window shows basic information, such as artist, genre, time signature, key, and more, for over 21,000 popular songs. Select a song, and it will find styles that match the genre, feel, time signature, and tempo of the selected song.
You can open this window by pressing the [Titles] tab in the MultiPicker Library or the [Find Titles] button in the StylePicker, clicking on the [Style] button and selecting Choose style from Song Title, or typing S 3 return keys.
[Note: The Song Title Browser opens in the MultiPicker Library window if Use MultiPicker instead of dialogs is enabled n the Edit menu or the track label's context menu. If this setting is disabled, the Song Title Browser opens as a standalone dialog.]
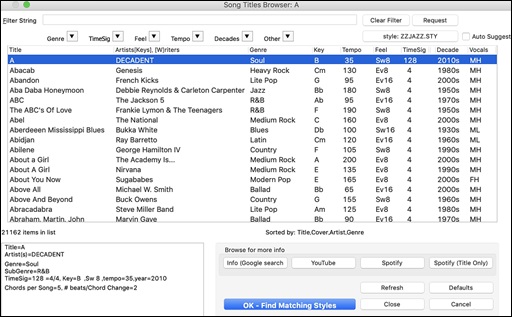
You can sort the list by any column.
Title: This shows you the song title.
Artist: These are the artist or artists most commonly associated with the song.
Genre: This is the musical genre that the song it typical played in.
Key: This is the song key that is usually associated with the song.
Tempo: This is a typical tempo for the song.
Feel: This shows you if the song is Even or Swing, and 8th or 16th cut-time.
Decade: This tells you the decade that the song is from.
Vocals: Typical vocals are shown: (M)ale/(F)emale, (H)igh/(L)ow voice.
You can filter the list by genres, time signature, feel, tempo, decades, and more.
The chord density filter is available. Press the [Other] filter button and select one of the menu items below Filter by Chord Density. For example, you can search titles that have chord changes in every 1-4 beats. You can also filter the list by chord complexity. This is scaled by 1 to 10; 1 means simple with few chord changes and 10 means complex with many chord changes. Press the [Other] filter button and select one of the menu items below Filter by Chord Changes.
You can see song titles that will only work with the current style.
Pressing the [style: ] button will filter the list by the genre, time signature, feel, and tempo of the current style. If the checkbox to the left of this button is enabled, then when you open the dialog, the list will be automatically filtered to show song titles that are similar to the current style.
If you do not see a song title you are looking for, press the [Request] button. This will launch your internet browser and open the PG Music forum page where you can request to add the song to the database.
The buttons in the Browse for more info area will launch the internet browser and let you browse for more info for the selected song or listen to the song.
Once you have found a song, press the [OK - Find Matching Styles] button. This will take you to the StylePicker window with styles that best match the tempo, feel, and genre of the selected song title.
MultiPicker Library
The MultiPicker Library window provides a one-stop hub for various features including the SongPicker, StylePicker, RealTracks Picker, RealDrums Picker, Melodist Picker, Chord Builder, AI Lyrics Generator, and more. The tabs are logically organized: Songs, Styles, Audio Tracks (RealTracks, RealDrums, Loops, and UserTracks), MIDI tracks (MIDI SuperTracks, MIDI Tracks, MIDI Soloists, Melodists, and Patches), and AI/Assistant (Chords, AI Lyrics Generation, and Song Titles Browser). All pickers share a common interface with similar functionality, including filters, search options, demos, memos, and more.
![]() Press the left side of the [Library] button on the side toolbar, or use the hotkeys F7 or M return to open the MultiPicker Library window. It opens either docked in the main workspace or as a floating window, depending on the MultiPicker Library opens as floating window setting, which is found in the drop-down menu in the arrow button. Regardless of this setting, control+clicking on the [Library] button opens the floating window, while shift+clicking add it docked in the main workspace.
Press the left side of the [Library] button on the side toolbar, or use the hotkeys F7 or M return to open the MultiPicker Library window. It opens either docked in the main workspace or as a floating window, depending on the MultiPicker Library opens as floating window setting, which is found in the drop-down menu in the arrow button. Regardless of this setting, control+clicking on the [Library] button opens the floating window, while shift+clicking add it docked in the main workspace.
Use the tab buttons at the top of the window to switch the type of tracks. ![]()
- [Songs]: This opens the SongPicker, which displays information for all songs in a specific folder, including title, key, time signature, genre, form, and more.
- [Styles]: This tab opens the StylePicker. Styles refer to styles of music like Jazz, Latin, Blues, Pop, Rock, Country, etc. You can pick a musical style either before or after you have entered the chords to a song. The StylePicker lists all styles with full information. It has a great filter feature for finding a perfect style for your song by selecting elements such as time signature, feel, or tempo, or by simply typing in a familiar song title.
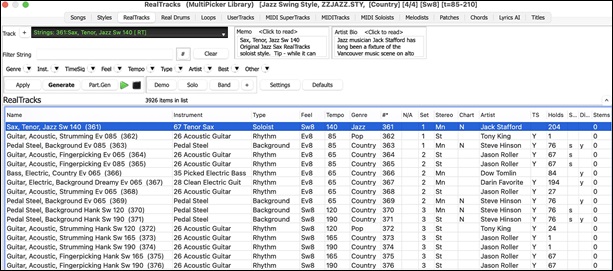
- [RealTracks]: RealTracks are recordings of top studio musicians and recording artists. RealTracks are not "samples" but full recordings, lasting several bars at a time, and can generate tracks that will play along in perfect sync with the other Band-in-a-Box tracks. Best of all, they follow the chord progression that you have entered, so that you hear an authentic audio accompaniment to your song!
- [RealDrums]: RealDrums are recordings of top studio drummers, playing multi-bar patterns. MIDI drums are patterns based on single drum hits, being programmed, typically on a quantized grid, of what people assume drummers are typically playing. We record drummers at multiple tempos, so the playing you hear at various tempos is also musically different, not just "sped up." Drummers play different types of fills etc. at slower/faster tempos, and these are captured with RealDrums.
- [Loops]: Loops are audio files (wav, wma, m4a, mp4, mp3) that reside in the RealTracks\Loops folder. You can add your own or third-party loops to this folder. Loops support many types of ACIDized Loops (for wav and mp3 files), an, if you add an Acid loop that is on a certain root (e.g., F), Band-in-a-Box will instantly allow you to use that as a complete style, by transposing that loop to the current chord of the song in Band-in-a-Box, so that the loop follows your chord progression.
- [UserTracks]: UserTracks allow anyone to create their own audio styles for use in Band-in-a-Box. With a UserTracks style, you can type in any chords into Band-in-a-Box, and the UserTracks style you made will play that chord progression! For example, if you've made a UserTracks style by recording yourself playing a guitar groove, you can then type any chords into Band-in-a-Box, and the result will be that it will play your guitar groove over these completely new, original chord changes! You can even change the tempo, or enter songs in any key, and it will still be able to play it!
- [MIDI SuperTracks]: MIDI SuperTracks are called "SuperTracks" because they are generated using a different engine than typical MIDI tracks. Typical MIDI tracks are generated from C7 patterns in a style and repeat these patterns over any chord. MIDI SuperTracks use actual MIDI playing from musicians (similar to RealTracks in that regard), so are not based on patterns.
- [MIDITracks]: You can add a MIDITrack from a MIDI style to any track of your song. There are over 800 custom MIDITracks to choose from.
- [MIDI Soloists]: That's right! Band-in-a-Box can "solo like a pro." Pick one of the many MIDI Soloists available, and the Soloist will generate a great solo for your song!
- [Melodists]: The Melodists can compose a new song in the style of your choice, complete with intro, chords, melody, etc. It even auto-generates a unique title for you! You can go from nothing to a completed song in less than 1 second! All you have to do is pick from a great variety of the Melodists. The Melodists can also generate just a melody over an existing chord progression.
- [Patches]: This allows you to choose from a list of over 1,100 MIDI patches (instrument sounds), all categorized by GM numbers.
- [Chords]: This provides two features: Progression Builder and Chord Picker, both of which allow you to enter chords by ear.
- [Lyrics]: Band-in-a-Box offers creative songwriting functions that suggest or generate themes, styles, titles, and even entire song ideas. It also provides customized AI lyrics generation, allowing you to create lyrics from scratch, generate the next line, or experiment with rhymes, synonyms, antonyms, related words, or alliterations. You can enhance your existing lyrics by adding vivid imagery, emotion, richer vocabulary, or more natural phrasing. With six lyric modes - Word Suggestions, Inspiration, Songwriting, Improvements, Full Song, and Custom - you can refine your lyrics in numerous ways.
- [Titles]: The Song Titles Browser shows basic information for over 21,000 popular songs. Select a song, and it will find styles that match the tempo, key, feel, and other characteristics of the selected song.
Some pickers allow you to confirm or change the track to which the selected item from the list will be applied.
![]()
[Note: For the Melodist, when selecting a track other than the Melody track, uncheck the “Use Melody track for Melodist” option below the track selector so that the Melodist will be generated on the selected track, not the Melody track. Similarly, uncheck the “Use Soloist track for Soloist” option when selecting a track other than the Soloist track.]
The [+] button beside the track selector opens a panel for soloing, muting, freezing, adjusting volume/reverb/pan/tone, changing the track label, writing a description, and more.
The list can be sorted by clicking on the column headings.
![]()
[Note: The column headings vary depending on the track types.]
- For RealTracks and MIDI SuperTracks, the "Type" column shows the types of playing (Rhythm, Background, and Soloists). For styles, this column tells you whether the style has RealTracks only ('R'), MIDI only ('M'), or a combination of RealTracks and MIDI ('RM').
- For styles, the Type column tells you whether the style has RealTracks only (‘R’), MIDI only (‘M’), or a combination of RealTracks and MIDI (‘RM’).
- The Feel column tells you whether the playing is in an even 8th feel, an even 16th feel, a swing 8th feel, or a swing 16th feel.
- The Tempo column shows the base (or typical) tempo.
- For the RealDrums, the /4 column indicates the time signature. If this column is empty, the time signature is 4/4; if there is a 3 in this column, the time signature is 3/4. There are also Lo and Hi columns that shows the recommended tempo range, and the x column tells if the tempo of the RealDrums that is out of range for the song.
- The Genre shows the types of music such as Jazz, Rock, Country, etc.
- There is a Group column for the styles list. The styles are grouped into three groups: Pop, Jazz, and Country. This column also shows a ‘genre score,’ which describes a style by a simple number from 1 to 100. This works as follows: quiet, classical, acoustic, jazz, or folk would have low genre scores (1 to 30); loud, aggressive, or heavy rock would have high genre scores (80-100); and light-medium pop would have mid-range genre scores. You can filter the style list by the genre score with the "Other" filter button either by choosing a pre-defined range or setting your own custom range. For example, if you're looking for a quiet "living room" type style, use the filter to only show styles with a genre score less than 40. This might show jazz, classical, folk or other quiet-acoustic styles.
- The N/A column shows “N/A” for the items that you have not installed yet or haven’t purchased.
- In the Set column the number of the RealTracks set that includes the instrument. This column also tells you whether a video is available for the RealTracks/RealDrums.
- The Stereo column shows whether the playback is stereo or mono.
- The Chart column shows “N” if notation is available. This column shows “Gt” for RealTracks or MIDI SuperTracks that have notation with accurate guitar tab and on-screen guitar fretboard display.
- The Artist column shows the name of the player. You can see the “Artist Bio” box for information about the player.
- The letter “Y” in the TS column means that Tempo Swapping is supported. If you have similar RealTracks available at different tempos, Band-in-a-Box automatically chooses the best one to use.
- If a number shows in the Holds column, the RealTrack supports shots, holds, and pushes.
- The Simpler Available column shows he letter “s” if there are simpler options available. These are parts with less busy, less embellished playing for generating simpler arrangements.
- The Direct Input Available column has the letter “y” if there is an option of clean recordings without effects. This allows you to start with a clean track and add your own effects.
- For RealTracks and RealDrums, there is a Stems column. For RealTracks, it shows number of individual instruments/voices available. For RealDrums, it shows the number of microphones used for stems during the actual recording sessions. When you select a RealTrack/RealDrum that has stems, you will see what they are just below the list. Using the checkboxes, you can load all stems, the selected stems, or the mix of all stems for your song. If you select all or individual stems, each stem will be loaded to separate tracks, so you can control volume, pan, etc. for each stem using the Mixer.
- The styles list has extra columns. The Date column shows the date when the style was made. The Set # column shows the set number that includes the style. The # Instr column shows the number of instruments that are present in the style, The # Substyles column shows the number of substyles contained in a style.
You can use the filter function to search items on the list.
![]()
Type a text (e.g., bossa) in the Filter String field, and the list will be filtered to show only the items that contain that text somewhere in the name, genre, memo, etc. The [#] button allows you to filter the list by many elements including feel, time signature, set numbers, artists, etc. You can also use the arrow buttons to quickly filter the list by genre, instrument, time signature, feel, and more. Press the [Clear] button to clear the filter and show all available items on the list.
For the StylePicker, there is also an Include Similar checkbox. If this is unchecked, Then the filtered list will show the exact match only, but if this option is checked, then the list will show the exact match and the similar styles. The [Clear] button will clear any filter so all styles will display.
You can read memos and artist bios (if available).
![]()
Audio demos are available.
![]() To hear them, press the [Demo] button. You can also double-click on the list or press the spacebar if you have disabled the Double-Click (or Spacebar) plays Chord Sheet (not pre-made demo) menu item in the [+] button. For RealTracks, RealDrums and MIDI SuperTracks, each demo has a “band” version with all instruments and a “solo” version with just one instrument. The demos play the band version first if the Demo button Plays “Band” (not “Solo”) menu item in the [+] button is enabled. If this is disabled, then the solo version will be played first. You can also press the [Band] button for the band version or the [Solo] button for the solo version. The [+] button shows a menu with options to adjust the volume of the audio demos, loop playback of audio demos, load song/style demos of the selected item on the list, etc.
To hear them, press the [Demo] button. You can also double-click on the list or press the spacebar if you have disabled the Double-Click (or Spacebar) plays Chord Sheet (not pre-made demo) menu item in the [+] button. For RealTracks, RealDrums and MIDI SuperTracks, each demo has a “band” version with all instruments and a “solo” version with just one instrument. The demos play the band version first if the Demo button Plays “Band” (not “Solo”) menu item in the [+] button is enabled. If this is disabled, then the solo version will be played first. You can also press the [Band] button for the band version or the [Solo] button for the solo version. The [+] button shows a menu with options to adjust the volume of the audio demos, loop playback of audio demos, load song/style demos of the selected item on the list, etc.
![]()
The [Apply] button applies the selected item on the list to the current track. This won’t generate a track but if you press the [Generate] button, a whole track will be generated and the song will play from the current position. shift+clicking on this button generates a whole track and plays the song from the start.
The green arrow button plays the song from the current position. shift+clicking on it plays the song from the start. The black square button stops the song or the audio demo.
To generate just a portion of the track, press the [Part.Gen] button to open a small panel. Then, specify the range based on either the full bar boundaries or precise regions in bars/beat/ticks, and press the [Re-Gen this Range] button.
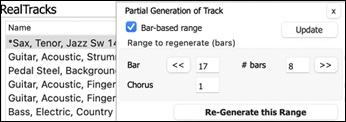
For some types of tracks, there is a [Settings] button that opens a small panel for additional settings.
RealTracks Settings and MIDI SuperTracks Settings Panels
The Timebase option is to play the selected RealTracks/MIDI SuperTracks at normal, half time, double time or triple time.
The [Medley] button allows you to create a medley of RealTracks on the same track.
If Bluesy is checked, the selected RealTracks/MIDI SuperTracks will play in a bluesy style, where major triads are treated like 7th chords.
If Simpler is checked, the selected RealTracks/MIDI SuperTracks will play a simpler arrangement (less busy, less embellished). See the “Simple Available” column for availability of simpler RealTracks/MIDI SuperTracks.
If Direct Input is checked, the selected RealTracks/MIDI SuperTracks will use a “clean signal” guitar so that you can add your own effects. See the “Direct Input Available” column for availability of clean recordings.
If you check the Held option, the selected RealTracks/MIDI SuperTracks will play held chords.
Select Disable RealTracks for this track (Force this track to MIDI) if you don’t want RealTracks for this track, even if the current style specifies a RealTrack.
RealDrums Settings Panel
Check For this song only, force MIDI drums if you don’t want the RealDrums set in the current style.
If Simple Drums for this song (no fills) is checked, RealDrums will play a simpler arrangement without fills.
You can select a Timebase (normal, half-time, double-time, or triple-time) for any RealDrums.
Check Show RealDrums that are N/A if you want to see RealDrums that are not installed in the Drums folder.
Show if Feel does not match will show a song where the drums are in even feel and the style is swing (or vice versa).
Check Show if Tempo is out of range to see RealDrums that wouldn’t work well at the current song tempo.
Uncheck the Show RealDrums that are not Favorites (*) to see only RealDrums that you have assigned as favorites.
If Show RealDrums with stems is checked, only RealDrums that include stems will be listed.
Melodist Settings Panel
In this panel, you can select the elements (melody, chords, song title, etc.) that the Melodist will generate. If the Chords checkbox is enabled, the Melodist will generate chords, but if you want to keep the current chord progression already entered on the Chord Sheet, then uncheck this option. By default, the Melodist will use the associated style, but if you don’t want the current style changed, then uncheck the Style Change option. You can also use the preset buttons to quickly select the elements; for example, the [Chords Only] button checks the “Chord” option and unchecks all other elements. The [Chords (from Existing Melody)] generates chords based on the existing melody using the Reharmonist feature. The [More Melodist] button opens the Melodist dialog to select additional settings and option.
MIDI Soloists Settings Menu
The Allow Style Changes with MIDI Soloists menu item lets you enable or disable style changes.
Select More MIDI Soloist Settings to open the Select Soloist dialog for more settings.
Defaults Panel
The [Defaults] button opens a panel where you can reset to defaults separately for the column width and the window size.
Style Options
For styles, there is an [Options] button that shows you a menu with various useful functions. These include loading song demos, setting the selected or loaded style as a remembered style so that you can easily revert to it, assigning the selected style as a favorite, opening the StylePicker Options dialog, etc. These functions are also accessible if you right-click on the style list.
Generating RealTracks
RealTracks are recordings of top studio musicians and recording artists. RealTracks are not "samples" but full recordings, lasting several bars at a time, and can generate tracks that will play along in perfect sync with the other Band-in-a-Box tracks. Best of all, they follow the chord progression that you have entered, so that you hear an authentic audio accompaniment to your song!
The RealTracks Picker allows you to assign specific RealTracks in your song. It displays all RealTracks from the Applications/Band-in-a-Box/RealTracks folder, providing information such as type (Rhythm/Background/Soloist), genre, feel, tempo, artist, and more. It also includes useful features for selecting RealTracks, such as filters, search options, demos, memos, and more.
![]()
![]() To open the RealTracks Picker, press the down arrow beside the [Library] button on the side toolbar and select RealTracks from the drop-down menu. You can also use the [RealTracks] button on the top toolbar, or the hotkeys R T retur or R T 1 retur.
To open the RealTracks Picker, press the down arrow beside the [Library] button on the side toolbar and select RealTracks from the drop-down menu. You can also use the [RealTracks] button on the top toolbar, or the hotkeys R T retur or R T 1 retur.
[Note: The RealTracks Picker opens in the MultiPicker Library window if Use MultiPicker instead of dialogs is enabled in the Edit menu or the track label's context menu. If this setting is disabled, the RealTracks Picker opens as a standalone dialog. The standalone dialog offers the same basic functionalities as the floating window, but it features a slightly different GUI and lacks options to generate a portion of the track, access track settings (such as solo, mute, freeze, volume, reverb, etc.), or change the font size.]
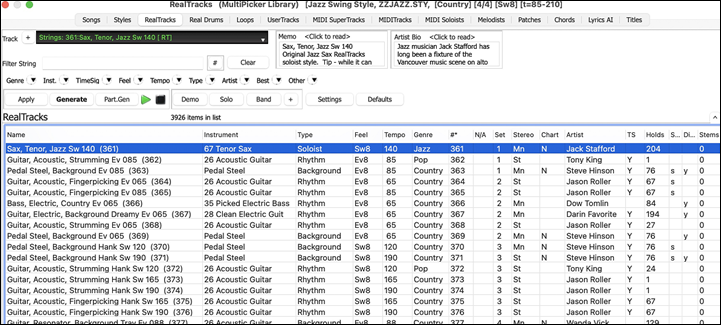
The track selector at the top left lets you confirm or change the current track. Your selection from the RealTracks list will be applied to this track.
The [+] button beside the track selector opens a panel for soloing, muting, freezing, adjusting volume/reverb/pan/tone, changing the track label, writing a description, and more.
The list can be sorted by clicking on the list column headings.
Right-clicking on the list opens a menu with commonly used functions, such as toggling a favorite, displaying only favorites, clearing the filter, finding similar RealTracks, opening the StylePicker to show only styles that use the selected RealTracks, and more.
You can use the filter functions to search for RealTracks. Type a text (e.g., "bass") to filter the list, showing only RealTracks that contain the typed text in the title, memo, genre, etc. When separated by spaces, each term is searched individually. For example, a search for "Country Guitar Ev 120" will find Country Guitar styles with an even feel and a tempo near 120. Adding a search term with a number will filter for RealTracks that match the tempo or fall within a compatible range. You can also use the arrow buttons to quickly filter the list by genre, instrument, time signature, feel, and more.
Audio demos are available. To hear them, select a RealTrack and press the [Demo] button. Double-clicking on a RealTrack in the list or pressing the spacebar also plays the audio demos if you have enabled the Double-Click (or Spacebar) plays Chord Sheet (not pre-made demo) option in the [+] button menu. Each demo has a "band" version with all instruments and a "solo" version with just one instrument. The demos play the band version first if the Demo button Plays "Band" (not "Solo") option in the [+] button menu is enabled. If this is disabled, then the solo version will be played first. You can also press the [Band] button for the band version or the [Solo] button for the solo version. The [+] button provides additional options to adjust the volume of the audio demos, loop playback, load song/style demos for the selected RealTracks, and more.
The [Apply] button applies the selected RealTrack to the current track. This won’t generate a track but if you press the [Generate] button, the entire track will be generated and the song will play from the current position. shift+clicking on this button generates the entire track and plays the song from the beginning. The green arrow button plays the song from the current position, and shift+clicking on it plays the song from the beginning. The black square button stops the song or the audio demo. To generate just a portion of the track, press the [Part.Gen] button to open a small panel. Then, specify the range based on either the full bar boundaries or precise regions in bars/beat/ticks, and press the [Re-Gen this Range] button.
Generating RealDrums
RealDrums are recordings of top studio drummers, playing multi-bar patterns. MIDI drums are patterns based on single drum hits, being programmed, typically on a quantized grid, of what people assume drummers are typically playing. We record drummers at multiple tempos, so the playing you hear at various tempos is also musically different, not just “sped up.” Drummers play different types of fills etc. at slower/faster tempos, and these are captured with RealDrums.
The RealDrums Picker allows you to assign specific RealDrums in your song. It displays all RealDrums from the Band-in-a-Box/Drums folder, providing information such as genre, time signature, feel, tempo, artist, and more. It also includes useful features for selecting RealDrums, such as filters, search options, demos, memos, and more.
![]()
![]() To open the RealDrums Picker, press the down arrow beside the [Library] button on the side toolbar and select RealDrums from the drop-down menu. You can also use the [RealDrums] button on the top toolbar, or the hotkeyscontrol+U, R D return or R D 1 return.
To open the RealDrums Picker, press the down arrow beside the [Library] button on the side toolbar and select RealDrums from the drop-down menu. You can also use the [RealDrums] button on the top toolbar, or the hotkeyscontrol+U, R D return or R D 1 return.
[Note: The RealDrums Picker opens in the MultiPicker Library window if Use MultiPicker instead of dialogs Is enabled in the Edit menu or the track label's context menu. If this setting is disabled, the RealTracks Picker opens as a standalone dialog. The standalone dialog offers the same basic functionalities as the floating window, but it features a slightly different GUI and lacks options to generate a portion of the track, or access track settings (such as solo, mute, freeze, volume, reverb, etc.).]
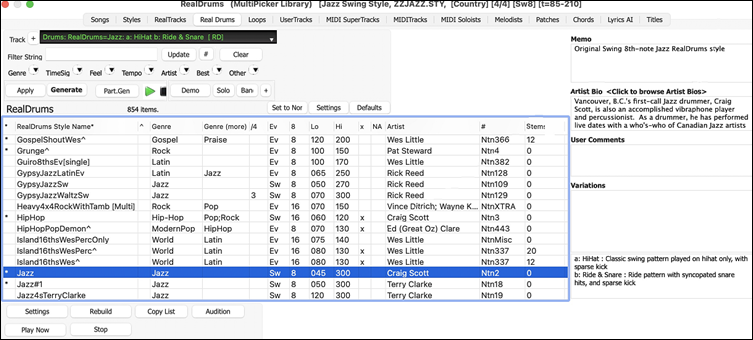
The track selector at the top left lets you confirm or change the current track. Your selection from the RealDrums list will be applied to this track. RealDrums can be generated on any of the 24 tracks, not just the Drums track, allowing you to use multiple RealDrums tracks in a single song.
The [+] button beside the track selector opens a panel for soloing, muting, freezing, adjusting volume/reverb/pan/tone, changing the track label, writing a description, and more.
The list can be sorted by any of the column headings.
Right-clicking on the list opens a menu with commonly used functions. For example, you can toggle a favorite, list only favorites, clear filter, find similar RealDrums, and show RealDrums compatible with the current style. Choosing Select/Edit Favorites and Recent from the context menu opens a dialog that shows favorites followed by recently used RealDrums.
You can use the filter features to search for RealDrums. Type a text (e.g., bossa) in the Filter String field, and press [Update]. You will the see only RealDrums that contain the typed text in the title, memo, genre, etc. If you separate terms with a space, each term is searched for separately. So, a search for “Bossa Rock Ev 120,” will find any Bossa Rock styles with an Even feel that would work with a tempo of close to 120. Adding a search term that has a number will filter for RealDrums that match the tempo or within a compatible range. You can also use the arrow buttons to quickly filter the list by genre, instrument, time signature, feel, and more.
Audio demos are available. To hear them, select a RealDrum and press the [Demo] button. Double-clicking on a RealDrum in the list or pressing the spacebar also plays the audio demos if you have enabled the Double-Click (or Spacebar) plays Chord Sheet (not pre-made demo) option in the [+] button menu. Each demo has a “band” version with all instruments and a “solo” version with just drums. The demos play the band version first if the Demo button Plays “Band” (not “Solo”) option in the [+] button menu is enabled. If this is disabled, then the solo version will be played first. You can also press the [Band] button for the band version or the [Solo] button for the solo version. The [+] button provides additional options to adjust the volume of the audio demos, loop playback of audio demos, load song/style demos of the selected RealDrums, and more.
The [Apply] button applies the selected RealDrums to the current track. This won’t generate a track but if you press the [Generate] button, the entire track will be generated and the song will play from the current position. shift+clicking on this button generates the entire track and plays the song from the beginning. The green arrow button plays the song from the current position, and shift+clicking on it plays the song from the beginning. The black square button stops the song or the audio demo. To generate just a portion of the track, press the [Part.Gen] button to open a small panel. You then specify the range based on either the full bar boundaries or precise regions in bars/beat/ticks and then press the [Re-Gen this Range] button.
Generating Loops
You can add your own or third party loops to any track. Loops are audio files (WAV/AIFF/CAF/MP3/MP4/WMA) that reside in Loops folder (/Applications/Band-in-a-Box/RealTracks/Loops). You can add your own files to this folder.
A file with metadata is supported. This happens automatically, and more fields (tempo, # of beats, and root note) are recognized from certain audio files (Acidized WAV or AIFF with Apple® Loop).
Loops Picker (MultiPicker Library)
![]() To open the Loops Picker in the MultiPicker Library, click on the down arrow beside the [Library] button on the side toolbar and select Loops from the drop-down menu.
To open the Loops Picker in the MultiPicker Library, click on the down arrow beside the [Library] button on the side toolbar and select Loops from the drop-down menu.

The track selector at the top left lets you confirm or change the current track. Your selection from the Loops list will be applied to this track.
The list can be sorted by clicking on the list column headings.
[Note: Some columns, such as TS (Time Swapping), Holds, Direct Input Available, Stems., are not applicable to Loops and therefore do not display any information..]
Right-clicking on the list opens a menu with commonly used functions. For example, you can toggle a favorite, list only favorites, clear filter, find similar RealDrums, and show RealDrums compatible with the current style. Choosing Select/Edit Favorites and Recent from the menu opens a dialog that shows favorites followed by recently used RealDrums.
You can use the filter features to search for RealDrums. Type a text (e.g., bossa) in the Filter String field, and press [Update]. You will the see only RealDrums that contain the typed text in the title, memo, genre, etc. If you separate terms with a space, each term is searched for separately. So, a search for “Bossa Rock Ev 120,” will find any Bossa Rock styles with an Even feel that would work with a tempo of close to 120. Adding a search term that has a number will filter for RealDrums that match the tempo or within a compatible range. You can also use the arrow buttons to quickly filter the list by genre, instrument, time signature, feel, and more.
Audio demos are available. To hear them, select a RealDrum and press the [Demo] button. Double-clicking on a RealDrum in the list or pressing the spacebar also plays the audio demos if you have enabled the Double-Click (or Spacebar) plays Chord Sheet (not pre-made demo) option in the [+] button menu. Each demo has a “band” version with all instruments and a “solo” version with just drums. The demos play the band version first if the Demo button Plays “Band” (not “Solo”) option in the [+] button menu is enabled. If this is disabled, then the solo version will be played first. You can also press the [Band] button for the band version or the [Solo] button for the solo version. The [+] button provides additional options to adjust the volume of the audio demos, loop playback of audio demos, load song/style demos of the selected RealDrums, and more.
The [Apply] button applies the selected RealDrums to the current track. This won’t generate a track but if you press the [Generate] button, the entire track will be generated and the song will play from the current position. shift+clicking on this button generates the entire track and plays the song from the beginning. The green arrow button plays the song from the current position, and shift+clicking on it plays the song from the beginning. The black square button stops the song or the audio demo. To generate just a portion of the track, press the [Part.Gen] button to open a small panel. You then specify the range based on either the full bar boundaries or precise regions in bars/beat/ticks and then press the [Re-Gen this Range] button.
Loops Picker (standalone dialog)
![]() The Loops Picker diaog is opened by pressing the [Loops] button on the top toolbar or using the hotkey R L return.
The Loops Picker diaog is opened by pressing the [Loops] button on the top toolbar or using the hotkey R L return.
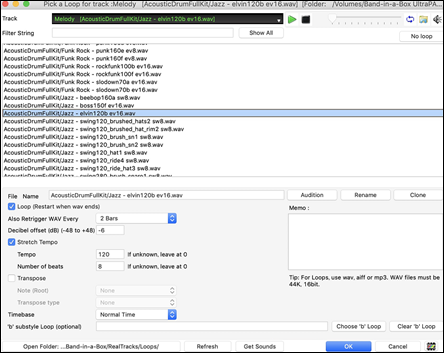
The track selector at the top lets you confirm or change the current track. Your selection from the Loops list will be applied to this track
Double-click on the list or use a transport control button to preview the loop. The instant preview sometimes plays demos from the internet. You can save any file that is being played from the internet by clicking the folder icon.
You can control the volume of the demos with the speaker icon in the transport control.
Normally, the loop will retrigger when it ends, but it can be retriggered at certain points using the Also retrigger WAV every option.
For a nature sound, there is no tempo, so you don't want to select Stretch Tempo. For a Drums or Guitar loop, you want to stretch the tempo. Once you select "Stretch Tempo," enter the tempo of the .m4a file (if known), and if not known, enter the # of beats in the .m4a file (e.g. 2 bars would be 8 beats). For WAV files with Acidized information or AIFF files with Apple® Loop, tempo, # of beats, and root note fields will be automatically entered.
For a nature sound, you don't want any transposition. For a melodic sound, you might want to transpose to the root of the chord in the Band-in-a-Box song. If so, enter the root of the WAV file, and set the Transpose type to "chord root."
The Timebase option allows you to select a timebase (normal, half-time, double-time, or triple-time) for any Loop.
If you want a different sound for the "b" substyle, enter that WAV file name in the 'b' substyle loop setting.
The [Open Folder] button opens your Loops folder and allows you to add audio files (loops) to it. If you add files, you need to press the [Refresh] button, or exit the dialog and re-enter it to refresh the list.
There are many good sources for loops and sounds on the Internet. One is freesound.org, which has many sound effects. The [Get Sounds] button launches your internet browser to search for free loops.
Pressing the [No Loop] button is a quick way to clear a loop on a track, as opposed to scrolling up to "No Loop chosen for this Track."
The [Rename] button allows you to rename a loop.
The [Clone] button will duplicate a loop, allowing you to use it with different parameters.
Generating UserTracks
UserTracks allow anyone to create their own audio styles for use in Band-in-a-Box. With a UserTracks style, you can type in any chords into Band-in-a-Box, and the UserTracks style you made will play that chord progression! For example, if you’ve made a UserTracks style by recording yourself playing a guitar groove, you can then type any chords into Band-in-a-Box, and the result will be that it will play your guitar groove over these completely new, original chord changes! You can even change the tempo, or enter songs in ANY key, and it will still be able to play it!
[Note: UserTracks support "Avoid transpositions in RealTracks" and "Ignore Slash Root of Slash Chords, except Bass Track" options in the Song Settings dialog.]
[Note: UserTracks work with rests. Just add rests to chords, and UserTracks will follow them. Note that there is no specific support for shots or hold by UserTracks. They will just rest when these are encountered.]
You can use the UserTracks in a similar manner to using RealTracks.
![]() Click on the down arrow beside the [Library] button on the side toolbar and select UserTracks from the drop-down menu to open the UserTracks Picker.
Click on the down arrow beside the [Library] button on the side toolbar and select UserTracks from the drop-down menu to open the UserTracks Picker.
[Note: The UserTracks Picker opens in the MultiPicker Library window if Use MultiPicker instead of dialogs is enabled in the Edit menu or the track label’s context menu. If this setting is disabled, the UserTracks Picker opens as a standalone dialog. The standalone dialog offers the same basic functionalities as the floating window, but it features a different GUI and lacks options to generate a portion of the track, access track settings (such as solo, mute, freeze, volume, reverb, etc.) or change the font size of the list.]
UserTracks Picker (MultiPicker Library)
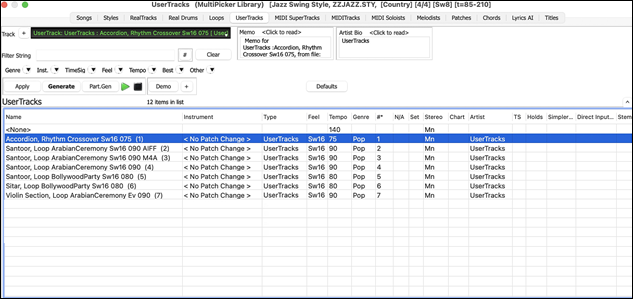
The track selector at the top left lets you confirm or change the current track. Your selection from the UserTracks list will be applied to this track.
Clicking on the [+] button beside the track selector will display a small panel, where you can solo, mute, freeze, set volume/reverb/panning/tone, change the track label, write the track description, and do more for the current track.
The list can be sorted by clicking on the list column headings.
[Note: Some columns, such as TS (Time Swapping), Holds, Direct Input Available, Stems, etc., are not applicable to UserTracks and therefore do not display any information.
Right-clicking on the list opens a menu with commonly used functions, such as toggling a favorite, displaying only favorites, clearing the filter, and more.
You can use the filter functions to search for UserTracks. Type a text (e.g., “bossa”) in the Filter String field, and the list will be filtered to show only the UserTracks that contain that text somewhere in the name, genre, memo, etc. You can also use the arrow buttons to quickly filter the list by genre, instrument, time signature, feel, and more.
Audio demos are available. To hear them, select a UserTrack and press the [Demo] button. Double-clicking on a UserTrack in the list or pressing the spacebar also plays the audio demos if you have enabled the Double-Click (or Spacebar) plays Chord Sheet (not pre-made demo) option in the [+] button menu. This button also provides additional options to adjust the volume of the audio demos, loop playback, and more.
The [Apply] button applies the selected UserTrack to the current track. This won’t generate a track but if you press the [Generate] button, the entire track will be generated and the song will play from the current position. shift+clicking on this button generates the entire track and plays the song from the beginning. The green arrow button plays the song from the current position, and shift+clicking on it plays the song from the beginning. The black square button stops the song or the audio demo. To generate just a portion of the track, press the [Part.Gen] button to open a small panel. You then specify the range based on either the full bar boundaries or precise regions in bars/beat/ticks and then press the [Re-Gen this Range] button.
UserTracks Picker (standalone dialog)
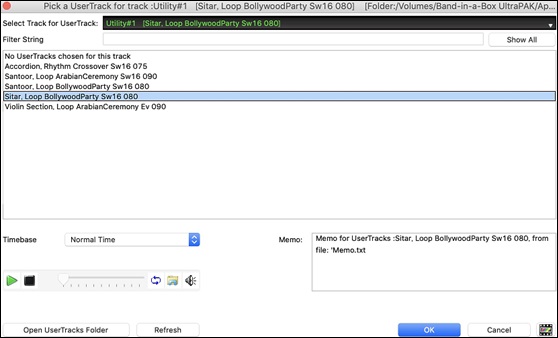
The track selector at the top lets you confirm or change the current track. Your selection from the Loops list will be applied to this track.
You can preview UserTracks by double-clicking on the list or using the transport control buttons.
The Timebase option allows you to adjust the tempo of the selected UserTrack to normal, half-time, double-time, or triple-time.
[Tip: UserTracks can be made and preset to a timebase by the user. For example, if you have a UserTrack in Ev 8 called “Santur,” you can clone the folder and rename the cloned one as “Santur [Double-Time].” Then it will play in Double-Time Ev 16 half of the tempo.
Select a UserTrack and press [OK]. Now the track behaves like RealTracks. Simply press the [Generate and Play] button to hear it.
Generating MIDI SuperTracks
MIDI SuperTracks are MIDI tracks that can be added to a track or a style and play like other MIDI tracks in a style. They are called “SuperTracks” because they are generated using a different engine than typical MIDI style tracks. Typical MIDI style tracks are generated from C7 patterns in the style and repeat these patterns over any chord. MIDI SuperTracks use actual MIDI playing from musicians (similar to RealTracks in that regard), so are not based on patterns.
To use MIDI SuperTracks, either:
1.
Choose a style or song that has MIDI SuperTracks, and press [Play]. (Look in the MIDI SuperTracks Demos folder for these songs.)
2.
Add a MIDI SuperTrack to a certain track.
![]() Click on the down arrow beside the [Library] button on the side toolbar and select MIDI SuperTracksfrom the drop-down menu to open the MIDI SuperTracks Picker. You can also use the [MIDI Tracks] button on the top toolbar.
Click on the down arrow beside the [Library] button on the side toolbar and select MIDI SuperTracksfrom the drop-down menu to open the MIDI SuperTracks Picker. You can also use the [MIDI Tracks] button on the top toolbar.
[Note: The MIDI SuperTracks Picker opens in the MultiPicker Library window if Use MultiPicker instead of dialogs is enabled in the Edit menu or the track label’s context menu. If this setting is disabled, the MIDI SuperTracks Picker opens as a standalone dialog. The standalone dialog offers the same basic functionalities as the floating window, but it features a different GUI and lacks options to switch the track, generate a portion of the track, access track settings (such as solo, mute, freeze, volume, reverb, etc.) or change the font size of the list.]T
MIDI SuperTracks Picker (MultiPicker Library)
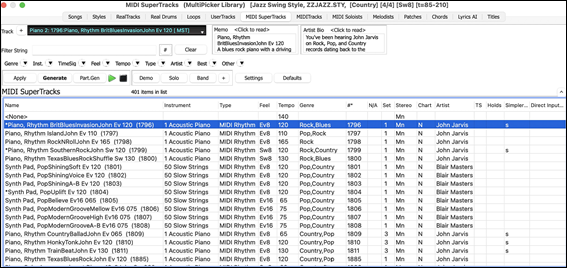
The track selector at the top left lets you confirm or change the current track. Your selection from the MIDI SuperTracks list will be applied to this track.
The [+] button beside the track selector opens a panel for soloing, muting, freezing, adjusting volume/reverb/pan/tone, changing the track label, writing a description, and more.
The list can be sorted by clicking on the list column headings.
Right-clicking on the list opens a menu with commonly used functions, such as toggling a favorite, displaying only favorites, clearing the filter, and more.
You can use the filter functions to search for MIDI SuperTracks. Type a text (e.g., “bossa”) in the Filter String field, and the list will be filtered to show only the MIDI SuperTracks that contain that text somewhere in the name, genre, memo, etc. You can also use the arrow buttons to quickly filter the list by genre, instrument, time signature, feel, and more.
Audio demos are available. To hear them, select a MIDI SuperTrack and press the [Demo] button. Double-clicking on a MIDI SuperTrack in the list or pressing the spacebar also plays the audio demos if you have enabled the Double-Click (or Spacebar) plays Chord Sheet (not pre-made demo) option in the [+] button menu. Each demo has a “band” version with all instruments and a “solo” version with just one instrument. The demos play the band version first if the Demo button Plays “Band” (not “Solo”) option in the [+] button menu is enabled. If this is disabled, then the solo version will be played first. You can also press the [Band] button for the band version or the [Solo] button for the solo version. The [+] button provides additional options to adjust the volume of the audio demos, loop playback, load song/style demos for the selected MIDI SuperTracks, and more.
The [Apply] button applies the selected MIDI SuperTrack to the current track. This won’t generate a track but if you press the [Generate] button, the entire track will be generated and the song will play from the current position. shift+clicking on this button generates the entire and plays the song from the beginning. The green arrow button plays the song from the current position, and shift+clicking on it plays the song from the beginning. The black square button stops the song or the audio demo.To generate just portion of the track, press the [Part.Gen] button to open a small panel. You then specify the range based on either the full bar boundaries or precise regions in bars/beat/ticks and then press the [Re-Gen this Range] button.
MIDI SuperTracks Picker (modal dialog)
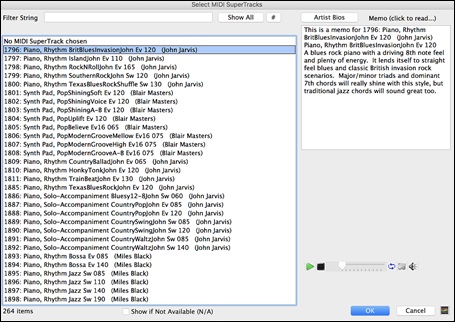
Type a text or press the filter button [#] to narrow down your search.
There are memos describing the individual MIDI SuperTracks, and you can click on the memo for a big window.
You can audition MIDI SuperTracks by double clicking on the list or using the transport control in the dialog.
Choose a MIDI SuperTrack from the list and click [OK].
When you play the song, you will hear a much more sophisticated MIDI arrangement than a typical MIDI style, since it is not based on C7 chord patterns; instead, it is based on hours of actual MIDI playing from a top studio musician.
Generating Custom MIDI Tracks
You can add MIDI Tracks individually from a MIDI style to any track of your song.
![]() Click on the down arrow beside the [Library] button on the side toolbar and select MIDITracks (from .STY) from the drop-down menu to open the MIDI SuperTracks Picker. You can also use the [MIDI Tracks] button on the top toolbar.
Click on the down arrow beside the [Library] button on the side toolbar and select MIDITracks (from .STY) from the drop-down menu to open the MIDI SuperTracks Picker. You can also use the [MIDI Tracks] button on the top toolbar.
[Note: The MIDI Track Picker opens in the MultiPicker Library window if Use MultiPicker instead of dialogs is enabled in the Edit menu or the track label’s context menu. If this setting is disabled, the MIDI SuperTracks Picker opens as a standalone dialog.]
MIDI Track Picker (MultiPicker Library)
This window allows you to choose from a list of over 800 custom MIDI tracks.
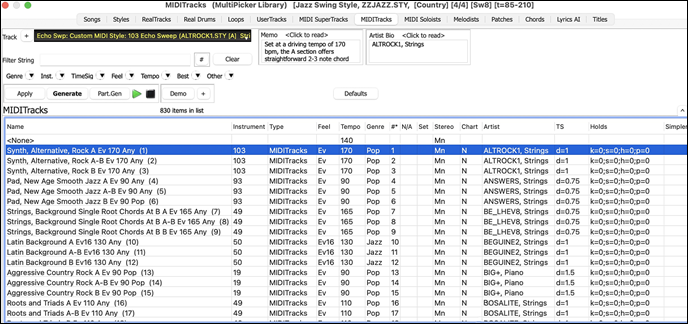
The track selector at the top left lets you confirm or change the current track. Your selection from the MIDI Tracks list will be applied to this track.
The [+] button beside the track selector opens a panel for soloing, muting, freezing, adjusting volume/reverb/pan/tone, changing the track label, writing a description, and more.
The list can be sorted by clicking on the list column headings.
[Note: The Artist column shows the source style and track. The TS column indicates a note density. For example, d=1 means there is one note in each bar and d=8 means there are eight notes in each bar. Some columns, such as, Holds, Direct Input Available, Stems, etc., are not applicable to Custom MIDI Tracks and therefore do not display any information.
You can use the filter functions to search for MIDI Tracks. Type a text (e.g., "bossa") in the Filter String field, and the list will be filtered to show only the MIDI Tracks that contain that text somewhere in the name, genre, memo, etc. You can also use the arrow buttons to quickly filter the list by genre, instrument, time signature, feel, and more.
Audio demos are available. To hear them, select a MIDI Track and press the [Demo] button. Double-clicking on a MIDI Track in the list or pressing the spacebar also plays the audio demos if you have enabled the Double-Click (or Spacebar) plays Chord Sheet (not pre-made demo) option in the [+] button menu. This button also provides additional options to adjust the volume of the audio demos, loop playback, and more.
The [Apply] button applies the selected MIDI Track to the current track. This won’t generate a track but if you press the [Generate] button, the entire track will be generated and the song will play from the current position. shift+clicking on this button generates the entire track and plays the song from the beginning. The green arrow button plays the song from the current position, and shift+clicking on it plays the song from the beginning. The black square button stops the song or the audio demo. To generate just a portion of the track, press the [Part.Gen] button to open a small panel. You then specify the range based on either the full bar boundaries or precise regions in bars/beat/ticks and then press the [Re-Gen this Range] button.
MIDI Track Picker (standalone dialog)
This dialog allows you to select MIDI tracks from any MIDI style.
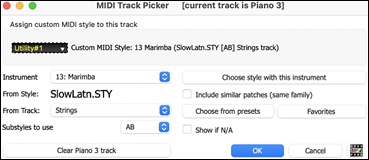
You can select MIDI parts a few different ways:
- [Choose Style with this instrument] This launches the StylePicker, filtered to only display styles that contain the instrument specified. For example, if you select “49 Strings,” it will then only show MIDI styles with strings.
- [Choose from Presets] This launches a dialog with preset “popular” choices for MIDITracks to add. You can type a filter like “49” to only see entries for “49 Strings,” or type “Strings.” This dialog shows you if the instrument is available in “a” or “b” substyle or both (“ab”).
- The [Favorites] button will remember your last few hundred choices, so you can re-use them.
The Substyles to use option lets you select a substyle from the selected style.
Once chosen, the MIDI track will play on the track chosen. Note that you can use the Strings part from a style and play it on any Band-in-a-Box track including Bass, Piano, Guitar, and even the Melody or Soloist track.
When you assign an instrument to a different track Band-in-a-Box will open a yellow message box to confirm your choice.
Press [OK] to continue or [Clear] to redo your choice.
Tutorial Demo Song – Adding MIDITrack
To check out a song that has had two individual MIDITracks added to it, open this folder: Band-in-a-Box/Tutorials/Tutorial - BB2012, and open the file <=HANKMID Demo (MIDI Presets used over a country swing style).SGU. Press the [Memo]button on the top toolbar to read about the feature and the demo song
Generating Soloist Track
That’s right! Band-in-a-Box can “solo like a pro” in hundreds of styles. You can either use the dedicated Soloist track or assign a soloist RealTrack to any track.
MIDI Soloist Picker (MultiPicker Library)
The MIDI Soloist Picker displays a list of Soloists with information such as instrument, genre, feel, tempo, and more. It also includes useful features for selecting Soloists, such as filters, search options, demos, memos, etc., and allows you to generate the entire track or just a portion of it.
![]() To use this feature, click on the down arrow beside the [Library] button on the side toolbar and select MIDI Soloists from the drop-down menu.
To use this feature, click on the down arrow beside the [Library] button on the side toolbar and select MIDI Soloists from the drop-down menu.
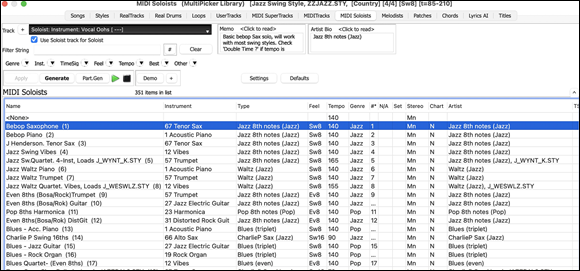
The track selector at the top left lets you confirm or change the current track. Your selection from the Soloist list will be applied to this track.
[Note: When selecting a track other than the Soloist track, uncheck the "Use Soloist track for Soloist" option below the track selector so that the Soloist will be generated on the selected track, not the Soloist track.]
The [+] button beside the track selector opens a panel for soloing, muting, freezing, adjusting volume/reverb/pan/tone, changing the track label, writing a description, and more.
The list can be sorted by clicking on the list column headings.
[Note: The Artist column shows the type of playing (e.g., Jazz 8th) and the style the Soloist will use Some columns, such as Holds, Direct Input Available, Stems, etc., are not applicable to the Soloists and therefore do not display any information.]
Right-clicking on the list opens a menu with commonly used functions, such as toggling a favorite, displaying only favorites, clearing the filter, and more.
You can use the filter functions to search for Soloists.
Type a text (e.g., “bossa”) in the Filter String field, and the list will be filtered to show only the Soloists that contain that text somewhere in the name, genre, memo, etc. You can also use the arrow buttons to quickly filter the list by genre, instrument, time signature, feel, and more.
Audio demos are available. To hear them, select a Soloist and press the [Demo] button. Double-clicking on a Soloist in the list or pressing the spacebar also plays the audio demos if you have enabled the Double-Click (or Spacebar) plays Chord Sheet (not pre-made demo) option in the [+] button menu. This button also provides additional options to adjust the volume of the audio demos, loop playback, and more.
Some Soloists use a specific style to generate a track. To prevent the current style in your song from being changed, click the [Settings] button and uncheck the Allow Style Changes with MIDI Soloists option.
You can press the [Generate] button to generate the entire track and play the song. The green arrow button plays the song from the current position, and shift+clicking on it plays the song from the beginning. The black square button stops the song or the audio demo. To generate just a portion of the track, press the [Part.Gen] button to open a small panel. You then specify the range based on either the full bar boundaries or precise regions in bars/beat/ticks and then press the [Re-Gen this Range] button. (Note: The [Apply] button is not relevant for Soloists.)
MIDI/RealTracks Soloist Picker (Select Soloist dialog)
Use the Select Soloist dialog to generate a MIDI or RealTracks Soloist track.
![]() To open it, use the [Soloist] button on the top toolbar, the hotkey shift+F4, or the menu item Soloist | Generate and Play a Solo. You can also control+click on the [Soloist] button on the top toolbar.
To open it, use the [Soloist] button on the top toolbar, the hotkey shift+F4, or the menu item Soloist | Generate and Play a Solo. You can also control+click on the [Soloist] button on the top toolbar.
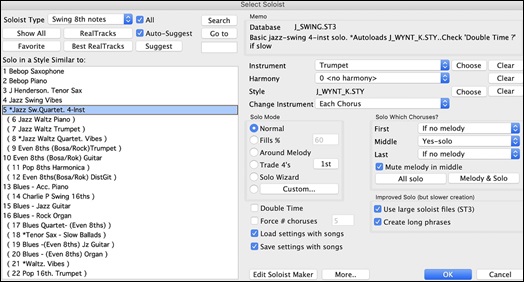
Generating Melodist Track
Feel like composing a brand-new song? With Band-in-a-Box, you can compose a new song in the style of your choice, complete with an intro, chords, melody, arrangement, and improvisations— all created by the program.
Melodist Picker (MultiPicker Library)
The Melodist Picker displays a list of Melodists with information such as instrument, genre, feel, tempo, and more. It also includes useful features for selecting Melodists, including filters, search options, demos, memos, etc., and allows you to generate the entire track or just a portion of it.
![]() To use this feature, click on the down arrow beside the [Library] button on the side toolbar and select Melodists from the drop-down menu.
To use this feature, click on the down arrow beside the [Library] button on the side toolbar and select Melodists from the drop-down menu.
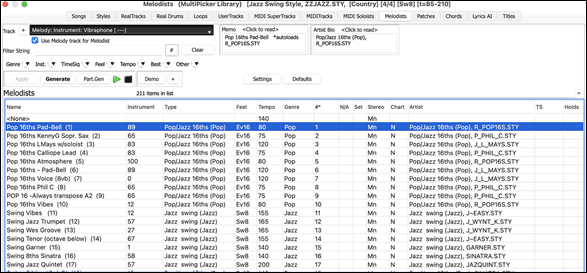
The track selector at the top left lets you confirm or change the current track. Your selection from the Melodist list will be applied to this track.
[Note: When selecting a track other than the Melody track, uncheck the "Use Melody track for Melodist" option below the track selector so that the Melodist will be generated on the selected track, not the Melody track.]
The [+] button beside the track selector opens a panel for soloing, muting, freezing, adjusting volume/reverb/pan/tone, changing the track label, writing a description, and more.
The list can be sorted by clicking on the list column headings.
[Note: The Artist column shows the type of playing (e.g., Pop/Jazz 16th) and the style the Melodist will use. Some columns, such as Holds, Direct Input Available, Stems, etc., are not applicable to the Melodists and therefore do not display any information.]
Right-clicking on the list opens a menu with commonly used functions, such as toggling a favorite, displaying only favorites, clearing the filter, and more.
You can use the filter functions to search for Melodists. Type a text (e.g., “bossa”) in the Filter String field, and the list will be filtered to show only the Melodists that contain that text somewhere in the name, genre, memo, etc. You can also use the arrow buttons to quickly filter the list by genre, instrument, time signature, feel, and more.
Audio demos are available. To hear them, select a Melodist and press the [Demo] button. Double-clicking on a Melodist in the list or pressing the spacebar also plays the audio demos if you have enabled the Double-Click (or Spacebar) plays Chord Sheet (not pre-made demo) option in the [+] button menu. This button also provides additional options to adjust the volume of the audio demos, loop playback, and more.
The [Settings] button opens a panel, allowing you to select the elements the Melodist will generate.
- If the Chords checkbox is enabled, the Melodist will generate chords, but to keep the current chord progression in your song, uncheck this option.
- By default, the Melodist will use the associated style, but if you don’t want the current style changed, uncheck the Style Change option.
- You can also use the preset buttons to quickly select the elements. For example, the [Chords Only] button checks the “Chord” option and unchecks all other elements.
- The [Chords (from Existing Melody)] generates chords based on the existing melody using the Reharmonist feature.
- The [More Melodist] button opens a dialog that allows you to generate songs and play them in a jukebox style, select the number of choruses, access the Melodist Editor, and more.
You can press the [Generate] button to generate the entire track and play the song. The green arrow button plays the song from the current position, and shift+clicking on it plays the song from the beginning. The black square button stops the song or the audio demo.To generate just a portion of the track, press the [Part.Gen] button to open a small panel. You then specify the range based on either the full bar boundaries or precise regions in bars/beat/ticks and then press the [Re-Gen this Range] button.
Melodist Picker (Select Melodist dialog)
There is another dialog that provides the Melodist feature. While it doesn’t include the audio demo option, it allows you to generate songs and play them in a jukebox style, select the number of choruses, access the Melodist Editor, and more.
![]() To open the Select Melodist dialog, click on the [Melodist] button on the top toolbar, use the hotkey shift+F5.
To open the Select Melodist dialog, click on the [Melodist] button on the top toolbar, use the hotkey shift+F5.
Pick one of the available Melodists, choose any desired settings, and press OK to let the Melodist work its magic!
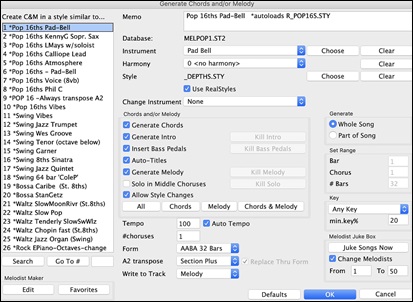
Track Settings and Actions
There is a convenient “one-stop-shopping” dialog where you can select RealTracks, Loops, MIDI SuperTracks, etc., set volume/ reverb/panning/tone, mute, solo, freeze, save as Performance Tracks, and do many other things for all 24 tracks.
You can open this dialog in several ways.
- Press control+F7 or T return keys.
- Use the Edit | Track Settings and Actions menu item.
- Right-click on the Chord Sheet and select Track Settings and Actions from the contextual menu.
- Right-click on the track radio button at the top of the screen and select Track Settings and Actions Dialog from the contextual menu.
In the list at the top of the dialog, you can see which instruments are currently selected for each track. It also shows the type of the track (RT/RD/MST), the mute or frozen status, and MIDI patches. Select a track in the list and select settings for that track at the bottom half of the dialog.
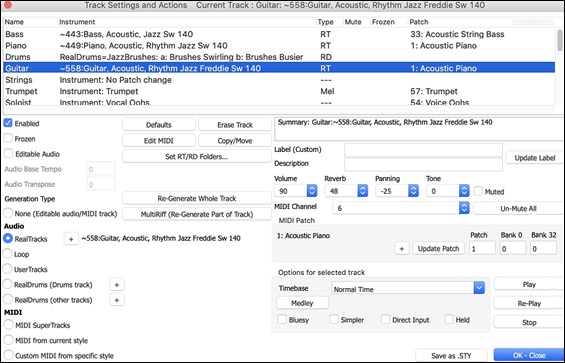
Enabled: If this is unchecked, the track will not be generated.
[Defaults]: This sets the track settings to defaults. Note that any settings from the underlying style will remain. To prevent style tracks from playing, disable the track.
[Erase Track]: This erases both audio and MIDI data from the track.
[Edit MIDI]: This has various MIDI editing commands like transpose, generate chord track, transpose octave to note range, etc.
[Copy/Move]: This allows you to copy or move the current track to another track.
[Set RT/RD Folders]: This lets you confirm or set the RealTracks and RealDrums folders to use. After changing them, visit the StylePicker and Press the [Rebuild] button to rebuild the style list.
Frozen: If this is checked, no new data will be auto-generated.
Editable Audio: This changes the track to an editable audio track, which will be saved as a WAV. This is usually done for vocals or other recordings.
Audio Base Tempo: If the track type is an editable audio track, this is the tempo that the audio was recorded or created at.
Audio Transpose: You can transpose the track if it’s an editable audio track.
[Re-Generate Whole Track]: For a RealTrack, this will re-generate the whole track.
[MultiRiff (Re-Generate Part of Track)]: This allows you to interactively create sections of RealTracks by choosing from multiple candidates (up to 20).
Generation Type - None: If this is set, no auto- generation will occur except for an underlying style. To prevent generation from an underlying style, disable the track.
Generation Type - RealTracks: Click on the radio button to open the RealTracks Picker, or click on the [+] button to select a RealTrack using other dialogs.
Generation Type - Loop: Click on this radio button to select a Loop.
Generation Type - UserTracks: Click on this radio button to select a UserTrack.
Generation Type - RealDrums (Drums Track): To select RealDrums on the Drums track, select this radio button to open the RealDrums Picker or the click on the [+] button to select RealDrums using other dialogs.
Generation Type - RealDrums (Other Tracks): This can be used for a second drum track or Drum Stems.
Generation Type - MIDI SuperTracks: Click on this radio button to select a MIDI SuperTrack. MIDI SuperTracks are high-quality MIDI tracks, based on performances by studio musicians.
Generation Type - MIDI from current style: This is a MIDI track from the current style.
Generation Type - Custom MIDI from specific style: You can select a MIDI track from another style.
Summary: You can copy this summary and paste it into a custom description.
Label: This allows you to customize the short track label.
Description: This allows you to customize the long track description.
[Update]: Press this button if you have entered a label and/or description.
Volume/Reverb/Panning/Tone: You can control mixer for the track.
[Un-Mute]: This will un-mute all tracks.
Muted: This will mute the track.
MIDI Channel: This allows you to re-route the MIDI events on the current track to another channel.
MIDI Patch: You can select a MIDI patch for the MIDI track by pressing the [+] button and using the menu. If you know the General MIDI patch number, Bank 0, and Bank 32, enter the numbers and press the [Update] button.
Timebase: With this option, you can hear an audio-type track (RealTracks, RealDrums, etc.) at normal, half time, double time, or triple time. If the style tempo is 80, a 160 tempo should be set to double time.
Medley: This allows a RealTracks medley (multiple consecutive or simultaneous RealTracks on the same track).
Bluesy: This option will play major triad like C as if they were C7, so the track sounds bluesy.
Simpler: This makes the arrangement use “simpler” playing, with less notes and embellishments.
Direct Input: This option is for electric guitar RealTracks that were recorded any effects so that you can add your own effects by amp simulators.
Held: If you check this, the track will make a simple arrangement, mostly playing held chords.
[Play]: This plays the song, using the current track settings and re-generating the tracks.
[Re-Play]: This replays the song without regenerating the tracks.
[Stop]: This stops playback.
[Save as .STY]: This allows you to create a new style with a new name. The style will contain the current auto-generated tracks in the song.
Adding a Melody – MIDI and/or Audio
Recording a MIDI Melody
You can record and edit your own melodies or solos with a MIDI keyboard (or other MIDI controllers) connected to Band-in-a-Box by your MIDI driver.
![]() Click on the [Record] button on the top toolbar or choose the menu option Melody | Edit Melody Track | Record Melody to open the Record MIDI dialogg.
Click on the [Record] button on the top toolbar or choose the menu option Melody | Edit Melody Track | Record Melody to open the Record MIDI dialogg.
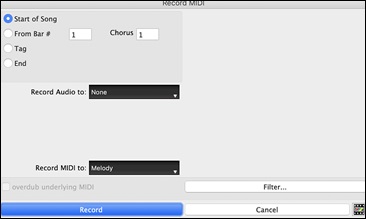
Pressing the [Record] button starts recording what you play on the Thru track. An audible count-in is played prior to recording.
Once you have completed recording your melody Band-in-a-Box will ask you if you would like to keep the take and if you would like to copy the recorded chorus to the whole song.
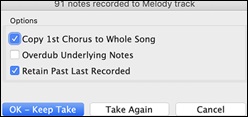
Embellishing MIDI Melody
When musicians see a Lead Sheet that has a melody written out, they almost never play it exactly as written. They change the timing to add syncopation, change durations to achieve staccato or legato playing, add grace notes, slurs, extra notes, vibrato, and other effects. You can have Band-in-a-Box do these automatically using the Embellisher.
![]() You can enable the Embellisher with the [Embellish] button on the top toolbar or with control+option+E. Any melody will be embellished as it is played so that you hear a livelier and more realistic melody - and it’s different every time.
You can enable the Embellisher with the [Embellish] button on the top toolbar or with control+option+E. Any melody will be embellished as it is played so that you hear a livelier and more realistic melody - and it’s different every time.
Embellisher dialog in the [Embellish] button menu or control+option+L opens the Melody Embellisher dialog with many user options to control the embellishment settings. The Embellisher presets allow you to choose a combination of common settings for the Embellisher quickly.
Harmonizing the MIDI Melody
The Select Melody Harmony dialog box allows you to choose from any of the pre-defined harmonies and even allows you to define your own.
![]() Press the [Harmony] button on the top toolbar and select MIDI - Melody Harmony, or use the hotkeycontrol+option+H. This opens the Select Melody Harmony dialog, where you can choose from any of the pre-defined harmonies.
Press the [Harmony] button on the top toolbar and select MIDI - Melody Harmony, or use the hotkeycontrol+option+H. This opens the Select Melody Harmony dialog, where you can choose from any of the pre-defined harmonies.
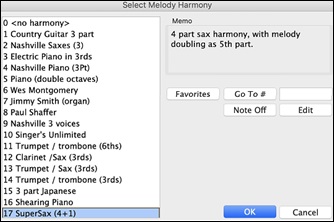
Select a harmony from the list and press [OK].
The [Favorites] button shows your favorite 50 Harmony styles (based on recent usage) and allows you to choose one to use on the Melody track. It also opens from the Harmony | Favorite Melody Harmonies menu item.
Enter the number of the harmony you want to go to and press [Go To #].
The [Note Off] button is to turn off any notes that are stuck on. (There shouldn’t be any.)
The [Edit] button opens the Harmony Editor, where you can customize Harmonists.
Recording Audio Melody
You can record your live vocal or instrumental performance and save it to an audio wave file along with the Band-in-a- Box accompaniment. Make sure that you have a microphone plugged in to your sound card, or a connection from a mixer, keyboard, or other audio device connected to the Line In jack on your sound card.
![]() Click on the [Record] button on the top toolbar or select the menu item Audio | Record Audio. This opens the Record Audio dialog and the VU Meters.
Click on the [Record] button on the top toolbar or select the menu item Audio | Record Audio. This opens the Record Audio dialog and the VU Meters.
[Tip: To leave the VU Meters open while recording, enable this option in the Record Audio dialog.]
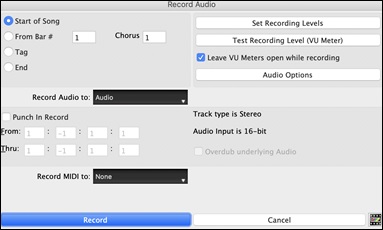
|
The meters show the average strength of the signal, with a dB scale, and a clip indicator. Clipping indicates that the signal has overloaded and will sound distorted (clipped). |
The [Set Recording Levels] button launches System Preferences > Sound, where you can select a recording device and recording levels for that device.
The [Test Recording Level (VU Meter)] button opens the VU Meters.
The [Audio Options] button opens the Audio Settings dialog, where you can choose the Audio track type (mono or stereo) for the current song or the new songs, and channels (left/right/both) to record the audio.
You can record audio from the start of the song, somewhere in the middle, or punch in by choosing a bar and chorus # to start recording.
Select the destination track with the Record Audio to option. Audio can be recorded to any track.
Select the destination track with the Record Audio to option. Audio can be recorded to any track.
If you also want to record MIDI at the same time, choose the destination track with the Record MIDI to option.
Punch-In Recording: This option allows you to punch-in record or overdub a section of audio. For example, if you messed up in bars 2 and 3, then set these bars as your range. Recording will take place only for this range.
Overdub underlying Audio: If there is already data in the Audio track and you want to overdub it (to add a harmony, for example), then you should enable this option. It is not essential to select it at this point, since you will get another chance at the end of the recording.
Press the [Record] button to start recording. If you have chosen to start recording from the beginning of the song, the song will start with a lead-in count. If you are starting from elsewhere in the song, recording will start instantly.
Pressing the [Stop] button on the toolbar or [esc] key stops the recording and open the Audio Recorded - Keep Take? dialog.
|
Copy 1st chorus to whole song - If you have recorded only the first chorus, you can choose the option to copy that to the whole song. This will fill up the whole song with the audio by repeating it as many times as necessary. |
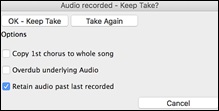
Press the [OK - Keep Take] button if you are happy with the recording. Then the audio will be added to the Audio track. You can listen to the result by pressing the [Play] button on the toolbar. If you are not happy with the results, you can go to the menu Edit | Undo Record Audio, and you will be back to where you were prior to the recording. You can also reopen the Record Audio dialog and press the [Take Again] button to cancel the recording.
Importing Audio Files
A mono or stereo WAV file can be imported to your song, optionally merging with or replacing any existing audio. Choose the menu item File | Import Audio or Audio | Import Audio. You then choose an audio file to import. This will open the Import Audio File dialog, which allows selection of the destination track, the point to insert the audio file, and the option to merge or overwrite existing audio in the destination.
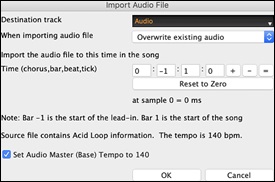
Editing Song
Copy/Move Tracks
The menu item Edit | Copy Special | Copy/Move Tracks allows copying/moving of any track to any other track. You can copy any channels from any track to any other track.
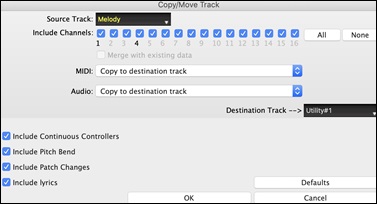
Select the Source Track that you want to copy or move data from and the Destination Track that will receive the copied or moved data. The ce and destination tracks can be any track - Bass, Drums, Piano, Guitar, Strings, Melody, Soloist, Audio, or Utility.
You should also select the action (Do nothing, Copy, or Move) for each of MIDI and Audio.
When copying or moving MIDI data, if you enable the Merge with existing data on tack option, the MIDI data in the destination track will be preserved and merged with the incoming MIDI data from the ce track. If this option is disabled, the MIDI data in the destination track will be replaced with the incoming MIDI data.
There are also options to include continuous controllers, pitch bend, patch changes, and lyrics when copying or moving MIDI data.
Examples of uses include:
- Loading a MIDI file to the Melody track, and copying the bass part to the Bass track, and then freezing the Bass track. This lets you setup a MIDI file with the same tracks as Band-in-a-Box uses. Note: the command automatically freezes the destination track after the copy.
- Getting the RealChart to play, to double a RealTracks part on another instrument. To do this, generate a RealTracks for piano on the piano track. Then copy the piano track to the strings track and set a strings patch. You now hear a RealTracks piano, with the strings doubling the piano part.
- Replace a RealChart with a MIDI version. If a RealChart is available, copy the RealChart as in the example above. Then eliminate the RealTracks on the original track. You now have a RealChart MIDI part playing instead of the RealTracks, and you can edit that part etc. as with any MIDI track.
Unfold (Convert to 1 big chorus)
If you have a song with 3 choruses and want to convert it to a single large chorus, this command “unfolds” the song into just that; one BIG chorus. This is useful for customizing a song.
When Edit | Song Form | Unfold is selected, Band-in-a-Box will display all choruses and verses of a song without loops or repeats. This is a useful command if you wish to make use of the Patch/Harmony change at any bar feature, or if you are going to generate a MIDI file for use with a sequencer or sequencing program.
![]() becomes
becomes ![]()
If you have a song with 3 choruses and want to convert it to a single large chorus, this command unfolds the song into just that; one BIG chorus. This is useful for customizing a song with style, patch or tempo changes in different verses.
Add Repeats and 1st/2nd Endings
Let’s add repeats and endings to a demo song “Miles1 Tutorial (no repeats yet)” in the Band-in-a-Box/Tutorials/Tutorial - Repeats and Endings folder.
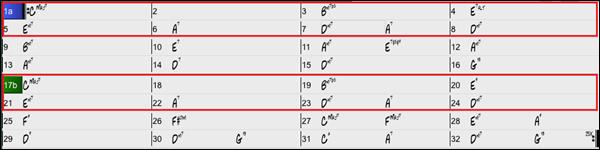
From looking at the Chord Sheet, we can see that this 32-bar form consists of two 16 bar sections. The first 8 bars of each section (bars 1-8 and 17-24) are the same. The 8 bars from bar 9 to bar 16 are the 1st ending, and the 8 bars from 25 to 32 are the 2nd ending.
Right-click on bar 9 and select the Repeats/Codas/1st-2nd Endings menu item. This will open the Edit Repeats and Endings dialog.
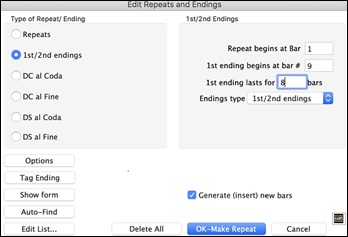
Select “1st/2nd Endings” as a type of repeat and ending.
Enter the following data.
- Repeat begins at bar # 1.
- 1st ending begins at bar 9.
- 1st ending lasts for 8 bars.
- Endings type 1st/2nd endings.
Note that by entering this data we have defined the complete 1st and 2nd endings: if the 1st ending begins at bar 9 and lasts for 8 bars, the 2nd ending must begin at bar 25 (17+8) (because there is an 8-bar repeated section from bar 1 to 8).
Since this is an existing song and it already has all the bars laid out, do not select the Generate (insert) new bars option.
Press the [OK-Make Repeat] button. Repeat will be made, and the Chord Sheet redraws with the 1st/2nd repeat showing.
![]() Make sure you have the Fake Sheet mode enabled.
Make sure you have the Fake Sheet mode enabled.
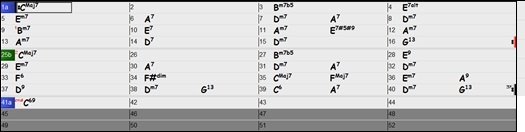
As you can see, there is a 1st ending at bar 9. At bar 16 there is a repeat symbol, indicating that the form goes back to bar 1 for 8 bars, and then will go to the bar after bar 16 for the 2nd ending. The 2nd ending is marked there (note that the bar number is 25, because the bars are numbered in linear fashion, and it is the 25th bar of the song as it would be played). Then the song goes to the end, which is bar 32.
![]() Let’s disable the Fake Sheet mode. We will then see a linear view, which is similar to the way it was before we enter the 1st/2nd endings.
Let’s disable the Fake Sheet mode. We will then see a linear view, which is similar to the way it was before we enter the 1st/2nd endings.
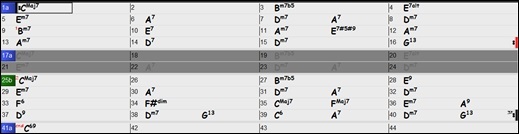
This shows all the 32 bars, including the bars that are part of the repeat and are highlighted in gray. Exposing these bars shows the linear view of the song, the way the song would be played. It also allows you to enter custom information for any of the bars, including the bars in the “gray area.” For example, if you want the chord at bar 21 to be an Em9 instead of an Em7, just type it in, even though it represents the repeated section leading to the 2nd ending.
Buttons in the Edit Repeats and Endings dialog
The [Options] button opens s the Display Options dialog, which includes an option to globally enable/disable the display of repeats and endings.
The [Show form] button displays a summary of the form of the song as examined by Band-in-a-Box. This is useful for analyzing the form of the song, in case you want to add your own repeats and endings manually, and want a quick summary of the form. Band-in-a-Box shows you the form in 2-bar sections. A typical AABA song might display a form like this.
0, 1, 2, 3
0, 1, 2, 4
5, 6, 7, 8
0, 1, 2, 4
Each of these numbers represents a unique 2 bar section of the song. You can see the first section (0, 1, 2, 3) is similar to the second section (0, 1, 2, 4) in fact they differ only in the last 2 bars. So, this would be a good candidate for a 1st/2nd ending. Also, the last A section of 0, 1, 2, 4 is identical to the 2nd A section, so would be a good candidate for a DC al Coda symbol.
When you press the [Auto-Find] button, Band-in-a-Box will examine the song and try to detect any repeats in the song.
The [Edit List] button shows you a list of repeats or endings that have been entered in the song and allows you to edit them.
The [Tag Ending] button opens the Song Setting dialog where you can set a tag ending.
The [Delete All] button will delete all the repeats that have been entered in the current song.
Auto-detect repeats for the song
There is also an auto-detect feature that analyzes the song and adds repeats and endings for you.
Don’t save the song because we want to use the original “Miles Tutorial (no repeats yet).MGU” song. Just reopen the song so that no repeats are set in the song.
![]() Click on the [Fake Sheet] button and select Auto-Detect Repeats now for this song.
Click on the [Fake Sheet] button and select Auto-Detect Repeats now for this song.
In this case, Band-in-a-Box has figured out that 1st/2nd endings exist. If you answer “Yes,” it will enter the same 1st/2nd endings that we entered manually.
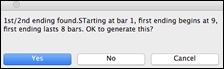
Note that this “auto-detect” does not find every 1st/2nd ending, especially if the chords are different in the repeated sections, but it can be a time saver when it does find them!
Set Time Signature for Range of Bars
![]() Click on the time signature shown on the top toolbar or select the menu item Edit | Song Form | Set Time Signature for a Range of Bar. This lets you assign a specific time signature at any bar and apply it to a range of bars, as often as you want.
Click on the time signature shown on the top toolbar or select the menu item Edit | Song Form | Set Time Signature for a Range of Bar. This lets you assign a specific time signature at any bar and apply it to a range of bars, as often as you want.
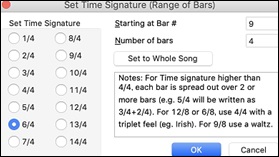
Transpose
The Edit | Transpose submenu lets you transpose the entire song by a number of semitones, or specify a range to transpose with the Transpose From.. To.. command.
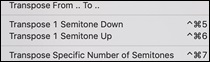
To transpose part of a song, simply highlight the area you wish to transpose and select Transpose From.. To.. in the submenu.When you have confirmed the starting bar and the number of bars you wish to transpose, click on the “Transpose to Key” area and select the destination key.
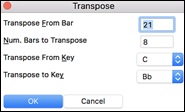
Settings for Current Bar
You can change the number of beats per bar, tempo, style, patch, volume, or harmony at a specific bar.
![]() Open the Bar Settings for Current Bar dialog by using the [Bar Settings] button on the toolbar, the hotkey F5, or the menu item Edit | Settings For Current Bar.
Open the Bar Settings for Current Bar dialog by using the [Bar Settings] button on the toolbar, the hotkey F5, or the menu item Edit | Settings For Current Bar.
[Tip: If the F5 key does not perform the expected function in Band-in-a-Box, you will need to go to the Apple® System Preferences and uncheck the system setting in the Keyboard Shortcuts list.]
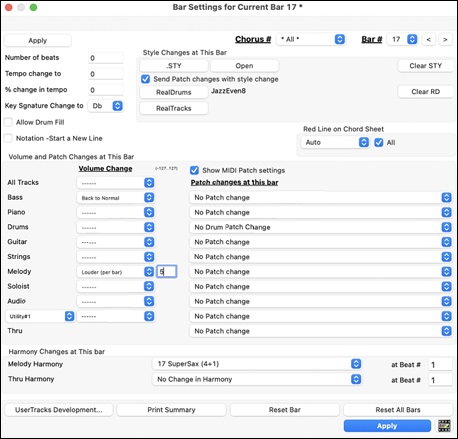
Chorus # is a setting that lets you apply the changes at the specified bar in all choruses or just in the chorus you choose.
Bar #: You can change the bar to edit without existing the dialog.
Number of beats sets the number of beats in a bar. The initial time signature of the song is determined by the style (e.g. Jazz =4/4, Waltz =3/4). In certain songs, you will want to insert time signature changes at a certain bar. For example, you might want a single bar of 2/4, or 8 bars of 3/4 time etc.
This option allows a change of time signature during a song. The change takes place at the beginning of the bar and continues until a new time signature change is specified. You can select # beats per bar from 1 to 4 beats per bar. A setting of 0 beat/bar is used for no change of time signature.
Examples:
-
A song in 4/4 time with a single bar of 6/4 time. Since the maximum # beats per bar is = 4 we will split the 6/4 bars into 2 bars, a 4/4 bar and a 2/4 bar. Insert a # beats per bar = 2 at the beginning of the 2/4 bar and then restore the time signature to 4/4 by assigning # beats per bar = 4 for the next bar.
-
A song in 5/4 time throughout: To do this we will alternately create a 3/4 bar + 2/4 bars. On odd numbered bars insert a # beats per bar = 3, and on even bars insert # of beats per bar = 2. This needs to be done for every bar.
Tempo Change: Most songs will have a single tempo throughout, but if you want to change the tempo at a certain bar of the song, then use this dialog box to type in the new tempo in beats per minute. Alternatively, type in a relative tempo change in a range of –90 to +100. A setting of –50 halves the tempo, a setting of 100 doubles it. Tempo can also be set by clicking on the metronome button. Clicking on this button 4 times will set the tempo to your tapped-in value. The tempo change takes effect at the beginning of the bar and remains until a new tempo change at another bar is inserted.
Style/RealDrums/RealTracks Changes at This Bar: You can specify a new style at any bar of the song, so that you can use many styles within the same song. Use the [STY] button to select a style using the StylePicker dialog. Use the [Open] button to select a style from a folder on your hard drive. You should select a style that is present in the Styles folder in Band-in-a-Box (or the same folder where the song resides). To remove the style change at this bar, press the [Clear STY] button. Individual styles have instrument patches assigned to them. Send patch changes with style change allows the option to send those assigned patches at the current bar. To keep the patches that had been previously used in the song, disable this option.
(Note: If the track type changes by the style change, the track will be silent from the current bar. For example, when the style with a MIDI piano track is selected for the song, if you select a style with a RealTrack piano track at the current bar, the piano track will be silent after the style change.)
RealDrums can be changed at any bar, either for the whole song or just for the selected chorus. To select the new RealDrums style, press the [RealDrums] button. This will open the RealDrums Picker where you can choose from a full list of RealDrums or filter the list to narrow your selection. You will see the new style name displayed onscreen. To remove the change, click on [Clear RD].
You can insert a specific RealTracks instrument at any bar to create a customized performance, without changing the style. For example, you can change an acoustic bass comping part to an acoustic bass solo at Chorus 4, Bar 1. Press the [RealTracks] button and you will see the RealTracks Changes dialog where you can choose which tracks you want to have RealTracks changes on. Select a track, press the down arrow button, and select a RealTrack from the list of available RealTracks
Allow Drum Fill: When this is enabled, you’ll get a drum fill at the current bar even if the following bar does not have a part marker. If you are at a bar before a part marker and you don’t want a drum fill, then disable this option.
Notation - Start a New Line: You can set the notation to start a new line at any bar. This allows you to customize the number of bars on each line and is used in conjunction with the Notation Options settings of bars-per-line on the notation. This feature works for chord sections.
Red Line on Chord Sheet: Any changes made in this dialog will be recorded on the Chord Sheet indicated by a line below the bar number, but you can hide the line using this option. The “All” checkbox applies to all songs and it’s enabled by default. The “Auto/No/Yes” drop-down applies to the current song only and overrides the global setting. If you select “No” when “All” is checked, you won’t see the red lines in the current song. If you select “Yes” when “All” is unchecked, you will see the red lines in the current song. If “Auto” is selected, the global setting will apply to the current song.
Volume/Patch Changes at This Bar: Volume and patch changes can be made for any track at any bar. Volume changes can be specified values or fade up/down amounts. Enabling “Show MIDI patch setting” allows you to select a MIDI patch for any track.
Harmony Changes at this Bar: You can insert harmony changes into the song at any bar and beat. For example, start the song with “no harmony” then have “SuperSax” come in on the bridge, then “Shearing” on the next chorus, etc. This is also effective when used with the Soloist on the Thru part. With this setting, you can have multiple types of horn section solos (i.e. Brass, Sax, etc.) or harmonized distortion guitar effects for guitar solos.
[UserTracks Development] opens a dialog for advanced settings when making UserTracks.
[Print Summary] opens a text report of all settings in the song that have been made in the Edit Settings for Current Bar dialog.
[Reset Current Bar] removes any settings you have changed for the current bar.
[Reset All Bars] removes any settings you have changed for all bars.
Normally, you don’t need to press the [Apply] button because any setting will automatically update as you change.
Any changes made for the current bar will remain in effect from that bar forward until new changes are recorded or until the next chorus if you have set the changes to apply only to the current chorus.
Song Memo
A song memo of up to 2000 characters may be added with your own notes about the song and the Band-in-a-Box song summary.
![]() The [Song Memo] button on the top toolbar or the hotkey option+M opens the Song Memo dialog, where you can type or edit a memo about the song. You can also select the “auto-open” option to display the memo automatically each time the song is loaded.
The [Song Memo] button on the top toolbar or the hotkey option+M opens the Song Memo dialog, where you can type or edit a memo about the song. You can also select the “auto-open” option to display the memo automatically each time the song is loaded.
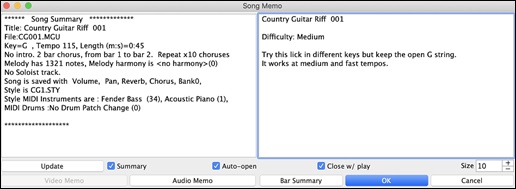
The dialog has an option to close automatically during playback. When the Close w/ play option is set, the dialog will close when the song starts to play and not reopen when it stops. This setting, in combination with the Auto-open setting, ensures that the memo opens when the song opens, but closes during playback. The font for the song memo is size selectable.
Type your memo in the right side of the dialog and press the [Update] button.
If the Summary checkbox is selected, the dialog displays a full summary of the song (title/tempo/patches used in the song), as well as other special features such as substyle patch changes or harmonies.
You can press the [Bar Summary] button to see a report of any changes to settings that are programmed in theEdit Settings for Current Bar dialog (F5).
If the song contains a video or audio memo, you can play it with the [Video Memo] or [Audio Memo] button. You can add a video memo to your song by creating a video file (mov, mp4, m4v) with the same name as your song file followed by _VideoMemo. For example, for mysong.mgu, save a video memo as mysong_VideoMemo.wov. Similarly, you can add an audio memo to your song by creating an audio file (m4a, mp3, wav, aiff) with the same name as your song file followed by _AudioMemo.
[Tip: The songs in the Band-in-a-Box/Songs and Lessons/101 Riffs - Country Guitar with Audio Memos folder contain audio memos. Open a song and press the [Audio Memo] button in the Song Memo dialog to listen to an audio memo.]
Viewing and Printing Notation
Notation Window
![]() Open the Notation window with the [Notation] button on the side toolbar. You will see standard notation on the grand staff. There are 3 notation modes in Band-in-a-Box, selected with the buttons in the Notation window toolbar.
Open the Notation window with the [Notation] button on the side toolbar. You will see standard notation on the grand staff. There are 3 notation modes in Band-in-a-Box, selected with the buttons in the Notation window toolbar.
The Standard Notation mode can be used for notation display and the entry of chords and lyrics. Just type a chord name and it will be inserted at the current time line location (the black vertical stripe just under the tool bar.)
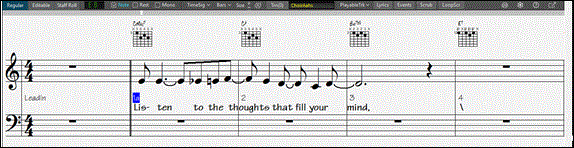
The Editable Notation mode allows entry of chords, lyrics, and text, and it also permits point-and-click entry of notes and rests as well as drag-and-drop editing.

The Staff Roll Notation mode has editing features of the Editable Notation mode. In addition, the velocity (vertical line) and duration (horizontal line) of notes can be edited.
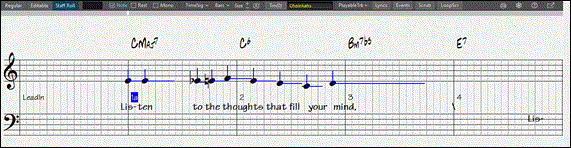
Lead Sheet Window
The Lead Sheet window displays a full page of notation with lots of options such as a selectable number of staves per page, clefs to show, font size, margins, scroll-ahead notation, and lyrics. You can set it to a big font size and read the notation from across the room. Since the notation scrolls ahead, you can read ahead without waiting for a page turn.
![]() To open the Lead Sheet window, press the [Lead Sheet] button on the side toolbar or use the hotkey control+L
To open the Lead Sheet window, press the [Lead Sheet] button on the side toolbar or use the hotkey control+L
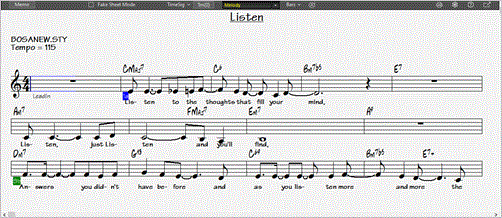
Multiple tracks of notation can be viewed together in the Lead Sheet window. To add tracks to display, click on the [+] button to the right of the track selector button, and select the tracks in the order that they should appear from top to bottom. Multiple tracks can also be printed like a score.
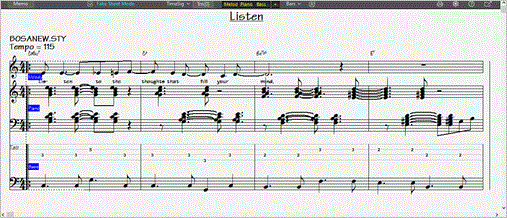
Printing
To print your song as sheet music, click on the printer icon in the Notation or Lead Sheet window. This opens the Print Options dialog with a full range of options including “Number of Copies” to print and “Print Range.”
Saving Song
![]() Once you have made a song (or have made changes to a song), you will probably want to save the song. Click on the [Save] button on the top toolbar, choose the menu item File | Save from the menu, or press F2 or command+S
Once you have made a song (or have made changes to a song), you will probably want to save the song. Click on the [Save] button on the top toolbar, choose the menu item File | Save from the menu, or press F2 or command+S
![]() Use the [Save+] button on the top toolbar to save a song with a different name or in a different location. (Songs that are “Saved As” with a different name have the new name added to the Recently Played Song dialog.) The [Save As] button menu includes additional options for saving a song.
Use the [Save+] button on the top toolbar to save a song with a different name or in a different location. (Songs that are “Saved As” with a different name have the new name added to the Recently Played Song dialog.) The [Save As] button menu includes additional options for saving a song.
Emailing Song
You can email a song, style or rendered audio file as attachments.
Press the [Save+] button on the top toolbar and choose Email Song File(s) as Attachment(s) from the drop-down menu, or select the menu item File | Save Special | Email Song File(s) as Attachment(s). This opens the Email Song dialog.

The dialog allows you to choose files you want to email:
- the song (.MGU or .SGU)
- the style (.STY)
- the extended style (.STX) (if any)
- a rendered audio file (choice of AIFF, M4A, WAV)
- Audio track (if any)
- Performance track (if any)
Pressing the [Send Email] button will launches your default mail application and prepare a new message with files attached.
Saving Song as Video and Upload to YouTube
You can save your song as a video that you can upload to YouTube or work with in video programs. You can make a video for the Chord Sheet or the Notation window that shows the highlighted chords or notes moving as the song plays.
![]() To use this feature, press the [Save+] button on the top toolbar and choose Save as Video from the drop-down menu.
To use this feature, press the [Save+] button on the top toolbar and choose Save as Video from the drop-down menu.
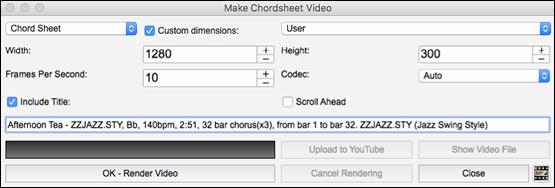
At the top left corner, choose the item (Chord Sheet or Notation track) to include in a video.
Enable Custom dimensions if you want to choose the width and height of the video. If this is disabled, the video dimensions will match the Chord Sheet as it appears.
A higher number you set for Frames Per Second will result in a large file and the rendering process will take longer.
You can select a specific Codec to encode the video. If Auto is selected, Band-in-a-Box will choose a compatible codec.
If Include Title is enabled, the video of the Chord Sheet will have a black bar at the top containing the title and information shown below.
The Scroll Ahead option makes the video of the Chord Sheet scroll so the bar that is currently playing will always be at the top of the video (i.e., more bars ahead will be visible).
Press the [OK - Render Video] button to start rendering the video. The video will continue to render unless you press the [Cancel Rendering] button. When the rendering is done, a message will show and you will be able to press the [Upload to YouTube] or [Show Video File].
[Note: A special use of this feature is to combine a video RealTracks with the corresponding notation in a single video. This creates an educational video, which shows the actual performance with notation/tab, playing over your chord progression! To do this, right-click on the Master button or one of the track buttons at the top of the main screen and select Render Video(s) from the menu.]
Saving Song as MusicXML
Band-in-a-Box supports MusicXML so you can easily export your Band-in-a-Box songs into notation programs such as Finale, Sibelius, and Guitar Pro, while still retaining the chords from the Band-in-a-Box song.
![]() Press the [Save+] button on the top toolbar and select Save Song as MusicXML File from the drop-down menu, or use the main menu File | Save Special | Save Song as MusicXML File. Then, when the BB File Save dialog opens, specify a file name and the location, and press the [Save] button. You will then see the Save XML File dialog.
Press the [Save+] button on the top toolbar and select Save Song as MusicXML File from the drop-down menu, or use the main menu File | Save Special | Save Song as MusicXML File. Then, when the BB File Save dialog opens, specify a file name and the location, and press the [Save] button. You will then see the Save XML File dialog.
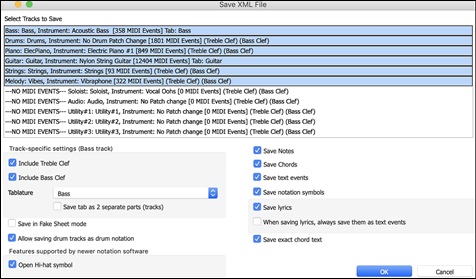
Select a track that you want to save in the XML file. To select multiple tracks, hold down the command key and click the track. Then, select the elements that you want to save in the XML file.
The Track-specific settings area lets you choose which clef to include for each track.
There is also an option to include a tablature.
The Save tab as 2 separate parts (tracks) option will save two parts: one for a notation track and the other for a tablature.
If you enable the Save in Fake Sheet Mode option, repeated sections will be hidden.
The Save exact chord text option allows you to save the exact chord text, rather than relying mainly on saving the chord type and degrees.
Press [OK], and the file will be ready to be opened in your notation program.
Saving Song as ABC Notation File
ABC notation is the simple text-based notation system used by musicians worldwide to store chords, melody, and lyrics of songs. You can find out more information about the songs and ABC notation at abcnotation.com.
![]() Press the [Save+] button on the top toolbar and select Save as ABC Notation File from the drop-down menu,or use the main menu File | Save Special | Save Song as ABC Notation File.
Press the [Save+] button on the top toolbar and select Save as ABC Notation File from the drop-down menu,or use the main menu File | Save Special | Save Song as ABC Notation File.
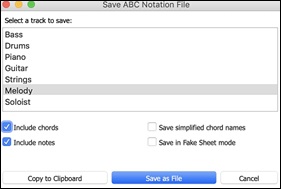
Select a track to save: Click on the track that you want to save in the file. This applies if “Include Notes” is enabled.
Include Chords: Check this to save chords in the file.
Include Notes: When this option is checked, notes on the selected track will be saved.
Simplified Chord Names : When this is enabled, complicated chords will be written as simplified names. For example, D7#5#9 will be written as D7.
Save in Fake Sheet mode: Enable this if you want to save repeats and endings in the file.
Pressing [Copy to clipboard] button will copy the file to the clipboard. You can then paste it into other programs.
Press the [Save as File] button, and then you type a name and select the destination in your hard drive.
Saving Song as Simple Text
You can save the song, including the chords and other information (title, key, tempo, form, style, etc.), as a text file.
![]() Press the [Save+] button on the top toolbar and select Save Song(s) to Text on Clipboard or File(s) from the drop-down menu, or use the main menu File | Save Special | Save Song(s) to Text on Clipboard or File(s).
Press the [Save+] button on the top toolbar and select Save Song(s) to Text on Clipboard or File(s) from the drop-down menu, or use the main menu File | Save Special | Save Song(s) to Text on Clipboard or File(s).
In the dialog, check the items you want to include in text. By default, the song metadata (title, key, tempo, form, style, etc.) and memo will be included, but if you don’t want them, you can exclude them. Select the Whole Song mode, and press the [Save as .txt file] button. If you want to copy the song to the clipboard instead of saving it as a text file, press the [OK - Copy to Clipboard] button instead.
The dialog also has an option to copy or save all songs in a specific folder. Select the Batch save all songs in this folder mode, press the folder icon to select the folder, and choose the option to include subfolders of that folder. Also select the destination with the Batch Save As option. You can copy all songs to the clipboard, save them as individual text files in the same folder, save them as individual text files in another folder, or save them as a single text file. Then, press [OK -Batch Save TXT] to copy or save the songs.
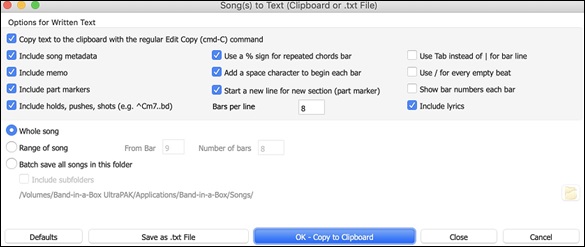
Saving Song as MIDI File
Your songs can be saved as Type 0 and Type 1 MIDI files as well as Karaoke files and General MIDI lyrics.
![]() Press the down arrow of the [Master] button on the toolbar and select Export song as MIDI file from the drop-down menu, or choose the menu item File | Save Special | Save Song as MIDI File. This opens the Save MIDI File dialog. The hotkey is control+S.
Press the down arrow of the [Master] button on the toolbar and select Export song as MIDI file from the drop-down menu, or choose the menu item File | Save Special | Save Song as MIDI File. This opens the Save MIDI File dialog. The hotkey is control+S.
Select the type of MIDI file to save with the MIDI File type option.
- By default, Band-in-a-Box writes Type 1 multiple track Standard MIDI Files.
- You can also save Type 0 MIDI files. They have all of the parts on a single track and are used by many hardware modules and other devices that play MIDI files because they are simpler to play (since they only have 1 track).
- Karaoke files (.KAR) are a special type of sing-along MIDI file with text events for the lyrics and a specific order for the tracks.
- There is an option to write the MIDI file with separate tracks for each drum instrument.
The [File on Disk] button saves a MIDI file to the folder you select. You can then load the MIDI file into your sequencer for further editing.
The [Clipboard] button copies the MIDI file to the clipboard as a standard MIDI file. This feature allows clipboard enabled programs to Edit | Paste the Band-in-a-Box MIDI file directly into the program.
When making a MIDI file, you can select a range of bars to be included. Highlight any range of bars on the Chord Sheet, and the MIDI file will be made for just that range. Alternatively, you can make a MIDI file for a partial range by pressing the [Set Range] button.
The [Batch mode] button allows you to convert an entire folder of songs to MIDI files with a single command and choose the resultant file names to be based on either the file name or the song title name.
Click on the [Options] button to open the MIDI File Options dialog. .
Include patch changes: If selected, patch (instrument) changes will be included in the MIDI file.
Include chord text markers: If selected, the chords will be written as text marker MIDI events.
Include part marker text markers: If selected, descriptive text part markers will be written to the MIDI file.
Include 2-bar lead-in: If you don’t want to create a MIDI file containing the first 2 bars of the 1—2—1-2-3-4 count-in, disable this option. If there is a Melody pickup, the 2-bar lead-in will remain in the file.
Write lyrics in: The GM specification has agreed upon specific requirements for writing lyrics in MIDI files, which are supported, so that lyrics that you save in Band-in-a-Box should show up identically in other MIDI programs. We recommend the GM format.
Write Section Text as Text Events: Your section text can be included in the MIDI file as text events.
Include forced channel meta event: This will include the forced channel META event. (Note: It is recognized by PG Music Inc. programs only.)
Include guitar position controller: This will insert a controller 84 which PG Music uses to indicate the fret position. Since some synths also use this for Portamento Control, you should use this setting with caution.
Write Soloist track on channel 5: Normally the program writes the Soloist part on channel 8. Since that could also mean the left hand of a piano track using the convention of channel 8/9 for piano, this option allows you to write it on channel 5 instead.
Write harmony: If set to YES, the harmony will be written to the MIDI file. If not, just the melody will be written to the MIDI file.
Write harmony on separate tracks: If set to YES, the harmony will be written to the MIDI file on separate tracks for each voice. You could use this to print out individual parts to your printer, for example.
Write Guitar part on 6 channels: If set to YES, the styles that are Intelligent Guitar Styles will result in a MIDI file that has the Guitar part written on 6 channels (11-16). Then, when you read it in PowerTracks, or another sequencer that uses the convention of 11-16 for guitar strings, the guitar part will display correctly.
For partial range MIDI files, chop off sustaining notes at end turns off notes that would be “hung” because their associated Note Off event does not fall within the range of bars saved to the MIDI file.
Also generate MIDI Drums in the MIDI file can be unchecked if your song uses RealDrums and you don’t want MIDI drums included in the MIDI file.
Save RealCharts in MIDI files: Enable this to save RealChrarts MIDI data in MIDI files so you can study the performance in other programs.
Resolution for MIDI file: By default, Band-in-a-Box saves MIDI files with 120 PPQ resolution. This is about 4 millisecond resolution, which is very good resolution. In our listening tests, people couldn’t tell the difference between files at 120 PPQ and files at higher PPQ (like 960 etc.). But if you prefer to work in a DAW at a higher PPQ, you can have Band-in-a-Box output at the resolution that you want.
Saving Song as Audio Files
![]() To save your song as an audio file, press the down arrow of the [Master] button on the toolbar and select Export Song as Audio File from the drop-down menu, or choose the menu item Audio | Export Song as Audio File. This opens the Render to Audio File dialog.
To save your song as an audio file, press the down arrow of the [Master] button on the toolbar and select Export Song as Audio File from the drop-down menu, or choose the menu item Audio | Export Song as Audio File. This opens the Render to Audio File dialog.
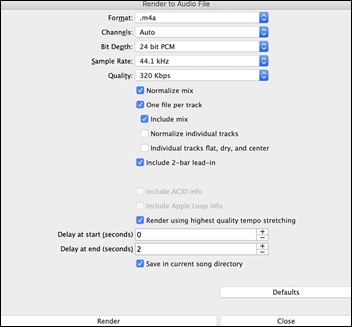
Format: Select the format of the audio file: WAV, AIF, or M4A.
Channels: When “Auto” is selected, individual tracks will be rendered as either mono or stereo, depending on the original ce. You can also force to render all tracks as stereo or mono.
Bit Depth: Select 16, 24, or 32 bit.
Sample Rate: Select 44.1, 48.0, or .96.0 kHz.
Normalize mix: Enable this option if you want the audio file normalized. Normalizing boosts the volume to a maximum level without distortion, but it takes longer to render.
One file per track: If this option is enabled, you will get separate audio files, one for each track.
Include Mix: If this is enabled, a mix of all tracks will be rendered to a separate file.
Normalize individual tracks: Enable this option if you want each track normalized individually. This applies if the “One file per track” option is enabled or when you drag and drop an individual track out of Band-in-a-Box.
Individual tracks flat, dry, and center: If this option is enabled, each track will render ignoring its Mixer settings (Volume, Pan, Reverb, and Tone), and the default settings will be used instead. The default settings are Volume=0 db, Pan = 0, Reverb= 0, Tone = 0). If this option is disabled and there is no lead-in in the Melody track, the lead-in will be skipped in the rendered file.
Include 2 bar lead-in: If this option is disabled and there is no lead-in in the Melody track, the lead-in will be skipped in the rendered file.
Include ACID info: If you are rendering to a WAV audio file, you can include ACID information such as tempo, key, and time signature. The ACID information can be read by many DAW programs.
Include Apple Loop Info: If this is enabled, Applesup>® Loop information (tempo, key, and time signature) will be added to the AIFF audio file.
Render using highest quality tempo stretching: If this option is enabled, the highest quality tempo stretching setting for élastique will be used when rendering. You may be using a lower quality setting for playback in order to increase performance, but this is not necessary when rendering to an audio file.
Delay at start (seconds): This allows you to add silence in seconds at the start of the audio file.
Delay at end (seconds): You can also add silence in seconds at the end of the audio file.
Save in current song directory: If the option is enabled, the Save dialog will default to the current song file’s directory. Otherwise, it will default to the previously used directory.
[Render]: To render the song, press this button and select the name and destination for the audio file.
Batch Render Audio Files
Selecting Batch Save .m4a for ALL SONGS in current folder for use on iPhone/iPad, Android Biab app renders a complete folder of song all at once. You can also use the menu command File | Save Special | Batch Save all songs in current folder to .m4a or aiff to render.
Save Individual Track as M4A or AIFF Audio File
Any track can be saved as an M4A or AIFF audio file from its contextual menu. The menu opens with a right-click, control+click, or a double-click on the track labe.
![]()
The file can then be imported into another audio program, such as GarageBand or Cubase.
File Menu Rendering Commands
You can also use the File | Save Song Special menu commands Save Song as M4A Audio or Save Song as AIFF Audio to render the Band-in-a-Box song to an audio file. Use the commandBatch Save All Songs in Current Folder as M4A or AIFF to render a batch of songs to audio.

Exporting Tracks by Drag and Drop
Band-in-a-Box has a “Drag and Drop” mode for your favorite DAW/sequencer (RealBand, Sonar, Reaper, Pro Tools, FL-Studio, Nuendo and more). In this mode, Band-in-a-Box becomes an always-on-top small window, making it easy to drag tracks from the Drop Station to your sequencer. Enter a chord progression in Band-in-a-Box, then drag the track label from the Mixer to your sequencer at the desired track and bar location.
![]() To toggle the Drag and Drop mode, click on the left side of the [Drop] button on the top toolbar.
To toggle the Drag and Drop mode, click on the left side of the [Drop] button on the top toolbar.
Drop Station
Use the Drop Station to drag and drop tracks from Band-in-a-Box to DAWs that don’t support direct drag and drop. If your DAW does not support the direct drop of a track that is not yet generated, you can drag a track label (Master, Bass, Piano, etc.) from the Mixer and drop it onto the Drop Station.
|
The Drop Station displays four different file types: WAV, M4A, AIF and MID. You can drag a track label and drop it onto the Drop Station to get an audio or MIDI file. |
The Drop Station makes it faster and easier to make different file types. It also allows you to make MIDI versions of the RealTracks (RealCharts), by simply dragging a RealTrack to the “MIDI” label of the Drop Station.
![]() If you want the entire performance into your DAW, drag the [Master] button on the top toolbar or the Master label on the Mixer and drop it onto the Drop Station. By default, a single file containing the full arrangement is dropped. If you want all tracks transferred as separate files instead, uncheck the “Drag Master as separate tracks” option in the Drag and Drop Settings dialog.
If you want the entire performance into your DAW, drag the [Master] button on the top toolbar or the Master label on the Mixer and drop it onto the Drop Station. By default, a single file containing the full arrangement is dropped. If you want all tracks transferred as separate files instead, uncheck the “Drag Master as separate tracks” option in the Drag and Drop Settings dialog.
![]() To trender only a portion of the performance, select the region on the Chord Sheet, then drag a track from the Mixer and drop it onto the Drop Station. (Don’t drag the selected region.)
To trender only a portion of the performance, select the region on the Chord Sheet, then drag a track from the Mixer and drop it onto the Drop Station. (Don’t drag the selected region.)
|
When you drop the track onto the Drop Station, you will see an orange color, indicating that the track is accepted and the file is being prepared. |
|
When the file is ready, the Drop Station turns green. You can now drag it to your favorite DAW (Sonar, Pro Tools etc.) or Windows® Explorer. |
|
If you drop the track to the [+], you are presented with a dialog, where you can choose a file format and other render options. |
|
You can choose a format (WAV, AIF, M4A, MP3, or MID) of the file. |
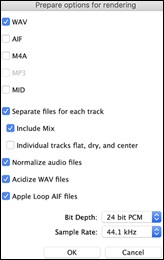
Drag and Drop Settings
![]() To customize the Drag and Drop settings, click on the right side of the [Drop] button and choose Configure Settings for Drag and Drop from the drop-down menu. Alternatively, open the Preferences dialog (command+, or Options | Preferences) and click on the [Drag and Drop] tab.
To customize the Drag and Drop settings, click on the right side of the [Drop] button and choose Configure Settings for Drag and Drop from the drop-down menu. Alternatively, open the Preferences dialog (command+, or Options | Preferences) and click on the [Drag and Drop] tab.
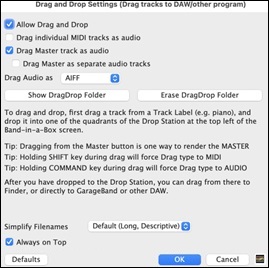
Allow Drag and Drop: Enable this to use the Drag and Drop feature.
Drag individual MIDI tracks as audio: This option applies when dragging a track directly to a DAW. When this is enabled, the MIDI tracks get converted to audio, using Apple® Synth.
Drag Master track as audio: If this is enabled, the entire arrangement gets converted to audio, using Apple® Synth. If this is disabled, the MIDI tracks in the arrangement get transferred as MIDI, in a single file.
Drag Master as separate tracks: If this is enabled, when dragging the Master button, the drop will result in multiple files, one for each track.
Drag Audio as: You can select a type of audio files to create.
Simplify Filenames: This controls how filenames are generated, with three choices: Default (long and descriptive), Simple Long (instrument name), and Simple Short (track name only).
Always on Top: If this is enabled, the Band-in-a-Box window will be always-on-top. Note that if you change this in the dialog, it won’t take effect until you exit the dialog.
Save Track as Performance
This takes “freezing” a track one step further and saves the audio itself. So, you can send your Band-in-a-Box song to your friend, who will be able to play that track without needing to have the RealTracks installed.
![]() To save the track, right-click on the track radio button and select Save Track as Performance File from the menu. You have a choice of an aiff or m4a file. When you choose, the track will be rendered to <Song Title><track name (e.g. Bass).aiff or .m4a.
To save the track, right-click on the track radio button and select Save Track as Performance File from the menu. You have a choice of an aiff or m4a file. When you choose, the track will be rendered to <Song Title><track name (e.g. Bass).aiff or .m4a.
![]() Select Track Actions | Erase Performance Track from the [+] button to remove the Performance Track.
Select Track Actions | Erase Performance Track from the [+] button to remove the Performance Track.
[Technical Note: A Performance Track can be made by simply making an audio file (.aiff or .m4a) and naming it the same as the song, but with the track name (Bass, Piano, Drums, Guitar, Strings, Melody, Soloist) added. For example, if the song is MySong.mgu, you put a file named MySong Melody.m4a in the same folder, and that will be a performance track on the Melody track. ]
Congratulations!
Now you know how to produce a complete song arrangement in Band-in-a-Box with RealDrums and RealTracks, a Melody, Solo, Harmonies, and Lyrics; either from scratch or from an imported MIDI file. You can print out clean lead sheet notation, complete with chord symbols. And you can save your song in MIDI form or as lossless PCM audio or compressed m4a audio for playback from your computer or over the Internet, to send as an e-mail attachment, or to upload to services such as Dropbox. You are on your way to making lots of great music with Band-in-a-Box.
Have Fun!
Unconditional 30-Day Money Back Guarantee on all PG Music products purchased from PG Music Inc.
PG Music Inc.
29 Cadillac Ave Victoria BC Canada V8Z 1T3
Sales: 800-268-6272, 250-475-2874,+ 800-4746-8742*
* Outside USA & Canada where International Freephone service is available.
Access Codes
Tech Support: Live Chat, support@pgmusic.com
 Online now
Need Help?
Customer Sales & Support
|
Phones (Pacific Time) 1-800-268-6272 1-250-475-2874 |
||
| Live Chat | ||
| OPEN | Online Ordering 24/7 |
|
| OPEN | Forums, email, web support |