
Search Manual
RealBand® 2018 for Windows® User’s Guide
Chapter 11: Mixer Window
Overview
|
The Mixer window provides real time control of volume and effects. You can launch it with the toolbar button or by typing Ctrl+8. |
This is an integrated mixer that controls both MIDI and Audio tracks. There are sliders for all 48 tracks, 8 auxiliary effects (Aux) busses, and a combined total of 16 audio output ports or audio subgroups.
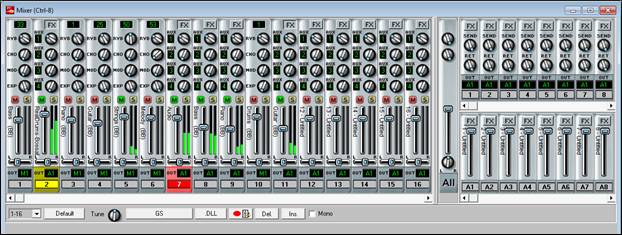
The Mixer track strips conveniently show the track name vertically to the left of the volume sliders. This is the track name that is assigned in the Tracks window, go to that window to add or change track strip names.
When the mouse cursor is positioned over a track number in the Mixer window a popup box will display all of the Track windows settings for the track - the track name and type, patch name, volume and pan settings, and effects settings.
|
MIDI tracks show an output port with an “M” prefix for a MIDI port or an “S” for a software synthesizer. They have controls for volume, pan, reverb, chorus, modulation, and expression plus a VU meter, a MIDI patch selection box, and a mute/unmute button. |
|
Audio tracks either have a prefix of “A,” for an audio output, or “G,” for an audio subgroup, on their output ports. They have volume and pan controls, a stereo VU meter, a mute/unmute button, four assignable auxiliary sends, and a track-specific FX insert. |
In addition to the track specific effects, there are eight global busses that can each have four chained effects each. You can assign each audio track to four different Aux busses and adjust the amount that each audio track uses the effects in each assigned bus. If that isn’t enough, you can add four chained effects to each audio subgroup and also to the main output - this will affect all tracks.
Mixer Controls
Knobs
|
To use the knobs, click and hold the left mouse button while the mouse cursor is inside the knob and move the mouse cursor in a circular motion. The knob’s pointer will follow your mouse cursor movements. |
In this follow mode you can even move the mouse cursor off the knob so that it isn’t obscuring your view of the pointer.
![]() As you move any Mixer knob or slider a continuous readout of its setting displays at the bottom of the window. At the desired position simply release the mouse button to set the value.
As you move any Mixer knob or slider a continuous readout of its setting displays at the bottom of the window. At the desired position simply release the mouse button to set the value.
Volume Slider
|
To use the slider controls, simply click, hold and drag the control knob using the mouse or click on the control strip above or below the knob to move the slider in small increments. Holding the mouse button down on the control strip causes continuous movement of the control in small increments until the mouse button is released. |
Pan Slider
|
If you need to see or edit the precise value of a knob or slider you can right mouse click on the knob to pop up a dialog box which displays the exact setting as a number, allowing you to manually type in a new numeric value (e.g., 80, 28, 12, etc.). |
These knobs and sliders can be automated with MIDI controller messages for volume, pan, chorus, and reverb that are present as events in a song.
Track Controls
The Mixer has different controls for MIDI tracks and audio tracks.
MIDI Track Strip
This is the Mixer strip for a MIDI track.
|
Click on the patch number box to see the Select Patch dialog where the name of the patch will be highlighted. You can select a new patch from this dialog. Control knobs for Reverb, Chorus, Modulation, and Expression effects have a smooth “real feel” response. Right-click on these control knobs to type in an exact controller value. Click on the [M] mute button above the fader to turn tracks on and off, i.e., to toggle between active and mute states. A red button indicates the track is muted, green indicates it is playing. The [S] solo button will change to bright yellow when the track is soloing. Right-click on the sliders to type in an exact fader level. The track name (from the Tracks window) is shown vertically to the left of the Volume slider. Each track strip has its own stereo VU meter. The LR stereo pan slider also has a smooth, even response with the option to right-click and type in an exact value. Click in the “Out” box to assign the track to a MIDI output port. DXi and VSTi synths are identified with an S. For example, the default DXi synth or VSTi synth is S16. Selected tracks are highlighted in red or yellow, as in the Tracks window. |
Hover the mouse over any track number to see a summary of the track settings (MIDI or audio).
|
A click in area around the track number will open the context menu with a full list of commands and settings for the particular track. This is the same menu that opens with a right-click in the Tracks window, so it reduces the need to switch back and forth between windows. |
Audio Track Strip
This is the Mixer strip for an Audio track.
|
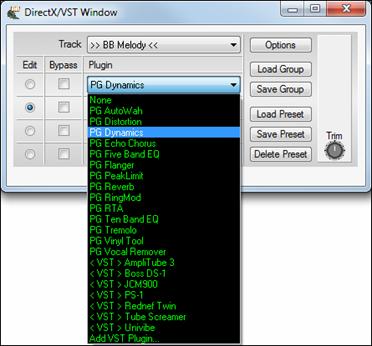
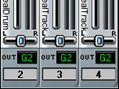
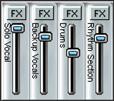
The [FX] button opens the DirectX/VST Window where up to four real time effects can be inserted into the track. When effects are assigned the button appears “pushed in.” Each track has four auxiliary effects sends that can be assigned to any four of the eight available Aux busses. Each Aux bus can have up to four chained effects. The rotary knobs set the send level to each Aux bus. Right-click on a knob to enter an exact level for the send. Click on the [M] mute button above the fader to turn tracks on and off, i.e., to toggle between active and mute states. A red button indicates the track is muted, green indicates it is playing. The [S] solo button will change to bright yellow when the track is soloing. The track name displays vertically to the left of the volume slider. The track name is entered in the Tracks window. Right-click on the volume slider to enter an exact fader level. Each track strip has its own stereo VU meter. The LR stereo pan slider also has a smooth, even response with the option to right-click and type in an exact value. Tracks can be assigned to audio subgroups using audio output ports that do not currently have a driver port assigned. This track is assigned to subgroup 2. When using audio subgroups the Aux busses should also be sent to that subgroup, so auxiliary busses 5, 6, 7, and 8 would be assigned to Subgroup 2 (G2) in this example. |
![]() Press the [FX] button to bring up the DirectX/VST Window, and you can select/edit the effects you wish to insert. When effects are assigned to a track the [FX] button appears “pushed in.”
Press the [FX] button to bring up the DirectX/VST Window, and you can select/edit the effects you wish to insert. When effects are assigned to a track the [FX] button appears “pushed in.”
|
A click in area around the track number will open the context menu with a full list of commands and settings for the particular track. This is the same menu that opens with a right-click in the Tracks window, so it reduces the need to switch back and forth between windows. |
Master Controls and Mixer Utilities
|
The two knobs in the All column serve as master reverb and chorus settings. These controls will affect the overall level of Reverb and Chorus without changing the settings on individual tracks.
The volume slider control in the All column is the master volume control. This setting is also displayed on the main toolbar. The L-R panning knob in the All column will change the settings for all 48 tracks at the same time. When a .SEQ file is saved, all of the Mixer’s current volume, pan, chorus, and reverb settings are also saved. These settings will be restored when the file is reloaded. |
The current mixer track corresponds to the current/highlighted track in the Tracks and/or Bars windows. You can change the current track in the Mixer window simply by clicking on the track number.
The Mixer’s Range Combo settings are determined by the display configuration you set with the splitter bar.
|
|
These two examples show the Range Combo settings with the splitter bar set to show 16 or 24 tracks at a time, but you could use different settings depending on the size of your display or on what combination of track strips, Aux busses, and output ports you want to see. |

This panel is scrollable, so if you can’t see all of the faders just use the scroll bar to get to the one you want.

|
The [Default] button located on the lower-left of the Mixer will reset all mixer parameters to the default settings. |
|
The Tune knob lets you fine-tune your synth or MIDI sound source. When you click on the Tune knob you’ll hear an “A” note sent out through the current part. Adjust the knob until the module is set to the desired tuning and release the mouse button. |
|
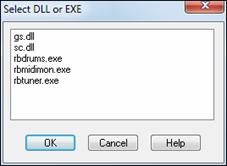
This button launches the Select DLL or EXE dialog that lets you select a .DLL or .EXE that was written specifically to work with RealBand. The name of the button changes from .EXE to .DLL depending on the plug-in that is running. |
|
All .DLLs or .EXEs that begin with the “$” character, e.g., $GS.DLL, will show up in the dialog (without the “$” character). |
|
This run button (to the left of the [.EXE] [.DLL] button) changes to show the name of the currently running .DLL or .EXE plug-in, such as the GS Settings dialog or the RealBand built-in Tuner. Click on this button to open the window displaying the currently running application. |
These .DLLs and .EXEs are small plug-in programs that have been specifically designed to work with the program to extend functionality and features, such as the .DLL plug-in that is used to edit Roland GS settings (gs.dll). All of these special .DLL/EXE plug-in files should reside in the RealBand default directory, e.g., c:\RealBand. A list of all plug-in files will be displayed automatically.
|
Clicking on the Record Mixer Moves button starts the song playing and lets you record only mixer moves. The controller moves are saved as MIDI events in the selected track (including audio tracks). |
|
The Delete button in the mixer will automatically delete all mixer events (volume, reverb, pan, chorus) that are currently embedded within the song's selected tracks. |
|
The Insert button in the mixer will automatically insert Mixer Events (volume, reverb, pan, chorus) into song’s non-blank tracks. |
|
Sometimes a stereo mix will have problems when it is played back in mono. Use this checkbox to hear the mix in mono and check for problems such as flanging or canceling. |
Creating Audio Subgroups in the Mixer
Unassigned Outputs Work As Subgroups
![]() When this checkbox is enabled in the Audio preferences dialog, any audio output ports that do not have a driver port assigned to them will function as subgroups. A subgroup is a bus or signal path that gives you the ability to control several tracks as a group.
When this checkbox is enabled in the Audio preferences dialog, any audio output ports that do not have a driver port assigned to them will function as subgroups. A subgroup is a bus or signal path that gives you the ability to control several tracks as a group.
Let’s suppose you only have one audio Output Driver port installed in RealBand and you’ve enabled the “Unassigned Outputs Work As Subgroups” checkbox. Audio Output Ports 2 -16 can then become subgroups.
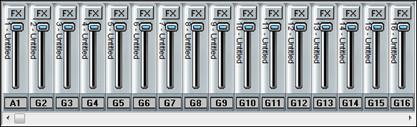
Note that this panel is scrollable, so if you can’t see all of the faders just use the ◄ ► scroll arrows to get to the one you want.
|
If you were to then set the output ports of tracks 2, 3, and 4 to G2 (i.e., port 2, which is now called Subgroup 2), and you were to adjust the volume of Subgroup 2 in the mixer the same way you do for output ports, this will affect the volume of all 3 tracks as a whole. You could also add effects to the subgroup in the mixer the same way you do for output ports. For example, you could apply an EQ to the subgroup as a whole. |
|
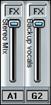
|
The final output of the subgroup (G2) is sent to the audio output port (A1).
Mixer labels for master effects
You can type in a label and it is shown vertically next to volume slider, and the labels are saved with .SEQ files. Right click on the fader to enter the label.

Real Time Audio Effects
Real time effects will let you add your favorite effects (such as chorus, reverb, EQ, etc.) at the same time that the audio tracks are played without permanently altering the actual track data. You can apply real time DirectX and VST effects to the audio tracks, Aux busses, audio subgroups, and audio output ports.
Track FX Inserts
|
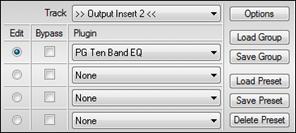
On the mixer, there is an [FX] button at the top of each channel (track) strip of the mixer. Press the [FX] button to bring up the DirectX/VST Window and you can select/edit a chain of up to four effects plug-ins you wish to insert for just that particular track. The “Track” field of the DirectX/VST Window lets you choose a track in which to select or edit effects. The “Edit” radio buttons let you chose which of the four effects to edit in the group of effects available in each Track. |
DirectX/VST Window
In the illustration, the Melody is the currently selected Track, and slot 1 (PG Dynamics) is selected for editing.

Effects Groups and Presets
The [Load Group] and [Save Group] buttons let you load and save the effects settings for the currently selected track. The [Load Preset] and [Save Preset] buttons let you save and load presets for the current effect (such as Echo/Chorus). The [Delete Preset] button lets you remove a preset from the list of already saved presets.
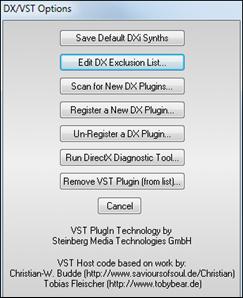
DX/VST Options
The [Options] button opens the DX/VST Options dialog.
|
These options are for managing the real time DirectX and VST effects plug-ins on your system. The chapter on Digital Audio Features has complete details. |
Mono Tracks Can use effects in Stereo Mode
![]() This setting in the Audio Options dialog allows mono audio tracks to use the real time effects track inserts in stereo mode for better sounding mixes.
This setting in the Audio Options dialog allows mono audio tracks to use the real time effects track inserts in stereo mode for better sounding mixes.
Aux Busses
|
Each track's mixer channel strip also has four assignable AUX knobs that let you individually control the send levels for up to four auxiliary effects on each track. There are eight Aux (auxiliary) effects busses in the Mixer window. Each allows a chain of up to four effects. You can adjust the Send level, Return level, and output port destination (audio port or subgroup) for each bus. The [FX] (effects) button at the top of each Aux strip brings up the DirectX/VST Window so you can select effects or edit effects settings. When a buss has any effects assigned to it the [FX] button appears to be “pushed in.” |
|
Effects can also be applied to the individual audio subgroups and output ports. Each subgroup and audio port has an FX insert, with slots for four chained effects. This is useful if you wish to apply special effects to a selected group of tracks, or apply them globally to the final stereo output. |
Real Time Effects Reset
|
The [Reset Realtime Effects] button in the Audio preferences dialog removes any real time effects from your project so you can begin remixing from scratch. |
Notes on Performance
The number of real time effects that you can expect to activate at a time without stressing the system depends on the speed of your computer. Normally you would mostly be using the Aux busses, since the effects used in the Aux busses can be applied to multiple tracks efficiently.
Let’s say you select a reverb in the Aux1 section of the mixer, and you use the Aux1 send knobs for five tracks to use Aux1 for reverb. In this case, there would only be one instance of this reverb plug-in active regardless of the number of tracks (5) that were utilizing the Aux1 bus, all tracks utilizing Aux1 share the same signal path.
Recordable Mixer Moves
Audio track mixer moves (Vol/Pan/Aux1/Aux2) are recordable, and you can insert/delete/edit the associated MIDI controller events in the Event List. To record Mixer moves the current track should be set to the track in which you want to record the moves.
- Rehearse the Mixer move while playing the song, noting the “begin” and “end” points for the move. It’s often useful to enable the metronome for reference during playback and recording.
 Start recording with the Mixer moves record button and perform the Mixer moves as rehearsed. Stop recording.
- Answer [Yes] to “Keep Recorded Mixer Moves?” They will show up as a series of MIDI controller events in the Event List for the selected track.
Alternatively, you could just use the Edit | MIDI | Fill command or insert MIDI controller events into the event list for the particular audio track.
Unconditional 30-Day Money Back Guarantee on all PG Music products purchased from PG Music Inc.
PG Music Inc.
29 Cadillac Ave Victoria BC Canada V8Z 1T3
Sales: 800-268-6272, 250-475-2874,+ 800-4746-8742*
* Outside USA & Canada where International Freephone service is available.
Access Codes
Tech Support: Live Chat, support@pgmusic.com
 Online now
Need Help?
Customer Sales & Support
|
Phones (Pacific Time) 1-800-268-6272 1-250-475-2874 |
||
| Live Chat | ||
| OPEN | Online Ordering 24/7 |
|
| OPEN | Forums, email, web support |