
Search Manual
RealBand® 2018 for Windows® User’s Guide
Chapter 7: Digital Audio Features
Overview
Audio tracks are great for recording live performances; they work much like tracks on a tape recorder. They are also used for RealTracks and RealDrums since these parts are created from live audio recordings of studio musicians.
You can edit audio data by cutting and pasting in the Bars window or the Audio Edit window, you can import .WAV, .MP3, .WMA, .WMV, and .CDA files to be inserted into audio tracks, and you can also process audio tracks with the professional effects included with RealBand.
|
Any track can be designated as an audio track - mono or stereo. Click on the track icon to set the track type. |

Other Audio Formats
RealBand supports .WAV, .WMA, .WMV, .CDA, .MP3, .MP4, and .M4A audio file formats.
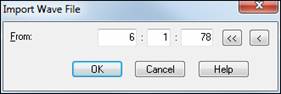
These files can be loaded directly with the File | Open menu option, or they can be imported to an exact location in a specific track with the File | Audio | Insert Wave File command (Ctrl+F3). |
|
Loading and Playing Audio Files
Let’s load an audio wave file and explore the audio features of RealBand. RealBand files have the .SEQ (sequence) file extension and open in the same way as a MIDI file.
|
Use the “Open a File” button or the menu command File | Open to go to the RealBand directory. In the “Samples” folder choose the file tutor2.seq. |
Tracks Window
Here’s how the Tracks window looks when the audio file is loaded.

|
Press the Play button. You should now be hearing the demo song playing through your computer’s sound system. What you’re hearing are four discrete tracks of digital audio. |
|
To mute any track, click on [M] button to the right of the track name. When the button is red the track is muted. |
![]()
![]() You can solo any track or combination of tracks by pressing the [S] buttons. Bright yellow = soloing.
You can solo any track or combination of tracks by pressing the [S] buttons. Bright yellow = soloing.
Mixer Window
|
To adjust track volume level and panning controls, open the Mixer window by selecting the Window | Mixer menu item or by clicking the Mixer button on the toolbar palette. |
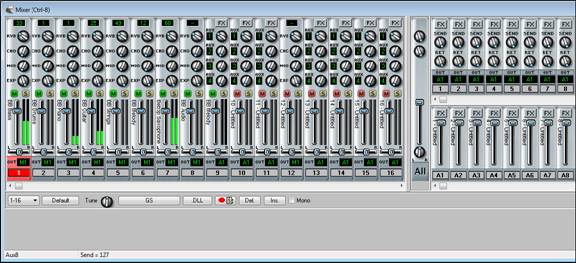
Here, you can change things such as track levels and panning to the left or right speaker as the song is playing.
|
Select a track view range from the combo list, or use the Mixer window left/right scroll bar directly above to scroll horizontally across the mixer layout.
|

|
The vertical splitter bar between the track strips and the bus strips can be moved right or left to make a custom mixer view. |
|
The Delete button in the mixer will automatically delete all mixer events (volume, reverb, pan, chorus) that are currently embedded within the song's selected tracks. |
|
The mixer’s Insert button will automatically insert mixer events (volume, reverb, pan, chorus) into the song’s non-blank tracks. |
The Ctrl+M and Ctrl+U hot keys are a convenient way to mute or unmute any track within the Bars or Mixer window.
|
Mixer moves can be recorded as the song is playing. There is a special “Record Mixer Moves” button in the mixer that will let you record ONLY mixer moves. This special button also lets you record mixer moves onto an audio track without the audio being silent during recording. |
Creating Audio Subgroups in the Mixer
Unassigned Outputs Work As Subgroups
![]() When this checkbox is enabled in the Audio Preferences dialog, any audio output ports that do not currently have a driver port assigned to them will function as subgroups. A subgroup is a bus or signal path that gives you the ability to control several tracks as a group.
When this checkbox is enabled in the Audio Preferences dialog, any audio output ports that do not currently have a driver port assigned to them will function as subgroups. A subgroup is a bus or signal path that gives you the ability to control several tracks as a group.
The Mixer chapter has full instructions for creating audio subgroups.
Video Window
You can load videos that you have already downloaded from YouTube or elsewhere into the RealBand Video Window. The audio is extracted from the video to the audio track, and you can slow down video and audio to help with learning and transcription, with Hi-Quality audio preserved at extreme tempo slowdowns.
To play a video, either use the [Open] toolbar button and select Open File from the menu or press the Views - [Video] button which launches the Video Window with its own toolbar which has an [Open] button.
Once you open a video, the Video Window will open.
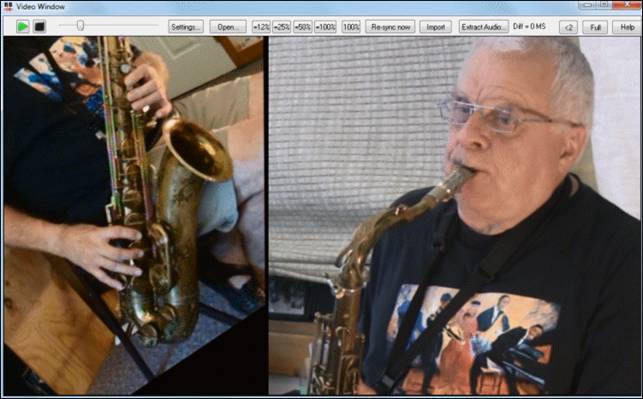
![]() There is a ‘Full’ Screen button to make the video full screen, and the [Esc] key will go out of the full screen mode.
There is a ‘Full’ Screen button to make the video full screen, and the [Esc] key will go out of the full screen mode.
![]() Play, Stop or Move to a position in the video using the Transport toolbar.
Play, Stop or Move to a position in the video using the Transport toolbar.
![]() As the song plays, you can slow down the video, and the audio will slow down and stay in sync.
As the song plays, you can slow down the video, and the audio will slow down and stay in sync.
The quality of the audio at slower tempos is great - better than most video player programs. The video slowdown range is 50-100%. If you want slower than that, you can select values as low as 12%, which is an 8X slow down (1 second would take 8 seconds), and still has good quality. Note: When set to values lower than 50%, the Video Window is disabled, but the audio continues at the extreme slow tempo. This is a great tool for transcription. You can select a range in the Track window and loop a section of the video at a low tempo for example.
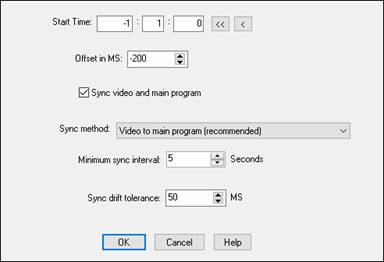
![]() If the audio and video have become out of sync, press this button to re-sync them.
If the audio and video have become out of sync, press this button to re-sync them.
![]() This will open the Video Settings dialog, which allows you to adjust the audio and video playback time.
This will open the Video Settings dialog, which allows you to adjust the audio and video playback time.
Real Time Effects Plug-Ins
RealBand supports DirectX and VST effects, which you can apply in real time to the audio tracks. A full range of PG Music effects is included with the program; you can also use any other third party DirectX or VST effects to add effects in real time without permanently altering the actual track data.
Installing DirectX Effects Plug-Ins
DirectX effects are installed by default in the Program Files folder on Windows computers. They will be present in the “Plugin” list in the DirectX/VST window. There is a “Scan” feature in the DirectX/VST Options that will search for newly installed DirectX plug-ins not on the list.
Installing a VST Effects Plug-In
|
Click on the [FX] button in the Mixer window or the [VST/DX Synth] button on the toolbar to open the DirectX/VST Window. |
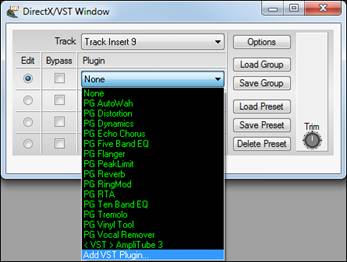
In the Plugin list, select the “Add VST Plugin...” item at the bottom of the list.
Select a VST plug-in .dll file in the following Select a VST plug-in dialog, and it is added to the plug-in list. After you add each VST, the plug-in is permanently added to the list. You only have to add each plug-in one time.
Remove VST/VSTi Plug-In
You can remove a VSTi or VST plug-in that you have installed. This only removes the VST/VSTi plug-in from RealBand' list of remembered VST plug-ins. The feature does not uninstall a plug-in or delete any plug-in files.
After you remove a plug-in from view in RealBand, that plug-in still remains usable to any other VST program where you prefer to have it available.
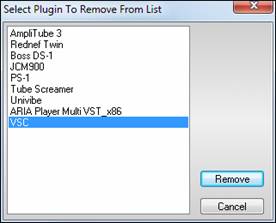
To remove a VSTi or VST plug-in from RealBand:
![]() Click on the [Options] button in the DirectX/VST Window to launch the DX/VST Options dialog.
Click on the [Options] button in the DirectX/VST Window to launch the DX/VST Options dialog.
![]() Select the [Remove VST Plugin (from list)…] button.
Select the [Remove VST Plugin (from list)…] button.
Select the plug-in to remove so it is highlighted in the list, then click the [Remove] button.
Uninstall a VST/VSTi Plug-In
If you want to permanently delete a VST/VSTi plug-in from your computer, first check if the plug-in has an uninstaller in the Windows menu “Start | Settings | Control Panel | Add or Remove Programs.” If an uninstaller is available, that is the best way to get a clean plug-in uninstall.
With plug-ins that do not have an uninstaller, it is safe to drag the plug-in's DLL and any other plug-in support files to the Windows Recycle folder.
DX/VST Options
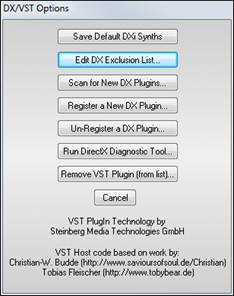
The [Options] button brings up the DX/VST Options dialog where you can manage your real time effects plug-ins.
[Save Default DXi Synths] saves your plug-in default settings.
The [Edit DX Exclusion List…] button lets you edit the list of plug-ins to include or exclude in the DirectX editor. This is useful if you have some plug-ins which were found and which aren’t compatible with RealBand. If you edit the exclusion list, you’ll see a dialog box with the left side displaying the included plug-ins and the right side displaying the excluded plug-ins:
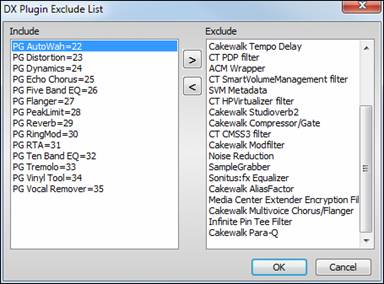
The [>] button moves a plug-in from the Include to the Exclude list.
The [<] button moves a plug-in from the Exclude to the Include list.
The [Scan for New Plug-Ins…] button will cause RealBand to scan for newly installed plug-ins.
The [Register a New Plug-In…] button can be used to register a plug-in with DirectX, so that audio applications such as RealBand can use the plug-in if you have a plug-in that doesn’t automatically register itself.
The [Unregister a Plug-In…] button removes a plug-in from DirectX so that audio applications will no longer be able to use this plug-in.
The [Run DirectX Diagnostic Tool…] button will run the Microsoft Direct X Diagnostic tool, which checks for problems with DirectX.
Select the [Remove VST Plugin (from list)…] button to remove a VST plug-in so that it is no longer included in the “Plugin” list in the DirectX/VST Window.
Effects Controls
|
The [FX] track insert button assigns effects to the specific track alone. Up to four effects can be chained on the FX insert. Each of the four Aux control knobs can be assigned to one of the eight auxiliary effects busses. The position of the control knob determines the amount of the signal that is routed through the auxiliary bus and how much of the “dry” signal goes directly to the audio output bus. |
Auxiliary Effects Busses
Each of the eight Aux busses can have a chain of up to four real time effects. These can be any DirectX or VST effects that you have installed on your system, either the included PG Music effects or third party effects.
The effects on each bus or insert are chained (in sequence), which means that the processed signal from each plug-in is then further processed by the chain’s next plug-in. There are no hard-and-fast rules, but a typical effects chain might start with effects that condition the incoming signal (noise gate, EQ, dynamics), then add effects that alter the tonal qualities of the sound (chorus, distortion, modulation) and then time-based effects (reverb, delay).
To run effects in parallel, rather than chained, you can assign them to any of the eight auxiliary busses and route each track individually through any four effects.
![]()
Choosing and Editing DirectX/VST Effects
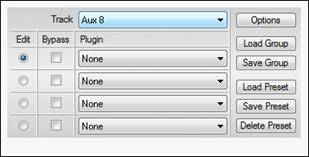
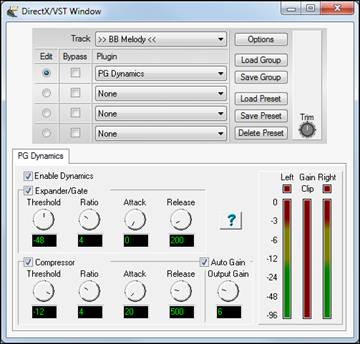
The Track field of the DirectX/VST window lets you choose a track in which to select or edit effects. A “track” can be a Track Insert, an Aux bus, or an Output Insert.
The “Edit” radio buttons let you choose which of the four effects to edit in the group of effects available in each track. The “Bypass” checkboxes lets you bypass any of the four effects in a group.
In the example, the BB Melody is the currently selected Track and slot 1 (PG Dynamics) is selected for editing.
The [Load Group] and [Save Group] buttons let you load and save the effects settings for the currently selected track. The [Load Preset] and [Save Preset] buttons let you save and load presets for the current effect. The [Delete Preset] button lets you remove a preset from the list of already saved presets.
VST/VSTi Additional Panel Controls
VST is necessarily different from DirectX/DXi, and some extra controls are available for VST plug-ins. DirectX/DXi plug-ins save their presets to the Windows Registry and only one setting is “alive” at a time.
VST/VSTi plug-ins save their presets to disk files. VST/VSTi plug-ins contain a bank of presets in memory. You can switch between presets while editing, and each edited preset is remembered in the current bank.
VST Generic User Interface
VST/VSTi plug-ins are not required to have a fancy graphic control panel. There are many “faceless” VST plug-ins that have many adjustable parameters, but no fancy control panel. When you open such a plug-in, the control panel will look like this example. RealBand presents one “generic” slider for each adjustable parameter in the plug-in.
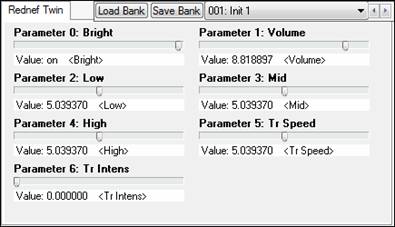
Parameter Name: Simply the name of each adjustable parameter.
Value Slider: Move the slider to adjust the parameter value.
Value Indication Text: Displays the value of the slider, as interpreted by the plug-in. In the above example, Parameter 0: Bright is interpreted as an ON/OFF switch, but Parameter 1: Volume is interpreted as a value from 0 to 10.
The number of real time effects that you can expect to activate at a time without stressing the system depends on the speed of your computer. Normally you would mostly be using the Aux busses, since the effects used in the Aux busses can be applied to multiple tracks efficiently. In other words, it isn’t very taxing on the CPU to apply an Aux effect to multiple tracks. For example, let’s say you were to select a reverb in the Aux 1 section of the mixer, and you adjust the Aux1 send knobs for 5 tracks so that they were all using Aux 1 for reverb. In this case, there would only be one instance of this reverb plug-in active in RealBand, regardless of the number of tracks (5) that were utilizing the Aux1 bus. What’s nice about this is that you can apply completely different amounts of the same effect to different tracks, so some tracks can be very “wet” with lots of reverb, while others can be relatively “dry” with very little reverb.
If you use Track Inserts on multiple-tracks, you will use up CPU processing power relatively quickly and your computer may have trouble handling this depending on the speed of your CPU. The reason for this is that the Track Inserts each involve the usage of a unique instance of each effect, since each Track Insert is a unique signal path for each track.
Reset Effects
|
The [Reset Realtime Effects] button is found in the Audio Preferences dialog. It removes all real time effects from your project so you can remix your project from scratch. |
Unconditional 30-Day Money Back Guarantee on all PG Music products purchased from PG Music Inc.
PG Music Inc.
29 Cadillac Ave Victoria BC Canada V8Z 1T3
Sales: 800-268-6272, 250-475-2874,+ 800-4746-8742*
* Outside USA & Canada where International Freephone service is available.
Access Codes
Tech Support: Live Chat, support@pgmusic.com
 Online now
Need Help?
Customer Sales & Support
|
Phones (Pacific Time) 1-800-268-6272 1-250-475-2874 |
||
| Live Chat | ||
| OPEN | Online Ordering 24/7 |
|
| OPEN | Forums, email, web support |