
Search Manual
RealBand® 2019 for Windows® User’s Guide
Appendix A: PG Music DirectX Plug-Ins
PG Reverb
Reverb is the spacious sound of multiple reflections in a room. In most rooms, reverb has three distinct phases:
- The listener first hears the direct sound from the instrument.
- Then a group of distinct echoes arrives, first reflections from the walls and ceiling.
- After the first reflections, more closely spaced echoes build up from secondary reflections bouncing between room surfaces. As the reverb decays, the echo density builds up into a final sheen of hundreds of quiet closely spaced echoes.
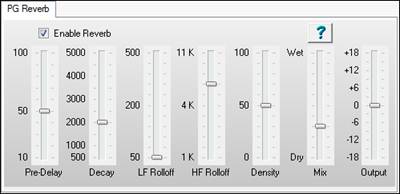
Pre-Delay is the time delay of first reflections.
Decay is the time it takes for reverb to decay. Reverb Time is measured as RT60, the time it takes reverb to decay to a level -60 dB below the dry signal.
Brightness is the rate at which the high frequencies die away as the reverb decays. Rooms with hard surfaces are typically bright, but rooms with soft surfaces are usually darker.
Density is the density of low-level echoes near the end of the reverb tail. High Density settings add sheen to the sound.
Mix is the proportion of original (Dry) signal to the reverb (Wet) signal. When PG Reverb is inserted in an Aux Return set Mix to 100 percent to keep the original dry signal from returning on the Aux. Any original dry signal returning on the Aux would dilute the effect of the reverb.
Output adjusts the final level of the plug-in.
Typical Settings
- A large hall might have long Pre-Delay, long Decay, and moderate Density.
- A hard large space such as a gymnasium might have long Pre-Delay, high Density and high Brightness.
- A soft large space such as a concert hall with carpet, padded seats, hangings, might have medium Density and low Brightness.
- A small hard space such as a tile washroom, might have short Pre-Delay, medium-to-long Decay, high Density, and high Brightness.
- A small soft space such as a large living room might have short Pre-Delay, short Decay, medium-to-low Density, and low Brightness.
PG Echo Chorus
PG Echo Chorus creates medium to long delay effects.
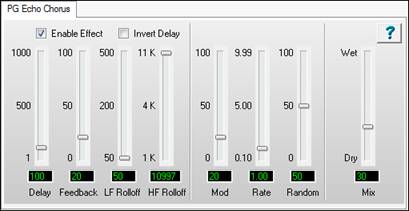
- A Delay longer than about 40 milliseconds is perceived as echo or slapback.
- A Delay in the range of 20 to 40 milliseconds is perceived as doubling or chorus.
- A Delay shorter than 20 milliseconds is perceived as a comb-filter effect rather than delay. Very short delay is called Flanging. Short delay flanging is better accomplished with the PG Flanger plug-in.
These delay ranges for Echo, Chorus, and Flange are approximate, and depend on the nature of the audio source. Sustained instruments may be perceived as a flange filter effect, even with rather long delays. Percussive instruments may be perceived as short slapback, even with very short delay time.
Pitch Modulation
A chorus of voices sounds big, because the individual voices have slightly different pitch and timing. PG Echo Chorus causes pitch and timing variation with the modulation section (the three sliders in the middle of the panel).
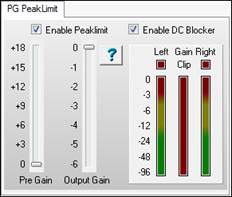
PG Peak Limit
PG Peak Limit is a DirectX plug-in that prevents signals getting loud enough to clip the audio. PG Peak Limit can also remove any DC Offsets that have crept into the audio stream. DC Offsets can reduce the available dynamic range of your music, and cause clicks at the beginning or end of audio files (when the silent audio level suddenly “jumps up” to the DC Offset).
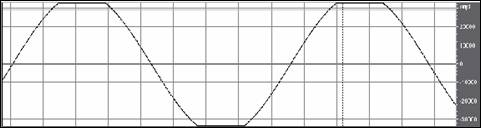
Audio Clipping happens when the audio is so loud that the sample numeric range is exceeded, and the tops of the waves are “clipped off.”
PG Peak Limit is a look-ahead peak limiter—it can “see peaks coming” and begin to reduce the output gain before over-level peaks can happen.
PG Peak Limit uses multi-stage Release Envelopes to smooth out the gain. This allows Peak Limit to recover very quickly after brief loud peaks, but recover more slowly after sustained over-level passages.
You get quick recovery from the occasional brief loud peak. Intermodulation distortion and pumping is difficult to hear on brief loud peaks, so we can afford to deal with quick peaks without drastically affecting the level of surrounding audio.
However, recovery time is longer on sustained loud passages, to avoid intermodulation distortion and “pumping” between low frequency and high frequency instruments.
Meters
The Left and Right level meters indicate the plug-in output level, including whatever extra loss is contributed by the Output Gain slider.
However the Gain meter always shows Gain Reduction before the contribution of the Output Gain slider. In other words, the Output Gain slider does not affect the Gain Reduction meter.
Only the Left meter is used with Mono signals.
The Clip indicators light when the plug-in output has exceeded 0 dB. The Clip indicators cannot light up if Peak Limit is enabled, because Peak Limit never allows Over-Level outputs. However, if Peak Limit is not enabled, you can see any over-level signals that might appear on Peak Limit’s input.
Enable Peak Limit allows the plug-in to control loud peaks.
Enable DC Blocker allows the plug-in to eliminate DC Offsets.
Pre Gain
Apply extra gain to the audio before limiting. If a song is too quiet, raise the Pre Gain to get a louder signal, without having to worry about clipping the output.
Even if a song is quite loud, you can apply extra gain to make a “fatter” sound. Music is often boosted via a Peak Limiter for a more consistent level.
If Pre Gain is boosted too much, the audio can sound “squashed.” It will be very loud, but you may hear “pumping” as the gain continually adjusts to the input level. Squashed music can sound “loud but lifeless.” It is nice to make nice loud songs, but you risk losing musical dynamics if you overdo Pre Gain.
Post Gain
Use Post Gain if you want to reduce the dynamic range of a track, but you don’t want the output level “as loud as it will go without clipping.”
Typical Uses
PG Peak Limit is typically inserted as the last plug-in on the Master Output Insert.
Applied to the Master Output Insert, PG Peak Limit makes sure your mix does not clip, and it eliminates any DC Offset.
Unless a song’s source tracks are really quiet, making it difficult to get enough gain just with the RealBand Mixer sliders, it is usually the “right thing to do” to set both Pre Gain and Post Gain to 0 dB. With this setting, PG Peak Limit offers a pure output clipping protection function, and never changes your music unless an over-level peak happens somewhere in the song.
If your tracks are well performed and do not obviously require drastic fix-up, it is probably best to use just a single instance of PG Peak Limit, inserted on the Master Output.
The RealBand mixer uses floating-point math, which means that the mixer cannot clip internally. The only way clipping can happen is when the floating point samples from the Master Output signal are converted back to 16 bit or 24 bit samples for playback or mixdown.
Therefore, with good source tracks, it doesn’t matter if the mixer internally exceeds 0 dB, provided you take precautions on the Mixer Output.
- Watch the output meters and reduce the master if you see clipping, or
- Insert PG Peak Limit on the Master Output to prevent output clipping.
Aux Return
In most cases, it makes no sense to insert PG Peak Limit on an Aux Return, unless you wish to apply Peak Limit to other unruly effects that are chained up-stream on the same Aux Return plug-in group.
Track Insert
PG Peak Limit can be used on a Track Insert as a quick-and-easy-to-adjust compressor, smoothing a track’s dynamic range.
PG Peak Limit may be helpful on tracks with inconsistent levels. If inexpertly performed or recorded, any track can have inconsistent levels. PG Peak Limit is not a cure-all for badly performed tracks. It is much better to record a proper performance, rather than apply a band-aid to fix-it-in-the-mix. However, if you should become stuck trying to mix an impossibly inconsistent performance, PG Peak Limit could help a bit.
PG Dynamics
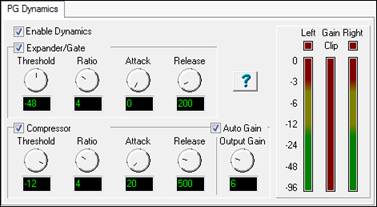
PG Dynamics will apply compression, expansion, or a combination of the two.
Compressor
A compressor “squeezes” the dynamics of a performance, reducing the difference between loud and quiet passages.
Compression is used for leveling a performance. If some sections of a performance are too loud and other sections too soft, compression can reduce the difference.
Compression can make a signal loud with more sustain. This can be desirable when preparing music for noisy environments, such as club music, car music, radio and television sound, or small computer multimedia speakers.
Live music has a wide dynamic range. Live music peaks are much louder than the average music level. When playing live music on a weak sound system— if playback volume is raised so you can hear soft parts, the speakers can distort on loud peaks. Compression can level the peaks, making a sound system can seem louder without distortion.
The PG Dynamics compressor is a downward compressor with make-up gain.
A downward compressor works by making loud signals softer. After loud passages have been made quieter by the compressor, you can apply make-up gain to raise the final audio level.
Compressor checkbox enables PG Dynamics’ compressor module.
Threshold sets the level where compression begins. Below Threshold, the level is unchanged. Above Threshold, as the input gets louder, the gain is gradually reduced.
Ratio adjusts how drastically the compressor behaves.
At a 2:1 ratio, an over-threshold input change of 6 dB would yield an output change of 3 dB. An input change of 12 dB would yield an output change of 6 dB. Modest ratios are appropriate for smoothing a vocal or drum performance.
At a 10:1 ratio, the difference between loud and soft signals is changed more drastically. An input change of 6 dB would yield an output change of only 0.6 dB. A 12 dB input change would yield an output change of 1.2 dB. At high ratios, loud and soft input signals arrive at the output at nearly the same level. High ratios are useful for special effects— add long sustain to clean guitar, or make spoken dialog loud and intelligible on small computer speakers.
Attack is the time required for the compressor to respond to an increase in amplitude.
As a general rule, use fast Attack values to compress individual notes, but use slow Attack values to compress the overall level of a track.
With fast Attack, each note will be modified, which can keep the notes within a phrase more consistent. This can tighten up an inconsistent performance, but also could remove the expressiveness from an expert expressive performance.
With slow Attack, individual notes are not affected very much, but the compressor controls long-term level. Individual notes can retain their expressive emphasis, but the long-term audio level is controlled.
Release is the time required for the compressor to respond to reductions in amplitude.
Fast Release lets the compressor “spring back” quickly after a loud passage.
Slow Release makes the compressor wait awhile before raising gain after a loud passage.
Use fast Release to compress individual notes. Use slow Release to compress the overall level of a track.
Very fast Attack and Release settings can sometimes cause intermodulation distortion on multi-instrument tracks (or wide-frequency-range single instruments such as Grand Piano). For instance, on a track containing both kick drum and hi-hat, the kick drum might audibly pump the hi-hat level.
Rule of thumb: Use moderate Attack and moderate-to-long Release on mixes, but use shorter Attack and Release on individual instruments.
With Auto Gain enabled, makeup gain is automatically adjusted to match the compressor settings.
As the compressor Ratio and Threshold knobs are adjusted, Auto Gain adjusts the Output Gain knob to set the output level to an “approximately good level.”
With slow Attack settings, the Auto Gain may be too high, causing the output to exceed 0 dB on fast note attacks. In this case, disable Auto Gain, and manually adjust the Output Gain knob for the desired output level.
Output Gain applies make-up gain to the audio output, in case the compressor settings make the signal too quiet.
Since PG Dynamics and the RealBand mixer use floating point math, the internal audio level can exceed 0 dB without clipping, as long as the level is reduced below 0 dB sometime before the mixer converts the output signal to 16 bit or 24 bit samples for playback or mixdown.
PG Dynamics can be safely adjusted so that occasional passages exceed 0 dB, as long as the signal is attenuated back into a safe range before exiting the RealBand Mixer. Adjust the final Mixer output level with the PG Dynamics Output Gain knob, or adjust the Mixer’s Track or Master sliders, or insert an instance of PG Peak Limit somewhere down-stream of any PG Dynamics plug-ins.
Expander/Gate
An Expander increases the difference between soft and loud sounds. The PG Dynamics Expander is a downward expander, which means it does not affect loud signals, but reduces the level of quiet signals. A Gate (sometimes called a noise gate) is simply a drastic, high-ratio Expander setting.
Expander/Gate checkbox enables PG Dynamics’ expander module.
Signals below Threshold are attenuated, but signals above threshold are not affected.
Ratio adjusts how drastically to attenuate below threshold.
At 1:2 Ratio, a -6 dB reduction of below-threshold input level, yields a -12 dB reduction in output level.
At 1:10 Ratio, a -6 dB reduction in input level, yields a -60 dB reduction in output level, effectively chopping off or gating low-level signals.
Modest Ratio can subtly reduce low-level noises between musical notes and phrases, without creating unnatural-sounding side effects.
High Ratio settings give more drastic results. Sometimes a high Ratio expander is useful as a special effect, but high ratio does not often sound natural.
Attack is the time required for the expander to respond to an increase of amplitude.
Release is the time required for the expander to respond to a decrease of amplitude.
Fast Release, combined with high Threshold and high Ratio, can cause odd-sounding decay tails. Sometimes it can even sound distorted. This is called Gate Chatter, and is a common side effect on expanders. If you hear Gate Chatter, use settings that are more conservative.
Using Compressor and Expander Together
High compression settings can raise low-level noise between musical phrases. To reduce hiss, noise, breathing sounds, lip smacks, kick drum squeak, snare drum rattles, or other quiet accidental noises between musical phrases, enable both the Compressor and Expander. Adjust the Expander to attenuate between musical phrases. This keeps the Compressor from boosting undesirable sounds.
When both compression and expansion are enabled, the signal first passes through the Expander, then passes through the Compressor, and finally the make-up gain is applied
PG Ten Band EQ
PG Ten Band EQ offers reasonably fine level of frequency contouring.
Fine frequency contouring is useful to repair a track with tonal flaws, but gentle tone shaping may sound more musical on tracks that basically sound OK, but need just a little tweaking.
If a track does not require fine tailoring of narrow bands, try PG Five Band EQ.
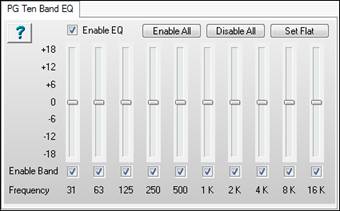
Enable Band
Though the processor load of an individual frequency band is very light, this plug-in can be made even more efficient by un-checking frequency bands that are not needed.
For instance, if a track only needs adjustment in the 250 and 500 Hz frequency bands, you could disable the other bands on that track.
Reducing the processor load can make it possible to run more simultaneous real-time plug-ins within RealBand.
When a band is disabled, the band is bypassed and receives no boost or cut. Bypassed bands have a flat frequency response, as if the slider was in the center position. This feature can also be used to help audition an EQ setting. If you are not sure that a certain band’s setting is making the sound better or worse, listen to the tune while toggling the band in and out. This is easier than constantly moving the slider to judge the effect of a setting.
- [Enable All] button enables all the bands.
- [Disable All] button disables all the bands. If you only want to enable one or two bands, it is quicker to [Disable All] and then enable the bands desired rather than to uncheck all the unwanted bands.
- [Set Flat] button returns all the sliders to the center position.
PG Five Band EQ
PG Five Band EQ is a convenient, simple effect for overall tone shaping. If a track requires finer control, try PG Ten Band EQ.
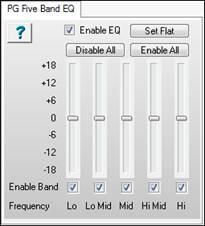
Enable Band
Though the processor load of an individual frequency band is very light, this plug-in can be made even more efficient by un-checking frequency bands that are not needed. For instance, if a track only needs adjustment in the Lo and Lo-Mid frequencies, you could disable the Mid, Hi-Mid, and Hi bands on that track. Reducing the processor load can make it possible to run more simultaneous real-time plug-ins within RealBand.
When a band is disabled, the band is bypassed and receives no boost or cut. Bypassed bands have a flat frequency response, as if the slider was in the center position. This feature can also be used to help audition an EQ setting. If you are not sure that a certain band’s setting is making the sound better or worse, listen to the tune while toggling the band in and out. This is easier than constantly moving the slider to judge the effect of a setting.
- [Enable All] button enables all the bands.
- [Disable All] button disables all the bands. If you only want to enable one or two bands, it is quicker to [Disable All] and then enable the bands desired rather than to uncheck all the unwanted bands.
- [Set Flat] button returns all the sliders to the center position.
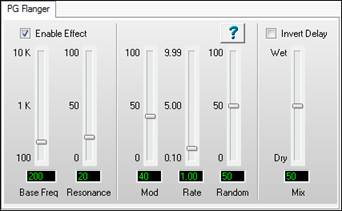
PG Flanger
Flange is a hollow, whooshing effect, created by mixing the original signal with a very short delay (usually less than 20 milliseconds).
Interference between the original and delayed signals, makes a comb filter —many peaks and dips in the frequency response. As delay increases, more peaks and notches appear in the comb filter, and the frequency of the lowest peak/notch descends.
In truth, any delay creates a comb filter, but as delay time increases, the number of peaks and notches multiply, and each peak or notch becomes very narrow. Above about 20 mS, there are so many narrow peaks/notches in the filter; the ear does not recognize individual peaks. The frequency response of a long delay usually sounds flat.
As a Flanger sweeps up and down, all the peaks and notches sweep up and down in tandem, and the spacing of the comb will change.
Many Flangers use a Delay control, as in a Chorus or Echo effect. However, since a Flanger acts like a filter, the PG Flanger uses a Base Frequency control, where the short delay is calibrated by frequency rather than milliseconds. This may make it more intuitive to dial up the desired frequency range.
Flange can be tasty on many types of instrument — Acoustic Guitar, Electric Guitar, Electric Piano, Bass, Drums, and Vocal.
Flange can be used as a quirky equalizer — Set slow modulation rate and little or no modulation depth. With this setting, the filter doesn’t move much (or at all). You can tune the flanger to statically emphasize specific frequencies in a signal.
Base Freq sets the lower limit of the lowest-pitched peak or notch in the comb filter. To get a wide sweep, set Base Freq low. Modulation will drive the frequency higher than the Base Freq at the “tops” of the modulation wave.
Resonance sets Flanger delay feedback. High resonance settings make peaks louder and notches deeper, creating a more pronounced effect.
Mod sets Modulation Depth, which controls how far the flanger sweeps. Think Vibrato Depth. When set to 100, it will sweep all the way from the Base Frequency up to about 10 KHz.
Rate is the Modulation Rate, which controls how fast the flanger sweeps. Think Vibrato Speed.
Random randomizes the modulation rate, to avoid a mechanical sweeping sound.
Mix is usually set to 50 percent for “classic” flanging, but you can reduce the setting for more subtle effects.
If PG Flanger is inserted by itself on an Aux Return, perhaps Mix should be set to 100 percent. Then adjust the amount of Flange at the Mixer output with RealBand’s “Aux Return Level control.”
Invert Delay
Invert the delay against the original signal. Inverted and non-Inverted have distinctly different sounds. The Invert setting makes a bright “classic” whooshing sound. Invert is even more dramatic at high Resonance settings.
With Invert enabled, low frequencies are attenuated, and the first filter Peak is at the Base Frequency. With Invert disabled, low frequencies are not attenuated and the first filter Notch is at the Base Frequency.
PG AutoWah
Wah effects were invented in the 60’s, pedal-controlled band-pass filters. In the 70’s, “envelope-follower” boxes became common for electric bass, clavinet, and guitar.
PG AutoWah is a classic envelope-follower effect. Loud input signals increase the filter cutoff frequency, and quiet input signals allow the filter to “close down.” Loud notes become brighter than quiet notes.
Distort adds some grit before filtering. When Distortion is set to a value of zero, there is no distortion. If attempting to AutoWah a mellow signal that doesn’t have many high frequencies, you can crank the Distort slider to add some buzzy highs before filtering.
Freq sets the filter’s lower frequency cutoff limit (in Hz). Quiet audio input levels allow the filter to drop no lower than the Lo Freq cutoff. If the Wah effect is too dark on quiet notes, increase Freq. If the wah effect is too bright on loud notes, try decreasing Freq or decreasing Sens.
Resonance adds a loudness peak at the cutoff frequency. When the filter sweeps around, this loudness peak emphasizes (resonates with) harmonics at the cutoff frequency. High resonance has a biting, synthetic effect. Low resonance is mellower sounding.
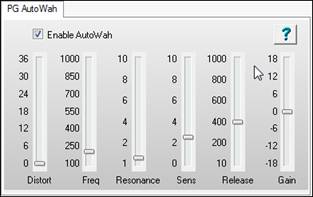
Sens adjusts the degree to which loud notes sweep the filter cutoff frequency. No level-sensitive sweep occurs when Sens is set to zero.
Release is the time (in milliseconds) that it takes for the filter to track note loudness decay. Adjust to taste.
Gain is applied if the plug-in settings make the signal too loud or too quiet.
PG Distortion
PG Distortion is a Soft Distortion effect. Soft Distortion is similar to over driven analog tape or tube amplifiers. Soft Distortion is mellow; it generates more even harmonics than hard distortion. Even harmonics can complement musical tones and chords. Tape or tubes have soft distortion because overloaded signal peaks are gently rounded off.
Hard Distortion is caused by over driven digital audio systems or solid-state amplifiers. Odd harmonics in hard distortion have a raucous sound — less musical sounding notes and chords.
Low Gain settings around 3 to 9 dB give subtle distortion, which may be perceived as “warm” or “fat.” Low Gain settings can be used to warm up vocal harmony, or fatten up drums and electric guitar. Many musicians prefer to record guitar and drums to analog tape, for a “fat” effect. Use modest amounts of Soft Distortion to fatten a track.
High Gain settings are more similar to the sound of a smoking guitar amp. Use high gain for Marshall-like electric guitar crunch. In Rap, Techno, Industrial, or Grunge styles, it is common to use high distortion to fry drum, synth, bass, or vocal tracks. Record a tame drum machine groove, and then distort the heck out of it for a nasty, rap street sound.
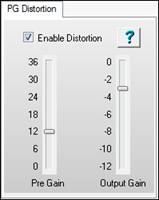
If the maximum gain doesn’t fry the signal adequately, make multiple passes on the same audio selection. With three or more passes of distortion, a signal can sound as ratty as your heart desires!!
Pre Gain — Adjust the amount of Soft Distortion.
Output Gain — Reduce the final level of the distorted signal. Distortion makes tracks sound louder. Use Output Gain to compensate by reducing the final level.
PG RingMod
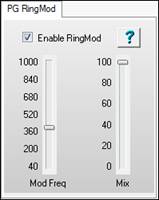
Ring Modulation is a strange effect, which works best for non-pitched sounds such as gongs, unusual percussion, and robot voices.
Ring Modulation is not a very useful effect on ordinary melodic or chord parts, because it radically changes the pitch of the signal.
PG RingMod is a balanced modulator, or four-quadrant multiplier. Carrier and Modulator signals are multiplied together, and only the sum and difference frequencies are passed. The original frequencies in each signal are suppressed.
Modulator Freq sets the frequency of the modulator sine wave.
Mix adjusts the mix between original signal and ring-modulated signal.
PG Tremolo
Tremolo applies amplitude modulation, causing the signal to repetitively rise and fall in level.
Tremolo is a classic guitar effect, as used on innumerable surf and rock songs of the 50’s and 60’s. The vocal chorus of the 60’s song, “Crimson and Clover” prominently featured tremolo. Tremolo is often heard today on Techno recordings, applied to instruments and vocal tracks. In Techno, the tremolo is often fast, with the tremolo rate locked to the tempo of the song, at eighth or sixteenth note rate.
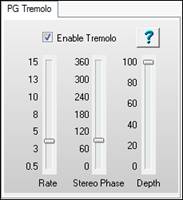
Rate is the number of tremolo pulses per second.
Stereo Phase only has an effect on Stereo Tracks. It is un-noticeable on mono tracks. Stereo Phase adjusts the time separation of the Tremolo pulse between left and right channels. When set to zero or 360 degrees, both channels “pulse” in sync. When set to 180 degrees, the tremolo has a ping-pong effect. The left channel is loudest when the right channel is quietest, and vice-versa. Set between 0 and 180 degrees, the sound may appear to move left to right. Set between 180 and 360 degrees, the sound may appear to move right to left.
Depth sets the depth of the tremolo effect. At zero percent, no tremolo is audible. At one hundred percent, the volume falls all the way to zero between each tremolo “pulse,” an exaggerated stuttering sound.
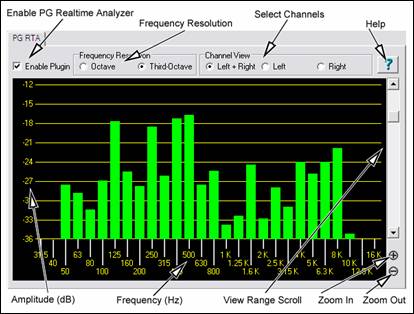
PG Real Time Analyzer
The PG Real Time Analyzer is ONLY a frequency measurement tool. PG RTA never modifies the audio.
Sonic Repair
An RTA can help identify frequencies which should be boosted or cut with an Equalizer plug-in. For instance, if an instrument track is too noisy, examine the frequency response with an RTA. To reduce noise, unused frequency bands would be the first likely places to equalize.
If a track sounds bad, the objectionable frequencies are likely to be among the loudest in the RTA display. It can be easier/quicker to improve the tone if you first try equalizing the loud frequencies.
Mixing/Mastering
An RTA is a good reality check on full mixes. To get a feel for the frequency distribution of a music style, use the RTA to study your favorite CDs. Music styles often have typical frequency distributions.
While polishing your mix, the RTA can help you make a tune's frequency balance “in the ballpark” of the tune's genre. It may seem uncreative to purposely make original tunes similar to the norm, but listeners are less likely to seriously audition a tune, if it sounds “out of whack” from the target genre.
Metal and Big Hair 80's Rock are among the brightest commercial mixes, often approaching a straight horizontal line on an RTA. If your mix has an overall positive slope (the high frequencies measure higher than low frequencies), you should rest your ears and then re-evaluate the mix. If the mix has a positive slope, it is almost certainly brighter than any musical genre.
Rhythm 'n' Blues tends to be bass-heavy. Most R&B tunes have an overall negative slope, with the high-frequency bands quieter than the low-frequency bands. If you mix an R&B tune with a straight-horizontal-line frequency distribution, it is probably too bright for the R&B genre.
Classical music tends to be even darker than R&B, except for low bass frequencies. Techno and Dance music is often very bass heavy. Jazz is typically pretty mellow, with low frequencies louder than high frequencies, but not necessarily a lot of very low bass.
Country music often has rolled-off low bass. Many country tunes use bright bass and bright kick drum, so that the bass is not as deep-sounding as R&B or Dance styles.
Some people have to work very hard to get a good mix, while others almost effortlessly find the proper combination. An RTA doesn't turn mixing into a “paint by number” game. For instance, if you only change the level of drum hi-hat, it can radically change the RTA display. One can make a bad-sounding mix which has the same frequency distribution as your favorite famous recording. But an RTA is an excellent reality check. If your mix sounds good to the ear, AND THE RTA IS ALSO IN THE BALLPARK, the odds are good that you are getting close to a finished mix.
Control Descriptions
Enable Plug-in Checkbox
Toggle the checkbox to turn the RTA ON or OFF.
PG RTA only does processing when:
- The plug-in is enabled.
- The plug-in is visible.
If PG RTA is not enabled or it is not visible, it does not add to the computer load during playback.
It does no harm to leave several instances of the plug-in assigned to various Tracks, Aux Returns, or Masters.
When you don’t have the plug-in visible on-screen, it will not load down the computer.
Frequency Resolution
The Octave button displays ten bands, representing the level of each octave in the audio. The Third-Octave button displays 28 bands, representing the level of each third of an octave in the audio.
There may be situations where it is more useful to have a 'general' overview at octave resolution, but the main reason you might prefer Octave resolution is to reduce the CPU load. Compared to third-octave resolution, Octave resolution only presents one third of the computer load.
Channel View
Channel View is only meaningful when metering a stereo track, or Aux/Master inserts (which are almost always stereo). The Channel View setting has no effect on a mono track.
If metering a stereo insert, select the Left+Right button to view the summed frequency response of both the Left and Right channels. Select the Left or Right buttons to view only one of the channels.
Zoom In/Out (Adjust the vertical amplitude resolution in dB.)
If a track has wide dynamics, zoom out to see all the bands without scrolling. If zoomed out too far, it can be difficult to visually judge frequency levels. All the bands may appear about the same level.
Zoom In to see the best amplitude resolution. For instance, in the screenshot above, the display was zoomed to 3 dB per ruler line, which emphasizes the differences between loud and quiet frequency bands.
View Range Scroll
Adjust the Scrollbar to center the display to taste. When zoomed-in on a quiet track (as in the screenshot above), you would scroll down to get a good view of the frequency distribution.
PG Vinyl Tool
PG Vinyl Tool can improve vinyl recordings.
Vinyl discs can have many troubles, depending on their condition. Some records may be severely damaged, whereas others may only have a few occasional crackles. Though PG Vinyl Tool has many processing sections, it will not be necessary to use every section on every record. We can't really offer meaningful presets, because each record you process will be a little different.
Digitally Recording a Vinyl Disc
Here are some basic recording tips. If the reader is interested, copious audiophile advice can be found on the internet. Some audiophile wisdom may be superstitious hokum, and other audiophile advice may be vastly better than the brief suggestions in this help file.
Obviously, to use PG Vinyl Tool, the disc must first be recorded to a computer audio file. To record a wave file, obviously you need a turntable... preferably a turntable in pretty good shape, with a reasonably new stylus.
For high-quality recording a vinyl disc, a home-audio turntable may be a better buy than a DJ turntable, which has special features unnecessary for a good vinyl-to-digital dub. At the same price levels, you may get better fidelity from a home-audio turntable rather than a DJ turntable.
A turntable with a magnetic cartridge is almost mandatory. Old turntables with ceramic cartridges just do not sound very good, and can have tracking force heavy enough to damage records.
Sometimes modern high-quality home-audio receivers do not have phono turntable inputs. However, if you have a quality home-audio integrated receiver (with phono inputs) or a quality turntable preamp, these are the best choice for turntable recording.
If you have a cheap home-audio tuner or phono preamp, the choice is less clear-cut. Older cheap tuners and phono preamps had undesirable preamp noise.
There are small inexpensive phono preamp boxes, but the cheapies often have excessive hum and hiss. Most DJ mixers have turntable phono preamp inputs, but the inexpensive DJ mixers are rather noisy.
If you do not have any gear with good phono inputs, you can connect the turntable to the inputs of an ordinary music recording mixer. The mixer will not have phono RIAA EQ, but at least most modern inexpensive mixers have low-noise preamps.
If you must use a mixer, check if your mixer has a couple of channels with high impedance guitar inputs. Guitar preamps often have a high input impedance, a characteristic which is also desirable in a turntable preamp.
Connect the output of your Tuner or Mixer to your computer's soundcard input. In RealBand set the input levels on the Mixer and computer to record a good loud level, but not loud enough to cause clipping. Try to avoid any clipping, even on the loud clicks that might be in a damaged vinyl record. PG Vinyl Tool will work best if the clicks are recorded clean.
Whatever preamp you use, leave the tone controls flat. Simply record the disc as accurately as possible. You can tweak the tone in the computer, after the disc has been dubbed to a wave file.
Clean the disc thoroughly. Some suggest water and a soft cloth (or whatever esoteric vinyl disc cleaning tools you may have available). Some audiophiles claim good results recording a disc “wet.” You might add a couple of drops of dish detergent to a bottle of water, and wet the record before recording. This will lubricate the record and minimize some noise and distortion.
Keep the stylus clean. It may help to play the record all the way thru before recording it. After the first play, re-clean/re-wet the disc, and then record. A first play might dislodge dust specks, so that the second play-thru might sound better.
After the disc is recorded to a wave file, you can insert the PG Vinyl Tool plug-in on the track, and twiddle the plug-in settings while the wave file plays. Polish the plug-in settings as you listen to the results.
You may find it beneficial to insert additional plug-ins after PG Vinyl Tool. Some obvious possibilities could be a Peak Limit or EQ plug-in. After PG Vinyl Tool has been adjusted to your satisfaction, make the final cleaned output with RealBand’s menu item Render | Merge Audio and DXi Tracks to Stereo Wave file.
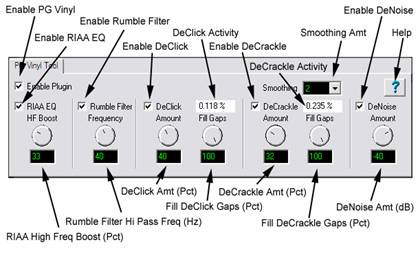
PG Vinyl Tool Features
Enable Plug-in Checkbox
Toggle the checkbox to compare the original recording to the plug-in output. This helps avoid excessive settings. PG Vinyl Tool uses look-ahead buffering, so if you bypass the plug-in, the output will “jump in time.” This is expected, because there is some added delay when PG Vinyl Tool is enabled.
RIAA EQ Checkbox
If you recorded from a stereo tuner or other gadget with a phono input jack, DO NOT enable the RIAA EQ section. The RIAA EQ option is for folks who do not have a turntable preamp, having recorded with an ordinary mixer.
RIAA EQ was designed to overcome the shortcomings of vinyl. RIAA pre-emphasis is applied when vinyl discs are mastered. High frequencies get boosted, and low frequencies get cut. This makes high frequencies compete better against the inevitable vinyl pops, clicks, and surface noise. Pre-emphasis also prevents low frequency signals from bouncing the stylus out of the groove.
When you play a record, the preamp's RIAA de-emphasis will reverse the EQ. High frequencies are cut, and low frequencies are boosted. If you do not apply RIAA de-emphasis, either with a phono preamp or in the software, vinyl will sound too bright and shallow.
HF Boost
If you recorded the disc with a mixer which has high-impedance inputs (preferably 1 MegOhm or better), set HF Boost to zero, for “pure” RIAA de-emphasis.
Most audio mixer instrument/line inputs have impedance in the 10 KOhm to 100 KOhm range. A turntable's magnetic cartridge will be “loaded” by the lower-than-expected mixer impedance. This won't damage the turntable, but will affect the frequency balance. A 10 KOhm mixer input could cut the highs quite a bit, and even a 100 KOhm mixer input could cut the highs a perceptible amount.
There is no way to predict the characteristics of your turntable cartridge and the input impedance of your mixer. Adjust HF Boost by ear until the frequency balance sounds right. You may not get the frequency response as precisely as the mastering engineer intended, but if you are happy with the result, who cares?
Some PG Vinyl Tool options can cut highs. If a record is damaged so much that subsequent PG Vinyl Tools cut high frequencies along with the noise, you could increase the HF Boost by ear, to make up the loss.
Rumble Filter Checkbox
Cheap or worn-out turntable platters can make subsonic vibrations. Slightly warped records can also make undesirable low-frequency noise. Use the Rumble Filter to block unwanted low frequencies.
The Rumble Filter is a 24 dB per Octave Butterworth High Pass filter, which attenuates undesirable low frequencies. In most situations, it will do no harm to always enable the Rumble Filter.
Rumble Filter Frequency
At the default of 40 Hz, signals below 40 Hz are attenuated, and signals above 40 Hz are unaffected.
Vinyl mastering engineers typically avoided frequencies lower than 40 Hz. It is difficult to make vinyl cleanly reproduce very low frequencies. Also, most consumers, even audiophiles with expensive stereos, did not have speakers capable of reproducing lower than 40 Hz.
Unless you are dubbing classical organ records, it is doubtful that there is anything of interest below 30 or 40 Hz. While adjusting PG Vinyl Tool, you can experimentally toggle the Rumble Filter on/off to make sure the filter is not removing important audio features.
DeCrackle Checkbox
Enable the DeCrackle section. PG Vinyl Tool defines crackle as high frequency defects in the range of 2000 Hz to 20,000 Hz.
A single microscopic speck of dust, or a tiny static discharge, can cause an isolated “tick” which is too short to be considered a “click.” The DeCrackle section removes these isolated ticks. Crackle is a cluster of high-frequency ticks. If there are multiple close-spaced ticks, the ticks are perceived as a crackling sound.
First disable the DeClick Checkbox, and adjust DeCrackle. On a clean record in good condition, DeCrackle may be the only necessary section. Normally you would only enable the DeClick section if DeCrackle can't adequately clean up the mess.
DeCrackle Amount
This adjusts the sensitivity of what PG Vinyl Tool considers to be a tick/crackle. At zero, nothing is removed. As the DeCrackle Amount is increased, PG Vinyl Tool will mute additional “tick suspects.” If the control is set too extreme, PG Vinyl Tool will partially mute musical features, such as hand percussion or high-hat notes. Only set the control high enough to remove ticks and crackles. If longer clicks remain, enable the DeClick section for additional cleaning.
DeCrackle Activity
This displays the percentage of audio which is muted. Except for very worn records, adjust the DeCrackle Amount so that the DeCrackle Activity reads no higher than a few percent. On very good discs, one might get “perfect” results with less than one percent of DeCrackle Activity. Strive to mute only the minimum necessary to clean your record.
Sometimes a bad click might be repaired in multiple processing stages, until the defect can no longer be detected. With absurdly high DeCrackle settings, the DeCrackle Activity can exceed 100 percent, because several stages incrementally repair the same bad clicks.
DeCrackle Fill Gaps
When a tick is detected, it is smoothly “snipped out” of the high-frequencies, without affecting the lower frequencies. High-frequency ticks last less than one millisecond. Each muted section is very short, only a few samples.
If Fill Gaps is set to zero, this tiny high-frequency-muted region is replaced by nothing. It behaves like a very brief high-frequency dropout. On a clean record, occasional muted ticks are never noticed. But on a dirty scratched disc, if many snips are made, it will sound like a reduction in high frequencies.
As you increase the Fill Gaps knob, PG Vinyl Tool will extrapolate the signal in the vicinity of the click, synthesizing a “guess” at what the signal might have been in the tiny muted region. If you set Fill Gaps to 100, it will insert this extrapolated guess at the same level as the original signal. This allows many ticks to be snipped from a dirty record, without reducing the high frequency content.
One might encounter a badly damaged record where the audio is so damaged that the guesses are not good enough. In these problem cases, try setting Fill Gaps to 70, or 50, filling the gaps with lower-amplitude guesses, which may sound less obnoxious.
Set Fill Gaps to 100, unless it sounds bad.
DeClick Checkbox
Enable the DeClick section. PG Vinyl Tool defines clicks as midrange frequency defects, in the range of 500 Hz to 2000 Hz.
DeClick Amount
Adjust the sensitivity of what PG Vinyl Tool considers to be a click. At zero, nothing is removed. As the DeClick Amount is increased, PG Vinyl Tool will mute more “click suspects.” If the control is set too high, it can partially mute musical features, like snare drum hits. Adjust this control only high enough to remove clicks.
DeClick Activity
This displays the percentage of audio which is being muted. Except for very worn records, it is advisable to adjust the DeClick Amount so that the DeClick Activity reads no higher than a few percent. On very good discs, one might get “perfect” results with much less than one percent of DeClick Activity. Strive to mute only the minimum necessary to clean your record.
Sometimes a bad click will be repaired in multiple processing stages, until the defect can no longer be detected as a tick or click. With absurdly high DeClick settings, the DeClick Activity can exceed 100 percent, because both stages incrementally repair the same bad clicks.
DeClick Fill Gaps
When a click is detected, it is smoothly “snipped out” of the midrange spectrum, without affecting the lower-frequencies at that point. A typical click might last 0.5 to 2 milliseconds. Each muted section is very short.
If Fill Gaps is set to zero, this small muted region is replaced by nothing. It behaves like a very brief mid-frequency dropout. On a clean record, occasional muted clicks are never noticed. But on a dirty scratched disc, if many snips are made, it can sound like a reduction in high and mid frequencies.
As you increase the Fill Gaps knob, PG Vinyl Tool extrapolates the midrange signal in the vicinity of the click, synthesizing a guess of what the signal might have been in the tiny muted region. If you set Fill Gaps to 100, it will insert this extrapolated guess at the same level as the original signal. This allows many clicks to be snipped from a dirty record, without reducing the mid-frequency content.
On many recordings, the extrapolated guesses are quite good. Frequent clicks can often be removed without audible side-effects.
One might encounter a badly damaged record where the audio is so damaged that the guesses are not good enough to be completely transparent.
In these problem cases, you could try setting Fill Gaps to 70, or 50, filling the gaps with lower-amplitude guesses, which may sound less obnoxious.
Set Fill Gaps to 100, unless it sounds bad.
Smoothing
Some badly damaged records (particularly worn-out 45's and 78's) have high frequency noise approaching “crackle on steroids.” The surface noise sounds like bacon frying. Crackle atop crackle, atop even more crackle.
The Smoothing section could be useful with severe surface noise. The Smoothing section is a very gentle Gaussian low pass filter with 6 selectable intensities.
Gaussian low pass filters are “about as good as it gets” for attenuating random noise while having minimal effect on music transients.
However, a Gaussian filter is still a low pass filter. All low pass filters reduce high frequencies along with surface noise. You should only enable the Smoothing section if it is necessary for a badly damaged record. Experiment with the Smoothing Level to find an acceptable tradeoff between reduction in surface noise versus reduction of musical high frequencies.
DeNoise Checkbox
PG Vinyl Tool DeNoise is a “hiss gate.” It gradually attenuates quiet High Frequencies below the Denoise Threshold. Think of it as a sliding high frequency dynamics expander.
Many vinyl discs were made from reel-to-reel tape masters. The best quality reel-to-reel tape recorders of yesteryear had more hiss than modern digital recorders. A vinyl disc in excellent condition could contain an accurate copy of the original tape hiss. In some cases, carefully adjusted DeNoise may give a perceived improvement over the original noise level.
DeNoising may also be beneficial on low level disc surface noise (slightly worn discs). If you have low level “frying bacon” surface noise, DeNoise might work better than Smoothing.
With loud “frying bacon” surface noise, you could try a judicious combination of Smoothing and DeNoise.
DeNoise Amount
This control sets the DeNoise threshold, in dB.
For instance, if you set it to -40 dB, high frequencies louder than -40 dB are passed unaltered. High frequencies quieter than -46 dB are completely silenced. Levels between -40 and -46 dB are gradually faded down to complete silence.
If the audio level at 8000 Hz happens to be below threshold, but the audio level at 4000 Hz happens to be above threshold, the 8000 Hz signal would be muted but the 4000 Hz signal would pass un-altered. This is “Multi Band Single-Ended Noise Reduction.”
The DeNoise section can slide the filter all the way down to 500 Hz; so on “silent” sections of a record, the DeNoise silence can be pretty silent.
Carefully adjust the Denoise Amount so that desirable high frequencies in the music are minimally affected, but hiss in the quiet sections of the music is removed. Even a 1 dB difference can be easy to hear when tweaking the Denoise Amount. Many high fidelity vinyl records didn't have much information higher than 10 KHz (another common mastering decision in the good old days). On many records, frequencies above 10 KHz can be squelched most of the time without noticeably affecting the sound.
A suggestion for tweaking the DeNoise Amount; first increase the setting until the music is obviously losing high frequencies. Then gradually reduce the level until the music is unaffected. This can ensure that any noise below the minimum music level is exterminated. Be sure to check the DeNoise Amount against the quietest parts of the recording, because the quiet locations are most likely to be affected if the DeNoise Amount has been set too high.
Conclusion
PG Vinyl Tool offers many tools which can clean vinyl records.
But there is a limit what can be done for severely damaged discs (without investing in very expensive tools). On very damaged records, you may be forced to decide between a “natural” sound which contains a few residual defects, versus a more heavily processed sound which has collected new annoying artifacts to replace the old annoying defects.
PG Vocal Remover
PG Vocal Remover can reduce the level of vocals on many commercial recordings.
Operating Principle
PG Vocal Remover exploits a common mixing technique; the lead vocal is often center-panned (i.e., the left and right stereo channels have identical vocal loudness). Typically the bass and kick drum is centered, and often snare drum is centered. However, most accompaniment instrumental tracks and backup harmony vocals are side-panned (louder on one side than the other).
On typical recordings, we can subtract one stereo channel from the other, which removes “common mode” lead vocal, but leaves side-panned accompaniment tracks relatively unaffected.
Simple subtraction will also cancel center-panned bass, kick drum, and snare (or other center-panned instruments). Therefore, we only subtract the midband where the vocal resides.
Even when lead vocal is center-panned, vocal reverb is typically in stereo. If a song has loud stereo reverb, the stereo vocal reverb is unaffected by the Vocal Remover. The Reduce Reverb feature can reduce the level of the side-panned tracks when the center vocal is loud.
Some vocal reverb leakage may not be a bad thing on a sing-along track. When you sing along, the original reverb ambience could make you sound better.
Source Recordings
PG Vocal Remover works best on wave files extracted from well-made commercial audio CD’s, which usually have good fidelity and low distortion. But it works fine on many MP3 or WMA files, as long as the file is encoded in stereo. It works best with high quality recordings. Of course an MP3 or WMA file must be converted when loading into RealBand.
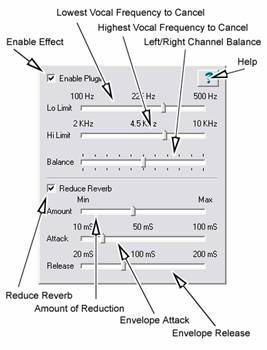
Operation
Enable Plug-in Checkbox
Toggle the checkbox to compare the sound with/without the Vocal Remover activated.
Balance Slider
Fine-tune with the Balance slider. The center position is typically as good as it gets, but some recordings have accidentally mismatched Left-Right balance. This is common with vinyl or cassette recordings, or CD-reissues of Oldies. You may get improved vocal cancellation by twiddling the Pan slider to find a “sweet spot.”
Lo Limit and Hi Limit Sliders
Adjust these sliders to fit the nature of the vocal. The default settings are fine for many tunes. Frequencies below the Lo Limit and above the Hi Limit are not processed, preserving fidelity except in the vocal midrange. Set the Lo Limit slider just low enough to attenuate low vocal notes. Set the Hi Limit slider just high enough to attenuate high vocal harmonics.
Obviously the best settings are different for a Baritone, Tenor, Alto, or Soprano voice. They are best set by ear. Some sopranos have warm low tone, but some Baritones have very bright tone, so the mid-frequency vocal range may be wider than expected.
Reduce Reverb Checkbox
Toggle the checkbox to compare with/without Reverb Reduction.
Reduce Reverb Amount Slider
Reverb Reduction behaves like a dynamics compressor, but the loudness of the center channel affects the loudness of the side channels. Move the slider to the right to increase the effect. The effect compares the relative level between center and side channels, so no processing takes place unless there is a significant difference between the loudness of the center versus side channels.
Vocal is not the only sound which can trigger the compressor. Any loud midrange center instrument could trigger the compressor, so if you crank the Amount too high, snare drum or other loud center instruments may unpleasantly “pump” the side channels.
Reduce Reverb Attack Slider
Works like a compressor Attack control. Move the slider to the left for faster response to sudden increase in loudness (when the vocalist starts a phrase). Move to the right for a slower response to sudden increase in loudness.
Reduce Reverb Release Slider
Works like a compressor Release control. Move to the left for faster recovery after the loudness diminishes (when the vocalist ends a phrase). Move right for slower recovery.
Adjusting Reverb Reduction
Experiment to get a feel for what works. There may be some songs where the reverb can't be improved, and in those cases just disable the Reduce Reverb Checkbox.
Some vocals have short pre-delay and reverb tails. Short attack and release would make sense.
Some songs (especially ballads) have loud “balloon” reverb tails with long pre-delay. Since the reverb comes in after the vocal phrase begins, and lasts a long time after the vocal phrase ends, longer attack and release would make sense. Adjust the Attack so that the compression kicks in about the same time as the pre-delay reverb, and adjust the release long enough to hold back the reverb after a vocal line is finished.
Don't expect miracles. You can reduce the reverb level, but will rarely completely eliminate vocal reverb. Judiciously use just enough compression to avoid ruining the overall fidelity.
Compare the dry sound against the processed sound. The maximum vocal reduction setting could be extreme enough to ruin the instrumental quality. Sometimes it is better to allow some vocal leakage to achieve the best-sounding instrumental quality. Is it better to allow some low voice leakage to improve the bass response? Is it better to allow some high voice leakage to improve the cymbals and acoustic guitar?
After the PG Vocal Remover is adjusted as good as it gets, try inserting an Equalizer plug-in downstream. Notch some frequencies to improve the effect.
If the output amplitude is inconsistent, try inserting a compressor or peak limiter plug-in downstream.
Unconditional 30-Day Money Back Guarantee on all PG Music products purchased from PG Music Inc.
PG Music Inc.
29 Cadillac Ave Victoria BC Canada V8Z 1T3
Sales: 800-268-6272, 250-475-2874,+ 800-4746-8742*
* Outside USA & Canada where International Freephone service is available.
Access Codes
Tech Support: Live Chat, support@pgmusic.com
 Online now
Need Help?
Customer Sales & Support
|
Phones (Pacific Time) 1-800-268-6272 1-250-475-2874 |
||
| Live Chat | ||
| OPEN | Online Ordering 24/7 |
|
| OPEN | Forums, email, web support |