
Search Manual
RealBand® 2019 for Windows® User’s Guide
Chapter 3: Tutorial – Guided Tour of RealBand
What is RealBand?
RealBand is your all-in-one audio workstation and accompaniment program!
You may be familiar with PG Music’s award-winning Band-in-a-Box program for intelligent automatic music accompaniment in a great variety of styles, and also with our PowerTracks Pro Audio DAW program for solid sequencing of both MIDI and digital audio at an incredible price. RealBand takes the main features of both programs and combines them into a full-featured sequencer with automatic accompaniment.
The other chapters in this guide provide detailed instructions and information on RealBand, but if you want to make real music now this tutorial will show you how to get started with RealBand, how to use its main features, and how to enjoy it.
Getting Started
RealBand will install by default to its own folder, usually c:\RealBand. To start the program, double click on the application file RealBand.exe in this folder.
To place a convenient shortcut on your desktop you can right-click on the file name RealBand.exe for a menu of options. Select Send To and then Desktop (create shortcut).
![]()
|
You can then open RealBand directly from your desktop by double-clicking on the icon, like any other Windows program. |
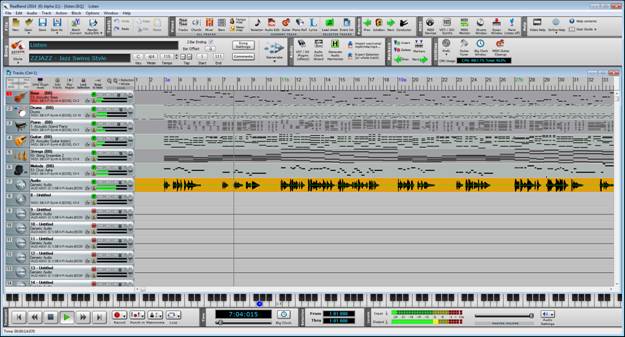
The first time RealBand runs, you will be prompted to select a MIDI device from a list of currently installed devices. If you have DXi or VSTi software synthesizers installed, you can choose to send your MIDI output to the software synth of your choice.
RealBand then prompts you to select the folders for Band-in-a-Box, RealTracks, and RealDrums. These are important settings, as they enable you to use all of Band-in-a-Box styles, RealDrums, and RealTracks that you have installed on your system. So if you have the latest Band-in-a-Box UltraPAK, then you also have access to every style, RealDrums set, and RealTracks instrument there is for use in RealBand too.

If the BB, Drums, or RealTracks folders don't exist on boot up, a Flash message will appear to warn the user. These folder paths can be assigned or changed manually in the Preferences.
![]()
![]()
Now that RealBand has guided you through the initial setup you can start to have fun. For a start, we could look at two of the main workspaces, the Tracks window and the Mixer window.
Introduction to the Tracks and Mixer Windows
|
The Tracks window is one of the main workspaces in RealBand. It opens with the [Tracks] tool bar button, with the hot key combination Ctrl+1, or with the menu command Window | Tracks. |
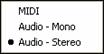
This window has 48 tracks, each of which can be designated as a MIDI track, a mono audio track, or a stereo audio track. When starting a new file, any track can be set to any track type in the Tracks window.
|
|
The default track type is Audio - Stereo, as indicated by the two audio wave forms on the track type button. (A mono audio track would show a single audio waveform.) |
|
A right mouse click on the track type button opens a menu of track options, and we will reset the track to be a MIDI track. The track type button changes to show a MIDI plug. |
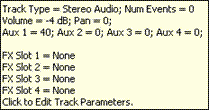
For a quick look at the settings for any track just hover the mouse cursor over the track type icon and a pop-up will give a summary of the current settings. |
|
You’ll have a great time recording your own audio and MIDI tracks in this window, and you can also import wave files, MP3s, WMA files, MIDI files, and Karaoke files. You’ll find your Tracks window settings duplicated in the Mixer window, where you will usually spend more time in the later stages of song production.
|
The Mixer window opens with the mixer icon, or with the hot key combination Ctrl+8, or with the menu command Window | Mixer. |
A right mouse click on any track strip brings up the same menu of track settings as in the Tracks window. These settings are explained completely in the Mixer Window help topic. There are many additional, and powerful, features in the mixer including real time audio effects with lots of routing options. This is where you put the finishing touches on your song productions. The Chords window is where automatic song arrangements begin.
Creating a New Song Arrangement
|
To generate a new song arrangement, you begin by typing the chords into the Chords window using standard chord symbols. This window opens with the [Chords] button, the hot key combination Ctrl+3, or the menu command Window | Chords. |
You’ll see the bars of the song displayed in rows. If a bar contains chord symbols they will be displayed to the right of the bar number.
Entering Chords
Enter the chords for your song by typing them in using standard chord symbols such as C, or Fm7, or Bb7, or Bb13#9/E. For example, type c6 to get the C6 chord. Note that you should never have to use the Shift key, as RealBand will sort this out for you.
- Use b for a flat, e.g. Bb7.
- Use # or 3 for a sharp, e.g. F#7. (# is the uppercase symbol of 3, so you can actually type F37 to get F#7 - RealBand will sort out the case, saving you the effort of using <SHIFT>3 to type the # symbol.
- Use / for Slash Chords with alternate Roots such as C7/E (C7 with E bass)
- Use a comma to enter 2 chords in a row. In the example below, we would type Ab9,G9 to enter 2 chords at a time (on beat 3 and 4 of bar 2)
You can use the Delete key to delete a chord, or type a comma and press Enter.
Each measure is divided into Beat Groups, indicated by a highlight cell. A Beat Group consists of two beats. If a song is in 4/4, then each measure will contain two beat groups. The current beat group will have a rectangle drawn around it. You can type two chords into the current beat group. For example if you type this: “C7,G7” (without the quotes) you’ll see the text you’re typing in the white rectangular panel on the toolbar. If you then hit <Enter> you’ll see the C7 and G7 chords appear within the current beat group, and the input rectangle will automatically advance to the next beat group. When you’re in the middle of typing chord symbols, you can use the backspace key to correct a mistake.
The Left Arrow and Right Arrow keys let you move the input rectangle to a different beat group without entering chords. You can also click the mouse on a different beat group to move the input rectangle to a new location.
The help topic Entering Chord Symbols has additional information and a list of the chord spellings that are recognized by RealBand. The Chords Window topic explains how to enter breaks such as rests and pushes, and how to copy chords.
Let’s enter some chords in the chord sheet.
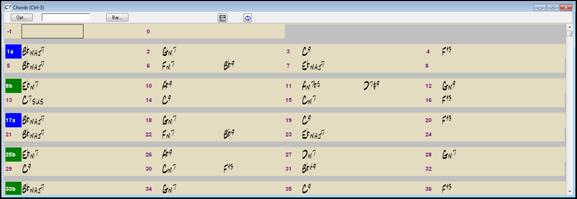
We’ll put our highlight cell in the first beat group of bar and type the letters cm7. Press the Enter key and the chord symbol Cm7 is entered at the start of bar 1.
Press the Enter key again and the highlight cell moves to bar 2. Type f7 for an F seventh chord and press Enter.
Now we’ll use some chord shortcuts. The letter “j” is the shortcut for a major seventh chord. Type bbj and press Enter to write the chord symbol BbMaj7 on the chord sheet. Move to the next bar and type ebj to write EbMaj7 in that bar. Advance to the next bar and type the letters ah to write Am7b5 – the h is for a half-diminished chord. In the next bar type df and the chord symbol D7b9 will be entered, then enter gm for a G minor chord in bar 7. We’ll stop there for purposes of this tutorial, and here is what our Chords window looks like now.
Now we’ll move on to the arranger toolbar to generate our RealBand song arrangement.
Arranger settings

For our short tutorial song, we’ll start at bar 1 and end at bar 8.
|
The Start of Song Chorus button is set at one by default, so it will stay the same. |
|
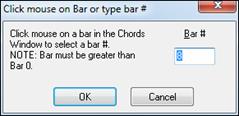
The End of Song Chorus button defaults to 32, so we’ll click on the button and type in the number of the new end-of-chorus bar in the Enter Measure Number box. |
![]() We’d like RealBand to add a 2-bar ending to our song, so we’ll check the 2 Bar Ending box.
We’d like RealBand to add a 2-bar ending to our song, so we’ll check the 2 Bar Ending box.
![]() Next, we’ll choose a style for our song by clicking on the style name to open the StylePicker window. You aren’t required to have Band-in-a-Box for your RealBand styles, but if you do you will see that all of your Band-in-a-Box styles are available here.
Next, we’ll choose a style for our song by clicking on the style name to open the StylePicker window. You aren’t required to have Band-in-a-Box for your RealBand styles, but if you do you will see that all of your Band-in-a-Box styles are available here.
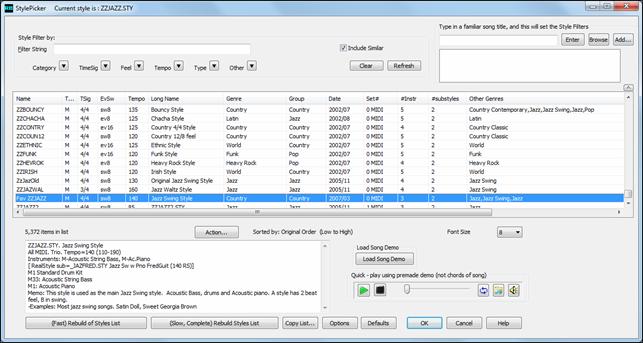
![]() From the Jazz category select the J!Lush style (or any other style of your choosing) and you’ll see that the style selection box has been updated with its name.
From the Jazz category select the J!Lush style (or any other style of your choosing) and you’ll see that the style selection box has been updated with its name.
|
The time signature defaults to 4/4, but a new time signature can be set by clicking in this box to open the Meter dialog. Compound time signatures are supported; in fact, the numerator can be any number from 1 to 99. The denominator is selected from the drop down combo box. |

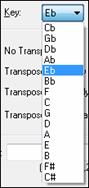
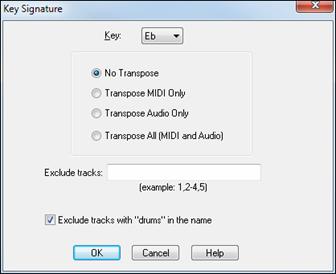
Our song is in C minor, so we could select the relative major key signature of Eb for fewer accidentals in the notation display. Click in the key box to open the Key Signature dialog and choose the new key from the dropdown list.
|
|
|
The Key Signature dialog also has options for transposing the song’s MIDI tracks, audio tracks, or both to the new key. In this instance we do not want to transpose the tracks; we just want to change the key signature so select “No Transpose.” |
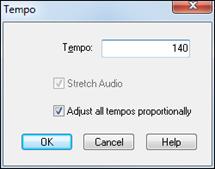
Just before we play our song we can set a tempo.
|
The tempo box has a setting of 120 bpm. To change it to 140 we’ll click in the box to open the Tempo dialog and type in 140. |
|
We could also set the tempo with the up and down scroll arrows, or even tap in a tempo with the minus and equals buttons. |
Tempo Calculator (Edit | Tempo | Tempo Calculator)
The length of a song depends on tempo and number of bars. With this calculator, found in the File menu under File Utilities, you can enter 2 of the 3 variables (length of song in seconds, tempo, number of bars) and the program calculates the third variable for you.
So we’ve entered our chords in the Chords window, set the length of our song and added a 2-bar ending, chosen a Band-in-a-Box style, and set the tempo.
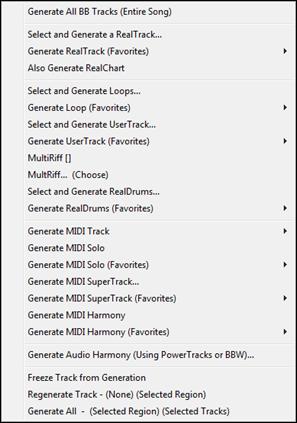
We’re ready to generate an automatic arrangement. Press the [Generate] button and select Generate All BB Tracks (Entire Song) from the menu options.
|
|

You will then see new tracks in the Tracks window.
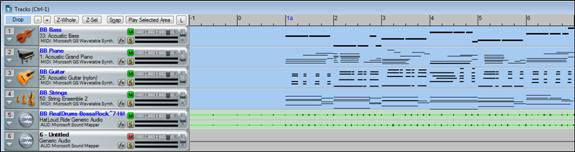
The track overview shows us that we have five MIDI tracks playing the parts generated by the J!Lush style, and because RealDrums are allowed in the Options | Preferences | Song Generation settings we have a RealDrums audio track. Notice that the BB track names are in blue, whereas user track names are in black.
BB tracks cannot be moved or renamed, but you can change any of the settings with the right-click menu – for example the patch, MIDI port, or MIDI channel. These tracks can also be edited in the track overview and in the Piano Roll or Notation windows. Let’s examine the BB Piano track in the Piano Roll window.
![]()
We can select the BB Piano track while still in the Tracks window, or we can open the Piano Roll window with the piano roll button and then select BB Piano from the track list.
![]()
![]()
In the Piano Roll window notes can be dragged and dropped, shortened or lengthened in the Note Panel, which is the upper part of the window.
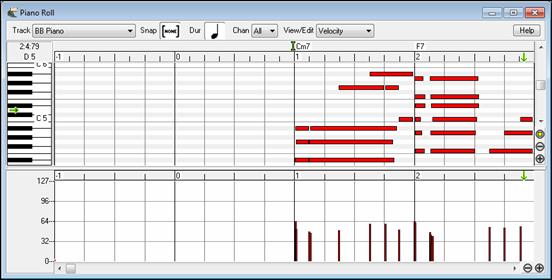
The lower panel is for graphic editing of the selected parameter in the View/Edit list. Note velocity is shown, but parameters such as pitch bend, channel aftertouch, and MIDI controllers can be edited in this panel as well. Please see the Piano Roll Window help topic for more on this very useful feature. The BB tracks can also be edited in the Editable Notation window.
|
Click on the eighth note toolbar button to open the Notation. In the Notation window toolbar, there are three buttons for different notation modes. Editable notation is the button with dotted vertical lines crossing the staff lines. |
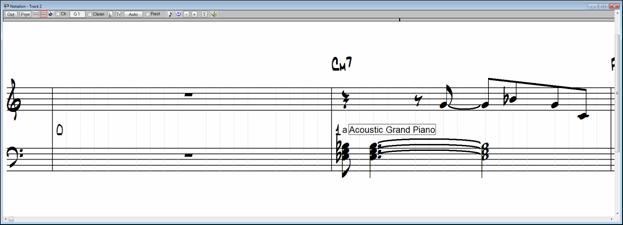
In this notation window notes can be inserted or deleted, and dragged and dropped. By right-clicking on any note head all parameters of the note can be edited and symbols and text can be added.
These features are covered in detail in the Notation Window topic.
Now that you have a RealBand accompaniment, your next step might be to record some audio tracks along with the BB tracks. The audio tracks could be vocals, live instruments, or the line output from a keyboard, mixer, or direct box, or digital audio if your sound card has that capability.
Audio Recording
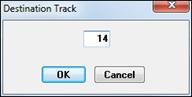
As long as your audio drivers have been set up audio recording is simple and straightforward. If you wish you can configure the destination track as described in the Tracks Window topic, but if you select any blank track and start recording RealBand will automatically change it to an audio track with the default audio settings.
To begin, select the track you wish to record in either the Tracks or Mixer window.
![]()
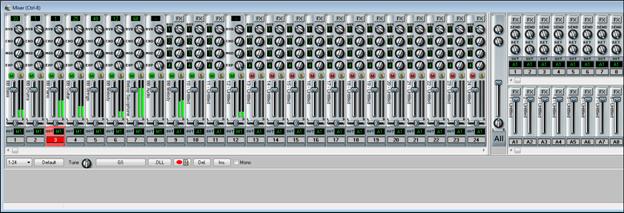
Check your recording level with the built-in VU meters, which are located at the bottom of the screen.

The input levels should normally be active in the mid-range of green segments with transient peaks in the yellow range. Red indicates levels that are too high and in danger of clipping, which adds a cracking sound to your track. When that happens, the top red segment marked “Clip” will light up. You’ll need to adjust the input level.
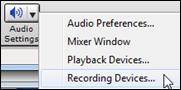
|
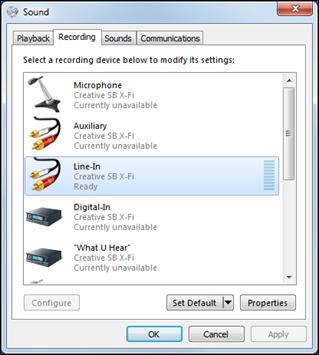
To adjust input levels that are either too low or too high just click on this speaker icon and select Recording Devices from the menu options to open the recording control window. |
Our recording input is the analog mix from an external mixer. If you were to select “What U Hear” as your input, you would also be recording the output of the BB tracks to your new track, which is not something you would normally want to do.
|
When you are ready, press on the audio recording button in the toolbar and record your part as the RealBand accompaniment plays. |
|
You also have the option of using a metronome to count you in and keep time during the recording using the settings that you choose under the Metronome tab in the Preferences. |
|
When you’ve finished recording, press the stop button on the toolbar. |
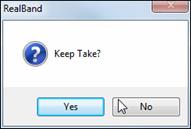
RealBand will prompt you to either keep or discard the take.
You can keep recording as many audio tracks as you want up to the limit of the 48 available tracks in RealBand. Here’s an overview of our first recording on track 10 and a second audio recording on track 11.

“Audio – Stereo” was specified as the track type for track 10 in the right-click Track window menu, but you’ll notice that Track 11 is a mono audio track. That is because we did not specify any audio settings for this track and RealBand automatically applied the default audio settings.
If you change your mind about an audio take you can use the Edit | Undo (Keep Take) menu command to clear it. Or, if you want to remove it at a later session, use the Edit | Track | Erase command.
Adding RealTracks
Another way to add live instrumental audio tracks is with RealTracks. To start, right-click on any blank track in the Tracks window. In the menu that opens, go to Generate | Select and Generate RealTrack. This opens the Assign RealTracks to Track dialog.
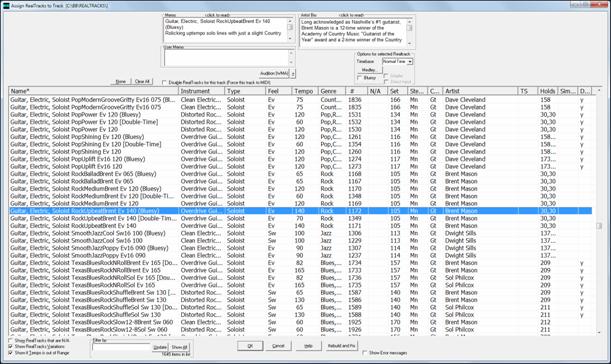
We’ve selected Guitar, Electric, Soloist RockUpbeatBrent Ev 140 (Bluesy) for our RealTrack. Click on the [OK] button and the RealTrack will be generated.
![]()
Your RealTracks players never complain about do-overs, so if you don’t get what you want the first time a RealTrack is generated, you can just generate another one. Better yet, use the MultiRiffs feature to audition 7 different RealTracks performances, and choose the one that’s best for our song with a single click! This works for the entire track, or the highlighted section of a track. Choose one riff or multiple riffs to add to the song.
To generate MultiRiffs you right-click with the mouse on the track where you want a new RealTracks instrument track generated. In the menu that opens, select MultiRiff… (Choose).
![]()
The RealTracks Picker will open and you can choose the instrument you want for the track. When you OK your choice there will be a bit of a delay and the MultiRiff dialog will open.
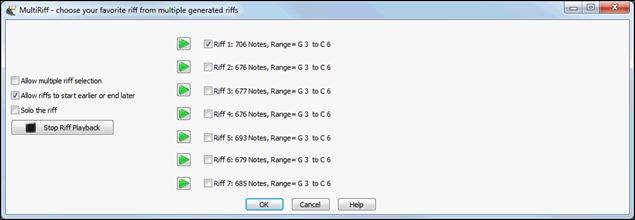
You will see the seven different riffs that have been generated listed along with a riff description giving the number and range of notes in each one. Click on the adjacent [►] play arrow to hear each riff playing along with your song arrangement.
Regenerating BB Tracks
You can always generate new BB tracks by choosing a new style and pressing the [Generate] button. Try as many as you like.
|
|
But what if there are tracks, or even parts of tracks, that you want to keep? RealBand lets you keep the parts you like and just regenerate selected bars on selected tracks. You can keep the same style or use a different style all together. Here’s an example.
We’ll substitute the first 4 bars of the BB Bass and BB Piano tracks by regenerating them in a different style.
|
Before selecting the region to regenerate, click on the [Snap to beat] button in the Tracks window. With [Snap to beat] enabled, RealBand will automatically snap to exact beat and bar line boundaries as you drag your mouse in the track overview to make your selection. |
We’ll select the region we want in the BB Bass track overview. Then that exact same region can be selected in the BB Piano track with a Ctrl+click on the track name.

Now we can pick another style and only the highlighted areas will be regenerated using that style. The rest of the arrangement will be unchanged. This is a very powerful feature for customizing and tweaking your arrangements, especially if you have the full collection of Band-in-a-Box styles.
This feature is not limited to BB tracks. You can use it on RealTracks and RealDrums tracks too. This is especially useful to generate specific RealTracks passages or fills for your song. To do that, use a blank track in the Tracks window and highlight the range of beats or bars that you want to fill. Then right-click on the track and select either Generate | Select and Generate RealTrack to choose an instrument from your full list or Generate | Generate RealTrack (Favorites) to select from a list of recently used Real instruments.
![]()
Song Settings and Song Generation Preferences
There are two types of settings that affect how your songs are generated by RealBand, the Song Settings and the Song Generation Preferences.
|
Song Settings are accessed from the [Song Settings] toolbar button. These settings apply only to the current song, including enabling or disabling RealTracks and RealDrums and specifying a particular RealDrums set for the song. |
|
Song Generation preferences are found in the Preferences dialog. These settings affect all songs and also include the path to your RealTracks and RealDrums folders. |
Importing Songs
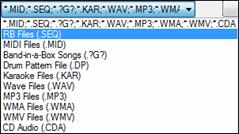
As you can see in the File | Open dialogue, RealBand supports all major audio and MIDI file types, including PG Music’s PowerTracks Pro Audio files (*.SEQ) and Band-in-a-Box files (*.?G?)
Once you’ve opened your song file in RealBand you can use the full power of the program to add parts, edit, mix, and finally produce a professional finished recording.
PowerTracks Pro Audio Songs
The PowerTracks Pro Audio .SEQ file is also the native format for RealBand files, so PowerTracks files load and play exactly as they would in that program.
Band-in-a-Box Songs
When importing a Band-in-a-Box file you have the choice of playing it “as-is” with the arrangement as created by Band-in-a-Box, or of generating a new arrangement in RealBand.
In this illustration, we see a Band-in-a-Box file that has been opened directly in RealBand. All of the parts, including the RealDrums track, are present in the blue-labeled BB tracks, 1 through 9.
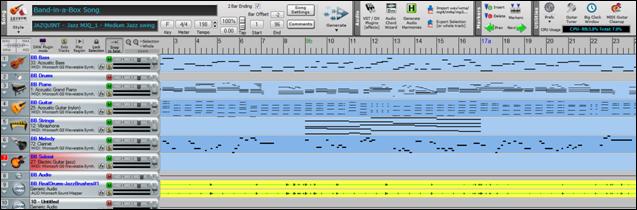
This arrangement will play exactly as it did the last time it was generated in Band-in-a-Box, which is worth remembering if you have an arrangement that you particularly liked. To keep it unchanged, you could save all of your BB tracks as user tracks with the Track menu command Make all BB tracks regular tracks. Or save the song as a .SEQ (sequence) file in RealBand.
Another option would be to use the Auto Convert Individual MIDI Track to Audio Track feature to render the MIDI tracks to audio and then save the song as a .SEQ file.
|
Of course, you can generate a new arrangement with any style and regenerate selected regions, add RealTracks, and record your own audio tracks, remix, and add effects once your Band-in-a-Box song is in RealBand. |

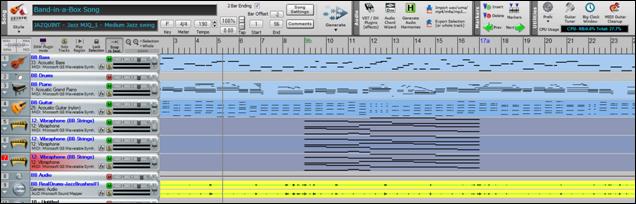
You can see by comparing the BB tracks in this image with the previous one that new BB tracks have been generated. Both versions use the JAZQUINT style, but any style could be used.
If your Band-in-a-Box song has RealTracks they will be generated in RealBand when you open the file. Here is a Band-in-a-Box song with an “all RealTracks” style that has been opened in RealBand.

The BB tracks, except for the MIDI Melody track, are empty and there are additional blue-labeled BB RealTracks starting at track 9.
This RealTracks arrangement can be regenerated using any RealTracks style, or you could even generate an arrangement with a regular Band-in-a-Box style and add BB tracks to the existing RealTracks.
If there are any RealTracks that you want to preserve when regenerating the arrangement you can use the Edit | Track | Duplicate feature to make a copy on a blank track.
![]()
This copy will be a user track (as indicated by the name in black type) and will not be affected by generating a new arrangement.
This is a useful way to generate multiple versions of a Real instrument part and then choose the one you like best, or edit together your favorite parts from different tracks, or even layer multiple tracks.
![]()
Additional RealTracks can be added to your song by right-clicking on any blank track and selecting one of the two options for generating RealTracks from the track options menu.
You can also highlight a region of a track and generate your RealTrack for just that region to “drop in” a Real instrument lick.

Finally, you’ll want to mix your tracks into a finished recording.
Mixing in RealBand
|
The Mixer window provides real time control of volume and effects. You can launch it with the fader button on the toolbar or by typing ALT+W -> . |
With its own real time effects and support for all other DirectX and VST plug-ins, the RealBand mixer is a powerful production tool. It offers great flexibility in applying these effects to individual tracks, to sub-mixes, and to the final audio output.
This is an integrated mixer that controls both MIDI and audio tracks. There are sliders for all 48 tracks, 8 auxiliary effects (Aux) busses, and a combined total of 16 audio output ports or audio subgroups.
The Mixer track strips conveniently show the track name vertically to the left of the volume sliders. This is the track name that is assigned in the Tracks window, go to that window to add or change track strip names.
When the mouse cursor is positioned over a track number in the Mixer window a popup box will display all of the Track windows settings for the track - the track name and type, patch name, volume and pan settings, and effects settings.
MIDI tracks show an output port with an “M” prefix for a MIDI port or an “S” for a software synthesizer. They have controls for volume, pan, reverb, chorus, modulation, and expression plus a VU meter, a MIDI patch selection box, and a mute/unmute button. |
|
|
Audio tracks either have a prefix of “A,” for an audio output, or “G,” for an audio subgroup, on their output ports. They have volume and pan controls, a stereo VU meter, a mute/unmute button, four assignable auxiliary sends, and a track-specific FX insert. |
In addition to the track specific effects, there are eight global busses that can each have four chained effects each. You can assign each audio track to four different Aux busses and adjust the amount that each audio track uses the effects in each assigned bus. If that isn’t enough, you can add four chained effects to each audio subgroup and also to the main output - this will affect all tracks.
For a full description of the Mixer and the use of its features, please refer to the Mixer Window help topic.
Having more fun with RealBand!
You’ve seen how easily you can create music from start to finish with RealBand. But don’t forget that this powerful program has many more features and configurable settings which are discussed in later chapters.
These features give you the ability to produce great sounding music in your own home “studio” with production values and effects that once required expensive studio time.
Have fun making your music with RealBand!
Unconditional 30-Day Money Back Guarantee on all PG Music products purchased from PG Music Inc.
PG Music Inc.
29 Cadillac Ave Victoria BC Canada V8Z 1T3
Sales: 800-268-6272, 250-475-2874,+ 800-4746-8742*
* Outside USA & Canada where International Freephone service is available.
Access Codes
Tech Support: Live Chat, support@pgmusic.com
 Online now
Need Help?
Customer Sales & Support
|
Phones (Pacific Time) 1-800-268-6272 1-250-475-2874 |
||
| Live Chat | ||
| OPEN | Online Ordering 24/7 |
|
| OPEN | Forums, email, web support |