
Search Manual
RealBand® 2019 for Windows® User’s Guide
Chapter 6: BB Tracks and MIDI tracks
Overview
As discussed elsewhere, any one of RealBand’s 48 tracks can be either a MIDI or audio track. And for either type you have the option of recording and creating your own parts or using the musical intelligence of RealBand to create professional tracks for you. When working with MIDI tracks, RealBand uses its Band-in-a-Box components to generate tracks in any of the Band-in-a-Box styles that you have installed on your computer.
RealBand also lets you generate selected sections of tracks and regenerate either complete tracks or selected parts as often as you want to – and with any style you want to use. This means that your BB Tracks can be assembled from any number of different styles to add variety and fine-tune the arrangement.
Creating a New Song Arrangement
|
To generate a new song arrangement you begin by typing the chords into the Chords window using standard chord symbols. This window opens with the [C7] button, the hot key combination Ctrl+3, or the menu command Window | Chords. Band-in-a-Box users will feel right at home. |
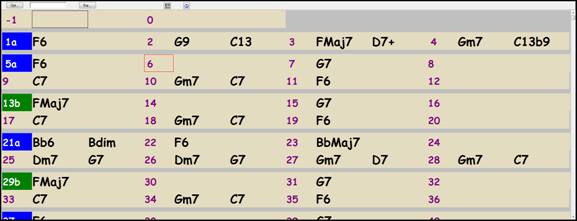
You’ll see the bars of the song displayed in rows. If a bar contains chord symbols they will be displayed to the right of the bar number.
Enter the chords for your song by typing them in using standard chord symbols such as C, or Fm7, or Bb7, or Bb13#9/E. For example, type c6 to get the C6 chord. Note that you should never have to use the Shift key, as RealBand will sort this out for you.
- Use b for a flat, e.g. Bb7.
- Use # or 3 for a sharp, e.g. F#7. (# is the uppercase symbol of 3, so you can actually type F37 to get F#7 - RealBand will sort out the case, saving you the effort of using <SHIFT>3 to type the # symbol.
- Use / for Slash Chords with alternate Roots such as C7/E (C7 with E bass)
- Use a comma to enter 2 chords in a row. In the example below, we would type Ab9,G9 to enter 2 chords at a time (on beat 3 and 4 of bar 2)
- You can use the Delete key to delete a chord, or type a comma and press Enter.
Each measure is divided into Beat Groups, indicated by a highlight cell. A Beat Group consists of two beats. If a song is in 4/4, then each measure will contain two beat groups. The current beat group will have a rectangle drawn around it. You can type two chords into the current beat group. For example if you type this: “C7,G7” (without the quotes) you’ll see the text you’re typing in the white rectangular panel on the toolbar. If you then hit <Enter> you’ll see the C7 and G7 chords appear within the current beat group, and the input rectangle will automatically advance to the next beat group. When you’re in the middle of typing chord symbols, you can use the backspace key to correct a mistake.
The Left Arrow and Right Arrow keys let you move the input rectangle to a different beat group without entering chords. You can also click the mouse on a different beat group to move the input rectangle to a new location.
For a list of the chord spellings that are recognized by RealBand see the help topic Entering Chord Symbols.
Rests/Shot/Held Chord/Pushes
Rests, Shot, Held Chord, and Pushes are supported by the RealBand generation routines:
A chord can be specified as a Rest by adding a period after the chord.
e.g. “C.” indicates a C chord that is a Rest.
A chord can be specified as a Shot by adding two periods after the chord.
e.g. “C..” indicates a C chord that is a Shot.
A chord can be specified as a Held Chord by adding three periods after the chord.
e.g. “C…” indicates a C chord that is a Held Chord.
Pushes:
^C = 8th push
^^C = 16th push
Part Markers
If you click directly on a bar number, the number will change into a Part Marker. There are two kinds of part markers:
- an “a” part marker (blue)
 ,
, - and a “b” part marker (green)
 .
.
The part markers choose one of the two substyles available for BB Tracks arrangements. In general these substyles correspond to the “a” and “b” sections of a song.
Clicking once on the bar number that currently has no part marker will set the bar to “a” part marker. Clicking again will set it to a “b” part marker. Clicking again would set the bar so it would be back to having no part marker.
The Chords window allows you to toggle the part marker type for a measure during playback. This can be done the usual way, which is to click on the measure number with the mouse. In addition, you can also toggle a part marker for the current measure by pressing either the letter M or the letter P on your keyboard when the Chords window is the currently active window (and when not already in the middle of entering a chord within the Chords window).
Entering Chords
Let’s enter some chords in the chord sheet.
We’ll put our highlight cell in the first beat group of bar and type the letters cm7. Press the Enter key and the chord symbol Cm7 is entered at the start of bar 1.
Press the Enter key again and the highlight cell moves to bar 2. Type f7 for an F seventh chord and press Enter.
Now we’ll use some chord shortcuts. The letter “j” is the shortcut for a major seventh chord. Type bbj and press Enter to write the chord symbol BbMaj7 on the chord sheet. Move to the next bar and type ebj to write EbMaj7 in that bar. Advance to the next bar and type the letters ah to write Am7b5 – the h is for a half-diminished chord. In the next bar type df and the chord symbol D7b9 will be entered, then enter gm for a G minor chord in bar 7. We’ll stop there for purposes of this tutorial, and here is what our Chords window looks like now.

Generating the BB Tracks
Now we’ll move on to the arranger toolbar to generate our RealBand song arrangement.
![]() The next thing to do is reset the default song length of 32 bars to 8 bars. We’ll leave the start-of-song chorus set at bar 1 and click on the end-of-chorus button to type in the number of the new end-of-chorus bar.
The next thing to do is reset the default song length of 32 bars to 8 bars. We’ll leave the start-of-song chorus set at bar 1 and click on the end-of-chorus button to type in the number of the new end-of-chorus bar.
|
For our short tutorial song we’ll start at bar 1 and end at bar 8. |
![]() We’d like RealBand to add a 2-bar ending to our song, so we’ll check the 2 Bar Ending box.
We’d like RealBand to add a 2-bar ending to our song, so we’ll check the 2 Bar Ending box.
|
Next, we’ll choose a style for our song by clicking on the style name to open the StylePicker window. |
You aren’t required to have Band-in-a-Box for your RealBand styles, but if you do you will see that all of your styles are available here.
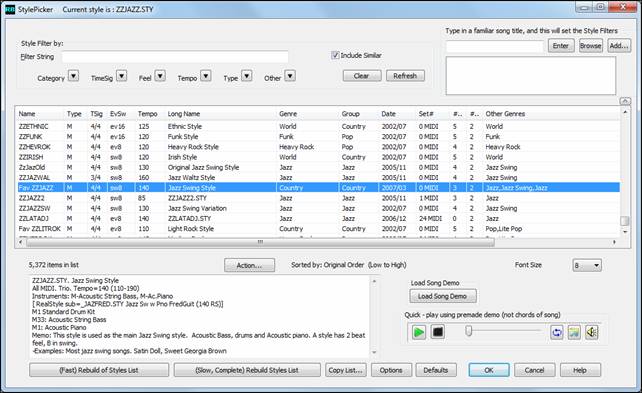
From the Jazz category select the J!Lush style (or any other style of your choosing) and you’ll see that the style selection box has been updated with its name.
![]()
|
You can audition an audio demo of a style without changing your existing arrangement, by using these control buttons. |
For example, if you see a style like _JSWINGG “Jazz Swing w/ Electric Guitar”, you can hear what it sounds like without loading in the style. This is useful because you hear an audio demo of a good example of the style in action. It is also useful because it can demonstrate a style that you don’t have, or you can compare to make sure that yours sounds the same as it is supposed to sound.
|
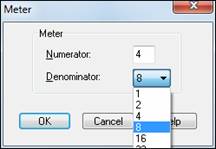
The time signature defaults to 4/4, but a new time signature can be set by clicking in this box to open the Meter dialog. Compound time signatures are supported. In fact, the numerator can be any number from 1 to 99. The denominator is selected from the drop down combo box. |
|
Our song is in C minor, so we could select the relative major key signature of Eb for fewer accidentals in the notation display. Click in the key box to open the Key Signature dialog. |
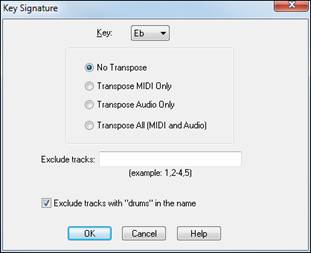
The Key Signature dialog also has options for transposing the song’s MIDI tracks, audio tracks, or both to the new key. In this instance we do not want to transpose the tracks; we just want to change the key signature so select “No Transpose.”
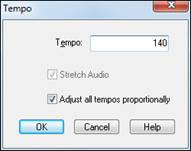
Just before we play our song we can set a tempo.
|
The tempo box has a setting of 120 bpm. To change it to 140 we’ll click in the box to open the Tempo dialog and type in 140. |
|
We could also set the tempo with the up and down scroll arrows, or even tap in a tempo with the minus and equals buttons. |
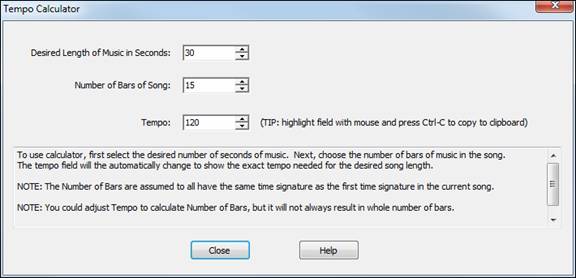
Tempo Calculator (Edit | Tempo | Tempo Calculator)
The length of a song depends on tempo and number of bars. With this calculator, you can enter 2 of the 3 variables (length of song in seconds, tempo, number of bars) and the program calculates the third variable for you. So, for example, if you need a piece of music lasting 60.00 seconds, and it is 45 bars, you can use the calculator to find the tempo that will achieve that.
So we’ve entered our chords in the Chords window, set the length of our song and added a 2-bar ending, chosen a Band-in-a-Box style, and set the tempo.
|
We’re ready to generate an automatic arrangement with BB tracks, and we’ll see them in the Tracks window when we press the [Generate] button to create our song. |
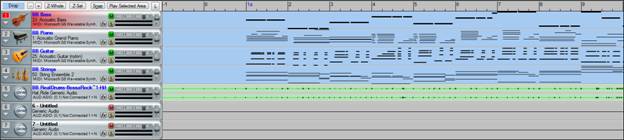
The track overview shows us that we have five MIDI tracks playing the parts generated by the J!Lush style, and because RealDrums are allowed in the Options | Preferences | Song Generation settings we have a RealDrums audio track. Notice that the BB Track names are in blue, whereas user track names are in black.
About BB Tracks
BB Tracks are MIDI tracks so they can be edited like any other MIDI track with the features described in the following section. BB tracks cannot be moved or renamed, but you can change any of the settings with the right-click menu – for example the patch, MIDI port, or MIDI channel.
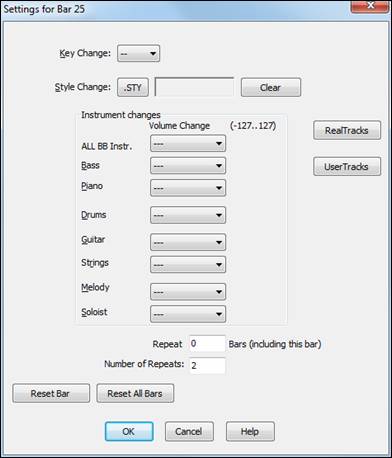
Settings for Bar
BB Tracks can be generated using more than one style, with volume changes, and with repeats.
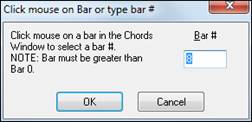
In the Chords window, click on the bar where you want to make changes. The [Bar] button launches the Settings for Bar dialog, or you can press the F5 function key.
![]()
![]()
![]() Use the [STY] button to open the StylePicker and make your selection, and use the [Clear] button to remove the selection. When the song is generated your new style will be heard playing at that bar. This feature can be used any number of times in a song.
Use the [STY] button to open the StylePicker and make your selection, and use the [Clear] button to remove the selection. When the song is generated your new style will be heard playing at that bar. This feature can be used any number of times in a song.
![]() RealTracks Bar changes can be made via the [RealTracks] button in the Chords window Settings for Bar dialog.
RealTracks Bar changes can be made via the [RealTracks] button in the Chords window Settings for Bar dialog.
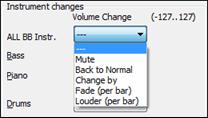
Volume changes can be applied at any bar to all BB tracks together, or just to selected instruments.
|
The options are:
|
You can add repeats to an arrangement.
![]()
The repeats display on the Chords window, and both audio/MIDI play with the repeats. When the number in “Repeat _ Bars” is greater than zero, a repeat will be enabled, and repeat signs shown in the Chords window.
![]()
![]() [Reset Bar] and [Reset All Bars] buttons allow you to quickly remove settings that apply to the current bar or all bars. Canceling the dialog will restore the original.
[Reset Bar] and [Reset All Bars] buttons allow you to quickly remove settings that apply to the current bar or all bars. Canceling the dialog will restore the original.
Now that you have generated BB Tracks for the chords you entered in the Chords window, your next step might be to record some additional MIDI tracks along with the BB tracks.
MIDI SuperTracks
Band-in-a-Box MIDI SuperTracks are supported, so you can now generate special MIDI tracks with sophisticated professional playing. These tracks are not generated from patterns, but, similar to RealTracks, use actual MIDI playing from top studio musicians.
There is a command in the right-click track popup menu to Generate | Generate MIDI SuperTrack.
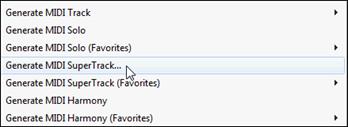
When you choose it you will see a menu of available SuperTracks. You can type filter text to narrow down your search.
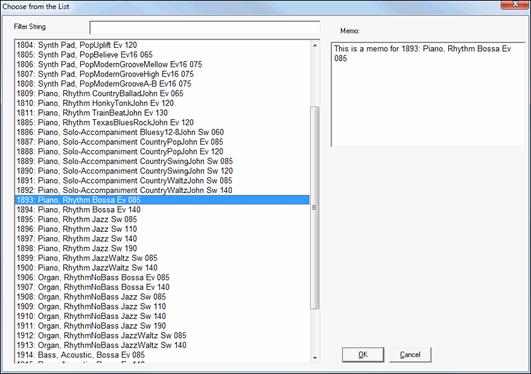
Choose an instrument from the list and click on OK to generate the track.
![]()
Once you choose the track, you will see that the track label has turned green (like RealTracks) to indicate that it is a MIDI SuperTrack
When you press Play, you will hear a much more sophisticated MIDI arrangement than a typical MIDI style, since it is not based on C7 chord patterns; instead it is based on hours of actual MIDI playing from a top studio musician
Once generated, MIDI SuperTracks behave like a regular MIDI track, and can be saved as MIDI files etc.
Recording Your Own MIDI Tracks
In addition to BB Tracks, MIDI data can be recorded on any track in RealBand. Just select the track by clicking on the track number, and make sure that the track type is set to MIDI.
MIDI is recorded with the Input driver that is selected in the MIDI Driver Setup dialog. (Press the [MIDI Devices] button on the toolbar.) If more than one Input Driver is available, then choose the one that is connected to your MIDI keyboard or controller.
Before you start, you might want to select a higher resolution for greater precision. RealBand supports note resolutions as high as 3840 PPQ.
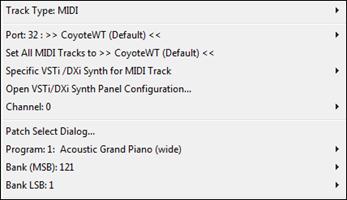
Then make the necessary settings in the Tracks window to select the port, MIDI channel, patch, etc. for the part you are recording. Right click on the track to open the track settings menu.
![]()
|
Start recording with the Record button, by pressing the R key on the computer keyboard, or with the menu command Action | Record. |
|
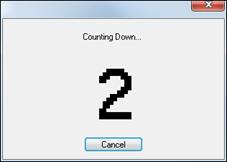
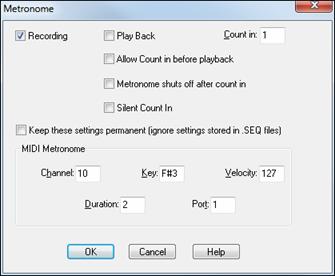
The Record command starts the count-in according to the settings that you have made in the Metronome Settings dialog.
|
|
In addition to the on-screen countdown, there is an option for a MIDI drum count-in on any drum kit instrument. The default note is F#3, hi-hat. There is a setting in the Metronome Settings dialog, “Keep these settings permanent (ignore settings stored in .SEQ files),” that will cause RealBand to remember the current metronome settings and ignore any settings stored in .SEQ files. |
Tracks are “painted Red” during recording, to confirm that recording is occurring in the right place.

|
Recording is stopped by hitting the spacebar or pressing the Stop button. |
|
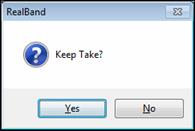
When recording is stopped, you will be asked whether or not you wish to keep the take. Remember that with MIDI recording small glitches are easily corrected; so you don’t need to discard an otherwise good take because of a minor slip. |
Auto Rewind
Auto Rewind is found in the Options menu. When enabled, RealBand will automatically rewind to the location that playback or recording was started. The choices are Recording Only, Playback Only, Both Recording and Playback, or Disabled.
It is convenient to rewind to the start of a recording after a take so that you can listen to the result immediately.

Overdubs
If there is MIDI data on the selected track it will be overdubbed, i.e., the existing MIDI notes will not be erased as the new ones are recorded. This is sometimes useful, but a better way to make overdubs is to select a blank track and give it the same settings as the track you want to overdub. Then record the overdub part on the new track, using as many tracks as you need for additional overdubs or layers. This is a great way to overdub drum fills or layer string parts.
Then you can delete, edit, or re-record each separate overdub without affecting the original track. Use Track | Merge to combine all of the overdubs onto a single track.
To clear any previously recorded material from a track go to Track | Erase Data Only. This will erase the recorded MIDI data on the track, but will preserve all of the other track settings such as volume, patch, and channel.
Punch-In
The Punch-In feature allows you to enable or disable Punch-In. If Punch-In mode is active, recording will erase previously recorded MIDI data in the Punch In range without the need to erase the old MIDI data.
|
You can enable or disable punch-in mode by clicking the Punch-in button. |
When Punch In is enabled, recording will take place during the period between From: and Thru: and will overwrite any existing events during that time.
|
The From: and Thru: settings for punch-in recording can be set in the Punch In dialog, or they can be the settings from the main toolbar. When punching in it is usual to get a “running start” by starting to play or sing before the actual punch-in point. The Punch In dialog’s pre-roll feature automatically starts playback by a specified number of bars and beats before the start of the punch-in point. In the example shown, the pre-roll could be leading in to a punch-in that starts with a pickup note on beat 4 of the bar. |
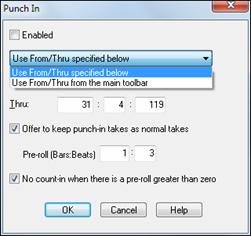
You wouldn’t normally have a count-in playing when a pre-roll is set.
When Punch-In is disabled, recording may occur at any time within the song and data will be merged with any existing events if the track is a MIDI track, or the data will overwrite existing data if the track is an Audio track.
Recording Mixer Moves
Any volume, pan, chorus, and reverb mixer adjustments made during recording will be recorded in real time as MIDI controller messages. Adjustments made in the All column of the mixer will not be recorded, however.
When recording mixer moves for audio tracks, you must move the slider for the current track in order to record the mixer moves. For MIDI tracks, you could move any slider and the data will get recorded onto the current track, but normally you’ll move the slider of the current track.
|
There is a special “Record Mixer Moves” button in the mixer, which will let you record ONLY mixer moves. |
This special button will also let you record mixer moves onto an audio track without the audio being silent during recording.
In order for the recording of mixer moves to work correctly for MIDI tracks, please make sure each track has its own unique MIDI channel in the Tracks window. Also, keep in mind that mixer moves will only be recorded onto the current track, so you can only record mixer moves for one track at a time.
For audio tracks, recorded Mixer moves show up as control changes in the Event List for that track. So, if you used the volume slider to fade the song out, you would see a series of Controller 7 (volume) changes in the Event List.
Alternatively, you could just use the Edit | MIDI | Fill command or insert MIDI controller events into the Event List for the particular audio track.
SysEx MIDI Events
You can insert System Exclusive data directly into a MIDI track as MIDI events. You can record SysEx data in real time and when you keep a take, the SysEx data will be added to a MIDI track as SysEx events. You could also load SysEx data into a SysEx MIDI event by receiving SysEx data from your synth, or by loading the SysEx data from a file. SysEx MIDI events can also be edited.
Editing BB Tracks and MIDI tracks
Edit Menu
The Edit menu lists all of the regular editing commands like Cut, Copy, and Paste plus many features that are unique to RealBand. All editing commands are fully described in the Reference chapter.
Piano Roll Editing
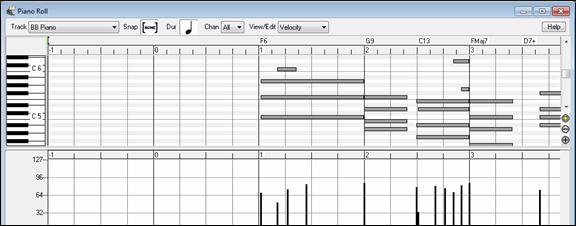
Let’s examine the BB Piano track in the Piano Roll window.
![]()
We can select the BB Piano track while still in the Tracks window, or we can open the Piano Roll window with the piano roll button and then select BB Piano from the track list.
![]()
![]()
In the Piano Roll window notes can be dragged and dropped, shortened, or lengthened in the Note Panel, which is the upper part of the window.
The lower panel is for graphic editing of the selected parameter in the View/Edit list. Note velocity is shown, but parameters such as pitch bend, channel aftertouch, and MIDI controllers can be edited in this panel as well. Please see the chapter titled Piano Roll Window for more on this very useful feature.
The BB Tracks and MIDI tracks can also be edited in the Editable Notation window.
Editable Notation
|
Click on the eighth note toolbar button to open the Notation. In the Notation window toolbar, there are three buttons for different notation modes. Editable notation is the button with dotted vertical lines crossing the staff lines. |
In the Editable Notation mode notes can be inserted by clicking on the Notation window with the left mouse button, moved by dragging with the left mouse button, or edited by clicking on a note head with the right mouse button. Broken vertical gray lines are shown across the staff to show each note subdivision for either eighth note triplets or sixteenth notes.
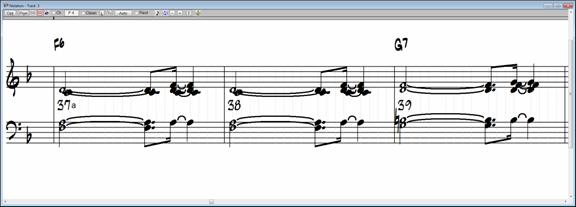
Editable Notation window in 16th note (even) resolution.
Moving Notes (Drag and Drop)
To move a note, move the mouse cursor over an existing note and then click and hold the left mouse button. The mouse cursor will change to a different shape. While keeping the mouse button pressed, move the mouse cursor over to the location you wish to drop the note and then let go of the mouse button. The note will be moved to the place you dropped it. Certain areas of the screen are not valid locations to drop a note. The mouse cursor will change to a circle with line through it to indicate an invalid location.
When you click and drag a note with the left mouse button you will hear the note being played as you move it up and down the screen. The note’s pitch will be increased or decreased chromatically as you move it up/down the screen.
Entering Notes
Notes can be inserted simply by clicking on the staff in an appropriate location. You will see the name and octave of the current note location in a box at the top of the window, helpful for inserting a note above or below the grand staff.
When inserting a note, holding down the mouse button and then pressing the Shift key (click+Shift) will make the note 1 half-step sharper than the position that you click on. Holding down the Ctrl key and then clicking (Ctrl+click) will make the note 1 half-step flatter, and holding down the Alt key will make the note a natural. Hold the key down until after you release the mouse button.
You can also insert notes by clicking on the Piano or the Guitar window. Notes will be inserted at the current location in the Notation window.
Notes can be deleted by holding down the Delete key and then clicking over the note you wish to delete.
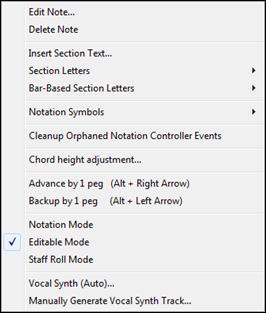
Editing Notes
Notes can be edited with a right-click directly on the note with to launch a menu of Editable Notation commands.
In addition to editing or deleting note events, this menu has commands for adding section text and notation symbols.
There is also a cleanup tool for controller events and 1 peg advance/backup to pinpoint the location of inserted notes.
The Notation chapter has full descriptions of these commands.
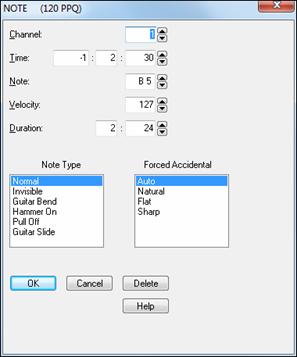
Click on Edit Note to open the NOTE editing dialog.
|
The NOTE dialog allows editing of:
The “Forced Accidental” setting lets you choose whether a note is displayed as a sharp or flat if the program is not showing what you want. Notes can be Normal, Invisible, or a Guitar Bend. The [Delete] button removes the note. |
Micro-Resolutions
You can change the resolution for any individual beat of a song to a different resolution by clicking with the right mouse button above that beat on the Notation window’s time line.
|
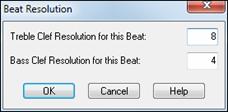
For example, if you click on the time line above the 2nd beat in a measure, a dialog box will pop which will let you set the resolution of the current beat for both clefs. |
|
If you select a resolution of 8, then 32nd notes can be displayed. You can even select a resolution as high as 32, which would allow 128th notes to be shown. When you choose a micro-resolution RealBand will insert a special controller event into the track as a means of storing the resolution. |
Highlighting a section of the Notation window.
When the Notation window is in Editable Notation Mode, you can highlight a section of the Notation window, so that you can cut or copy the section.
To highlight a section of the Notation window:
- Click and hold the left mouse button at the upper right corner of the rectangular section you want to highlight. Make sure you don’t click on any existing notes, and make sure you don’t release the left mouse button until you are finished highlighting.
- Move the mouse down and to the right to form a rectangle. You will see a rectangular section of the Notation Window become highlighted in reverse.
- When you’ve finished highlighting release the left mouse button.
During the process of highlighting a section, you can highlight a section beyond the current notation screen by moving the mouse cursor beyond the right edge of the notation window. When you do this, the Notation window will advance to the next screen. The Notation window will continue advancing until you move the mouse cursor back inside of the Notation window. You should move the mouse cursor back inside the notation window when it has reached the screen that contains the last measure of the section you wish to highlight. Then you can move the mouse cursor to the left or right within the Notation window to adjust to make any final adjustments to the highlighted section.
Event List Editing
An Event List window is an event editor that lets you insert or delete MIDI events, and lets you make changes to existing events. A list of events is displayed vertically in a window, with each line in the list representing an individual event. Each event is shown with its track number, time, MIDI channel number, the kind of the event, and the parameters of the event. The [Ins], [Del], and [Change] buttons may be used to insert, delete, and change events. You can also type directly in the Ch, Time, and Event fields to change the values of an event.

|
When an Event List is created by pressing the [Event List] button, the F2 key, or by using the Window | New | Event List menu, it is based on the tracks that are currently selected. For example, if only track 1 is selected, and you use the New command to create an Event List window, it will only deal with events that occur in track 1. |
A Track combo lets you set the Event List window to any track number (or all tracks). Click on the ▼ down arrow in the Track combo to see the list of tracks. You can select an individual track to view, or select “Multi” to see all tracks. The Tr column to the left shows the track number(s) for the events displayed.
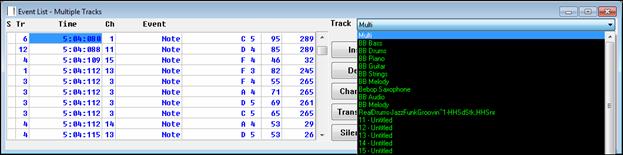
You can also open an Event List for selected tracks. In this case the Event List will deal with events in all the tracks which where selected at the time of the creation of the Event List window. For example, if tracks 1 through 3 were selected when you created an Event List window, the Event List will deal with events occurring in those 3 tracks regardless of what tracks you've selected after it was created.
Events may be inserted by pressing the computer keyboard’s Insert key. After pressing Insert, a menu will pop up, and you may choose which type of event to insert. After picking the kind of event to insert, an entry box will pop up which will let you choose the MIDI channel, time, and any other parameters of the event. Events may be deleted simply by pressing the computer’s Delete key.
Existing events may be edited by pressing the [Change] button. A dialog box will pop up, and you may make changes to the event. You can also type directly in the Time, Ch, and Event fields in the Event List window. You can use either the period (.) or colon (:) key to separate the Measures:Beats:Ticks (or the Hours:Minutes:Seconds:Frames when the SMPTE display mode is enabled).
Notes can be made into “invisible notes” using the radio button in the edit entry box. Invisible notes will be invisible in the Notation window when in non-editable notation mode.
You can play events one at a time by pressing the [Transmit] button. If the event you're playing isn't a note, the cursor will be advanced to the next event, but if the event is a note, it will be sustained until any other key is pressed. You can stop a sustained note from sounding by pressing the [Silence] button. The sustained note will also stop in other situations, such as when you switch to a different window or choose a different event list command.
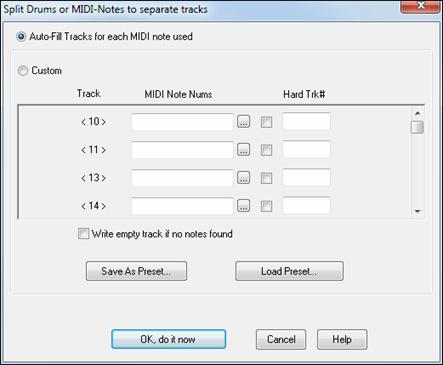
Split MIDI Drums
The Edit | MIDI | Split MIDI drums command will split a MIDI drum track to separate tracks, which allows for precise editing of drum kit balance and dynamics. The “Custom” settings allow you to control which notes go to which track. This feature acts upon the current track, and is not necessarily limited to drum tracks.
If the “Auto-Fill Tracks for each MIDI note used setting” is enabled, then RealBand will automatically move each MIDI note over to a new blank track.
If the Custom setting is enabled, you can specify which midi notes go to which track. On the left column of the Custom section, you will see the track numbers that notes will be placed onto. You can type the note numbers into MIDI Note Nums edit field, separated by commas. For example, “62,65” would mean that MIDI note numbers 62 and 65 will go onto the track specified on the left field E.g. <7>.
If you press the “...” button a list box will pop up that makes it easier to specify the note numbers. The Note Name Octave number of each note is shown (e.g. E 5) and, for notes in the GM drum range, the GM drum sound names for GM drums are shown (e.g. Acoustic Snare, Closed High Hat, etc) .
You could override the track number by enabling the checkbox next to the “Hard Trk” field and typing another track number in the hard track field. The Hard Track can be any MIDI or blank track that you specify.
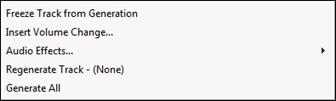
Freeze Tracks
You can “freeze” a track, which prevents it from being regenerated by functions like re-generate all tracks. To do this, right-click on the track and select, Freeze track from Generation.
Auto-Backup of .SEQ Files
When you save a file, RealBand saves a backup of the file in a c:\RealBand\RBBACKUP folder. This doesn’t add any time to the file-save command, and the number of backups is configurable. So the next time that you mistakenly overwrite a file when saving, go the backup folder to look for a saved previous copy!
Unconditional 30-Day Money Back Guarantee on all PG Music products purchased from PG Music Inc.
PG Music Inc.
29 Cadillac Ave Victoria BC Canada V8Z 1T3
Sales: 800-268-6272, 250-475-2874,+ 800-4746-8742*
* Outside USA & Canada where International Freephone service is available.
Access Codes
Tech Support: Live Chat, support@pgmusic.com
 Online now
Need Help?
Customer Sales & Support
|
Phones (Pacific Time) 1-800-268-6272 1-250-475-2874 |
||
| Live Chat | ||
| OPEN | Online Ordering 24/7 |
|
| OPEN | Forums, email, web support |