
Search Manual
Band-in-a-Box® 2023 for Windows User's Guide
Chapter 15: Reference
Band-in-a-Box Menu Descriptions
This chapter gives line-by-line descriptions for all Band-in-a-Box menus.
File Menu
New is used to blank the Chord Sheet and start a new song.
Open shows and opens all available file types (MGU, WAV, WMA, MP3, MID, KAR, CDG, and CDA). And it remembers your preference, so you can restrict it to a certain file type.
Open Special shows menu items for opening songs. Open Next Song and Open Previous Song will open the next/previous song in alphabetical order. If the song loaded has a file name of “Paul,” choosing load-next-file will find the next file in alphabetical order after Paul, maybe it would be “Peter.” Shift+F8 and Ctrl+Shift+F8 are the hot keys for this. Tip: If you’re working with a lot of Band-in-a-Box songs doing editing etc., remember the “Open Next Song” commands – they will save you a lot of time!
Open (Using Standard Dialog) uses the standard Windows® dialog. Open Filtered by Style loads only song in current style. Open with Melodies lists only song files that have melodies (*.mg?). Open Favorite Songs opens the dialog that shows the last 150 songs played. Favorite Folders opens a list of recently used folders for quick access. Open Karaoke (KAR) File opens Karaoke files directly in Band-in-a-Box, displaying the lyrics and chord symbols for the song. Open Song by Title opens the SongPicker, which shows information for up to 60,000 songs. It has many filter features for finding songs. You can also search songs that have similar chord progressions or melody fragments. Open MIDI File loads a MIDI file into Band-in-a-Box and the MIDI file will play with the chords intelligently interpreted on-screen. MIDI files read in Section Markers and show them as part markers. Open MusicXML File imports a MusicXML file (*.musicxml, *.XML, *.MXL) from your notation programs such as Finale, Sibelius, and Guitar Pro to Band-in-a-Box. Open ABC Notation Music File imports an ABC notation file. Open Audio (WAV, WMA, MP3, WMV) will open an audio file in WAV, MP3, Windows® Media Player (WMA, WMV) or CD Audio (CDA) format. Play back at 1/2, 1/4, or 1/8 speed for transcribing or analyzing. Open Audio with Chords (WAV, WMA, MP3, WMV, CDA) will open a WAV, WMA, MP3, WMV, or CD Audio file and also figure out the chords and bar lines. Find File finds a Band-in-a-Box song (or any file that Band-in-a-Box can open), including filtering by words found in the file name or any text in the file. |
Revert to Saved abandons your edits and reverts to the previously saved song.
Save Song saves the current song under original title.
Save Song as... is to save the current song with a different name or in a different location.
Save Special shows menu items for saving songs.
Save Song with Patches and Harmony: All settings are normally saved with Band-in-a-Box files. If you would like to save certain patches with a song, then type in the number of the patch (instrument) that you would like. Leave the other instruments at zero (0) for No Patch Change. Remember that - as with all other Band-in-a-Box functions - you use the General MIDI number for the instrument, regardless of the synth you are using. You can also freeze selected tracks in this dialog. Save Song as MIDI File saves the song as a Standard MIDI file. You can save in Type 1 (multi-tracks) or Type 0 (single track) files. Karaoke MIDI files are also supported. Save Song as MusicXML File: Band-in-a-Box supports MusicXML so you can easily export your Band-in-a-Box songs into notation programs such as Finale, Sibelius, and Guitar Pro, while still retaining the chords from the Band-in-a-Box song. Save Song as ABC Notation File allows you to save the song as an ABC notation file. ABC notation is the simple text-based notation system used by musicians worldwide to store chords, melody, and lyrics of songs. You can find out more information about the songs and ABC notation at abcnotation.com. Save Song to Favorite Folder allows you to save the song in one of your favorite folders. Save Song(s) to Text on Clipboard or File(s): Chords and other data in the current song can be copied as a simple text format, and then be pasted into another song in Band-in-a-Box or a text file in a program like Notepad. You can also copy chords and other data in all songs in the selected folder to the clipboard, or you can save them as individual text files or a single text file. Save Song as wav/wma/mp3/mp4/m4a renders the song in the audio format you choose and saves it to the specified location. Email Song File(s) as Attachment(s) allows you to email a song (.MGU or .SGU), style (.STY and .STX) or rendered audio file (m4a, wma, wav, mp3) as attachments. |
Import shows menu items for importing a file to the current song.
Import Melody from MIDI File allows you to import MIDI data from a file (*.MID) into the Melody track. Import Melody from Clipboard allows you to import MIDI data that has been pasted into the clipboard (e.g., from a sequencer such as PowerTracks) into the Melody track. Import Soloist Part from MIDI File allows you to import MIDI data from a file (*.MID) into the Soloist track. Import Soloist Part from Clipboard allows you to import MIDI data that has been pasted into the clipboard (e.g., from a sequencer such as PowerTracks) into the Soloist track. Import MusicXML File allows you to import a MusicXML file (*.musicxml, *.XML, *.MXL), to the current song. In the dialog that opens after choosing a MusicXML file, select a track that you want to import. If you want to change the destination track, right-click on a track and select Destination Track. Then, in the area below the track selection, select items that you want to import from the MusicXML file. If you do not want all the tracks to be merged into the Melody track, disable the “Load all XML tracks to Melody” option. The “# Bars in XML file to Skip” setting allows you to load the MusicXML file from a certain bar. For example, a setting of 4 will load the MusicXML file from bar 5. When you are ready, press [OK], and the MusicXML file will be imported to the current song. Import Audio (WAV, WMA, MP3, WMV) allows you to import an audio file into your Band-in-a-Box song. A Mono or Stereo audio file can be imported to the Audio track, optionally merging or replacing any existing Audio track. Import Chords from PG Music MIDI file will read in the chord symbols from PG Music MIDI files made by programs like Band-in-a-Box or PowerTracks Pro Audio. Note that it won’t read in the chords from a MIDI file that doesn’t have special chord symbols typed in to it, i.e., it doesn’t interpret chords. If you want to interpret chords from any MIDI file, use the File | Import | Import Chords from MIDI File option instead. Import Chords from PG Music MIDI file on CLIPBOARD: Chords from most PG Music programs can be copied to the clipboard and imported with this command. Import Chords from MIDI File uses the MIDI File Chord Wizard to interpret chords from any MIDI file, and also import tracks to the Melody and Soloist tracks. Import MGU Song imports part or all of an existing Band-in-a-Box song to your current song, with options to specify source and destination range, type of information to import (chords, melody, lyrics, etc.), and more. |
Medley Maker opens the Medley Maker, allowing you automatically make a medley of Band-in-a-Box songs.
Load Style from StylePicker will open the StylePicker window with complete style information.
Load Style Special shows menu items for loading a style.
Load a User Style from disk: Styles can be selected and loaded with Long File Name dialogs. Select Favorite Styles opens the Favorite Styles dialog, which contains a list of the most recent 150 styles used. Since these are ordered based upon how often they are used, we call this the “favorite styles” list. Since you can also store user-definable favorite lists, we also refer to them as Set Lists. Load Previous Style / Load Next Style: These functions, like the Load Next Song function, load in the previous (or next) style in alphabetical order of the file name. . Find a RealTracks Replacement for current MIDI style will find the best RealTracks replacement for your current MIDI style and ask if you want to use it. Load Style demo for current style loads the demo song for the currently loaded style. This feature is also available with a click on the name of the style on the main screen. The menu that displays will include the option to “Load Song Demo” for the current style. Style is Enabled: When this is disabled, the name of the style will have an X at the beginning, which indicates a disabled style. The disabled style won’t sound or write any data to the MIDI file. The most common use for disabling a style is when a MIDI file is loaded to the Melody track. Then the style won’t sound and conflict with the full arrangement on the Melody track. OK to load style with songs allows you to keep a style in memory. This way, all subsequent songs that are loaded will not change the style (even if they have a different associated style), so you can easily play songs in the same style. If you’ve found a new favorite style, you can try it out in all kinds of songs without having to reload the style each time. For example, let’s say we’ve discovered the GARNER style, and want to try it out on many different songs. Select File | Load Style Special | OK to load styles with songsto ensure the item is NOT checked. Then when you load a song the saved style associated with the song doesn’t load and the song will play in GARNER.STY. You can over-ride this style by loading in another style using the [Style] button or the File | Load Style Special menu. The new style loaded will stay in until you choose another one, or until you turn off the forced styles option and load a song that uses a different style. Style Aliases: You can create an alias so that when Band-in-a-Box looks for a style, it will load its alias instead, so when you have found a new favorite style just change the alias and you don’t have to change all of your songs. Restore Style Prior to Style Alias reverts to the original MIDI style after you have used a RealTracks replacement. It also turns off the style alias feature for the song. Auto-Replace MIDI styles with RealTracks styles when songs loaded: If you have made a lot of songs using older MIDI styles, and would prefer that they play with RealTracks, you can now do this easily by selecting the menu option File | Load Style Special | Auto-Replace MIDI styles with RealTracks styles when songs loaded. Then, if you have the needed RealTracks installed, your MIDI style will be intelligently replaced with a RealTracks style. There is also a manual option to do this on as-needed basis, disable the feature for a certain song, or to reverse it if you prefer the MIDI style. Suggest RealTracks style replacements when songs are loaded: This feature is the manual option for Auto-Replace MIDI styles. It suggests RealTracks style replacements but doesn’t automatically load them. That is done manually from the RealTracks toolbar button menu. It is disabled when “Auto-Replace” is checked. |
StyleMaker shows menu items for making and editing styles.
Make A New Style allows you to begin to create a new style, using the StyleMaker feature. See online Tutorial #6: StyleMaker - Making a New Style. Edit a Style allows you to edit an existing style (*.STY) from disk. The resulting style can then be saved with the same name or a different name. This function uses the StyleMaker. See online Tutorial #5: StyleMaker – Editing Styles. Edit Current Style allows you to quickly get into the StyleMaker to edit the current style. The current style is the style that is displayed in the Style Box on the main screen. Usually, you would use Ctrl+Shift+F9 to do this quickly. Save Current Song (except muted instruments) as a Style saves the style that is in use to the C:\bb\Styles folder with the parts that are currently selected. If, for example, a MIDI style has had RealTracks added, the RealTracks will be saved with the style and the style name will get an = sign prefix. So, if you were to add an acoustic bass RealTracks to the ZZJAZZ style and save it with this feature, the name would change to =ZZJAZZ.STY. It also saves MIDI SuperTracks and Hi-Q instruments (or other TGS files), and automatically calculates dB offsets based on volume, taking existing offsets into account. Press the[Rebuild] button in the StylePicker and the new style name will be added to the list of Other Styles. Make a Hybrid Style: The “Hybrid Styles” feature allows you to play and create a style that has instruments from up to five different styles! You can, for example, play a song with a Reggae bass, Rock drums, Salsa piano, or any combination of up to five styles that you want. Style Wizard (Create Style from MIDI File) launches the Style Creation Wizard, which automatically converts a MIDI file (.MID) to a Band-in-a-Box Style (.STY). Simply open a MIDI file, select your options, and press “Save-As Style.” |
File Utilities opens a sub-directory of file utilities.
Change Directory (Path) opens the Browse Folder window where a new directory can be selected. Run Explorer in Current Directory launches Explorer. Pressing Ctrl+Alt+F3 is the usual way to get to this item and will quickly open Explorer. Once Explorer is open, you could double-click on a song or style to load it in. (Assuming that there is a file association for Band-in-a-Box songs and styles made in Explorer.) Run Explorer (choose folder) opens a Browse for Folder dialog where you can choose a folder. Auto-rename song files to Long File Names will rename all song files in the current directory to long file names, using the song title as the name. Rename Any File on disk… or Rename CURRENT song filename allows you to rename files. Delete File from disk deletes a song file without exiting the program “Nuke It!” (Delete CURRENT song file from list) deletes the current song. Associate File types (songs, styles) with Windows… / Remove File Associations (songs, styles) with Windows… will associate (or remove associations for) the file types for Band-in-a-Box songs and styles in Explorer. Once set, this means that you can double-click on a song or style in Explorer and Band-in-a-Box will open with that song or style. Batch create MIDI files convert an entire folder of BB songs to MIDI files. You can choose the file names to be based either on the original file name or song title name. This feature is also accessed with the [Batch mode…] button in the MIDI file dialog. Change all songs in current folder to a specific TEMPO will set all the songs in the folder to the tempo you enter, but it is NOT UNDOABLE. (Tempos can be reset individually.) Change all songs in current folder to a specific STYLE name is also NOT UNDOABLE. Change all song in current folder to default Mix applies the default mix as set in the Master right-click context menu. This is not undoable. |
Print Song - Chords/Melody opens the Print Options dialog.
Print Song in Lead Sheet Mode prints the song using the Lead Sheet options (such as fake sheet).
Print Multiple Songs prints all songs, or just selected songs, in a song directory.
Exit to exit completely from the Band-in-a-Box program.
The last five files opened are listed at the bottom of the File menu, numbered 0 through 4.
Edit Menu
Undo and Redo allow you to undo or redo most operations including track generation.
Cut functions like a delete command to remove bars from a song.
Copy is to copy chords to a clipboard. Copying a section of chords can be done in the same manner as copying text in a Windows® word processor. To select the region to copy, place the mouse cursor at the bar to begin the selection. Then, holding down the left mouse button, drag the mouse over the region. As you do this you will see that the region will be inverted (i.e. looks dark). When you have selected the desired region of chords to copy, release the mouse button. Copy the selected region to the clipboard by using the keystrokes Ctrl+C or selecting the Edit | Copy menu item.
Copy Special shows menu items for copying.
Copy From…To… / Copy Breaks (Rests/Shots/Holds): One of the best ways to copy chords is the Copy From… To… command, or pressing Alt+C, which launches the Copy Chords and/or melody dialog. The Copy Rest command will similarly bring up the Copy Rests dialog to allow copying of rests. These dialogs allow you to specify the number of bars to copy, the location to copy to, and the option to copy the Chords, Melody, Soloist, and/or Lyrics. Copy/Move Tracks allows copying or moving data (audio and/or MIDI) from one track to another. Copy Song(s) to Text on clipboard or file(s) allows you to select the items to include when you copy the chords in the song. It also allows you to copy or save all songs in a specific folder to the clipboard or save them as text file(s). |
Paste: Assuming you have already copied some chords to the clipboard, you are then ready to paste the copied chords into another part of your Chord Sheet. Move the highlight cell to the bar to begin the paste of chords. Copy the chords at the highlighted bar by using the keystrokes Ctrl+V or selecting the Edit | Paste menu item.
Erase From… To… launches the Erase Chords and/or melody dialog, which allows you to specify the number of bars to erase and option to erase the Chords, Melody, Soloist, and/or Lyrics.
Insert Bar(s) inserts a certain number of bars into the Chord Sheet.
Delete Bar(s) removes a certain number of bars from the Chord Sheet.
Nudge Chords/Melody allows moving a range of chords by any number of bars and beats.
Song Form shows menu items for a song form.
|
Song Form Dialog (Arrange song like AABACAA) allows you to define sections of a song (A, B, C, etc.), and then rearrange the song by typing the form you want (e.g., AABABAACA) Settings for This Song opens the Song Settings dialog for settings such as endings, tags, style variations, pushes, rests, and chord embellishments to make your song interesting and varied. The dialog can also be accessed by pressing the [Song Settings] button on the main screen. Repeats/codas/1st-2nd endings: You can add repeats and endings so that the Lead Sheet window will display and print using 1st /2nd endings. Generate ( Remove) Intro Bars will launch the Generate Intro dialog where you can specify the characteristics of the intro you wish to generate. For more information on this feature please refer to the Automatic Intro section. Reduce (durations of chords by 1/2) cuts chord durations by 50% (e.g., 4beats>>2beats; 2beats>>1beat). Expand (durations of chords by 2) doubles the durations of chords (e.g., 1beat>>2beats; 2beats>>4beats). Unfold (Convert to 1 BIG chorus):
Choose this command to unfold a multi-chorus song into one BIG chorus. When selected, Band-in-a-Box will display all choruses and verses of a song without loops or repeats. It is useful, for instance, when you have a song with 3 choruses and want to convert it to a single large chorus, or to customize a song with the “Edit Settings for Current Bar” feature to change meter, tempo, patches, styles, and/or harmonies and generate a MIDI file for export. Fold (Convert 1 chorus to multiple) converts a song with a single big chorus to multiple smaller choruses based on the information you enter in the Fold Song dialog (chorus begins, chorus ends, tag etc.). If you have imported a MIDI file, you might have a file that is 96 bars long, but really consists of 3 choruses of 32 bars each. You can convert this to a 32-bar song by using the Edit | Fold song option, including inserting tag endings, and 2-bar endings. |
Transpose shows menu items for transposing the complete song or selected parts of the song.
|
Transpose From ... To ... launches the Transpose dialog for transposing a particular section of the song. The bar values can be typed in manually or you can transpose a portion of a song by highlighting the region you wish to have transposed, selecting this menu item, and typing in the new key you wish to transpose to. Transpose 1 Semitone Down or Transpose 1 Semitone Up transposes the entire song. This can be done while the song is playing. Band-in-a-Box will pause briefly, and then resume playing in the new key at the same place in the song. Transpose # of semitones opens a dialog where you can type in the number of semitones to transpose the song. |
Tempo shows menu items for setting the song tempo.
- When a new song is started the tempo is set based on Style. This is the tempo that is embedded in the style file. It can be reset to any tempo.
- You can quickly enter a specific tempo for a song with the Set Tempo… command (hot key is Ctrl+Alt+T), or by clicking on the tempo. A dialog opens up where you can type in a tempo.
- You can quickly change to different speeds with the menu commands or hot keys. For example, choosing Half Speed (or the hot keys Ctrl -) will change the playback speed to half, and Normal Speed (Ctrl =) will revert to normal speed.
- Load an audio file and use the tempo feature to play it at reduced speed without changing the pitch, a big help for analyzing and transcribing songs.
- For practicing tunes, it can be useful to play them at slower or faster tempos. You can enter an amount to change tempos for each song that is loaded.
Change Tempo of all loaded songs by…: For practicing tunes, it can be useful to play them at slower or faster tempos. You can enter an amount to change tempos for each song that is loaded.
Set Audio Master (Base) Tempo is used to ensure that tempo stretches are based on correct master tempo. It uses a sophisticated peak-limiting algorithm to ensure that increases in the volume do not result in clipping of the sound, which would be heard as a loud distortion.
Lyrics shows menu items for showing or editing lyrics.
Enter Note-Lyrics at current bar opens the Lyric entry box at the current location of the timeline or highlight cell. Big Lyrics Window opens the Big Lyrics window for viewing lyrics and, optionally, chord symbols. Lyric Document Window displays a full screen of formatted lyrics. Easily copy and paste lyrics to and from your favorite word processor. The lyrics will then display in the Big Lyrics window. Copy Lyrics to Clipboard allows you to copy a song’s lyrics (and/or the chords) to the standard Windows® clipboard. By pasting this data into a word processor, you can print out the lyrics in the font of your choice. The dialog has options to allow copying of note-based and/or line-based lyrics. With either option you can choose to include the chord symbols, have double or single line spacing, and make margin settings. Copy Bar-Based in 1st chorus to whole song copies the note-based lyrics for the first chorus to the rest of the song. Convert Note-Based Lyrics to Bar-Based Lyrics converts the note-based lyrics to bar-based lyrics. Erase Bar-Based Lyrics erases bar-based lyrics. Erase Note-Based Lyrics erases only the note-based lyrics. Erase Note-Based Lyrcs from Choruses: Select from a list box to kill lyrics in the selected chorus. Move Bar-Based Lyric Ahead to Timeline / Move Bar-Based Lyric Back to Timeline: If you have a note-based lyric that you want to time shift ahead or back, you can click on the time line at the destination that you want, and then choose this item. You can also shift lyric times using the Lyric Event list. Timeshift Bar-Based Lyrics (ticks) / Insert Beat(s) in Bar-Based Lyrics / Delete Beat(s) from Bar-Based Lyrics: These are functions that apply to the entire lyric track. They are useful when you’re inserting bars or beats into the song and need to move the lyrics around to keep them in sync. Edit Bar-Based Lyrics as Event List opens the Edit Lyrics dialog with Edit, Insert, Append, and Delete functions. Vocal Synth - Auto Mode (Generate Vocal Audio from Lyrics & Melody):
Your Melody or Soloist track with lyrics can be rendered to a vocal audio track by sending it to the 3rd party vocal synthesizer Sinsy. Choose the language, Japanese or English, and one of the female or male vocalists. You can adjust the gender of the voice in a range from -0.8 to +0.8. Higher values are more masculine. If your track does not include lyrics you can enter a syllable to use for notes with no lyrics. Vocal Synth - Manual Mode (Generate Vocal Audio from Lyrics & Melody): With this command, Band-in-a-Box will generate a file named Sound.XML and save it in C:\bb\Data\SRequest. Use your browser to navigate to www.sinsy.jp and upload the xml file. A file named sound.wav will be returned and loaded into the Audio track of your song. |
Chords shows menu items for editing chords.
Chord Substitution (Vhoose your own) allows you to see a list of possible chord substitutions for the current chord progression. You can also access it from a right-click on the Chord Sheet, and by pressing the Chord Substitution button. Chord Substitution (Auto-Generate) will automatically pick chord substitutions for all or part of the song. Chord Reharmonization (Choose your own) shows you the current bar in the song with a list of suggested chord progressions for the current melody, based on the melody and genre that you choose. Chord Reharmonization (Auto-Generate) generates an entirely new chord progression for a complete song or a portion of a song. Selecting this menu option opens the Reharmonist dialog. ‘Jazz Up’ chords will “Jazz Up” the chords by changing chords like C and Cmaj to 7th and 6th chords. Song embellishment will be turned on for the song. Select the type of 7ths from the list box, and then click on the [OK – Jazz UP] button. ’Jazz Down’ chords will “Jazz Down” the chords by changing chords with 7ths (e.g. C7) to triads (e.g. C) and 9ths and 13ths to 7th chords. Song embellishment is turned off. Press [OK – Jazz Down] to proceed. Search and Replace Chords will search and replace chords, including support for asterisks (*) as wildcards. |
Edit Chord Shortcuts file (shortcut.txt) / Refresh Chord Shortcuts:
If you have found a chord that Band-in-a-Box doesn’t recognize, you can add your own shortcuts in a text file that you make yourself called C:\bb\shortcut.txt and Band-in-a-Box will allow you to type in that chord in the future. Click on this menu command to open or create your own chord shortcuts file. Make sure to save the file after editing. Changes won’t take effect until you choose Edit | Chords | Refresh Chord Shortcuts…
The text file C:\bb\Data\shortcut.txt allows you to add new chord shortcuts. If you find a chord that Band-in-a-Box won’t accept, like Csus2 when it expects C2 instead, you can enter this on a single line (without the quotes) “Csus2@C2.” Then Band-in-a-Box will enter the chord C2 whenever you type in Csus 2. You can also use it for shortcuts. For example, if you entered j@maj7 Band-in-a-Box would let you type Cj for CMaj7. See the file C:\bb\Data\pgshortc.txt for examples of shortcuts.
Chord Builder allows you to build up chords using mouse clicks.
Play Current Chord plays the current chord on the Chord Sheet. It is most commonly accessed by pressing Shift+Enter on the Chord Sheet.
Chord Settings launches the Chord Options dialog, where you can put in rests and pushes. You can launch the Preview, Chord Builder, or Chord-Substitution Functions from this window.
MicroChord Settings (up to 4 chords per beat) opens the Set MicroChords dialog where you can enter up to 4 chords per beat, select tracks to be excluded from playing MicroChords, select options, and set a specific rhythm.
Track Settings and Actions opens a convenient “one-stop-shopping” dialog where you can select RealTracks, Loops, MIDI SuperTracks, etc., set volume/ reverb/panning/tone, mute, solo, freeze, and do many other things for all 24 tracks.
Slide Tracks allows you to move any of the Bass, Drums, Piano, Guitar, Strings or Melody track ahead or behind by a certain amount. You could, for example, slide the Bass track so it plays a little ahead of the rest of the band. This has the effect of making the bass player “drive the band,” and is useful in Jazz styles to make the music sound more exciting.
Settings for Current Bar opens the Edit Settings for Current Bar dialog where you can change meter, tempo, volume, patches, styles, RealDrums styles, and/or harmonies at the current bar.
Song Memo: A song memo of up to 2000 characters may be added.
Set Time Signature (range of bars) allows you to assign a specific time signature at any bar and apply it to a range of bars, as often as you want. For example, to have one 5/4 bar, bar 13, select this menu item, and toggle the 5/4 button. Then, type in the bar beginning (13) and number of bars (1) in the space provided.
Auto-Generate Song Title allows you to generate a title for a song. There is also a button on the main screen for this.
Options Menu
MIDI/Audio driver setup: Select MIDI Input and MIDI Output drivers and choose a Synthesizer / Sound Card patch map. Select the [MIDI Output Driver Wizard] button for help with your selection. Click on the [Audio Settings] button if you need to set up audio drivers, such as ASIO drivers. This topic is discussed in detail in the MIDI and Audio Setup instructions.
Use/Set ALTERNATE MIDI output driver for session allows you to set a temporary MIDI Driver for a session, useful when your main MIDI Driver is “in-use” by another application.
Return to Factory Settings: Choosing this command will reset all settings to the default at the time of shipping. Return to Factory Settings also offers to nuke the drum kit and MIDI Driver choice, making the return to factory settings complete.
|
If you choose MOST settings, the patch map and drum kit will be left intact, and not reset. |
What add-ons do I have? will search your directory to tell you which add-ons you have and which you don’t.
Language Selection allows you to change language from English to another language for display. If there are other languages supported by your version of Band-in-a-Box, then they will be displayed in this dialog. International language versions are available for download from here.
MIDI Patch Maps, etc.
Open Preferences File / Save Preferences As:
You can save and load custom preferences files with your current settings saved and restored. For example, you can have a preference that remembers a certain group of songs, notation transpositions, etc.
The Options | Return to Factory Settings menu command saves preferences to disk, so that the settings can be restored at any time
Preferences
The Preferences dialog allows you to set various settings that are saved in the Band-in-a-Box for Windows® configuration file called intrface.bbw.
MIDI OptionsThe [MIDI Options] button in the Preferences dialog opens the MIDI Options dialog.
Turn External Keyboard’s Local On at end of session: If you have set the Keyboard Local to Off (usually to eliminate MIDI echo) this setting turns it back on at the end of your Band-in-a-Box session. MIDI SettingsThe [Channels] button button in the Preferences dialog opens the MIDI Settings dialog.
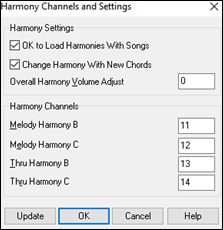
Panning: Panning refers to the stereo placement (i.e. Left to Right) of a given part’s sound. The range of this parameter is -63 to +63. A setting of 0 is centered in the middle of the stereo field. Harmony Channels and SettingsThe [Harmony] button in the Preferences dialog opens the Harmony Channels and Settings dialog where settings for the harmonies are made.
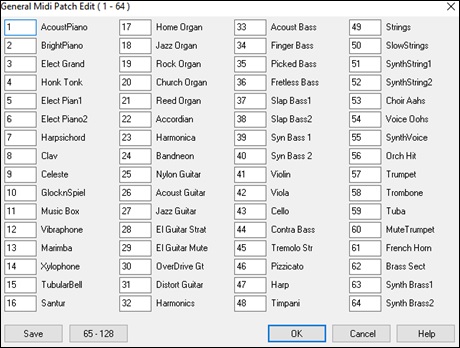
Overall Harmony Volume Adjust: Sets a level for the overall harmony in a range of -128 to 128, with 0 leaving the settings as programmed in the Harmony file. General MIDI Patch MapThe [Patch Map] button in the Preferences dialog opens the General MIDI Patch Edit dialog, where you can make a customized General MIDI patch map.
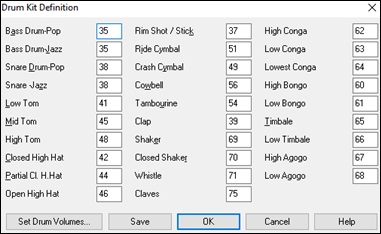
Drum Kit DefinitionThe [Drum Kit] button in the Preferences dialog opens the Drum Kit Definition dialog. If you have been unable to find a preset drum map that matches your synth’s drum notes, then you may need to type in the drum notes that your sound source uses. To do this, you need to hook your MIDI controller up to play the drum sounds from the keyboard. Play up and down the keyboard to hear all the drum sounds.
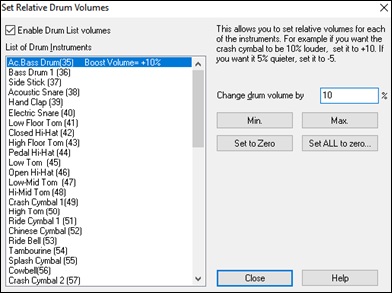
Customize the Relative Volumes of the Drum Kit Instruments. The [Set Drum Volumes] button allows you to make the crash cymbal 10% quieter, boost the kick-drum by 15%, and turn off the “tambourine” entirely. Changes apply to any song when this feature is enabled, and playback and written MIDI files will reflect the changes.
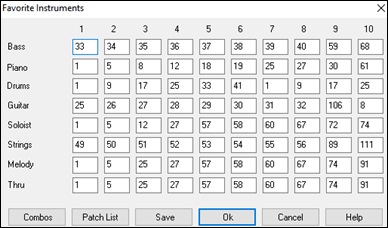
Favorite InstrumentsThe [Favorite Patch] button in the Preferences dialog opens the Favorite Instruments dialog.
Note: If you use a custom patch map it will convert your synth’s non-GM patch numbers, always enter GM patch numbers for the favorite instruments.
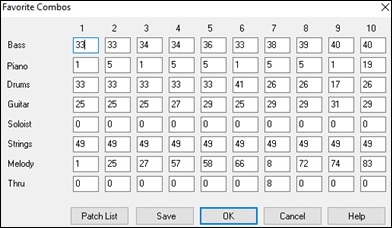
The [Patch List] button displays the General MIDI Patch List of instrument names and patch numbers. The [Combos] button opens the Favorite Combos dialog.
|

Play Menu
Play: This plays the current arrangement from the start without regenerating the parts, unless they have not yet been generated. Edits to accompaniment parts are kept.
Play Special shows menu items for playing the song.
Play (and Generate): This generates a new arrangement and plays the song. Play (Generation): This plays the song without generating a new arrangement. Generate (even if tracks are frozen): When you do this, the song will regenerate, the tracks will get rewritten, and the song will stay frozen. So, if you’re freezing songs to get the instant playback with RealTracks but get tired of the “same-old” frozen arrangement, just press Shift+Play, generate a new arrangement, and press Save. Then the new “fresh-frozen” arrangement will play instantly, even with many RealTracks. Tip: Obviously, you wouldn’t use this feature to force regeneration of a frozen song if you have made custom edits to the song that you don’t want to lose, unless you’ve saved the song and have a backup copy.
Play from Bar…: Choose a chorus and bar to play from in the current arrangement. Parts are not regenerated. Use this command during playback to jump to any bar in the song. Play from Current Position: When the song is stopped this command starts playback again at the bar with the highlight cell. Go (Open and Play): This launches an Open File dialog for selection of any song in any directory. The selected song loads and plays automatically in Band-in-a-Box. |
Stop: This stops playback or recording. To resume playback from the current bar, use the Play From Current Position command or the [Play from Bar…] toolbar button. To play from the start of the song, press the [Play] toolbar button.
Pause: This pauses the song. Repeating this command resumes play from the exact location where the song was paused.
Play & Loop Highlighted Section: Drag the mouse cursor to select a region of bars in the Chord Sheet and then use this command to play the selected region as a loop.
Looping:
You can loop any section of the song. The program will then start playback at the first loop point and play the looped section until stop is pressed or looping is turned off.
Looping of a section of the song is enabled with the Loop Section Enabled command in the [Loop] toolbar button, the Loop Section Enabled command, or the keystroke NUMPAD 1.
Open the Loop Section Settings dialog with the menu command, by clicking the [Loop] button in the toolbar, or pressing NUMPAD 2.
The remaining commands in this submenu are also found in the Loop Section Settings dialog.
Force loaded songs to # choruses will set every song that you load to the same number of choruses.
Juke Box Play: This opens the Options for Juke Box dialog to select and play a jukebox list.
Previous Juke Box Song / Next Juke Box song: This allows you to navigate back and forth in a juke box set list.
Wizard Play Along feature: The Wizard is a play along feature that allows you to use the QWERTY keyboard or your connected MIDI keyboard to play along with Band-in-a-Box. The Wizard is only active during playback.
Wizard uses “Smart” notes: Toggle this on so the Wizard will only play notes based on the chord/key of the song. Toggle “Smart” notes OFF (unchecked) to have the Wizard provide you access to the chromatic scale.
Panic!: Select this if your MIDI notes are stuck ON and it’s driving you crazy!
Panic should also Reset DXi synth: When selected, hung DXi/VSTi notes are also cleared by the Panic feature.
Freeze all tracks: This freezes all tracks – MIDI, RealTracks, and RealDrums – for fast replay without regenerating tracks.
Un-freeze all tracks: This unfreezes tracks to allow normal regeneration.
Freeze track: This allows the selection of a single track to freeze.
Step Advance:
When a song is paused these commands can be used to navigate step-by-step through the currently selected track. For example, when the Melody track is displayed on the Notation window, Lead Sheet window, or Guitar window; selecting the Step Advance One Chord menu item will highlight and play the next chord of the melody. This is a great way to study the notes being played, and to navigate around the track.
Melody Menu
Track Type: Normally you’d leave the track type set to Single. But you can set it to:
- Multi (16) - Channel: All channels get preserved, and outputted on the channels, this would be useful for importing an entire MIDI file and playing it from the Melody channel (using a silent style).
- Guitar: Channels 11 to 16 will display on the guitar as strings 11 to 16, TAB will show, the notation will be up an octave, and the MIDI file will contain the channels preserved.
- Piano: In this mode, channels 8 and 9 are treated as the left and right hand of a piano part.
- Selecting any one of Bass, Ukulele, Mandolin, Banjo (5-string), or Violin will display the correct tablature in the Notation window and the correct fretboard in the Guitar window.
- Set the track to match any of the 11 alternate guitar tunings, such as DADGAD, Open G, or Double Drop D, supported by Band-in-a-Box. Then you will see the correct notes on the guitar fretboard, in the notation and tablature.
- If the track has drums that use GM Drum notes, you can select Drums to see drum notation.
Melodist – Generate Melody and Chords (Shift+F5) launches the Melodist feature.
Melody Maker submenu items allow you to edit Melodist files using the Melody Maker.
Start a Melodists File allows you to make and edit Melodists saved under the filename of your choice. See the Melodist Editor dialog for additional details on importing/exporting/saving Melodists. Edit a Melodists File opens an Open File dialog where you can select any Melodist file (*.MEL) to edit. Edit Current Melodists File opens the Melodist dialog with the currently installed Melodists file. Refresh Melodist (Shift+F7) allows the Melodist full access to all melody ideas contained in its database. |
Sequencer Window for Multi-Channel Melody: There are 2 tracks in Band-in-a-Box to add your own recordings. These are the Melody and Soloist tracks. Normally, you would want a single part on each of them, but since MIDI information can have separate channels, it is possible to store 16 separate parts on each of the Melody and Soloist tracks. When the Melody or Soloist track has been set to “Multi (16)-Channel” we refer to this as “Sequencer Mode.” Selecting this command will then launch the Sequencer Window. Then you can customize which channels will play and display.
Import Melody from MIDI File allows you to import MIDI data from a file (*.MID) into the Melody track. Import Melody from Clipboard allows you to import MIDI data that has been pasted into the clipboard (e.g., from a sequencer such as PowerTracks). Record Melody (Ctrl+R) launches the Record Melody dialog to record a MIDI melody. Record Melody from Bar... (Ctrl+Alt+R) starts recording at the current location of the highlight cell after playing a two bar lead-in. Step Edit Melody allows you to enter/edit a melody in step time from the Notation window. This uses an event list. Quantize, Time Adjust
Transpose shows menu items for transposing the Melody track.
Form shows menu items that is related to a song form.
Adjust Level of Melody allows you to increase or decrease the volume (velocity) of the Melody track without affecting the other tracks. Copy to Soloist Track copies the entire contents of the Melody track to the Soloist track. Useful for a temporary holding area for your Melody or bouncing tracks. Move to Soloist Track copies the entire contents of the Melody track to the Soloist track and erases the original data from the Melody track, preparing it for a new track or data. Swap Melody and Soloist Track performs a “double copy/move” so that the data that was in the Melody track gets transferred to the Soloist track and vice versa. This is also known as track bouncing. Convert Harmony to Melody Track… converts a single line Melody track to include the current harmony selection. Remove Harmony (or guitar solo) from Melody Track removes a harmony from a track, providing that the harmony was put there by Band-in-a-Box in the first place using the Convert Harmony to Melody Track command. Generate Guitar Chord Solo opens the Guitar feature dialog for generating a guitar chord solo. Auto-Rechannel to Guitar Display converts channels on a track to channels 11 to 16. Channels 11 to 16 are used by Band-in-a-Box to indicate strings 1 to 6 of a guitar. It uses the current position marker on the guitar for this command. A popup question will ask if you want to include events that are already on the guitar channels. Rechannel to Specific Guitar Fret Position over Range changes the fret position over the selected range. Map Melody track to C7 chord is a useful tool when making styles. Change Pitch Bend Rangelets you set the range in semitones. Insert Guitar Bend events when pitch bend found will insert controllers so the guitar will display bends. Piano Hand-Splitmanually splits a piano part on a Melody or Soloist track using the intelligent hand-splitting routines. The left/right hands display in red/blue on the big piano, and on bass/treble clefs on the notation. Import a piano MIDI file to the Melody track to get a split-hands display and printout. Adjust Legato/Staccato by… allows you to increase legato of the Melody track by N ticks, avoiding the next note by M ticks, or reduce the length of notes by N ticks, preserving a minimum of M ticks duration of notes. To increase legato of the notes, enter a positive number in the first dialog. The duration of notes in the track will be increased by this number of ticks. Then, in the next dialog, specify the number of ticks to avoid next note. To reduce the length of notes, enter a negative number in the first dialog. The duration of notes in the track will be decreased by this number of ticks. Then, in the next dialog, specify the minimum duration of notes. Adjust Channels by will adjust all MIDI channels by the number value entered. Remove extra Sustain Pedals (MIDI Controller 64) will remove Sustain Pedals from the track. |
Embellish Melody shows menu items for enabling and customizing the Melody embellishment feature.
Embellish Melody during playback (Ctrl+Alt+E) toggles the melody embellisher feature. Embellish Melody Dialog (Ctrl+Alt+L) allows you to customize the settings of the embellisher, choose an embellisher type from presets, and make a particular Embellishment permanent. |
Mute Melody during Middle Choruses to allow for soloing.
Generate Soundtrack launches the SoundTrack feature, which allows you to generate music in the style you choose for any length of time you specify. As the “producer,” you select the genre, length of time, instruments, and fade-in/fade-out options. The SoundTrack adjusts the tempo and duration to match the settings, and then allows you to save the file as a WAV, WMA (Windows® Media Audio), or MP3 file.
Soloist Menu
Track Type: Normally, you’d leave the track type set to Single. But you can set it to:
- Multi (16) -Channel: All channels get preserved, and outputted on the channels, this would be useful for importing an entire MIDI file, and playing it from the Melody channel (using a silent style).
- Guita: Channels 11 to 16 will display on the guitar as strings 11 to 16, TAB will show, the notation will be up an octave, and the MIDI file will contain the channels preserved.
- Piano: In this mode, channels 8 and 9 are treated as the left and right hand of a piano part.
- Selecting any one of Bass, Ukulele, Mandolin, Banjo, or Violin will display the correct tablature in the Notation window and the correct fretboard in the Guitar window.
- Set the track to match any of the 11 alternate guitar tunings, such as DADGAD, Open G, or Double Drop D that are supported by Band-in-a-Box. Then you will see the correct notes on the guitar fretboard, in the notation and tablature.
- If the track has drums that use GM Drum notes, you can select Drums to see drum notation.
Soloist - Generate and Play a Solo (Shift+F4): Opens the Select Soloist dialog where a preset Soloist style can be selected or your own Soloist can be defined.
Soloist Makeris a submenu of editing Soloists files. If you want to make your own soloists or modify an existing Soloist, use the Soloist Maker (edit) module. The Soloist Maker allows you to define the parameters essential to a soloist’s playing, such as instrument range (i.e. tenor saxophone), extra legato playing, playing more on top of the beat, playing straighter 8th notes than usual swing 8th notes. In addition, you can set phrasing options, such as how long the phrase should be, and how much “space” to leave between phrases. You can also set how “outside” the playing should be.
Start a Soloists File allows you to make and edit Soloist styles saved under the filename of your choice. Edit a Soloists file opens an Open File dialog where you can select any Soloist file (*.SOL) to edit. To edit the soloist you are using, use the Edit Current Soloist File command. Edit Current Soloists File opens the Select Soloist dialog with the currently installed Soloists file. Refresh Soloist allows the Soloist full access to all solo ideas contained in its database. Use to refresh after several Soloists have been made. OK to Load Soloists with Songs: Enable this option if you want Soloists to be automatically loaded with a song that was saved with Soloist information. Allow Soloist Harmony (on THRU Harmony) : Enable this option to permit the Soloist to utilize the Harmony features. This will allow the Soloist to make a harmonized solo with the harmony of your choice. See the Select Soloist dialog for additional details. |
Sequencer Window for Multi-Channel Soloist: There are two tracks in Band-in-a-Box to add your own recordings. These are the Melody and Soloist tracks. Normally you would want a single part on each of them. But, since MIDI information can have separate channels, it is possible to store 16 separate parts on each of the Melody and Soloist tracks. When the Melody or Soloist track has been set to “Multi (16)-Channel” we refer to this as “Sequencer Mode.” Selecting this command will then launch the Sequencer Window. Then you can customize which channels will play and display.
Edit Soloist Track is a submenu of editing options.
Import to Soloist Track from MIDI File allows you to import MIDI data from a file (*.MID) into the Soloist track. Import to Soloist Track from Clipboard allows you to import MIDI data that has been pasted into the clipboard (e.g., from a sequencer such as PowerTracks). Record to SoloistTrackallows you to record MIDI to the Soloist track.. Record to Soloist Track from…starts recording at the current location of the highlight cell after playing a 2-bar lead-in. Step Edit Soloist allows you to enter/edit a soloist in step time from the Notation window. This uses an event list. Quantize, Time Adjust
Transpose shows menu items for transposing the Soloist track.
Form shows menu items that is related to a song form
Adjust Level of Soloist Track allows you to increase or decrease the volume (velocity) of the Soloist track without affecting the other tracks. Copy to Melody Track copies the entire contents of the Soloist track to the Melody Track. This is useful for a temporary holding area for your soloist or for bouncing tracks. Move to Melody Track copies the entire contents of the Soloist track and erases the original data from the Soloist track, preparing it for a new track or data. Swap Melody and Soloist Track performs a “double copy/move” so that the data that was in the Soloist track gets transferred to the Melody track and vice versa. This is also known as track bouncing. Convert Harmony to Soloist Track… converts a single line Soloist track to include the current harmony selection. Remove Harmony (or guitar solo) from Soloist Track removes a harmony from a track, providing that the harmony was put there by Band-in-a-Box in the first place using the Convert Harmony to Soloist Track command. Generate Guitar Chord Solo opens the Guitar feature dialog for generating a guitar chord solo. Auto-Rechannel to Guitar Display converts channels on a track to channels 11 to 16. Channels 11 to 16 are used by Band-in-a-Box to indicate strings 1 to 6 of a guitar. It uses the current position marker on the guitar for this command. A popup question will ask if you want to include events that are already on the guitar channels. Rechannel to Specific Guitar Fret Position over Range changes the fret position over the selected range. Piano Hand-Split manually splits a piano part on a Melody or Soloist track using the intelligent hand-splitting routines. The left/right hands display in red/blue on the big piano, and on bass/treble clefs on the notation. Import a piano MIDI file to the Soloist track to get a split-hands display and printout. Adjust Legato/Staccato by… allows you to increase legato of the Soloist track by N ticks, avoiding the next note by M ticks, or reduce the length of notes by N ticks, preserving a minimum of M ticks duration of notes. To increase legato of the notes, enter a positive number in the first dialog. The duration of notes in the track will be increased by this number of ticks. Then, in the next dialog, specify the number of ticks to avoid next note. To reduce the length of notes, enter a negative number in the first dialog. The duration of notes in the track will be decreased by this number of ticks. Then, in the next dialog, specify the minimum duration of notes. Adjust Channels by will adjust all MIDI channels by the number value entered. |
Scales shows menu items for generating scales.The menu items Generate Scales and Auto-Generate Scales when play pressed allow you to generate scales for a certain song or auto-generate them for all loaded songs. You can view the scales in the notation and the on-screen guitar and piano.
Audio Menu
The Record Audio function is used to record audio using a microphone plugged into your sound card or a guitar (or mixer) plugged into the line-in on your sound card.
The next two items, Record Audio and MIDI (Melody) and Record Audio and MIDI (Soloist) refer to the situation where you want to simultaneously record an audio track (vocals etc.) as well as a MIDI track. You can record the MIDI to any track.
The Plugin menu command refers to running a plug-in audio effect. This applies an audio effect such as Reverb or Chorus to the already recorded audio part. Band-in-a-Box comes with a large selection of high quality audio effects built-in, such as Compressor, Gate, Distortion, Reverb, Echo, Chorus, Flanger, Ring Mod, Tremolo, Tone Control, Graphic EQ, Parametric EQ, Gain Change, De-Ess, Auto-Wah, Pitch Shift, Exciter, Enhancer and Hum Filter. DirectX plug-ins from PG Music and other makers are also supported.
Edit Audio shows menu items for editing the Audio track.
Copy First Chorus to Whole Song copies the first chorus of audio to the rest of the song. Erase Audio from All Choruses is used to erase the Audio Track. Erase Audio Chorus will erase the First Chorus, Middle Choruses, or the Last Chorus as chosen from a list box. Erase Region of Audio will erase a specified region of bars/beats of audio. Adjust Volume Level of Audio Track changes the volume of the Audio track itself. It uses a sophisticated peak-limiting algorithm to ensure that increases in the volume do not result in clipping of the sound, which would be heard as a loud distortion. It accepts units of decibels (dB). Zero means no change in the level, whereas +6 would be a doubling of the sound, and –6 halves the sound level. Timeshift Audio (ms) is used to time shift the whole Audio track a certain number of milliseconds. Normally you wouldn’t have to time shift a track at all. There are settings in the Audio Settings dialog that can adjust for synchronization differences between your sound card and MIDI devices (for example, the VSC has a 430ms latency). But the time shift audio command can be useful in special cases. Tip: 1000ms = 1 second. Positive values move the Audio track ahead, negative values move it back.
Insert Silence in Audio Track lets you insert silence of the specified length at the specified location. For example, if you decide to add an extra 2 bars to the intro in Band-in-a-Box, and you’ve already recorded an audio, you should insert 2 bars (8 beats in a 4/4 time signature) into the Audio track as well. Delete Region of Audio Track will delete a region of audio, eliminating the created gap. Convert Channels (mono/stereo) allows you to convert the Audio track from stereo to mono, or vice versa. There is an option to choose the percentage of each channel. |
Audio Drivers/Settings opens the Audio Settings dialog where you can select an audio driver (WAS, ASIO, or MME) or the settings.
Playback Mixer / Playback VU Meter takes you directly to the Windows® Playback control to adjust volumes on your sound card. Note that not all sound devices have VU meters.
Recording Mixer / Recording VU Metertakes you directly to the Windows® Recordingcontrol to adjust volumes on your sound card. Note that not all sound devices have VU meters.
Export Song as Audio File allows you to save the song as an audio file.
Import Audio (WAV, WMA, MP3, WMV) will open an audio file in WAV, MP3, Windows® Media Player, or CD Audio format.
Audio Edit Window (Ctrl+Shift+A) launches the Audio Edit window where the wave file can be viewed and edited.
Audio Harmonies, Pitch Tracking, Fix Tuning (Audio Edit) opens the Audio Harmony dialog, which allows you to harmonize the audio or correct out-of-tune notes.
Audio Transcribe (monophonic) transcribes the audio data as MIDI data.
Audio Chord Wizard opens the Audio Edit window and allows you to use the built-in Audio Chord Wizard feature.
Set Audio Master (Base) Tempo is used to ensure that tempo stretches are based on correct master tempo. It uses a sophisticated peak-limiting algorithm to ensure that increases in the volume do not result in clipping of the sound, which would be heard as a loud distortion.
Render Song to Audio Tracks (and mute tracks): Use this to render all tracks to the Audio track and disable track generation.
Un-Render Song from Audio Tracks (Enables tracks, erase audio track): Use this to erase the rendered Audio track and restore track generation.
Harmony Menu
Melody Harmony (Select) (Alt+F10) shows you the complete harmony styles list and allows you to choose one for the current Melody track.
Thru Harmony (Select) (Alt+F11) shows you the complete harmony styles list and allows you to choose one for the current Thru track.
Favorite Melody Harmonies (Ctrl+F10) shows your favorite 50 harmony styles (based on recent usage) and allows you to choose one to use on the Melody track.
Favorite Thru Harmonies (Ctrl+F11) : This option brings up your favorite 50 Harmony styles (based on recent usage) and allows you to choose oneto use on the Thru track.
Real Time MIDI Harmonies allows you to play harmonies in real time. Use this with your MIDI keyboard (while Band-in-a-Box is stopped). When this dialog (shown above) is open, you can play a chord with the left hand (below the split point set in the dialog), and the chord you play is and displayed in the dialog. Then, the notes that you play in the right hand will get harmonized according to this left-hand chord. If you set the “Only Harmonize if Left hand chord held down,” you will be able to control what notes get harmonized by holding down the chord when you want a note to be harmonized.
Audio Harmonies, Pitch Tracking, Fix Tuning opens the Audio Harmony dialog, which allows you to harmonize the audio or correct out-of-tune notes.
Harmonies Editor shows menu items for making or editing harmonies.
Start a New Harmonies File: This allows you to make and edit Harmony styles saved under your own filename. Edit a Harmonies File: This allows you to edit a Harmony file that is in the C:\bb\Data directory. Edit Current Harmonies File: This allows you to edit the Harmony file that is currently loaded on your system. |
Convert Harmony to Melody Track converts a single line Melody track to include the current harmony selection, with options to convert the whole song or specify a range of bars, to eliminate note overlaps, and loosen note start times.
Convert Harmony to Soloist Track converts a single line Soloist track to include the current harmony selection (On the Thru harmony), with options to convert the whole song or specify a range of bars, to eliminate note overlaps, and loosen note start times.
Harmonies Settings shows menu items for using harmonies.
OK to Load Harmonies with Songs: Enable this menu item if you want to load any harmony settings that were saved/embedded in a given song. Save Harmony with This Song: Enable this menu item to allow Band-in-a-Box to embed the harmony settings for the current song so that they may be recalled automatically at a later time. Change Harmony with New Chord: Enable this menu item to allow the program to vary the harmony characteristics (i.e. inversions) each time a new chord is encountered in the song. Allow Melody Harmony (Shift+F10): Enable this menu item to allow harmonies on the Melody MIDI channels. Allow Thru Harmony (Shift+F11): Enable this menu item to allow harmonies on the Thru MIDI channels. Allow Soloist Harmony (on THRU Harmony):
Enable this menu item to allow the Thru MIDI channels to utilize the harmony features for the Soloist track. Use Passing Harmonies for THRU: When playing along on a MIDI keyboard (or the Wizard) using a Thru harmony, you can use passing harmonies. For example, on a C7 chord, with an Ab note, the harmony might be a B diminished chord, which is a passing harmony. Only THRU Harmonize if note held down = 36 (C3): By setting this option you can specify to only harmonize the note if a certain note is held down. (The default note is a C two octaves below middle C.) |
Window Menu
The Window menu launches various windows in Band-in-a-Box.
Notation shows menu items for Notation display for your song.
Notation (or Chord) Window (Ctrl+W) toggles between the Notation and the Chord Sheet views. Movable Notation Window (Ctrl+O) opens a movable and resizable Notation window. Notation/Edit/Note Roll Mode (Ctrl+Alt+N) moves the notation window through its various entry modes. Note Insert Mode: Toggling this to “on” allows you to insert notes graphically with your mouse or keyboard on the notation window. Mono Entry Mode: Toggle this “on” if you are inserting single notes (not chords) on the notation window. Clean Display Mode: Toggle this “on” if you want notes displayed on your notation window in a quantized view (does not affect song playback). Event List Editor: You can edit events including all MIDI events and lyric events using the Event List Editor. You can edit the Melody, Soloist, Lyrics, or StyleMaker patterns using this event list. The information in the Event List is color coded by channels for multi-channel Melody and Soloist tracks. Play Previous Screen backs the song up four bars. Play Next Screen moves the song to the next four bars. Track Displayed: Since there is not enough room on the screen to display the notation for all instruments, only one is displayed at a time. You can choose which one you want to display from this menu option or with the instrument buttons on the Notation window. Switch to Next Track (Ctrl+F5) / Switch to Previous Track (Ctrl+Shift+F5) swtich trackst. |
Lead Sheet Window (Alt+W) opens the Lead Sheet window.
Lyrics shows menu items to open lyrics windows or Vocal Wizard.
Big Lyrics Window (Ctrl+Shift+L) launches a window that displays lyrics in a Karaoke format. Lyric Document Window (Ctrl+Alt+Shift+L) displays a full screen of formatted lyrics. You can easily copy and paste lyrics to and from your favorite word processor. The lyrics will also display in the Big Lyrics window. Show Karaoke Window allows you to see scrolling Karaoke lyrics in a Karaoke MP3/CDG file. Vocal Wizard selects and transposes the song to the best key for the singer’s vocal range. |
Audio Edit shows menu items to open two types of windows.
Audio Edit Window (Ctrl+Shift+A) allows you to edit audio data, using copy, cut, and paste. You can zoom the audio in to the sample level so that you can see the actual sine waves present. Moveable Audio Edit Window opens the regular Audio Edit window but lets you reposition it on the screen. |
Piano Roll shows menu items to open two types of windows.
Piano Roll Window launches the Piano Roll window where you can edit the Melody or Soloist track in a traditional piano roll format. Moveable Piano Roll Window opens the regular Piano Roll window, but lets you move and reposition it on the screen. |
Big Piano Window (Ctrl+Shift+N) launches a window that displays a Big Piano.
Drum Kit Window (Ctrl+Shift+D) launches the animated Drum Kit.
Guitar Window (Ctrl+Shift+G) launches an on-screen Guitar.
Floating Mixer Window (Ctrl+Shift+M) opens or closes the Mixer.
Fullscreen Chord Sheet View (Ctrl+T)displays Notation screen or Chord Sheet in full screen mode.
MIDI Monitor displays a list of MIDI data received from computer MIDI Input and/or Band-in-a-Box output, useful for educational or diagnostic purposes.
Guitar Tuner: The Tuner is optimized for guitar and bass, though it may be useful with other instruments.
Ear Training Window (Ctrl+Shift+J): You can practice your ear training with help from Band-in-a-Box. In addition to the common interval exercises (perfect 4th, minor 2nd, etc.), learning to play-by-ear for Jazz and Pop music is further enhanced by ear training exercises to recognize common chord types (e.g., Major, Minor, Dominant, etc.) You will also see buttons that launch musical games for fun while you train your ear. [Pitch Invasion] helps to develop perfect pitch as you shoot down “alien” notes invading from above (you hear the note sound, and click on the on-screen Piano, MIDI or QWERTY to shoot them down). [Music Replay] develops your pitch, rhythm, and melody recognition by replaying what the program plays in note, rhythm, or melodic modes.
Practice Window (Alt+Shift+L) allows convenient 1-click access to many Band-in-a-Box features that help you with practicing. These include the Ear Training dialog, games (Pitch Invasion etc.), Metronome, CopyMe, Sight Reading, 101 Riffs series, and more.
Conductor Window (Ctrl+~):
As the song is playing, many “single key” hot keys are available to control the playback and looping of the song. For example, pressing the “4” key will ensure that the middle chorus is the next one played, and pressing the “S” key will ensure that the middle section is looped. This would be useful to extend a song that has the last chorus playing. Custom loop points can also be set for each song.
These settings are ideal for live performance, or “jam sessions” where you aren’t entering new Band-in-a-Box songs but want full control of the playback. These loops happen seamlessly at the end of the chorus, so are suitable for the “dance floor.” In addition, you can control Band-in-a-Box from a standard MIDI keyboard, pressing MIDI keys corresponds to program functions. For example, load the next song, play/pause/tempo adjust/change thru patch/jump to middle choruses/open the notation or lead sheet window – all from your MIDI keyboard!
Chord Builder
Chord Builder (Ctrl+Shift+B) allows you to build up chords using mouse clicks. Play Current Chord plays the current chord on the Chord Sheet. It is most commonly accessed by pressing Shift+Enter on the Chord Sheet. |
MIDI Chord Detection shows you menu items for entering chords from a keyboard. Select MIDI Chord Detection… and play any chord on your MIDI keyboard. Band-in-a-Box will then provide you with up to 4 interpretations of the chord you played, with its best suggestion at the top and alternates below.
Plug-in Mode for DAW (Ctrl+Shift+S) puts Band-in-a-Box into plug-in mode, open as a small always-on-top window that acts as a plug-in for your favorite DAW/sequencer so that you can drag-and-drop MIDI and audio (WAV) tracks from BB to your favorite sequencer.
The DAW Plug-in mode is a mode within the regular Band-in-a-Box program. This mode allows you to transfer tracks, or parts of tracks, to other DAW Sequencers easily, by simply dragging the track icons from Band-in-a-Box (BB) to the tracks window of your DAW.
BB2Go (Prepare mp4 files for iPhone version): Band-in-a-Box for iPhone (BB iPhone)is an app for iOS devices including iPhone®, iPad®, and iPod Touch®. The BB iPhone version is meant to function as a client to the regular Band-in-a-Box desktop version. The BB iPhone app is available separately from the Apple® App Store. The iPhone version of Band-in-a-Box will see the “BB2Go” folder (C:\bb\BB2Go).
Help Menu
Index lists all of the Help topics. Type in a keyword under the “Index” tab to go to the topic you want.
Help Topics shows menu items to open various Help topics.
Newest Features describes the new features in the current version.
Feature Browser (/ Enter) opens the Feature Browser dialog that lists many features in Band-in-a-Box and allows you to browse them, find the feature by text filter, read descriptions about the feature, find how to launch the feature, access to the online information or video about the feature, and do more.
Program Manuals (pdf) shows menu items for opening the program manuals.
Display Program Manual will open a .pdf file of the full Band-in-a-Box manual. Follow the bookmarks to find specific topics. Display Program UPGRADE Manual will open a .pdf of the upgrade manual for this particular version of Band-in-a-Box, which may include new documentation not yet added to the full manual. The upgrade manual is often a more convenient way to reference the new features in Band-in-a-Box without looking through the full manual. |
Show Help Hints: Band-in-a-Box has comprehensive fly-by hints that appear when you move over an item. These include hints for the dialog boxes and various windows. You can set the hints to display none, basic, or detailed information.
Tip of the Day: This feature can be set to run automatically when Band-in-a-Box opens. If you want to add your own tips, you can edit the BBW.TIP file. Just put a tip on a single line (no carriage return till the end of the tip). Tips are limited to 255 characters per tip. Band-in-a-Box automatically compiles the BBW.TIP file at startup of the program to a binary file called BBW.TPB.
Check for Updates:
User can check/download/pause/continue/install for a newer version (not free), newer build (free), and updated RealTracks files (free). You can set whether you want any checking for updates at boot up to be done, and if so, how often. (Note: A setting of 0 days will check every time you run the program.) You can also press the [Refresh] button to check for a major or minor upgrade of the program and RealTracks patches. Download free updates within this dialog when available.
What add-ons do I have?: One of the greatest strengths of Band-in-a-Box is the ability to add-on and enhance the program through add-on Styles, Soloist, and Melodist disks. The “What Add-ons” feature in the Help menu scans your computer’s Band-in-a-Box directory and displays what add-ons are and aren’t found. To see the latest add-ons, click on the [www.pgmusic.com/addons.htm] button to go directly to the add-ons page on the PG Music Inc. web site.
Web www.pgmusic.com has links to some important pages on the PG Music Inc. web site. Selecting one of these topics will automatically launch your Web Browser, and direct you to the PG Music web site.
About Band-in-a-Box launches a dialog with key information such as the version number you are running and computer system information.
Utilities
Display Log Text file of Yellow/Green Messages: The yellow/green flash messages with time and date are saved in a file called C:\bb\Data\Logs\FlashMessageLog.txt. You can open this file inside the program at any time by choosing this menu command. You can open this file inside the program at any time by choosing this menu command or pressing the L O G Enter keys Install Coyote WaveTable Synth runs the setup program for the Coyote WT 1.0 software synthesizer. Write BandInABoxRequest file creates a file that you can email to support@pgmusic.com if you have a problem activating the program. Run Cleanup routine: The Band-in-a-Box folder (usually C:\bb) has become full of lots of files over the years. Up to 10,000 files are present in the folder on a full install of the UltraPAK. This menu command will run a utility app C:\bb\Data\BB_cleanup.exe, which will unclutter the folder and move files to various subfolders. (Note: This utility will run automatically during the Band-in-a-Box program installation, so normally you don’t need to run this manually.) Run Download/Install Manager now: The Download and Install Manager can be used to download and install all of the files in any product that you order at www.pgmusic.com, with one click. . |
Activate Band-in-a-Box (Serial Number Required) allows you to activate Band-in-a-Box if you haven’t done so yet. Band-in-a-Box needs to be activated within 30 days after you first run Band-in-a-Box.
Shortcuts: Keystroke Commands - Hot Keys
Quick Song Settings
B E G I N Enter |
Sets the beginning of the chorus to the current bar |
C H O R U S E N D Enter |
Sets the end of the chorus to the current bar |
E N D Enter |
Sets the end of the song to the current bar |
T K C Enter |
Sets key signature to c, tkbb would set it to bb |
T R C Enter |
Transposes song to key of C. (T K B B Enter would set it to Bb.) |
T 1 2 5 Enter |
Sets tempo to 125 |
[ |
Decreases the tempo by 5. |
] |
Increases the tempo by 5. |
You can use hotkeys to set the time signature for the current bar. Just type a time signature (4/4, 3/4, 2/4, or 1/4), and it will be entered to the current bar. Typing 0/4 clears the time signature from the current bar.
K Quick Copy
K Enter copies the last 8 bars to the current location.
By adding additional keys, you can specify the number of bars to copy. For example, K 1 2 , 3 Enterwould copy 12 bars from bar 3 to current location.
There is a hotkey to insert N bars at the current location. For example, I N 8 Enter would insert 8 bars, I N 4 Enter would insert 4 bars, etc.
There is also hotkey to copy the last N bars and insert them to the current location. For example, K I 8 Enter or I K 8 Enter would copy the last 8 bars and insert them to the current location.
By adding additional keys, you can specify the copy source location. For example, I K 8 , 9 Enter or K I 8 , 9 Enter would copy 8 bars from the bar 9 and insert them to the current location. I K K 8 , 9 Enter or K K I 8 , 9 Enter would do the same, but launch the Copy Chord and/or Melody dialog, which allows you to choose what to copy..
Quick-Load Songs and Styles
You can quickly load a song by typing only. In chord entry mode (Chord Sheet or Notation window) type the word “song” followed by a file name or partial file name + Enter and the song will get loaded if it is in the current folder. Typing “bossa” would load in the first song with bossa in the name AFTER the current song name in the current folder.
To change to another folder, type “song” followed by the full path and file name. For example, type song and then C:\bb\zzjazz.mg1+Enter to load in that exact song namee.
Quick-load a style by typing “style” followed by a style name. For example, S T Y L E Z Z B O S S A Enter will load zzbossa.sty.
Muting Tracks
Alt+2 |
Mute all tracks. |
Alt+3 |
Mute the Bass track. |
Alt+4 |
Mute the Piano track. |
Alt+5 |
Mute the Drums track. |
Alt+6 |
Mute the Guitar track. |
Alt+7 |
Mute the Strings track. |
Alt+8 |
Mute the Melody track. |
Alt+9 |
Mute the Soloist track. |
Alt+0 |
Mute the Thru track. |
Soloing Tracks
Alt+Shift+Z |
Solo the current track. |
Alt+2 then Alt+3 |
Solo the Bass track. |
Alt+2 then Alt+4 |
Solo the Piano track. |
Alt+2 then Alt+5 |
Solo the Drums track. |
Alt+2 then Alt+6 |
Solo the Guitar track. |
Alt+2 then Alt+7 |
Solo the Strings track. |
Alt+2 then Alt+8 |
Solo the Melody track. |
Alt+2 then Alt+9 |
Solo the Soloist track. |
Alt+2 then Alt+0 |
Solo the Thru track. |
Selecting Tracks
Ctrl+3 |
Selecs the Bass track. |
Ctrl+4 |
Select the Pianotrack. |
Ctrl+5 |
Select the Drums track. |
Ctrl+6 |
Select the Guitar track. |
Ctrl+7 |
Select the Strings track. |
Ctrl+8 |
Select the Melody track. |
Ctrl+9 |
Select the Soloist track. |
Track Mixer Settings
Ctrl+Shift+Q / W |
Decrease/increase current track’s volume by 5. |
Ctrl+Shift+E / R |
Decrease/increase current track’s panning by 5. |
Ctrl+Shift+T / Y |
Decrease/increase current track’s reverb by 5. |
Ctrl+Alt+Shift+R |
Set current track’s volume. |
Ctrl+Alt+A |
Decrease master volume by 5. |
Ctrl+Alt+S |
Increase master volume by 5. |
Ctrl+Alt+D |
Set master volume. |
Ctrl+Alt+Shift+Q |
Reduce all tracks’ volumes by 5. |
Ctrl+Alt+Shift+W |
Increase all tracks’ volumes by 5. |
Ctrl+Alt+Shift+E |
Set all tracks’ volumes. |
Windows
/ Enter |
Feature Browser. |
Ctrl+T |
Display Notation screen or Chord Sheet in full screen. |
Ctrl+W |
Toggle Notation and Chord Sheet windows. |
Ctrl+O |
Movable Notation window. |
Alt+W |
Lead Sheet window. |
Ctrl+P |
Print Lead Sheet |
Ctrl+~ |
Conductor window. |
Ctrl+Shift+A |
Audio Edit window. |
Ctrl+Shift+D |
Drum Kit window. |
Ctrl+Shift+G |
Guitar window. |
Ctrl+Shift+J |
Ear training window. |
Ctrl+Shift+L |
Big Lyrics window. |
Ctrl+Shift+M |
Mixer Window |
Ctrl+Shift+N |
Big Piano window. |
Ctrl+Shift+S |
Plug-in mode for DAW. |
Alt+Shift+L |
Practice window. |
Ctrl+Alt+Shift+L |
Lyric Document window. |
Opening Song
S S 4 Enter or F3 or Alt+Shift+F3 |
Open song. |
S S 7 Enter or Ctrl+Shift+F8 |
Open previous song (in alphabetical order). |
S S 8 Enter or Shift+F8 |
Open next song (in alphabetical order). |
S S 1 Enter or S S Enter or Ctrl+F3 |
Open song using the Song Picker window. |
S S 2 Enter or Shift+F3 |
Open song from favorite songs list. |
S S 3 Enter or Shift+F3 |
Open song from recently played songs list. |
S S 6 Enter or Alt+Shift+F |
Open song from favorite folders. |
Alt+F3 |
Open song with melodies. |
S S 9 Enter |
Open MIDI file. |
S S 1 3 Enter |
Open Karaoke file. |
S S 1 0 Enter |
Open audio file. |
S S 1 1 Enter |
Find Song |
S S 1 2 Enter or S 9 Enter |
Open song demo for the current style. |
Opening Styles
S 6 Enter or F9 |
Open style. |
S 7 Enter or Ctrl+Alt+Shift+F8 |
Open previous style (in alphabetical order). |
S 8 Enter or Alt+Shift+F8 |
Open next style (in alphabetical order). |
S Enter or S 1 Enter or Ctrl+F9 |
Open style using the StylePicker. |
S 4 Enter or Shift+F9 |
Open style from recently played styles list. |
S 5 Enter or Shift+F9 |
Open style from favorite styles list. |
S 2 Enter |
Show the Best RealStyles list. |
S 3 Enter |
Open the Song Titles Browser. |
S 1 0 Enter |
Play audio demo for the current style. |
RealTracks/RealDrums/Loops
R T Enter or R T 1 Enter |
RealTracks Picker. |
R T 2 Enter |
RealTracks Settings. |
R T 3 Enter |
Select Best All RealTracks. |
R T 4 Enter |
Select Best Chording RealTracks. |
R T 5 Enter |
Select Best Soloist RealTracks. |
R D Enter or R D 1 Enter |
RealDrums Picker. |
R D 3 Enter |
RealDrums QuickList. |
Ctrl+Shift+F6 |
Enable/Disable RealDrums. |
R D 2 Enter |
RealDrums Settings. |
R L Enter |
Select Loop. |
Saving Song
F2 or Ctrl+S |
Save song. |
Alt+F2 |
Save song with patches. |
Alt+Shift+S |
Save song to favorite folder. |
Playing and Recording Song
F4 |
Play song with generation. |
Spacebar |
Play song from the current position with no generation. |
Ctrl+Spacebar |
Play song from the beginning with no generation. (Note: The Spacebar plays from the current position and Ctrl+Spacebar plays from the beginning if “Plays from current position (Ctrl+Spacebar from start)” is selected for the “Spacebar” setting in the Preferences dialog (Options | Preference). These hotkeys will be opposite if “Plays from start (Ctrl+Spacebar from current position)” is selected for this setting.) |
Ctrl+F |
Play song from any bar. |
Ctrl+G |
Play song from current bar. |
F10 |
Play and loop the highlighted area. |
Ctrl+H |
Pause/Resume playing song. |
Spacebar or Esc |
Stop playing song. |
Ctrl+R |
Record MIDI. |
Ctrl+Alt+R |
Record MIDI from any bar. |
Looping / Song Navigation Keystrokes
NUMPAD 1 |
Toggle looping on/off. |
NUMPAD 2 |
Open Loop Section Settings dialog. |
Ctrl+NUMPAD 1 |
Play with last chorus looped. |
Ctrl+NUMPAD 2 |
Play with middle choruses looped. |
Ctrl+NUMPAD 3 |
Play with middle and last choruses looped. |
Ctrl+NUMPAD 4 |
Jump to last chorus. |
Ctrl+NUMPAD 5 |
Jump to ending. |
Ctrl+NUMPAD 7 |
Loop Notation screen. |
NUMPAD [DEL] |
Advances the notation, lead sheet, and guitar window by one chord (group of notes). |
NUMPAD [INS] |
Backs up the notation, lead sheet, and guitar window by one chord. |
Editing Song
Ctrl+C |
Copy. |
Ctrl+X |
Cut. |
Ctrl+V |
Paste. |
Ctrl+Z |
Undo. |
Shift+Ctrl+Z |
Redo. |
Alt+C |
Copy From ... To… |
Alt+K |
Erase From ... To… |
Ctrl+Shift+V |
Paste text to Song(s). |
F5 |
Edit current bar options. |
Alt+F5 |
Edit current chord options. |
M Enter |
Set MicroChords. |
Ctrl+Alt+T |
Set tempo. |
Ctrl = |
Set to normal speed. |
Ctrl - |
Set to half speed. |
T Enter |
Track Settings |
Ctrl+N |
Song Settings. |
Ctrl+Shift+B |
Chord Builder. |
Shift+Enter |
Play current chord |
Ctrl+Alt+I |
Import chords from MIDI file. |
Alt+Shift+T |
Auto-generate a title. |
Ctrl+Alt+1 |
Transpose Melody track one octave down |
Ctrl+Alt+2 |
Transpose Melody track one octave up |
Ctrl+Alt+3 |
Transpose Soloist track one octave down |
Ctrl+Alt+4 |
Transpose Soloist track one octave up |
Ctrl+Alt+5 |
Transpose song 1 semitone down. |
Ctrl+Alt+6 |
Transpose song 1 semitone up. |
Ctrl+Alt+7 |
Transpose setting dialog. |
Shift+F5 |
Select Melodist. |
Shift+F4 |
Select Soloist. |
Shift+F7 |
Refresh Melodist or Soloist. |
Alt+F10 |
Select Melody harmony. |
Alt+F11 |
Select Thru harmony. |
Ctrl+F10 |
Select favorite Melody harmony. |
Ctrl+F11 |
Select favorite Thru harmony. |
Shift+F10 |
Allow Melody harmony. |
Shift+F11 |
Allow Thru Harmony. |
Ctrl+Alt+E |
Toggle Melody Embellisher. |
Ctrl+Alt+L |
Melody Embellisher dialog. |
Editing Notes in Notation Window
N |
Enter a note at the current time line. |
M |
Add a note a third above the current note on the time line |
R |
Enter a rest at the current time line. |
Up Cursor |
Change the pitch of the highlighted note by 1 semitone up. |
Down Cursor |
Change the pitch of the highlighted note by 1 semitone down. |
Right Cursor |
Move the time line forward. |
Left Cursor |
Move the time line backward. |
Shift+L/R Cursor |
Highlight the current note on the time line |
Ctrl+Alt+Right Cursor |
Change the time of the highlighted note by +5 ticks |
Ctrl+Alt+Left Cursor |
Change the time of the highlighted note by--5 ticks |
Editing MIDI in Piano Roll Window
Ctrl+A |
Select the whole track. |
Ctrl+C |
Copy the selected region to the clipboard. |
Ctrl+X |
Cut the selected MIDI. |
Ctrl+V |
Paste the copied MIDI to the current location and merges it with the existing MIDI.. |
Delete |
Delete the selected MIDI. |
+ (plus) |
Increase velocities of all selected MIDI by 1. |
Shift++ |
Increase velocities of all selected MIDI by 5. |
– (minus) |
Decrease velocities of all selected MIDI by 1 |
Shift+- |
Decrease velocities of all selected MIDI by 5 |
~ (tilde) |
Randomize velocities of all selected MIDI by -1 to +1. |
Shift+~ |
Randomize velocities of the selected MID by -5 to +5. |
Editing Audio in Audio Edit Window
Home |
Move the cursor to the beginning of the track. |
End |
Move the cursor to the end of the track. |
Shift+Home |
Move the left cursor of the selected region to the beginning of the track. |
Shift+End |
Move the right cursor to the end of the track. |
Ctrl+A |
Select the whole track. |
Ctrl+C |
Copy the selected region to the clipboard. |
Ctrl+X |
Cut the selected region of audio. |
Ctrl+V |
Paste the copied audio to the current location and overwrites the existing audio. |
Ctrl+Shift+V |
Paste the copied audio to the current location and merges it with the existing audio. |
| Delete | Erase the selected region of audio. |
Shift+Delete |
Delete the selected region of audio. |
StyleMaker
Alt+F9 |
Open Style Maker to edit any style. |
Ctrl+Shift+F9 |
Open StyleMaker to edit current style. |
F1, Shift+F1, Ctrl+F1 |
Help. |
F2 |
Save style. |
Alt+F2 |
Save style as ... |
R or F3 |
Record pattern. |
Spacebar or F4 |
Play pattern. |
F8 |
Play pattern on chord. |
F10 |
Edit pattern options. |
F6 or Shift+F6 |
Change instrument. |
Cursor Keys |
Move around screen. |
Alt+F4 |
Quit the StyleMaker. |
F5 |
[Drum Pattern Editor] Drum alternate notes. |
ZXCVBNM,. /(bottom row) |
[Drum Pattern Editor] Drum note entry. |
F6 |
[Drum Pattern Editor] Time base. |
F10 or Alt+F4 |
[Drum Pattern Editor] Exit. |
More Hot Keys
Ctrl+Alt+Q |
Send GM mode on message. |
Ctrl+E |
Preferences dialog. |
F12 |
Panic! All notes off. |
F1 |
Help. |
Ctrl+F1 |
Help – Topic Search. |
Shift+F1 |
Help – How To. |
Alt+F4 |
Quit the program. |
L O G Enter |
Open the flash message log file (FlashMessageLog.txt). |
Additional Keystrokes
There are additional keystrokes available, listed on the pulldown menus beside the function. Hot keys may access any function on the pull-down menu by pressing the Alt key and the first letter of the Menu followed by the underlined letter of the command. For example, Alt+F+O would access File | Open.
Chord List
Commonly used chords are displayed here in bold type.
It is not necessary to type upper or lower case. The program will sort this out for you.
Any chord may be entered with an alternate root (“Slash Chord”) e.g.: C7/E = C7 with E bass.
Separate chords with commas to enter 2 chords in a 2-beat cell, e.g., Dm,G7
Major Chords
C, Cmaj, C6, Cmaj7, Cmaj9, Cmaj13, C69, Cmaj7#5, C5b, Caug, C+, Cmaj9#11, Cmaj13#11
Minor Chords
Cm, Cm6, Cm7, Cm9, Cm11, Cm13, Cmaug, Cm#5, CmMaj7
Half Diminished Chords
Cm7b5
Diminished Chords
Cdim
Dominant 7th Chords
C7, C7+, C9+, C13+, C13, C7b13, C7#11, C13#11, C7#11b13, C9,
C9b13, C9#11, C13#11, C9#11b13, C7b9, C13b9, C7b9b13, C7b9#11,
C13b9#11, C7b9#11b13, C7#9, C13#9, C7#9b13, C9#11, C13#9#11, C7#9#11b13
C7b5, C13b5, C7b5b13, C9b5, C9b5b13, C7b5b9, C13b5b9, C7b5b9b13,
C7b5#9, C13b5#9, C7b5#9b13, C7#5, C13#5, C7#5#11, C13#5#11, C9#5,
C9#5#11, C7#5b9, C13#5b9, C7#5b9#11, C13#5b9#11, C7#5#9, C13#5#9#11,
C7#5#9#11, C13#5#9#11
Suspended 4 Chords
Csus, C7sus, C9sus,
C13sus, C7susb13, C7sus#11, C13sus#11, C7sus#11b13, C9susb13, C9sus#11, C13sus#11, C9sus#11b13, C7susb9, C13susb9, C7susb9b13, C7susb9#11,
C13susb9#11, C7susb9#11b13, C7sus#9, C13sus#9, C7sus#9b13, C9sus#11, C13sus#9#11, C7sus#9#11b13,
C7susb5, C13susb5, C7susb5b13, C9susb5, C9susb5b13, C7susb5b9,
C13susb5b9, C7susb5b9b13, C7susb5#9, C13susb5#9, C7susb5#9b13,
C7sus#5, C13sus#5, C7sus#5#11, C13sus#5#11, C9sus#5, C9sus#5#11, C7sus#5b9, C13sus#5b9, C7sus#5b9#11, C13sus#5b9#11, C7sus#5#9, C13sus#5#9#11, C7sus#5#9#11, C13sus#5#9#11
Add2 Chords
Cadd2, Cmadd2
Tricky Chords
C5b This is “C flat 5.” It is spelled this way to avoid confusion.
C2, C5, C4, C69, C7alt, Cm7#5
You can type C-7 for Cm7 (i.e. use the minus sign) or C7-9 for C7b9.
Shortcut Chords
If you enter a lot of songs, you will appreciate these shortcut keys.
J = Maj7 (For example, to type CMaj7, just type CJ.)
H = m7b5 (H stands for Half diminished.)
D = dim
S = 7sus
Add your own chord shortcuts.
Have you found a chord that Band-in-a-Box doesn’t recognize? If so, add it to your chord shortcuts file, and Band-in-a-Box will allow you to type in that chord in the future. This also lets you define chord “shortcuts,” one-letter abbreviations for longer chord names (“J” for “Maj7” etc.). If you find a chord that Band-in-a-Box won’t accept like Csus2, when it expects C2 instead you can enter this on a single line (without the quotes) “Csus2@C2.” Then Band-in-a-Box will enter the chord C2 if you type in Csus 2.
The text file C:\bb\Data\Shortcut.txt allows you to add new chord shortcuts. Note that this file doesn’t ship with Band-in-a-Box (or it would overwrite your file!). The file C:\bb\Data\pgshortc.txt for shortcuts supplied by PG Music. You can add your own shortcuts in a text file you make yourself and name C:\bb\Data\shortcut.txt.
Band-in-a-Box Files and Folders
By default, Band-in-a-Box is installed to the C:\bb folder. This folder contains following subfolders.
AudioChordWizard - This folder contains the standalone Audio Chord Wizard program, which interprets the chords from audio files (MP3, WAV, M4A, etc.).
AutoSave - This folder stores the auto-saved songs to prevent losing your work if something crashes on your system.
BB2Go - The iPhone version of Band-in-a-Box will see this folder. You can send files back and forth from BB iPhone to the desktop version of Band-in-a-Box, and the files go to this folder. You can add audio to the Band-in-a-Box files in this folder with the Windows | BB2Go menu command in the desktop version of Band-in-a-Box and select the files that you want to have MP4/M4A audio added.
BBHelpers - This folder contains the program called BandinaBoxServer.exe. You need to have this program running to allow the BB Remote app to connect to your desktop version of Band-in-a-Box.
BBPlugins - This folder holds copies of the several different types of the Band-in-a-Box DAW Plugin that may be useful in different situations. Band-in-a-Box DAW Plugin Standalone.exe is a special version of the plugin that is not used within any DAW, but instead works as a standalone program. This is useful for troubleshooting or for people who want to run a simplified version of the Band-in-a-Box program. You can use this program to generate tracks and drag them to Explorer.
Data - This folder contains data for the various Band-in-a-Box features.
Demos - This folder is packed with many demo songs.
Documentations - This folder contains the program manual, the upgrade manual, the Help file, and additional documentations. It also contains the Tutorials folder, which includes the files provided for use with the tutorials found in the manual or the help file.
DragDrop - This is is the location for files rendered by dragging tracks to the Drop station.
Drums - This folder has subfolders containing the files for all the RealDrums sets installed in your program. It is the default location recognized by Band-in-a-Box. If this folder is moved or the RealDrums files are installed in a custom location, the new location must be entered in the RealDrums Settings dialog so that Band-in-a-Box knows where to find them.
DX Settings - The .tgs files that stores VST/DX plugin settings are saved in this folder. It also contains presets of a Hi-Q MIDI instrument and a VST plugin (e.g. sforzando).
Preferences - The preferences you set in the program are saved in thisfolder. It includes a file named intrface.bbw, which stores all the program settings including MIDI and audio driver setup. If you delete this file, the program will open like a new installation the next time it runs. This is useful as a “global reset” if system settings have been changed by accident and are difficult to restore.
RealTracks - This folder has subfolders containing the files for all the RealTracks installed in your program. It is the default location recognized by Band-in-a-Box. If this folder is moved or the RealTracks files are installed in a custom location, the new location must be entered in the RealTracks Settings dialog so that Band-in-a-Box knows where to find them.
Soloists - All Soloist files (ST2 and XT2 files) are stored in this folder.
Songs - This is your “home” folder for the SongPicker. You can put any songs to this folder.
Songs and Lessons - Band-in-a-Box comes with a large library of songs that demonstrate some of the most popular styles of music as well as songs for listening, learning, and jamming. This folder is packed with musical content for a variety of tastes and purposes.
Styles - Band-in-a-Box styles use the file extension .sty and are stored in this folder. These are the styles that are listed in the StylePicker. If you add new styles, they will be installed in this folder and added to the StylePicker list by clicking on the [Rebuild] button.
TicketsActivated - When you successfully activate Band-in-a-Box, a .bin file will be created in this folder.
Undos - Most undo data is stored in RAM, but bigger data is stored as files in this folder. For example, if you edit audio in the Audio Edit window, the undo data will be created in this folder.
uninstall - The uninstall programs for the Band-in-a-Box program and addons are saved in this folder.
Frequently Asked Questions
1. What is Band-in-a-Box?
Band-in-a-Box is an intelligent automatic accompaniment program. You can hear and play along to many song ideas and go from “nothing” to “something” in a very short period of time with Band-in-a-Box as your “on demand” backup band. Just type in the chords for any song using standard chord symbols (like C, Fm7 or C13b9), choose the style you’d like, and Band-in-a-Box does the rest. Band-in-a-Box automatically generates a complete professional quality arrangement of piano, bass, drums, guitar, and strings in a wide variety of styles.
2. How can I order Band-in-a-Box?
Place your order online using Visa, MasterCard, American Express, Discover, JCB, UnionPay, Amazon Pay, PayPal, or Wire Transfer. After you place your order, you will receive an email with your product serial number and a link to the download page for your purchase.
If you have any questions or need assistance, please contact one of our customer service representatives by email at sales@pgmusic.com, via our Live Online Chat, or by phone at 250-475-2874 (direct), 1-800-268-6272 or 1-888-PGMUSIC (toll-free in the USA and Canada), or 800-4746-8742* (toll-free outside of the USA and Canada).*Where Universal International Freephone service is available. View International Access Codes.
3. Do you have a Band-in-a-Box program demo?
We don’t have a demo program available for download currently since the program is quite large with all the RealTracks and RealDrums, however we do have a 30 day money-back guarantee on all products purchased directly from us. You can watch our video on our Band-in-a-Box Video Demos page. You can also listen to hundreds of audio demos of Band-in-a-Box at our RealTracks pages, and you can look through all of the Band-in-a-Box Add-ons offered here: https://www.pgmusic.com/addons.php?os=win
4. What new features are there in the latest version of Band-in-a-Box?
With each version upgrade, we add many great new features.
With Band-in-a-Box 2023, we’ve added Partial Track Re-Generations, with an on-screen Regeneration Panel and an Always Different setting to get up to 40 variations on any RealTracks. Undo - Track Generation and Undo - Song Generation is added. Playable Tracks are enhanced for Playable RealTracks (404 new Sforzando sounds, 700 total - all with Audio Demos), and now include Playable RealDrums, MIDI SuperTracks and MIDI tracks. There are now RealTracks Stems, Auto-Save Song, generate Intros using Song Chords, RealDrums Fills control, and much more! See all the new features in Band-in-a-Box 2023: https://www.pgmusic.com/bbwin.new.htm
With Band-in-a-Box 2022, we added “All Tracks are Equal,” so all 24 tracks have the same capabilities, including style generation and audio editing. Playable RealTracks to customize the RealTracks performances by adding your own notes, using sounds from the RealTracks recording. A MultiRiff feature to interactively arrange sections of RealTracks, as you build up the track by choosing from multiple versions. We also added a One-Click Download and Install Manager, Motifs, Drum Stems, and much more.
With Band-in-a-Box 2021, we added 16 new editable Utility tracks, which can be used for audio and/or MIDI. 24-bit audio playback, recording, mixing, and rendering is now supported. Auto-Fix “sour” notes - out-of-tune notes in RealTracks will be auto corrected to match chord tones. 4X’s faster audio DSP processing (using SIMD), allowing smoother playback & faster rendering for a larger number of tracks, and much more.
With Band-in-a-Box 2020, we added Multi-riffs, RealTracks thickening and panning, left-handed Student Guitar view, Drag n drop from mixer, Audio Chord Wizard enhancements and much more.
With Band-in-a-Box 2019, we added a brand-new 64-bit version of Band-in-a-Box, which works well with the latest plugins and 64-bit OS features! We’ve also made and include a 64-bit VST Plugin of Band-in-a-Box, which you can use inside your favorite DAW (Cakewalk, Reaper, ProTools, etc.) to generate styles, RealTracks, RealDrums, Multi-Riffs, etc. We include a 64-bit GM MIDI synth VSTSynthFont64 with default GM soundfonts, allowing you to specify any GM soundfont. The completely redesigned SongPicker shows information for up to 50,000 songs and has useful filter and search features including search by chord progression and/or melodic phrase.
With Band-in-a-Box 2018, we added Video RealTracks, a new ultra-low-latency audio driver, the Audio Chord Wizard has been redesigned and is built into Band-in-a-Box, audio harmonies have been enhanced with audio transcription, audio tuning can be fixed, notation properly supports time signatures like 12/8, 9/8 & 6/8, the toolbar has been enhanced with skins and more customization, songs can be saved as MP3, you can open ABC notation files, and the Audio Edit Window has been redesigned with a new GUI and features.
With Band-in-a-Box 2017, main screen GUI has been redesigned with many requested improvements, including a new, smaller footprint, configurable toolbars, and more. RealTracks sound better than ever with improved stretching and transposition quality (Elastique 3), better phrase transitions, and Natural Arrangements. We have added new “Woodshedding” RealTracks called 12-Key Guitar RealTracks from Brent Mason played in 12 keys with Hi-Q (precise) Tab/Notation which is ideal for studying and learning.
With Band-in-a-Box 2016, we redesigned and enhanced the StylePicker, rebuilt the Chord Sheet with improved functionality and customization options. We also added 201 new RealTracks, 11 new MIDI SuperTracks, 19 Instrumental Studies (bass, acoustic & electric guitar, piano & saxophone, in a variety of genres), and for the first time ever, 3 “Artist Video Performances,” which are video files that play in Band-in-a-Box, with live saxophone performances playing along with Band-in-a-Box RealTracks. We also have over 80 new RealStyles, which are new styles using existing RealTracks and Loops. These include great Top-40 styles, “Requested” styles, J-Pop, K-Pop, German “Schlager,” and more!
With Band-in-a-Box 2015, we added 50 new features, 101 new RealTracks, 15 new MIDI SuperTracks, 46 Artist Performances, 18 Instrumental Studies and 1,000 Killer Modern Loops. New features include support for your 64-bit VST plugins and VSTi instruments using jBridge, functions to load, play, view and slow down videos you’ve downloaded from YouTube or elsewhere, Automatic Program Updates, and GUI enhancements.
With Band-in-a-Box 2014, we added 50 new features (including an all-new GUI and UserTracks), 101 new RealTracks, 54 new MIDI SuperTracks, 20 Artist Performances and 8 new Hi-Q MIDI Sounds. Compared to version 2012 (December 2011) this adds 100 new features, 303 RealTracks, 145 MIDI SuperTracks and 26 Hi-Q Sounds! There are now over 1,200 hours of RealTracks/RealDrums (studio musician audio recordings) included with the UltraPlusPAK or EverythingPAK!
With Band-in-a-Box 2013 we added a new MIDI DXi/VST synth (SampleTank) and added some great High Quality (“Hi-Q”) MIDI Sounds. These Hi-Q sounds make the MIDI tracks (both regular and MIDI SuperTracks) sound much better. We added Performance Tracks – Artist’s Performances on the Melody track, to showcase the Band-in-a-Box RealTracks demos playing along to an artist performing the melody. These are great for listening or for learning-from-the-Pros (since notation/tab shows for the performances). “Print to PDF” to save your printouts directly as a PDF file, or share your arrangements with the added SoundCloud.com integration and DropBox integration. There are a number of RealTracks enhancements including “Pick best soloist RealTracks” that shows you the soloists that best match the genre, tempo, and feel of your song, and many more.
With Band-in-a-Box 2012.5 we’ve added MIDI SuperTracks! MIDI SuperTracks are a great sounding option for those who would like to use MIDI in their arrangement. Instead of MIDI styles based on C7 chord patterns that get repeated over every chord, the MIDI SuperTracks are based on actual playing by studio musicians. When you play the SuperTracks using your MIDI synth, or favorite VST plug-ins you get an incredibly realistic sound using MIDI.
With Band-in-a-Box 2012, we’ve added VST synth support for each track, so you can have multiple synths playing on your songs. You can also use VST Audio Plug-ins (reverb, delay etc.) on each track. Customize over 150 of the Guitar based RealTracks with the new Guitar Amp Simulator (AmpliTube CS). We include “Direct Input” (clean signal) Guitar RealTracks for these, so all of the added effects come from the Guitar Amp Simulator. We’ve added “Loops” support, so you can add your own, or 3rd party loops to any Band-in-a-Box track.
For the previous version, Band-in-a-Box 2011.5, we added a new floating Mixer Window, allowing you to quickly set volumes, panning, reverb, tone and patches. There’s a new “BB Remote” app for your iPhone®, which can be used as a remote control for the desktop version of Band-in-a-Box 2011.5 or higher! We added 101 RealTracks in Sets 122-136, including: 70’s Soul, Celtic Hornpipes & Slipjigs, Crossover Pop, Gypsy Jazz, Jazz Piano and Organ, Brent Mason Country soloing, Praise & Worship, and much more!
For Band-in-a-Box 2011, we added over 50 new features, including big improvements to the sounds of the RealTracks so that they sound more natural over a much wider range of tempos, using the elastique Pro V2 time stretching engine by zplane.development. These improvements are built-in, so there’s nothing you need to do to get it working. Your existing songs will just sound better automatically! Also, we made an iPhone® version of Band-in-a-Box, which connects to your Windows desktop version of Band-in-a-Box 2011 or higher and allows you to generate, play, and save songs on your iPhone®, iPod touch®, iPad™, or Android phone - with the same high quality RealTracks sound! 101 new RealTracks since July 2010, including: Gypsy Jazz, Celtic Jigs & Reels, Calypso, Praise & Worship, Reggae, Brent Mason Guitar, and so much more!
In Band-in-a-Box 2010, we added a new “Plug-in” mode, allowing you to simply Drag-n-Drop tracks between Band-in-a-Box and your favorite sequencer (RealBand, Sonar, Reaper, ProTools, FL-Studio, Nuendo and more). RealTracks generation time was improved, typically 3X faster. RealTracks support for Shots, Holds, and Pushes was added. Endings are improved, and RealTracks endings are now 4 bars long, giving time for the natural decay of the instruments. Individual MIDI or RealTracks can be frozen, so the arrangements can be saved and fixed, and will replay quickly without need for regeneration.
5. What is RealBand?
RealBand is a fully-featured and powerful music arranging, sequencing, and digital recording program that is included in Band-in-a-Box for Windows. RealBand combines the most popular features from PG Music’s PowerTracks Pro Audio and Band-in-a-Box programs into an all-in-one sequencing program with automatic accompaniment.
With RealBand you can create an arrangement with Band-in-a-Box tracks by typing in the chords and choosing a style. You can add RealTracks and RealDrums that follow the chord changes, add your own audio or MIDI tracks, and then edit and produce the finished song without ever leaving the program!
A great way to learn more about RealBand is to watch the RealBand introduction video.
6. What are the differences between RealBand, Band-in-a-Box, and PowerTracks Pro Audio?
Band-in-a-Box is an intelligent automatic accompaniment and arranging program, which means that you can go from nothing to complete song arrangements in as little as a few seconds. Simply enter chords to a song, choose a style of music, and Band-in-a-Box generates a full band arrangement complete with Bass, Piano, Drums, Guitar, Strings, and more.
Band-in-a-Box can generate MIDI tracks, which are played through a MIDI synthesizer and displayed in notation, and it can also generate RealTracks and RealDrums, which are intelligently compiled from audio recordings of musicians playing real instruments.
Band-in-a-Box has many other amazing intelligent features such as automatic Harmonies, Ear training modules, the Soloist (which generates professional quality solos over any chord progression), and the Melodist (which can create entire original songs from scratch with Chords, Melodies, Intros, and Solos).
PowerTracks Pro Audio is a professional, fully featured, 48 track digital audio and MIDI sequencer. This program allows you to assemble music layer by layer and track by track using MIDI or digital audio, or a combination of the two. Unlike Band-in-a-Box, PowerTracks Pro Audio does not generate any music for you. Instead, it gives you complete control and flexibility to record, edit, mix, and master your music.
You can start from “scratch”, recording your MIDI tracks or step-inputting them, and recording digital audio tracks. Or you can work from existing audio and MIDI files that you have imported into the program for further processing. Many people have used Band-in-a-Box in conjunction with PowerTracks, by exporting songs from Band-in-a-Box as MIDI or wave files then importing these files into PowerTracks.
RealBand combines many of the features from PowerTracks Pro Audio and Band-in-a-Box into an all-in-one sequencing program with automatic accompaniment.
As with Band-in-a-Box, you can type in chords to a song, choose a style of music, and it will generate a complete band arrangement that can include MIDI tracks, RealTracks, and RealDrums. Band-in-a-Box and RealBand are compatible with all the same song and style formats, so any style that you use in Band-in-a-Box can also be used in RealBand. Unlike Band-in-a-Box, RealBand does not have many of the additional “intelligent” features, such as the Soloist, Melodist, Harmonist, Vocal Harmonizer, Chord Substitution Wizard, and automatic Melody Embellisher. Developing song ideas and using the program as an educational or practice tool are easier to do and more suited to Band-in-a-Box.
As with PowerTracks, you have complete control over recording and editing your music track by track, as well as mixing and mastering using full-featured Tracks and Mixer Windows. You can ‘freeze’ your “BB” (Band-in-a-Box) generated tracks then fine-tune them, you can re-generate each track individually or re-generate a range of bars. You can layer as many additional MIDI or audio tracks as you want. You can assign any combination of DX/VST effects to individual tracks, aux busses, or the main output. You can assign different DXi/VSTi synthesizers to individual MIDI tracks. You can merge all your tracks to a single stereo wave file or compressed audio format and burn an audio CD. And you can do ALL of this without ever leaving RealBand!
The latest versions of both Band-in-a-Box and RealBand are included in any Band-in-a-Box first-time purchase or upgrade!
7. What is the difference between Band-in-a-Box Pro and the Band-in-a-Box MegaPAK?
The Pro and MegaPAK include the same Band-in-a-Box and RealBand program engines, however the MegaPAK includes many more Styles, Soloists, Melodists, RealTracks, RealDrums and more. Whereas the Pro version comes with over 1,000 Styles (MIDI Styles and RealStyles), the MegaPAK comes with over 3,000 Styles (MIDI Styles and RealStyles)!
Specifically, Band-in-a-Box Pro comes with a basic ‘starter’ set of Styles, Soloists, Melodists, RealDrums, and RealTracks: It includes 64 MIDI SuperTracks, 1,000 Styles (MIDI Styles and RealStyles), 100+ MIDI Soloists, ~60 MIDI Melodists, 22 Artist Performances, 21 Nature Sounds and Percussion Loops, 1,000 Dubstep, Modern and Top 40 Loops and the Pro RealCombos 590 RealTracks instruments in 350+ Bands!) RealCombos are full bands of RealTracks and RealDrums instruments (no MIDI) in the same style. For example, the Jazz Swing 140 RealCombo includes 5 RealInstruments (Bass, Piano, Guitar, Sax, and Drums) that play at a medium swing tempo. Essentially, RealCombos allow you to hear *some* full bands of RealTracks without having to get the largest Band-in-a-Box package.
The Band-in-a-Box MegaPAK includes everything that the Pro version has, plus a lot more. It includes 3,000+ Styles (MIDI Styles and RealStyles), 163 MIDI SuperTracks, over 300 MIDI Soloists, 200+ MIDI Melodists, 63 Artist Performances, 21 Nature Sounds and Percussion Loops and 1,000 Dubstep, Modern and Top 40 Loops. It also includes the MegaPAK RealCombos (Over 800 RealTracks in 530+ Bands).
Visit our Band-in-a-Box Add-ons page for a complete list of available add-ons. Visit our Band-in-a-Box page to see comparisons of the different Band-in-a-Box and RealBand packages.
8. What is the difference between the Band-in-a-Box MegaPAK, UltraPAK and UltraPAK+?
All of the packages include the latest versions of both Band-in-a-Box and RealBand. The Band-in-a-Box MegaPAK includes 3,000+ Styles (MIDI Styles and RealStyles), 163 MIDI SuperTracks, over 300 MIDI Soloists, 200+ MIDI Melodists, 63 Artist Performances, 21 Nature Sounds and Percussion Loops and 1,000 Dubstep, Modern and Top 40 Loops. It also includes the MegaPAK RealCombos (Over 800 RealTracks in 530+ Bands). RealCombos are full bands of RealTracks and RealDrums instruments (no MIDI) in the same style. For example, the Jazz Swing 140 RealCombo includes 5 RealInstruments (Bass, Piano, Guitar, Sax, and Drums) that play at a medium swing tempo. Essentially, RealCombos allow you to hear *some* full bands of RealTracks without having to get the largest Band-in-a-Box package.
The UltraPAK includes over 7,000+ Styles (MIDI Styles and RealStyles), 290+ MIDI SuperTracks, over 300 MIDI Soloists, 200+ MIDI Melodists, 160+ Artist Performances, 21 Nature Sounds and Percussion Loops and 1,000 Dubstep, Modern and Top 40 Loops. PLUS ALL of the currently available RealDrums and RealTracks Sets. Now there’s over 3,500 RealTracks included in the UltraPAK. That’s over 3,700 hours of studio musicians recordings!
The UltraPAK+ includes all the UltraPAK contents, and adds the Songs & Lessons PAK
9. Is it true that you offer a 30-day money back guarantee on your products?
Yes! We offer an unconditional 30-day money back guarantee on all PG Music products purchased directly from us. If for any reason you decide that the PG Music product is not for you, simply contact us within 30 days of your order and we will refund you the purchase price of the item.
10. What are the recommended system requirements for Band-in-a-Box?
Band-in-a-Box runs on Windows 7 / 8 / 8.1 / 10 / 11 (32 or 64-bit) and require at least a 1.0 GHz processor (2GHz+ multicore recommended). Basic MIDI features require a less powerful computer than the latest RealTracks features. For best performance, we recommend a fairly up-to-date computer with Windows 10 or higher, a fast processor, and at least 2GB RAM. Without RealDrums or RealTracks, you need a minimum of about 1GB of free hard disk space (15GB recommended). More hard disk space is required for the RealTracks and RealDrums, roughly 100-400MB per Set. A full install of the PRO version (including RealTracks/Drums) requires about 30GB. A full install of the MEGAPAK version requires about 40GB. The UltraPAK is about 120GB (another ~100GB is required for the installation files when downloading the UltraPAK or UltraPAK+). You have the option of either downloading, or shipping “pre-installed” on a USB hard drive. You can run the program directly from the hard drive or install on your computer.
A MIDI sound source is required. This could be a sound card, a MIDI keyboard, MIDI sound module, or software synthesizer. We include a software synthesizer with Band-in-a-Box.
11. What are the requirements for iPhone version of Band-in-a-Box for Windows?
For Band-in-a-Box iPhone version, iOS version needed is iOS 4 or higher. You also need to have the desktop version of Band-in-a-Box 2011 or higher for Windows.
12. Are all the styles in the iOS version or is it only that you can work on the songs (with selected style) saved in the Windows desktop folder used by the server?
BB iPhone version doesn’t generate songs on the iPhone, it connects to your desktop version of Band-in-a-Box 2011 or higher for Windows, within your house (LAN) or from anywhere (Internet - WiFi or 3G). Once connected, it acts as a client, and you can:
-
Generate songs, which transfer to and play on the iPhone.
-
Get any songs that you have in the c:\bb\BB2Go folder. Either get one at a time, or Get all.
-
Send any songs that you make on the iPhone to the BB2Go folder.
For example, let’s say you have 100 Favorite Songs that you like to play.
1) Put them in the BB2Go Folder.
2) (optional) If you want to pre-generate mp4 audio for them, in desktop Band-in-a-Box, choose [menu]-Windows-BB2Go and that dialog shows you all the files, and you can press a button to generate mp4 audio for all songs.
3) Make sure that Band-in-a-Box Server is running. This will show up as an icon in System Tray with a musical note. (If it isn’t running, you can run it from the BB2Go dialog mentioned in #2 above.
4) Run iPhone BB, choose menu-File-Server, and you should see the IP address of the Band-in-a-Box Server. If you do, then connect to it.
5) If you have any problem connecting or generating songs, it would be because of a firewall or Anti-Virus program blocking communication. If so, create an exception in the firewall or AV program, and the problem should be solved. Usually, you need to reboot the Band-in-a-Box Server.exe, or the iPhone or possibly reboot Windows after you’ve done that.
6) Once connected, on the iPhone you could choose File-Server-Get Songs- Get All Songs.
This will get your 100 favorite songs, and if you have pre-generated the audio (as in #2), then they are ready to play, and sound identical to how they sound on the BB Desktop, with all of your MIDI and RealTracks sounds.
Also, once connected, you can generate any song in any style, much like you do using the desktop version.
This example above assumes you are using a LAN connection within your house. For connection using Internet, see details on our support page.
13. Do you offer technical support after I purchase the program?
Yes. We offer extensive technical support for all PG Music Inc. products. All technical support is free and unlimited for registered customers. You can e-mail us, use our Live Online Chat, or phone us toll-free (from most countries). Please visit our Support Page for more details and contact information.
14. What shipping methods do you offer? Is there a download-only option?
We do offer shipping for Band-in-a-Box packages. If you would like to receive a backup copy of your Band-in-a-Box, be sure to add the physical backup copy to your order on checkout.
The Band-in-a-Box packages are also available for download. Note: If you ordered the Audiophile Edition, you can download the compressed RealTracks and RealDrums. The uncompressed files will be shipped on the hard drive.
Flash Drive Orders: Pro, MegaPAK, and PlusPAK packages only
Shipped free by mail. The Flash Drive media is $15.
USA: Delivery typically within 2-3 business days.
Canada/International: Delivery typically within 5-10 business days.
Hard Drive Orders: UltraPAK, UltraPAK+, Audiophile, and OmniPAK packages only
Shipped free by courier. The Hard Drive media is $25.
USA: Delivery typically within 2-3 business days.
Canada/International: Delivery typically within 2-6 business days.
All other products are download only.
15. Are all of your products available for download (electronic delivery)?
Yes, PG Music software is available for immediate download when you order online, and you will also have the option of a physical shipment for the backup copy of your purchase. Note: If you ordered the Audiophile Edition, you can download the compressed RealTracks and RealDrums. The uncompressed files will be shipped on the hard drive.
16. Do you ship overseas?
Yes, we ship Band-in-a-Box products anywhere in the world that is served by an international carrier.
17. If I choose to download the program, will I still get shipped a backup copy of the software and documentation?
We do offer shipping for Band-in-a-Box packages. If you would like to receive a backup copy of your Band-in-a-Box, be sure to add the physical backup copy to your order on checkout. All other products are download only.
18. Do you offer upgrades from previous versions of Band-in-a-Box?
Yes, you can upgrade to the latest version of Band-in-a-Box from any previous version. Visit the Band-in-a-Box for Windows Purchasing page for more details.
19. Can I upgrade from Band-in-a-Box Pro to the MegaPAK, UltraPAK, or Audiophile Edition?
Yes, you can upgrade to the latest Band-in-a-Box MegaPAK, UltraPAK, or Audiophile Edition from ANY version of Band-in-a-Box including the current version. To order, or for more information, visit the Band-in-a-Box for Windows Purchasing page.
20. If I purchased the last UltraPAK version, do I need to order the new UltraPAK Upgrade?
You don’t need to, but we have special low pricing on these upgrade paths. They are a much better deal than a regular upgrade. If you purchase the UltraPAK upgrade, you will keep yourself up-to-date with all the latest Styles, RealDrums, RealTracks, MIDI SuperTracks, Artist Performance Sets, Soloists, and Melodists available. You also have the option of upgrading to the latest PlusPAK version, as long as you have the last UltraPAK version. This will provide you with the new version and any new RealTracks and RealDrums that were released. When you install the PlusPAK to your previous UltraPAK, it is the equivalent of ordering a new UltraPAK version. If you only purchase the regular upgrade, you will still retain the add-ons (styles etc.) you got with your previous purchase, but you won’t get all the new ones. Visit our Band-in-a-Box page to see all of the upgrade packages available.
21. I purchased Band-in-a-Box for Mac and now I want to run it on a PC. Is there a “crossgrade” that I can purchase?
Yes, you can crossgrade from any Mac version of Band-in-a-Box to the latest version of Band-in-a-Box for Windows. You can choose any of the upgrades “from 2016 or earlier or crossgrade.”
To order, or for more information, visit the Band-in-a-Box for Windows Purchasing page.
22. Are songs that I create with Band-in-a-Box copyrighted?
The arrangements made by Band-in-a-Box are yours, and your songs may be used freely as long as they don’t infringe upon the intellectual property rights of others.
23. Do I need to be a musician to use your products?
No! Our products can be used by anyone, regardless of their musical ability. Although we have many satisfied customers who are professional or amateur musicians and educators, you don’t have to be a musician to use or enjoy our products.
24. Why is the price of your products so low?
Peter Gannon, the president and founder of PG Music Inc., states that he set out “...to create software that I would want to purchase and use myself.” To this end, we strive to create quality software that is affordable and fun to use, while performing at a professional level. One of our goals is to give you, the customer, more than you ever expected when you purchased the program.
25. Are your prices in US dollars?
Yes, all of our prices are shown in US dollars.
26. Do you offer special academic pricing for school systems?
There are Site License and LabPAK purchase options available to schools and other educational institutions who are interested in purchasing 5 or more copies of Band-in-a-Box for one location (like a computer or music lab). We also offer custom pricing for school-wide, district-wide, and even state, provincial, or national licensing. For more information, please visit the Educators Page or contact marketing@pgmusic.com.
At this time, we do not offer an academic/educational discount on individual purchases of our software.
27. Is it safe to use a credit card over the internet?
Every modern browser comes with SSL (Secure Sockets Layer) encryption technology. This allows information that you pass to our servers to be encrypted during transmission, without you having to set up anything special. We also have installed a digital security certificate on our servers, which certifies that we are who we say we are when you’re connected.
28. Is Band-in-a-Box available from any local dealers?
Yes, Band-in-a-Box is represented by dealers worldwide. Here is a complete list of our distributors: https://www.pgmusic.com/distributors.htm
29. How do I know if Band-in-a-Box will be able to create an accompaniment in my style of interest?
There are over 10,000 styles (MIDI and RealStyles) currently available for Band-in-a-Box, ranging from Pop, Rock, Jazz, Blues, Country, and Classical, to many different world styles. So, chances are that you will be able to find a suitable style. You can browse through all of our styles and listen to audio demos at our Band-in-a-Box Add-ons page.
30. What is the PG Music OmniPAK?
The PG Music OmniPAK (https://www.pgmusic.com/omnipak.htm) includes over 40 popular music software titles - Band-in-a-Box and RealBand with all the uncompressed RealTracks and RealDrums WAV files, PowerTracks Pro Audio, the Pianist Series, the Multimedia Performance Series, and much more! The OmniPAK is shipped on a portable high-speed USB 3.0 hard drive with all programs pre-installed. This purchase does not include third-party software.
31. How can I register my software?
We have an Online Registration Form.. Note: If you purchased your software directly from us, you are automatically registered.
If you purchased your software directly from PG Music, you are automatically registered. If you purchased Band-in-a-Box from a third party, register your software by following these steps:
1) Launch the Band-in-a-Box software on your computer.
2) Go to the "Help" menu in the toolbar.
3) Select Web www.pgmusic.com
4) Select the "Register Online" option.
5) A registration dialog will appear in your web browser. Enter your registration information, including your name, email address, and the Band-in-a-Box Serial Number provided to you.
6) Click on the "Submit" button to complete the registration process.
Please note that registering your product is not the same as activating your Band-in-a-Box program. If you'd like information on how to activate Band-in-a-Box, please ask me about how to activate the program.
32. I placed an order, but didn’t receive an email confirmation.
The email confirmation is sent out the moment your order is processed. First, check your email program’s “spam” or “junk” folder; the email could have been sent there. If not, you may have entered an incorrect email address into the order form, or (rarely) your ISP has blocked the email. Please contact us if you can’t find the email.
33. Can I purchase a complete User’s Guide for Band-in-a-Box?
You can view the full manual online at https://www.pgmusic.com/manuals/.
34. What types of files can Band-in-a-Box save as?
Band-in-a-Box saves files in its proprietary formats (.SGU, .MGU, .STY, etc.). You can also save your songs in the Standard MIDI File (SMF) Format (.MID - type 0 or type 1), .KAR format (Karaoke File Format), .ABC format (ABC notation), .XML format (Music XML), or convert your songs to .WAV files and a variety of compressed audio formats such as .MP3 and .WMA.
35. Can I view music notation and print out lead sheets with Band-in-a-Box?
Yes, you can view and print out the musical notation for any of the tracks that Band-in-a-Box generates (piano, bass, guitar, etc.), as well as tracks that you input. It is easy to customize and print out excellent quality lead sheets with chords, melody, and lyrics.
36. Can I burn audio CDs containing my Band-in-a-Box compositions?
Yes, as long as your computer is equipped with a CD burner. In fact, you can create an audio CD without ever having to exit Band-in-a-Box!
37. Do any of your products convert audio files to midi?
New for version 2018, Band-in-a-Box now comes equipped with a transcribe function that is accessible from the Audio Edit window. PowerTracks Pro Audio also comes equipped with a Pitch to MIDI conversion tool, and this will convert monophonic .wav files into MIDI. A trumpet, saxophone, or single human voice would be a good candidate for this type of process, whereas a guitar chord (multiple notes) would not. For polyphonic audio files (more than one instrument) the technology needed to convert an audio file to MIDI note-for-note is not available. Band-in-a-Box also includes the Audio Chord Wizard, which will automatically figure out the chords from any MP3, WAV, or WMA (Windows Media) audio file and display them!
38. I just placed an order, but I am unable to download the software. What should I do?
All PG Music software is available for immediate download.
After placing your order, you will receive your order confirmation email. This email contains the link(s) to access your Downloads page, and the Band-in-a-Box Serial Number if you ordered a Band-in-a-Box package.
Click on the link(s) in your order confirmation email to go directly to your Downloads page for each product. If the Install Manager is available for the product, there will be a link to download it at the top of your download page list. Complete instructions and troubleshooting tips for the Install Manager (“One-click installer”) are available:
- Tutorial for Windows (https://www.pgmusic.com/download-manager-help.htm)
- Tutorial for Mac (https://www.pgmusic.com/download-manager-mac-help.htm)
Or, watch the “One-click Install” video:
- Video: Using the One-click Installer on Windows https://www.youtube.com/watch?v=RipTVhGaVIU&feature=youtu.be)
- Video: Using the One-click Installer on Mac (https://www.youtube.com/watch?v=HNoVd5E8pbo&feature=youtu.be)
If you have created an account on pgmusic.com, you can also access your downloads by logging into your account and clicking the “My Products” page. This page lists all your recently purchased serial numbers and downloads. If you do not see your recently purchased product on your My Products page, it may not have been connected with that account. This could happen if you used a different email address when you ordered, or were not logged into the account. Contact us if you need help with this.
If you did not get an order confirmation email:
You may have typed in the wrong email address when you placed the order. If so, please contact us to correct this and we can resend the email.
Your email program may have a utility that filters out possible junk emails and puts them in a separate mailbox. Check to see if you have a 'Spam' or 'Junk' folder, for example.
Additional product download troubleshooting and tips
- The Install Manager will only work for orders placed on March 2021 or later. For any order (including orders placed prior to that), you can still access the downloads on your 'My Products' page by logging into your account at www.pgmusic.com/account.
- Files can either be downloaded using the “Install Manager” or via individual download links. On the download page, check the box “Show all downloads”, and this will allow you to download the individual installer files using your web browser. For the large Band-in-a-Box packages that consist of many installers, the Install Manager should normally be used since it greatly simplifies the download and install process.
- If when you click on a link, you get a 404 page, error message, “page cannot be displayed”, or something similar (but other web pages work fine for you), the problem is likely at our end. Please contact us ASAP so that we can fix this.
- Download speed varies considerably based on many factors including your available bandwidth, geographical location, our server load, time of day, and more. If you are downloading a large Band-in-a-Box package, like the UltraPAK, the download could take anywhere from a couple of hours to over a day. If the connection speed is MUCH slower than what you expect (based on your measured connection speed - e.g. search 'internet speed test') you may want to wait and try again later, or contact us if the problem persists. Sometimes slow downloads are beyond our control, such as if there is a malfunctioning router somewhere between you and our servers.
- For individual downloads, troubleshoot by trying a different web browser to make sure it isn't a browser specific problem (e.g. old cached file).
- If you get an error message such as “not a valid Win32 application,” “there is no program associated with this file,” or “setup files are corrupted” when trying to run a downloaded installer, this typically means that the file is corrupt due to your internet connection being interrupted partway through the download. Remove the file from your hard drive and download it again.
- Security software (Anti-virus, firewalls) can sometimes interfere with installs. Symptoms might include the file being 'quarantined' or blocked when you try to run it. These are typically 'false positives'. Please contact us to report the problem. On Windows, Microsoft Defender SmartScreen will often block old installers (2019 and earlier) by default, and you need to allow them to 'run anyways'. On Mac, you might get a message such as “file cannot be checked for malicious software” on older installer packages that are not notarized. You can still install the file by control+clicking on it and clicking Open.
- If you are having trouble with a Band-in-a-Box download and would like have the physical copy shipped, or you are having a problem not covered here, please contact us for further assistance.
39. What languages is Band-in-a-Box available in?
We currently have language support for the latest version of Band-in-a-Box for Windows in 5 different languages - German, French, Italian, Spanish, and Japanese.
You can purchase Band-in-a-Box in any of these languages from their individual pages. Click on one of the languages above or go to the PG Music home page and click on one of the flags along the top of the page.
If you have already purchased the latest version of Band-in-a-Box in English and would like a different language, please contact us.)
40. Can I purchase the English Band-in-a-Box upgrade if I have a previous localized (non-English language) Band-in-a-Box version.
Yes, if you have purchased a localized version of Band-in-a-Box previously (French, Dutch, German, Spanish, Italian, Portuguese, Danish, Polish, Swedish, Russian, Simplified or Traditional Chinese, or Korean) and the latest version is not yet available in your language, you can still upgrade to the latest English version. You should install the upgrade into your existing Band-in-a-Box folder (C:\bb by default). Band-in-a-Box will still be in your preferred language after you install the upgrade, with the exception of some of the new features in Band-in-a-Box if they have not been translated yet. If the translation for the latest version becomes available in your language, you will be eligible to receive this at no extra charge.
41. When I try to install the program, I get a message that the “setup files are corrupted”.
This normally occurs with downloaded programs. This error may occur when double-clicking on an installer that was downloaded from our site. It means that the setup file is the wrong size or the file failed a CRC (cyclic redundancy check). Most likely something went wrong when you were downloading the file, for example your internet connection may have been lost. Delete the file that you downloaded and try the download again. Note that your browser may have cached the old (corrupt) file, so to be sure, before downloading the file again, delete your internet browser’s cache (temporary internet files). Then, right-click on the download link and select Save As. If the download seems to happen very fast the second time, that’s an indication that it’s using a cached file.
42. Common pre-sales questions about RealDrums and RealTracks.
- Will the RealTracks or RealDrums track play at any tempo that I choose? Yes, the RealDrums track will play in perfect sync with the rest of your tracks at any tempo you select in Band-in-a-Box. In addition, the drummer will change the way it plays based ONLY on the tempo that the song is played at, like a human drummer would. Each RealTracks instrument has an ideal tempo that it sounds best at, but it will automatically play in sync with your song at any tempo you choose. You can even change the tempo on-the-fly (while the song is playing). For the most common instruments (for example basic guitar strumming), there are a wide range of RealTracks available at different tempos.
- Can I replace any MIDI track with a RealTracks instrument? Yes, you can replace any MIDI track in any Band-in-a-Box song or style with the RealTracks instrument of your choice. You can have any combination of MIDI and RealTracks in your song.
- Will RealDrums only work with new RealDrums styles, or can I use RealDrums with older/existing styles? There are specific “styles with RealDrums” included with the program, but you can also have Band-in-a-Box replace the MIDI drum track in ANY of your existing and older styles, with RealDrums. This will add new life and realism to songs that you have already composed. There is a RealDrums settings dialog that allows you to specify how often you want RealDrums to replace the standard MIDI drum track.
- Are RealTracks and Drums included when I save my song as a MIDI file for editing in another program? The RealTracks and RealDrums won’t be part of the MIDI file because they are audio (not MIDI), however Band-in-a-Box will automatically save a wave file containing the audio tracks, and this can easily be imported into your audio and MIDI sequencer (for example PowerTracks Pro Audio) along with the MIDI file.
- Will I still hear RealTracks if I play Band-in-a-Box through an external MIDI synth/sound module? Because the RealTracks are audio (not MIDI), they are not transmitted to an external hardware synthesizer via MIDI cables. The RealTracks will still be played through your computer’s sound card or audio interface, and you can mix the output from your sound card with the output of your sound module using audio cables.
- I often render my songs to wave/MP3/WMA. Will the RealTracks be in my rendered wave files? Yes, the RealTracks are automatically merged into the rendered wave file.
43. What are RealCombos?
RealCombos are included in the Pro and MegaPAK packages, because those packages don’t have the complete set of currently available RealTracks instruments. Essentially, RealCombos allow you to hear SOME full bands of RealTracks without having to get the largest Band-in-a-Box package. For example, the “Jazz Swing 140” RealCombo includes 5 instruments (Bass, Piano, Guitar, Sax, and Drums) from various RealTracks Sets that all play at a medium swing tempo.
44. I hate installing programs, and just want to plug and play. I also want the best Band-in-a-Box and RealBand version that you have, with everything pre-installed.
The Band-in-a-Box UltraPAK and UltraPAK+ can each be shipped pre-installed on a high-speed USB 3.0 hard drive. These include the latest versions of Band-in-a-Box and RealBand, as well as all the currently available MIDI SuperTracks, Artist Performance Sets, Styles, Soloists, Melodists, RealDrums Sets, and RealTracks Sets. You can run the programs directly from the hard drive, without installing them on your computer. Just plug in the drive and you’re ready to play! You still have the option of installing the program to your computer hard drive if you would rather run the programs from there.
Another option is the Audiophile edition. This has all the same contents as the UltraPAK+ hard drive, but ALSO includes the uncompressed WAV files for all of the RealTracks and RealDrums. This means that the highest sound quality of the RealTracks and RealDrums is preserved. This package ships on a high-speed USB 3.0 hard drive.
45. What is the difference between the Audiophile editions of Band-in-a-Box and the regular Band-in-a-Box packages?
The Audiophile editions ship pre-installed on a high-speed USB 3.0 hard drive, and has everything that the “regular” versions of Band-in-a-Box and RealBand have, plus all the uncompressed audio in WAV file format for ALL the RealTracks and RealDrums, so the highest sound quality is preserved. We normally ship RealTracks audio files as compressed WMA files (usually 128 or 160 kbps) instead of WAV files. The WMA files are excellent quality, and make the program MUCH smaller (roughly 90GB).
With a typical setup at home, many people would not be able to hear a difference, but some advanced users prefer to have the original WAV files. Note that it is possible to uncompress the ‘regular edition’ WMA files to WAV, however these will not be the same as the original WAV files, having already been compressed once. Also, please note that the ‘Audiophile editions’ do include the WMA files as well, which gives you the option of installing the program on your computer the same way as with the ‘regular edition’.
46. Is the latest version of Band-in-a-Box backwards compatible with songs and styles from older versions?
Yes. Band-in-a-Box is designed to be fully backwards compatible with songs and styles created with previous versions of the program. In addition, you can often make your older songs sound much better after upgrading to the latest version, by choosing newer Styles, RealTracks, and RealDrums that came with your upgrade.
47. How much is Band-in-a-Box?
If you are a first-time buyer of Band-in-a-Box, your prices are:
- Band-in-a-Box Pro: $129
- Band-in-a-Box MegaPAK: $269
- Band-in-a-Box UltraPAK: $469
- Band-in-a-Box UltraPAK+: $569
- Band-in-a-Box Audiophile Edition: $669
If you purchased Band-in-a-Box previously, you qualify for upgrade pricing.
If you have our current version or last year's version, your regular upgrade prices are:
- Band-in-a-Box Pro Upgrade: $69
- Band-in-a-Box MegaPAK Upgrade: $149
- Band-in-a-Box UltraPAK Upgrade: $279
- Band-in-a-Box UltraPAK+ Upgrade: $379
- Band-in-a-Box PlusPAK Upgrade (for UltraPAK and UltraPAK+ customers): $129
- Band-in-a-Box Audiophile Edition Upgrade: $299 (if you own an older Audiophile Edition) or $479 if you don’t.
If you have an earlier version or you are changing to a completely different OS, your regular upgrade prices are:
- Band-in-a-Box Pro Upgrade: $79
- Band-in-a-Box MegaPAK Upgrade: $169
- Band-in-a-Box UltraPAK Upgrade: $299
- Band-in-a-Box UltraPAK+ Upgrade: $399
- Band-in-a-Box Audiophile Edition Upgrade: $299 (if you own an older Audiophile Edition) or $499 if you don’t.
Compare the different Band-in-a-Box packages using the comparison chart for Windows and for Mac.
48. Can I purchase an upgrade?
Yes, if you purchased an older version of Band-in-a-Box, it can be upgraded. Pricing will depend on which version you currently own.
If you purchased Band-in-a-Box previously, you qualify for upgrade pricing.
If you have our current version or last year's version, your regular upgrade prices are:
- Band-in-a-Box Pro Upgrade: $69
- Band-in-a-Box MegaPAK Upgrade: $149
- Band-in-a-Box UltraPAK Upgrade: $279
- Band-in-a-Box UltraPAK+ Upgrade: $379
- Band-in-a-Box PlusPAK Upgrade (for UltraPAK and UltraPAK+ customers): $129
- Band-in-a-Box Audiophile Edition Upgrade: $299 (if you own an older Audiophile Edition) or $479 if you don’t.
If you have an earlier version or you are changing to a completely different OS, your regular upgrade prices are:
- Band-in-a-Box Pro Upgrade: $79
- Band-in-a-Box MegaPAK Upgrade: $169
- Band-in-a-Box UltraPAK Upgrade: $299
- Band-in-a-Box UltraPAK+ Upgrade: $399
- Band-in-a-Box Audiophile Edition Upgrade: $299 (if you own an older Audiophile Edition) or $499 if you don’t.
Compare the different Band-in-a-Box packages using the comparison chart for Windows and for Mac.
49. What Band-in-a-Box is a good starter package?
The Band-in-a-Box Pro is a great starter package at only $129. It includes a variety of add-ons to get you started including, RealTracks and RealDrums, style (MIDI and RealStyles), Melodists, Soloists, Artist Performances, and loops.
If you purchase the Pro version and decide you want a larger package later, that is not a problem. Just contact our customer service team for assistance.
Compare the different Band-in-a-Box packages using the comparison chart Windows and for Mac.
50. What are RealTracks?
RealTracks are audio recordings of real musicians playing various instruments, such as guitars, bass, drums, piano, and more. RealTracks replace the MIDI track for that instrument and can be controlled just like the MIDI instrument (volume changes, muting etc.). They even follow the chord progression that you have entered, so you hear an authentic audio accompaniment or solo.
RealTracks are not "samples"... They are full recordings, lasting from 1 to 8 bars at a time, playing in perfect sync with the other tracks. Choose from pre-made Band-in-a-Box Styles or combine RealTracks instruments to make your own band.
Listen to RealTracks demos for Windows and for Mac.
51. How much are RealTracks?
RealTracks Sets are available for $29 each. We also offer RealPAKs for Jazz, Country, Guitar, and Rock-Pop. We release a genre PAK per version release, which includes the newest Sets of that genre RealTracks & RealDrums. RealPAKs can be purchased starting at $79 each.
If you decide to purchase a number of these, the most cost effective way to get all the regular RealTrack and RealDrums Sets is by upgrading to the UltraPAK (Windows or Mac) for $279 or $299 (depending on which version you have). Plus, the UltraPAK is chock-full of other great, highly requested add-ons!
52. How do I get more RealTracks?
The most cost effective way to get all the regular RealTrack and RealDrums Sets is by purchasing the UltraPAK. A first-time UltraPAK is $469. If you purchased Band-in-a-Box previously, the upgrade to the UltraPAK (Windows or Mac) is $279 or $299 (depending on which version you have).
We also offer individual RealTracks Sets for $29 each and RealPAK genre PAKs for Jazz, Country, Guitar, and Rock-Pop starting at $79 each.
53. What are XPro Styles PAKs?
XPro Styles PAKs are additional style PAKs that work with any Band-in-a-Box (2023 or higher version) of the Pro, MegaPAK, UltraPAK, UltraPAK+, and Audiophile Edition. These PAKs contain a wide variety of musical styles, ranging from jazz and rock-pop to country and folk. Each PAK includes a collection of over 100 pre-made arrangements and musical patterns that can be used to enhance and customize your music compositions. These styles can be easily applied to your songs, allowing you to experiment with different genres and create unique musical arrangements. These styles are not included in any other package.
You can listen to demos and learn more about the XPro Styles PAKs for Windows: https://www.pgmusic.com/xpro.php?os=win and for Mac: https://www.pgmusic.com/xpro.php?os=mac
54. What are Xtra Styles PAKs?
Xtra Styles PAKs are additional style PAKs that work with the UltraPAK, UltraPAK+, or Audiophile Edition of Band-in-a-Box. These PAKs contain a wide variety of musical styles, ranging from jazz and rock-pop to country and folk. Each PAK includes a collection of over 150+ pre-made arrangements and musical patterns that can be used to enhance and customize your music compositions. These styles can be easily applied to your songs, allowing you to experiment with different genres and create unique musical arrangements. These styles are not included in any other package.
Xtra Styles PAKs were released for Band-in-a-Box 2016 and higher. Too see what version is required for each Xtra Styles PAK, listen to demos, and to learn more, visit the products pages for Windows or Mac.
Note: Xtra Styles PAKs will not work with the Pro or MegaPAK versions because they need the RealTracks from the UltraPAK, UltraPAK+, or Audiophile Edition.
55. What is the difference between Xtra Styles PAKs and XPro Styles PAKs?
XPro Styles PAKs include additional styles that work with the Pro, MegaPAK, UltraPAK, UltraPAK+, or Audiophile Edition of Band-in-a-Box. Each PAK adds 100+ styles that are not included in any other package.
XPro Styles PAKs were released for Band-in-a-Box 2021 and higher. Too see what version is required for each XPro Styles PAK, listen to demos, and learn more, visit the products pages for Windows or Mac.
Xtra Styles PAKs are additional style PAKs that only work with Band-in-a-Box UltraPAK, UltraPAK+, or Audiophile Edition. Each PAK adds 100+ styles that are not included in any other package.
Xtra Styles PAKs were released for Band-in-a-Box 2016 and higher. Too see what version is required for each Xtra Styles PAK, listen to demos, and to learn more, visit the products pages for Windows or Mac.
Note: Xtra Styles PAKs will not work with the Pro or MegaPAK versions because they need the RealTracks from the UltraPAK, UltraPAK+, or Audiophile Edition.
56. Do you have an installment or payment plan?
We do offer an easy, interest free payment plan for most Band-in-a-Box packages. If you add an eligible Band-in-a-Box package to your cart, you may choose the payment plan option during the checkout process. The total cost of the package will be broken up into 4 payments. You will pay ¼ of the cost upfront, with the next portion being charged to your payment method every 30 days for the next 3 months.
57. Where do I put the coupon code?
There will be a section to enter the coupon code after you click “Checkout Now” in the shopping cart. Note: The coupon code must be valid and be applied to an eligible Band-in-a-Box package to receive the discount.
58. Where do I select the physical backup copy for my Band-in-a-Box order?
Click “Checkout Now” in the shopping cart, a window will display where you will be able to select to have the physical backup added to your order.
59. Do you offer free shipping?
Band-in-a-Box is sold as an e-delivery/download product. Although there are no shipping charges, if you want to have a back-up copy of your purchase shipped you would pay for the media it will be delivered on. The Band-in-a-Box Pro, MegaPAK, and PlusPAK backup copies are available on a flash drive for $15. The Band-in-a-Box UltraPAK, UltraPAK+, and Audiophile Editon backup copies are available on a USB hard drive for $25.
60. Where can I learn about RealTracks?
You can find more information about RealTracks in Band-in-a-Box by accessing the RealTracks Settings dialog. From there, you can click on the [+] button to the right of the RealTracks radio button and choose "Select RealTracks" to view a list of available RealTracks. You can also double-click on a RealTracks to hear an audio demo. Additionally, you can open the Artist Browser to see more information about the artists who recorded the RealTracks.
There are also demos and write-ups of the RealTracks on our website.
Windows: https://www.pgmusic.com/realtracks.all.php?os=win
Mac: https://www.pgmusic.com/realtracks.all.php?os=mac
61. What is the link for the online manual?
The online manuals are available here: https://www.pgmusic.com/manuals/
62. What is LabPAK?
LabPAK is a purchase option available to schools and educational institutions who want to buy 5 or more copies of Band-in-a-Box for a specific location, such as a computer or music lab. It is a cost-effective way for educational institutions to provide Band-in-a-Box to multiple users.
Compare the different Band-in-a-Box LabPAK packages using the comparison chart for Windows and for Mac.
63. How do I stop the song from playing again?
To stop the song from playing again, you can click on the [Stop] button on the toolbar. This will stop the playback of the song.
Check to see that the number of choruses is set to the number of times you want the song to play through. For example, if it is set to 3, change that to 1.
Unconditional 30-Day Money Back Guarantee on all PG Music products purchased from PG Music Inc.
PG Music Inc.
29 Cadillac Ave Victoria BC Canada V8Z 1T3
Sales: 800-268-6272, 250-475-2874,+ 800-4746-8742*
* Outside USA & Canada where International Freephone service is available.
Access Codes
Tech Support: Live Chat, support@pgmusic.com
 Online now
Need Help?
Customer Sales & Support
|
Phones (Pacific Time) 1-800-268-6272 1-250-475-2874 |
||
| Live Chat | ||
| OPEN | Online Ordering 24/7 |
|
| OPEN | Forums, email, web support |